Categories
Raspberry Pi

Raspberry Pi photo frame using the pictures on your Google Drive II

Intro

This is basically the same post as my previous post, Raspberry Pi photo frame using your pictures on your Google Drive. The are several ideas I am introducing in this treatment.

  • better time separation of the photos for a more meaningful viewing
  • smart resizing of photos to effectively enlarge narrow photos
  • analysis of photos for date and time
  • analysis of photos for GPS info, converting to city and even address!
  • build up of alternate slideshow which includes date, file, folder and location information embedded at the bottom of every picture
  • quality control check to make sure file is an actual JPEG
  • tiny thumbnail pictures are skipped
  • rotating slideshow refreshes either daily or every three days
  • pictures of documents are excluded (future enhancement)
  • a nice picture is displayed when the slideshow is refreshed

Mostly for my own sake, I’ve re-named most of the relevant files and re-worked some as well in order to avoid name conflicts.

I find this treatment is pretty robust and can withstand a lot of errors and mistakes.

So let’s get started.

The easier way to get the files

Because there are now so many files – 18 at last count! – I’ve bundled them all into a tar file. So to get them all in one fell swoop do this.

$ wget https://drjohnstechtalk.com/blog/downloads/photoFrameII.tar

$ tar xvf photoFrameII.tar

Then skip down to the section of this post called crontab entries, which you will still need to do.

But because I think the scripts could be useful for other projects as well, I’m including them here in their entirety in the following section.

The files

The brains of the thing is master3.sh.

master3.sh

#!/bin/sh
# DrJ 1/2021
# call this from cron once a day to refesh random slideshow once a day
NUMFOLDERS=20
DEBUG=1
HOME=/home/pi
RANFILE=$HOME/random.list
REANFILE=$HOME/rean.list
DISPLAYFOLDER=$HOME/Pictures
DISPLAYFOLDERTMP=$HOME/Picturestmp
EXIFTMP=$HOME/EXIFtmp
EXIF=$HOME/EXIF
TXTDIR=$HOME/picstxt
MSHOW=$HOME/mediashow
MSHOW2=$HOME/mediashowtmp2
MSHOW3=$HOME/mediashowtmp3
SLEEPINTERVAL=1
STARTFOLDER="MaryDocs/Pictures and videos"

echo "Starting master process at "`date`


cd $HOME

rm -rf $DISPLAYFOLDERTMP
mkdir $DISPLAYFOLDERTMP

#listing of all Google drive files starting from the picture root
# this takes a few minutes so we may want to skip for debugging
if [ "$1" = "skip" ]; then
  if [ $DEBUG -eq 1 ]; then echo SKIP Listing all files from Google drive; fi
else
  if [ $DEBUG -eq 1 ]; then echo Listing all files from Google drive; fi
  rclone ls remote:"$STARTFOLDER" > files
# filter down to only jpegs, lose the docs folders and the tiny JPEGs
  if [ $DEBUG -eq 1 ]; then echo Picking out the JPEGs and losing the small images; fi
  egrep '\.[jJ][pP][eE]?[gG]$' files |awk '$1 > 11000 {$1=""; print substr($0,2)}'|grep -i -v /docs/ > jpegs.list
fi

# check if we got anything. If our Internt dropped there may have been a problem, for instance
flines=`cat files|wc -l`
if [ $flines -lt 60 ]; then
  echo "rclone did not produce enough files. Check your Internet setup and rclone configuration."
  echo Only $flines files in the file listing - not enough - so pausing 60 seconds and starting over... at `date`
# start a new job and kill ourselves!
  nohup $HOME/master3.sh > master.log 2>&1 &
  exit
fi

# throw NUMFOLDERS or so random numbers for picture selection, select triplets of photos by putting
# names into a file
if [ $DEBUG -eq 1 ]; then echo "\nGenerate random filename triplets"; fi
./random-files3.pl -f $NUMFOLDERS -j jpegs.list -r $RANFILE

# copy over these 60 jpegs
if [ $DEBUG -eq 1 ]; then echo "\nCopy over these random files"; fi
cat $RANFILE|while read line; do
  if [ $DEBUG -eq 1 ]; then echo filepath is $line; fi
  rclone copy remote:"${STARTFOLDER}/$line" $DISPLAYFOLDERTMP
  sleep $SLEEPINTERVAL
done

# do a re-analysis to push pictures further apart in time
if [ $DEBUG -eq 1 ]; then echo "\nRe-analyzing pictures for their timestamps"; fi
cd $DISPLAYFOLDERTMP; $HOME/reanalyze.pl

# copy over just the new pictures that we determined were needed
if [ $DEBUG -eq 1 ]; then echo "\nCopy over the needed replacement files"; fi
cat $REANFILE|while read line; do
  if [ $DEBUG -eq 1 ]; then echo filepath is $line; fi
  rclone copy remote:"${STARTFOLDER}/$line" $DISPLAYFOLDERTMP
  sleep $SLEEPINTERVAL
done

# QC: toss out the pics which are not actually JPEGs
if [ $DEBUG -eq 1 ]; then echo "\nQC: Toss out the pics which are not actually JPEGs"; fi
cd $DISPLAYFOLDERTMP; ../QC.pl

# save EXIF metadata for later
if [ $DEBUG -eq 1 ]; then echo "\nSave EXIF metadata for later"; fi
cd $DISPLAYFOLDERTMP; $HOME/get-all-EXIF.sh
rm -rf $EXIF;mv $EXIFTMP $EXIF

# analyze EXIF info to extract most interesting things
if [ $DEBUG -eq 1 ]; then echo "\nAnalyze EXIF data"; fi
rm -rf $TXTDIR; $HOME/analyze.sh

# rotate pics as needed
if [ $DEBUG -eq 1 ]; then echo "\nRotate the pics which need it"; fi
cd $DISPLAYFOLDERTMP; $HOME/rotate-as-needed.sh

# resize pics
if [ $DEBUG -eq 1 ]; then echo "\nSize all pics to the display size"; fi
$HOME/resize.sh

# create text info + images
if [ $DEBUG -eq 1 ]; then echo "\nEmbed pic info"; fi
$HOME/embedpicinfo.sh

cd ~

# kill any old slideshow
if [ $DEBUG -eq 1 ]; then echo Killing old fbi slideshow; fi
sudo pkill -9 -f fbi
pkill -9 -f m3.pl

# remove old pics
if [ $DEBUG -eq 1 ]; then echo Removing old pictures; fi
rm -rf $DISPLAYFOLDER

mv $DISPLAYFOLDERTMP $DISPLAYFOLDER
cp $MSHOW3 $MSHOW

touch refresh

#run looping fbi slideshow on these pictures
if [ $DEBUG -eq 1 ]; then echo Start "\nfbi slideshow in background"; fi
cd $DISPLAYFOLDER ; nohup ~/m3.pl  >> ~/m3.log 2>&1 &

if [ $DEBUG -eq 1 ]; then echo "And now it is "`date`; fi

random-files3.pl


#!/usr/bin/perl
use Getopt::Std;
my %opt=();
getopts("c:df:j:r:",\%opt);
$nofolders = $opt{f} ? $opt{f} : 20;
$DEBUG = $opt{d} ? 1 : 0;
$cutoff = $opt{c} ? $opt{c} : 5;
$cutoffS = 60*$cutoff;
$jpegs = $opt{j} ? $opt{j} : "jpegs.list";
$ranpicfile = $opt{r} ? $opt{r} : "jpegs-random.list";
print "d,f,j,r: $opt{d}, $opt{f}, $opt{j}, $opt{r}\n" if $DEBUG;
$mshowt = "mediashowtmp";
open(JPEGS,$jpegs) || die "Cannot open jpegs listing file $jpegs!!\n";
@jpegs = <JPEGS>;
# remove newline character
$nopics = chomp @jpegs;
open(RAN,"> $ranpicfile") || die "Cannot open random picture file $ranpicfile!!\n";
for($i=0;$i<$nofolders;$i++) {
  $t = int(rand($nopics-2));
  print "random number is: $t\n" if $DEBUG;
# a lot of our pics follow this naming convention
# 20160831_090658.jpg
  ($date,$time) = $jpegs[$t] =~ /(\d{8})_(\d{6})/;
  if ($date) {
    print "date, time: $date $time\n" if $DEBUG;
# ensure neighboring picture is at least five minutes different in time
    $iPO = $iP = $diff = 1;
    ($hr,$min,$sec) = $time =~ /(\d\d)(\d\d)(\d\d)/;
    $secs = 3600*$hr + 60*$min + $sec;
    print "Pre-pic logic\n";
    while ($diff < $cutoffS) {
      $iP++;
      $priorPic = $jpegs[$t-$iP];
      $Pdate = $Ptime = 0;
      ($Pdate,$Ptime) = $priorPic =~ /(\d{8})_(\d{6})/;
      ($Phr,$Pmin,$Psec) = $Ptime =~ /(\d\d)(\d\d)(\d\d)/;
      $Psecs = 3600*$Phr + 60*$Pmin + $Psec;
      print "hr,min,sec,Phr,Pmin,Psec: $hr,$min,$sec,$Phr,$Pmin,$Psec\n" if $DEBUG;
      $diff = abs($secs - $Psecs);
      print "diff: $diff\n" if $DEBUG;
# end our search if we happened upon different dates
      $diff = 99999 if $Pdate ne $date;
    }
# post-picture logic - same as pre-picture
    print "Post-pic logic\n";
    $diff = 0;
    while ($diff < $cutoffS) {
      $iPO++;
      $postPic = $jpegs[$t+$iPO];
      $Pdate = $Ptime = 0;
      ($Pdate,$Ptime) = $postPic =~ /(\d{8})_(\d{6})/;
      ($Phr,$Pmin,$Psec) = $Ptime =~ /(\d\d)(\d\d)(\d\d)/;
      $Psecs = 3600*$Phr + 60*$Pmin + $Psec;
      print "hr,min,sec,Phr,Pmin,Psec: $hr,$min,$sec,$Phr,$Pmin,$Psec\n" if $DEBUG;
      $diff = abs($Psecs - $secs);
      print "diff: $diff\n" if $DEBUG;
# end our search if we happened upon different dates
      $diff = 99999 if $Pdate ne $date;
    }
  } else {
    $iP = $iPO = 2;
  }
  $priorPic = $jpegs[$t-$iP];
  $Pic = $jpegs[$t];
  $postPic = $jpegs[$t+$iPO];
  print RAN qq($priorPic
$Pic
$postPic
);
# this is how we'll preserve the order of the pictures. ls -1 often gives a different order!!
($p1) = $priorPic =~ /([^\/]+)$/;
($p2) = $Pic =~ /([^\/]+)$/;
($p3) = $postPic =~ /([^\/]+)$/;
print "p1 p2 p3: $p1 $p2 $p3" if $DEBUG;
$picsinorder .= $p1 . "\0" . $p2 . "\0" . $p3 . "\0";
}
close(RAN);
open(MS,">$mshowt") || die "Cannot open mediashow file $mshowt!!\n";
print MS $picsinorder;
close(MS);
print "pics in order: $picsinorder\n" if $DEBUG;

reanalyze.pl

#!/usr/bin/perl
use Getopt::Std;
my %opt=();
#
# assumption is that we are runnin this from a directory containing pictures
$tier1 = 100; $tier2 = 200; $tier3 = 300; # secs
$DEBUG = 1;
$HOME = "/home/pi";
# pics are here
$pNames = "$HOME/reanpicnames";
$ranfile = "$HOME/random.list";
$reanfile = "$HOME/rean.list";
$origfile = "$HOME/jpegs.list";
$mshowt = "$HOME/mediashowtmp";
$mshow2 = "$HOME/mediashowtmp2";

open(REAN,">$reanfile") || die "Cannot open reanalyze file $reanfile!!\n";
$ms = `cat $mshowt`;
print "Original media show: $ms\n" if $DEBUG;
@lines = split('\0',$ms);
$Pdate = $Phr = $Pmin = $Psec = 0;
$diff = 9999;
for($i=0;$i<@lines;$i++){
  $date = 0;
  $secs = $ymd = 0;
  $_ = $lines[$i];
  $file = $_;
# ignore pictures with names like 20130820_180050.jpg
  next if /\d{8}_\d{4}/;
  open(ANAL,"$HOME/getinfo.py \"$file\"|") || die "Cannot open file: $file!!\n";
  print "filename: $file\n" if $DEBUG;
  while(<ANAL>){
#extract date and time from remaining pictures, if possible
# # DateTimeOriginal = 2018:08:18 20:16:47
#    print STDERR "DATE: $_" if $DEBUG;
if (/date/i && $date++ < 1) {
   print "date match in getinfo.pyoutput: $_" if $DEBUG;
   ($ymd,$hr,$min,$sec) = /(\d{4}:\d\d:\d\d) (\d\d):(\d\d):(\d\d)/;
   $secs = 3600*$hr + 60*$min + $sec;
   print "file,secs,ymd,i: $file,$secs,$ymd,$i\n" if $DEBUG;
   $YMD[$i] = $ymd;
   $SECS[$i] = $secs;
}
} # end loop over analysis of this pic
} # end loop over all files
# now go over that
$oldfolder = 0;
for($i=1;$i<@lines;$i++){
 $folder = int($i/3) + 1;
 next unless $folder != $oldfolder;
   print "analyzing results. folder no. $folder\n" if $DEBUG;
# analyze pics in triplets
# center pic
   $j = ($folder - 1)*3 + 1;
   for ($o=-1;$o<2;$o+=2){
     $k=$j+$o;
     print "j,k,o: $j,$k,$o\n" if $DEBUG;
     next unless $SECS[$j] > 0 && $YMD[$j] == $YMD[$k] && $YMD[$j] > 0;
     print "We have non-0 dates we're dealing with\n" if $DEBUG;
     $file = $lines[$k];
     chomp($file);
     $diff = abs($SECS[$j] - $SECS[$k]);
     print "diff: $diff\n" if $DEBUG;
     next unless $diff < $tier3;
# the closer the files are together the more we push away
     $bump = 1 if $diff < $tier3;
     $bump = 2 if $diff < $tier2;
     $bump = 3 if $diff < $tier1;
# get full filepath
     $filepath = `grep \"$file\" $ranfile`;
     chomp($filepath);
# now use that to search within the jpegs file listing
     $prog = $o < 0 ? "head" : "tail";
     $newfilepath = `grep -C$bump "$filepath" $origfile|$prog -1`;
     ($newfile) = $newfilepath =~ /([^\/]+)$/;
     chomp($newfile);
     print "file,filepath,newfile,newfilepath,bump: $file,$filepath,$newfile,$newfilepath,$bump\n" if $DEBUG;
     print REAN $newfilepath;
# we'll get the new pictures over in a separate step to keep this more atomic
     $ms =~ s/$file/$newfile/;
    }
    $oldfolder = $folder;
} # end loop over pics
# print out new mediashow pics in order
print "Printing new mediashow: $ms\n" if $DEBUG;
open(MS,">$mshow2") || die "Cannot open mediashow $mshow2!!\n";
print MS $ms;
close(MS)

QC.pl

#!/usr/bin/perl
# kick out the non-JPEG files - sometimes they creep in
$DEBUG = 1;
$HOME = "/home/pi";
$mshow2 = "$HOME/mediashowtmp2";
$mshow3 = "$HOME/mediashowtmp3";
$ms = `cat $mshow2`;
@pics = split('\0',$ms);
foreach $file (@pics) {
  print "file is $file\n" if $DEBUG;
#DSC00185.JPG: JPEG image data, JFIF standard 1.01...
  $res = `file "$file"|cut -d: -f2`;
  if ($res =~ /JPEG/i){
    print "This file is indeed a JPEG image\n" if $DEBUG;
  } else {
    print "Not a JPEG image! We have to remove this file form the mediashow\n" if $DEBUG;
    $ms =~ s/$file\0//;
  }
}
# print out new mediashow pics in order
print "Printing new mediashow: $ms\n" if $DEBUG;
open(MS,">$mshow3") || die "Cannot open mediashow $mshow3!!\n";
print MS $ms;
close(MS);

get-all-EXIF.sh

#!/bin/sh
# DrJ 1/2021
# preserve EXIF info of all the images because our rotate step removes it
# and we will use it in subsequent steps
# assumption is that our current directory is the one where we want to read files
EXIFTMP=~/EXIFtmp
mkdir $EXIFTMP
ls -1|while read line; do
  echo file is "$line"
  ~/getinfo.py "$line" > $EXIFTMP/"$line"
done

analyze.sh

#!/bin/sh
# DrJ 1/2021
# try to extract date, file and folder name and even GPS info, create jpegs with info
# for each image
# assumption is that are current directory is the one where we want to alter files
HOME=/home/pi
TXTDIR=$HOME/picstxt
# it's assumed EXIF info for each pic has already been extracted and put into EXIF diretory
EXIF=$HOME/EXIF
mkdir $TXTDIR
cd $EXIF
ls -1|while read line; do
  echo file is "$line"
  echo -n "$line"|../analyzeDate.pl > "$TXTDIR/${line}"
  echo -n "$line"|../analyzeGPS.pl >> "$TXTDIR/${line}"
done

rotate-as-needed.sh

#!/bin/sh
# DrJ 12/2020
# some of our downloaded files will be sideways, and fbi doesn't auto-rotate them as far as I know
# assumption is that our current directory is the one where we want to alter files
ls -1|while read line; do
  echo file is "$line"
  o=`~/getinfo.py "$line"|grep -ai orientation|awk '{print $NF}'`
  echo orientation is $o
  if [ "$o" -eq "6" ]; then
    echo "90 clockwise is needed, o is $o"
# rotate and move it
    ~/rotate.py -90 "$line"
    mv rot_"$line" "$line"
  elif [ "$o" -eq "8" ]; then
    echo "90 counterclock is needed, o is $o"
# rotate and move it
    ~/rotate.py 90 "$line"
    mv rot_"$line" "$line"
  elif [ "$o" -eq "3" ]; then
    echo "180 rot is needed, o is $o"
# rotate and move it
    ~/rotate.py 180 "$line"
    mv rot_"$line" "$line"
  fi
done

resize.sh

#!/bin/sh
# DrJ 2/2021
# To combat the RPi's inherent sluggish performance we'll downsize the pictures in advance to save fbi the effort
#
# on the pidisplay fbset gives:
#mode "800x480"
#    geometry 800 480 800 480 32
#    timings 0 0 0 0 0 0 0
#    rgba 8/16,8/8,8/0,8/24
#endmode
displaywidth=`fbset|grep geometry|awk '{print $2}'`
displayheight=`fbset|grep geometry|awk '{print $3}'`

ls -1|while read line; do
  echo file is "$line"
  ~/fancyresize.py $displaywidth $displayheight "$line"
  mv resize_"$line" "$line"
done

embedpicinfo.sh

#!/bin/sh
# DrJ 2/2021
# To combat the RPi's inherent sluggish performance we'll downsize the pictures in advance to save fbi the effort
#
# on the pidisplay fbset gives:
#mode "800x480"
#    geometry 800 480 800 480 32
#    timings 0 0 0 0 0 0 0
#    rgba 8/16,8/8,8/0,8/24
#endmode
displaywidth=`fbset|grep geometry|awk '{print $2}'`
displayheight=`fbset|grep geometry|awk '{print $3}'`

ls -1|while read line; do
  echo file is "$line"
# this will create a new image with same name prepended with txt_
  ~/embedpicinfo.py $displaywidth $displayheight "$line"
done

Auxiliary files

rotate.py

#!/usr/bin/python3
# call with two arguments: degrees-to-rotate and filename
import PIL, os
import sys
from PIL import Image
# first do: pip3 install piexif
import piexif

degrees = int(sys.argv[1])
pic = sys.argv[2]

picture= Image.open(pic)
# see https://github.com/hMatoba/Piexif for piexif writeup
# this method of preserving EXIF info does not always work, and
# causes script to crash when it fails!
##exif_dict = piexif.load(picture.info["exif"])
##exif_bytes = piexif.dump(exif_dict)
## both rotate and preserve EXIF data
##picture.rotate(degrees,expand=True).save("rot_" + pic,"jpeg", exif=exif_bytes)
# rotate (which will blow away EXIF info, sorry...)
picture.rotate(degrees,expand=True).save("rot_" + pic,"jpeg")

getinfo.py

#!/usr/bin/python3
import os,sys
from PIL import Image
from PIL.ExifTags import TAGS

for (tag,value) in Image.open(sys.argv[1])._getexif().items():
        print ('%s = %s' % (TAGS.get(tag), value))

print ('%s = %s' % (TAGS.get(tag), value))

embedpicinfo.py

#!/usr/bin/python3
# from https://auth0.com/blog/image-processing-in-python-with-pillow/
# fonts are described here:
# https://pillow.readthedocs.io/en/stable/reference/ImageDraw.html
from PIL import Image, ImageDraw, ImageFont
import sys, os

width = int(sys.argv[1])
height = int(sys.argv[2])
# for Pidisplay:
#width = 800
#height = 480
imageFile = sys.argv[3]
imageandtext = 'txt_' + imageFile

tfile = '../picstxt/' + imageFile
f = open(tfile)
txtlines = f.readlines()
f.close()

# our fonts
fnt = ImageFont.truetype("/usr/share/fonts/truetype/dejavu/DejaVuSans-Bold.ttf", 14)
#fnt = ImageFont.truetype("/usr/share/fonts/truetype/dejavu/DejaVuSans.ttf", 40)
fnt36 = ImageFont.truetype("/usr/share/fonts/truetype/dejavu/DejaVuSans-Bold.ttf", 36)
fnt2 = ImageFont.truetype("/usr/share/fonts/truetype/dejavu/DejaVuSans.ttf", 18)
fntBold = ImageFont.truetype("/usr/share/fonts/truetype/dejavu/DejaVuSans-Bold.ttf", 40)
# PiDisplay resolution is 800x480
margin = 35
# semi-parameterized variables
x0 = margin - 30
x1 = margin -15
cwidth = 6
yline = 27
ychevron=(yline-28)/2
ycoff = 5
yoffset = 12
yrec= -10
rpad = 15
#
textimagey = 130
textimagex = width

# menu items
textimage = Image.new('RGB', (textimagex, textimagey), 'white')
for t in txtlines:
    img_draw = ImageDraw.Draw(textimage)
    img_draw.text((margin, yoffset), t, font=fnt, fill='MidnightBlue')
    yoffset += yline

# merge three images together...
# black background covering whole display:
masterimage = Image.new('RGB',(width,height),'black')
# original image:
oimage = Image.open(imageFile)
# original image width
owidth = oimage.size[0]
# get offset so narrow pictures are centered
xoffset = int((width - owidth)/2)
masterimage.paste(oimage,(xoffset,0))
masterimage.paste(textimage,(0,height - textimagey))

masterimage.save(imageandtext)

fancyresize.py

#!/usr/bin/python3
# DrJ 2/2021
import PIL, os
import sys
from PIL import Image
# somewhat inspired by http://www.riisen.dk/dop/pil.html
# arguments:
# <width> <height> file
# with and height should be provided as values in pixels
# image file should be provided as argument.
# A pidisplay is 800x480

displaywidth = int(sys.argv[1])
displayheight = int(sys.argv[2])
smallscreen = 801
imageFile = sys.argv[3]
im1 = Image.open(imageFile)
narrowmax = .76
blowupfactor = 1.1
# take less from the top than the bottom
topshare = .3
bottomshare = 1.0 - topshare
# for DrJ debugging
DEBUG = True
if DEBUG:
  print("display width and height: ",displaywidth,displayheight)

def imgResize(im):
    width = im.size[0]
    height = im.size[1]
    if DEBUG:
      print("image width and height: ",width,height)

# If the aspect ratio is wider than the display screen's aspect ratio,
# constrain the width to the display's full width
    if width/float(height) > float(displaywidth)/float(displayheight):
      if DEBUG:
        print("In section width contrained to full width code section")

      widthn = displaywidth
      heightn = int(height*float(displaywidth)/width)
      im5 = im.resize((widthn, heightn), Image.ANTIALIAS) # best down-sizing filter
    else:
      heightn = displayheight
      widthn  = int(width*float(displayheight)/height)

      if width/float(height) < narrowmax and displaywidth < smallscreen:
# if width is narrow we're losing too much by using the whole picture.
# Blow it up by blowupfactor% if display is small, and crop most of it from the bottom
        heightn = int(displayheight*blowupfactor)
        widthn  = int(width*float(heightn)/height)
        im4 = im.resize((widthn, heightn), Image.ANTIALIAS) # best down-sizing filter
        top = int(displayheight*(blowupfactor - 1)*topshare)
        bottom = int(heightn - displayheight*(blowupfactor - 1)*bottomshare)
        if DEBUG:
          print("heightn,top,widthn,bottom: ",heightn,top,widthn,bottom)

        im5 = im4.crop((0,top,widthn,bottom))
      else:
        im5 = im.resize((widthn, heightn), Image.ANTIALIAS) # best down-sizing filter

    im5.save("resize_" + imageFile)

imgResize(im1)

analyzeDate.pl

#!/usr/bin/perl
# 20180818_201647.jpg
use POSIX;
$DEBUG = 1;
$HOME = "/home/pi";
$random = "$HOME/random.list";
$rean   = "$HOME/rean.list";
#$file = "Picturestmp/20180422_134220.jpg";
while(<>){
$GPS = $date = 0;
$gpsinfo = "";
$file = $_;
#open(ANAL,"$HOME/getinfo.py \"$file\"|") || die "Cannot open file: $file!!\n";
open(ANAL,"cat \"$file\"|") || die "Cannot open file: $file!!\n";
print STDERR "filename: $file\n" if $DEBUG;
while(<ANAL>){
  $town = "";
  if (/DateTimeOriginal/i && $date++ < 1) {
# DateTimeOriginal = 2018:08:18 20:16:47
#or...  DateTimeDigitized = 2016/03/07 00:57:49
    print STDERR "DATE: $_" if $DEBUG;
    ($yr,$mon,$date,$hr,$min) = /(\d{4}):(\d\d):(\d\d) (\d\d):(\d\d)/;
    print STDERR "$yr,$mon,$date,$hr,$min\n" if $DEBUG;
# my custom format: Saturday, August 18, 2018  8:16 pm
    $dateinfo =  strftime("%A, %B %d, %Y %l:%M %p", 0, $min, $hr, $date , $mon - 1, $yr - 1900, -1, -1, -1);
  }
}
# folder info from random.list
$match = `cat $random $rean|grep "$file"`;
($folder) = $match =~ /(.+)\/[^\/]+/;
print STDERR "matched line, folder: $match, $folder\n" if $DEBUG;

# if no date, use filesystem date
if ( ! $dateinfo ) {
  $jpegfile = "../Picturestmp/$file";
  $mtime = (stat($jpegfile))[9];
  $handtst = `ls -l "$jpegfile"`;
  @ltime = localtime $mtime;
  $dateinfo =  strftime("(guess) %A, %B %d, %Y %l:%M %p",@ltime);
  print STDERR "No date info. Use filesystem date. mtime is $mtime. dateinfo: $dateinfo\n";
  print STDERR "Hand test of file age: $handtst\n";
}

$dateinfo = $dateinfo || "No date found";
$gpsinfo = $gpsinfo || "No info found";

print qq(File: $file
Folder: $folder
Date: $dateinfo
);
}

analyzeGPS.pl

#!/usr/bin/perl
# use in combination with this post https://drjohnstechtalk.com/blog/2020/12/convert-gps-coordinates-into-town-name/
use POSIX;
$DEBUG = 1;
$HOME = "/home/pi";
#$file = "Pictures/20180422_134220.jpg";
while(<>){
$GPS = $date = 0;
$gpsinfo = "";
$file = $_;
#open(ANAL,"$HOME/getinfo.py \"$file\"|") || die "Cannot open file: $file!!\n";
open(ANAL,"cat \"$file\"|") || die "Cannot open file: $file!!\n";
print STDERR "filename: $file\n" if $DEBUG;
while(<ANAL>){
  $postalcode = $town = $name = "";
  if (/GPS/i) {
    print STDERR "GPS: $_" if $DEBUG;
# GPSInfo = {1: 'N', 2: (39.0, 21.0, 22.5226), 3: 'W', 4: (74.0, 25.0, 40.0267), 5: 1.7, 6: 0.0, 7: (23.0, 4.0, 14.0), 29: '2016:07:22'}
   ($pole,$deg,$min,$sec,$hemi,$lngdeg,$lngmin,$lngsec) = /1: '([NS])', 2: \(([\d\.]+), ([\d\.]+), ([\d\.]+)...3: '([EW])', 4: \(([\d\.]+), ([\d\.]+), ([\d\.]+)\)/i;
   print STDERR "$pole,$deg,$min,$sec,$hemi,$lngdeg,$lngmin,$lngsec\n" if $DEBUG;
   $lat = $deg + $min/60.0 + $sec/3600.0;
   $lat = -$lat if $pole eq "S";
   $lng = $lngdeg + $lngmin/60.0 + $lngsec/3600.0;
   $lng = -$lng if $hemi = "W" || $hemi eq "w";
   print STDERR "lat,lng: $lat, $lng\n" if $DEBUG;
   #$placename = `curl -s "$url"|grep -i toponym`;
   next if $lat == 0 && $lng == 0;
# the address API is the most precise
   $url = "http://api.geonames.org/address?lat=$lat\&lng=$lng\&username=drjohns";
   print STDERR "Url: $url\n" if $DEBUG;
   $results = `curl -s "$url"|egrep -i 'street|house|locality|postal|adminName'`;
   print STDERR "results: $results\n" if $DEBUG;
   ($street) = $results =~ /street>(.+)</;
   ($houseNumber) = $results =~ /houseNumber>(.+)</;
   ($postalcode) = $results =~ /postalcode>(.+)</;
   ($state) = $results =~ /adminName1>(.+)</;
   ($town) = $results =~ /locality>(.+)</;
   print STDERR "street, houseNumber, postalcode, state, town: $street, $houseNumber, $postalcode, $state, $town\n" if $DEBUG;
# I think locality is pretty good name. If it exists, don't go  further
   $postalcode = "" if $town;
   if (!$postalcode && !$town){
# we are here if we didn't get interesting results from address reverse loookup, which often happens.
     $url = "http://api.geonames.org/extendedFindNearby?lat=$lat\&lng=$lng\&username=drjohns";
     print STDERR "Address didn't work out. Trying extendedFindNearby instead. Url: $url\n" if $DEBUG;
     $results = `curl -s "$url"`;
# parse results - there may be several objects returned
     $topelemnt = $results =~ /<geoname>/i ? "geoname" : "geonames";
     @elmnts = ("street","streetnumber","lat","lng","locality","postalcode","countrycode","countryname","name","adminName2","adminName1");
     $cnt = xml1levelparse($results,$topelemnt,@elmnts);

     @lati = @{ $xmlhash{lat}};
     @long = @{ $xmlhash{lng}};
# find the closest entry
     $distmax = 1E7;
     for($i=0;$i<$cnt;$i++){
       $dist = ($lat - $lati[$i])**2 + ($lng - $long[$i])**2;
       print STDERR "dist,lati,long: $dist, $lati[$i], $long[$i]\n" if $DEBUG;
       if ($dist < $distmax) {
         print STDERR "dist < distmax condition. i is: $i\n";
         $isave = $i;
       }
     }
     $street = @{ $xmlhash{street}}[$isave];
     $houseNumber = @{ $xmlhash{streetnumber}}[$isave];
     $admn2 = @{ $xmlhash{adminName2}}[$isave];
     $postalcode = @{ $xmlhash{postalcode}}[$isave];
     $name = @{ $xmlhash{name}}[$isave];
     $countrycode = @{ $xmlhash{countrycode}}[$isave];
     $countryname = @{ $xmlhash{countryname}}[$isave];
     $state = @{ $xmlhash{adminName1}}[$isave];
     print STDERR "street, houseNumber, postalcode, state, admn2, name: $street, $houseNumber, $postalcode, $state, $admn2, $name\n" if $DEBUG;
     if ($countrycode ne "US"){
       $state .= " $countryname";
     }
     $state .= " (approximate)";
   }
# turn zipcode into town name with this call
   if ($postalcode) {
     print STDERR "postalcode $postalcode exists, let's convert to a town name\n";
     print STDERR "url: $url\n";
     $url = "http://api.geonames.org/postalCodeSearch?country=US\&postalcode=$postalcode\&username=drjohns";
     $results = `curl -s "$url"|egrep -i 'name|locality|adminName'`;
     ($town) = $results =~ /<name>(.+)</i;
     print STDERR "results,town: $results,$town\n";
   }
   if (!$town) {
# no town name, use adminname2 which is who knows what in general
     print STDERR "Stil no town name. Use adminName2 as next best thing\n";
     $town = $admn2;
   }
   if (!$town) {
# we could be in the ocean! I saw that once, and name was North Atlantic Ocean
     print STDERR "Still no town. Try to use name: $name as last resort\n";
     $town = $name;
   }
   $gpsinfo = "$houseNumber $street $town, $state" if $locality || $town;
   } # end of GPS info exists condition
  } # end loop over ANAL file
  $gpsinfo = $gpsinfo || "No info found";
  print qq(Location: $gpsinfo
);
} # end loop over STDIN

#####################
# function to parse some xml and fill a hash of arrays
sub xml1levelparse{
# build an array of hashes
$string = shift;
# strip out newline chars
$string =~ s/\n//g;
$parentelement = shift;
@elements = @_;
$i=0;
while($string =~ /<$parentelement>/i){
 $i++;
 ($childelements) = $string =~ /<$parentelement>(.+?)<\/$parentelement>/i;
 print STDERR "childelements: $childelements" if $DEBUG;
 $string =~ s/<$parentelement>(.+?)<\/$parentelement>//i;
 print STDERR "string: $string\n" if $DEBUG;
 foreach $element (@elements){
  print STDERR "element: $element\n" if $DEBUG;
  ($value) = $childelements =~ /<$element>([^<]+)<\/$element>/i;
  print STDERR "value: $value\n" if $DEBUG;
  push @{ $xmlhash{$element} }, $value;
 }
} # end of loop over parent elements
return $i;
} # end sub xml1levelparse

m3.pl

#!/usr/bin/perl
# show the pics ; rotate the screen as needed
# for now, assume the display is in a neutral
# orientation at the start
use Time::HiRes qw(usleep);
$DEBUG = 1;
$delay = 6; # seconds between pics
###$delay = 4; # for testing
$mdelay = 200; # milliseconds
$mshow = "$ENV{HOME}/mediashow";
$pNames = "$ENV{HOME}/pNames";
# pics are here
$picsDir = "$ENV{HOME}/Pictures";
$refreshFile = "$ENV{HOME}/refresh";

chdir($picsDir);
$cn = `ls -1|wc -l`;
chomp($cn);
print "$cn files\n" if $DEBUG;
# throw up a first picture - all black. Trick to make black bckgrd permanent
system("sudo fbi -a --noverbose -T 1 $ENV{HOME}/black.jpg");
# see if this is a new batch of pictures
$refresh = (stat($refreshFile))[9];
$now = time();
$diff = $now - $refresh;
print "refresh,now,diff: $refresh, $now, $diff\n" if $DEBUG;
if ($diff < 100){
  system("sudo fbi -a --noverbose -T 1 $ENV{HOME}/newslideshowintro.jpg");
  sleep(25);
}
system("sudo fbi -a --noverbose -T 1 $ENV{HOME}/black.jpg");
system("sleep 1; sudo killall fbi");
# start infinitely looping fbi slideshow
for (;;) {
# then start slide show
# shell echo cannot work with null character so we need to use a file to store it
    system("sudo xargs -a $mshow -0 fbi --noverbose -1 -T 1  -t $delay ");
    ###system("sudo xargs -a $mshow -0 fbi -a -1 -T 1  -t $delay "); # for testing
# fbi runs in background, then exits, so we need to monitor if it's still alive
    for(;;) {
      open(MON,"ps -ef|grep fbi|grep -v grep|") || die "Cannot launch ps -ef!!\n";
      $match = <MON>;
      if ($match) {
        print "got fbi match\n" if $DEBUG > 1;
        } else {
        print "no fbi match\n" if $DEBUG;
# fbi not found
          last;
      }
      close(MON);
      print "usleeping, noexist is $noexit\n" if $DEBUG > 1;
      usleep($mdelay);
    } # end loop testing if fbi has exited
} # close of infinite loop

Optional script

mshowtmp.pl (revision not yet reflected in the tar file)

#!/usr/bin/perl
# add txt_ to beginning of filename
$DEBUG = 1;
$HOME = "/home/pi";
$mshow = "$HOME/mediashow.orig";
$mshow2 = "$HOME/mediashowtmp2";
$ms = `cat $mshow`;
@pics = split('\0',$ms);
$ms = "";
foreach $file (@pics) {
  print "file is $file\n" if $DEBUG;
  $ms .= "txt_" . $file . "\0";
}
# print out new mediashow pics in order
print "Printing new mediashow: $ms\n" if $DEBUG;
open(MS,">$mshow2") || die "Cannot open mediashow $mshow2!!\n";
print MS $ms;
close(MS);

crontab entries


# display some ip info first
@reboot sleep 15;ip a|grep wlan|sudo tee -a /dev/console > /dev/null
@reboot sleep 22; ./m3.pl >> m3.log 2>&1
# reboot if we can’t reach the Internet
19 5 */2 * * curl google.com > /dev/null 2>&1 || sudo reboot
26 5 */2 * * ./master3.sh >> master.log 2>&1

That will refresh the slideshow every two days, which we found is a good interval for our lifestyle – some days you don’t get around to viewing them. If you want to refresh every day just change ‘*/2″ to ‘*’.

And… that’s it!

Reminder

Don’t forget to make all these files executable. Something like:

$ chmod +x *.pl *.py *.sh

should do it.

My equipment

RPi 3 running Raspbian Lite, OS version “Bullseye,” though older versions also work well, just accommodating the appropriate packages which have changed over time.

Pi Display. The Pi Display resolution is 800×480, so pretty small.

HDMI display such as a TV as alternate to a Pi Display. This does work! I just tested this in Jan, 2022. My Sony TV display resolution is 1920 x 1080.

Pre-install

There are a few things you’ll need (accurate statement as of OS Bullseye, Jan 2022) such as these system packages: fbi, file, rclone, and these python modules: pip, Pillow, and piexif. That’s mostly described in my previous post so I won’t repeat it here. Basically the system package you install with apt-get. After installing pip you use it to install Pillow and piexif.

Getting started

To see how badly things are going for you (hey, I like to be cautiously pessimistic) after you’ve created all these files and have installed rclone, do a

$ ./master3.sh

If you have your rclone file listing (which takes a long time) and want to focusing on debugging the rest of it, do a

$ ./master3.sh skip

Discussion

In this version of Raspberry Pi photo frame I’ve made more effort to force time separation between the randomly selected photos. But, that’s not all. I blow up pictures taken in a narrow (portrait) mode (see next paragraph). And I do some fancy analysis to determine filename, folder, date, time and even location of the pictures. And there’s more. I create an alternate version of each photo which embeds this info at the bottom – in anticipation of my even more fancy remote-controlled slideshow! I am afraid to overwrite what I have previously posted because that by itself is a complete solution and works quite well on its own. So this can be considered worthy of folks looking for a little more challenge to get better results.

The fancyresize.py script is designed around my small PiDisplay which has a horizontal resolution of only 800 pixels. It blows up a narrow, portrait-format picture only if the detected display has a horizontal resolution of no more than 800 pixels. It blows the picture up by 10%, chops off 3% from the top, 7% from the bottom, because that yields optimal results in my experience. If you like that approach but are using a larger HDMI display, you could edit the “801” in that file to make it a larger number (bigger than your display, like 5000).

Show pictures with embedded info

This process is not streamlined. But it can be cool to do it by hand. You could follow these steps.

$ ./mshowtmp.pl; mv mediashowtmp2 mediashow

If you wait the whole cycle the next time around it should display the pictures with the embedded info at the bottom. If you’re impatient, do this:

$ sudo pkill -9 fbi; sudo pkill -9 m3.pl

$ nohup ./m3.pl > m3.log 2>&1 &

googleapi: Error 403: Rate Limit Exceeded, rateLimitExceeded

I’m seeing this while transferring the pictures. Guess I’ll have to slow down the transfer. Not sure. Still figuring this out.

Fun Fact

You know how those old digital cameras created files prefixed with DSC, like DSC00102.JPG? If you read the JPEG spec, which is a pretty dense document, you learn that DSC stands for Digital Still Camera.

Concept for tossing out pictures of documents

We sometimes take pictures of documents, or computer screens, or a slide at a presentation, or a historical marker. They don’t make for compelling slideshow material. Well, the historical markers are debatable since they have character. Anyway, I am looking at using an old open source program called tesseract to do OCR (optical character recognition) on all the photos to help identify those containing a lot of words so they can be excluded. I’ll include that if I determine it to be a good approach.

Installing a searchable dictionary on Raspberry Pi

To install a word dictionary that you can do simple searches against on an RPi, try:

$ sudo apt-get install wamerican

or maybe

$ sudo apt-get install wamerican-huge

Those will produce simple wordlists, not actual dictionaries with definitions as you might have expected. They go into /usr/share/dict, e.g., usr/share/dict/american-english-huge.

The dict program is quite nice. apt-get install dict. Then you run it like this

$ dict neume

and it shoots back definitions and cites sources for those definitions. The drawback for my purposes is that it uses your Internet connection and I’m trying to build a photo frame that doesn’t rely too much on the Internet after the photos themselves are fetched.

$ sudo apt-cache search wordlist

lists all available dictionaries, I believe.

Setting up tesseract

This page has these instructions

git clone https://github.com/thortex/rpi3-tesseract.git 
cd rpi3-tesseract 
cd release 
./install_requires_related2leptonica.sh ./install_requires_related2tesseract.sh 
./install_tesseract.sh

But you’re gonna need git first:

$ sudo apt-get install git

RPi lost Wifi

This could be a whole separate post. In the course of my hard work my RPi just would not acquire an IP address on wlan0.

Here’s a great command to see all the SSIDs it knows about:

$ sudo iwlist wlan0 scan > scan.log

Then you can inspect scan.log in an editor. Turns out the one SSID it needed wasn’t in the list. Turns out I had reserved a DHCP entry for it in my router. My router was simply not cooperating, it seems – the RPi wasn’t doing anything wrong. I was almost ready to re-install the whole thing and waste hours… My router is an older model Linksys WRT1200AC. I removed the DHCP reservation on the router, then did a

$ sudo service networking stop; sudo service networking start

on the RPi, and…all was good! Its assigned IP won’t change that often, I can always check the router to see what it is. The management software with the Linksys is quite good.

I’m still having IP issues. So I added an additional crontab entry to display IP info of the WiFi adapter for a few seconds before the slideshow kicks in. This will tell me if it at least has an IP (which it often doesn’t)! It’s a pretty clever idea if I say so myself – the way I managed to do it that is. It’s not in the tar file.

RPi partially blown up

I’ve been running the photo frame for about two years now. All the residents love to see when the pictures refresh what the new slideshow brings. But in all the work I’ve done here and there I’ve partially blown up the RPi. Symptoms: running curl produces a segmentation fault; running crontab -e produces crontab: “/usr/bin/sensible-editor” exited with status 2; and then there’s the fact I lose my IP after a few days. I bet there’s a lot else that’s wrong too, but the sldieshow stuff keeps chugging along, amazingly. I’m too unmotivated (lazy) to fix all these problems, except the IP thing. That prevents slideshow refreshes. So I’ve decided to script a reboot command to run before the slideshow refresh. The resulting conditional reboot is now incorporated into the crontab entries shown earlier.

And by the way, I did fix this problem by re-imaging the micro SD card. That brought a new problem which is that the display blanked out afew only a few seconds. I bought a new display (turns out I didn’t need to), still had the problem, then figured out how to fix it. I wrote up the fix in this post.

Conclusion

A more advanced treatment of photos is shown in this post than I have done previously. It is fairly robust and will withstand quite a few user errors in my experience. The end result will be an interesting display of your photos, randomly selected but in small groupings.

References and related

The tar file which contains everything: https://drjohnstechtalk.com/blog/downloads/photoFrameII.tar

Please see this popular post Raspberry Pi photo frame using your pictures on your Google Drive for more details.

Is your Pi Display blanking out? I have the fix for that in this post.

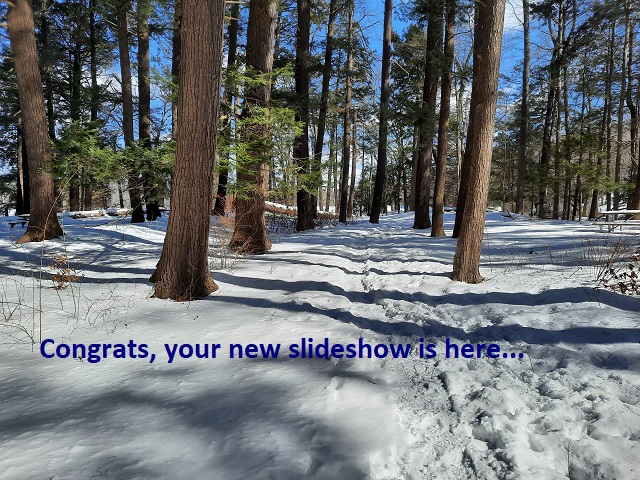
m3.pl refers to a black.jpg and a newslideshowintro.jpg file. It’s not a disaster to not have those, but the overall experience will be slightly better. Here’s black.jpg:

And the beautiful newslideshowintro.jpg I created is at the top of this blog post.

Tesseract, an surprisingly old and surprisingly good OCR open-source OCR program, is basically impossible to compile for RPi. Fortunately, someone has done it for us. This page has the instructions: https://github.com/thortex/rpi3-tesseract

Categories
TCP/IP Uncategorized Web Site Technologies

The IT Detective Agency: web site not accessible

Intro
In this spellbinding segment we examine what happened when a user found an inaccessible web site.


Some details
The user in a corporate environment reports not being able to access https://login.smartnotice.net/. She has the latest version of Windows 10.


On the trail
I sense something is wrong with SSL because of the type of errors reported by the browser. Something to the effect that it can’t make a secure connection.


But I decided to doggedly pursue it because I have a decent background in understanding SSL-related problems, and I was wondering if this was the first of what might be a systemic problem. I’m always interested to find little problem and resolve them in a way that addresses bigger issues.


So the first thing I try to lean more about the SSL versions and ciphers supported is to use my Go-To site, ssllabs.com, Test your Server: https://www.ssllabs.com/ssltest/. Well, this test failed miserably, and in a way I’ve never seen before. SSLlabs just quickly gave up without any analysis! So we pushed ahead, undaunted.


So I hit the site with curl from my CentOS 8 server (Upgrading WordPress brings a thicket of problems). Curl works fine. But I see it prefers to use TLS 1.3. So I finally buckle down and learn how to properly cnotrol the SSL/TLS version in curl. The output from curl -help is misleading, shall we say?


You think using curl –tlsv1.2 is going to use TLS v 1.2? Think again. Maybe it will, or maybe it won’t. In fact it tells curl to use TLS version 1.2 or higher. I totally missed understanding that for all these years.
What I’m looking for is to determine if the web site is willing to use TLS v 1.2 in addition to TLS v 1.3.


The ticket is … –tls-max 1.2 . This sets the maximum TLS version curl will use to access the URL.


So we have
curl -v –tls-max 1.3 https://login.smartnotice.net/

<!-- /* Font Definitions */ @font-face {font-family:"Cambria Math"; panose-1:2 4 5 3 5 4 6 3 2 4; mso-font-charset:1; mso-generic-font-family:roman; mso-font-format:other; mso-font-pitch:variable; mso-font-signature:0 0 0 0 0 0;} @font-face {font-family:Calibri; panose-1:2 15 5 2 2 2 4 3 2 4; mso-font-charset:0; mso-generic-font-family:swiss; mso-font-pitch:variable; mso-font-signature:-469750017 -1073732485 9 0 511 0;} /* Style Definitions */ p.MsoNormal, li.MsoNormal, div.MsoNormal {mso-style-unhide:no; mso-style-qformat:yes; mso-style-parent:""; margin-top:0in; margin-right:0in; margin-bottom:8.0pt; margin-left:0in; line-height:107%; mso-pagination:widow-orphan; font-size:11.0pt; font-family:"Calibri",sans-serif; mso-ascii-font-family:Calibri; mso-ascii-theme-font:minor-latin; mso-fareast-font-family:Calibri; mso-fareast-theme-font:minor-latin; mso-hansi-font-family:Calibri; mso-hansi-theme-font:minor-latin; mso-bidi-font-family:"Times New Roman"; mso-bidi-theme-font:minor-bidi;} .MsoChpDefault {mso-style-type:export-only; mso-default-props:yes; font-family:"Calibri",sans-serif; mso-ascii-font-family:Calibri; mso-ascii-theme-font:minor-latin; mso-fareast-font-family:Calibri; mso-fareast-theme-font:minor-latin; mso-hansi-font-family:Calibri; mso-hansi-theme-font:minor-latin; mso-bidi-font-family:"Times New Roman"; mso-bidi-theme-font:minor-bidi;} .MsoPapDefault {mso-style-type:export-only; margin-bottom:8.0pt; line-height:107%;} @page WordSection1 {size:8.5in 11.0in; margin:1.0in 1.0in 1.0in 1.0in; mso-header-margin:.5in; mso-footer-margin:.5in; mso-paper-source:0;} div.WordSection1 {page:WordSection1;} -->
*   Trying 104.18.27.134...
* TCP_NODELAY set
* Connected to login.smartnotice.net (104.18.27.134) port 443 (#0)
* ALPN, offering h2
* ALPN, offering http/1.1
* successfully set certificate verify locations:
*   CAfile: /etc/pki/tls/certs/ca-bundle.crt
  CApath: none
* TLSv1.3 (OUT), TLS handshake, Client hello (1):
* TLSv1.3 (IN), TLS handshake, Server hello (2):
...
html head

But

curl -v –tls-max 1.2 https://login.smartnotice.net/

<!-- /* Font Definitions */ @font-face {font-family:"Cambria Math"; panose-1:2 4 5 3 5 4 6 3 2 4; mso-font-charset:1; mso-generic-font-family:roman; mso-font-format:other; mso-font-pitch:variable; mso-font-signature:0 0 0 0 0 0;} @font-face {font-family:Calibri; panose-1:2 15 5 2 2 2 4 3 2 4; mso-font-charset:0; mso-generic-font-family:swiss; mso-font-pitch:variable; mso-font-signature:-469750017 -1073732485 9 0 511 0;} /* Style Definitions */ p.MsoNormal, li.MsoNormal, div.MsoNormal {mso-style-unhide:no; mso-style-qformat:yes; mso-style-parent:""; margin-top:0in; margin-right:0in; margin-bottom:8.0pt; margin-left:0in; line-height:107%; mso-pagination:widow-orphan; font-size:11.0pt; font-family:"Calibri",sans-serif; mso-ascii-font-family:Calibri; mso-ascii-theme-font:minor-latin; mso-fareast-font-family:Calibri; mso-fareast-theme-font:minor-latin; mso-hansi-font-family:Calibri; mso-hansi-theme-font:minor-latin; mso-bidi-font-family:"Times New Roman"; mso-bidi-theme-font:minor-bidi;} .MsoChpDefault {mso-style-type:export-only; mso-default-props:yes; font-family:"Calibri",sans-serif; mso-ascii-font-family:Calibri; mso-ascii-theme-font:minor-latin; mso-fareast-font-family:Calibri; mso-fareast-theme-font:minor-latin; mso-hansi-font-family:Calibri; mso-hansi-theme-font:minor-latin; mso-bidi-font-family:"Times New Roman"; mso-bidi-theme-font:minor-bidi;} .MsoPapDefault {mso-style-type:export-only; margin-bottom:8.0pt; line-height:107%;} @page WordSection1 {size:8.5in 11.0in; margin:1.0in 1.0in 1.0in 1.0in; mso-header-margin:.5in; mso-footer-margin:.5in; mso-paper-source:0;} div.WordSection1 {page:WordSection1;} -->
*   Trying 104.18.27.134...
* TCP_NODELAY set
* Connected to login.smartnotice.net (104.18.27.134) port 443 (#0)
* ALPN, offering h2
* ALPN, offering http/1.1
* successfully set certificate verify locations:
*   CAfile: /etc/pki/tls/certs/ca-bundle.crt
  CApath: none
* TLSv1.2 (OUT), TLS handshake, Client hello (1):
* TLSv1.2 (IN), TLS alert, protocol version (582):
* error:1409442E:SSL routines:ssl3_read_bytes:tlsv1 alert protocol version
* Closing connection 0
curl: (35) error:1409442E:SSL routines:ssl3_read_bytes:tlsv1 alert protocol version

So now we know, this web site requires the latest and greatest TLS v 1.3.
Even TLS 1.2 won’t do.

Well, this old corporate environment still offered users a choice of old
browsers, including IE 11 and the old Edge browser. These two browsers simply do not support TLS 1.3. But I fuond even Firefox wasn’t working, although the Chrome browser was.

How to explain all that? How to fix it?

It comes down to a good knowledge of the particular environment. As I think I stated, the this corporate environment uses proxies, which in turn, most
likely, tried to SSL intercept the traffic. The proxies are old so they in turn
don’t actually support SSL interception of TLS v 1.3! They had separate
problems with Chrome browser so they weren’t intercepting its traffic. This explains why FF was broken yet Chrome worked.

So the fix, such as it was, was to disable SSL interception for this request
URL so that Firefox would work, and tell the user to use either FF or Chrome.

Just being thorough, when i tested from home with Edge Chromium – the newer Edge browser – it worked and SSLlabs showed (correctly) that it supports TLS 1.3. Edge in the corporate environment is the older, non-Chromium one. It seems to max out at TLS 1.2. No good.

For good measure I explained the situation to the desktop support people.

Case: closed.

Appendix

How did I decide the proxies didn’t support TLS 1,3? What if this site had some other issue after all? I looked on the web for another web site which only supports TLS 1.3. I thought hopefully badssl.com would have one. But they don’t! Undaunted yet again, I determined to change my own web site, drjohnstechtalk.com, into one that only supports TLS 1.3! This is easy to do with apache web server. You basically need a line that looks like this:

SSLProtocol all -SSLv3 -TLSv1 -TLSv1.1 -TLSv1.2

Categories
Web Site Technologies

How to POST with curl

Intro
For the hard-core curl fans I find these examples useful.

Example 1
Posting in-line form data, e.g., to an api:

$ curl ‐d ‘hi there’ https://drjohns.com/api/example

Well, that might work, but I normally add more switches.

Example 2

$ curl ‐iksv ‐d ‘hi there’ https://drjohns.com/api/example|more

Perhaps you have JSON data to POST and it would be awkward or impossible to stuff into the command line. You can read it from a file like this:

Example 3

$ curl ‐iksv ‐d @json.txt https://drjohns.com/api/example|more

Perhaps you have to fake a useragent to avoid a web application firewall. It actually suffices to identify with the -A Mozilla/4.0 switch like this:

Example 4

$ curl ‐A Mozilla/4.0 ‐iksv ‐d @json.txt https://drjohns.com/api/example|more

Suppose you are behind a proxy. Then you can tack on the -x switch like this next example.

Example 5

$ curl ‐A Mozilla/4.0 ‐x myproxy:8080 ‐iksv ‐d @json.txt https://drjohns.com/api/example|more

Those are the main ones I use for POSTing data while seeing what is going on. You can also add a maximum time (-m I think).

Example 6

If you’re sending JSON data, you ought to declare it with a content-type header:

$ curl ‐A Mozilla/4.0 ‐H ‘Content-type: application/json’ ‐iksv ‐d @json.txt https://drjohns.com/api/example|more

POSTman
Just overhearing people talk, I believe that “normal” people use a tool called POSTman to do similar things: POST XML, SOAP or JSON data to an endpoint. I haven’t had a need to use it or even to look into it myself. yet.

Conclusion
We have documented some useful switches in curl. POSTing data occurs when using APIs, e.g., RESTful APIs, so these techniques are useful to master. Roadblocks thrown up by web application firewalls or proxy servers can also be easily overcome.

Categories
Raspberry Pi SLES Web Site Technologies

Pi-hole: it’s as easy as pi to get rid of your advertisements

Intro
I learned about pi-hole from Bloomberg Businessweek of all places. Seems right up my alley – uses Raspberry Pi in your home to get rid of advertisements. Turns out it was too easy and I don’t have much to contribute except my own experiences with it!

The details
When I read about it I got to thinking big picture and wondered what would prevent us from running an enterprise version of this same thing? Well, large enerprises don’t normally run production critical applications like DNS servers (which this is, by the way) on Raspberry Pis, which is not the world’s most stable hardware! But first I had to try it at home just to learn more about the technology.

pi-hole admin screen

I was surprised just how optimized it was for the Raspberry Pi, to the neglect of other systems. So the idea of using an old SLES server is out the window.

But I think I got the essence of the idea. It replaces your DNS server with a custom one that resolves normal queries for web sites the usual way, but for DNS queries that would resolve to an Ad server, it clobbers the DNS and returns its own IP address. Why? So that it can send you a harmless blank image or whatever in place of an Internet ad.

You know those sites that obnoxiously throw up those auto-playing videos? That ain’t gonna happen any more when you run pi-hole.

You have to be a little adept at modifying your home router, but they even have a rough tutorial for that.

Installation
For the record on my Rspberry Pi I only did this:
$ sudo su ‐
$ curl ‐sSL https://install.pi‐hole.net | bash

It prompted me for a few configuration details, but the answers were obvious. I chose Google DNS servers because I have a long and positive history using them.

You can see that it installs a bunch of packages – surprisingly many considering how simple in theory the thing is.

Test it
On your Raspberry Pi do a few test resolutions:

$ dig google.com @localhost # should look like it normally does
$ dig pi.hole # should return the IP of your Raspberry Pi
$ dig adservices.google.com # I gotta check this one. Should return IP address of your Pi

It runs a little web server on your Pi so the Pi acts as adservices.google.com and just serves out some white space instead of the ad you would have gotten.

Linksys router
Another word about the home router DHCP settings. You have the option to enter DNS server. So I put the IP address of my raspberry pi, 192.168.1.119. What I expected is that this is the DNS server that would be directly handed out to the DHCP clients on my home network. But that is not the case. Instead it still hands out itself, 192.168.1.1 as DNS server. But in turn it uses the raspberry PI for its resolution. This through me when I did an ipconfig /all on my Windows 10 and didn’t see the DNS server I expected. But it wa all working. About 10% of my DNS queries were pi-holed (see picture of my admin screen above).

I guess pi-hole is run by fanatics, because it works surprisingly well. Those complex sites still worked, like cnn.com, cnet.com. But they probably load faster without the ads.

Two months check up

I checked back with pihole. I know a DNS server is running. The dashboard is broken – the sections just have spinning circle instead of data. It’s already asking me to upgrade to v 3.3.1. I run pihole -up to do the upgrade.

Another little advantage
I can now ssh to my pi by specifying the host as pi.hole – which I can actually remember!

Idea for enterprise
finally, the essence of the idea probably could be ported over to an enterprise. In my opinion the secret sauce are the lists of domain names to clobber. There are five or six of them. Some have 50,000 entries. So you’d probably need a specialized DNS server rather than the default ISC BIND. I remember running a specialized DNS server like that when I ran Puremessage by Sophos. It was optimized to suck in real-time blacklists and the like. I have to dig through my notes to see what we ran. I’m sure it wasn’t dnsmasq, which is what pi-hole runs on the Raspberry Pi! But with these lists and some string manipulation and a simple web server I’d think it’d be possible to replicate in enterprise environment. I may never get the opportunity, more for lack of time than for lack of ability…

Conclusion
Looking for a rewarding project for your Raspberry Pi? Spare yourself Internet advertisements at home by putting it to work.

References and related
The pi-hole web site: https://pi-hole.net/
Another Raspberry Pi project idea: monitor your cable modem and restart it when it goes south.

Categories
Linux SLES Web Site Technologies

Compiling curl and openssl on Redhat Linux

Intro
I have an ancient Redhat system which I’m not in a position to upgrade. I like to use curl to test web sites, but it’s getting to the point that my ancient version has no SSL versions in common with some secure web sites. I desperately wanted to upgrade curl while leaving the rest of the system as is. Is it even possible? How would you do it? All these things and more are explained in today’s riveting blog post.

The details
Redhat version
I don’t know the proper command so I do this:
$ cat /etc/system-release

ed Hat Enterprise Linux Server release 6.6 (Santiago)

Current curl version
$ ./curl ‐‐version

curl 7.19.7 (x86_64-redhat-linux-gnu) libcurl/7.19.7 NSS/3.16.2.3 Basic ECC zlib/1.2.3 libidn/1.18 libssh2/1.4.2

Limited set of SSL/TLS protocols
$ curl ‐help

...
 -2/--sslv2         Use SSLv2 (SSL)
 -3/--sslv3         Use SSLv3 (SSL)
...
 -z/--time-cond <time> Transfer based on a time condition
 -1/--tlsv1         Use TLSv1 (SSL)
...

New version of curl

curl 7.55.1 (x86_64-unknown-linux-gnu) libcurl/7.55.1 OpenSSL/1.1.0f zlib/1.2.3

New SSL options

     --ssl           Try SSL/TLS
     --ssl-allow-beast Allow security flaw to improve interop
     --ssl-no-revoke Disable cert revocation checks (WinSSL)
     --ssl-reqd      Require SSL/TLS
 -2, --sslv2         Use SSLv2
 -3, --sslv3         Use SSLv3
...
     --tls-max <VERSION> Use TLSv1.0 or greater
     --tlsauthtype <type> TLS authentication type
     --tlspassword   TLS password
     --tlsuser <name> TLS user name
 -1, --tlsv1         Use TLSv1.0 or greater
     --tlsv1.0       Use TLSv1.0
     --tlsv1.1       Use TLSv1.1
     --tlsv1.2       Use TLSv1.2
     --tlsv1.3       Use TLSv1.3

Now that’s an upgrade! How did we get to this point?

Well, I tried to get a curl RPM – seems like the appropriate path for a lazy system administrator, right? Well, not so fast. It’s not hard to find an RPM, but trying to install one showed a lot of missing dependencies, as in this example:
$ sudo rpm ‐i curl‐minimal‐7.55.1‐2.0.cf.fc27.x86_64.rpm

warning: curl-minimal-7.55.1-2.0.cf.fc27.x86_64.rpm: Header V4 DSA/SHA1 Signature, key ID b56a8bac: NOKEY
error: Failed dependencies:
        libc.so.6(GLIBC_2.14)(64bit) is needed by curl-minimal-7.55.1-2.0.cf.fc27.x86_64
        libc.so.6(GLIBC_2.17)(64bit) is needed by curl-minimal-7.55.1-2.0.cf.fc27.x86_64
        libcrypto.so.1.1()(64bit) is needed by curl-minimal-7.55.1-2.0.cf.fc27.x86_64
        libcurl(x86-64) >= 7.55.1-2.0.cf.fc27 is needed by curl-minimal-7.55.1-2.0.cf.fc27.x86_64
        libssl.so.1.1()(64bit) is needed by curl-minimal-7.55.1-2.0.cf.fc27.x86_64
        curl conflicts with curl-minimal-7.55.1-2.0.cf.fc27.x86_64

So I looked at the libcurl RPM, but it had its own set of dependencies. Pretty soon it looks like a full-time job to get this thing compiled!

I found the instructions mentioned in the reference, but they didn’t work for me exactly like that. Besides, I don’t have a working git program. So here’s what I did.

Compiling openssl

I downloaded the latest openssl, 1.1.0f, from https://www.openssl.org/source/ , untar it, go into the openssl-1.1.0f directory, and then:

$ ./config ‐Wl,‐‐enable‐new‐dtags ‐‐prefix=/usr/local/ssl ‐‐openssldir=/usr/local/ssl
$ make depend
$ make
$ sudo make install

So far so good.

Compiling zlib
For zlib I was lazy and mostly followed the other guy’s commands. Went something like this:
$ lib=zlib-1.2.11
$ wget http://zlib.net/$lib.tar.gz
$ tar xzvf $lib.tar.gz
$ mv $lib zlib
$ cd zlib
$ ./configure
$ make
$ cd ..
$ CD=$(pwd)

No problems there…

Compiling curl
curl was tricky and when I followed the guy’s instructions I got the very problem he sought to avoid.

vtls/openssl.c: In function ‘Curl_ossl_seed’:
vtls/openssl.c:276: error: implicit declaration of function ‘RAND_egd’
make[2]: *** [libcurl_la-openssl.lo] Error 1
make[2]: Leaving directory `/usr/local/src/curl/curl-7.55.1/lib'
make[1]: *** [all] Error 2
make[1]: Leaving directory `/usr/local/src/curl/curl-7.55.1/lib'
make: *** [all-recursive] Error 1

I looked at the source and decided that what might help is to add a hint where the openssl stuff could be found.

Backing up a bit, I got the source from https://curl.haxx.se/download.html. I chose the file curl-7.55.1.tar.gz. Untar it, go into the curl-7.55.1 directory,
$ ./buildconf
$ PKG_CONFIG_PATH=/usr/local/ssl/lib/pkgconfig LIBS=”‐ldl”

and then – here is the single most important point in the whole blog – configure it thusly:

$ ./configure ‐‐with‐zlib=$CD/zlib ‐‐disable‐shared ‐‐with‐ssl=/usr/local/ssl

So my insight was to add the ‐‐with‐ssl=/usr/local/ssl to the configure command.

Then of course you make it:

$ make

and maybe even install it:

$ make install

This put curl into /usr/local/bin. I actually made a sym link and made this the default version with this kludge (the following commands were run as root):

$ cd /usr/bin; mv curl{,.orig}; ln ‐s /usr/local/bin/curl

That’s it! That worked and produced a working, modern curl.

By the way it mentions TLS1.3, but when you try to use it:

$ curl ‐i ‐k ‐‐tlsv1.3 https://drjohnstechtalk.com/

curl: (4) OpenSSL was built without TLS 1.3 support

It’s a no go. But at least TLS1.2 works just fine in this version.

One other thing – put shared libraries in a common area
I copied my compiled curl from Redhat to a SLES 11 SP 3 system. It didn’t quite run. Only thing is, it was missing the openssl libraries. So I guess it’s also important to copy over

libssl.so.1.1
libcrypto.so.1.1

to /usr/lib64 from /usr/local/lib64.

Once I did that, it worked like a charm!

Conclusion
We show how to compile the latest version of openssl and curl on an older Redhat 6.x OS. The motivation for doing so was to remain compatible with web sites which are already or soon dropping their support for TLS 1.0. With the compiled version curl and openssl supports TLS 1.2 which should keep it useful for a long while.

References and related
I closely followed the instructions in this stackoverflow post: https://stackoverflow.com/questions/44270707/cant-build-latest-libcurl-on-rhel-7-3#44297265
openssl source: https://www.openssl.org/source/
curl sources: https://curl.haxx.se/download.html
Here’s a web site that only supports TLS 1.2 which shows the problem: https://www.askapache.com/. You can see for yourself on ssllabs.com

Categories
Linux Web Site Technologies

curl showing its age with SSL error

Intro
I’ve used curl as a debugging tool for a long time. But time moves on and my testing system didn’t. So now for the first time I saw an error that is produced by this situation, and I will explain it.

The details

The error

$ curl ‐i ‐k https://julialang.org/

curl: (35) error:1407742E:SSL routines:SSL23_GET_SERVER_HELLO:tlsv1 alert protocol version

$ curl ‐help

...
 -2/--sslv2         Use SSLv2 (SSL)
 -3/--sslv3         Use SSLv3 (SSL)
...
 -1/--tlsv1         Use TLSv1 (SSL)
...

Compare this to a server which I’ve kept up-to-date with openssl and curl:

...
 -2/--sslv2         Use SSLv2 (SSL)
 -3/--sslv3         Use SSLv3 (SSL)
...
 -1/--tlsv1         Use =&gt; TLSv1 (SSL)
    --tlsv1.0       Use TLSv1.0 (SSL)
    --tlsv1.1       Use TLSv1.1 (SSL)
    --tlsv1.2       Use TLSv1.2 (SSL)
...

On this server I can fetch the home page with curl.

So it appears the older system does not have a compatible version of TLS. To confirm this use SSLLABS. We see this:

SSLLabs evaluation of julialang.org

Sure enough, only TLS 1.2 is supported by the server, and my poor old curl doesn’t have that! Too bad for me, but it shows it’s time to upgrade.

Another problem site
askapache.com is another vexing site. On a curl version which supposedly supports tls 1.2 I get this error:
$ curl ‐‐tlsv1.2 ‐‐verbose ‐k https://askapache.com/

* About to connect() to askapache.com port 443 (#0)
*   Trying 192.237.251.158... connected
* Connected to askapache.com (192.237.251.158) port 443 (#0)
* Initializing NSS with certpath: sql:/etc/pki/nssdb
* warning: ignoring value of ssl.verifyhost
* NSS error -12286
* Closing connection #0
* SSL connect error
curl: (35) SSL connect error

This is with curl version 7.19.7 on my CentOS 6.8 system.

This same site works fine on my compiled version of curl with the latest openssl, version 7.55.1. The system-supplied curl is missing support for some cipher suites.

Here’s my compiled curl and openssl list of cipher suites:
$ openssl ciphers

ECDHE-ECDSA-AES256-GCM-SHA384:ECDHE-RSA-AES256-GCM-SHA384:DHE-RSA-AES256-GCM-SHA384:
ECDHE-ECDSA-CHACHA20-POLY1305:ECDHE-RSA-CHACHA20-POLY1305:DHE-RSA-CHACHA20-POLY1305:
ECDHE-ECDSA-AES128-GCM-SHA256:ECDHE-RSA-AES128-GCM-SHA256:DHE-RSA-AES128-GCM-SHA256:
ECDHE-ECDSA-AES256-SHA384:ECDHE-RSA-AES256-SHA384:DHE-RSA-AES256-SHA256:ECDHE-ECDSA-AES128-SHA256:ECDHE-RSA-AES128-SHA256:DHE-RSA-AES128-SHA256:ECDHE-ECDSA-AES256-SHA:
ECDHE-RSA-AES256-SHA:DHE-RSA-AES256-SHA:ECDHE-ECDSA-AES128-SHA:ECDHE-RSA-AES128-SHA:DHE-RSA-AES128-SHA:RSA-PSK-AES256-GCM-SHA384:
DHE-PSK-AES256-GCM-SHA384:RSA-PSK-CHACHA20-POLY1305:DHE-PSK-CHACHA20-POLY1305:
ECDHE-PSK-CHACHA20-POLY1305:AES256-GCM-SHA384:PSK-AES256-GCM-SHA384:PSK-CHACHA20-POLY1305:
RSA-PSK-AES128-GCM-SHA256:DHE-PSK-AES128-GCM-SHA256:AES128-GCM-SHA256:PSK-AES128-GCM-SHA256:
AES256-SHA256:AES128-SHA256:ECDHE-PSK-AES256-CBC-SHA384:ECDHE-PSK-AES256-CBC-SHA:SRP-RSA-AES-256-CBC-SHA:SRP-AES-256-CBC-SHA:RSA-PSK-AES256-CBC-SHA384:DHE-PSK-AES256-CBC-SHA384:RSA-PSK-AES256-CBC-SHA:
DHE-PSK-AES256-CBC-SHA:AES256-SHA:PSK-AES256-CBC-SHA384:PSK-AES256-CBC-SHA:ECDHE-PSK-AES128-CBC-SHA256:ECDHE-PSK-AES128-CBC-SHA:SRP-RSA-AES-128-CBC-SHA:SRP-AES-128-CBC-SHA:
RSA-PSK-AES128-CBC-SHA256:DHE-PSK-AES128-CBC-SHA256:RSA-PSK-AES128-CBC-SHA:DHE-PSK-AES128-CBC-SHA:AES128-SHA:PSK-AES128-CBC-SHA256:PSK-AES128-CBC-SHA

and what I see on my older system:
$ openssl ciphers

DHE-RSA-AES256-SHA:DHE-DSS-AES256-SHA:AES256-SHA:DHE-RSA-CAMELLIA256-SHA:DHE-DSS-CAMELLIA256-SHA:
CAMELLIA256-SHA:EDH-RSA-DES-CBC3-SHA:EDH-DSS-DES-CBC3-SHA:DES-CBC3-SHA:DES-CBC3-MD5:
DHE-RSA-AES128-SHA:DHE-DSS-AES128-SHA:AES128-SHA:DHE-RSA-CAMELLIA128-SHA:DHE-DSS-CAMELLIA128-SHA:
CAMELLIA128-SHA:RC2-CBC-MD5:RC4-SHA:RC4-MD5:RC4-MD5:EDH-RSA-DES-CBC-SHA:EDH-DSS-DES-CBC-SHA:DES-CBC-SHA:
DES-CBC-MD5:EXP-EDH-RSA-DES-CBC-SHA:EXP-EDH-DSS-DES-CBC-SHA:EXP-DES-CBC-SHA:EXP-RC2-CBC-MD5:EXP-RC2-CBC-MD5:EXP-RC4-MD5:EXP-RC4-MD5

Note that when curl successfully connects it shows which cipher suite was chosen if you use the -v switch:

$ curl ‐v ‐k https://drjohnstechtalk.com/

* About to connect() to drjohnstechtalk.com port 443 (#0)
*   Trying 50.17.188.196... connected
* Connected to drjohnstechtalk.com (50.17.188.196) port 443 (#0)
...
* SSL connection using TLS_ECDHE_RSA_WITH_AES_128_GCM_SHA256
...

On a more demanding server – one that does not work with old curl, this dialog is longer, TLS 1.2 is preferred and a more secure cipher suite is chosen – one not available on the other system:

(issue standard curl -k -v <server_name>)

*   Trying 50.17.188.197...
* TCP_NODELAY set
* Connected to 50.17.188.197 port 443 (#0)
* ALPN, offering http/1.1
* Cipher selection: ALL:!EXPORT:!EXPORT40:!EXPORT56:!aNULL:!LOW:!RC4:@STRENGTH
* TLSv1.2 (OUT), TLS handshake, Client hello (1):
* TLSv1.2 (IN), TLS handshake, Server hello (2):
* TLSv1.2 (IN), TLS handshake, Certificate (11):
* TLSv1.2 (IN), TLS handshake, Server key exchange (12):
* TLSv1.2 (IN), TLS handshake, Server finished (14):
* TLSv1.2 (OUT), TLS handshake, Client key exchange (16):
* TLSv1.2 (OUT), TLS change cipher, Client hello (1):
* TLSv1.2 (OUT), TLS handshake, Finished (20):
* TLSv1.2 (IN), TLS handshake, Finished (20):
* SSL connection using TLSv1.2 / ECDHE-RSA-AES256-GCM-SHA384

Another curl error explained
While running

$ curl -v -i -k https://drjohnstechtalk.com/

* About to connect() to drjohnstechtalk.com port 443 (#0)
*   Trying 50.17.188.196... connected
* Connected to drjohnstechtalk.com (50.17.188.196) port 443 (#0)
* Initializing NSS with certpath: sql:/etc/pki/nssdb
* warning: ignoring value of ssl.verifyhost
* skipping SSL peer certificate verification
* SSL connection using TLS_ECDHE_RSA_WITH_AES_128_GCM_SHA256
* Server certificate:
*       subject: CN=drjohnstechtalk.com,C=US
*       start date: Apr 03 00:00:00 2017 GMT
*       expire date: Apr 03 23:59:59 2019 GMT
*       common name: drjohnstechtalk.com
*       issuer: CN=Trusted Secure Certificate Authority 5,O=Corporation Service Company,L=Wilmington,ST=NJ,C=US
&gt; GET / HTTP/1.1
&gt; Host: drjohnstechtalk.com
&gt; Accept: */*
&gt; User-Agent: Mozilla/4.0 (compatible; MSIE 8.0; Windows NT 5.1; Trident/4.0; .NET CLR 1.0.3705; .NET CLR 1.1.4322; .NET CLR 2.0.50727; InfoPath.1; .NET CLR 3.0.04506.30;
&gt;
* SSL read: errno -5961
* Closing connection #0
curl: (56) SSL read: errno -5961

What’s going on?
In this test drjohnstechtalk.com was behind a load balancer. The load balancer had SSL configured. The back-end server was not running however though the load balancer’s health check did not detect that condition. So the load balancer permitted the initial connection, but then shut things off when it could not open a connection to the back-end server. So this error has nothing to do with curl showing its age, but I didn’t know that when I started debugging it.

errno 104
Then there’s this one:

$ curl ‐v ‐i ‐k https://lb.drjohnstechtalk.com/

*   Trying 50.17.188.196...
* TCP_NODELAY set
* Connected to fw-change-request.bdrj.net (50.17.188.196) port 443 (#0)
* ALPN, offering http/1.1
* Cipher selection: ALL:!EXPORT:!EXPORT40:!EXPORT56:!aNULL:!LOW:!RC4:@STRENGTH
* successfully set certificate verify locations:
*   CAfile: /etc/pki/tls/certs/ca-bundle.crt
  CApath: none
* TLSv1.2 (OUT), TLS handshake, Client hello (1):
* TLSv1.2 (IN), TLS handshake, Server hello (2):
* TLSv1.2 (IN), TLS handshake, Certificate (11):
* TLSv1.2 (IN), TLS handshake, Server key exchange (12):
* TLSv1.2 (IN), TLS handshake, Server finished (14):
* TLSv1.2 (OUT), TLS handshake, Client key exchange (16):
* TLSv1.2 (OUT), TLS change cipher, Client hello (1):
* TLSv1.2 (OUT), TLS handshake, Finished (20):
* TLSv1.2 (IN), TLS handshake, Finished (20):
* SSL connection using TLSv1.2 / ECDHE-RSA-AES256-GCM-SHA384
* ALPN, server did not agree to a protocol
* Server certificate:
*  subject: C=US; ST=NJ; CN=lb.drjohnstechtalk.com
*  start date: Nov 14 12:06:02 2017 GMT
*  expire date: Nov 14 12:06:02 2018 GMT
*  SSL certificate verify result: unable to get local issuer certificate (20), continuing anyway.
&gt; GET / HTTP/1.1
&gt; Host: lb.drjohnstechtalk.com
&gt; User-Agent: curl/7.55.1
&gt; Accept: */*
&gt;
* OpenSSL SSL_read: SSL_ERROR_SYSCALL, errno 104
* Closing connection 0
curl: (56) OpenSSL SSL_read: SSL_ERROR_SYSCALL, errno 104

This also seems to occur as I’ve seen when there’s a load balancer in front of a web server where the load balancer is working fine but the web server is not.

Another example challenging web site
$ curl ‐‐version

curl 7.19.7 (x86_64-redhat-linux-gnu) libcurl/7.19.7 NSS/3.27.1 zlib/1.2.3 libidn/1.18 libssh2/1.4.2
Protocols: tftp ftp telnet dict ldap ldaps http file https ftps scp sftp
Features: GSS-Negotiate IDN IPv6 Largefile NTLM SSL libz

$ curl ‐v ‐k https://e1st.smapply.org/

* About to connect() to e1st.smapply.org port 443 (#0)
*   Trying 72.55.140.155... connected
* Connected to e1st.smapply.org (72.55.140.155) port 443 (#0)
* Initializing NSS with certpath: sql:/etc/pki/nssdb
* warning: ignoring value of ssl.verifyhost
* NSS error -12286
* Closing connection #0
* SSL connect error
curl: (35) SSL connect error

I have seen this suggestion on the Internet to fix the system-supplied curl on a CentOS 6.8 system:

yum update -y nss curl libcurl

It didn’t work!

Rationale
I tried to give the owners of e1st.smapply.org a hard time for supporting such a limited set of ciphersuites – essentially only the latest thing (which you can see yourself by running it through sslabs.com): TLS_ECDHE_RSA_WITH_AES_256_GCM_SHA384. If I run this through SSL interception on a Symantec proxy with an older image, that ciphersuite isn’t present! I had to upgrade, then it was fine. But getting back to the rationale, they told me they have future-proofed their site for the new requirements of PCI and they would not budge.

Another curl error

curl: (3) Illegal characters found in URL

If your url looks visibly OK, mkae sure you don’t have and non-printed characters in it. Put it through the linux od -c utility. In my case I culled the url from a Location header after parsing it with awk. Unbeknownst to me, tagging along at the end, unseen, was an extra \n\r characters. I had to get rid of those.

Conclusion
A TLS version error is explained, as well as the way it came about. Another curl/SSL error is also explained.

References and related
I eventually came up with the solution: compile my own updated version of curl! I describe how I did it in this blog post.

A more recent TLS versioning problem which I could have only resolved by using curl is described in this post.

Categories
Network Technologies

Obscure curl error explained – partially

Intro
Are you, like me, vexed by this curl error:

curl: (51) SSL peer certificate or SSH remote key was not OK

?

More details
I have many Linux systems from which to test. But I can only produce this error on some of them. It’s rather strange. I know most of the conditions which create this problem, but not all of them.

As you will see elsewhere on the Internet the error is in general produced by a DNS name/URL mismatch. The funny thing is that I always use the -k switch when running curl. This particular error occurred on some systems even with the -k switch! Now trhat’s noteworthy.

Circumstances which lead to the error

hostname in url does not match name in the certificate, e.g.,

curl -i -k https://vmanswer.com/

For me I only see the error on an older SLES 11 SP2 system. But I’m not sure how significant that is.

Additional debug info can be gleaned by adding the -v switch.

Circumstances which will not produce this error

If the URL hostname and the name on the certificate match, all is good.
If the URL uses an IP rather than a hostname all is good.
Perhaps certain implementations of curl and/or openssl will never produce this error as long as the -k switch is used??

Conclusion
The curl error curl: (51) SSL peer certificate or SSH remote key was not OK has been slightly better explained. It’s generally a hostname/certificate name mismatch and it only occurs on some curl versions.

Categories
DNS Linux Perl Raspberry Pi Web Site Technologies

Roll your own domain drop catching service using GoDaddy

Intro
I’m after a particular domain and have been for years. But as a matter of pride I don’t want to overpay for it, so I don’t want to go through an auction. There are services that can help grab a DNS domain immediately after it expires, but they all want $$. That may make sense for high-demand domains. Mine is pretty obscure. I want to grab it quickly – perhaps within a few seconds after it becomes available, but I don’t expect any competition for it. That is a description of domain drop catching.

Since I am already using GoDaddy as my registrar I thought I’d see if they have a domain catching service. They don’t which is strange because they have other specialized domain services such as domain broker. They have a service which is designed for much the same purpose, however, called backorder. That creates an auction bid for the domain before it has expired. The cost isn’t too bad, but since I started down a different path I will roll my own. Perhaps they have an API which can be used to create my own domain catcher? It turns out they do!

It involves understanding how to read a JSON data file, which is new to me, but otherwise it’s not too bad.

The domain lifecycle
This graphic from ICANN illustrates it perfectly for your typical global top-level domain such as .com, .net, etc:
gtld-lifecycle

To put it into words, there is the
initial registration,
optional renewals,
expiration date,
auto-renew grace period of 0 – 45 days,
redemption grace period of 30 days,
pending delete of 5 days, and then
it’s released and available.

So in domain drop catching we are keenly interested in being fully prepared for the pending delete five day window. From an old discussion I’ve read that the precise time .com domains are released is usually between 2 -3 PM EST.

A word about the GoDaddy developer site
It’s developer.godaddy.com. It looks like one day it will be a great site, but for now it is wanting in some areas. Most of the menu items are duds and are placeholders. Really there are only three (mostly) working sections: get started, documentation and demo. Get started is only a few words and one slender snippet of Ajax code, and the demo itself also extremely limited, so the only real resource they provide is Documentation. Documentation is designed as an active documentation that you can try out functions with your data. You run it and it shows you all the needed request headers and data as well as the received response. The thing is that it’s very finicky. It’s supposed to show all the available functions but I couldn’t get it to work under Firefox. And with Internet Explorer/Edge it only worked about half the time. It seems to help to access it with a newly launched browser. The documentation, as good as it is, leaves some things unsaid. I have found:

https://api.ote-godaddy.com/ – use for TEST. Maybe ote stands for optional test environment?
https://api.godaddy.com/ – for production (what I am calling PROD)

The TEST environment does not require authentication for some things that PROD does. This shell script for checking available domains, which I call available-test.sh, works in TEST but not in PROD:

#!/bin/sh
# pass domain as argument
# apparently no AUTH is rquired for this one
curl -k 'https://api.ote-godaddy.com/v1/domains/available?domain='$1'&amp;checkType=FAST&amp;forTransfer=false'

In PROD I had to insert the authorization information – the key and secret they showed me on the screen. I call this script available.sh.

#!/bin/sh
# pass domain as argument
curl -s -k -H 'Authorization: sso-key *******8m_PwFAffjiNmiCUrKe******:**FF73L********' 'https://api.godaddy.com/v1/domains/available?domain='$1'&amp;checkType=FULL&amp;forTransfer=false'

I found that my expiring domain produced different results about five days after expiring if I used checkType of FAST versus checkType of FULL – and FAST was wrong. So I learned you have to use FULL to get an answer you can trust!

Example usage of an available domain

$ ./available.sh dr-johnstechtalk.com

{"available":true,"domain":"dr-johnstechtalk.com","definitive":false,"price":11990000,"currency":"USD","period":1}

2nd example – a non-available domain
$ ./available.sh drjohnstechtalk.com

{"available":false,"domain":"drjohnstechtalk.com","definitive":true,"price":11990000,"currency":"USD","period":1}

Example JSON file
I had to do a lot of search and replace to preserve my anonymity, but I feel this post wouldn’t be complete without showing the real contents of my JSON file I am using for both validate, and, hopefully, as the basis for my API-driven domain purchase:

{
  "domain": "dr-johnstechtalk.com",
  "renewAuto": true,
  "privacy": false,
  "nameServers": [
  ],
  "consent": {
    "agreementKeys": ["DNRA"],
    "agreedBy": "50.17.188.196",
    "agreedAt": "2016-09-29T16:00:00Z"
  },
  "period": 1,
  "contactAdmin": {
    "nameFirst": "Dr","nameLast": "John",
    "email": "[email protected]",
    "addressMailing": {
      "address1": "555 Piney Drive",
      "city": "Smallville","state": "New Jersey","postalCode": "55555",
      "country": "US"
    },
    "phone": "+1.5555551212"
  },
  "contactBilling": {
    "nameFirst": "Dr","nameLast": "John",
    "email": "[email protected]",
    "addressMailing": {
      "address1": "555 Piney Drive",
      "city": "Smallville","state": "New Jersey","postalCode": "55555",
      "country": "US"
    },
    "phone": "+1.5555551212"
  },
  "contactRegistrant": {
    "nameFirst": "Dr","nameLast": "John",
    "email": "[email protected]",
    "phone": "+1.5555551212",
    "addressMailing": {
      "address1": "555 Piney Drive",
      "city": "Smallville","state": "New Jersey","postalCode": "55555",
      "country": "US"
    }
  },
  "contactTech": {
    "nameFirst": "Dr","nameLast": "John",
    "email": "[email protected]",
    "phone": "+1.5555551212",
    "addressMailing": {
      "address1": "555 Piney Drive",
      "city": "Smallville","state": "New Jersey","postalCode": "55555",
      "country": "US"
    }
  }
}

Note the agreementkeys value: DNRA. GoDaddy doesn’t document this very well, but that is what you need to put there! Note also that the nameservers are left empty. I asked GoDaddy and that is what they advised to do. The other values are pretty much what you’d expect. I used my own server’s IP address for agreedBy – use your own IP. I don’t know how important it is to get the agreedAt date close to the current time. I’m going to assume it should be within 24 hours of the current time.

How do we test this JSON input file? I wrote a validate script for that I call validate.sh.

#!/bin/sh
# DrJ 9/2016
# godaddy-json-register was built using GoDaddy's documentation at https://developer.godaddy.com/doc#!/_v1_domains/validate
jsondata=`tr -d '\n' &lt; godaddy-json-register`
 
curl -i -k -H 'Authorization: sso-key *******8m_PwFAffjiNmiCUrKe******:**FF73L********' -H 'Content-Type: application/json' -H 'Accept: application/json' -d "$jsondata" https://api.godaddy.com/v1/domains/purchase/validate

Run the validate script
$ ./validate.sh

HTTP/1.1 100 Continue
 
HTTP/1.1 100 Continue
Via: 1.1 api.godaddy.com
 
HTTP/1.1 200 OK
Date: Thu, 29 Sep 2016 20:11:33 GMT
X-Powered-By: Express
Vary: Origin,Accept-Encoding
Access-Control-Allow-Credentials: true
Content-Type: application/json; charset=utf-8
ETag: W/"2-mZFLkyvTelC5g8XnyQrpOw"
Via: 1.1 api.godaddy.com
Transfer-Encoding: chunked

Revised versions of the above scripts
So we can pass the domain name as argument I revised all the scripts. Also, I provide an agreeddAt date which is current.

The data file: godaddy-json-register

{
  "domain": "DOMAIN",
  "renewAuto": true,
  "privacy": false,
  "nameServers": [
  ],
  "consent": {
    "agreementKeys": ["DNRA"],
    "agreedBy": "50.17.188.196",
    "agreedAt": "DATE"
  },
  "period": 1,
  "contactAdmin": {
    "nameFirst": "Dr","nameLast": "John",
    "email": "[email protected]",
    "addressMailing": {
      "address1": "555 Piney Drive",
      "city": "Smallville","state": "New Jersey","postalCode": "55555",
      "country": "US"
    },
    "phone": "+1.5555551212"
  },
  "contactBilling": {
    "nameFirst": "Dr","nameLast": "John",
    "email": "[email protected]",
    "addressMailing": {
      "address1": "555 Piney Drive",
      "city": "Smallville","state": "New Jersey","postalCode": "55555",
      "country": "US"
    },
    "phone": "+1.5555551212"
  },
  "contactRegistrant": {
    "nameFirst": "Dr","nameLast": "John",
    "email": "[email protected]",
    "phone": "+1.5555551212",
    "addressMailing": {
      "address1": "555 Piney Drive",
      "city": "Smallville","state": "New Jersey","postalCode": "55555",
      "country": "US"
    }
  },
  "contactTech": {
    "nameFirst": "Dr","nameLast": "John",
    "email": "[email protected]",
    "phone": "+1.5555551212",
    "addressMailing": {
      "address1": "555 Piney Drive",
      "city": "Smallville","state": "New Jersey","postalCode": "55555",
      "country": "US"
    }
  }
}

validate.sh

#!/bin/sh
# DrJ 10/2016
# godaddy-json-register was built using GoDaddy's documentation at https://developer.godaddy.com/doc#!/_v1_domains/validate
# pass domain as argument
# get date into accepted format
domain=$1
date=`date -u --rfc-3339=seconds|sed 's/ /T/'|sed 's/+.*/Z/'`
jsondata=`tr -d '\n' &lt; godaddy-json-register`
jsondata=`echo $jsondata|sed 's/DATE/'$date'/'`
jsondata=`echo $jsondata|sed 's/DOMAIN/'$domain'/'`
#echo date is $date
#echo jsondata is $jsondata
curl -i -k -H 'Authorization: sso-key *******8m_PwFAffjiNmiCUrKe******:**FF73L********' -H 'Content-Type: application/json' -H 'Accept: application/json' -d "$jsondata" https://api.godaddy.com/v1/domains/purchase/validate

available.sh
No change. See listing above.

purchase.sh
Exact same as validate.sh, with just a slightly different URL. I need to test that it really works, but based on my reading I think it will.

#!/bin/sh
# DrJ 10/2016
# godaddy-json-register was built using GoDaddy's documentation at https://developer.godaddy.com/doc#!/_v1_domains/purchase
# pass domain as argument
# get date into accepted format
domain=$1
date=`date -u --rfc-3339=seconds|sed 's/ /T/'|sed 's/+.*/Z/'`
jsondata=`tr -d '\n' &lt; godaddy-json-register`
jsondata=`echo $jsondata|sed 's/DATE/'$date'/'`
jsondata=`echo $jsondata|sed 's/DOMAIN/'$domain'/'`
#echo date is $date
#echo jsondata is $jsondata
curl -s -i -k -H 'Authorization: sso-key *******8m_PwFAffjiNmiCUrKe******:**FF73L********' -H 'Content-Type: application/json' -H 'Accept: application/json' -d "$jsondata" https://api.godaddy.com/v1/domains/purchase

Putting it all together
Here’s a looping script I call loop.pl. I switched to perl because it’s easier to do certain control operations.

#!/usr/bin/perl
#DrJ 10/2016
$DEBUG = 0;
$status = 0;
open STDOUT, '&gt;', "loop.log" or die "Can't redirect STDOUT: $!";
                   open STDERR, "&gt;&amp;STDOUT"     or die "Can't dup STDOUT: $!";
 
                   select STDERR; $| = 1;      # make unbuffered
                   select STDOUT; $| = 1;      # make unbuffered
# edit this and change to your about-to-expire domain
$domain = "dr-johnstechtalk.com";
while ($status != 200) {
# show that we're alive and working...
  print "Now it's ".`date` if $i++ % 10 == 0;
  $hr = `date +%H`;
  chomp($hr);
# run loop more aggressively during times of day we think Network Solutions releases domains back to the pool, esp. around 2 - 3 PM EST
  $sleep = $hr &gt; 11 &amp;&amp; $hr &lt; 16 ? 1 : 15;
  print "Hr,sleep: $hr,$sleep\n" if $DEBUG;
  $availRes = `./available.sh $domain`;
# {"available":true,"domain":"dr-johnstechtalk.com","definitive":false,"price":11990000,"currency":"USD","period":1}
  print "$availRes\n" if $DEBUG;
  ($available) = $availRes =~ /^\{"available":([^,]+),/;
  print "$available\n" if $DEBUG;
  if ($available eq "false") {
    print "test comparison OP for false result\n" if $DEBUG;
  } elsif ($available eq "true") {
# available value of true is extremely unreliable with many false positives. Confirm availability by making a 2nd call
    print "available.sh results: $availRes\n";
    $availRes = `./available.sh $domain`;
    print "available.sh re-test results: $availRes\n";
    ($available2) = $availRes =~ /^\{"available":([^,]+),/;
    next if $available2 eq "false";
# We got two available eq true results in a row so let's try to buy it!
    print "$domain is very likely available. Trying to buy it at ".`date`;
    open(BUY,"./purchase.sh $domain|") || die "Cannot run ./purchase.pl $domain!!\n";
    while() {
# print out each line so we can analyze what happened
      print ;
# we got it if we got back
# HTTP/1.1 200 OK
      if (/1.1 200 OK/) {
        print "We just bought $domain at ".`date`;
        $status = 200;
     }
    } # end of loop over results of purchase
    close(BUY);
    print "\n";
    exit if $status == 200;
  } else {
    print "available is neither false nor true: $available\n";
  }
  sleep($sleep);
}

Running the loop script
$ nohup ./loop.pl > loop.log 2>&1 &
Stopping the loop script
$ kill ‐9 %1

Description of loop.pl
I gotta say this loop script started out as a much simpler script. I fortunately started on it many days before my desired domain actually became available so I got to see and work out all the bugs. Contributing to the problem is that GoDaddy’s API results are quite unreliable. I was seeing a lot of false positives – almost 20%. So I decided to require two consecutive calls to available.sh to return true. I could have required available true and definitive true, but I’m afraid that will make me late to the party. The API is not documented to that level of detail so there’s no help there. But so far what I have seen is that when available incorrectly returns true, simultaneously definitive becomes false, whereas all other times definitive is true.

Results of running an earlier and simpler version of loop.pl

This shows all manner of false positives. But at least it never allowed me to buy the domain when it wasn’t available.

Now it's Wed Oct  5 15:20:01 EDT 2016
Now it's Wed Oct  5 15:20:19 EDT 2016
Now it's Wed Oct  5 15:20:38 EDT 2016
available.sh results: {"available":true,"domain":"dr-johnstechtalk.com","definitive":false,"price":11990000,"currency":"USD","period":1}
dr-johnstechtalk.com is available. Trying to buy it at Wed Oct  5 15:20:46 EDT 2016
HTTP/1.1 100 Continue
 
HTTP/1.1 100 Continue
Via: 1.1 api.godaddy.com
 
HTTP/1.1 422 Unprocessable Entity
Date: Wed, 05 Oct 2016 19:20:47 GMT
X-Powered-By: Express
Vary: Origin,Accept-Encoding
Access-Control-Allow-Credentials: true
Content-Type: application/json; charset=utf-8
ETag: W/"7d-O5Dw3WvJGo8h30TqR7j8zg"
Via: 1.1 api.godaddy.com
Transfer-Encoding: chunked
 
{"code":"UNAVAILABLE_DOMAIN","message":"The specified `domain` (dr-johnstechtalk.com) isn't available for purchase","name":"ApiError"}
Now it's Wed Oct  5 15:20:58 EDT 2016
Now it's Wed Oct  5 15:21:16 EDT 2016
Now it's Wed Oct  5 15:21:33 EDT 2016
available.sh results: {"available":true,"domain":"dr-johnstechtalk.com","definitive":false,"price":11990000,"currency":"USD","period":1}
dr-johnstechtalk.com is available. Trying to buy it at Wed Oct  5 15:21:34 EDT 2016
HTTP/1.1 100 Continue
 
HTTP/1.1 100 Continue
Via: 1.1 api.godaddy.com
 
HTTP/1.1 422 Unprocessable Entity
Date: Wed, 05 Oct 2016 19:21:36 GMT
X-Powered-By: Express
Vary: Origin,Accept-Encoding
Access-Control-Allow-Credentials: true
Content-Type: application/json; charset=utf-8
ETag: W/"7d-O5Dw3WvJGo8h30TqR7j8zg"
Via: 1.1 api.godaddy.com
Transfer-Encoding: chunked
 
{"code":"UNAVAILABLE_DOMAIN","message":"The specified `domain` (dr-johnstechtalk.com) isn't available for purchase","name":"ApiError"}
Now it's Wed Oct  5 15:21:55 EDT 2016
Now it's Wed Oct  5 15:22:12 EDT 2016
Now it's Wed Oct  5 15:22:30 EDT 2016
available.sh results: {"available":true,"domain":"dr-johnstechtalk.com","definitive":false,"price":11990000,"currency":"USD","period":1}
dr-johnstechtalk.com is available. Trying to buy it at Wed Oct  5 15:22:30 EDT 2016
...

These results show why i had to further refine the script to reduce the frequent false positives.

Review
What have we done? Our looping script, loop.pl, loops more aggressively during the time of day we think Network Solutions releases expired .com domains (around 2 PM EST). But just in case we’re wrong about that we’ll run it anyway at all hours of the day, but just not as quickly. So during the aggressive period we sleep just one second between calls to available.sh. When the domain finally does become available we call purchase.sh on it and exit and we write some timestamps and the domain we’ve just registered to our log file.

Performance
Miserable. This API seems tuned for relative ease-of-use, not speed. The validate call often takes, oh, say 40 seconds to return! I’m sure the purchase call will be no different. For a domainer that’s a lifetime. So any strategy that relies on speed had better turn to a registrar that’s tuned for it. GoDaddy I think is more aiming at resellers of their services.

Don’t have a linux environment handy?
Of course I’m using my own Amazon AWS server for this, but that needn’t be a barrier to entry. I could have used one of my Raspberry Pi’s. Probably even Cygwin on a Windows PC could be made to work.

Appendix A
How to remove all newline characters from your JSON file

Let’s say you have a nice JSON file which was created for you from the Documentation exercises called godaddy-json-register. It will contain lots of newline (“\n”) characters, assuming you’re using a Linux server. Remove them and put the output into a file called compact-json:

$ tr ‐d ‘\n'<godaddy‐json‐register>compact‐json

I like this because then I can still use curl rather than wget to make my API calls.

Appendix B
What an expiring domain looks like in whois

Run this from a linux server
$ whois <expiring‐domain.com>

Domain Name: expiring-domain.com
...
Creation Date: 2010-09-28T15:55:56Z
Registrar Registration Expiration Date: 2016-09-27T21:00:00Z
...
Domain Status: clientDeleteHold
Domain Status: clientDeleteProhibited
Domain Status: clientTransferProhibited
...

You see that Domain Status: clientDeleteHold? You don’t get that for regular domains whose registration is still good. They’ll usually have the two lines I show below that, but not that one. This is shown for my desired domain just a few days after its official expiration date.

2020 update

Four years later, still hunting for that domain – I am very patient! So I dusted off the program described here. Suprisingly, it all still works. Except maybe the JSON file. The onlything wrong with that was the lack of nameservers. I added some random GoDaddy nameservers and it seemed all good.

Conclusion
We show that GoDaddy’s API works and we provide simple scripts which can automate what is known as domain dropcatching. This approach should attempt to register a domain within a cople seconds of its being released – if we’ve done everything right. The GoDaddy API results are a little unstable however.

References and related
If you don’t mind paying, Fabulous.com has a domain drop catching service.
ICANN’s web site with the domain lifecycle infographic.
GoDaddy’s API documentation: http://developer.godaddy.com/
More about Raspberry Pi: http://raspberrypi.org/
I really wouldn’t bother with Cygwin – just get your hands on real Linux environment.
Curious about some of the curl options I used? Just run curl ‐‐help. I left out the description of the switches I use because it didn’t fit into the narrative.
Something about my Amazon AWS experience from some years ago.
All the perl tricks I used would take another blog post to explain. It’s just stuff I learned over the years so it didn’t take much time at all.
People who buy and sell domains for a living are called domainers. They are professionals and my guide will not make you competitive with them.

Categories
Network Technologies Security

Internet Explorer can’t access https page – maybe a client CERT is needed?

Intro
I don’t see such issues often, but today two came to my attention. Both are quasi-government sites. Here’s an example of what you see when testing with your browser if it’s Internet Explorer:

Vague error displayed by Internet Explorer when site requires a client certificate

The details
Just for the fun of it, I accessed the home page https://tf.buzonfiscal.com/ and got a 200 OK page.

I learned some more about curl and found that it can tell you what is going on.

$ curl ‐vv ‐i ‐k https://tf.buzonfiscal.com/

* About to connect() to tf.buzonfiscal.com port 443 (#0)
*   Trying 23.253.28.70... connected
* Connected to tf.buzonfiscal.com (23.253.28.70) port 443 (#0)
* successfully set certificate verify locations:
*   CAfile: none
  CApath: /etc/ssl/certs/
* SSLv3, TLS handshake, Client hello (1):
* SSLv3, TLS handshake, Server hello (2):
* SSLv3, TLS handshake, CERT (11):
* SSLv3, TLS handshake, Server key exchange (12):
* SSLv3, TLS handshake, Server finished (14):
* SSLv3, TLS handshake, Client key exchange (16):
* SSLv3, TLS change cipher, Client hello (1):
* SSLv3, TLS handshake, Finished (20):
* SSLv3, TLS change cipher, Client hello (1):
* SSLv3, TLS handshake, Finished (20):
* SSL connection using DHE-RSA-AES256-SHA
* Server certificate:
*        subject: C=MX; ST=Nuevo Leon; L=Monterrey; O=Diverza informacion y Analisis  SAPI de CV; CN=*.buzonfiscal.com
*        start date: 2016-07-07 00:00:00 GMT
*        expire date: 2018-07-07 23:59:59 GMT
*        subjectAltName: tf.buzonfiscal.com matched
*        issuer: C=US; O=thawte, Inc.; CN=thawte SSL CA - G2
*        SSL certificate verify ok.
> GET / HTTP/1.1
> User-Agent: curl/7.19.7 (x86_64-suse-linux-gnu) libcurl/7.19.7 OpenSSL/0.9.8j zlib/1.2.3 libidn/1.10
> Host: tf.buzonfiscal.com
> Accept: */*
>
< HTTP/1.1 200 OK
HTTP/1.1 200 OK
< Date: Fri, 22 Jul 2016 15:50:44 GMT
Date: Fri, 22 Jul 2016 15:50:44 GMT
< Server: Apache/2.2.4 (Win32) mod_ssl/2.2.4 OpenSSL/0.9.8e mod_jk/1.2.37
Server: Apache/2.2.4 (Win32) mod_ssl/2.2.4 OpenSSL/0.9.8e mod_jk/1.2.37
< Accept-Ranges: bytes
Accept-Ranges: bytes
< Content-Length: 23
Content-Length: 23
< Content-Type: text/html
Content-Type: text/html
 
<
<html>
200 OK
* Connection #0 to host tf.buzonfiscal.com left intact
* Closing connection #0
* SSLv3, TLS alert, Client hello (1):

Now look at the difference when we access the page with the problem.

$ curl ‐vv ‐i ‐k https://tf.buzonfiscal.com/timbrado

* About to connect() to tf.buzonfiscal.com port 443 (#0)
*   Trying 23.253.28.70... connected
* Connected to tf.buzonfiscal.com (23.253.28.70) port 443 (#0)
* successfully set certificate verify locations:
*   CAfile: none
  CApath: /etc/ssl/certs/
* SSLv3, TLS handshake, Client hello (1):
* SSLv3, TLS handshake, Server hello (2):
* SSLv3, TLS handshake, CERT (11):
* SSLv3, TLS handshake, Server key exchange (12):
* SSLv3, TLS handshake, Server finished (14):
* SSLv3, TLS handshake, Client key exchange (16):
* SSLv3, TLS change cipher, Client hello (1):
* SSLv3, TLS handshake, Finished (20):
* SSLv3, TLS change cipher, Client hello (1):
* SSLv3, TLS handshake, Finished (20):
* SSL connection using DHE-RSA-AES256-SHA
* Server certificate:
*        subject: C=MX; ST=Nuevo Leon; L=Monterrey; O=Diverza informacion y Analisis  SAPI de CV; CN=*.buzonfiscal.com
*        start date: 2016-07-07 00:00:00 GMT
*        expire date: 2018-07-07 23:59:59 GMT
*        subjectAltName: tf.buzonfiscal.com matched
*        issuer: C=US; O=thawte, Inc.; CN=thawte SSL CA - G2
*        SSL certificate verify ok.
> GET /timbrado HTTP/1.1
> User-Agent: curl/7.19.7 (x86_64-suse-linux-gnu) libcurl/7.19.7 OpenSSL/0.9.8j zlib/1.2.3 libidn/1.10
> Host: tf.buzonfiscal.com
> Accept: */*
>
* SSLv3, TLS handshake, Hello request (0):
* SSLv3, TLS handshake, Client hello (1):
* SSLv3, TLS handshake, Server hello (2):
* SSLv3, TLS handshake, CERT (11):
* SSLv3, TLS handshake, Server key exchange (12):
* SSLv3, TLS handshake, Request CERT (13):
* SSLv3, TLS handshake, Server finished (14):
* SSLv3, TLS handshake, CERT (11):
* SSLv3, TLS handshake, Client key exchange (16):
* SSLv3, TLS change cipher, Client hello (1):
* SSLv3, TLS handshake, Finished (20):
* SSLv3, TLS alert, Server hello (2):
* SSL read: error:14094410:SSL routines:SSL3_READ_BYTES:sslv3 alert handshake failure, errno 0
* Empty reply from server
* Connection #0 to host tf.buzonfiscal.com left intact
curl: (52) SSL read: error:14094410:SSL routines:SSL3_READ_BYTES:sslv3 alert handshake failure, errno 0
* Closing connection #0

There is this line that we didn’t have before, which comes immediately after the server has received the GET request:

SSLv3, TLS handshake, Hello request (0):

I think that is the server requesting a certificate from the client (sometimes known as a digital ID). You don’t see that often but in government web sites I guess it happens, especially in Latin America.

Lessons learned
I eventually have learned after all these years that the ‐vv switch in curl gives helpful information for debugging purposes like we need here.

I had naively assumed that if a site requires a client certificate it would require it for all pages. These two examples belie that assumption. Depedning on the URI, the behaviour of curl is completely different. In other words one page requires a client certificate and the other doesn’t.

Where to get this client certificate
In my experience the web site owner normally issues you your client certificate. You can try to use a random one, self-signed etc, but that’s extremely unlikely to work since they’ve already bothered with this high level of security why wold they throw that effort away and permit a certificate that they can not verify?

Categories
Admin

The IT Detective Agency: strange ssl error explained

Intro
Fromm time-to-time I get an unusual ssl error when using curl to check one of my web sites. This post documents the error and how I recovered from it.

The details

I was bringing up a new web site on the F5 BigIP loadbalancer. It was a secure site. I typically use the F5 as an ssl acclerator so it terminates the ssl connection and makes an http connection back to the origin server.

So I tested my new site with curl:

$ curl -i -k https://secure.drj.com/

curl: (52) SSL read: error:00000000:lib(0):func(0):reason(0), errno 104

Weird, I thought. I had taken the certificate from an older F5 unit and maybe I had installed it or its private key wrong?

I tested with openssl:

$ openssl s_client -showcerts -connect secure.drj.com:443

...
SSL handshake has read 2831 bytes and written 453 bytes
---
New, TLSv1/SSLv3, Cipher is RC4-SHA
Server public key is 2048 bit
Secure Renegotiation IS NOT supported
Compression: NONE
Expansion: NONE
SSL-Session:
    Protocol  : TLSv1
    Cipher    : RC4-SHA
    Session-ID: E95AB5EA2D896D5B3A8BC82F1962FA4A68669EBEF1699DF375EEE95410EF5A0C
    Session-ID-ctx:
    Master-Key: EC5CA816BBE0955C4BC24EE198FE209BB0702FDAB4308A9DD99C1AF399A69AA19455838B02E78500040FE62A7FC417CD
    Key-Arg   : None
    Start Time: 1374679965
    Timeout   : 300 (sec)
    Verify return code: 20 (unable to get local issuer certificate)
---

This all looks pretty normal – the same as what you get from a healthy working site. So the SSL, contrary to what I was seeing from curl, seemed to be working OK.

OK, so, SSL is handled by the F5 itself we were saying. That leaves the origin server. Bingo!

In F5 you have virtual servers and pools. You configure the SSL CERTs and the public-facing IP and the pool on the virtual server. The pool is where you configure your origin server(s).

I had forgotten to associate a default pool with my virtual server! So the F5 had nowhere to go really with the request after handling the initial SSL dialog.

I don’t think the available help for this error is very good so I wanted to offer this specific example.

So I associated a pool with my virtual server and immediately the problem went away.

Case closed.

Conclusion
We solved a very specific case this week and hopefully provided some guidance to others who might be seeing this issue.

References
My favorite openssl commands