We woke up yesterday to no Internet. The usual remedies consumers go through did nothing to resolve the issue. What to do?
The details – November 25, 2020
The usual restarts or my router and the cable modem did not work. I plugged in my work laptop directly to the cable modem for some quick tests but that did not work.
I plugged my work-issued VPN router directly to the cable modem and it did not pick up an IP and re-establish the tunnel.
When I logged into my router I saw that its WAN IP was listed as 0.0.0.0, which means none at all.
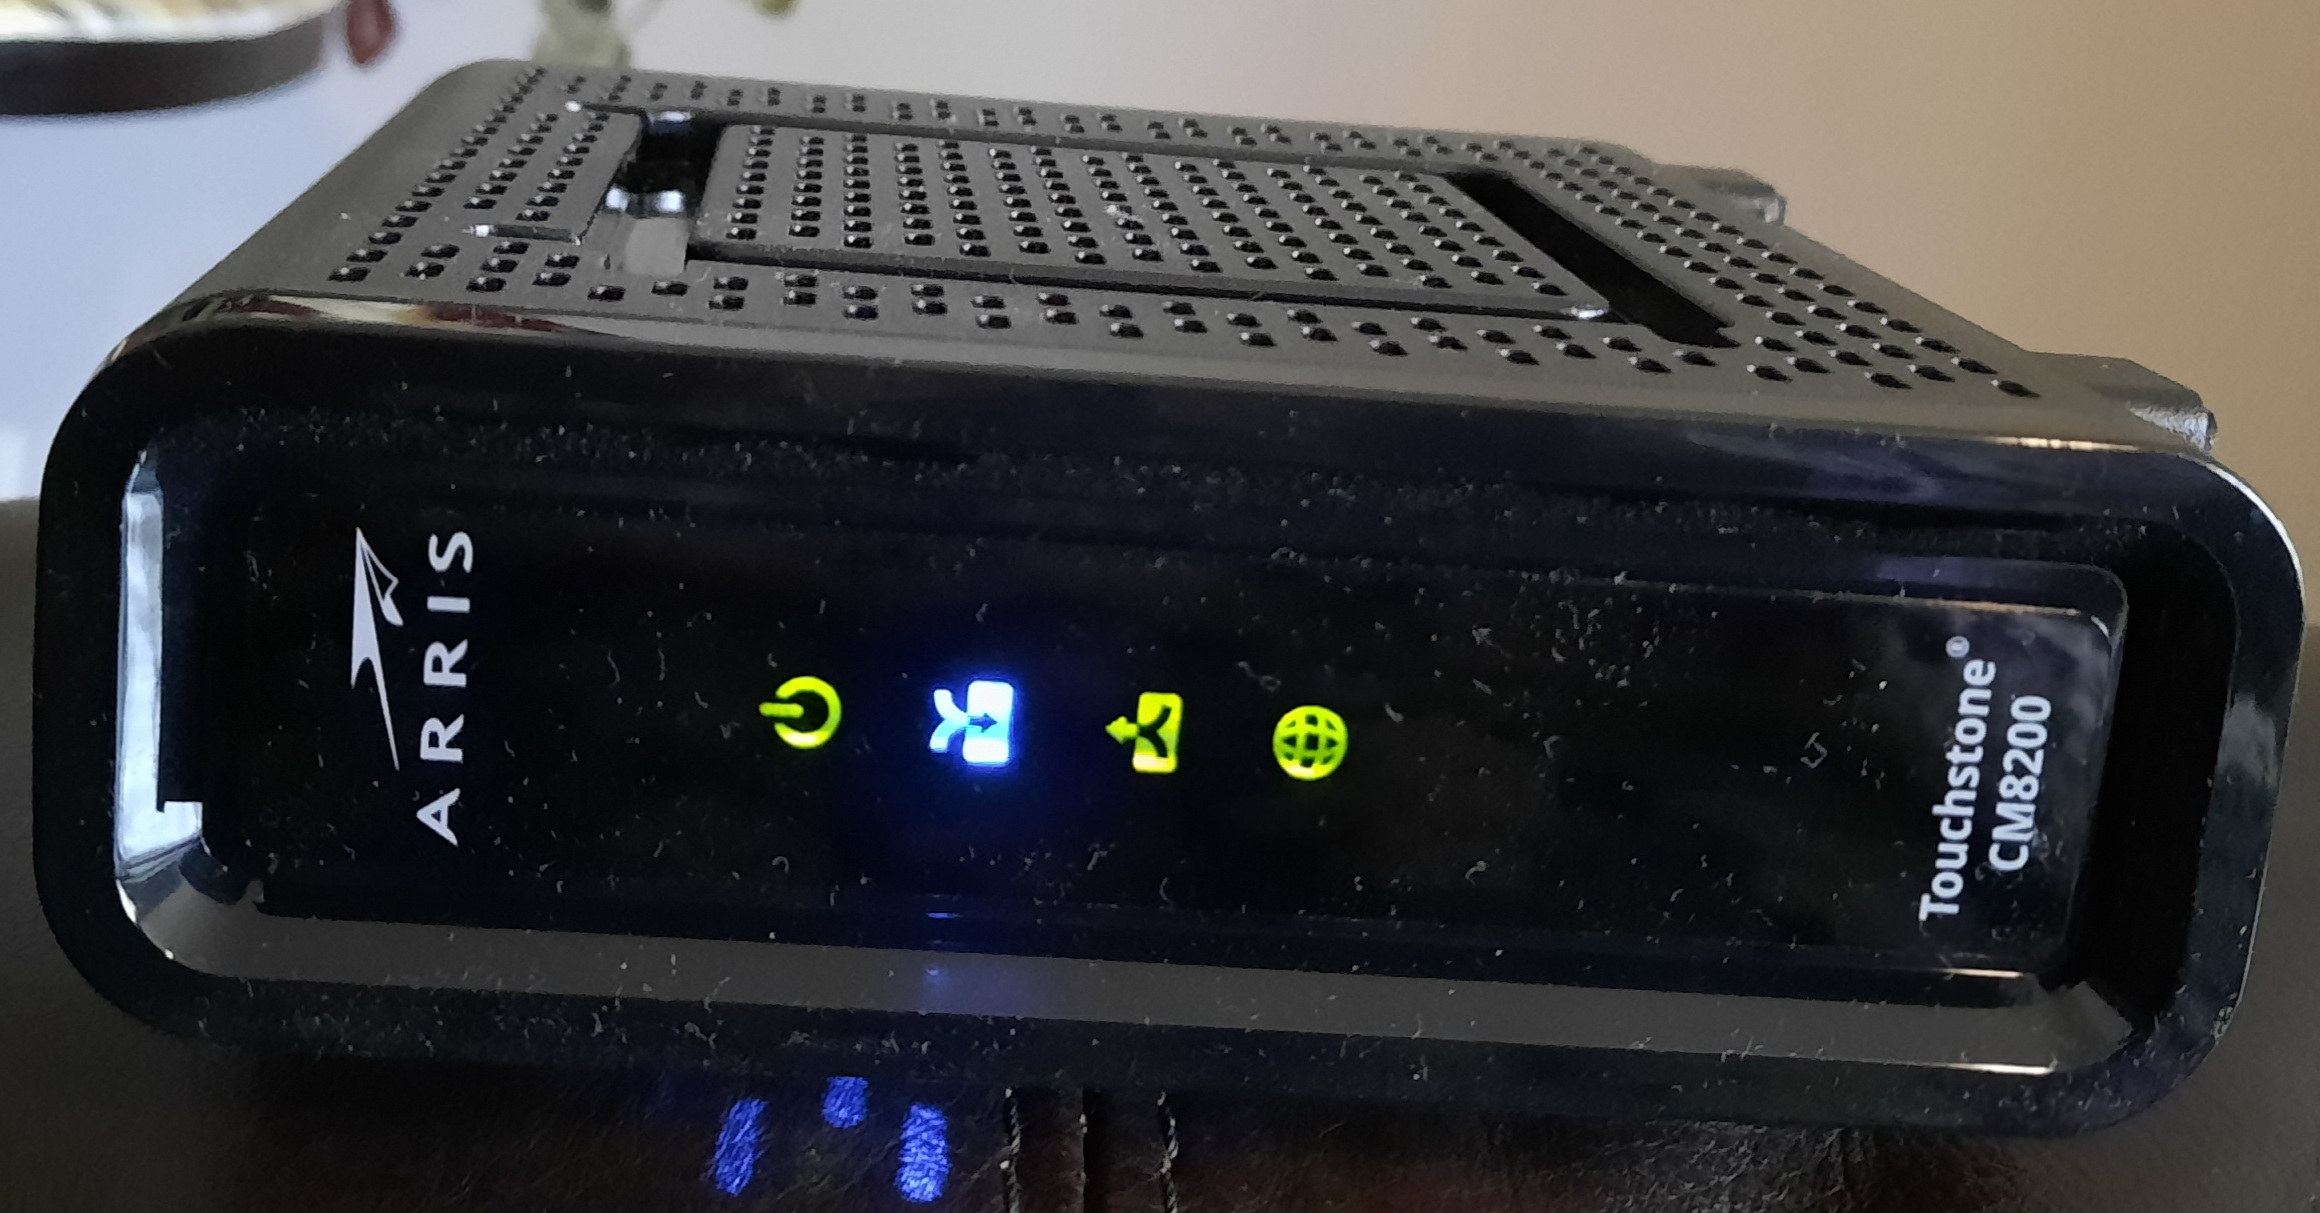
I called the ISP twice. Both time they said they could “see” my modem, and they tried to restart it on their end, but that did not seem to do anything at all, based on the constant status LEDs (see picture below). I got my service visit moved up from Dec 11th to Dec 2nd, but still that would mean a week without Internet – not so great when three people are relying on it for their work.
I rebooted the cable modem a couple times at least. Nothing changed.
Then I started some research on quickie alternatives. Ask a friend from work for a spare Cradlepoint air card? They’re already out on vacation. Get a Chinese-made unlocked hotspot with pre-purchased data? Seems fishy, and ultimately expensive. Verizon brand hotspot? We had a borrowed one. Very finicky. And no ethernet ports.
Raspberry Pi + DIY approach?
At one point in the evening, convinced I would have to wait days for for a visit from the cable guy, I rigged up a spare Raspberry Pi to act as a router between a mobile hotspot (a companion tablet to a Verizon phone) and my Linksys router. Why bother? Why not just use the hotspot directly? Mostly because it’s a pain in the rear to reprogram all those Internet of Things devices one has in ones home these days, notably the several Echo Dots, but as well, a wireless printer, a few laptops, Firesticks, tablets, etc. With this approach I keep the WiFi SSID as it was for all those devices. And, it sort of worked! At least I got one Echo Dot to work. I didn’t push my luck. This stuff consumes a lot of data, even when “idle.”
To be continued…
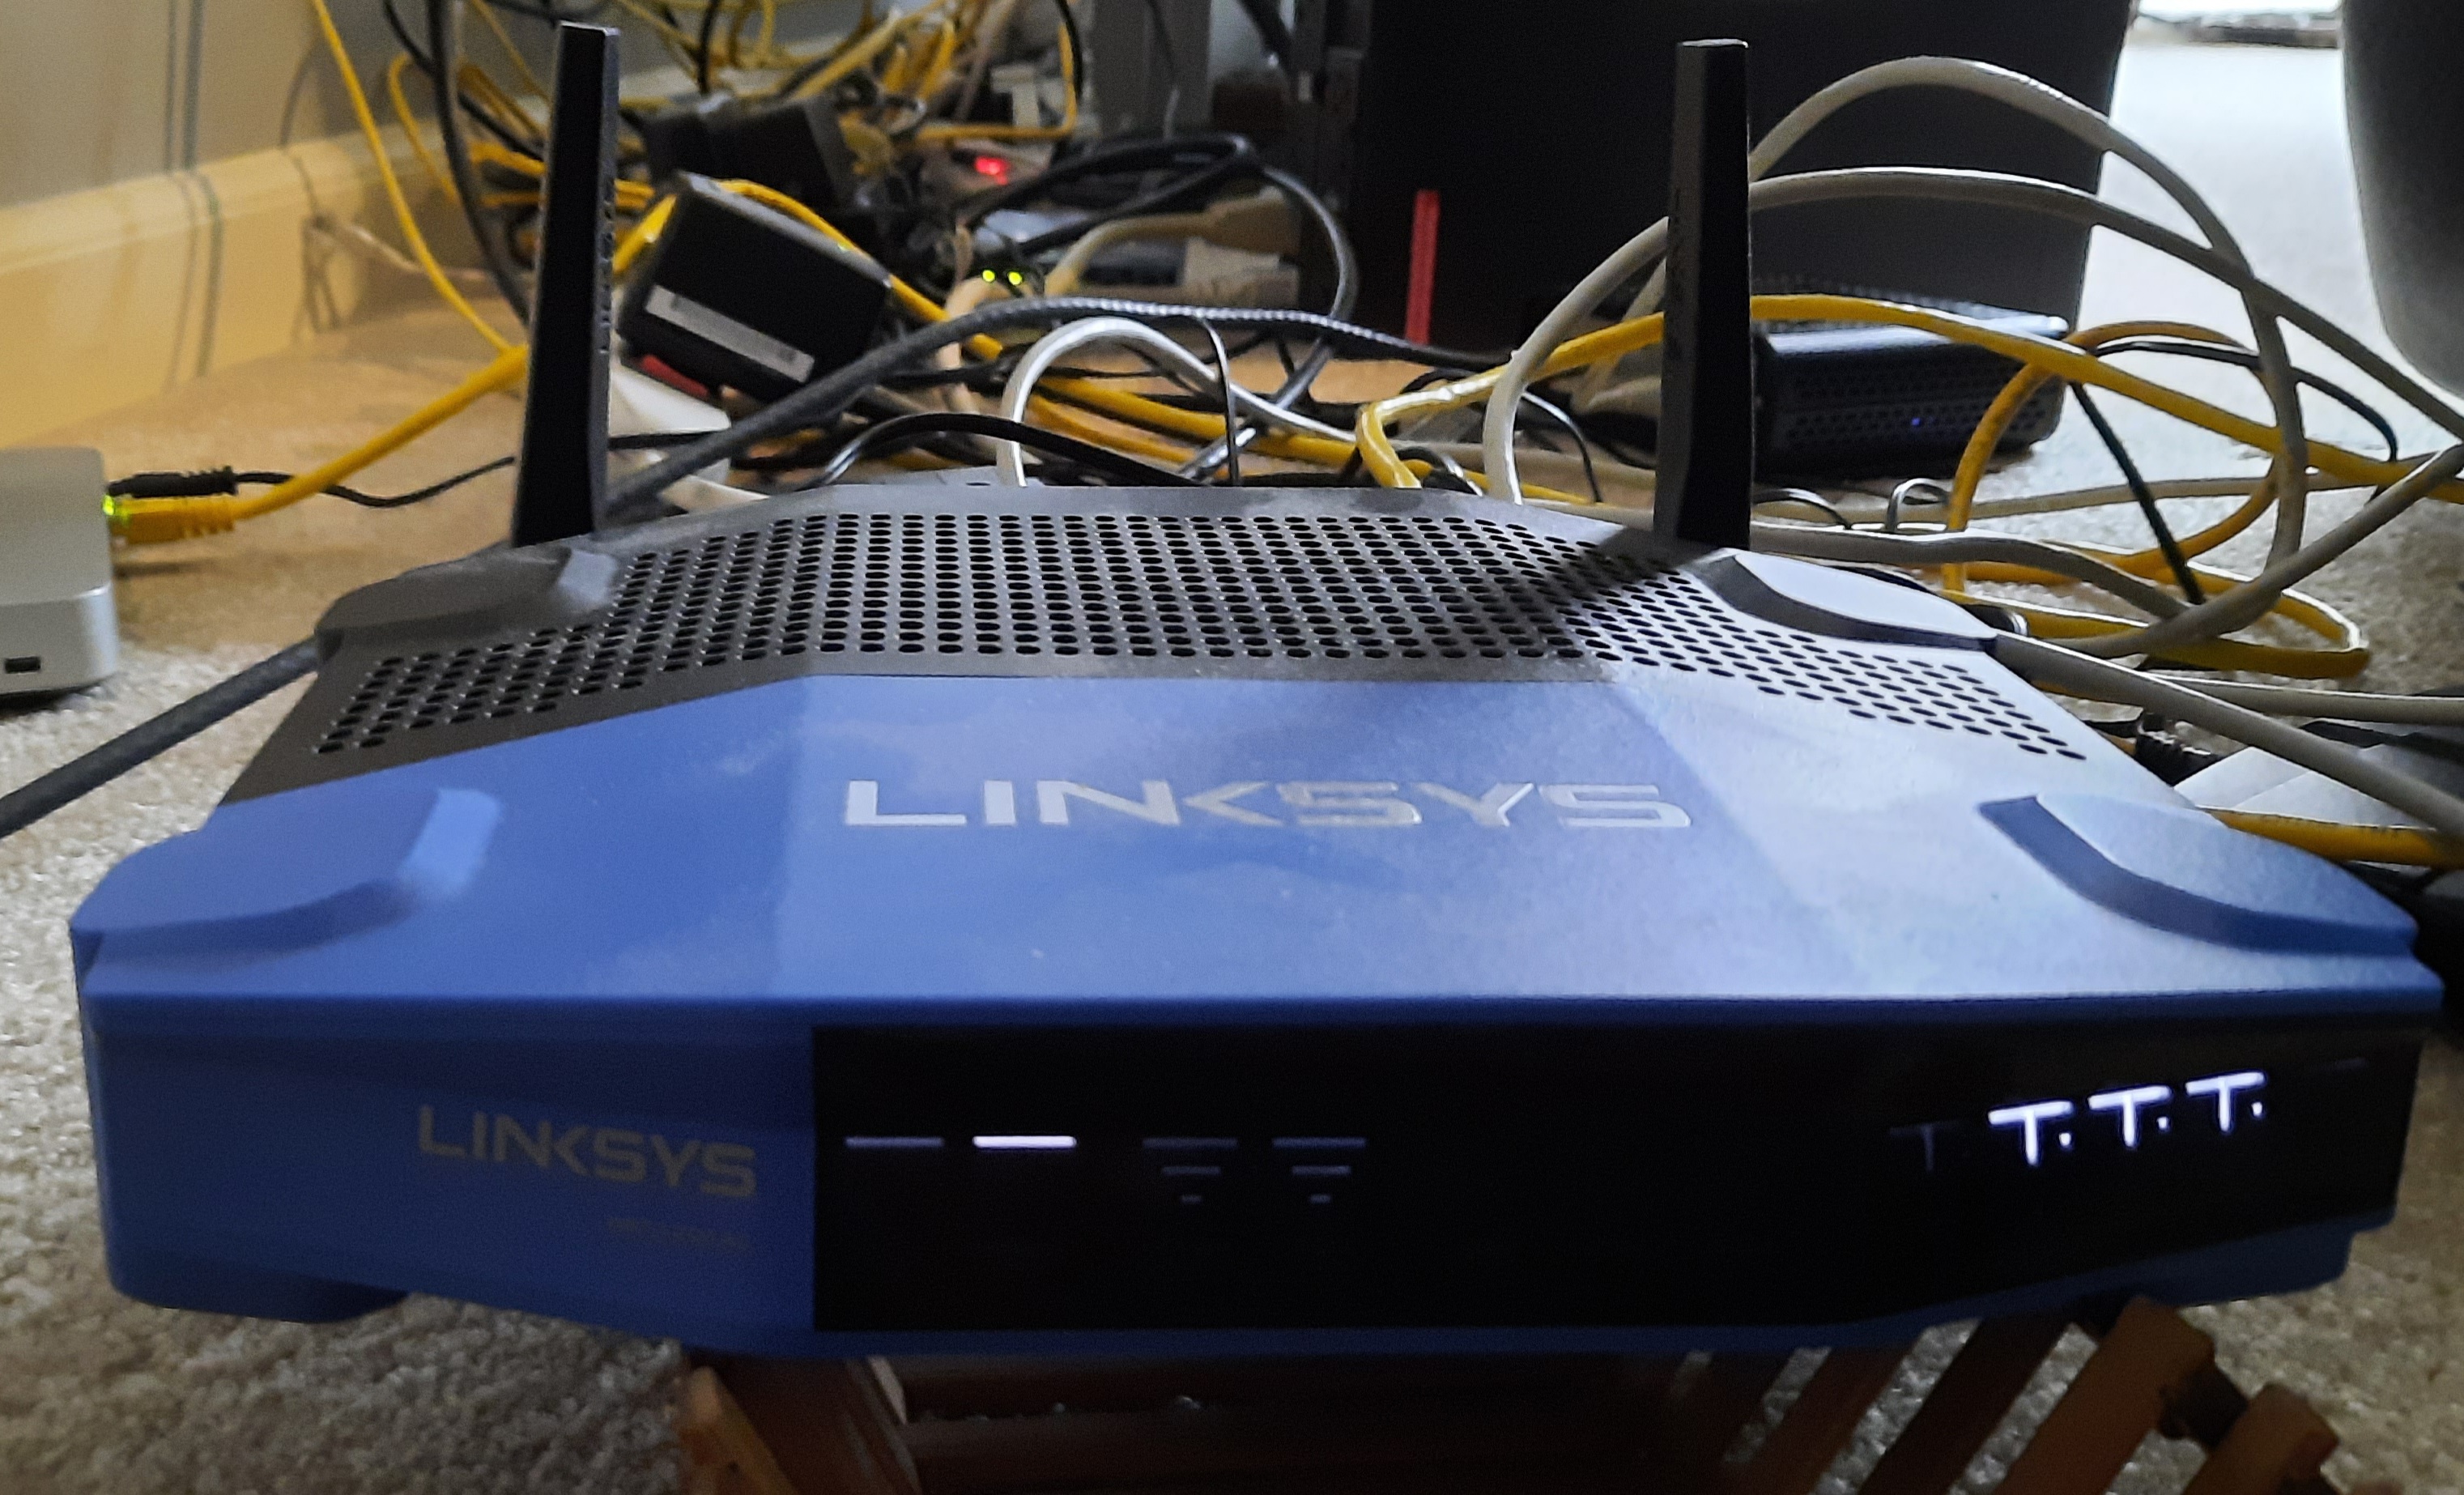
Linksys WRT1200AC status lights – when healthy!Cable Modem tatus lights – when operating normally
But I am pretty good at troubleshooting. What I know that less experienced people may not is that all the testing I’ve done to that point was not ironclad proof of failure of the cable modem. I know the traditional advice of old is to hook up a laptop directly to the ethernet port and work with it that way. Furthermore the cable company support said that my status lights were reading normally. So, when I tested my work laptop? Are you kidding? That thing has so many problems when I switch between SSIDs due to some new security software – it loves to display the Globe in the system tray, and the only recourse is to reboot. That’s what I was seeing, but notice I said a quickie test? I did not have time to do that reboot and all that. And that work-issued VPN router? I don’t know how that thing really works either. Never having set it up that way I did not trust reading too much into its results (which was essentially an orange status light instead of the usual white).
So when I had more time in the evening, I hooked up a home laptop which I know should work. After a cable modem reboot in fact I did get an IP and could surf the Internet. That was a glimmer of hope. So I put my router back in place. Still it did not pick up an WAN IP address. Still reading 0.0.0.0 for its IP.
Then I put the laptop back, writing down the IP, subnet mask and default gateway. Then I put my router back, switched its WAN mode from DHCP to fixed IP, putting on the exact IP address the laptop had picked up, with correct subnet mask and default gateway. Still it was not working. When the router is not working the WAN status light is sort of orange-ish. It’s white (pictured above) when the WAN link is communicating.
I decided the fault should lie more with my router than anywhere else, and since it wasn’t working and no number of power cycles was changing that situation, I decided that a factory reset is the thing to try. The last thing I could try. I noted the exact name and passwords of my SSIDs, held the reset button for 15 seconds until the status lights flicked out, and let it start up. It went through a start-up process, which i saw after connecting to its default IP of 192.168.1.1. It was clear it was not seeing the cable modem at the point where it should, but it had some very specific advice to try: power off cable modem, wait two minutes, power it back on, and then it would try again. And that did work! Yeah!
What may have precipitated this
My local cable company was recently bought by a much bigger company. I know for a fact what my WAN IP used to be, and I see it has changed. They now draw from a giant pool of IPs – a /14 in CIDR notation – that’s 262,000 addresses – that belongs to the new owner. So I believe the problem occurred due to a poor implementation of the dhcp protocol within my router, or a poor interplay between my router’s DHCP client and the ISP’s DHCP server. But I can’t research that line of troubleshooting because the ISP’s DHCP policies would require a lot of time-consuming experimentation on my part to reverse engineer based on observed behaviour under different conditions. And I would need an open source DHCP client – but I have the Raspberry Pi running dnsmasq for that, so that end could gather all the needed client information.
Prior to this acquisition I would tend to keep the same WAN IP for years – that’s how stable it was.
Another approach
Very germane to this topic is the fact that my neighbor down the street experienced his own Internet outage the day after I did! His solution was to buy a better cable modem. I did not know you could do that – I thought they were proprietary. He also saw his router with the 0.0.0.0 WAN address. And his approach also worked. This makes me less sure my router was really at fault – maybe Altice screwed up their DHCP service for half a day.
Conclusion
Unusual for me, I’m going to write the conclusion before writing the tedious part which is the full explanation in the middle.
By the end of the day I got the Internet working. After isolating the problem to my home router, the Linksys WRT1200AC, and determining that any amount of power cycling was not clearing things up, a factory reset did the trick! The cable modem and my cable Internet service was fine all along.
Intro The end pieces of the pergola above my deck kept blowing off. I finally lost track of them and decided to 3D print a replacement to keep my skills fresh. I will use this as an opportunity to review my process for 3D printing.
The details For people like me who don’t really know what they are doing, the kinds of objects you can 3D print is pathetically small. Yes, there are sites like thingiverse.com. But there are so many physical constraints if striking out on your own. If the extruder is pulling the filament horizontally it can only be unsupported for, I forget, 1 cm or so. That may be called a bridge. If you’re going from smaller to wider, the angle of increase cannot be greater than 45 degrees though I think 30 degrees is a safer bet. If you can want to violate either of those contraints you’ll have to include supports which you later saw away (yuck).
So those two constraints, combined, kill just about anything you’d ever want to print.
But, amazingly, my endplates could meet the criteria, if I made a slight compromise, so I went for it.
Openscad I use openscad.org’s software to make a mathematical model of the object, built up from primitive geometric shapes (cubes and cylinders, mainly). When I learned you could write a simple program to generate your figure, and see the results rendered, I was like, sign me up.
Here is my openscad code, with some extra unused stuff left over from a previous design.
STL You always make mistakes. The question is if you have the trouble-shooting skills to catch them before committing to printing… Anyway, when satisfied, render your object (F6), only then can you export to STL (stereolithography), which I guess is a universal description language.
Cura Then you need a slicer! I think that translates your shape into movements that the 3D printer needs to make to lay down the filament, layer by layer. So import your STL file into Cura.
I think I set up Cura last year. I don’t want to mess with it. And don’t start playing with your model. It’ll do funny things to it. Just save as GCode. That’s it. Cura kindly estimates how long your print will take, and how much filament it will use up.
Cura will every time propose to upgrade itself. Don’t waste your time. Just say no. If all you’re doing is using it to turn STL into GCode you don’t need the latest. Anet a8 printer It can be a royal pain to adjust the Z axis. Usually you have to adjust all four corners so that pulling a paper through gives just a little friction. The screws and assembly is so bad that you are constantly shifting between over-correcting and under-correcting. In this case I divided the problem in two because the plate was so narrow I just adjusted for the two sides, not all four corners, which is a nightmare. And I’m a little ahead of myself, but I have to say that this approach worked brilliantly.
Transfer the file to the micro SD card. Print, and enjoy! More fun is printing something with a lot of holes. The printer makes the coolest electric sounds as it quickly shuttles back and forth and to and fro. This endplate is pretty boring by comparison and mostly consists of long stretches of material.
End result
side by side
With its long flat section, the thing really adheres to the plate, unfortunately. I slightly nicked a corner prying it off with a screwdriver. But I think that beats the alternative of it not adhering to your plate. I’ve seen that once – and the printed thing just gets dragged around, which is fatal.
My piece came out a couple millimeters short in both dimensions. Still functional because of what it is, but still something I need to understand better.
Industrial design I take it for granted that the PLA I’m printing is not as strong as the original plastic, so I should compensate by making edges thicker than needed. But I have to say the thing came out quite rigid and strong. This cheap 3D printer – if you treat it right – produces some high-quality output!
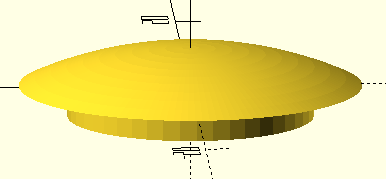
Bolt hole cover In June I decided to print a bolt hole cover, also for the pergola above my deck. Modelling was pretty easy. I used a sphere for the first time to create the curved shape of the cover. Then I had to “get rid” of the rest of the sphere so I swallowed the unwanted portion of it up with a giant cylinder.
Here’s the openscad code.
// DrJ 6/2020. Parameters in mm

  innerR=8;outerR=11;plugHeight=2;
  epsilon=0.4;upperHeight=2.5;
  sphereR=26; big=50;
  tinyR=1;
 // min facet angle and facet size (mm)
  $fa = 1.1; $fs = 1.1;


  difference() {
  translate([0,0,-(sphereR - upperHeight)]) color ([0.2, 0, 0]) sphere(r=sphereR);
  translate([0,0,-big/2]) cylinder(r=big,h=big,center=true);

  }
  translate([0,0,-plugHeight/2]) cylinder(r=innerR,h=plugHeight, center=true);
Bolt hole cover
I installed Cura v. 3.2.1 to make sure I had a version with support for supports, ha, ha. Most views don’t even show the support. I made sure I had it generate supports. Then I found that the layers view, when you drag it through the layers, shows the supports it will make. Some support options definitely would not have worked, by the way, namely, lines.
But, basically, supports are basically impossible to remove. I pried at it and rubbed with sandpaper but my vague hope that the supports might pop off were badly misplaced. The thing looks like a button. But fortunately the plug part was shallow so I just super-glued the thing onto my pergola and it looks like the real deal at a glance. In fact it looks better.
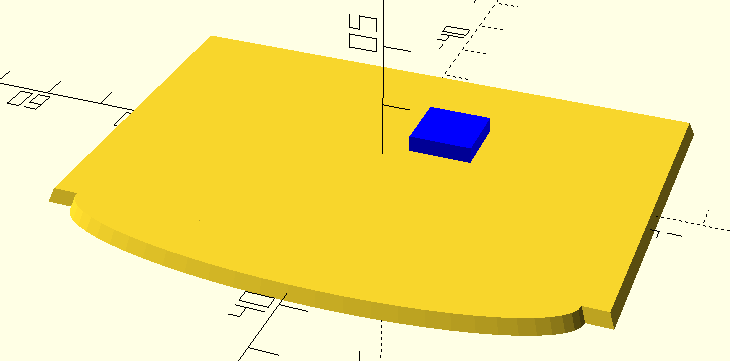
Mailbox plate
If I thought I was a whiz at this sort of thing, this mini-project proved me wrong. I was going to add a semi-circle at the bottom of a rectangle, and work through Pythagorean’s theorem to find the unknowns. I was just spending too much time and really, eye-balling it was more effective. And a more desirable shape was an ellipse. So the good ones make these parameterized models, but I find it’s not so easy and when you want to bang out some custom part quickly, it may not make sense.
There was a gaping hole in my mailbox post. This plate covers it up. Here’s the code.
What techniques I learned from this simple mailbox plate project
I used the linear extrude method for the first time. Very useful. So, shapes like squares and cirlces (or ellipses) extruded along the Z-asix. My first effort did not include the bump-out, which I needed as a spacer. So I learned that you don’t always have to re-level after every print and this was the first time the dang filament didn’t break on me between print jobs – because I acted within 24 hours. I even re-used the blue tape. All real time-savers. So I used the 3D printer the way you imagine it to be – just there to print stuff, not to worry about fixing all the time.
I also had a reject – a first attempt without the bumpout. I kept it to test the breaking strength. So the thickness is 2.3 mm, right (I have to get calipers!)? It’s pretty darn strong. I was probably applying 10 pounds of force and it was hardly budging. Each layer prints orthogonally and a piece this thin is solid material.
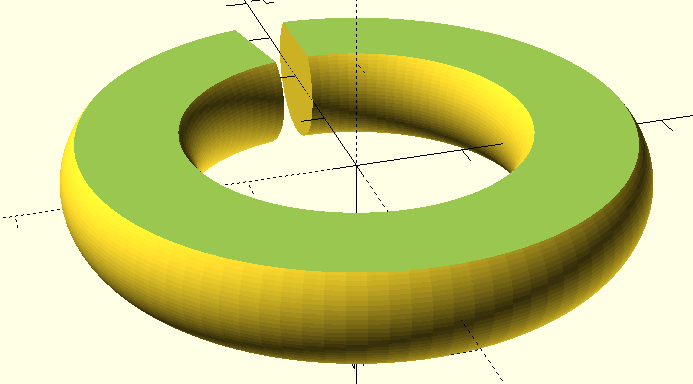
Bird feeder C ring
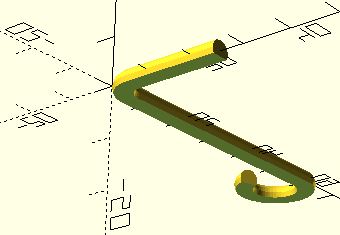
I have a backyard bird feeder which hangs too low – I fear a squirrel could jump to it. So I wanted a way to shorten the hang by winding the wire around something that will stay. So I designed a C-shaped ring thing. works great. This is a first time for me for using a rotate extrude. I had to chop off the bottom of the ring so that I would not need supports. This is my shortest code yet, and least paraemerized. It’s just easier when you want to knock something out quickly…
// DrJ 7/2020. Parameters in mm
// min facet angle and facet size (mm)
$fa = 1.1; $fs = 1.1; $fn=100;
difference(){
rotate_extrude(angle=348,convexity = 10)
translate([20, 0, 0])
circle(r = 6);
translate([0,0,-9]) cube([60,60,10],center=true);
}
Bird feeder C ring
This is my first piece with interior fill. The bird feeder is pretty heavy – 10 pounds. but this little C ring is plenty strong for entwining the hanging string.
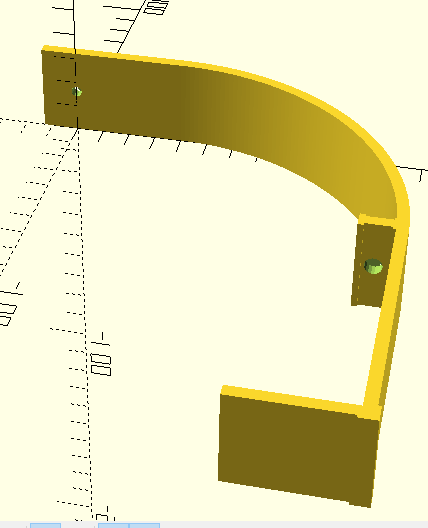
Curved TV bracket
The code
// DrJ 12/2019. Parameters in mm
  z=32;
  thickness=4;
  a=38; // 1 1/2" - the lip
  S=174; //6 7/8" - how far to come out
  m=127; // 5 3/32" - hole to TV edge
  n=13; // 1/2" extra beyond screw hole
  o=m-S/2;
  r=S/2;
  Rscrewhole=2;
  t=85; //restraint y from inner claw
  u=S-thickness-t;
  Rthole=3;
  xt=12;

  reinforce=10;
  bigthick=thickness+1;

  // min facet angle and facet size (mm)
  $fa = 1.1; $fs = 1.1;

  difference() {
    translate([-n,0,0])
    cube([n+o,thickness,z]);
    translate([0,thickness,z/2]) rotate([90,0,0]) cylinder(r=Rscrewhole,h=thickness*3);
  }
  // staircase
  translate([m-a,-S,0])
    cube([a+thickness,thickness,z]);
  translate([m,-S,0])
    cube([thickness,S/2,z]);
  //reinforce the corner
  shim=bigthick-thickness;
  translate([m-shim,-S-shim,0]) cube([bigthick+shim,shim,z]);
  translate([m,-S-shim,0]) cube([bigthick,bigthick+shim,z]);
  // curved section
  translate([o,-S/2,0]) {
      rotate_extrude(angle=90,convexity=10){ translate([S/2,0,0]) square([thickness,z]);}
  }
  // restraint
  translate([m-xt,-u,0]) {
      difference() {
          cube([xt,thickness,z]);
          translate([2*Rthole,thickness,z/2]) rotate([90,0,0]) cylinder(r=Rthole,h=thickness*3);
  }}
  //thickeners
  translate([m-1,-u-1,0]) cube([2,thickness+2,z]);
  translate([m-xt,-u-1,0]) cube([2,thickness+2,z]);
Waffle tile
// DrJ 12/2019. Parameters in mm


  barthick=6;
  shaveamount=2;
  shavedthick=barthick-shaveamount;
  lip=7;
  lipandextra=lip+3;
  radius=1.5;
  z=7;
  ytot=190;
  //y=ytot-2*lip;
  y=ytot;
  nbars=5;
  xstep = (ytot-2*lipandextra-nbars*barthick)/(nbars-1) + barthick;

  // min facet angle and facet size (mm)
  $fa = 1.1; $fs = 1.1;
  difference() {
   wafer();
   // half material for tesselation
   halfbar=barthick/2;
   translate([halfbar,-y+lip,-1]) wafer(z+2);
   translate([-halfbar,y-lip,-1]) wafer(z+2);
   translate([y-lip,halfbar,-1]) wafer(z+2);
   translate([-y+lip,-halfbar,-1]) wafer(z+2);
   // holes
   ydis=lipandextra-lip/2;
      echo (ydis);
   translate([0,-ydis,z/2]) rotate([0,90,0]) cylinder(r=radius,h=y);
   translate([0,y-2*lipandextra+ydis,z/2]) rotate([0,90,0]) cylinder(r=radius,h=y);
   translate([lipandextra-ydis,0,z/2]) rotate([-90,0,0]) cylinder(r=radius,h=y);
   translate([y-lipandextra+ydis,-1,z/2]) rotate([-90,0,0]) cylinder(r=radius,h=y);
   // shave off material by sitting cube on top
   cubelen=y-2*(lipandextra+shavedthick);
   translate([lipandextra+shavedthick,shavedthick,z-shaveamount]) cube([cubelen,cubelen,z]);
  }

  //rotate([-90,0,0]) cylinder(r=radius,h=y);

  module wafer(zwafer=z){
  for(xs=[lipandextra:xstep:ytot]){
      translate([xs,-lipandextra,0]) bar(zwafer);
  }
  translate([y,0,0]) rotate(90) {for(xs=[0:xstep:ytot]){
      translate([xs,0,0]) bar(zwafer);
  }
  }
  }

  module bar(zheight=z) {
      cube([barthick,y,zheight]);
  }
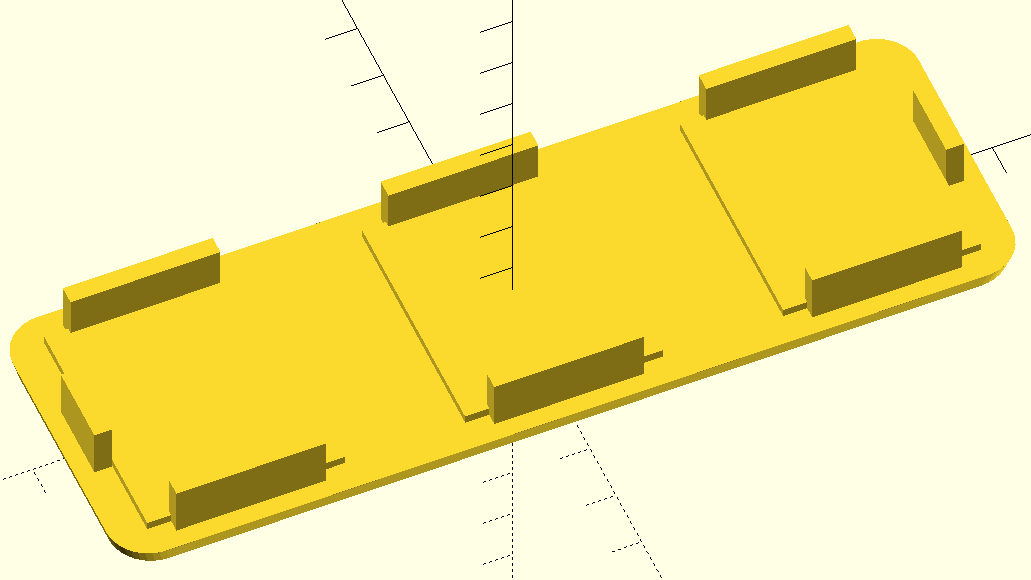
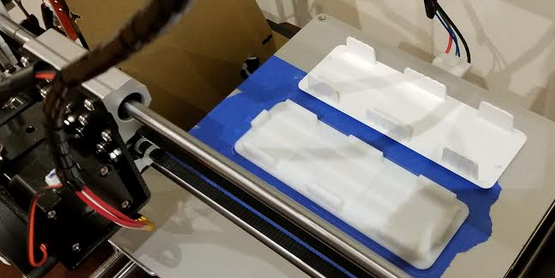
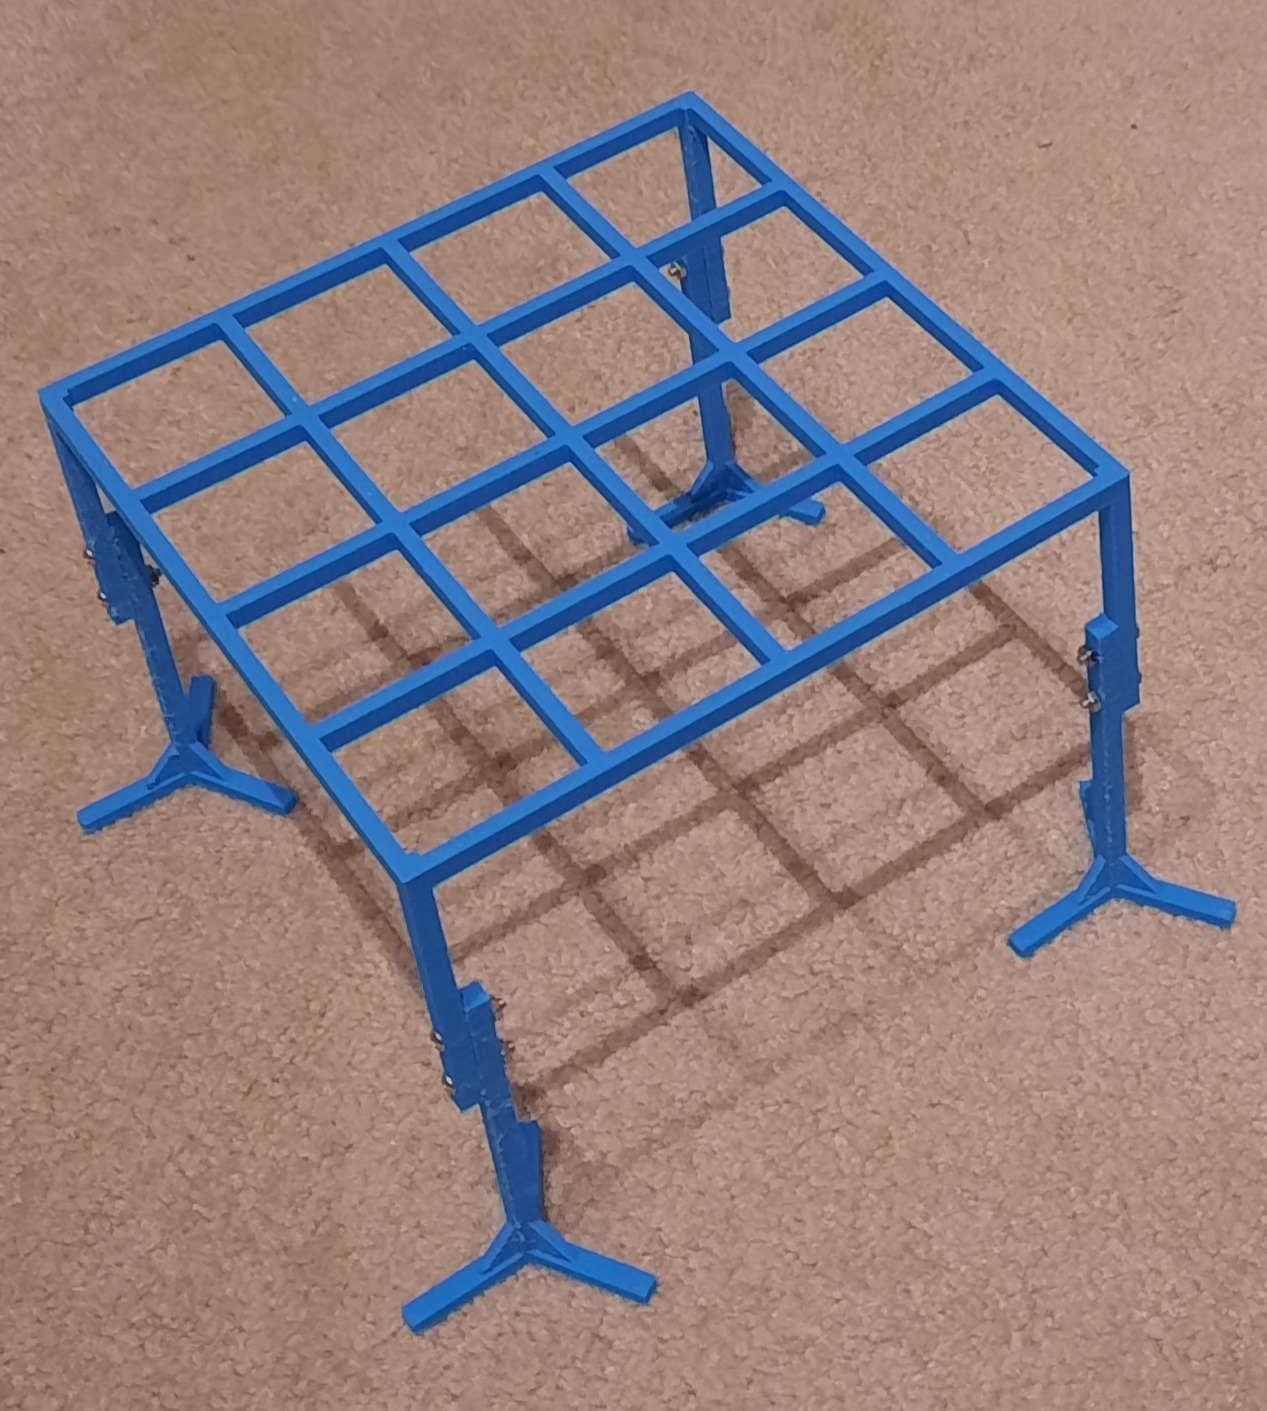
Router platform
Router platform
This router platform consists of two separate printing jobs. Here are the bird legs. Note these openscad files contain a bunch of unneeded detritus.
A friend printed this for me using PETG material. It seems pretty nice. And my design works really well for my singular purpose (shown in picture below).
// DrJ 6/2021. Parameters in mm
barthick=6;
legthick=6;
height=94; // approximate – remeasure
apart=50;
innerringD=32; // 1.25″
boost=innerringD/2 + 4;
fromend=7; // for topbar screwholes
nexthole=26.2;
topbarlen=38 + nexthole/2 + fromend; // 1.5″ back from rod center
radius=1.8; // works with m3 screws
// min facet angle and facet size (mm)
$fa = 1.1; $fs = 1.1;
//lie the whole thing flat for printing with no supports
rotate([0,90,0]){
zigzag(); translate([0,apart,0]) zigzag();
crossbar();
gallows();
}
I need a thingy to loosen my birdfeed. I had been using an allen wrench, but I lost it and it wasn’t quite the right shape – nowhere to put it. So I designed this simple fit-for-purpose object. It features a hook for hanging, a rounded corner and a flat bottom for easy printing.
I should be embarrassed to admit this, but I’m otherwise tech-savvy so I am not. I put my orange USB stick 9flash drive) into my computer in order to copy over my latest GCode, and the computer made that typical Windows double sound which shows you’ve plugged something into a USB port, but the F: drive would not show up no matter what I did.
Well, turns out I had left the micro SD card behind in the printer! It has to be inserted into the back of the USB stick. Duh, right? In my defense I hadn’t printer anything in months and I simply forgot the setup.
How frequently should the print bed be leveled?
I thought maybe you have to do it before every print job. But you see that TV bracket up above? I had to print out five of them as I continued to refine the design (and I was really trying to not be wasteful!). They take five – six hours to print. i would simply print one out after another without re-leveling the print bed. No issues. I did have to press down on my painters tape, which bubbled up where there was contact with the PLA.
Does printing thin, vertical pieces work OK?
Yes. I did a 3 mm thick piece about 1 1/2″ high – no issues. Then I switched to 4 mm and also no problems of course.
How large can holes be in the “wrong” (Z) dimension?
Again in that TV bracket I had holes of 4 mm and 6 mm in diameter in the z dimension. Do the rules about “bridges” apply? I have no idea, but they’re fine. Not smooth as glass, but sub-millimeter deviations from perfection. Definitely fine for passing screws through. maybe just a tad rougher in appearance than the surrounding surfaces. At some point as you scale up the radius, the top of a hole is a bridge, so failure has to occur, just thinking through this logically.
Do the belts and motors of the printer get loose after a few prints and after a year?
Not really. Mine still printed great after a year and light usage. I still can’t believe the quality that comes out in fact.
How uniformly does the print bed have to be leveled?
We all know you pull a paper through between nozzle and print bed and adjust until you meet resistance. What if one corner has more resistance than the rest? I would say it doesn’t matter. If you’ve ripping up the paper – that’s an issue, but the difference between a little resistance and more resistance should not be sweated. On my printer I assert it’s impossible to make the bed completely uniform. Also see the tip below about the print bed. I also recommend not to move the printer after leveling the print bed. I believe it will deform from even small movement. But I have printed six 50 gram jobs, one after the other, without re-leveling, which is great. The sixth job, however, totally failed. But see the next tip about watching the beginning of the print job.
Watch the beginning of the print job
I have lost prints twice. First time it was that the heated filament printed out a bit, but then the stuff on the print bed just started to be dragged around. Second time I printed a long, narrow piece. One end of it started to curl upwards like a water ski. I re-adjusted the print bed level no that side. Those things are going happen at the beginning of the print job if it happens at all. So watch the beginning of the printing for proper printing.
Are there differences in PLA?
Surprisingly, the answer seems to be definitely yes. The white PLA which came with printer seems to be much more fragile than the black stuff I bought (see link below). I’ve been told that the filament becomes brittle with exposure to air. With my white PLA it kept breaking off after a few days between print jobs, no matter what I did! The black stuff, by contrast, did not break off once! Not even when left in place for months!
Does PLA deform under tension or sheer forces?
See that C ring above? That was printed with the black stuff and used outside. It stretched noticeably over the course of the summer. perhaps a combination of the summer heat plus the tension. But whatever, the printed parts feel nice and rigid when first printed out, but they will permanently deform! Engineering plastics could probably address that, but I have no practical experience with them.
How to yank the finished print away off the print bed
You’ll break your fingernails trying to pry your printed masterpieces off the print bed. Of course I use blue painters tape over the print bed. I have settled on a technique where I use a needle nose pliers. Pull firmly while simultaneously pushing down with the other hand on the print bed. All my stuff, which is pretty dimensional, pops right off like that, and the tape is ready for another print – it is not ruined.
Thin strips are padded
With my setup, anyway, my thin vertical pieces are consistently coming out over the specified dimensions by about .5 mm. This overage can be important in a lot of projects. Similarly, holes are produced smaller than the specified dimensions, though I don’t know by how much, but seems to be in the range .5 – 1.0 mm. I know these things because I bought an inexpensive caliper!
How many parts of this type can you get from your spool of PLA?
Most (all?) of my projects involve fourth-grade level math, honestly. No algebra. Maybe a tiny hint of trigonometry. Anywya, Cura tells you how much PLA your printout will use. My TV bracket was around 50 grams. This is painfully obvious, but just to put it out there, do the math. If you have a 1 KG (= 1000 grams) spool of PLA and each thing you’re printing takes, e.g., 50 grams, you can print 1000 grams / (50 grams per piece) = 20 pieces.
Filament stops coming out in the middle of the printing – what to do?
I am currently suffering from this. I think my nozzle is too full of crud. I have no idea how to fix it (no time to research this).
I don’t enjoy tinkering with my finicky 3D printer. Is there a “3D printing as a Service” business?
I have been told there is not. People send ridiculously impossible things to print, expecting miracles. Perhaps someone will soon solve this issue (by qualifying all print jobs beforehand)? OK. There is a very commercial service. But it is way too expensive for hobbyist. Probably a minimum of $100. See the references for another suggestion.
Time-saving tip for leveling the print bed
My anet a8 prints great once I get it set up. But that setup – boy is it a pain. Leveling the print bed being the absolute worst. Because, if you follow their advice and adjust each corner, well, they don’t seem to stay and you end up reversing your direction on the screws of the print bed. Or you’ll get one corner and then the corner you had just done will be off.
But think about it. For these small jobs, it only has to be level at the center. So, the heck with it, just make sure when you drag a piece of paper with the nozzle at the center that it has a bit of resistance, and don’t stress about what happens at the four distant corners. You will maintain your sanity this way.
Conclusion I found the missing piece after printing this piece out, as luck would have it. BUT, then I found another place, right against the side of the house, that was never covered, but could have been. So I slapped my printed part there – it worked great!
A subsequent bolt hole cover project revealed that supports are nasty and basically impossible to remove. Yet the design was such that the thing worked anyways with a little superglue.
A plate to cover a hole in the mailbox post came next, and then a ring with a little slit for my bird feeder. Those two use an extrusion method.
You have to render your model or else export to STL does absolutely nothing, and also does not show an error, except in the console, which you may not be showing.
I learned quite a lot doing the curved TV bracket project. I shared my learnings.
References and related
3D-printing-as-a-service
If you are lucky enough to live in Oak Creek, Wisconsin, or really anywhere in Milwaukee county, you have it! And it’s really cheap – $.05/gram. https://oakcreeklibrary.org/3d-printer/
As for the rest of us, we have to encourage our local libraries and community colleges to get with the program. I think it’s coming, so make sure your interest is known.
This 3D printing service may be the most suitable for hobbyists: https://www.sculpteo.com/ . My modest wine bottle holder would cost $27 in their cheapest configuration (SLS plastic PA12). But at least their service looks really legit and gives you lots of options.
The program I use to generate my designs is Openscad. It’s free and still being actively developed. It’s great if you know a bit of scripting and a bit of geometry. https://openscad.org/
But there are a lot of other great 3D designs out there beyond just Thingiverse. This site introduces lots of these resources with example pictures from printed models.
In a lot of ways, the last few years have seen 3D printing “going mainstream,” so to speak. People are no longer astonished by the sheer capabilities of the technology, and we’re getting more accustomed to seeing stories about one interesting product or another having been 3D printed. People are also gaining more access to 3D printing; in some cases the costs of the devices have fallen, though we have posted about building one’s own 3D printer as well, and this is another option some savvier consumers are embracing.
The process of getting to this point, at which 3D printing is at least somewhat familiar to a lot of people, has been complex, fascinating, and enjoyable. But now that 3D printing is mainstream, what’s next for the technology? It’s hard to say with certainty, but we can look to a few current trends and developments and predict some of the ways that the technology could become more popular still.
Further Understanding Of Capabilities
Even if people are no longer astonished by what 3D printing can do in general, further understanding of the full range of the technology’s capabilities is likely to come with time. In a sense, the initial learning curve concerned the basic concept – that a 3D object could be printed into empty space by a machine according to a digital design. Next, people will inevitably come to learn about all of the various twists that can exist within that broad concept. For instance, people will get more used to the idea that 3D printers can create metal objects, and not only work with plastics; people will come to be familiar with larger 3D printers on a scale that can create car parts, or potentially even small homes and urban planning features. Ideas like these don’t necessarily fall into the most basic understanding of 3D printing, but they’ll inevitably be more widely understood in short time.
Combination With Other Advanced Manufacturing
This is perhaps more of a concern for large companies and significant manufacturing operations. Nevertheless, it’s a good bet that the next few years will see more people come to understand 3D printing as one of a few advanced manufacturing methods that can contribute to the creation of modern products. The technology’s most noteworthy counterpart may be injection molding, which is not as new, but which has grown vastly more sophisticated and capable. This is basically a process by which a given material is heated and molded to fit a shape, such that it hardens in that shape and becomes a final product. Fictiv describes injection molding processes as being ideal for design validation or for higher volume production, which largely conveys the idea that they are similarly useful to 3D printing. The truth though is that people may come to realize that the combination of the two technologies can benefit entire industries. For instance, there are some cases in which prototypes and early models are created via 3D printing (a better process for trial-and-error), and then used as the basis for large-scale molding efforts to design product lines.
3D-Printed Food
The very notion of 3D-printed food can sound absurd on its face. It reads very much like something from a science fiction novel or a fantasy film in which food can simply be created, and there are no more resource shortages. Amazingly enough though, while it’s not all quite so glossy and miraculous as the sci-fi version, 3D-printed food has become a reality. Hackaday explains how 3D-printed food can work in a piece written just last year, and the concept is actually surprisingly straightforward. Basically, pastes made of organic materials and broken down ingredients (such as, in one example, peas and seaweed) can be printed into mock versions of regular food items (in the same example, a steak). The same article acknowledges that taste isn’t necessarily ideal just yet, but the very idea of creating food products from a mishmash of edible materials is exciting. It’s a starting point for what could be a massive step toward addressing food shortages, and it’s likely to become one of the main topics driving further interest in 3D printing.
Command-Based Projects
This is something we don’t hear all that much about yet, but which could make for a significant step particularly with regard to consumer 3D printing. Singularity Hub took a look at 3D printing innovations we might see in the next five years or so and introduced this idea in an interesting way, stating that “hey” will become the “most frequently used command in design engineering.” Specifically the suggestion is that we’ll be able to say, “Hey 3D printer, design me a new pair of shoes” in much the same way we ask Alexa or Siri to make shopping lists or tell us the weather. If this proves to be true, it’s likely we’ll see a significant spike in consumer 3D printer purchases. For that matter, it could significantly change much of the retail industry.
Ultimately one of the cool things about 3D printing is that we’re all still figuring it out. It likely has countless applications we have’t yet considered or imagined. The suggestions here are grounded in current trends and speculation though, and should play a significant role in keeping this technology fresh and interesting.
Intro
This may be really obvious to some, but I did not realize until recently that you can adjust the touch screen sensitivity on a Samsung smartphone. Who knew?
Why it matters
I have a family member with a glass screen protector. I watched her struggle tapping and swiping multiple times to get it to respond. No one mentioned a way to fix it. Then i helped apply a new glass screen protector after the old one broke and i did an RTFM. The directions mentioned you can increase the touch sensitivity in settings. It’s no longer where it said. but in Display settings.
Intro
My old car I decided finally needed a touch of Bluetooth connectivity. But how to do it without spending a fortune?
The details
I found this amazingly inexpensive gadget on Amazon that describes itself as follows: Handsfree Call Car Charger,Wireless Bluetooth FM Transmitter Radio Receiver&Mp3 Music Stereo Adapter,Dual USB Port Charger Compatible for All Smartphones,Samsung Galaxy,LG,HTC,etc.
I guess it’s normally $16 but I bought on Cyber Monday so it was about $12. 12 dollars! I think if I had gone to the dealer for an after-market solution it would have been $500.
The bad first
Let’s get the bad out of the way, bearing in mind my expectations were rather low so I may be leaving out some obvious “of course it doesn’t have that…” type of stuff.
This device does an FM broadcast and you pick an unoccupied FM frequency to listen to it. On the other side it connects to a Bluetooth device such as a phone. In IT terms I’d call it a gateway since it converts one protocl to another (Bluetooth to FM). Having read the reviews, but not finding anything addressing my interests, my idea was to continue to use my FM stations, and put the station used by this device on a preset so when a call comes in to my phone I hit the station preset and accept the call on the device.
Well, you basically can’t listen to other FM stations as long as this thing is powered up. So even tuned to 88.7 at the far end of the dial, it interferes with stations up and down the dial for some reason. It’ not impossible but you’d have to have a high tolerance for static to use it that way.
Also, I’ve read that these little things break on some people after a few months. But I would no feel cheated, remember, low expectations?
The good
– microphone is good
– compatible with Samsung
– capable of audio program controls
– boots up quickly, maybe 10 seconds
My solution
I only really listen to NPR. I tried the WNYC app in the Playstore. I used to think it was buggy – stopping at random times. But I’ve had good luck my first few trips. Plays great through this thing! In many ways it’s better than FM because I don’t have to change NPR stations as I drive to work, etc, and its signal is often better. There is some static background however. Now my phone GPS talks to me through the speakers (it used to be silent in the car).
The unknown
Not sure about outbound calls to much. If you hit the button twice it seems to call the last dialed number. There are these settings U01, U02, U30. maybe those are for speed dialing?
Precisely why it has to so broadly interfere with all FM stations is a mystery.
Being a thoughtful person, I also wonder what it does to the FM reception of cars around me, ha ha? Could they pick up my call? Now that I think of it, I do remember hearing someone’s phone call on my FM radio once, many years ago. Use of an aux cord would be a way around that, but this little device does not support that.
The amazing
How cuold they pack all this tech, make something that basically works as it’s supposed to, and sell it for $12? I’m in awe.
Intro
A lost credit card. Or was it misplaced? Months later a whole bunch of “modest” charges appear all at once, a couple days after a few lower-value test charges were made.
Thank goodness I had the presence of mind to lower my alert limit on transactions from $200 to $50. I was not too late to have all the charges disputed despite the test charges being two days old.
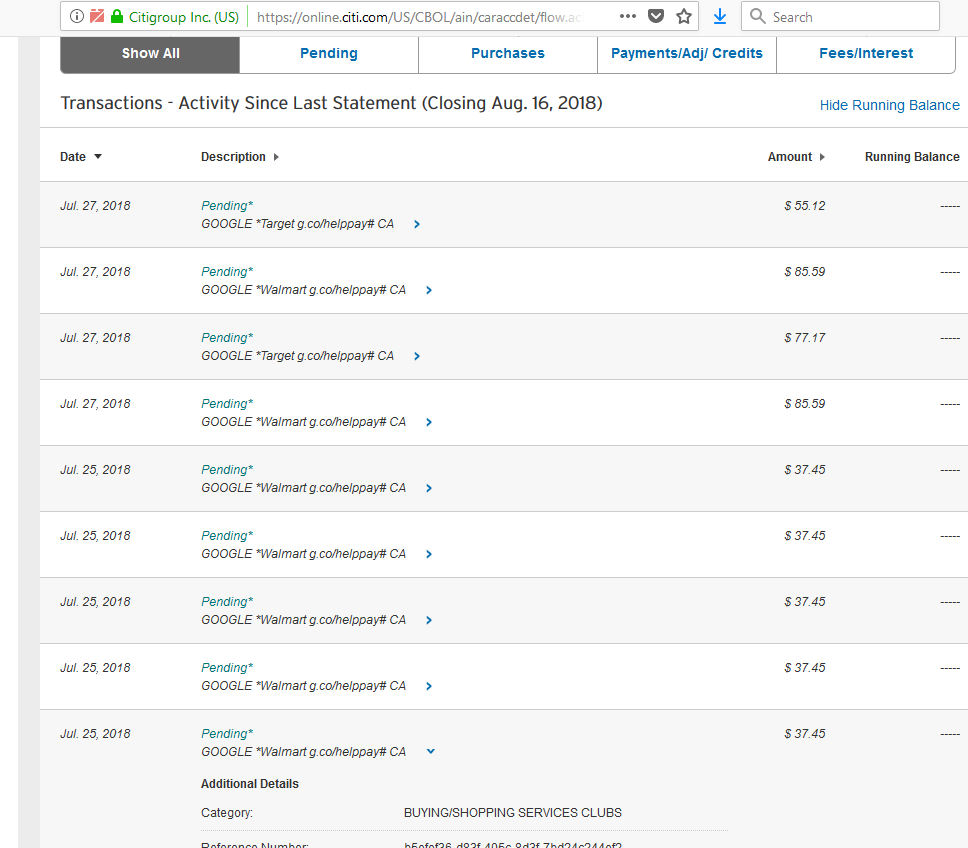
What fraudulent credit card charges look like
I do not know how these charges were created – what is Google/Walmart or Google/Target.
I can guess how my address was matched to the card – it’s a sufficiently uncommon last name available from simple public records.
Conclusion
Well, now we know the card was lost or stolen, not misplaced. After all these years that’s the first time that has happened to us. We will not be responsible for the disputed charges.
Intro
Since solar panels are a major commitment I did some research first. My criteria (high-efficiency, not manufactured in China, carried by a local installer) was met by Sunpower X-series whose panels generate 345 KWh, which was pretty much at the high end in 2017.
The details
I live in a northern latitude area (41° latitude) with plenty of snowfall. I have a sloped roof.
I just assumed that the snow would melt off the panels at more or less the same rate as off the rest of the roof.
That is not at all the case.
I was working from home one day in the kitchen when I heard someone on the roof. At least that’s what it sounded like. The person seemed to be clearing the snow off my panels, how thoughtful of my installer to send someone to do that. The snow was thundering and avalanching off the roof onto my deck. Eventually I realized the mini-avalanches were real, the person up there on the roof was no more real than Santa Claus.
So yes, the snow slides off those panels in thunderous mini-avalanches. So today after a big snow event, this has been going on this morning, the day after, on and off for hours. Around the panels the roof retains its snow, but the panels themselves have lost all theirs. I see my neighbors’ panels are also cleared so this must be a universal phenomenon.
It’s worth mentioning because it’s a little frightening when you first hear it.
Power consumption vastly overestimated
I suppose this next problem is peculiar to just my installation. Sunpower gives you this nice portal so you see what you’re generating and what you’re using. In my case the generation numbers seem plausible, but the usage numbers are way off.
February bill shows 621 KWh metered, 386 KWh out = 235 KWh billed.
Sunpower shows 1442 KWh used, 531 KWh generated, for a net of -910 KWh.
So we can compare 235 to the 910. The should be about the same yet there is a huge difference.
The usage is almost, but not quite doubled. if we add 235 billed to the 531 generated we’d have 766 used. So usage is overestimated by a factor 1.89. But I doubt it’s a simple formula like that to correct their numbers. During the time of generation – daylight – the usage estimates numbers dip. So I don’t know what they’ve done wrong, and my installer says their support is horrible. It’s been nine months and I’ve just asked for an update. It’s more annoyance than anything.
Verizon Phone Finder
They will lead you to some page that seems to suggest you needed to buy a premium service from them if you need to find your phone. Don’t fall for it. Or maybe you will get their other page which only sends you on to Google’s page. So, for Android phones, here is the universal phone finder link:
It’s pretty cool. It shows pretty precisely where the phone is, how much power is left and gives you the chance to ring it for five minutes and even lock it.
Apple iPhones
Use https://icloud.com/find . But you’ll have to know your icloud password. Actually I’ve used the Android finder a few times but never really used the iphone finder. Hopefully it works just as well.
Change your Verizon Wireless Voicemail password
This is even harder to find unless you have just the right search terms.
From a Verizon app on your phone
I haven’t used this method.
https://www.verizonwireless.com/support/knowledge-base-17076/
How to set up your voicemail so as not to enter a password
Basic idea: add a contact for Voicemail tack on two pauses, then append the password. So that will be
*86,,<YOUR_PASSWORD>
For instance I named this contact VM. If my password were 1234 the number would be
*86,,1234
To generate the “,” character go to the special characters key to the right of # when typing in the number.
Intro
I got an offer for $20/month broadband access from Centurylink. It got me to thinking, could I somehow use that as a backup connection to my current cable ISP? How would that work? Could I use a Raspberry Pi as a WAN load-balancing router?
The details
Well I’m not sure about using Raspberry Pi. It’s not so simple.
But I just wanted to mention there are solutions out there in the marketplace to this very problem. They’re not that easy to find, hence this article. They’re mostly aimed at small businesses where Internet connectivity is very important, like an Internet cafe.
This Cisco dual WAN router for $157 would do the trick:
Conclusion
We have identified commercial solutions to the question: can I use two ISPs at home to provide high availability and load-balancing. I have my doubts however and I think running OpenWRT may be the best option.
Intro
Maybe it’s just me, but I’ve always had some issues getting my flashlight app to work on my phones. First there’s the issue of finding one from a trusted source (many contain spyware: access to my contacts?? for a flashlight?? I don’t think so…). So I trusted Swiss Army Knife, but then I had to launch that, then drill down to the flashlight, blah, blah. And the flashlight app on the Windows phone also looks a little seedy. And anyway sometimes you don’t want to overwhelm with your camera’s LED. Maybe just a simple glow from the backlight of your screen is enough to guide you down the hallway int he dark… I know I found myself using both my Fire HD tablet and my Windows phone in exactly that way.
Then I decided to scan a slide, using the backlight of my tablet to permit the scanner to see the colors, etc. That did not work out, by the way. It sounds like a good idea, though, doesn’t it? i guess the backlight is not sufficiently bright. maybe if I play with screen brightness…
Anyway, for all the above reasons I realized I could use a white backlight app. Rather than pay $0.99 for another dodgy app, I decided to write a web page that displays an all-white background. Then i could bookmark it and use it on both my Windows phone and my tablet!
White backlight web page
This is really complicated – don’t try this for yourself. Ha, ha just kidding. This is about as simple as it gets. Falls into the catgeory of “wish I had thought of it sooner,” or “Duh.”
The HTML code
Want to put this on your own web server? Here is the code.
<html><head><body bgcolor="white"></htnml>
<html><head><body bgcolor="white"></htnml>
Conclusion
No banners, no ads, no intrusive permissions: this is a web page that maximizes the soft glow of your device’s backlight. You could play with your screen brightness to possibly make it still brighter, adjust the length it glows for, etc. For convenience to pull it up in a jiffy I’ve bookmarked my White backlight web page.