Categories
CentOS DNS Linux Network Technologies Raspberry Pi Security Web Site Technologies

Roll your own dynamic DNS update service

Intro
I know my old Cisco router only has built-in support for two dynamic DNS services, dyndns.org and TZO.com. Nowadays you have to pay for those, if even they work (the web site domain names seem to have changed, but perhaps they still support the old domain names. Or perhaps not!). Maybe this could be fixed by firmware upgrades (to hopefully get more choices and hopefully a free one, or a newer router, or running DD-WRT. I didn’t do any of those things. Being a network person at heart, I wrote my own. I found the samples out there on the Internet needed some updating, so I am sharing my recipe. I didn’t think it was too hard to pull off.

What I used
– GoDaddy DNS hosting (basically any will do)
– my Amazon AWS virtual server running CentOS, where I have sudo access
– my home Raspberry Pi
– a tiny bit of php programming
– my networking skills for debugging

As I have prior experience with all these items this project was right up my alley.

Delegating our DDNS domain from GoDaddy
Just create a nameserver record from the domain, say drj.com, called, say, raspi, which you delegate to your AWS server. Following the example, the subdomain would be raspi.drj.com whose nameserver is drj.com.


DNS Setup on an Amazon AWS server

/etc/named.conf

//
// named.conf
//
// Provided by Red Hat bind package to configure the ISC BIND named(8) DNS
// server as a caching only nameserver (as a localhost DNS resolver only).
//
// See /usr/share/doc/bind*/sample/ for example named configuration files.
//
 
options {
//      listen-on port 53 { 127.0.0.1; };
//      listen-on port 53;
        listen-on-v6 port 53 { ::1; };
        directory       "/var/named";
        dump-file       "/var/named/data/cache_dump.db";
        statistics-file "/var/named/data/named_stats.txt";
        memstatistics-file "/var/named/data/named_mem_stats.txt";
        allow-query     { any; };
        recursion no;
 
        dnssec-enable yes;
        dnssec-validation yes;
        dnssec-lookaside auto;
 
        /* Path to ISC DLV key */
        bindkeys-file "/etc/named.iscdlv.key";
 
        managed-keys-directory "/var/named/dynamic";
};
 
logging {
        channel default_debug {
                file "data/named.run";
                severity dynamic;
        };
};
 
zone "." IN {
        type hint;
        file "named.ca";
};
 
include "/etc/named.rfc1912.zones";
include "/var/named/dynamic.conf";
include "/etc/named.root.key";

/var/named/dynamic.conf

zone "raspi.drj.com" {
  type master;
  file "/var/named/db.raspi.drj.com";
// designed to work with nsupdate -l used on same system - DrJ 10/2016
// /var/run/named/session.key
  update-policy local;
};

/var/named/db.raspi.drj.com

$ORIGIN .
$TTL 1800       ; 30 minutes
raspi.drj.com      IN SOA  drj.com. postmaster.drj.com. (
                                2016092812 ; serial
                                1700       ; refresh (28 minutes 20 seconds)
                                1700       ; retry (28 minutes 20 seconds)
                                1209600    ; expire (2 weeks)
                                600        ; minimum (10 minutes)
                                )
                        NS      drj.com.
$TTL 3600       ; 1 hour
                        A       125.125.73.145

Named re-starting program
Want to make sure your named restarts if it happens to die? nanny.pl is a good, simple monitor to do that. Here is the version I use on my server. Note the customized variables towards the top.

#!/usr/bin/perl
#
# Copyright (C) 2004, 2007, 2012  Internet Systems Consortium, Inc. ("ISC")
# Copyright (C) 2000, 2001  Internet Software Consortium.
#
# Permission to use, copy, modify, and/or distribute this software for any
# purpose with or without fee is hereby granted, provided that the above
# copyright notice and this permission notice appear in all copies.
#
# THE SOFTWARE IS PROVIDED "AS IS" AND ISC DISCLAIMS ALL WARRANTIES WITH
# REGARD TO THIS SOFTWARE INCLUDING ALL IMPLIED WARRANTIES OF MERCHANTABILITY
# AND FITNESS.  IN NO EVENT SHALL ISC BE LIABLE FOR ANY SPECIAL, DIRECT,
# INDIRECT, OR CONSEQUENTIAL DAMAGES OR ANY DAMAGES WHATSOEVER RESULTING FROM
# LOSS OF USE, DATA OR PROFITS, WHETHER IN AN ACTION OF CONTRACT, NEGLIGENCE
# OR OTHER TORTIOUS ACTION, ARISING OUT OF OR IN CONNECTION WITH THE USE OR
# PERFORMANCE OF THIS SOFTWARE.
 
# $Id: nanny.pl,v 1.11 2007/06/19 23:47:07 tbox Exp $
 
# A simple nanny to make sure named stays running.
 
$pid_file_location = '/var/run/named/named.pid';
$nameserver_location = 'localhost';
$dig_program = 'dig';
$named_program =  '/usr/sbin/named -u named';
 
fork() && exit();
 
for (;;) {
        $pid = 0;
        open(FILE, $pid_file_location) || goto restart;
        $pid = <FILE>;
        close(FILE);
        chomp($pid);
 
        $res = kill 0, $pid;
 
        goto restart if ($res == 0);
 
        $dig_command =
               "$dig_program +short . \@$nameserver_location > /dev/null";
        $return = system($dig_command);
        goto restart if ($return == 9);
 
        sleep 30;
        next;
 
 restart:
        if ($pid != 0) {
                kill 15, $pid;
                sleep 30;
        }
        system ($named_program);
        sleep 120;
}

The PHP updating program myip-update.php

<?php
# DrJ: lifted from http://pablohoffman.com/dynamic-dns-updates-with-a-simple-php-script
# but with some security improvements
# 10/2016
# PHP script for very simple dynamic DNS updates
#
# this script was published in http://pablohoffman.com/articles and
# released to the public domain by Pablo Hoffman on 27 Aug 2006
 
# CONFIGURATION BEGINS -------------------------------------------------------
# define password here
$mysecret = 'myBigFatsEcreT';
# CONFIGURATION ENDS ---------------------------------------------------------
 
 
$ip = $_SERVER['REMOTE_ADDR'];
$host = $_GET['host'];
$secret = $_POST['secret'];
$zone = $_GET['zone'];
$tmpfile = trim(`mktemp /tmp/nsupdate.XXXXXX`);
 
if ((!$host) or (!$zone) or (!($mysecret == $secret))) {
    echo "FAILED";
    unlink($tmpfile);
    exit;
}
 
$oldip = trim(`dig +short $host.$zone @localhost`);
if ($ip == $oldip) {
    echo "UNCHANGED. ip: $ip\n";
    unlink($tmpfile);
    exit;
}
 
echo "$ip - $oldip";
 
$nsucmd = "update delete $host.$zone A
update add $host.$zone 3600 A $ip
send
";
 
$fp = fopen($tmpfile, 'w');
fwrite($fp, $nsucmd);
fclose($fp);
`sudo nsupdate -l $tmpfile`;
unlink($tmpfile);
echo "OK ";
echo `date`;
?>

In the above file I added the “sudo” after awhile. See explanation further down below.

Raspberry Pi requirements
I’ve assumed you can run your Pi 24 x 7 and constantly and consistently on your network.

Crontab entry on the Raspberry Pi
Edit the crontab file for periodically checking your IP on the Pi and updating external DNS if it has changed by doing this:

$ crontab ‐e
and adding the line below:

# my own method of dynamic update - DrJ 10/2016
0,10,20,30,40,50 * * * * /usr/bin/curl -s -k -d 'secret=myBigFatsEcreT' 'https://drj.com/myip-update.php?host=raspi&zone=drj.com' >> /tmp/ddns 2>&1

A few highlights
Note that I’ve switched to use of nsupdate -l on the local server. This will be more secure than the previous solution which suggested to have updates from localhost. As far as I can tell localhost updates can be spoofed and so should be considered insecure in a modern infrastructure. I learned a lot by running nsupdate -D -l on my AWS server and observing what happens.
And note that I changed the locations of the secret. The old solution had the secret embedded in the URL in a GET statement, which means it would also be embedded in every single request in the web server’s access file. That’s not a good idea. I switched it to a POSTed variable so that it doesn’t show up in the web server’s access file. This is done with the -d switch of curl.

Contents of temporary file
Here are example contents. This is useful when you’re trying to run nsupdate from the command line.

update delete raspi.drj.com A
update add raspi.drj.com 3600 A 51.32.108.37
send


Permissions problems

If you see something like this on your DNS server:

$ ll /var/run/named

total 8
-rw-r--r-- 1 named www-data   6 Nov  6 03:15 named.pid
-rw------- 1 named www-data 102 Oct 24 09:42 session.key

your attempt to run nsupdate by your web server will be foiled and produce something like this:

$ /usr/bin/nsupdate ‐l /tmp/nsupdate.LInUmo

06-Nov-2016 17:14:14.780 none:0: open: /var/run/named/session.key: permission denied
can't read key from /var/run/named/session.key: permission denied

The solution may be to permit group read permission:

$ cd /var/run/named; sudo chmod g+r session.key

and make the group owner of the file your webserver user ID (which I’ve already done here). I’m still working this part out…

That approach doesn’t seem to “stick,” so I came up with this other approach. Put your web server user in sudoers to allow it to run nsupdate (my web server user is www-data for these examples):

Cmnd_Alias     NSUPDATE = /usr/bin/nsupdate
# allow web server to run nsupdate
www-data ALL=(root) NOPASSWD: NSUPDATE

But you may get the dreaded

sudo: sorry, you must have a tty to run sudo

if you manage to figure out how to turn on debugging.

So if your sudoers has a line like this:

Defaults    requiretty

you will need lines like this:

# turn of tty requirements only for www-data user
Defaults:www-data !requiretty

Debugging
Of course for debugging I commented out the unlink line in the PHP update file and ran the
nsupdate -l /tmp/nsupdate.xxxxx
by hand as user www-data.

During some of the errors I worked through that wasn’t verbose enough so I added debugging arguments:

$ nsupdate ‐D ‐d ‐l /tmp/nsupdate.xxxxx

When that began to work, yet when called via the webserver it wasn’t working, I ran the above command from within PHP, recording the output to a file:

...
`sudo nsupdate -d -D -l $tmpfile > /tmp/nsupdate-debug 2>&1`

That turned out to be extremely informative.

Conclusion
We have shown how to combine a bunch of simple networking tools to create your own DDNS service. The key elements are a Raspberry Pi and your own virtual server at Amazon AWS. We have built upon previous published solutions to this problem and made them more secure in light of the growing sophistication of the bad guys. Let me know if there is interest in an inexpensive commercial service.

References and related

nanny.pl write-up: https://www.safaribooksonline.com/library/view/dns-bind/0596004109/ch05s09.html
Categories
Network Technologies Security

Internet Explorer can’t access https page – maybe a client CERT is needed?

Intro
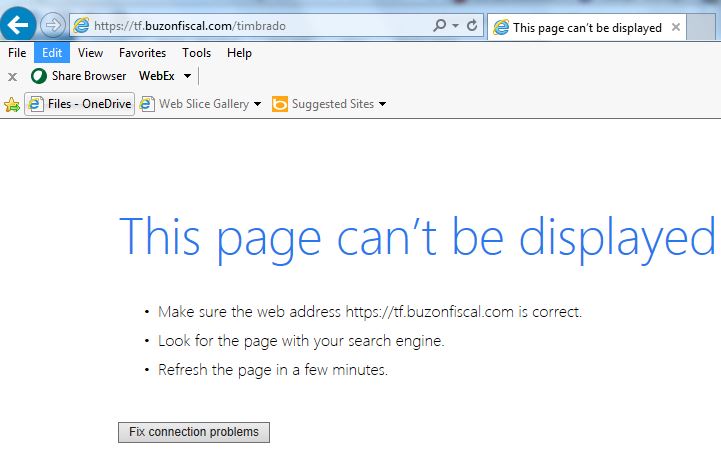
I don’t see such issues often, but today two came to my attention. Both are quasi-government sites. Here’s an example of what you see when testing with your browser if it’s Internet Explorer:

Vague error displayed by Internet Explorer when site requires a client certificate

The details
Just for the fun of it, I accessed the home page https://tf.buzonfiscal.com/ and got a 200 OK page.

I learned some more about curl and found that it can tell you what is going on.

$ curl ‐vv ‐i ‐k https://tf.buzonfiscal.com/

* About to connect() to tf.buzonfiscal.com port 443 (#0)
*   Trying 23.253.28.70... connected
* Connected to tf.buzonfiscal.com (23.253.28.70) port 443 (#0)
* successfully set certificate verify locations:
*   CAfile: none
  CApath: /etc/ssl/certs/
* SSLv3, TLS handshake, Client hello (1):
* SSLv3, TLS handshake, Server hello (2):
* SSLv3, TLS handshake, CERT (11):
* SSLv3, TLS handshake, Server key exchange (12):
* SSLv3, TLS handshake, Server finished (14):
* SSLv3, TLS handshake, Client key exchange (16):
* SSLv3, TLS change cipher, Client hello (1):
* SSLv3, TLS handshake, Finished (20):
* SSLv3, TLS change cipher, Client hello (1):
* SSLv3, TLS handshake, Finished (20):
* SSL connection using DHE-RSA-AES256-SHA
* Server certificate:
*        subject: C=MX; ST=Nuevo Leon; L=Monterrey; O=Diverza informacion y Analisis  SAPI de CV; CN=*.buzonfiscal.com
*        start date: 2016-07-07 00:00:00 GMT
*        expire date: 2018-07-07 23:59:59 GMT
*        subjectAltName: tf.buzonfiscal.com matched
*        issuer: C=US; O=thawte, Inc.; CN=thawte SSL CA - G2
*        SSL certificate verify ok.
> GET / HTTP/1.1
> User-Agent: curl/7.19.7 (x86_64-suse-linux-gnu) libcurl/7.19.7 OpenSSL/0.9.8j zlib/1.2.3 libidn/1.10
> Host: tf.buzonfiscal.com
> Accept: */*
>
< HTTP/1.1 200 OK
HTTP/1.1 200 OK
< Date: Fri, 22 Jul 2016 15:50:44 GMT
Date: Fri, 22 Jul 2016 15:50:44 GMT
< Server: Apache/2.2.4 (Win32) mod_ssl/2.2.4 OpenSSL/0.9.8e mod_jk/1.2.37
Server: Apache/2.2.4 (Win32) mod_ssl/2.2.4 OpenSSL/0.9.8e mod_jk/1.2.37
< Accept-Ranges: bytes
Accept-Ranges: bytes
< Content-Length: 23
Content-Length: 23
< Content-Type: text/html
Content-Type: text/html
 
<
<html>
200 OK
* Connection #0 to host tf.buzonfiscal.com left intact
* Closing connection #0
* SSLv3, TLS alert, Client hello (1):

Now look at the difference when we access the page with the problem.

$ curl ‐vv ‐i ‐k https://tf.buzonfiscal.com/timbrado

* About to connect() to tf.buzonfiscal.com port 443 (#0)
*   Trying 23.253.28.70... connected
* Connected to tf.buzonfiscal.com (23.253.28.70) port 443 (#0)
* successfully set certificate verify locations:
*   CAfile: none
  CApath: /etc/ssl/certs/
* SSLv3, TLS handshake, Client hello (1):
* SSLv3, TLS handshake, Server hello (2):
* SSLv3, TLS handshake, CERT (11):
* SSLv3, TLS handshake, Server key exchange (12):
* SSLv3, TLS handshake, Server finished (14):
* SSLv3, TLS handshake, Client key exchange (16):
* SSLv3, TLS change cipher, Client hello (1):
* SSLv3, TLS handshake, Finished (20):
* SSLv3, TLS change cipher, Client hello (1):
* SSLv3, TLS handshake, Finished (20):
* SSL connection using DHE-RSA-AES256-SHA
* Server certificate:
*        subject: C=MX; ST=Nuevo Leon; L=Monterrey; O=Diverza informacion y Analisis  SAPI de CV; CN=*.buzonfiscal.com
*        start date: 2016-07-07 00:00:00 GMT
*        expire date: 2018-07-07 23:59:59 GMT
*        subjectAltName: tf.buzonfiscal.com matched
*        issuer: C=US; O=thawte, Inc.; CN=thawte SSL CA - G2
*        SSL certificate verify ok.
> GET /timbrado HTTP/1.1
> User-Agent: curl/7.19.7 (x86_64-suse-linux-gnu) libcurl/7.19.7 OpenSSL/0.9.8j zlib/1.2.3 libidn/1.10
> Host: tf.buzonfiscal.com
> Accept: */*
>
* SSLv3, TLS handshake, Hello request (0):
* SSLv3, TLS handshake, Client hello (1):
* SSLv3, TLS handshake, Server hello (2):
* SSLv3, TLS handshake, CERT (11):
* SSLv3, TLS handshake, Server key exchange (12):
* SSLv3, TLS handshake, Request CERT (13):
* SSLv3, TLS handshake, Server finished (14):
* SSLv3, TLS handshake, CERT (11):
* SSLv3, TLS handshake, Client key exchange (16):
* SSLv3, TLS change cipher, Client hello (1):
* SSLv3, TLS handshake, Finished (20):
* SSLv3, TLS alert, Server hello (2):
* SSL read: error:14094410:SSL routines:SSL3_READ_BYTES:sslv3 alert handshake failure, errno 0
* Empty reply from server
* Connection #0 to host tf.buzonfiscal.com left intact
curl: (52) SSL read: error:14094410:SSL routines:SSL3_READ_BYTES:sslv3 alert handshake failure, errno 0
* Closing connection #0

There is this line that we didn’t have before, which comes immediately after the server has received the GET request:

SSLv3, TLS handshake, Hello request (0):

I think that is the server requesting a certificate from the client (sometimes known as a digital ID). You don’t see that often but in government web sites I guess it happens, especially in Latin America.

Lessons learned
I eventually have learned after all these years that the ‐vv switch in curl gives helpful information for debugging purposes like we need here.

I had naively assumed that if a site requires a client certificate it would require it for all pages. These two examples belie that assumption. Depedning on the URI, the behaviour of curl is completely different. In other words one page requires a client certificate and the other doesn’t.

Where to get this client certificate
In my experience the web site owner normally issues you your client certificate. You can try to use a random one, self-signed etc, but that’s extremely unlikely to work since they’ve already bothered with this high level of security why wold they throw that effort away and permit a certificate that they can not verify?

Categories
Admin Network Technologies Security

IP address wall of shame

Intro
It can be very time-consuming to report bad actors on the Internet. The results are unpredictable and I suppose in some cases the situation could be worsened. Out of general frustration, I’ve decided to publicly list the worst offenders.

The details
These are individual IPs or networks that have initiated egregious hacking attempts against my server over the past few years.

I can list them as follows:

$ netstat ‐rn|cut ‐c‐16|egrep ‐v ^'10\.|172|169'

Kernel IP routing table
Destination     Gateway         Genmask
46.151.52.61    127.0.0.1       255.255.255.255
23.110.213.91   127.0.0.1       255.255.255.255
183.3.202.105   127.0.0.1       255.255.255.255
94.249.241.48   127.0.0.1       255.255.255.255
82.19.207.212   127.0.0.1       255.255.255.255
46.151.52.37    127.0.0.1       255.255.255.255
43.229.53.13    127.0.0.1       255.255.255.255
93.184.187.75   127.0.0.1       255.255.255.255
43.229.53.14    127.0.0.1       255.255.255.255
144.76.170.101  127.0.0.1       255.255.255.255
198.57.162.53   127.0.0.1       255.255.255.255
146.185.251.252 127.0.0.1       255.255.255.255
123.242.229.75  127.0.0.1       255.255.255.255
113.160.158.43  127.0.0.1       255.255.255.255
46.151.52.0     127.0.0.1       255.255.255.0
121.18.238.0    127.0.0.1       255.255.255.0
58.218.204.0    127.0.0.1       255.255.255.0
221.194.44.0    127.0.0.1       255.255.255.0
43.229.0.0      127.0.0.1       255.255.0.0
0.0.0.0         10.185.21.65    0.0.0.0

Added after the initial post
185.110.132.201/32
69.197.191.202/32 – 8/2016
119.249.54.0/24 – 10/2016
221.194.47.0/24 – 10/2016
79.141.162.0/23 – 10/2016
91.200.12.42 – 11/2016. WP login attempts
83.166.243.120 – 11/2016. WP login attempts
195.154.252.100 – 12/2016. WP login attemtps
195.154.252.0/23 – 12/2016. WP login attempts
91.200.12.155/24 – 12/2016. WP login attempts
185.110.132.202 – 12/2016. ssh attempts
163.172.0.0/16 – 12/2016. ssh attempts
197.88.63.63 – WP login attempts
192.151.151.34 – 4/2017. WP login attempts
193.201.224.223 – 4/2017. WP login attempts
192.187.98.42 – 4/2017. WP login attempts
192.151.159.2 – 5/2017. WP login attempts
192.187.98.43 – 6/2017. WP login attempts

The offense these IPs are guilty of is trying obsessively to log in to my server. Here is how I show login attempts:

$ cd /var/log; sudo last ‐f btmp|more

qwsazx   ssh:notty    175.143.54.193   Tue Jul 12 15:23    gone - no logout
qwsazx   ssh:notty    175.143.54.193   Tue Jul 12 15:23 - 15:23  (00:00)
pi       ssh:notty    185.110.132.201  Tue Jul 12 14:57 - 15:23  (00:26)
pi       ssh:notty    185.110.132.201  Tue Jul 12 14:57 - 14:57  (00:00)
ubnt     ssh:notty    185.110.132.201  Tue Jul 12 14:18 - 14:57  (00:39)
ubnt     ssh:notty    185.110.132.201  Tue Jul 12 14:18 - 14:18  (00:00)
brandon  ssh:notty    175.143.54.193   Tue Jul 12 13:46 - 14:18  (00:31)
brandon  ssh:notty    175.143.54.193   Tue Jul 12 13:46 - 13:46  (00:00)
ubnt     ssh:notty    185.110.132.201  Tue Jul 12 13:41 - 13:46  (00:04)
ubnt     ssh:notty    185.110.132.201  Tue Jul 12 13:41 - 13:41  (00:00)
root     ssh:notty    185.110.132.201  Tue Jul 12 13:08 - 13:41  (00:33)
PlcmSpIp ssh:notty    118.68.248.183   Tue Jul 12 13:03 - 13:08  (00:05)
PlcmSpIp ssh:notty    118.68.248.183   Tue Jul 12 13:02 - 13:03  (00:00)
support  ssh:notty    118.68.248.183   Tue Jul 12 13:02 - 13:02  (00:00)
glassfis ssh:notty    175.143.54.193   Tue Jul 12 12:59 - 13:02  (00:03)
glassfis ssh:notty    175.143.54.193   Tue Jul 12 12:59 - 12:59  (00:00)
support  ssh:notty    185.110.132.201  Tue Jul 12 12:34 - 12:59  (00:24)
support  ssh:notty    185.110.132.201  Tue Jul 12 12:34 - 12:34  (00:00)
amber    ssh:notty    175.143.54.193   Tue Jul 12 12:10 - 12:34  (00:24)
amber    ssh:notty    175.143.54.193   Tue Jul 12 12:10 - 12:10  (00:00)
admin    ssh:notty    185.110.132.201  Tue Jul 12 12:00 - 12:10  (00:09)
admin    ssh:notty    185.110.132.201  Tue Jul 12 12:00 - 12:00  (00:00)
steam1   ssh:notty    175.143.54.193   Tue Jul 12 11:29 - 12:00  (00:31)
steam1   ssh:notty    175.143.54.193   Tue Jul 12 11:29 - 11:29  (00:00)
robyn    ssh:notty    175.143.54.193   Tue Jul 12 08:37 - 11:29  (02:52)
robyn    ssh:notty    175.143.54.193   Tue Jul 12 08:37 - 08:37  (00:00)
postgres ssh:notty    209.92.176.23    Tue Jul 12 08:16 - 08:37  (00:20)
postgres ssh:notty    209.92.176.23    Tue Jul 12 08:16 - 08:16  (00:00)
root     ssh:notty    209.92.176.23    Tue Jul 12 08:16 - 08:16  (00:00)
a        ssh:notty    209.92.176.23    Tue Jul 12 08:16 - 08:16  (00:00)
plex     ssh:notty    175.143.54.193   Tue Jul 12 07:51 - 08:16  (00:24)
plex     ssh:notty    175.143.54.193   Tue Jul 12 07:51 - 07:51  (00:00)
root     ssh:notty    40.76.25.178     Tue Jul 12 06:06 - 07:51  (01:45)
pi       ssh:notty    64.95.100.89     Tue Jul 12 05:49 - 06:06  (00:16)
pi       ssh:notty    64.95.100.89     Tue Jul 12 05:49 - 05:49  (00:00)
...

The above is a sampling from today’s culprits. It’s a small, slow server so logins take a bit of time and brute force dictionary attacks are not going to succeed. But honestly, These IPs ought to be banned from the Internet for such flagrant abuse. I only add the ones to my route table which are multiply repeating offenders.

Here is the syntax on my server I use to add a network to this wall of shame:

$ sudo route add ‐net 221.194.44.0/24 gateway 127.0.0.1

So, yeah, I just send them to the loopback interface which prevents my servers from sending any packets to them. I could have used the Amazon AWS firewall but I find this more convenient – the command is always in my bash shell history.

A word about other approaches like fail2ban
Subject matter experts will point out the existence of tools, notably, fail2ban, which will handle excessive login attempts from a single IP. I already run fail2ban, which you can read about in this posting. The IPs above are generally those that somehow persisted and needed extraordinary measures in my opinion.

August 2017 update
I finally had to reboot my AWS instance after more than three years. I thought about my ssh usage pattern and decided it was really predictable: I either ssh from home or work, both of which have known IPs. And I’m simply tired of seeing all the hack attacks against my server. And I got better with the AWS console out of necessity.
Put it all together and you get a better way to deal with the ssh logins: simply block ssh (tcp port 22) with an AWS security group rule, except from my home and work.

References and related
My original defense began with an implementation of fail2ban. This is the write-up.

Categories
Admin Apache CentOS Network Technologies Security Web Site Technologies

Idea for free web server certificates: Let’s Encrypt

Intro
I’ve written various articles about SSL. I just came across a way to get your certificates for free, letsencrypt.org. But their thing is to automate certificate management. I think you have to set up the whole automated certificate management environment just to get one of their free certificates. So that’s a little unfortunate, but I may try it and write up my experience with it in this blog (Update: I did it!). Stay tuned.

Short duration certificates
I recently happened upon a site that uses one of these certificates and was surprised to see that it expires in 90 days. All the certificate I’ve ever bought are valid for at least a year, sometimes two or three. But Let’s Encrypt has a whole page justifying their short certificates which kind of makes sense. It forces you to adopt their automation processes for renewal because it will be too burdensome for site admins to constantly renew these certificates by hand the way they used to.

November 2016 update
Since posting this article I have worked with a hosting firm a little bit. I was surprised by how easily he could get for one of “my” domain names. Apparently all it took was that Let’s Encrypt could verify that he owned the IP address which my domain name resolved to. That’s different from the usual way of verification where the whois registration of the domain gets queried. That never happened here! I think by now the Let’s Encrypt CA, IdenTrust Commercial Root CA 1, is accepted by the major browsers.

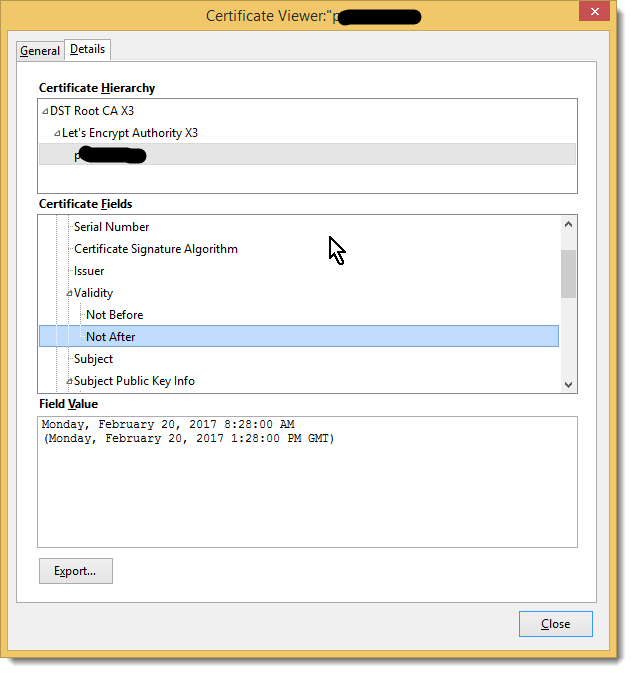
Here’s a picture that shows one of these certificates which was just issued November, 2016 with its short expiration.

lets-encrypt-2016-11-22_15-03-39

My own experience in getting a certificate
I studied the ACME protocol a little bit. It’s complicated. Nothing’s easy these days! So you need a program to help you implement it. I went with acme.sh over Certbot because it is much more lightweight – works through bash shell. Certbot wanted to update about 40 packages on my system, which really seems like overkill.

I’m very excited about how easy it was to get my first certificate from letsencrypt! Worked first time. I made sure the account I ran this command from had write access to the HTMLroot (the “webroot”) because an authentication challenge occurs to prove that I administer that web server:

$ acme.sh ‐‐issue ‐d drjohnstechtalk.com ‐w /web/drj

[Wed Nov 30 08:55:54 EST 2016] Registering account
[Wed Nov 30 08:55:56 EST 2016] Registered
[Wed Nov 30 08:55:57 EST 2016] Update success.
[Wed Nov 30 08:55:57 EST 2016] Creating domain key
[Wed Nov 30 08:55:57 EST 2016] Single domain='drjohnstechtalk.com'
[Wed Nov 30 08:55:57 EST 2016] Getting domain auth token for each domain
[Wed Nov 30 08:55:57 EST 2016] Getting webroot for domain='drjohnstechtalk.com'
[Wed Nov 30 08:55:57 EST 2016] _w='/web/drj'
[Wed Nov 30 08:55:57 EST 2016] Getting new-authz for domain='drjohnstechtalk.com'
[Wed Nov 30 08:55:58 EST 2016] The new-authz request is ok.
[Wed Nov 30 08:55:58 EST 2016] Verifying:drjohnstechtalk.com
[Wed Nov 30 08:56:02 EST 2016] Success
[Wed Nov 30 08:56:02 EST 2016] Verify finished, start to sign.
[Wed Nov 30 08:56:03 EST 2016] Cert success.
-----BEGIN CERTIFICATE-----
MIIFCjCCA/KgAwIBAgISA8T7pQeg535pA45tryZv6M4cMA0GCSqGSIb3DQEBCwUA
MEoxCzAJBgNVBAYTAlVTMRYwFAYDVQQKEw1MZXQncyBFbmNyeXB0MSMwIQYDVQQD
ExpMZXQncyBFbmNyeXB0IEF1dGhvcml0eSBYMzAeFw0xNjExMzAxMjU2MDBaFw0x
NzAyMjgxMjU2MDBaMB4xHDAaBgNVBAMTE2Ryam9obnN0ZWNodGFsay5jb20wggEi
MA0GCSqGSIb3DQEBAQUAA4IBDwAwggEKAoIBAQC1PScaoxACI0jhsgkNcbd51YzK
eVI/P/GuFO8VCTYvZAzxjGiDPfkEmYSYw5Ii/c9OHbeJs2Gj5b0tSph8YtQhnpgZ
c+3FGEOxw8mP52452oJEqrUldHI47olVPv+gnlqjQAMPbtMCCcAKf70KFc1MiMzr
2kpGmJzKFzOXmkgq8bv6ej0YSrLijNFLC7DoCpjV5IjjhE+DJm3q0fNM3BBvP94K
jyt4JSS1d5l9hBBIHk+Jjg8+ka1G7wSnqJVLgbRhEki1oh8HqH7JO87QhJA+4MZL
wqYvJdoundl8HahcknJ3ymAlFXQOriF23WaqjAQ0OHOCjodV+CTJGxpl/ninAgMB
AAGjggIUMIICEDAOBgNVHQ8BAf8EBAMCBaAwHQYDVR0lBBYwFAYIKwYBBQUHAwEG
CCsGAQUFBwMCMAwGA1UdEwEB/wQCMAAwHQYDVR0OBBYEFGaLNxVgpSFqgf5eFZCH
1B7qezB6MB8GA1UdIwQYMBaAFKhKamMEfd265tE5t6ZFZe/zqOyhMHAGCCsGAQUF
BwEBBGQwYjAvBggrBgEFBQcwAYYjaHR0cDovL29jc3AuaW50LXgzLmxldHNlbmNy
eXB0Lm9yZy8wLwYIKwYBBQUHMAKGI2h0dHA6Ly9jZXJ0LmludC14My5sZXRzZW5j
cnlwdC5vcmcvMB4GA1UdEQQXMBWCE2Ryam9obnN0ZWNodGFsay5jb20wgf4GA1Ud
IASB9jCB8zAIBgZngQwBAgEwgeYGCysGAQQBgt8TAQEBMIHWMCYGCCsGAQUFBwIB
FhpodHRwOi8vY3BzLmxldHNlbmNyeXB0Lm9yZzCBqwYIKwYBBQUHAgIwgZ4MgZtU
aGlzIENlcnRpZmljYXRlIG1heSBvbmx5IGJlIHJlbGllZCB1cG9uIGJ5IFJlbHlp
bmcgUGFydGllcyBhbmQgb25seSBpbiBhY2NvcmRhbmNlIHdpdGggdGhlIENlcnRp
ZmljYXRlIFBvbGljeSBmb3VuZCBhdCBodHRwczovL2xldHNlbmNyeXB0Lm9yZy9y
ZXBvc2l0b3J5LzANBgkqhkiG9w0BAQsFAAOCAQEAc4w4a+PFpZqpf+6IyrW31lj3
iiFIpWYrmg9sa79hu4rsTxsdUs4K9mOKuwjZ4XRfaxrRKYkb2Fb4O7QY0JN482+w
PslkPbTorotcfAhLxxJE5vTNQ5XZA4LydH1+kkNHDzbrAGFJYmXEu0EeAMlTRMUA
N1+whUECsWBdAfBoSROgSJIxZKr+agcImX9cm4ScYuWB8qGLK98RTpFmGJc5S52U
tQrSJrAFCoylqrOB67PXmxNxhPwGmvPQnsjuVQMvBqUeJMsZZbn7ZMKr7NFMwGD4
BTvUw6gjvN4lWvs82M0tRHbC5z3mALUk7UXrQqULG3uZTlnD7kA8C39ulwOSCQ==
-----END CERTIFICATE-----
[Wed Nov 30 08:56:03 EST 2016] Your cert is in  /home/drj/.acme.sh/drjohnstechtalk.com/drjohnstechtalk.com.cer
[Wed Nov 30 08:56:03 EST 2016] Your cert key is in  /home/drj/.acme.sh/drjohnstechtalk.com/drjohnstechtalk.com.key
[Wed Nov 30 08:56:04 EST 2016] The intermediate CA cert is in  /home/drj/.acme.sh/drjohnstechtalk.com/ca.cer
[Wed Nov 30 08:56:04 EST 2016] And the full chain certs is there:  /home/drj/.acme.sh/drjohnstechtalk.com/fullchain.cer

Behind the scenes the authentication resulted in these two accesses to my web server:

66.133.109.36 - - [30/Nov/2016:08:55:59 -0500] "GET /.well-known/acme-challenge/EJlPv9ar7lxvlegqsdlJvsmXMTyagbBsWrh1p-JoHS8 HTTP/1.1" 301 618 "-" "Mozilla/5.0 (compatible; Let's Encrypt validation server; +https://www.letsencrypt.org)"
66.133.109.36 - - [30/Nov/2016:08:56:00 -0500] "GET /.well-known/acme-challenge/EJlPv9ar7lxvlegqsdlJvsmXMTyagbBsWrh1p-JoHS8 HTTP/1.1" 200 5725 "http://drjohnstechtalk.com/.well-known/acme-challenge/EJlPv9ar7lxvlegqsdlJvsmXMTyagbBsWrh1p-JoHS8" "Mozilla/5.0 (compatible; Let's Encrypt validation server; +https://www.letsencrypt.org)" "drjohnstechtalk.com"

The first was HTTP which I redirect to https while preserving the URL, hence the second request. You see now why I needed write access to the webroot of my web server.

Refine our approach
In the end iI decided to run as root in order to protect the private key from prying eyes. This looked like this:

$ acme.sh ‐‐issue ‐‐force ‐d drjohnstechtalk.com ‐w /web/drj ‐‐reloadcmd "service apache24 reload" ‐‐certpath /etc/apache24/certs/drjohnstechtalk.crt ‐‐keypath /etc/apache24/certs/drjohnstechtalk.key ‐‐fullchainpath /etc/apache24/certs/fullchain.cer

What’s a nice feature about acme.sh is that it remembers parameters you’ve typed by hand and fills them into a single convenient configuration file. So the contents of mine look like this:

Le_Domain='drjohnstechtalk.com'
Le_Alt='no'
Le_Webroot='/web/drj'
Le_PreHook=''
Le_PostHook=''
Le_RenewHook=''
Le_API='https://acme-v01.api.letsencrypt.org'
Le_Keylength=''
Le_LinkCert='https://acme-v01.api.letsencrypt.org/acme/cert/037fe5215bb5f4df6a0098fefd50b83b046b'
Le_LinkIssuer='https://acme-v01.api.letsencrypt.org/acme/issuer-cert'
Le_CertCreateTime='1480710570'
Le_CertCreateTimeStr='Fri Dec  2 20:29:30 UTC 2016'
Le_NextRenewTimeStr='Tue Jan 31 20:29:30 UTC 2017'
Le_NextRenewTime='1485808170'
Le_RealCertPath='/etc/apache24/certs/drjohnstechtalk.crt'
Le_RealCACertPath=''
Le_RealKeyPath='/etc/apache24/certs/drjohnstechtalk.key'
Le_ReloadCmd='service apache24 reload'
Le_RealFullChainPath='/etc/apache24/certs/fullchain.cer'

References and related
Examples of using Lets Encrypt with domain (DNS) validation: How I saved $69 a year on certificate cost.
The Let’s Encrypt web site, letsencrypt.org
When I first switched from http to https: drjohnstechtalk is now an encrypted web site
Ciphers
Let’s Encrypt’s take on those short-lived certificates they issue: Why 90-day certificates
acme.sh script which I used I obtained from this site: https://github.com/Neilpang/acme.sh
CERTbot client which implements ACME protocol: https://certbot.eff.org/
IETF ACME draft proposal: https://datatracker.ietf.org/doc/draft-ietf-acme-acme/?include_text=1

Categories
Security Web Site Technologies

Microsoft Exchange Online Protection is not PCI compliant

Intro
Microsoft’s cloud offering, Office 365, is pretty good for enterprises. It’s clear a lot of thought has been put into it, especially the security model. But it isn’t perfect and one area where it surprisingly falls short is compliance with payment card industry specifications.

The details
You need to have PCI (payment card industry) compliance to work with credit cards.

An outfit I am familiar with did a test Qualys run to check out our PCI failings. Of course there were some findings that constitute failure – simple things like using non-secure cookies. Those were all pretty simply corrected.

But the probe also looked at the MX records of the DNS domain and consequently at the MX servers. These happened to be EOP servers in the Azure cloud. They also had failures. A case was opened with Microsoft and as they feared, Microsoft displayed big-company-itis and absolutely refused to do anything about it, insisting that they have sufficient security measures in place.

So they tried a scan using a different security vendor, Comodo, using a trial license. Microsoft’s EOP servers failed that PCI compliance verification as well.

More details
The EOP servers gave a response when probed by UDP packets originating from port 53, but not when originating from some random port. That doesn’t sound like the end of the world, but there are so many exploits these days that I just don’t know. As I say Microsoft feels it has other security measures in place so they don’t see this as a real security problem. But explanations do not have a place in PCI compliance testing so they simply fail.

Exception finally granted
Well all this back-and-forth between Qualys and Microsoft did produce the desired result in the end. Qualys agreed with Micrsoft’s explanation of their counter-measures and gave them a pass in the end! So after many weeks the web site finally achieved PCI-DSS certification.

Conclusion
Microsoft’s cloud mail offering, Exchange Online Protection, is not PCI compliant according to standard testing by security vendors. As far as I know you literally cannot use EOP if you want your web site to accept credit card payments unless you get a by-hand exception from the security vendor whose test is used, which is what happened in this case after much painful debate. Also as far as I know I am the first person to publicly identify this problem.

Categories
Admin Network Technologies Proxy Security TCP/IP Web Site Technologies

The IT Detective Agency: Cisco Jabber stopped working for some using WAN connections

Intro
This is probably the hardest case I’ve ever encountered. It’s so complicated many people needed to get involved to contribute to the solution.

Initial symptoms

It’s not easy to describe the problem while providing appropriate obfuscation. Over the course of a few days it came to light that in this particular large company for which I consult many people in office locations connected via an MPLS network were no longer able to log in to Cisco Jabber. That’s Cisco’s offering for Instant Messaging. When it works and used in combination with Cisco IP phones it’s pretty good – has some nice features. This major problem was first reported November 17th.

Knee-jerk reactions
Networking problem? No. Network guys say their networks are running fine. They may be a tad overloaded but they are planning to route Internet over the secondary links so all will be good in a few days.
Proxy problem? Nope. proxy guys say their Bluecoat appliances are running fine and besides everyone else is working.
Application problem? Application owner doesn’t see anything out of the ordinary.
Desktop problem? Maybe but it’s unclear.

Methodology
So of the 50+ users affected I recognized two power users that I knew personally and focussed on them. Over the course of days I learned:
– problem only occurs for WAN (MPLS) users
– problem only occurs when using one particular proxy
– if a user tries to connect often enough, they may eventually get in
– users can get in if they use their VPN client
– users at HQ were not affected

The application owner helpfully pointed out the URL for the web-based version of Cisco Jabber: https://loginp.webexconnect.com/… Anyone with the problem also could not log in to this site.

So working with these power users who patiently put up with many test suggestions we learned:

– setting the PC’s MTU to a small value, say 512 up to 696 made it work. Higher than that it generally failed.
– yet pings of up to 1500 bytes went through OK.
– the trace from one guy’s PC showed all his packets re-transmitted. We still don’t understand that.
– It’s a mess of communications to try to understand these modern, encrypted applications
– even the simplest trace contained over 1000 lines which is tough when you don’t know what you’re looking for!
– the helpful networking guy from the telecom company – let’s call him “Regal” – worked with us but all the while declaring how it’s impossible that it’s a networking issue
– proxy logs didn’t show any particular problem, but then again they cannot look into SSL communication since it is encrypted
– disabling Kaspersky helped some people but not others
– a PC with the problem had no problem when put onto the Internet directly
– if one proxy associated with the problem forwarded the requests to another, then it begins to work
– Is the problem reproducible? Yes, about 99% of the time.
– Do other web sites work from this PC? Yes.

From previous posts you will know that at some point I will treat every problem as a potential networking problem and insist on a trace.

Biases going in
So my philosophy of problem solving which had stood the test of time is either it’s a networking problem, or it’s a problem on the PC. Best is if there’s a competition of ideas in debugging so that the PC/application people seek to prove beyond a doubt it is a networking problem and the networking people likewise try to prove problem occurs on the PC. Only later did I realize the bias in this approach and that a third possibility existed.

So I enthused: what we need is a non-company PC – preferably on the same hardware – at the same IP address to see if there’s a problem. Well we couldn’t quite produce that but one power user suggested using a VM. He just happened to have a VM environment on his PC and could spin up a Windows 7 Professional generic image! So we do that – it shows the problem. But at least the trace form it is a lot cleaner without all the overhead of the company packages’ communication.

The hard work
So we do the heavy lifting and take a trace on both his VM with the problem and the proxy server and sit down to compare the two. My hope was to find a dropped packet, blame the network and let those guys figure it out. And I found it. After the client hello (this is a part of the initial SSL protocol) the server responds with its server hello. That packet – a largeish packet of 1414 bytes – was not coming through to the client! It gets re-transmitted multiple times and none of the re-transmits gets through to the PC. Instead the PC receives a packet the proxy never sent it which indicates a fatal SSL error has occurred.

So I tell Regal that look there’s a problem with these packets. Meanwhile Regal has just gotten a new PC and doesn’t even have Wireshark. Can you imagine such a world? It seems all he really has is his tongue and the ability to read a few emails. And he’s not convinced! He reasons after all that the network has no intelligent, application-level devices and certainly wouldn’t single out Jabber communication to be dropped while keeping everything else. I am no desktop expert so I admit that maybe some application on the PC could have done this to the packets, in effect admitting that packets could be intercepted and altered by the PC even before being recorded by Wireshark. After all I repeated this mantra many times throughout:

This explanation xyz is unlikely, and in fact any explanation we can conceive of is unlikely, yet one of them will prove to be correct in the end.

Meanwhile the problem wasn’t going away so I kludged their proxy PAC file to send everyone using jabber to the one proxy where it worked for all.

So what we really needed was to create a span port on the switch where the PC was plugged in and connect a 2nd PC to a port enabled in promiscuous mode with that mirrored traffic. That’s quite a lot of setup and we were almost there when our power user began to work so we couldn’t reproduce the problem. That was about Dec 1st. Then our 2nd power user also fell through and could no longer reproduce the problem either a day later.

10,000 foot view
What we had so far is a whole bunch of contradictory evidence. Network? Desktop? We still could not say due to the contradictions, the likes of which I’ve never witnessed.

Affiliates affected and find the problem
Meanwhile an affiliate began to see the problem and independently examined it. They made much faster progress than we did. Within a day they found the reason (suggested by their networking person from the telecom, who apparently is much better than ours): the server hello packet has the expedited forwarding (EF) flag set in the differentiated code services point (DSCP) section of the IP header.

Say what?
So I really got schooled on this one. I was saying It has to be an application-aware “something” on the network or PC that is purposefully messing around with the SSL communication. That’s what the evidence screamed to me. So a PC-based firewall seemed a strong contender and that is how Regal was thinking.

So the affiliate explained it this way: the company uses QOS on their routers. Phone (VOIP) gets priority and is the only application where the EF bit is expected to be set. VOIP packets are small, by the way. Regular applications like web sites should just use the default QOS. And according to Wikipedia, many organizations who do use QOS will impose thresholds on the EF pakcets such that if the traffic exceeds say 30% of link capacity drop all packets with EF set that are over a certain size. OK, maybe it doesn’t say that, but that is what I’ve come to understand happens. Which makes the dropping of these particular packets the correct behaviour as per the company’s own WAN contract and design. Imagine that!

Smoking gun no more
So now my smoking gun – blame it on the network for dropped packets – is turned on its head. Cisco has set this EF bit on its server hello response on the loginp.webexconnect.com web site. This is undesirable behaviour. It’s not a phone call after all which requires a minimum jitter in packet timing.

So next time I did a trace I found that instead of EF flag being set, the AF (Assured Forwarding) flag was set. I suppose that will make handling more forgiving inside the company’s network, but I was told that even that was too much. Only default value of 0 should be set for the DSCP value. This is an open issue in Cisco’s hands now.

But at least this explains most observations. Small MTU worked? Yup, those packets are looked upon more favorably by the routers. One proxy worked, the other did not? Yup, they are in different data centers which have different bandwidth utilization. The one where it was not working has higher utilization. Only affected users are at WAN sites? Yup, probably only the WAN routers are enforcing QOS. Worked over VPN, even on a PC showing the problem? Yup – all VPN users use a LAN connection for their proxy settings. Fabricated SSL fatal error packet? I’m still not sure about that one – guess the router sent it as a courtesy after it decided to drop the server hello – just a guess. Problem fixed by shutting down Kaspersky? Nope, guess that was a red herring. Every problem has dead ends and red herrings, just a fact of life. And anyway that behaviour was not very consistent. Problem started November 17th? Yup, the affiliate just happened to have a baseline packet trace from November 2nd which showed that DSCP was not in use at that time. So Cisco definitely changed the behaviour of Cisco Jabber sometime in the intervening weeks. Other web sites worked, except this one? Yup, other web sites do not use the DSCP section of the IP header so it has the default value of 0.

Conclusion
Cisco has decided to remove the DSCP flag from these packets, which will fix everything. Perhaps EF was introduced in support of Cisco Jabber’s extended use as a soft phone??? Then this company may have some re-design of their QOS to take care of because I don’t see an easy solution. Dropping the MTU on the proxy to 512 seems pretty drastic and inefficient, though it would be possible. My reading of TCP is that nothing prevents QOS from being set on any sort of TCP packet even though there may be a gentleman’s agreement to not ordinarily do so in all except VOIP packets or a few other special classes. I don’t know. I’ve really never looked at QOS before this problem came along.

The company is wisely looking for a way to set all packets with DSCP = 0 on the Intranet, except of course those like VOIP where it is explicitly supposed to be used. This will be done on the Internet router. In Cisco IOS it is possible with a policy map and police setting where you can set set-dscp-transmit default. Apparently VPN and other things that may check the integrity of packets won’t mind the DSCP value being altered – it can happen anywhere along the route of the packet.

Boy applications these days are complicated! And those rare times when they go wrong really require a bunch of cooperating experts to figure things out. No one person holds all the expertise any longer.

My simplistic paradigm of its either the PC or the network had to make room for a new reality: it’s the web site in the cloud that did them in.

Could other web sites be similarly affected? Yes it certainly seems a possibility. So I now know to check for use of DSCP if a particular web site is not working, but all others are.

References and related
This Wikipedia article is a good description of DSCP: https://en.wikipedia.org/wiki/Differentiated_services

Categories
Admin CentOS Linux Security

The IT Detective Agency: WordPress login failure leads to discovery of ssh brute force attack

Intro
Yes my WordPress instance never gave any problems for years. Then one day my usual username/password wouldn’t log me in! One thing led to another until I realized I was under an ssh brute force attack from Hong Kong. Then I implemented a software that really helped the situation…

The details
Login failure

So like anyone would do, I double-checked that I was typing the password correctly. Once I convinced myself of that I went to an ssh session I had open to it. When all else fails restart, right? Except this is not Windows (I run CentOS) so there’s no real need to restart the server. There very rarely is.

Mysql fails to start
So I restarted mysql and the web server. I noticed mysql database wasn’t actually starting up. It couldn’t create a PID file or something – no space left on device.

No space on /
What? I never had that problem before. In an enterprise environment I’d have disk monitors and all that good stuff but as a singeleton user of Amazon AWS I suppose they could monitor and alert me to disk problems but they’d probably want to charge me for the privilege. So yeah, a df -k showed 0 bytes available on /. That’s never a good thing.

/var/log very large
So I ran a du -k from / and sent the output to /tmp/du-k so I could preview at my leisure. Fail. Nope, can’t do that because I can’t write to /tmp because it’s on the / partition in my simple-minded server configuration! OK. Just run du -k and scan results by eye… I see /var/log consumes about 3 GB out of 6 GB available which is more than I expected.

btmp is way too large
So I did an ls -l in /var/log and saw that btmp alone is 1.9 GB in size. What the heck is btmp? Some searches show it to be a log use to record ssh login attempts. What is it recording?

Disturbing contents of btmp
I learned that to read btmp you do a
> last -f btmp
The output is zillions of lines like these:

root     ssh:notty    43.229.53.13     Mon Oct 26 14:56 - 14:56  (00:00)
...

I estimate roughly 3.7 login attempts per second. And it’s endless. So I consider it a brute force attack to gain root on my server. This estimate is based on extrapolating from a 10-minute interval by doing one of these:

> last -f btmp|grep ‘Oct 26 14:5’|wc

and dividing the result by 10 min * 60 s/min.

First approach to stop it
I’m at networking guy at heart and remember when you have a hammer all problems look like nails 😉 ? What is the network nail in this case? The attacker’s IP address of course. We can just make sure packets originating from that IP can’t get returned form my server, by doing one of these:

> route add -host 43.229.53.13 gw 127.0.0.1

Check it with one of these:

> netstat -rn

Kernel IP routing table
Destination     Gateway         Genmask         Flags   MSS Window  irtt Iface
43.229.53.13    127.0.0.1       255.255.255.255 UGH       0 0          0 lo
10.185.21.64    0.0.0.0         255.255.255.192 U         0 0          0 eth0
169.254.0.0     0.0.0.0         255.255.0.0     U         0 0          0 eth0
0.0.0.0         10.185.21.65    0.0.0.0         UG        0 0          0 eth0

Then watch the btmp grow silent since now your server sends the reply packets to its loopback interface where they die.

Short-lived satisfaction
But the pleasure and pats on your back will be short-lived as a new attack from a new IP will commence within the hour. And you can squelch that one, too, but it gets tiresome as you stay up all night keeping up with things.

Although it wouldn’t bee too too difficult to script the recipe above and automate it, I decided it might even be easier still to find a package out there that does the job for me. And I did. It’s called

fail2ban

You can get it from the EPEL repository of CentOS, making it particularly easy to install. Something like:

$ yum install fail2ban

will do the trick.

I like fail2ban because it has the feel of a modern package. It’s written in python for instance and it is still maintained by its author. There are zillions of options which make it daunting at first.

To stop these ssh attacks in their tracks all you need is to create a jail.local file in /etc/fail2ban. Mine looks like this:

# DrJ - enable sshd monitoring
[DEFAULT]
bantime = 3600
# exempt CenturyLink
ignoreip = 76.6.0.0/16  71.48.0.0/16
#
[sshd]
enabled = true

Then reload it:

$ service fail2ban reload

and check it:

$ service fail2ban status

fail2ban-server (pid  28459) is running...
Status
|- Number of jail:      1
`- Jail list:   sshd

And most sweetly of all, wait a day or two and appreciate the marked change in the contents of btmp or secure:

support  ssh:notty    117.4.240.22     Mon Nov  2 07:05    gone - no logout
support  ssh:notty    117.4.240.22     Mon Nov  2 07:05 - 07:05  (00:00)
dff      ssh:notty    62.232.207.210   Mon Nov  2 03:38 - 07:05  (03:26)
dff      ssh:notty    62.232.207.210   Mon Nov  2 03:38 - 03:38  (00:00)
zhangyan ssh:notty    62.232.207.210   Mon Nov  2 03:38 - 03:38  (00:00)
support  ssh:notty    117.4.240.22     Sun Nov  1 22:47 - 03:38  (04:50)
support  ssh:notty    117.4.240.22     Sun Nov  1 22:47 - 22:47  (00:00)
oracle   ssh:notty    180.210.201.106  Sun Nov  1 20:44 - 22:47  (02:03)
oracle   ssh:notty    180.210.201.106  Sun Nov  1 20:44 - 20:44  (00:00)
a        ssh:notty    180.210.201.106  Sun Nov  1 20:44 - 20:44  (00:00)
openerp  ssh:notty    123.212.42.241   Sun Nov  1 20:40 - 20:44  (00:04)
openerp  ssh:notty    123.212.42.241   Sun Nov  1 20:40 - 20:40  (00:00)
dff      ssh:notty    187.210.58.215   Sun Nov  1 20:36 - 20:40  (00:04)
dff      ssh:notty    187.210.58.215   Sun Nov  1 20:36 - 20:36  (00:00)
zhangyan ssh:notty    187.210.58.215   Sun Nov  1 20:36 - 20:36  (00:00)
zhangyan ssh:notty    187.210.58.215   Sun Nov  1 20:35 - 20:36  (00:00)
root     ssh:notty    82.138.1.118     Sun Nov  1 19:57 - 20:35  (00:38)
root     ssh:notty    82.138.1.118     Sun Nov  1 19:49 - 19:57  (00:08)
root     ssh:notty    82.138.1.118     Sun Nov  1 19:49 - 19:49  (00:00)
PlcmSpIp ssh:notty    82.138.1.118     Sun Nov  1 18:42 - 19:49  (01:06)
PlcmSpIp ssh:notty    82.138.1.118     Sun Nov  1 18:42 - 18:42  (00:00)
oracle   ssh:notty    82.138.1.118     Sun Nov  1 18:34 - 18:42  (00:08)
oracle   ssh:notty    82.138.1.118     Sun Nov  1 18:34 - 18:34  (00:00)
karaf    ssh:notty    82.138.1.118     Sun Nov  1 18:18 - 18:34  (00:16)
karaf    ssh:notty    82.138.1.118     Sun Nov  1 18:18 - 18:18  (00:00)
vagrant  ssh:notty    82.138.1.118     Sun Nov  1 17:13 - 18:18  (01:04)
vagrant  ssh:notty    82.138.1.118     Sun Nov  1 17:13 - 17:13  (00:00)
ubnt     ssh:notty    82.138.1.118     Sun Nov  1 17:05 - 17:13  (00:08)
ubnt     ssh:notty    82.138.1.118     Sun Nov  1 17:05 - 17:05  (00:00)
...

The attacks still come, yes, but they are so quickly snuffed out that there is almost no chance of correctly guessing a password – unless the attacker has a couple centuries on their hands!

Augment fail2ban with a network nail

Now in my case I had noticed attacks coming from various IPs around 43.229.53.13, and I’m still kind of disturbed by that, even after fail2ban was implemented. Who is that? Arin.net said that range is handled by apnic, the Asia pacific NIC. apnic’s whois (apnic.net) says it is a building in Mong Kok district of Hong Kong. Now I’ve been to Hong Kong and the Mong Kok district. It’s very expensive real estate and I think the people who own that subnet have better ways to earn money than try to pwn AWS servers. So I think probably mainland hackers have a backdoor to this Hong Kong network and are using it as their playground. Just a wild guess. So anyhow I augmented fail2ban with a network route to prevent all such attacks form that network:

$ route add -net 43.229.0.0/16 gw 127.0.0.1

A few words on fail2ban

How does fail2ban actually work? It manipulates the local firewall, iptables, as needed. So it will activate iptables if you aren’t already running it. Right now my iptables looks clean so I guess fail2ban hasn’t found anything recently to object to:

$ iptables -L

Chain INPUT (policy ACCEPT)
target     prot opt source               destination
f2b-sshd   tcp  --  anywhere             anywhere            multiport dports ssh
 
Chain FORWARD (policy ACCEPT)
target     prot opt source               destination
 
Chain OUTPUT (policy ACCEPT)
target     prot opt source               destination
 
Chain f2b-sshd (1 references)
target     prot opt source               destination
RETURN     all  --  anywhere             anywhere

Indeed, checking my messages file the most recent ban was over an hour ago – in the early morning:

Nov  2 03:38:49 ip-10-185-21-116 fail2ban.actions[28459]: NOTICE [sshd] Ban 62.232.207.210

And here is fail2ban doing its job since the log files were rotated at the beginning of the month:

$ cd /var/log; grep Ban messages

Nov  1 04:56:19 ip-10-185-21-116 fail2ban.actions[28459]: NOTICE [sshd] Ban 185.61.136.43
Nov  1 05:49:21 ip-10-185-21-116 fail2ban.actions[28459]: NOTICE [sshd] Ban 5.8.66.78
Nov  1 11:27:53 ip-10-185-21-116 fail2ban.actions[28459]: NOTICE [sshd] Ban 61.147.103.184
Nov  1 11:32:51 ip-10-185-21-116 fail2ban.actions[28459]: NOTICE [sshd] Ban 118.69.135.24
Nov  1 16:57:05 ip-10-185-21-116 fail2ban.actions[28459]: NOTICE [sshd] Ban 162.246.16.55
Nov  1 17:13:17 ip-10-185-21-116 fail2ban.actions[28459]: NOTICE [sshd] Ban 82.138.1.118
Nov  1 18:42:36 ip-10-185-21-116 fail2ban.actions[28459]: NOTICE [sshd] Ban 82.138.1.118
Nov  1 19:57:55 ip-10-185-21-116 fail2ban.actions[28459]: NOTICE [sshd] Ban 82.138.1.118
Nov  1 20:36:05 ip-10-185-21-116 fail2ban.actions[28459]: NOTICE [sshd] Ban 187.210.58.215
Nov  1 20:44:17 ip-10-185-21-116 fail2ban.actions[28459]: NOTICE [sshd] Ban 180.210.201.106
Nov  2 03:38:49 ip-10-185-21-116 fail2ban.actions[28459]: NOTICE [sshd] Ban 62.232.207.210

Almost forgot to mention
How did I free up space so I could still examine btmp? I deleted an older large log file, secure-20151011 which was about 400 MB. No reboot necessary of course. Mysql restarted successfully as did the web servers and I was back in business logging in to my WP site.

August 2017 update
I finally had to reboot my AWS instance after more than three years. I thought about my ssh usage pattern and decided it was really predictable: I either ssh from home or work, both of which have known IPs. And I’m simply tired of seeing all the hack attacks against my server. And I got better with the AWS console out of necessity.
Put it all together and you get a better way to deal with the ssh logins: simply block ssh (tcp port 22) with an AWS security group rule, except from my home and work.

Conclusion
The mystery of the failed WordPress login is examined in great detail here. The case was cracked wide open and the trails that were followed led to discovery of a brute force attempt to gain root access to the hosting server. Methods were implemented to ward off these attacks. An older log file was deleted from /var/log and mysql restarted. WordPress logins are working once again.

References and related info
fail2ban is documented in a wiki of uneven quality at www.fail2ban.org.
Another tool is DenyHosts. One of the ideas behind DenyHosts – its capability to share data – sound great, but look at this page: http://stats.denyhosts.net/stats.html. “Today’s data” is date-stamped July 11, 2011 – four years ago! So something seems amiss there. So it looks like development was suddenly abandoned four years ago – never a good sign for a security tool.

Categories
Admin Linux Security

Citrix problems with SHA2 certificates SSL error 61

Intro
Basically all certificates issued these days use the SHA2 signing algorithm whereas a year ago or for some CAs just a few months ago this was not the case and the SHA1 signing algorithm was being used. This change causes some compatibility problems.

The details
It can be a little hard to test a new certificate with Citrix Secure Gateway. If you try it and pray, you may well find that a majority of Citrix clients can connect your Secure Gateway but some cannot. They may even see SSL error 61.

So if you dutifully go to this Citrix support page, TID 101990, you read a very convincing description of the problem and why it happens. The only thing is, it is probably totally wrong for your case! Because in it they argue that your certificate is faulty and go back to your CA and get a good one! Ridiculous! I’ve dealt with lots of CAs and gotten lots of certificates. Never had a faulty one like that.

So what’s the real explanation? I think it is that their own Citrix client is out-of-date on the PC where it isn’t working and doesn’t support SHA2! This is still an unfolding story so that involves a little speculation. Upgrade the Citrix Receiver client and try again.

But of course you need to do your basic homework and make sure the basic stuff is in order. Use openssl to fetch your certificate and certificate chain and have a look at them to make sure you’ve really set it up right. A beginner’s mistake is to forget to include the intermediate CERT. Perhaps that could cause the SSL error 61 as well. And of course you need a certificate issued by a legitimate CA. A self-signed certificate will probably definitely give you an SSL error 61.

Given time I’ll show how to check if your certificate – or any other reference certificate you want to compare it to- uses SHA1 or SHA2.

To be updated if I get more conclusive information…

Conclusion
Citrix is giving out misleading or wrong advice about SSL error 61.

References and related articles
This site seems to confirm the widespread problem with many Citrix clients and SHA2 certificates.
http://www.p2vme.com/2014/02/sha2-certificates-and-citrix-receiver.html
This site talks about the dangers of SHA1 certificates and what Microsoft is doing about it.

Categories
Security

Encrypting the cloud from your desktop

Background
More and more private users are storing their digital goods in the cloud. You can’t beat the convenience. But prying eyes, intelligence agencies or what-not may be a concern.

Solution
I just learned about a product from a German company called Boxcryptor. It is compatible with Google Drive, Dropbox, etc. It runs on your desktop, or ipad, Android phone, Macbook, etc. So it may be an appropriate choice. I believe you can even be selective about which directories to encrypt. So maybe put your photos in one folder, leave them be, and your financial spreadsheets in another and just encrypt that.

There is a modest annual fee.

I haven’t _personally_ tried it. It was recommended and demonstrated to me by someone who uses it. I will check it out if I can find the time.

To be continued…

References

Categories
Admin Apache CentOS Security

drjohnstechtalk.com is now an encrypted web site

Intro
I don’t overtly chase search engine rankings. I’m comfortable being the 2,000,000th most visited site on the Internet, or something like that according to alexa. But I still take pride in what I’m producing here. So when I read a couple weeks ago that Google would be boosting the search rank of sites which use encryption, I felt I had to act. For me it is equally a matter of showing that I know how to do it and a chance to write another blog posting which may help others.

Very, very few people have my situation, which is a self-hosted web site, but still there may be snippets of advice which may apply to other situations.

I pulled off the switch to using https instead of http last night. The detail of how I did it are below.

The details
Actually there was nothing earth-shattering. It was a simple matter of applying stuff i already know how to do and putting it all together. of course I made some glitches along the way, but I also resolved them.

First the CERT
I was already running an SSL web server virtual server at https://drjohnstechtalk.com/ , but it was using a self-signed certificate. Being knowledgeable about certificates, I knew the first and easiest thing to do was to get a certificate (cert) issued by a recognized certificate authority (CA). Since my domain was bought from GoDaddy I decided to get my SSL certificate form them as well. It’s $69.99 for a one-year cert. Strangely, there is no economy of scale so a two-year cert costs exactly twice as much. i normally am a strong believer in two-year certs simply to avoid the hassle of renewing, etc, but since I am out-of-practice and feared I could throw my money away if I messed up the cert, I went with a one-year cert this time. It turns out I had nothing to fear…

Paying for a certificate at GoDaddy is easy. Actually figuring out how to get your certificate issued by them? Not so much. But I figured out where to go on their web site and managed to do it.

Before the CERT, the CSR
Let’s back up. Remember I’m self-hosted? I love being the boss and having that Linux prompt on my CentOS VM. So before I could buy a legit cert I needed to generate a private key and certificate signing request (CSR), which I did using openssl, having no other fancy tools available and being a command line lover.

To generate the private key and CSR with one openssl command do this:

$ openssl req -new -nodes -out myreq.csr

It prompts you for field values, e.g.:

Here’s how that dialog went:

Generating a 2048 bit RSA private key
.............+++
..............................+++
writing new private key to 'privkey.pem'
-----
You are about to be asked to enter information that will be incorporated
into your certificate request.
What you are about to enter is what is called a Distinguished Name or a DN.
There are quite a few fields but you can leave some blank
For some fields there will be a default value,
If you enter '.', the field will be left blank.
-----
Country Name (2 letter code) [XX]:US
State or Province Name (full name) []:New Jersey
Locality Name (eg, city) [Default City]:
Organization Name (eg, company) [Default Company Ltd]:drjohnstechtalk.com
Organizational Unit Name (eg, section) []:
Common Name (eg, your name or your server's hostname) []:drjohnstechtalk.com
Email Address []:
 
Please enter the following 'extra' attributes
to be sent with your certificate request
A challenge password []:
An optional company name []:

and the files it created:

$ ls -ltr|tail -2

-rw-rw-r-- 1 john john     1704 Aug 23 09:52 privkey.pem
-rw-rw-r-- 1 john john     1021 Aug 23 09:52 myreq.csr

Before shipping it off to a CA you really ought to examine the CSR for accuracy. Here’s how:

$ openssl req -text -in myreq.csr

Certificate Request:
    Data:
        Version: 0 (0x0)
        Subject: C=US, ST=New Jersey, L=Default City, O=drjohnstechtalk.com, CN=drjohnstechtalk.com
        Subject Public Key Info:
            Public Key Algorithm: rsaEncryption
                Public-Key: (2048 bit)
                Modulus:
                    00:e9:04:ab:7e:e1:c1:87:44:fb:fe:09:e1:8d:e5:
                    29:1c:cb:b5:e8:d0:cc:f4:89:67:23:ab:e5:e7:a6:
                    ...

What are we looking for, anyways? Well, the modulus should be the same as it is for the private key. To list the modulus of your private key:

$ openssl rsa -text -in privkey.pem|more

The other things I am looking for is the common name (CN) which has to exactly match the DNS name that is used to access the secure site.

I’m not pleased about the Default City, but I didn’t want to provide my actual city. We’ll see it doesn’t matter in the end.

For some CAs the Organization field also matters a great deal. Since I am a private individual I decided to use the CN as my organization and that was accepted by GoDaddy. So Probably its value also doesn’t matter.

the other critical thing is the length of the public key, 2048 bits. These days all keys should be 2048 bits. some years ago 1024 bits was perfectly fine. I’m not sure but maybe older openssl releases would have created a 1024 bit key length so that’s why you’ll want to watch out for that.

Examine the CERT
GoDaddy issued the certificate with some random alpha-numeric filename. i renamed it to something more suitable, drjohnstechtalk.crt. Let’s examine it:

$ openssl x509 -text -in drjohnstechtalk.crt|more

Certificate:
    Data:
        Version: 3 (0x2)
        Serial Number:
            27:ab:99:79:cb:55:9f
        Signature Algorithm: sha256WithRSAEncryption
        Issuer: C=US, ST=Arizona, L=Scottsdale, O=GoDaddy.com, Inc., OU=http://certs.godaddy.com/repository/, CN=Go Daddy Secure Certificate Authority - G2
        Validity
            Not Before: Aug 21 00:34:01 2014 GMT
            Not After : Aug 21 00:34:01 2015 GMT
        Subject: OU=Domain Control Validated, CN=drjohnstechtalk.com
        Subject Public Key Info:
            Public Key Algorithm: rsaEncryption
                Public-Key: (2048 bit)
                Modulus:
                    00:e9:04:ab:7e:e1:c1:87:44:fb:fe:09:e1:8d:e5:
                    29:1c:cb:b5:e8:d0:cc:f4:89:67:23:ab:e5:e7:a6:
                     ...

So we’re checking that common name, key length, and what if any organization they used (in the Subject field). Also the modulus should match up. Note that they “cheaped out” and did not provide www.drjohnstechtalk.com as an explicit alternate name! In my opinion this should mean that if someone enters the URL https://www.drjohnstechtalk.com/ they should get a certificate name mismatch error. In practice this does not seem to happen – I’m not sure why. Probably the browsers are somewhat forgiving.

The apache side of the house
I don’t know if this is going to make any sense, but here goes. To begin I have a bare-bones secure virtual server that did essentially nothing. So I modified it to be an apache redirect factory and to use my brand shiny new legit certificate. Once I had that working I planned to swap roles and filenames with my regular configuration file, drjohns.conf.

Objective: don’t break existing links
Why the need for a redirect factory? This I felt as a matter of pride is important: it will permit all the current links to my site, which are all http, not https, to continue to work! That’s a good thing, right? Now most of those links are in search engines, which constantly comb my pages, so I’m sure over time they would automatically be updated if I didn’t bother, but I just felt better about knowing that no links would be broken by switching to https. And it shows I know what I’m doing!

The secure server configuration file on my server is in /etc/apache2/sites-enabled/drjohns.secure.conf. It’s an apache v 2.2 server. I put all the relevant key/cert/intermediate cert files in /etc/apache2/certs. the private key’s permissions were set to 600. The relevant apache configuration directives are here to use this CERT along with the GoDaddy intermediate certificates:

 
   SSLEngine on
    SSLCertificateFile /etc/apache2/certs/drjohnstechtalk.crt
    SSLCertificateKeyFile /etc/apache2/certs/drjohnstechtalk.key
    SSLCertificateChainFile /etc/apache2/certs/gd_bundle-g2-g1.crt

I initially didn’t include the intermediate certs (chain file), which again in my experience should have caused issues. Once again I didn’t observe any issues from omitting it, but my experience says that it should be present.

The redirect factory setup
For the redirect testing I referred to my own blog posting (which I think is underappreciated for whatever reason!) and have these lines:

# I really don't think this does anything other than chase away a scary warning in the error log...
        RewriteLock ${APACHE_LOCK_DIR}/rewrite_lock
<VirtualHost *:80>
 
        ServerAdmin webmaster@localhost
        ServerName      www.drjohnstechtalk.com
        ServerAlias     drjohnstechtalk.com
        ServerAlias     johnstechtalk.com
        ServerAlias     www.johnstechtalk.com
        ServerAlias     vmanswer.com
        ServerAlias     www.vmanswer.com
# Inspired by the dreadful documentation on http://httpd.apache.org/docs/2.0/mod/mod_rewrite.html
        RewriteEngine on
        RewriteMap  redirectMap prg:redirect.pl
        RewriteCond ${redirectMap:%{HTTP_HOST}%{REQUEST_URI}} ^(.+)$
# %N are backreferences to RewriteCond matches, and $N are backreferences to RewriteRule matches
        RewriteRule ^/.* %1 [R=301,L]

Pages look funny after the switch to SSL
One of the first casualties after the switch to SSL was that my pages looked funny. I know from general experience that this can happen if there is hard-wired links to http URLs, and that is what I observed in the page source. In particular my WP-Syntax plugin was now bleeding verbatim entries into the columns to the right if the PRE text contained long lines. Not pretty. The page source mostly had https includes, but in one place it did not. It had:

<link rel="stylesheet" href="http://drjohnstechtalk.com/blog/wp-content/plugins/wp-syntax/wp-syntax.css"

I puzzled over where that originated and I had a few ideas which didn’t turn out so well. For instance you’d think inserting this into wp-config.php would have worked:

define( 'WP_CONTENT_URL','https://drjohnstechtalk.com/blog/wp-content/');

But it had absolutely no effect. Finally I did an RTFM – the M being http://codex.wordpress.org/Editing_wp-config.php which is mentioned in wp-config.hp – and learned that the siteurl is set in the administration settings in the GUI, Settings|General WordPress Address URL and Site Address URL. I changed these to https://drjohnstechtalk.com/blog and bingo, my plugins began to work properly again!

What might go wrong when turning on SSL
In another context I have seen both those errors, which I feel are poorly documented on the Internet, so I wish to mention them here since they are closely related to the topic of this blog post.

SSL routines:SSL23_GET_SERVER_HELLO:unknown protocol:s23_clnt.c:601

and

curl: (35) error:140770FC:SSL routines:SSL23_GET_SERVER_HELLO:unknown protocol

I generated the first error in the process of trying to look at the SSL web site using openssl. What I do to test that certificates are being properly presented is:

$ openssl s_client -showcerts -connect localhost:443

And the second error mentioned above I generated trying to use curl to do something similar:

$ curl -i -k https://localhost/

The solution? Well, I began to suspect that I wasn’t running SSL at all so I tested curl assuming I was running on tcp port 443 but regular http:

$ curl -i http://localhost:443/

Yup. That worked just fine, producing all the usual HTTP response headers plus the content of my home page. So that means I wasn’t running SSL at all.

This virtual host being from a template I inherited and one I didn’t fully understand, I decided to just junk the most suspicious parts of the vhost configuration, which in my case were:

<IfDefine SSL>
<IfDefine !NOSSL>
...
</IfDefine>
</IfDefine>

and comment those guys out, giving,

#<IfDefine SSL>
#<IfDefine !NOSSL>
...
#</IfDefine>
#</IfDefine>

That worked! After a restart I really was running SSL.

Making it stronger
I did not do this immediately, but after the POODLE vulnerability came out and I ran some tests I realized I should have explicitly chosen a cipher suite in my apache server to make the encryption sufficiently unbreakable. This section of my working with ciphers post shows some good settings.

Mixed content
I forgot about something in my delight at running my own SSL web server – not all content was coming to the browser as https and Firefox and Internet Explorer began to complain as they grew more security-conscious over the months. After some investigation I found that what it was is that I had a redirect for favicon.ico to the WordPress favicon.ico. But it was a redirect to their HTTP favicon.ico. I changed it to their secure version, https://s2.wp.com/i/favicon.ico, and all was good!

I never use the Firefox debugging tools so I got lucky. I took a guess to find out more about this mixed content and clicked on Tools|Web developer|Web console. My lucky break was that it immediately told me the element that was still HTTP amidst my HTTPS web page. Knowing that it was a cinch to fix it as mentioned above.

Conclusion
Good-ole search engine optimization (SEO) has prodded us to make the leap to run SSL. In this posting we showed how we did that while preserving all the links that may be floating ou there on the Internet by using our redirect factory.

References
Having an apache instance dedicated to redirects is described in this article.
Some common sense steps to protect your apache server are described here.
Some other openssl commands besides the ones used here are described here.
Choosing an appropriate cipher suite and preventing use of the vulnerable SSLv2/3 is described in this post.
I read about Google’s plans to encrypt the web in this Naked Security article.