I’m looking to test my old Raspberry Pi model 3 to see if it can play mp4 videos I recorded on my Samsung Galaxy A51 smartphone. I had assumed it would get overwhelmed and give up, but I haven’t tried in many years, so… The first couple videos did play, sort of. I was using vlc. Now if you’ve seen any of my posts you know I’ve written a zillion posts on running a dynamic slideshow based on RPi. Though the most important of these posts was written years ago, it honestly still runs and runs well to this day, amazingly enough. Usually technology changes or hardware breaks. But that didn’t happen. Every day I enjoy a brand new slideshow in my kitchen.
In most of my posts I use the old stalwart program fbi. In fact I don’t even have XWindows installed – it’s not a requirement if you know what you’re doing. But as far as I can see, good ‘ole fbi doesn’t do streaming media such as videos in mp4 format. As far as I know, vlc is more modern and most importantly, better supported. So after a FAIL trying with mplayer (still haven’t diagnose that one), I switched to trials with vlc.
I haven’t gotten very far, and that’s why I wanted to share my learnings. There’s just so much you can do with vlc, that even what you may think are the most common things anyone would want are very hard to find working examples for. So that’s where I plan to contribute to the community. As I figure out an ‘easy” thing, I will add it here. And if I’m the only one who ever refers to this post, so be it. I love my own My favorite python tips, post, for instance. it has everything I use on a regular basis. So I’m thinking this will be similar.
The problem with my cable modem is back. So I’ve revisited my own project and just slightly tweaked things. I am also using an RPi model 4 now. Works great…
Original Intro
I lose my Internet far too often – sometimes once a day. Of course I have lots of network gear in a rat’s nest of cables. I narrowed the problem down to the cable modem, which simply needs to be power cycled and all is good. Most people would call their cable company at this point. I decided to make a little project of it to see if I could get my Raspberry Pi to
– monitor the Internet connection and
– automatically power-cycle the cable modem
Cool, right?
Needless to say, if I can power cycle a modem, I can control power to all kinds of devices with the RPi.
Is there a product already on the market?
Why yes, there is. Normally that would shut me down in my tracks because what’s the point? But the product is relatively expensive – $100, so my DIY solution is considerably less since I already own the RPi. See references for a link to the commercial solution to this problem.
Getting a control cable
This is pathetic, but, in 2017 I originally cut out a cable from an old computer that no longer works. The jumper has more pins than I need, but I could make it work. In 2021 I used proper jumper cables. It’s neater. Thing is, I’ve had them for awhile and I forget where I got them from. perhaps a friend.
Setting up my GPIO, just for testing
The following is only there to show you how easy it is to send signals out the GPIO pin. The script I wrote below, connTest.sh, does all this setup for you if you just want to quickly get down to business.
I am plugged into the end so I need to manipulate GPIO pin 21. Become root
$ sudo su – Get to the right directory
$ cd /sys/class/gpio Create the pin for user manipulation
$ echo 21 > export Move to that pin’s directory
$ cd gpio21 Set up pin for sending signal OUT
$ echo out > direction Test what we have so far
$ cat direction
out
out
$ cat value
0
connTest.sh script
I put this in /usr/local/etc and called it connTest.sh. I’m still tinkering with it a bit. But it shows what we’re basically trying to do.
#!/usr/bin/bash
# DrJ 8/2021
# Test if Internet connection is still good and send signal to relay if it is not
# see https://drjohnstechtalk.com/blog/2017/10/raspberry-pi-automates-cable-modem-power-cycling-task/?preview_id=3121&preview_nonce=9b896f248d&post_format=standard&_thumbnail_id=-1&preview=true
Break=300
Sleep=11
pingpadding=30 # if no response ping takes longer to run
log=/var/log/connTest
pinglog=/tmp/ping.log
#
# one-time setup of our GPIO pin so we can control it
# if the power is on the right, GPIO pin 21 is the lower right pin
pin=21
cd /sys/class/gpio
echo $pin > export
cd gpio$pin
echo out > direction

# divert STDOUT and STDERR to log file
exec 1>$log
exec 2>&1
echo "$0 starting monitoring at "$(date)
# report our external IP
curl -s ipinfo.io|head -2|tail -1
while /bin/true; do
try1=$(curl -is --connect-timeout 6 www.google.com|wc -c)
[[ $try1 -lt 300 ]] && {
  echo google came up short. Trying amazon next. characters: $try1
  sleep 60
  try2=$(curl -is --connect-timeout 6 https://www.amazon.com|wc -c)
  [[ $try2 -lt 300 ]] && {
    echo "#################"
    echo "We have a connection problem at "$(date)
    echo character counts. google: $try1, amazon, $try2
    echo "Power cycling router and waiting for $Break seconds"
# start a ping job
    ping -c $Break 1.1.1.1 > $pinglog 2>&1 &

# this will shut power off
    echo 1 > value
    sleep 4
# and this will turn it back on
    echo 0 > value
# this prevents us from too aggressively power-cycling
    sleep $(($Break+$pingpadding))
# report on ping results
#22 packets transmitted, 22 received, 0% packet loss, time 53ms
#rtt min/avg/max/mdev = 6.536/15.533/24.705/4.510 ms
    echo printing last three lines from ping results log:
    tail -3 $pinglog
    line=`tail -2 $pinglog|head -1`
    t1=`echo -n $line|awk '{print $1}'`
    t2=`echo -n $line|awk '{print $4}'`
#  downtime=$(($t1-$t2))
# test for integer inputs
    [[ "$t1" =~ ^[0-9]+$ ]] && [[ "$t2" =~ ^[0-9]+$ ]] && downtime=$(($t1-$t2))
    echo  DOWNTIME: $downtime seconds
# report our external IP
    curl -s ipinfo.io|head -2|tail -1
    echo "#################"
  }
}
sleep $Sleep
done
Starting on boot
These days I just use my crontab trick – much easier. You edit your crontab by saying sudo crontab -e. Then put in these lines at the bottom:
# DrJ 7/13/21

@reboot sleep 45; /usr/local/etc/connTest.sh > /tmp/connTestRun.log 2>&1

# bring down wireless after awhile – assume we have a wired connection

@reboot sleep 120; /usr/sbin/ifconfig wlan0 down
Only include that last line if you have an ethernet cable connection, which, for monitoring purposes, you should. WiFi is just not as reliable.
In all this I had the most trouble getting the startup script to bend to my will! But I think it’s functioning now. It may not be the most efficient, but it’s workable, meaning, it starts up connTest.sh after a reboot, and sends the log to /var/log/connTest.
My conntest file looks like this after I rebooted a few days ago:
/usr/local/etc/connTest.sh starting monitoring at Sat 18 Sep 08:11:47 EDT 2021
“ip”: “67.83.122.167”,
#################
We have a connection problem at Mon 20 Sep 14:13:03 EDT 2021
Power cycling router and waiting for 300 seconds
printing last three lines from ping results log:
— 1.1.1.1 ping statistics —
300 packets transmitted, 202 received, +9 errors, 32.6667% packet loss, time 563ms
rtt min/avg/max/mdev = 7.581/13.387/35.981/3.622 ms
DOWNTIME: 98 seconds
“ip”: “67.83.122.167”,
So it needs to restart my cable modem about every other day and often during those critical daytime hours when I am working from home.
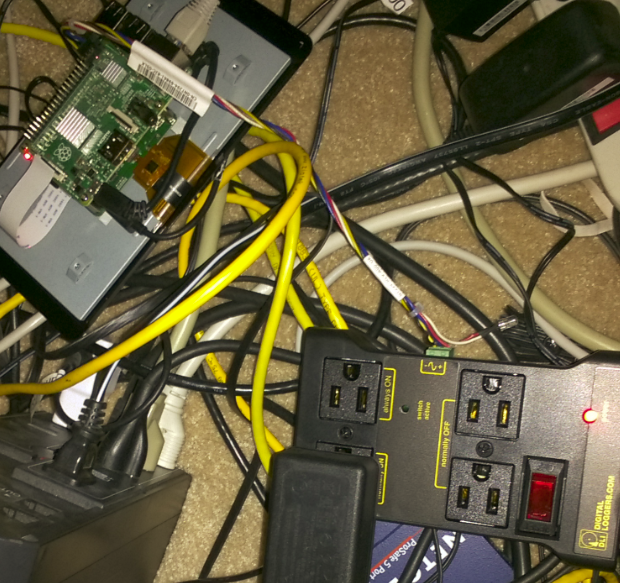
Substitute below for one thousand words
Raspberry Pi GPIO pins 21 plus ground connected to the power relay
So you can almost make out the different outlets from the power relay: always on; normally on; normally off. Makes perfect sense, right?
See that green plug on the side of the relay? I was such a newbie I was shoving the wires into it, unsure how to make a good connection. Well, with a little effort it simply pulls out, revealing a screws that can be used to secure the wires in the holes.
Some conclusions about my cable modem problems
The problems always occur during the day, i.e., when it is being used more heavily (the monitoring is 24×7 so it doesn’t distinguish). So somehow it’s actual usage which triggers failure. I wonder if it outputs more heat and overheats when the Internet is used more heavily? Just a hypothesis.
Outage can be reduced to about 90 seconds with this script based on the ping drop testing. Your mileage may vary, as they say.
My ISP does not give me a new IP after I reboot.
A strange error pops up
After running for awhile I noticed this error in the log:
I’ve still got to look into that root cause of that issue. A reboot cleared it up however.
Conclusion
It’s fun to actually turn off and on 110V AC power using your Raspberry Pi! Especially when there is a useful purpose behind it such as a cable modem which starts to perform better after being power cycled. At only $30 this is a pretty affordable DIY project. I provide some scripts which shows how to work with GPIO pins using the command line. That turns out to be not so mysterious after all…
If the switching can work fast enough, I’m thinking of a next project with lights set to musical beats…!
Intro
Dig is a really useful networking tool. I use it several times a day. But always on Linux where it’s usually built-in. On Raspberry Pi’s raspbian you can install it with a simple apt-get install dnsutils. Then I learned it wasn’t hard at all to install on Windows, especially as a fairly minimalist installation that just puts files on your PC and makes no changes to the Registry, which is all you really need for light use.
The details
Go to http://www.isc.org/downloads/. Expand BIND.
Click download button for the current stable release.
Pick the win-64-bit link (because chances are you’re running Windows 64 bit these days) and wait for download to complete.
Open up zip file.
Unzip or extract all files to (this is my suggestion) c:\apps\bind.
To run it
Open a command window. Probably easiest way is hold down Windows key + r and type in cmd. In CMD window simply type \apps\bind\dig to run dig like you do on Linux.
Example commands Example 1, Resolve address for google.com
C:\> \apps\bind\dns google.com
; <<>> DiG 9.9.8-P2 <<>> google.com
;; global options: +cmd
;; Got answer:
;; ->>HEADER<<- opcode: QUERY, status: NOERROR, id: 24929
;; flags: qr rd ra; QUERY: 1, ANSWER: 6, AUTHORITY: 0, ADDITIONAL: 1

;; OPT PSEUDOSECTION:
; EDNS: version: 0, flags:; udp: 4096
;; QUESTION SECTION:
;google.com.                    IN      A

;; ANSWER SECTION:
google.com.             88      IN      A       173.194.207.113
google.com.             88      IN      A       173.194.207.139
google.com.             88      IN      A       173.194.207.138
google.com.             88      IN      A       173.194.207.101
google.com.             88      IN      A       173.194.207.102
google.com.             88      IN      A       173.194.207.100

;; Query time: 41 msec
;; SERVER: 192.168.2.1#53(192.168.2.1)
;; WHEN: Mon Jan 11 12:16:17 Eastern Standard Time 2016
;; MSG SIZE  rcvd: 135
; <<>> DiG 9.9.8-P2 <<>> google.com
;; global options: +cmd
;; Got answer:
;; ->>HEADER<<- opcode: QUERY, status: NOERROR, id: 24929
;; flags: qr rd ra; QUERY: 1, ANSWER: 6, AUTHORITY: 0, ADDITIONAL: 1
;; OPT PSEUDOSECTION:
; EDNS: version: 0, flags:; udp: 4096
;; QUESTION SECTION:
;google.com. IN A
;; ANSWER SECTION:
google.com. 88 IN A 173.194.207.113
google.com. 88 IN A 173.194.207.139
google.com. 88 IN A 173.194.207.138
google.com. 88 IN A 173.194.207.101
google.com. 88 IN A 173.194.207.102
google.com. 88 IN A 173.194.207.100
;; Query time: 41 msec
;; SERVER: 192.168.2.1#53(192.168.2.1)
;; WHEN: Mon Jan 11 12:16:17 Eastern Standard Time 2016
;; MSG SIZE rcvd: 135
This gives all kinds of useful information – what your default DNS server is (at the bottom – mine is 192.168.2.1), how long the query took *this one: 41 msec), whether the answer is authoritative or not (no AA flag here, so this is not an authoritative answer), as well as the answer to the question posed.
Example 2, Resolve nameserver records for the domain amazon.com using Google’s DNS server 8.8.8.8 over TCP from our local IP address of 192.168.2.3
We started out slow, but this example throws the kitchen sink at you to show the power of dig!
; <<>> DiG 9.9.8-P2 <<>> +tcp -b 192.168.2.3 ns amazon.com @8.8.8.8
;; global options: +cmd
;; Got answer:
;; ->>HEADER<<- opcode: QUERY, status: NOERROR, id: 64444
;; flags: qr rd ra; QUERY: 1, ANSWER: 6, AUTHORITY: 0, ADDITIONAL: 1

;; OPT PSEUDOSECTION:
; EDNS: version: 0, flags:; udp: 512
;; QUESTION SECTION:
;amazon.com.                    IN      NS

;; ANSWER SECTION:
amazon.com.             3599    IN      NS      ns3.p31.dynect.net.
amazon.com.             3599    IN      NS      ns4.p31.dynect.net.
amazon.com.             3599    IN      NS      ns1.p31.dynect.net.
amazon.com.             3599    IN      NS      pdns1.ultradns.net.
amazon.com.             3599    IN      NS      pdns6.ultradns.co.uk.
amazon.com.             3599    IN      NS      ns2.p31.dynect.net.

;; Query time: 50 msec
;; SERVER: 8.8.8.8#53(8.8.8.8)
;; WHEN: Mon Jan 11 12:27:26 Eastern Standard Time 2016
;; MSG SIZE  rcvd: 188
; <<>> DiG 9.9.8-P2 <<>> +tcp -b 192.168.2.3 ns amazon.com @8.8.8.8
;; global options: +cmd
;; Got answer:
;; ->>HEADER<<- opcode: QUERY, status: NOERROR, id: 64444
;; flags: qr rd ra; QUERY: 1, ANSWER: 6, AUTHORITY: 0, ADDITIONAL: 1
;; OPT PSEUDOSECTION:
; EDNS: version: 0, flags:; udp: 512
;; QUESTION SECTION:
;amazon.com. IN NS
;; ANSWER SECTION:
amazon.com. 3599 IN NS ns3.p31.dynect.net.
amazon.com. 3599 IN NS ns4.p31.dynect.net.
amazon.com. 3599 IN NS ns1.p31.dynect.net.
amazon.com. 3599 IN NS pdns1.ultradns.net.
amazon.com. 3599 IN NS pdns6.ultradns.co.uk.
amazon.com. 3599 IN NS ns2.p31.dynect.net.
;; Query time: 50 msec
;; SERVER: 8.8.8.8#53(8.8.8.8)
;; WHEN: Mon Jan 11 12:27:26 Eastern Standard Time 2016
;; MSG SIZE rcvd: 188
The only problem is that I don’t think the TCP option actually worked – I gotta run wireshark to verify. On Linux it definitely works! Not sure what’s wrong with windows. But the other options are working as designed.
OK, wireshark install is failing, but I ran tcpdump on a DNS server I run and confirmed that indeed the +tcp option is working forcing dig to use TCP communication for those queries.
Raspberry Pi
I believe you do
$ sudo apt-get install bind9-dnsutils
At least on a generic Debian system that works. I have to confirm on RPi still.
Conclusion
We’ve demonstrated a low-impact way to install dig for Windows and shown some examples of using it.