Intro
Why would you even want to do this when you can buy a native IP webcam for less? I’m not sure, but i found myself in this situation so it could happen to others, and I found some things that worked and some that required quite some effort.
In my previous post I spoke about using opencv on Raspberry Pi.
This post is more about getting at an image with a minimum of lag time and relatively low bandwidth.
The setup
The specific camera I am working with is an ELP mini USB camera for $20.
What I did not do
I considered bolting on an add-on to opencv to convert the video stream into mjpeg. But the process looked relatively obscure so I did not feel that was a good way to go.
I skimmed through the mjpeg (motion jpeg) standard. Looks pretty straightforward. i even considered writing my own streamer. It’s probably not too hard to write a bad one! But I feared it would be unreliable so I didn’t go that route. It’s just jpeg, separator, jpeg, separator, jpeg, etc. Here’s the Wikipedia link: https://en.wikipedia.org/wiki/Motion_JPEG.
I think the best software for is mjpg_streamer. It is not available as a simple package. So you have to compile it and patch it.
Follow his recipe
This guy’s recipe worked for me:
https://jacobsalmela.com/2014/05/31/raspberry-pi-webcam-using-mjpg-streamer-over-internet/
Mostly! I needed the patch as well (which he also mentions). his instructions for the patch aren’t accurate.
He provides a link. You need to save the contents by launching the downloaded file and saving it as input_uvc_patch.txt after opening it in Windows Notepad (if you’re doing this download through Windows).
On the Pi, you would do these steps:
cd ~/mjpg-streamer patch -p0 < input_uvc_patch.txt make USE_LIBV4L2=true clean all sudo make DESTDIR=/usr/local install |
That is, assuming you had copied the patch file into that ~/mjpg-streamer directory.
Before we get too far, I wished to mention that the command fswebcam proved somewhat useful for debugging.
Here’s a weird thing about that camera
We had one, then I got another one. The two cameras do not behave the same way!
Device files
I guess Raspberry Pi has its own version of plug-and-play. So what it means is that when you plug in the camera a device file is dynamically created called /dev/video0. Now if you happen to plug in a second USB camera, that one becomes device /dev/video1. Some utilities are designed to work with /dev/video0 and require extra arguments to deal with a camera with a different device number, e.g., fswebcam -d /dev/video1 image.jpg.
But actually running two cameras did not work out too well for me. It seemed to crash and I don’t have time to investigate that.
The working command is…
My livestream.sh file looks like this right now. It will change but this is a good document point.
#!/bin/bash /usr/local/bin/mjpg_streamer -i "/usr/local/lib/input_uvc.so -yuv -f 12 -q 50 \ -r 352x288" -o "/usr/local/lib/output_http.so -w /usr/local/www" |
The main point is that I found this additional -yuv argument seemed to get the one webcam to work, whereas the other USB camera didn’t need that! If you don’t include it launcher.sh may appear to work, but all you see when you connect to the direct video stream looks like this image:

One time when I ran it it crashed and suggested that -yuv argument be added, so I tried it and it actually worked! That’s how i discovered that oddity.
Bandwidth with those settings
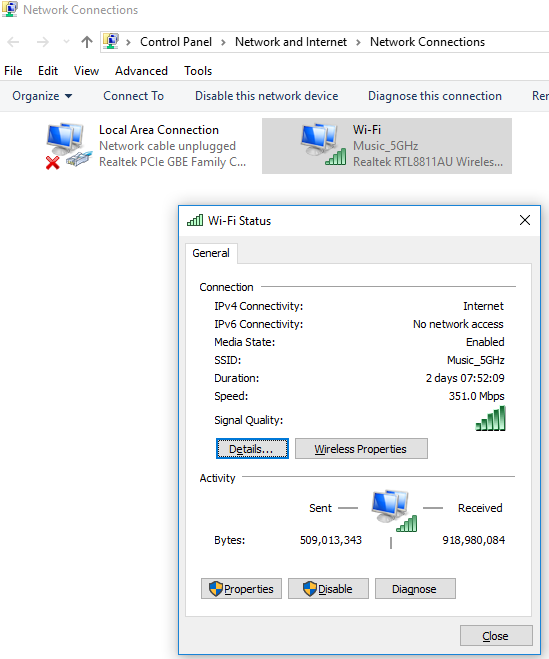
About 2 mbps. How do I measure that? simple. I bring up the web page and tool around the networking stuff until i find Change Adapter Settings (always difficult to find). Then I double-click on my active adapter and stare at the received bytes to get a feel for how much it’s incrementing by each second. Multiply by 10, and voila, you have a crude measure, perhaps +/- 30%, of your bandwidth consumed!
Latency
This is so important it needs its own section.
Latency is pretty good. We’ve measured it to be 0.26 seconds.
fswebcam errors
What happens if you run fswebcam while livestream is running?
$ fswebcam /tmp/image.jpg
--- Opening /dev/video0... Trying source module v4l2... /dev/video0 opened. No input was specified, using the first. Error selecting input 0 VIDIOC_S_INPUT: Device or resource busy |
Makes sense. Only one program on the Pi can capture the output form the camera.
Does the simple command fswebcam image.jpg work all the time? No it does not! Sometimes it simply fails, which is scary.
Here is an example of two consecutive calls to fswebcam about a second apart which illustrates the problem:
$ fswebcam /tmp/image.jpg
--- Opening /dev/video0... Trying source module v4l2... /dev/video0 opened. No input was specified, using the first. Adjusting resolution from 384x288 to 352x288. --- Capturing frame... Timed out waiting for frame! No frames captured. |
$ fswebcam /tmp/image.jpg
--- Opening /dev/video0... Trying source module v4l2... /dev/video0 opened. No input was specified, using the first. Adjusting resolution from 384x288 to 352x288. --- Capturing frame... Captured frame in 0.00 seconds. --- Processing captured image... Writing JPEG image to '/tmp/image.jpg'. |
Running two USB cameras wih a single Ras Pi
This initially did not work in my first attempts but now it does!
It probably helps to be running a Raspebrry Pi 3 with Raspbian Stretch OS.
Maybe this wasn’t needed but we made a directory /usr/local/www2 and copied all the files from /usr/local/www to /usr/local/www2. A 2nd USB camera when plugged in creates /dev/video1 as I mentioned. You have to pick a different port, so we chose port 8090. Putting it all together we have the script below, livestream2.sh:
#!/bin/bash /usr/local/bin/mjpg_streamer -i "/usr/local/lib/input_uvc.so -d /dev/video1 -yuv -q 50 -r 352x288 -f 12" -o "/usr/local/lib/output_http.so -w /usr/local/www2 -p 8090" |
If a 2nd camera isn’t plugged in then the script errors out and doesn’t run, which is pretty much what we want. Running it by hand we get this:
$ ./livestream2.sh
MJPG Streamer Version: svn rev: 3:172M i: Using V4L2 device.: /dev/video1 i: Desired Resolution: 352 x 288 i: Frames Per Second.: 12 i: Format............: YUV i: JPEG Quality......: 80 ERROR opening V4L interface: No such file or directory Init v4L2 failed !! exit fatal i: init_VideoIn failed |
Reining in the bandwidth
We found that by lowering the jpeg quality with the -q
Bandwidth monitor on the Pi
Some of this was written by the student so apologies for the misspellings! Probably will be refined in the future. We can tease out how much bandwidth we’re actually using on the Pi by measuring the transmitted (TX) bytes periodically. We’ll record that during a matcgh so we can prove to ourselves and others that we have our bandwidth under control – far less than 7 mbps despite using two cameras.
banwidthmonitor.pl Perl program
#!/usr/bin/perl #monitor banwidth $DEBUG = 1; $sleep = 5; $| = 1; $date = `date`; print $date; for (;;) { $tx = `ip -s link show eth0 | tail -1| awk \'{print \$1}\'`; print $tx if $DEBUG; $txbitstotal = 8 * $tx; $timetotal = time; $txbits = $txbitstotal - $txbitstotalold if $txbitstotalold; $time = $timetotal - $timetotalold; $txbitstotalold = $txbitstotal; $banwidth = $txbits / $time if $timetotalold; print "banwidth $banwidth\n"; $timetotalold = $timetotal; # TX: bytes packets errors dropped carrier collsns # 833844072 626341 0 0 0 0 sleep $sleep; } |
Output from program
Watch as our bandwidth usage grows to around 700 kbps as we turn on one of our video cameras.
$ ./banwidthmonitor.pl
Tue Jan 30 21:09:32 EST 2018 9894771 banwidth 9895095 banwidth 518.4 10252073 banwidth 571164.8 10697648 banwidth 712920 11151985 banwidth 726939.2 11597595 banwidth 712976 12043230 banwidth 713016 ^C |
Unreliable video stream startup
Sometimes one video stream does not come on correctly after first power-up. This is most perplexing as with computer gear one expects consistent, reproducible behaviour, yet that is not at all what we’ve observed.
This makes no sense, but in one environment we had our two streams running successfully six times in a row. Then I take the equipment home and find only one of the two streams starts up. It seems more likely to fail after sitting powered off for a few hours! I know it doesn’t make sense but that’s how it is.
In any case we have built a monitor which looks for and corrects this situation. It’s pretty clever and effective if I say so myself! And necessary! We created one monitor each for the two video devices. Here’s videomonitor.sh:
#!/bin/bash # DrJ make sure video stream is not stuck. Restart it if it is sleep 8 while /bin/true; do chars=`curl -s -m1 localhost:80/?action=stream|wc -c` if [ $chars -lt 100 ]; then # we are stuck! date echo Video stuck so we will restart it pid=`ps -ef|grep mjpg|grep 'p 80'|grep -v sudo|awk '{print $2}'` sudo kill $pid sleep 1 ~/livestream.sh & # restart... else # we have a good stream touch /tmp/stream80 fi sleep 5 done |
and videomonitor2.sh
#!/bin/bash # DrJ make sure video stream is not stuck. Restart it if it is sleep 8 while /bin/true; do chars=`curl -s -m1 localhost:443/?action=stream|wc -c` if [ $chars -lt 100 ]; then # we are stuck! date echo Video stuck so we will restart it pid=`ps -ef|grep mjpg|grep 'p 443'|grep -v sudo|awk '{print $2}'` sudo kill $pid sleep 1 ~/livestream2.sh & # restart... else # we have a good stream touch /tmp/stream443 fi sleep 5 done |
And we’ll start these at boot time like the long and growing list of things we are starting at boot time.
Allowed ports
From rule 66…
R66. Communication between the ROBOT and the OPERATOR CONSOLE is restricted as follows: A. Network Ports: HTTP 80: Camera connected via switch on the ROBOT, bi-directional HTTP 443: Camera connected via switch on the ROBOT, bi-directional ... |
So…to be safe we are switching from use of ports 8080 and 8090 to ports 80 and 443. But this means we have to preface certain commands – such as mjpg_streamer – with sudo since tcp ports < 1024 are privileged.
Flashing an led when we have a good video stream
Our led is soldered to a gruond pin and GPIO pin 18.
We call this program ledflash.sh
#!/bin/bash
#flashes the led
while /bin/true; do
if [ -f /tmp/stream80 ] && [ -f /tmp/stream443 ]; then
  pin=18
  cd /sys/class/gpio
  echo $pin > export
  cd gpio$pin
  echo out > direction
  while /bin/true; do
#make 5 quick flashes
    for i in `seq 1 5`; do
      echo 1 > value
      sleep 0.1
      echo 0 > value
      sleep 0.1
    done
#now lets make the long flash
    echo 1 > value
    sleep 0.6
  done
fi
sleep 2
done |
We start it at boot time as well. It tells us when both video streams are ready for viewing because only then do the files get created and then the led starts flashing.
It takes about 62 seconds from the time power is supplied to the Raspberry Pi to the time the LED starts flashing (indicating the two video streams are ready).
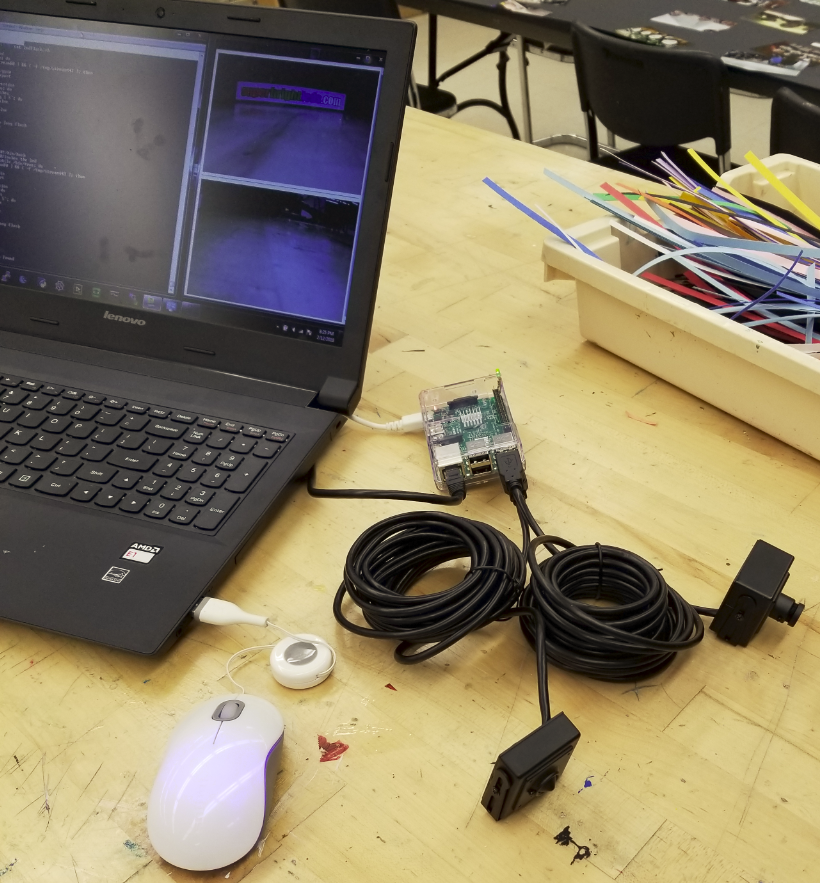
Picture of setup
This picture goes a long way to convey the ideas.
References and related
Multiple IP addresses
We needed an IP for testing in the lab, another when we brought it home and a third for competitions. This blog post showed how we gave it all needed IP addresses for our purposes!
FIRST FRC provides this guide for use of IP addresses at their events.
Amazon seemed to run out of the original USB camera we worked with. The ELP pinhole USB camera seems to work just as well and is just as cheap, around $20: https://smile.amazon.com/gp/product/B00K7ZWVVO/ref=oh_aui_detailpage_o00_s00?ie=UTF8&psc=1
Raspberry Pi model 2 and 3 GPIO pins are documented here: https://www.raspberrypi.org/documentation/usage/gpio-plus-and-raspi2/.
The lazy person’s way to start any script at during boot-up is presented here: Linux tip: easy way to automatically start a script after a reboot