Categories
Linux

Install WSL2 for Windows 10 Home Edition: not as easy as they say, but not impossible either, and definitely worth it, plus tips for Windows 11

2023 Intro – Windows 11 Home Edition

I just got my HP Aero with Windows 11. One of the very first things I did is to get WSL going, that’s how important it is to me. I did not do a simple wsl –install, at least not initially. Maybe it would have worked, maybe not. Instead I launched a PowerShell window as administrator and ran the two dism commands as shown below. Then this command did nothing – it’s not recognized:

wsl --set-default-version 2

Then I just went for it and tried to install Debian:

wsl --install --distribution Debian

It seemed to go through, but I remember that it always does (the fake). But all of a sudden I was being asked to set up an account. A reboot, and then a there was a Debian window. And the wsl command works. So no kernel patching needed any longer (I believe).

The section below is my original post based on my experience installing wsl on Windows 10 home edition.

Intro

I installed WSL2 on my work laptop a couple weeks ago. It didn’t go terribly smoothly but now that I have it, I love it. I had been using a Cygwin environment, but I fear that is looking a little long in the tooth. WSL2 is fast to start up. But the main contrast is that while Cygwin is an emulator, WSL2 is a true hypervisor so you get a full-fledged linux VM, right on your PC. Of course this was always possible with products like VirtualBox or whatnot, but Microsoft has sort of built in this capability with newer versions of Windows 10, so there’s no mussing with external software any longer.

But at work I have Windows 10 Professional, of course. What about at home where I have Windows 10 Home Edition like most of us? My understanding is that you could not run a hypervisor with Windows 10 Home Edition. And I was probably right, until recently. But now you can. I know because I just managed it tonight.

None of the tutorials out there were exactly right, but they all contained pieces of the truth. So my contribution is to add weight to the correct steps you’ll need to take. Unfortunately I only get to do it once so my notes aren’t the best. Still, I may be able to spare you some pitfalls.

Why you should want WSL2

If you love linux command-line, then I would say this is a must-have.

What doesn’t work

You’ll see suggestions to fire up powershell and simply run

wsl –install

Chances are about 95% that that won’t work if you are reading this article – would that it would be so simple.

Instead, do this

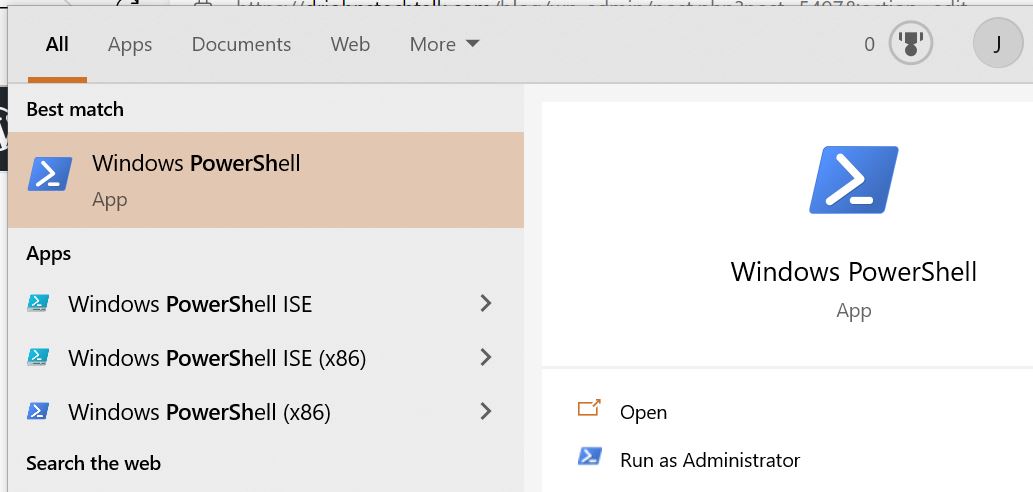
Open a powershell window as administrator. To do that type powershell in the start menu, and look around at all the options. Pick out the one that mentions Run as administrator.

Running Powershell as Administrator

Then enter this command into the PS window.

dism.exe /online /enable-feature /featurename:Microsoft-Windows-Subsystem-Linux /all /norestart

Then this.

dism.exe /online /enable-feature /featurename:VirtualMachinePlatform /all /norestart

Then this.

wsl --set-default-version 2

You need to update your kernel. Download this WSL2 kernel update file and install it: https://wslstorestorage.blob.core.windows.net/wslblob/wsl_update_x64.msi

A reboot at this point is probably a good idea.

Now you need to get yourself a linux distro to install.

There are certain wsl commands you can issue which will helpfully give you the URL to the Debian distro: You put the URL into the browser and it redirects you to the MS Store. But I forget what that is. perhaps wsl -d Debian. But I suppose you can simply go to the MS Store directly and search for Debian and install it.

Nameserver issues when using vpn

Actually when I switched from wsl v 1 to wsl v 2, name resolution really didn’t work at all. The proximate cause is that the /etc/resolv.conf file contained the IP of the host system. But the host system doesn’t have a dns server… So after considering other options, I think the best is to embrace this guy’s script. It is supposed to dynamically figure out the best nameservers, which is pretty cool: https://github.com/jacob-pro/wsl2-dns-agent

He writes:

(Optionally) save it to your startup folder (%APPDATA%\Microsoft\Windows\Start Menu\Programs\Startup), so it is automatically launched when you log in.

So i guess that’s the current way to run a custom program upon startup. That could be useful.

Enhance your experience with Windows Terminal

One good suggestion out of Windows Central is to use Windows Terminal. At least it looks good. I haven’t had time to try it myself. I normally just fire up a CMD window and type wsl. My Debian starts immediately and I have a satisfactory command-line environment. But working with multiple windows will be nice so I have to check it out.

Just look for Windows Terminal in the MS Store.

Windows Central suggestions

A web site called Windows Central has a pretty good stepwise guide. But their advertising is so obnoxious, I’m afraid to accidentally touch any part of the page for fear of getting sent to one of their many advertisers. Even still it probably happened about five times. So I won’t make the link to them too prominent. And, anyway, their guide is a little oversimplified.

My equipment

I have a four-year old HP Pavilion laptop running Windows 10 2021 H2 if I remember correctly. It has solid state drives so it’s not too slow, and it boots pretty quickly.

BIOS – basically impossible to get into these days

I’m sure people who do this for a living will disagree, but for ordinary people it’s basically impossible to disrupt the boot process to modify the BIOS settings. And you may need to do that. In fact that was the hardest thing of all for me. Pressing F10 or delete or Escape or F2 – and does that mean hold the FN key down first?? No one explains that, and I don’t have patience to watch a YouTube video. But after trying a bunch of combinations and booting a bunch of times, and never getting into the BIOS settings, I was really glad to learn Windows 10 offers an alternate way! And it works…

Access BIOS settings from Windows 10

Very briefly, the steps are:

Windows Settings > Update & Security > Recovery > Restart Now > Advanced Startup -> Restart Now > Reboot > select Troubleshoot > Advanced Options > UEFI Firmware Settings > (BIOS menu) enable virtualization > Save.

To see the details, go to this HP article: How to Enter BIOS Setup on Windows PCs | HP® Tech Takes

Why you may need to alter the BIOS settings

Well, on my laptop my installation of Debian kept failing with this error. Error: 0x80370102 The virtual machine could not be started because a required feature is not installed. I read on a Microsoft site that could be because the ability to run virtual servers was not enabled in the BIOS. And, yes, that turned out to be absolutely true. It was disabled. So I enabled it and bam, the Debian install started asking me for a username and password, and I was running a Debian VM!

To be fleshed out as my time permits…

But, I love my Debian linux. It’s just like Raspberry Pi OS Lite. I just install packages as I need them: python, pip, curl, bind9-dnsutils, ssh, etc.

Operating inbound TCP services

After the initial thrill wears off, you realize you may need practical things that you have on your Raspberry Pi such as an ssh server or a web server. I believe this will be possible. Still working on it. After installing ssh you can fire it up:

$ sudo service ssh start

This post describes some of those service commands which you have under a WSL linux install: [3 Fixes] System Has Not Been Booted With Systemd as Init System (partitionwizard.com)

If you ignore that article you may see this error! System has not been booted with systemd as init system (PID 1). Can’t operate.

Back to your ssh server. Now you can already connect to it from the Windows system itself, e.g., from a CMD window:

C:\Users\me> ssh user@localhost

user is the Debian user you set during initial setup. So, anyway, that works and that’s cool. But you’re still locked out from the outside.

This helpful Microsoft article discusses networking for WSL2. Apparently it is still evolving and so it’s a bit primitive right now: Accessing network applications with WSL | Microsoft Docs

From a CMD Window launched as administrator:

netsh interface portproxy add v4tov4 listenport=22 listenaddress=0.0.0.0 connectport=22 connectaddress=172.22.167.12

But this does not work in my case. Firewall thing, I’m sure. Yes! for me, where I also run Mcafee, I needed to go to their firewall settings > Ports and system services. Then I had to add a service for TCP port 22 – the ssh default port. Then it began to work and my RPi could ssh and sftp to my Debian VM! sftp kind of hanged a bit. Have to see how bad that is.

How the filesystems are mapped

Where are your nice, tidy linux directories to be found on your ugly File Explorer? You should have a Linux > Debian (or whatever your installed distribution is) section added to the bottom of your File Explorer.

Debian filesystem as it appears in File Explorer

But really, where is that? For me, it is:

C:\Users\USERNAME\AppData\Local\Packages\TheDebianProject.DebianGNULinux_76v4gfsz19hv4\LocalState\rootfs\home\…

And turning things around, how do you navigate to the C drive from your linux command line? Just

cd /mnt/c

Most of the interesting files in my case are in /mnt/c/user/USERNAME

References and related

That obnoxious Windows Central article I mentioned above with a lot of the WSL2 installation information. It’s a veritable minefield of links to irrelevant stuff, so you’ve been warned: How to install Linux WSL2 on Windows 10 and Windows 11 | Windows Central

WSL2 kernel update.

Seeing Error: 0x80370102? Try Troubleshooting Windows Subsystem for Linux | Microsoft Docs A whole host of other WSL2 errors are addressed in this article as well.

This article purports to be for servers, but I think it’s applicable to PCs as well. It gets pretty technical. System requirements for Hyper-V on Windows Server | Microsoft Docs

About starting system services such as the ssh daemon: [3 Fixes] System Has Not Been Booted With Systemd as Init System (partitionwizard.com)

A good overview of WSL2 networking: Accessing network applications with WSL | Microsoft Docs

How to Enter BIOS Setup on Windows PCs | HP® Tech Takes

With WSL 2 dns name resolution can often be mucked up. This guy has a nice fix: https://github.com/jacob-pro/wsl2-dns-agent

Categories
Admin Linux SLES

How to add private root CAs in SLES or Redhat or Debian

Intro
From time-to-time I run my own PKI infrastructure, namely issuing my own certificates from my private root CA. I wanted this root CA to be recognized by Linux utilities running on Suse Linux (SLES), in particular, lftp, which I was trying to use to access an ftps site, which itself is a post for another day. In other words, how do you add a certificate to the certificate store in linux?

The details
Let’s say you have your root certificate in the standard form like this example

-----BEGIN CERTIFICATE-----
MIIIPzCCBiegAwIBAgITfgAAAATHCoXJivwKLQAAAAAABDANBgkqhkiG9w0BAQsF\nADA2MQswCQYD
VQQGEwJERTENMAsGA1UEChMEQkFTRjEYMBYGA1UEAxMPQkFTRiBS\nb290IENBIDIxMB4XDTE3MDgxMDEyNDAwOFoXDTI4MDgxMDEyNTAwOFowXDETMBEG\nCgm
...
PEScyptUSAaGjS4JuxsNoL6URXYHxJsR0bPlet\nSct
-----END CERTIFICATE-----

Then you can put the certificate inline and within one script install it so that it permanently joins the other root CAs in /etc/ssl/certs with a script like this example:

DrJ_Root_CA="-----BEGIN CERTIFICATE-----\nMIIIPzCCBiegAwIBAgITfgAAAATHCoXJivwKLQAAAAAABDANBgkqhkiG9w0BAQsF\nADA2MQswCQYD
VQQGEwJERTENMAsGA1UEChMEQkFTRjEYMBYGA1UEAxMPQkFTRiBS\nb290IENBIDIxMB4XDTE3MDgxMDEyNDAwOFoXDTI4MDgxMDEyNTAwOFowXDETMBEG\nCgm
SJomT8ixkARkWA05FVDEUMBIGCgmSJomT8ixkARkWBEJBU0YxFjAUBgoJkiaJ\nk/IsZAEZFgZCQVNGQUQxFzAVBgNVBAMTDkJBU0YgU1VCIENBIDIzMIICIjAN
Bgkq\nhkiG9w0BAQEFAAOCAg8AMIICCgKCAgEAqrfoKxrCPCw/u2PBEaAwW/VHLxBw6JNi\n42F3EhXmligGb/Uu4kcWO016IGFatVrPhdAtShAqmTXis0w57hW
jn1Iptvo7rROY\nGPmH7aSW/fYM/x2Lln7NlltayXspWawqBzWzYGADodyjn/Z5TaLYaG8lajiabCM5\nUJDhlZ/SUR3xylqIIFaQK3k2twjeGoxobhbr9hJcQZ
fXF0V5FCSCzJExDYma6bs1\nZtyqP/yHaiOeWXGdnqM9EPfT8kmIC42ZXq7s2JZI5OUflJBbaebYEbuDad6Rh19E\nRchXABLe68+TF/4AZCw16iRwRgq/2Re2W
WPMtVomyZ2txvn51iizqBkdVGzIRklC\n3yIv5MRzDFTfG940/tSAomHsz+RdGbL+NCBeWSY+rnJQdExJ7bLXFLVsTNGL68lP\nMuYrkxYQKWRtVhvQCHsdd5E0
t9QR4iY1JLWQxq3GHy98tBbCGiKMpBbuj/9I/E6c\nGrikouv2QyNnCN34PXpUxTQmDj5LZGV9w2faqpwUBD2ZWsbyVSgvD8TcjdxzcMcj\nLBnYUaZ8wHFqUj2
DBahctfKQxA8Ptrzt1mDIGOQliZGDwrTVMECd+noQhTlF1eS+\nvNraV3dYRMymVxh58MPEaDJgwIRcBWAAOeBbZlyx76oskXdmjOiz5jqyoR5eweCE\ntS4jfM
EW6UECAwEAAaOCAx4wggMaMAsGA1UdDwQEAwIBhjAQBgkrBgEEAYI3FQEE\nAwIBADAdBgNVHQ4EFgQUdn7nwFGpb8uzpFVs5QWQcsA0Q6IwQwYDVR0gBDwwOjA
4\nBgwrBgEEAYGlZAMCAgEwKDAmBggrBgEFBQcCARYaaHR0cDovL3BraXdlYi5iYXNm\nLmNvbS9jcAAwGQYJKwYBBAGCNxQCBAweCgBTAHUAYgBDAEEwEgYDVR
0TAQH/BAgw\nBgEB/wIBADAfBgNVHSMEGDAWgBSS9auUcX38rmNVmQsv6DKAMZcmXDCCAQkGA1Ud\nHwSCAQAwgf0wgfqggfeggfSGgbZsZGFwOi8vL0NOPUJBU
0YlMjBSb290JTIwQ0El\nMjAyMSxDTj1DRFAsQ049UHVibGljJTIwS2V5JTIwU2VydmljZXMsQ049U2Vydmlj\nZXMsQ049Q29uZmlndXJhdGlvbixEQz1yb290
LERDPWJhc2YsREM9Y29tP2NlcnRp\nZmljYXRlUmV2b2NhdGlvbkxpc3Q/YmFzZT9vYmplY3RDbGFzcz1jUkxEaXN0cmli\ndXRpb25Qb2ludIY5aHR0cDovL3B
raXdlYi5iYXNmLmNvbS9yb290Y2EyMS9CQVNG\nJTIwUm9vdCUyMENBJTIwMjEuY3JsMIIBNgYIKwYBBQUHAQEEggEoNIIBJDCBuQYI\nKwYBBQUHMAKGgaxsZG
FwOi8vL0NOPUJBU0YlMjBSb290JTIwQ0ElMjAyMSxDTj1B\nSUEsQ049UHVibGljJTIwS2V5JTIwU2VydmljZXMsQ049U2VydmljZXMsQ049Q29u\nZmlndXJhd
GlvbixEQz1yb290LERDPWJhc2YsREM9Y29tP2NBQ2VydGlmaWNhdGU/\nYmFzZT9vYmplY3RDbGFzcz1jZXJ0aWZpY2F0aW9uQXV0aG9yaXR5MGYGCCsGAQUF\n
BzAChlpodHRwOi8vcGtpd2ViLmJhc2YuY29tL3Jvb3RjYTIxL1JPT1RDQTIxLnJ6\nLWMwMDctajY1MC5iYXNmLWFnLmRlX0JBU0YlMjBSb290JTIwQ0ElMjAyM
S5jcnQw\nDQYJKoZIhvcNAQELBQADggIBAClCvn9sKo/gbrEygtUPsVy9cj9UOQ2/CciCdzpz\nXhuXfoCIICgc0YFzCajoXBLj4V6zcYKjz8RndaLabDaaSQgj
phXFiZSBH8OII+cp\nTCWW1x+JElJXo9HB7Ziva2PeuU5ajXtvql5PegFYWdmgK2Q1QH0J2f1rr7B4nNGu\noyBi1TOSll+0yJApjx213lM9obt6hkXkjeisjcq
auMVh+8KloM0LQOTAD1bDAvpa\nVVN9wlbytvf4tLxHpvrxEQEmVtTAdVchuQV1QCeIbqIxW41l6nhE2TlPwEmTr+Cv\najMID/ebnc9WzeweyTddb6DSmn4mSc
okGpj8j8Z7cw173Yomhg1tEEfEzip+/Jx6\nd2qblZ9BUih9sHE8rtUBEPLvBZwr2frkXzL3f8D6w36LxuhcqJOmDaIPDpJMH/65\nAbYnJyhwJeGUbrRm3zVtA
5QHIiSHi2gTdEw+9EfyIhuNKS4FO/uonjJJcKBtaufl\nGFL6y0WegbS5xlMV9RwkM22R7sQkBbDTr+79MqJXYCGtbyX0JxIgOGbE4mxvdDVh\nmuPo9IpRc5Jl
pSWUa7HvZUEuLnUicRbfrs1PK/FBF7aSrJLoYprHPgP6421pl08H\nhhJXE9XA2aIfEkJ4BcKw0BqOP/PEScyptUSAaGjS4JuxsNoL6URXYHxJsR0bPlet\nSct
3\n-----END CERTIFICATE-----\n"
 
cd /etc/pki/trust/anchors/
echo -e -n $DrJ_Root_CA > DrJ_Root_CA.pem
c_rehash
update-ca-certificates

So the key commands are c_rehash and update-ca-certificates.

Usually SLES is similar to Redhat. But it seems to be different in this case.

This was tested on a SLES 12 SP3 system.

It copies the certificate to /etc/pki/trust/anchors, which by itself is insufficient. Then it creates some kind of hash symlink to the CA file and makes sure that this new certificate doesn’t get wiped out by subsequent system patching. That’s the purpose of the c_rehash and update-ca-certificates commands.

You may also see these hashes and certificates in /etc/ssl/certs. I’m not sure because that’s where I started with all this. But merely dropping the private root CA into /etc/ssl/certs is insufficient, I can say from experience!

Redhat
Redhat is better documented, but for completeness I include it here. You have your inline certificate as in the SLES script, then following that:

...
cd /etc/pki/ca-trust/source/anchors/
echo -e -n $DrJ_Root_CA > DrJ_Root_CA.pem
update-ca-trust

So update-ca-trust is the key command for Redhat Linux. This was tested on Redhat Linux v 7.6.

Fedora v 33

Put your CA file with a .crt file extension into /etc/pki/ca-trust/source/anchors like for Redhat. Run update-ca-trust extract

Debian Linux circa 2023

Put your private CA file into a new directory /usr/share/ca-certificates/extra. Then run sudo dpkg-reconfigure ca-certificates. When prompted with a list of bundles to include make sure to enable your new extra file. Your certificate file needs to end in ‘crt’, not, e.g., ‘cer’. Seems pretty arbitrary to me, but that’s how it is. Of course it has to be standard PEM format. (—BEGIN CERTIFICATE—, etc.).

Python and self-signed certificates or certificates from private CAs

First, note that those are two different cases and need to be handled slightly differently! You may be in need of these measures if you are getting an error in python like this:

urllib3.exceptions.MaxRetryError: HTTPSConnectionPool(host=’www.myhost.local’, port=443): Max retries exceeded with url: / (Caused by SSLError(SSLCertVerificationError(1, ‘[SSL: CERTIFICATE_VERIFY_FAILED] certificate verify failed: unable to get local issuer certificate (_ssl.c:1123)’)))

Self-signed certificate

If the certificate is truly self-signed, then throw it into a file, let’s call it my-crt.crt in your home directory. Then set an environment variable before running python:

$ export REQUESTS_CA_BUNDLE=~/my-crt.crt

It should now work.

Python reverts to SSL: CERTIFICATE_VERIFY_FAILED after upgrade

So I had it all working. Then the requests package complained about my version of the urllib package. So I upgraded requests with a pip3 –upgrade requests. They the above-mentioned SSL error came back. I noticed that urllib got upgraded when requests was upgraded.

I basically gave up and totally kludged python to fix this. But only after playing with the certifi package etc. So I took the file that is for me the output of certifi.where(): /usr/local/lib/python3.9/site-packages/certifi/cacert.pem

I edited it as root and simply appended by private root CAs to that file. I hated to do it, and I know I should have at least used a virtual env, blah, blah. But at least now my jobs run. By the way, my by-hand tests of urlopen all worked! So it’s just the way some package was using it beyond my control that I had to create this kludge.

Certificate issued from a private CA

I added the private CA to the system CA on Debian with the update-ca-certificates mentioned above. Still no joy. Then I noticed the web server forgot to provide the intermediate certificate so I added that as well. Then, at least, curl began to work. But not python. Strange. For python I still need to define this environment variable:

$ export REQUESTS_CA_BUNDLE=/etc/ssl/certs/ca-certificates.crt

A second method to handle the case of a certificate issued from a private CA is to bundle the certificate + the intermediate certificate + the private root CA all into a single file, let’s call it my-crt.crt, in your home directory, and define the envirnoment variable same as for the self-signed certificate case:

$ export REQUESTS_CA_BUNDLE=~/my-crt.crt

My favorite openssl commands shows some commands to run to examine the certificate of a web server.

lftp usage tip with a private CA
If like me you were doing this work in conjunction with running ftps using a certificate signed by a private CA, and want your ftp client, lftp, to not complain about the unrecognized CA, then this tip will help.

After initiating your lftp and sending the username and password, you can send this command
$ ssl:ca-file <path-to-your-private-CA-file>
lftp is so flexible it offers many other ways to do this as well. But this is the one I use.

Conclusion
We show how to add your own root CA to a SLES 12 system. I did not find a good reference for this informaiton anywhere on the Internet.

References and related
My favorite openssl commands.

The basics of working with cipher settings

For Reedhat/CentOS I am evaluating this blog post on the proper way to add your own private CA: https://www.happyassassin.net/2015/01/14/trusting-additional-cas-in-fedora-rhel-centos-dont-append-to-etcpkitlscertsca-bundle-crt-or-etcpkitlscert-pem/

For the Redhat approach I used this blog post: https://www.happyassassin.net/2015/01/14/trusting-additional-cas-in-fedora-rhel-centos-dont-append-to-etcpkitlscertsca-bundle-crt-or-etcpkitlscert-pem/

Categories
Admin CentOS Linux Raspberry Pi

A few RPM and YUM commands and equivalent on Raspberry Pi

Intro
This post adds nothing to the knowledge out there and readily available on the Internet. I just got tired of looking up elsewhere the few useful rpm and yum commands that I employ. Here’s how I installed a missing binary on one system when I have a similar system that has it.

RPM is the Redhat Package Manager. It is also used on Suse Linux (SLES). A much better resource than this page (Hey, we can’t all be experts!) is http://www.idevelopment.info/data/Unix/Linux/LINUX_RPMCommands.shtml

List all installed packages:

$ rpm −qa
dmidecode-2.11-2.el6.x86_64
libXcursor-1.1.10-2.el6.x86_64
basesystem-10.0-4.el6.noarch
plymouth-core-libs-0.8.3-24.el6.centos.x86_64
libXrandr-1.3.0-4.el6.x86_64
ncurses-base-5.7-3.20090208.el6.x86_64
python-ethtool-0.6-1.el6.x86_64

Same as above – list all installed packages – but list the most recently installed packages first (Wish I had discovered this command sooner)!

$ rpm −qa −−last

libcurl-devel-7.19.7-35.el6                   Mon Apr  1 20:00:47 2013
curl-7.19.7-35.el6                            Mon Apr  1 20:00:47 2013
libidn-devel-1.18-2.el6                       Mon Apr  1 20:00:46 2013
libcurl-7.19.7-35.el6                         Mon Apr  1 20:00:46 2013
libssh2-1.4.2-1.el6                           Mon Apr  1 20:00:45 2013
ncurses-static-5.7-3.20090208.el6             Mon Apr  1 19:59:24 2013
ncurses-devel-5.7-3.20090208.el6              Mon Apr  1 19:58:40 2013
gcc-c++-4.4.7-3.el6                           Fri Mar 15 07:59:36 2013
gcc-gfortran-4.4.7-3.el6                      Fri Mar 15 07:59:34 2013
...

Which package owns a command:

$ rpm −qf `which make`
make-3.81-3.el5

(This was run on an older Redhat 5.6 system which has make.)

Similarly, which package owns a file:

$ rpm −qf /usr/lib64/libssh2.so.1
libssh2-1-1.2.9-4.2.2.1

List files in (an installed) package:
$ rpm −ql freeradius-client-1.1.6-40.1

List files in an rpm package file:
$ rpm −qlp packages/HPSiS1124Core-11.24.241-Linux2.4.rpm

Get history of the package versions on this server:

$ yum history list te-agent

Get history of the list of changes to this package:

$ rpm -q -changelog te-agent

Install a package from a local RPM file:
$ rpm −i openmotif-libs-32bit-2.3.1-3.13.x86_64.rpm

Uninstall a packge:
$ rpm −e package
$ rpm −e freeradius-server-libs-2.1.1-7.12.1

How will you install the missing make in CentOS? Use yum to search for it:

$ yum search make

Loaded plugins: fastestmirror
Determining fastest mirrors
 * base: mirror.umd.edu
 * extras: mirror.umd.edu
 * updates: mirror.cogentco.com
============================== N/S Matched: make ===============================
automake.noarch : A GNU tool for automatically creating Makefiles
...
imake.x86_64 : imake source code configuration and build system
...
make.x86_64 : A GNU tool which simplifies the build process for users
makebootfat.x86_64 : Utility for creation bootable FAT disk
mendexk.x86_64 : Replacement for makeindex with many enhancements
...

How to install it:

$ sudo yum install make.x86_64

Loaded plugins: fastestmirror
Loading mirror speeds from cached hostfile
 * base: mirror.umd.edu
 * extras: mirror.umd.edu
 * updates: mirror.cogentco.com
Setting up Install Process
Resolving Dependencies
--&gt; Running transaction check
---&gt; Package make.x86_64 1:3.81-19.el6 will be installed
--&gt; Finished Dependency Resolution
 
Dependencies Resolved
 
===========================================================================================================================
 Package                   Arch                        Version                             Repository                 Size
===========================================================================================================================
Installing:
 make                      x86_64                      1:3.81-19.el6                       base                      389 k
 
Transaction Summary
===========================================================================================================================
Install       1 Package(s)
 
Total download size: 389 k
Installed size: 1.0 M
Is this ok [y/N]: y
Downloading Packages:
make-3.81-19.el6.x86_64.rpm                                                                         | 389 kB     00:00
Running rpm_check_debug
Running Transaction Test
Transaction Test Succeeded
Running Transaction
  Installing : 1:make-3.81-19.el6.x86_64                                                                               1/1
 
Installed:
  make.x86_64 1:3.81-19.el6
 
Complete!

make should now be in your path.

If we were dealing with SLES I would use zypper instead of yum, but the idea of searching and installing is similar.

Debian Linux, e.g. Raspberry Pi

Find which package a file belongs to:

> dpkg -S filepath

List installed packages:

> dpkg -l

List all files belonging to the package iperf3:

> dpkg -L iperf3

Transferring packages from one system to another

When I needed to transfer Debian packages from one system with Internet access to another without, I would do:

apt download apache2

Then sftp the file to the other system and on it do

apt install ./apache2_2.4.53-1~deb11u1_amd64.deb

In fact that only worked after I installed all dependencies. This web of files covered all dependencies:

apache2-bin_2.4.53-1~deb11u1_amd64.deb
apache2-data_2.4.53-1~deb11u1_all.deb
apache2-utils_2.4.53-1~deb11u1_amd64.deb
apache2_2.4.53-1~deb11u1_amd64.deb
libapr1_1.7.0-6+deb11u1_amd64.deb
libaprutil1-dbd-mysql_1.6.1-5_amd64.deb
libaprutil1-dbd-odbc_1.6.1-5_amd64.deb
libaprutil1-dbd-pgsql_1.6.1-5_amd64.deb
libaprutil1-dbd-sqlite3_1.6.1-5_amd64.deb
libaprutil1-ldap_1.6.1-5_amd64.deb
libaprutil1_1.6.1-5_amd64.deb
libgdbm-compat4_1.19-2_amd64.deb
libjansson4_2.13.1-1.1_amd64.deb
liblua5.3-0_5.3.3-1.1+b1_amd64.deb
libmariadb3_1%3a10.5.15-0+deb11u1_amd64.deb
libperl5.32_5.32.1-4+deb11u2_amd64.deb
mailcap_3.69_all.deb
mariadb-common_1%3a10.5.15-0+deb11u1_all.deb
mime-support_3.66_all.deb
mysql-common_5.8+1.0.7_all.deb
perl-modules-5.32_5.32.1-4+deb11u2_all.deb
perl_5.32.1-4+deb11u2_amd64.deb
ssl-cert_1.1.0+nmu1_all.deb