As a creature of habit, I fall for an editor and can never imagine using something else. In the VAX days there was EDT, which if memory serves was replaced by the even better VPU. On Ultrix we ran a pretty nice editor simply called e from Rand Corporation. Then there was the love affair with emacs, and finally for the last 30 years vi.
Well with my latest server, a Debian 12 machine, I was having trouble with insert mode, specifically, inserting text from my Windows clipboard. Never had problems before….
Well for some reason, if you want to insert text from the clipboard, you now use <CTRL.>-<SHIFT>V in command mode. Well, at least on Windows 11 running WSL 2 that seems to work. I now realize that doesn’t work from Windows 10 with WSL. I had better figure this out soon…
Windows 10 running WSL
The terminal type (check the TERM environment variable) is set toxterm-color256. I tried pasting any and all registers which is the standard thing you would do if you use the standard Internet advice. None of it worked for me. I finally realized on my own that – and this harkens back to my old days with the beloved VAX 780 – that if I set the terminal type to vt100 all was good! Seriously. Back in the day we had physical VT100 terminals. Well, before that I think there was a VT52? Then maybe a VT102. VT202 was a big upgrade. Anyway, initially I added the following line to my .bashrc file:
export TERM=vt100
and now I can insert clipboard text the way I always have (mouse right-click) in vi insert mode. This kludge was how we fixed a lot of terminal display issues in the old days. But now I see display from top is messed up! Probably other curses-based apps as well. So two steps forward, one step back. So now what I’ve done is removed that line from .bashrc and put the following lines in my .bash_aliases file:
# DrJ kludge to get vi to work and keep top working
alias top='export TERM=xterm-256color;\top'
alias vi='export TERM=vt100;\vi'
That \top harkens back to an old linux convention where a command preceded by \ invokes a program but ignores defined aliases for that program.
Conclusion
I have offered one possible solution to the can’t insert text from the clipboard problem into my vi: set the TERM environment variable to the old-fashioned vt100. Now I can once again right-click while in insert mode to paste in clipboard text.
This was a very vexing issue for a creature of habit such as me!
References and related
This whole issue came up only when I switched from CentOS 8 to Debian 12 as my back-end server. Believe me, Debian 12 is so superior in so many ways this little setback would never make a material impact in that decision. Here’s the write-up of my upgrade.
I’m thrilled to announce that the long-running blog drjohnstechtalk.com has now been migrated to a modern back-end operating system. drjohnetchtalk.com is, a far as I know, the only quality-written technical resource on the Internet which is not supported by ads. Instead it runs on a pay-it-forward approach, embracing the spirit of the old Internet before it was ruined by big money.
drjohnstechtalk.com has been providing solutions to obscure tech questions since 2011.
The details
I like to run my own server which I can use for other purposes as well. I think that approach used to be more common. Now it’s harder to find others using it. Anyway, my old hosting environment is a CentOS server. I had hoped it would last me up to 10 years! 10 years is about the duration of long-term support for Redhat linux. It’s a real pain to migrate a WordPress blog with lots of history where it is important to preserve the articles and the permalinks. This article documents the nightmare I put myself through to get that up and running. Before that there was a CentOS 6 server. Then in 2022 – only about two years later – I learned that CentOS was dead! IBM had killed it. I’m over-simplifying here somewhat, but not by much.
So my blog sort of limped on on this unsupported system, getting riskier by the day to run as I was missing out on security patches. Then my companyt accidentally included one of my blogs in a security scan and I saw I had some vulnerabilities. So I upgraded WordPress versions and plugin versions. So with up to date software, the stage was set to migrate to a newer OS. Further motivation was provided by the fact that after the WP upgrade, the pages loaded more slowly. And sometimes the site just collapsed and crashed.
I have come to love Debian linux due to my positive experience with running it on Raspberry Pis and a few other places. It tends to run more recent versions of open source software, for instance. So I chose a Debian linux server. Then I forget where I learned this. Perhaps I asked someone at work which web server to use, but the advice was to use nginx, not apache! This was very new to me as I had never run nginx, not that I was in love with apache.
So, anyway, here I am writing this on my shiny new Debian 12 bookworm server which is running an nginx web server! And wow my site loads so much faster now. It’s really striking…
Running WordPress in a subdirectory with nginx
There always has to be a hard part, right? This was really, really hard. I run WP in the subdirectory blog as you can see from any of my URLs. I must have scoured a dozen sites on how to do it, none of which completely worked for me. So I had to do at least some of the heavy lifting and work out a working config on my own.
# mostly taken from https://www.nginx.com/resources/wiki/start/topics/recipes/wordpress/
# but with some important mods
upstream php {
    server unix:/var/run/php/php8.2-fpm.sock;
}

server {
  listen 443 ssl;

    include snippets/self-signed.conf;


    server_name drjohnstechtalk.com www.drjohnstechtalk.com;

    root /web/drjohns;
    index index.php index.html;


    access_log /var/log/nginx/drjohns.access.log;
    error_log /var/log/nginx/drjohns.error.log;

    client_max_body_size 100M;

# the following section prevents wp-admin from infintely redirecting to itself!
    location /blog/wp-admin {
            root /web/drjohns;
            try_files $uri $uri/ /blog/wp-admin/index.php?$args;
    }

    location /blog {
            root /web/drjohns/blog;
            try_files $uri $uri/ /blog/index.php?$args;
    }
    location ~ \.php$ {
#NOTE: You should have "cgi.fix_pathinfo = 0;" in php.ini
         include fastcgi_params;
         fastcgi_intercept_errors on;
         fastcgi_pass php;
         fastcgi_param SCRIPT_FILENAME $document_root$fastcgi_script_name;
    }
    location ~* \.(js|css|png|jpg|jpeg|gif|ico|svg) {
            expires max;
            log_not_found off;
    }
}
I had to add ths svg file type to ignore, the location directive that matches /blog/wp-admin/. I had to define the upstream label as php and refer to that label in fastcgi_pass. I had to figure out my correct version of fastcgi. I tossed out some location directives which weren’t too important to me.
I disabled the wp-hide-login plugin while I grappled with why I was getting first a 404 not found for /blog/wp-admin/, then later, the too many redirects error. But I still had the issue with it disabled. Once I resolved the problem by adding the /blog/wp-admin location directive – I seem to be the only one on the Internet offering this solution and no other solution worked for me! – then I re-enabled the hide login plugin. The other plugins are working I would say.
I’m on the fence about it, fearing it might slow my speedy server. But it looks pretty good. So for now I am relying on AWS Network Security Group rules. Did you know you can ask them to increase your max rule quota frmo 20 to 40? Yes, you can. I did and got approved overnight. I have added the Cloudflare ranges.
Cloudflare
I continue to use Cloudflare as reverse proxy, certificate issuer, DNS provider and light security screening. The change to the new server did not alter that. But I needed a new config file to properly report the origin IP address in my access files. The following file does the trick for me. It is up to date as of February 2024, can be placed in your /etc/nginx/conf.d directory and called, e.g., cloudlfare.conf.
The idea is that if the source IP of the HTTP connection to nginx is from the Cloudflare range of IPs, then this must represent a request proxied through Cloudflare and the original IP of the client is in the HTTP header CF-Connecting-IP, which nginx can report on. If not, just use the normal IP from the TCP connection.
Swap space
On CentOS I had to provide some swap space because otherwise apache + mariaDB + WordPress would easily send its cpu soaring. So far I have not had to do that with my new Debian 12! That is great… So I have a t2.small instance with 25 GB of gp2 storage (100 iops). The server is basically running with a 0.00 load average now. I don’t get a lot of traffic so I hope that infrastructure will suffice.
Set the timezone
My Debian system started out in the UTC timezone. This command confirms that:
sudo timedatectl
This command brings up a menu and i can change the timezone to US Eastern:
sudo dpkg-reconfigure tzdata
Automate patching
It hasn’t run yet, but I’m hoping this root crontab entry will automate the system updates:
There should be three years of full support plus two more years of long term support for a stable Debian release, if I’ve undrstood it correctly. So I believe I may hope to get five years out of my Bookworm version, give or take. Debian — Debian Releases
Fixing the vi editor
I’ve never really had a problem with vi until this server. I show how I fixed it in this blog post.
Status after a few days – not all positive news
Well after a few days I feel the server response has noticeably slowed. I could not run top because I messed up the terminal with my fix to vi! So in a panic I restarted mariadb which seemed to help performance a lot. I will have to figure out how to monitor for this problem and how best to address it. I’m sure it will return. Here is my monitor.sh script:
#!/bin/bash
# restart mariaDB if home page response becomes greater than one second
curl -m1 -o /dev/null -ksH 'Host:drjohnstechtalk.com' https://localhost/blog/
# if curl didn't have enough time (one sec), its exit status is 28
[ $? -eq 28 ] && (systemctl stop mariadb; sleep 3; systemctl start mariadb; echo mariadb restart at $(date))
I invoke it from root’s crontab every three minutes:
# check that our load time is within reason or else restart mariadb -DrJ 2/24
*/3 * * * * sleep 25;cd /home/admin/hosting; ./monitor.sh >> monitor.log 2>&1
I do love my kludges. I will be on the lookout for a better long-term solution.
Conclusion
The technical blogging web site drjohnstechtalk.com now runs on new infrastructure: Debian 12 running nginx. It is muich faster than before. The migration was moderately painful! I have shared the technical details on how I managed to do it. I hope that, unlike my previous platform of CentOS 8, this platform lasts me for the next 10 years!
As my devoted followers will be aware, I nearly kiled myself converting my Centos 6 VM to CentOS 8. For instance see Upgrading WordPress brings a thicket of problems. That is an experience I only want to go through every 10 years, and fortunately, CentOS was just the right platform as its support was supposed to last 10 years I started this blog in either 2011 I believe. I went to CentOS 8 in 2020.
But instead of eight more good years, I’ve learned that CentOS is basically a dead product. EOL in industry parlance. IBM killed it. The last upgrades to CentOS 8 came at the end of 2021. There is a sort of CentOS, now called CentOS Stream, but it should be basically thought of a another Fedora. Probably IBM was losing too much money with people choosing CentOS (free) over RedHat paid subscription.
But anyway, I’ve come to resent how out-of-date the packages are on CentOS and I am much more favorable to plain old Debian linux, largely due to my work on the Raspberry Pi. There the packages like python are much more uptodate. I guess the support is for five years.
The other VM I would consider for my next iteration is Amazon Linux. It has a lot of what I need already installed, so less fuss. But I think they’re only supported for three years.
Rocky Linux, the CentOS replacement
After three years I finally hard about the best CentOS replacement. Rocky Linux. I guess it’s still a bit obscure, but you can find it as an AMI on the marketplace. It has no cost and its stated aim is to be bug-for-bug compatible with Redhat! See the Wikipedia article.
References and related
There is a snarky commentary about this topic which inspired this article. I don’t have the link right now but it is enlightening. I will post it if I ever find it.
I have always been somewhat agog at the idea of limiting bandwidth on my linux servers. Users complain about slow web sites and you want to try it for yourself, slowing your connection down to meet the parameters of their slower connection. More recently I happened on librespeed, an alternative to speedtest.net, where you can run both server and client. But in order to avoid transferring too much data and monopolizing the whole line, I wanted to actually put in some bandwidth throttling. I began an exploration of available methods to achieve this and found some satisfactory approaches that are readily available on Redhat-type linuxes.
bandwidth throttling, bandwidth rate limiting, bandwidth classes – these are all synonyms for what is most commonly called traffic shaping.
What doesn’t work so well
I think it’s important to start with the walls that I hit.
Cgroup
I stumbled on cgroups first. The man page starts in a promising way
cgroup - control group based traffic control filter
Then after you research it you see that support was enabled for cgroups in linux kernels already long ago. And there is version 1 and 2. And only version 1 supports bandwidth limits. But if you’re just a mid-level linux person such as myself, it is confusing and unclear how to take advantage of cgroup. My current conclusion is that it is more a subsystem designed for use by systemctl. In fact if you’ve ever looked at a status, for instance of crond, you see a mention of a cgroup:
sudo systemctl status crond
? crond.service - Command Scheduler
Loaded: loaded (/usr/lib/systemd/system/crond.service; enabled; vendor preset: enabled)
Active: active (running) since Mon 2021-08-09 15:44:24 EDT; 5 days ago
Main PID: 1193 (crond)
Tasks: 1 (limit: 11278)
Memory: 2.1M
CGroup: /system.slice/crond.service
mq1193 /usr/sbin/crond -n
I don’t claim to know what it all means, but there it is. Some nice abilities to schedule and allocate finite resources, at a very high level.
So I get the impression that no one really uses cgroups to do traffic shaping.
apache web server to the rescue – not
Since I was mostly interested in my librespeed server and controlling its bandwidth during testing, I wondered if the apache web server has this capability built-in. Essentially, it does! There is the module mod_ratelimit. So, quest over, and let the implementation begin! Except not so fast. In fact I did enable that module. And I set it up on my librespeed server. It kind of works, but mostly, not really, and nothing like its documented design.
That’s their example section. I have no interest in such low limits and tried various values from 4000 to 12000. I only got two different actual rates from librespeed out of all those various configurations. I could either get 83 Mbps or around 162 Mbps. And that’s it. Merely having any statement whatsoever starts limiting to one of these strange values. With the statement commented out I was getting around 300 Mbps. So I got rate-limiting, but not what I was seeking and with almost no control.
So the apache config approach was a bust for me.
Trickle
There are some linux programs that are perhaps promoted too heavily? Within a minute of posting my first draft of this someone comes along and suggests trickle. Well, on CentOS yum search trickle gives no results. My other OS was SLES v 15 and I similarly got no results. So I’m not enamored with trickle.
tc – now that looks promising
Then I discovered tc – traffic control. That sounds like just the thing. I had to search around a bit on one of my OSes to find the appropriate package, but I found it. On CentOS/Redhat/Fedora the package is iproute-tc. On SLES v15 it was iproute2. On FreeBSD I haven’t figured it out yet.
But it looks unwieldy to use, frankly. Not, as they say, user-friendly.
tcconfig + tc – perfect together
Then I stumbled onto tcconfig, a python wrapper for tc that provides convenient utilities and examples. It’s available, assuming you’ve already installed python, through pip or pip3, depending on how you’ve installed python. Something like
$ sudo pip3 install tcconfig
I love the available settings for tcset – just the kinds of things I would have dreamed up on my own. I wanted to limit download speeds, and only on the web server running on port 443, and noly from a specific subnet. You can do all that! My tcset command went something like this:
More importantly – does it work? Yes, it works beautifully. I run a librespeed cli with three concurrent streams against my AWS server thusly configured and I get around 149 Mbps. Every time.
Note that things are opposite of what you first think of. When I want to restrict download speeds from a server but am imposing traffic shaping on the server (as opposed to on the client machine), from its perspective that is upload traffic! And port 443 is the source port, not the destination port!
Raspberry Pi example
I’m going to try regular librespeed tests on my home RPi which is cabled to my router to do the Internet monitoring. So I’m trying
Despite the strange delay-distro appearing in the tcshow output, the results are perfect. Here are my librespeed results, running against my own private AWS server:
Time is Sat 21 Aug 16:17:23 EDT 2021
Ping: 20 ms Jitter: 1 ms
Download rate: 100.01 Mbps
Upload rate: 9.48 Mbps
!
Problems creep in on RPi
I swear I had it all working. This blog post is the proof. Now I’ve rebooted my RPi and that tcset command above gives the result Illegal instruction. Still trying to figure that one out!
March, 2022 update. My RPi had other issues. I’ve re-imaged the micro SD card and all is good once again. I set traffic shaping policies as shown in this post.
Conclusion about tcconfig
It’s clear tcset is just giving you a nice interface to tc, but sometimes that’s all you need to not sweat the details and start getting productive.
Possible issue – missing kernel module
On one of my servers (the CentOS 8 one), I had to do a
$ sudo yum install kernel-modules-extra
$ sudo modprobe sch_netem
before I could get tcconfig to really work.
To do list
Make the tc settings permanent.
Verify tc + tcconfig work on a Raspberry Pi. (tc is definitely available for RPi.)
Conclusion
We have found a pretty nice and effective way to do traffic shaping on linux systems. The best tool is tc and the best wrapper for it is tcconfig.
References and related
Librespeed is a great speedtest.net alternative for hard-code linux types who love command line and being in full control of both ends of a speed test. I describe it here.
Power cycling one’s cable modem automatically via an attached RPi. I refer to this blog post specifically because I intend to expand that RPi to also do periodic, automated speedtesting of my home braodband connection, with traffic shaping in place if all goes well (as it seems to thus far).
Bandwidth management and “queueing discipline” in all its gory detail is explained in this post, including example raw tc commands. I haven’t digested it yet but it may represent a way for me to get my RPi working again without a re-image: http://www.fifi.org/doc/HOWTO/en-html/Adv-Routing-HOWTO-9.html
Intro
Wordpress tells me to upgrade to version 5.4. But when I try it says nope, your version of php is too old. Now admittedly, I’m running on an ancient CentOS server, now at version 6.10, which I set up back in 2012 I believe.
I’m pretty comfortable with CentOS so I wanted to continue with it, but just on a newer version at Amazon. I don’t like being taken advantage of, so I also wanted to avoid those outfits which charge by the hour for providing CentOS, which should really be free. Those costs can really add up.
Lots of travails setting up my AWS image, and then…
I managed to find a CentOS amongst the community images. I chose centos-8-minimal-install-201909262151 (ami-01b3337aae1959300).
OK. Brand new CentOS 8 image, 8.1.1911 after patching it, which will be supported for 10 years. Surely it has the latest and greatest??
But I didn’t see it until after I had done all the work below the hard way. Oh well.
When I install php I get version 7.2.11. WordPress is telling me I need a minimum of php version 7.3. If i download the latest php, it tells me to download the latest apache. So I do. Version 2.4.43. I also install gcc, anticipating some compiling in my future…
But apache won’t even configure:
httpd-2.4.43]$ ./configure --enable-so
checking for chosen layout... Apache
checking for working mkdir -p... yes
checking for grep that handles long lines and -e... /usr/bin/grep
checking for egrep... /usr/bin/grep -E
checking build system type... x86_64-pc-linux-gnu
checking host system type... x86_64-pc-linux-gnu
checking target system type... x86_64-pc-linux-gnu
configure:
configure: Configuring Apache Portable Runtime library...
configure:
checking for APR... no
configure: error: APR not found.  Please read the documentation.
httpd-2.4.43]$ ./configure --enable-so
checking for chosen layout... Apache
checking for working mkdir -p... yes
checking for grep that handles long lines and -e... /usr/bin/grep
checking for egrep... /usr/bin/grep -E
checking build system type... x86_64-pc-linux-gnu
checking host system type... x86_64-pc-linux-gnu
checking target system type... x86_64-pc-linux-gnu
configure:
configure: Configuring Apache Portable Runtime library...
configure:
checking for APR... no
configure: error: APR not found. Please read the documentation.
  --with-apr=PATH         prefix for installed APR or the full path to
                             apr-config
  --with-apr-util=PATH    prefix for installed APU or the full path to
                             apu-config

(apr-util configure)
checking for APR... no
configure: error: APR could not be located. Please use the --with-apr option.

try:

 ./configure --with-apr=/usr/local/apr

but

-D_GNU_SOURCE   -I/usr/local/src/apr-util-1.6.1/include -I/usr/local/src/apr-util-1.6.1/include/private  -I/usr/local/apr/include/apr-1    -o xml/apr_xml.lo -c xml/apr_xml.c && touch xml/apr_xml.lo
xml/apr_xml.c:35:10: fatal error: expat.h: No such file or directory
 #include
          ^~~~~~~~~
compilation terminated.
make[1]: *** [/usr/local/src/apr-util-1.6.1/build/rules.mk:206: xml/apr_xml.lo] Error 1
--with-apr=PATH prefix for installed APR or the full path to
apr-config
--with-apr-util=PATH prefix for installed APU or the full path to
apu-config
(apr-util configure)
checking for APR... no
configure: error: APR could not be located. Please use the --with-apr option.
try:
./configure --with-apr=/usr/local/apr
but
-D_GNU_SOURCE -I/usr/local/src/apr-util-1.6.1/include -I/usr/local/src/apr-util-1.6.1/include/private -I/usr/local/apr/include/apr-1 -o xml/apr_xml.lo -c xml/apr_xml.c && touch xml/apr_xml.lo
xml/apr_xml.c:35:10: fatal error: expat.h: No such file or directory
#include
^~~~~~~~~
compilation terminated.
make[1]: *** [/usr/local/src/apr-util-1.6.1/build/rules.mk:206: xml/apr_xml.lo] Error 1
So I install expat header files:
$ yum install expat-devel
And then the make of apr-util goes through. Not sure this is the right approach or not yet, however.
So following php’s advice, I have:
$ ./configure –enable-so
checking for chosen layout... Apache
...
checking for pcre-config... false
configure: error: pcre-config for libpcre not found. PCRE is required and available from http://pcre.org/
checking for chosen layout... Apache
...
checking for pcre-config... false
configure: error: pcre-config for libpcre not found. PCRE is required and available from http://pcre.org/
So I install pcre-devel:
$ yum install pcre-devel
Now the apache configure goes through, but the make does not work:
/usr/local/apr/build-1/libtool --silent --mode=link gcc  -g -O2 -pthread         -o htpasswd  htpasswd.lo passwd_common.lo       /usr/local/apr/lib/libaprutil-1.la /usr/local/apr/lib/libapr-1.la -lrt -lcrypt -lpthread -ldl -lcrypt
/usr/local/apr/lib/libaprutil-1.so: undefined reference to `XML_GetErrorCode'
/usr/local/apr/lib/libaprutil-1.so: undefined reference to `XML_SetEntityDeclHandler'
/usr/local/apr/lib/libaprutil-1.so: undefined reference to `XML_ParserCreate'
/usr/local/apr/lib/libaprutil-1.so: undefined reference to `XML_SetCharacterDataHandler'
/usr/local/apr/lib/libaprutil-1.so: undefined reference to `XML_ParserFree'
/usr/local/apr/lib/libaprutil-1.so: undefined reference to `XML_SetUserData'
/usr/local/apr/lib/libaprutil-1.so: undefined reference to `XML_StopParser'
/usr/local/apr/lib/libaprutil-1.so: undefined reference to `XML_Parse'
/usr/local/apr/lib/libaprutil-1.so: undefined reference to `XML_ErrorString'
/usr/local/apr/lib/libaprutil-1.so: undefined reference to `XML_SetElementHandler'
collect2: error: ld returned 1 exit status
make[2]: *** [Makefile:48: htpasswd] Error 1
/usr/local/apr/build-1/libtool --silent --mode=link gcc -g -O2 -pthread -o htpasswd htpasswd.lo passwd_common.lo /usr/local/apr/lib/libaprutil-1.la /usr/local/apr/lib/libapr-1.la -lrt -lcrypt -lpthread -ldl -lcrypt
/usr/local/apr/lib/libaprutil-1.so: undefined reference to `XML_GetErrorCode'
/usr/local/apr/lib/libaprutil-1.so: undefined reference to `XML_SetEntityDeclHandler'
/usr/local/apr/lib/libaprutil-1.so: undefined reference to `XML_ParserCreate'
/usr/local/apr/lib/libaprutil-1.so: undefined reference to `XML_SetCharacterDataHandler'
/usr/local/apr/lib/libaprutil-1.so: undefined reference to `XML_ParserFree'
/usr/local/apr/lib/libaprutil-1.so: undefined reference to `XML_SetUserData'
/usr/local/apr/lib/libaprutil-1.so: undefined reference to `XML_StopParser'
/usr/local/apr/lib/libaprutil-1.so: undefined reference to `XML_Parse'
/usr/local/apr/lib/libaprutil-1.so: undefined reference to `XML_ErrorString'
/usr/local/apr/lib/libaprutil-1.so: undefined reference to `XML_SetElementHandler'
collect2: error: ld returned 1 exit status
make[2]: *** [Makefile:48: htpasswd] Error 1
So I try configure or apr-util with expat built-in.
But when I do the make of apr-util I now get this error:
/usr/local/apr/build-1/libtool: line 7475: cd: builtin/lib: No such file or directory
libtool:   error: cannot determine absolute directory name of 'builtin/lib'
make[1]: *** [Makefile:93: libaprutil-1.la] Error 1
make[1]: Leaving directory '/usr/local/src/apr-util-1.6.1'
make: *** [/usr/local/src/apr-util-1.6.1/build/rules.mk:118: all-recursive] Error 1
From what I read this new error occurs due to having –expat-built-in! So now what? So I get rid of that in my configure statement for apr-util. For some reason, apr-util goes through and compiles. And so I try this for compiling apache24:
$ ./configure –enable-so –with-apr=/usr/local/apr
And then I make it. And for some reason, now it goes through. I doubt it will work, however… it kind of does work.
It threw the files into /usr/local/apache2, where there is a bin directory containing apachectl. I can launch apachectl start, and then access a default page on port 80. Not bad so far…
Hey, maybe for once their instructions will work. Nope.
configure: error: Package requirements (libxml-2.0 >= 2.7.6) were not met:

Package 'libxml-2.0', required by 'virtual:world', not found

Consider adjusting the PKG_CONFIG_PATH environment variable if you
installed software in a non-standard prefix.
So I guess I need to install libxml2-devel:
$ yum install libxm2-devel
Looks like I get past that error. Now it’s on to this one:
configure: error: Package requirements (sqlite3 > 3.7.4) were not met:
So I install sqlite-devel:
$ yum install sqlite-devel
Now my configure almost goes through, except, as I suspected, that was a nonsense argument:
It’s not there when you look for it! Why the heck did they – php.net – give an example with exactly that?? Annoying. So I leave it out. It goes through. Run make. It takes a long time to compile php! And this server is pretty fast. It’s slower than apache or anything else I’ve compiled.
But eventually the compile finished. It added a LoadModule statement to the apache httpd.conf file. And, after I associated files with php extension to the php handler, a test file seemed to work. So php is beginning to work. Not at all sure about the mysql tie-in, however. In fact see further down below where I confirm my fears that there is no MySQL support when PHP is compiled this way.
Is running SSL asking too much?
Apparently, yes. I don’t think my apache24 has SSL support built-in:
Invalid command 'SSLCipherSuite', perhaps misspelled or defined by a module not included in the server configuration
Invalid command 'SSLCipherSuite', perhaps misspelled or defined by a module not included in the server configuration
So I try
$ ./configure –enable-so –with-apr=/usr/local/apr –enable-ssl
Not good…
checking for OpenSSL... checking for user-provided OpenSSL base directory... none
checking for OpenSSL version >= 0.9.8a... FAILED
configure: WARNING: OpenSSL version is too old
no
checking whether to enable mod_ssl... configure: error: mod_ssl has been requested but can not be built due to prerequisite failures
Where is it pulling that old version of openssl? Cause when I do this:
$ openssl version
OpenSSL 1.1.1c FIPS 28 May 2019
OpenSSL 1.1.1c FIPS 28 May 2019
That’s not that old…
I also noticed this error:
configure: WARNING: Your APR does not include SSL/EVP support. To enable it: configure --with-crypto
So maybe I will re-compile APR with that argument.
Nope. APR doesn’t even have that argument. But apr-uil does. I’ll try that.
Not so good:
configure: error: Crypto was requested but no crypto library could be enabled; specify the location of a crypto library using --with-openssl, --with-nss, and/or --with-commoncrypto.
I give up. maybe it was a false alarm. I’ll try to ignore it.
This time at least the configure goes through – no ssl-related errors.
I needed to add the Loadmodule statement by hand to httpd.conf since that file was already there from my previous build and so did not get that statement after my re-build with ssl support:
LoadModule ssl_module modules/mod_ssl.so
LoadModule ssl_module modules/mod_ssl.so
Next error please
Now I have this error:
AH00526: Syntax error on line 92 of /usr/local/apache2/conf/extra/drjohns.conf:
SSLSessionCache: 'shmcb' session cache not supported (known names: ). Maybe you need to load the appropriate socache module (mod_socache_shmcb?).
AH00526: Syntax error on line 92 of /usr/local/apache2/conf/extra/drjohns.conf:
SSLSessionCache: 'shmcb' session cache not supported (known names: ). Maybe you need to load the appropriate socache module (mod_socache_shmcb?).
I want results. So I just comment out the lines that talk about SSL Cache and anything to do with SSL cache.
And…it starts…and…it is listening on both ports 80 and 443 and…it is running SSL. So I think i cracked the SSL issue.
Switch focus to Mysql
I didn’t bother to find mysql. I believe people now use mariadb. So I installed the system one with a yum install mariadb. I became root and learned the version with a select version();
+-----------------+
| version()       |
+-----------------+
| 10.3.17-MariaDB |
+-----------------+
1 row in set (0.000 sec)
+-----------------+
| version() |
+-----------------+
| 10.3.17-MariaDB |
+-----------------+
1 row in set (0.000 sec)
Is that recent enough? Yes! For once we skate by comfortably. The WordPress instructions say:
MySQL 5.6 or MariaDB 10.1 or greater
I setup apache. I try to access wordpress setup but instead get this message:
Forbidden

You don't have permission to access this resource.
Forbidden
You don't have permission to access this resource.
every page I try gives this error.
The apache error log says:
client denied by server configuration: /usr/local/apache2/htdocs/
client denied by server configuration: /usr/local/apache2/htdocs/
Not sure where that’s coming from. I thought I supplied my own documentroot statements, etc.
I threw in a Require all granted within the Directory statement and that seemed to help.
PHP/MySQL communication issue surfaces
Next problem is that PHP wasn’t compiled correctly it seems:
Your PHP installation appears to be missing the MySQL extension which is required by WordPress.
Your PHP installation appears to be missing the MySQL extension which is required by WordPress.
So I’ll try to re-do it. This time I am trying these arguments to configure:
$ ./configure ‐‐with-apxs2=/usr/local/apache2/bin/apxs ‐‐with-mysqli
Well, I’m not so sure this worked. Trying to setup WordPress, I access wp-config.php and only get:
Error establishing a database connection
Error establishing a database connection
This is roll up your sleeves time. It’s clear we are getting no breaks. I looked into installing PhpMyAdmin, but then I would neeed composer, which may depend on other things, so I lost interest in that rabbit hole. So I decide to simplify the problem. The suggested test is to write a php program like this, which I do, calling it tst2.php:
PHP Warning:  mysqli_connect(): (HY000/2002): No such file or directory in /web/drjohns/blog/tst2.php on line 7

Warning: mysqli_connect(): (HY000/2002): No such file or directory in /web/drjohns/blog/tst2.php on line 7
PHP Warning: mysqli_connect(): (HY000/2002): No such file or directory in /web/drjohns/blog/tst2.php on line 7
Warning: mysqli_connect(): (HY000/2002): No such file or directory in /web/drjohns/blog/tst2.php on line 7
Some quick research tells me that php does not know where the file mysql.sock is to be found. I search for it:
$ sudo find / ‐name mysql.sock
and it comes back as
/var/lib/mysql/mysql.sock
/var/lib/mysql/mysql.sock
So…the prescription is to update a couple things in pph.ini, which has been put into /usr/local/lib in my case because I compiled php with mostly default values. I add the locatipon of the mysql.sock file in two places for good measure:
Install WordPress
I begin to install WordPress, creating an initial user and so on. When I go back in I get a directory listing in place of the index.php. So I call index.php by hand and get a worisome error:
Fatal error: Uncaught Error: Call to undefined function gzinflate() in /web/drjohns/blog/wp-includes/class-requests.php:947 Stack trace: #0 /web/drjohns/blog/wp-includes/class-requests.php(886): Requests::compatible_gzinflate('\xA5\x92\xCDn\x830\f\x80\xDF\xC5g\x08\xD5\xD6\xEE...'
Fatal error: Uncaught Error: Call to undefined function gzinflate() in /web/drjohns/blog/wp-includes/class-requests.php:947 Stack trace: #0 /web/drjohns/blog/wp-includes/class-requests.php(886): Requests::compatible_gzinflate('\xA5\x92\xCDn\x830\f\x80\xDF\xC5g\x08\xD5\xD6\xEE...'
I should have compiled php with zlib is what I determine it means… zlib and zlib-devel packages are on my system so this should be straightforward.
More arguments for php compiling
OK. Let’s be sensible and try to reproduce what I had done in 2017 to compile php instead of finding an resolving mistakes one at a time.
Package 'libcurl', required by 'virtual:world', not found
I will install libcurl-devel in hopes of making this one go away.
Past that error, and onto this one:
configure: error: DBA: Could not find necessary header file(s).
I’m trying to drop the –with-gdbm and skip that whole DBA thing since the database connection seemed to be working without it. Now I see an openssl problem:
make: *** No rule to make target '/tmp/php-7.4.4/ext/openssl/openssl.c', needed by 'ext/openssl/openssl.lo'. Stop.
make: *** No rule to make target '/tmp/php-7.4.4/ext/openssl/openssl.c', needed by 'ext/openssl/openssl.lo'. Stop.
Even if I get rid of openssl I still see a problem when running configure:
gawk: ./build/print_include.awk:1: fatal: cannot open file `ext/zlib/*.h*' for reading (No such file or directory)
gawk: ./build/print_include.awk:1: fatal: cannot open file `ext/zlib/*.h*' for reading (No such file or directory)
Now I can ignore that error because configure exits with 0 status and make, but the make then stops at zlib:
SIGNALS   -c /tmp/php-7.4.4/ext/sqlite3/sqlite3.c -o ext/sqlite3/sqlite3.lo
make: *** No rule to make target '/tmp/php-7.4.4/ext/zlib/zlib.c', needed by 'ext/zlib/zlib.lo'.  Stop.
SIGNALS -c /tmp/php-7.4.4/ext/sqlite3/sqlite3.c -o ext/sqlite3/sqlite3.lo
make: *** No rule to make target '/tmp/php-7.4.4/ext/zlib/zlib.c', needed by 'ext/zlib/zlib.lo'. Stop.
Reason for above php compilation errors
I figured it out. My bad. I had done a make distclean in addition to a make clean when i was re-starting with a new set of arguments to configure. i saw it somewhere advised on the Internet and didn’t pay much attention, but it seemed like a good idea. But I think what it was doing was wiping out the files in the ext directory, like ext/zlib.
So now I’m starting over, now with php 7.4.5 since they’ve upgraded in the meanwhile! With this configure command line (I figure I probably don’t need gdb):
./configure –with-apxs2=/usr/local/apache2/bin/apxs –with-mysqli –disable-cgi –with-zlib –with-gettext –with-gdbm –with-curl –with-openssl
Well, the php compile went through, however, I can’t seem to access any WordPress pages (all WordPress pages clock). Yet my simplistic database connection test does work. Hmmm. OK. If they come up at all, they come up exceedingly slowly and without correct formatting.
I think I see the reason for that as well. The source of the wp-login.php page (as viewed in a browser window) includes references to former hostnames my server used to have. Of course fetching all those objects times out. And they’re the ones that provide the formatting. At this point I’m not sure where those references came from. Not from the filesystem, so must be in the database as a result of an earlier WordPress install attempt. Amazon keeps changing my IP, you see. I see it is embedded into WordPress. In Settings | general Settings. I’m going to have this problem every time…
What I’m going to do is to create a temporary fictitious name, johnstechtalk, which I will enter in my hosts file on my Windows PC, in Windows\system32\drivers\etc\hosts, and also enter that name in WordPress’s settings. I will update the IP in my hosts file every time it changes while I am playing around. And now there’s even an issue doing this which has always worked so reliably in the past. Well, I found I actually needed to override the IP for drjohnstechtalk.com in my hosts file. But it seems Firefox has moved on to using DNS over https, so it ignores the hosts file now! i think. Edge still uses it however, thankfully.
WordPress
So WordPress is basically functioning. I managed to install a few of my fav plugins: Akismet anti-spam, Limit Login Attempts, WP-PostViews. Some of the plugins are so old they actually require ftp. Who runs ftp these days? That’s been considered insecure for many years. But to accommodate I installed vsftpd on my server and ran it, temporarily.
Then Mcafee on my PC decided that wordpress.org is an unsafe site, thank you very much, without any logs or pop-ups. I couldn’t reach that site until I disabled the Mcafee firewall. Makes it hard to learn how to do the next steps of the upgrade.
More WordPress difficulties
WordPress is never satisfied with whatever version you’ve installed. You take the latest and two weeks later it’s demanding you upgrade already. My first upgrade didn’t go so well. Then I installed vsftpd. The upgrade likes to use your local FTP server – at least in my case. so for ftp server I just put in 127.0.0.1. Kind of weird. Even still I get this error:
Downloading update from https://downloads.wordpress.org/release/wordpress-5.4.2-no-content.zip…

The authenticity of wordpress-5.4.2-no-content.zip could not be verified as no signature was found.

Unpacking the update…

Could not create directory.

Installation Failed
So I decided it was a permissions problem: my apache was running as user daemon (do a ps -ef to see running processes), while my wordpress blog directory was owned by centos. So I now run apache as user:group centos:centos. In case this helps anyone the apache configurtion commands to do this are:
User centos
Group centos
then I go to my blog directory and run something like:
chown -R centos:centos *
Wordpres Block editor non-functional after the upgrade
When I did the SQL import from my old site, I killed the block editor on my new site! This was disconcerting. That little plus sign just would not show up on new pages, no posts, whatever. So I basically killed wordpress 5.4. So I took a step backwards and started v 5.4 with a clean (empty) database like a fresh install to make sure the block editor works then. It did. Whew! Then I did an RTFM and deactivated my plugins on my old WordPress install before doing the mysql backup. I imported that SQL database, with a very minimal set of plugins activated, and, whew, this time I did not blow away the block editor.
CentOS bogs down
I like my snappy new Centos 8 AMI 80% of the time. But that remaining 20% is very annoying. It freezes. Really bad. I ran a top until the problem happened. Here I’ve caught the problem in action:
top - 16:26:11 up 1 day, 21 min, 2 users, load average: 3.96, 2.93, 5.30
Tasks: 95 total, 1 running, 94 sleeping, 0 stopped, 0 zombie
%Cpu(s): 0.1 us, 2.6 sy, 0.0 ni, 0.0 id, 95.8 wa, 0.4 hi, 0.3 si, 0.7 st
MiB Mem : 1827.1 total, 63.4 free, 1709.8 used, 53.9 buff/cache
MiB Swap: 0.0 total, 0.0 free, 0.0 used. 9.1 avail Mem

PID USER PR NI VIRT RES SHR S %CPU %MEM TIME+ COMMAND
44 root 20 0 0 0 0 S 1.6 0.0 12:47.94 kswapd0
438 root 0 -20 0 0 0 I 0.5 0.0 1:38.84 kworker/0:1H-kblockd
890 mysql 20 0 1301064 92972 0 S 0.4 5.0 1:26.83 mysqld
5282 centos 20 0 1504524 341188 64 S 0.4 18.2 0:06.06 httpd
5344 root 20 0 345936 1008 0 S 0.4 0.1 0:00.09 sudo
560 root 20 0 93504 6436 3340 S 0.2 0.3 0:02.53 systemd-journal
712 polkitd 20 0 1626824 4996 0 S 0.2 0.3 0:00.15 polkitd
817 root 20 0 598816 4424 0 S 0.2 0.2 0:12.62 NetworkManager
821 root 20 0 634088 14772 0 S 0.2 0.8 0:18.67 tuned
1148 root 20 0 216948 7180 3456 S 0.2 0.4 0:16.74 rsyslogd
2346 john 20 0 273640 776 0 R 0.2 0.0 1:20.73 top
1 root 20 0 178656 4300 0 S 0.0 0.2 0:11.34 systemd
So what jumps out at me is the 95.8% wait time – that ain’t good – an that a process which includes the name swap is at the top of ths list, combined with the fact that exactly 0 swap space is allocated. My linux skills may be 15 years out-of-date, but I think I better allocate some swap space (but why does it need it so badly??). On my old system I think I had done it. I’m a little scared to proceed for fear of blowing up my system.
So if you use drjohnstechtalk.com and it freezes, just come back in 10 minutes and it’ll probably be running again – this situation tends to self-correct. No one’s perfect.
Some of the commands are dd to create an empty file, mkswap, swapon and swapon -s to see what it’s doing. And it really, really helped. I think sometimes mariadb needed to swap, and sometimes apache did. My system only has 1.8 GB of memory or so. And the drive is solid state, so it should be kind of fast. Because I used 1.2 GB for swap, I also extended my volume size when I happened upon Amazon’s clear instructions on how you can do that. Who knew? See below for more on that. If I got it right, Amazon also gives you more IO for each GB you add. I’m definitely getting good response after this swap space addition.
An aside about i/o
In the old days I perfected a way to study i/o using the iostat utility. You can get it by installing the sysstat package. A good command to run is iostat -t -c -m -x 5
Examing these three consecutive lines of output from running that command is very instructional:
I tooled around in the admin panel (which previously had brought my server to its knees), and you see the %util shot up to 90%, reads per sec over 2000 , writes per second 1400. So, really demanding. It’s clear my server would die if more than a few people were hitting it hard. And I may need some fine-tuning.
Success!
Given all the above problems, you probably never thought I’d pull this off. I worked in fits and starts – mostly when my significant other was away because this stuff is a time suck. But, believe it or not, I got the new apache/openssl/apr/php/mariadb/wordpress/centos/amazon EC2 VPC/drjohnstechtalk-with-new-2020-theme working to my satisfaction. I have to pat myself on the back for that. So I pulled the plug on the old site, which basically means moving the elastic IP over from old centos 6 site to new centos8 AWS instance. Since my site was so old, I had to first convert the elastic IP from type classic to VPC. It was not too obvious, but I got it eventually.
Damn hackers already at it
Look at the access log of your new apache server running your production WordPress. If you see like I did people already trying to log in (POST accesses for …/wp-login.php), which is really annoying because they’re all hackers, at least install the WPS Hide Login plugin and configure a secret login URL. Don’t use the default login.
Meanwhile I’ve decided to freeze out anyone who triess to access wp-login.php because they can only be up to no good. So I created this script which I call wp-login-freeze.sh:
#!/bin/sh
# freeze hackers who probe for wp-login
# DrJ 6/2020
DIR=/var/log/drjohns
cd $DIR
while /bin/true; do
tail -200 access_log|grep wp-login.php|awk '{print $1}'|sort -u|while read line; do
echo $line
route add -host $line reject
done
sleep 60
done
Works great! Just do a netstat -rn to watch your ever-growing list of systems you’ve frozen out.
But xmlrpc is the worst…
Bots which invoke xmlrpc.php are the worst for little servers like mine. They absolutely bring it to its knees. So I’ve just added something similar to the wp-login freeze above, except it catches xmlrpc bots:
#!/bin/sh
# freeze hackers who are doing God knows what to xmlrpc.php
# DrJ 8/2020
DIR=/var/log/drjohns
cd $DIR
while /bin/true; do
# example offending line:
# 181.214.107.40 - - [21/Aug/2020:08:17:01 -0400] "POST /blog//xmlrpc.php HTTP/1.1" 200 401
tail -100 access_log|grep xmlrpc.php|grep POST|awk '{print $1}'|sort -u|while read line; do
echo $line
route add -host $line reject
done
sleep 30
done
I was still dissatisfied with seeing bots hit me up for 30 seconds or so, so I decided heck with it, I’m going to waste their time first. So I added a few lines to xmlrpc.php (I know you shouldn’t do this, but hackers shouldn’t do what they do either):
// DrJ improvements
if ($_SERVER['REQUEST_METHOD'] === 'POST') {
// just make bot suffer a bit... the freeze out is done by an external script
   sleep(25);
    //
}
// end DrJ enhancements
This freeze out trick within xmlrpc.php was only going to work if the bots run single-threaded, that is, they run serially, waiting for one request to finish before sending the next. I’ve been running it for a couple days and have enthusiasitically frozen out a few IPs. I can attest that the bots do indeed run single-threaded. So I typically get two entries in my access file to xmlrpc from a given bot, and then the bot is completely frozen out by the loopback route which gets added.
Mid-term issues discovered months later
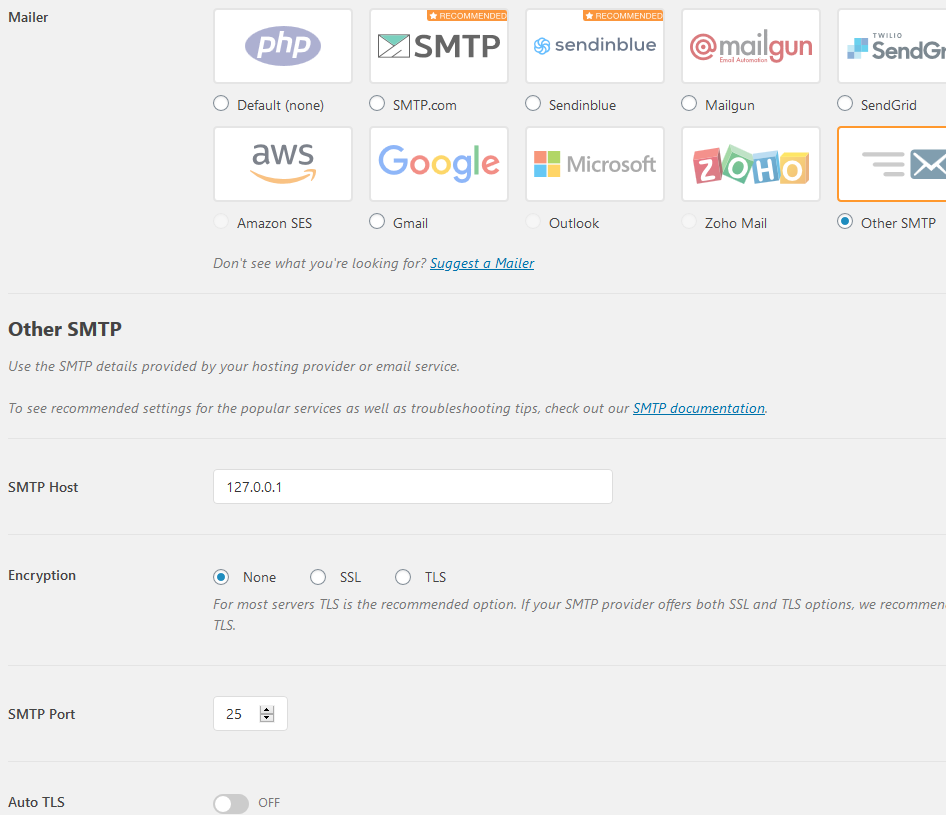
Well, I never needed to send emails form my server, until I did. And when I did I found I couldn’t. It used to work from my old server… From reading a bit I see WordPress uses PHP’s built-in mail() function, which has its limits. But my server did not have mailx or postfix packages. So I did a
$ yum install postfix mailx
$ systemctl enable postfix
$ systemctl start postfix
That still didn’t magically make WordPress mail work, although at that point I could send mail by hand frmo a spoofed address, which is pretty cool, like:
Well, wouldn’t you know my friend’s WordPress site I was trying to host brought my server to its knees. Again. Seems to be a common theme. I was hoping it was merely hackers who’d discovered his new site and injected it with the xmlrpc DOS because that would have been easy to treat. But no, no xmlrpc issues so far according to the access_log file. He uses more of the popular plugins like Elementor and Ninja Forms. Well, that Ninja Forms Dashboard is a killer. Reliably brings my server to a crawl. I even caught it in action from a running top and saw swap was the leading cpu-consuming process. And my 1.2 GB swap file was nearly full. So I created a second, larger swap file of 2 GB and did a swapon for that. Then I decommissioned my older swap file. Did you know you can do a swapoff? Yup. I could see the old one descreasing in size and the new one building up. And now the new one is larger than the old ever could be – 1.4 GB. Now Ninja forms dashboard can be launched. Performance is once again OK.
So…hosting second WordPress site now resolved.
Updating failed. The response is not a valid JSON response.
So then he got that error after enabling permalinks. The causes for this are pretty well documented. We took the standard advice and disabled all plugins. Wihtout permalinks we were fine. With them JSON error. I put the .htaccess file in place. Still no go. So unlike most advice, in my case, where I run my own web server, I must have goofed up the config and not enabled reading of the .htaccess file. Fortunately I had a working example in the form of my own blog site. I put all those apache commands which normally go into .htaccess into the vhost config file. All good.
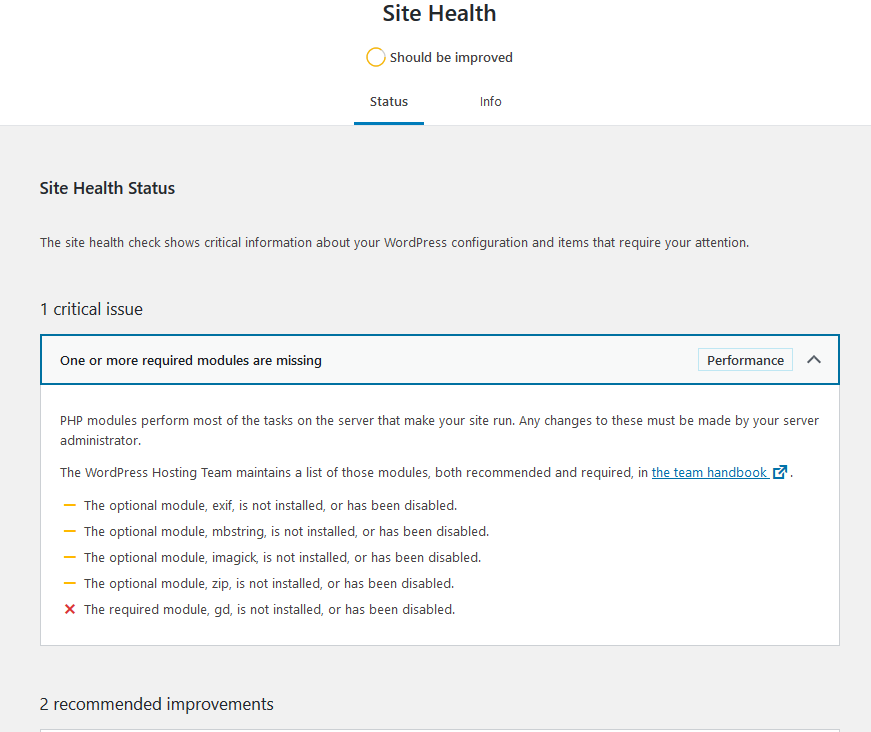
Although my site seems to be humming alnog, now I have to find the more obscure errors. WordPress mentioned my site health has problems.
WordPress site health
I think gd is used for graphics. I haven’t seen any negative results from this, yet. I may leave it be for the time being.
Lets Encrypt certificate renewal stops working
This one is at the bottom because it only manifests itself after a couple months – when the web site certificate either expires or is about to expire. Remember, this is a new server. I was lazy, of course, and just brought over the .acme.sh from the old server, hoping for the best. I didn’t notice any errors at first, but I eventually observed that my certificate was not getting renewed either even though it had only a few days of validity left.
To see what’s going on I ran this command by hand:
acme.sh new-authz error: {"type":"urn:acme:error:badNonce","detail":"JWS has no anti-replay nonce","status": 400}
seemed to be the most important error I noticed. The general suggestion for this is an acme.sh –upgrade, which I did run. But the nonce error persisted. It tries 20 times then gives up.
— warning: I know enough to get the job done, but not enough to write the code. Proceed at your own risk —
I read some of my old blogs and played with the command
My Webroot is /web/drjohns by the way. Now at least there was an error I could understand. I saw it trying to access something like http://drjohnstechtalk.com/.well-known/acme-challenge/askdjhaskjh
which produced a 404 Not Found error. Note the http and not https. Well, I hadn’t put much energy into setting up my http server. In fact it even has a different webroot. So what I did was to make a symbolic link
ln -s /web/drjohns/.well-known /web/insecure
I re-ran the acme.sh –issue command and…it worked. Maybe if I had issued a –renew it would not have bothered using the http server at all, but I didn’t see that switch at the time. So in my crontab instead of how you’re supposed to do it, I’m trying it with these two lines:
# Not how you're supposed to do it, but it worked once for me - DrJ 8/16/20
22 2 * * * "/root/.acme.sh"/acme.sh --issue -d drjohnstechtalk.com -w /web/drjohns > /dev/null 2>&1
22 3 16 * * "/root/.acme.sh"/acme.sh --update-account --issue -d drjohnstechtalk.com -w /web/drjohns > /dev/null 2>&1
The update-account is just for good measure so I don’t run into an account expiry problem which I’ve faced in the past. No idea if it’s really needed. Actually my whole approach is a kludge. But it worked. In two months’ time I’ll know if the cron automation also works.
Why kludge it? I could have spent hours and hours trying to get acme.sh to work as it was intended. I suppose with enough persistence I would have found the root problem.
2021 update. In retrospect
In retrospect, I think I’ll try Amazon Linux next time! I had the opportunity to use it for my job and I have to say it was pretty easy to set up a web server which included php and MariaDB. It feels like it’s based on Redhat, which I’m most familiar with. It doesn’t cost extra. It runs on the same small size on AWS. Oh well.
2022 update
I’m really sick of how far behind Redhat is with their provided software. And since they’ve been taken over by IBM, how they’ve killed CentOS is scandalous. So I’m inclined to go to a Debian-based system for my next go-around, which is much more imminent than I ever expected it to be thanks to the discontinuation of support for CentOS. I asked someone who hosts a lot of WP sites and he said he’d use Ubuntu server 22, PHP 8, MariaDB and NGinx. Boy. Guess I’m way behind. He says performance with PHP 8 is much better. I’ve always used apache but I guess I don’t really rely on it for too many fancy features.
Intro
I think I’ve been running CentOS 6 for six years now. With upgrades I’m at v 6.9. It was nice and new six years ago, but not so much anymore. I think it showed its age when I tried to run Docker. It just wouldn’t fly an I don’t feel like debugging it. The conventional wisdom seems to be that it is not possible – the two are incompatible, which further discouraged me.
Here are my notes
followed https://www.liquidweb.com/kb/how-to-install-docker-on-centos-6/ - DrJ 6/18/18

my problem:
level=error msg="[graphdriver] prior storage driver \"devicemapper\" failed: Error running DeviceCreate (CreatePool) dm_tas
k_run failed"
https://github.com/moby/moby/issues/13008


docker -d -D
...
DEBU[0000] Warning: could not change group /var/run/docker.sock to docker: Group docker not found
INFO[0000] Listening for HTTP on unix (/var/run/docker.sock)
WARN[0000] You are running linux kernel version 2.6.32-131.17.1.el6.x86_64, which might be unstable running docker. Please
upgrade your kernel to 3.10.0.
DEBU[0000] devicemapper: driver version is 4.20.6
DEBU[0000] Generated prefix: docker-202:65-131224
DEBU[0000] Checking for existence of the pool 'docker-202:65-131224-pool'
DEBU[0000] Pool doesn't exist. Creating it.
DEBU[0000] Error retrieving the next available loopback: open /dev/loop-control: no such file or directory
DEBU[0000] Error retrieving the next available loopback: open /dev/loop-control: no such file or directory
ERRO[0000] [graphdriver] prior storage driver "devicemapper" failed: Error running DeviceCreate (CreatePool) dm_task_run fa
iled
FATA[0000] Error starting daemon: error initializing graphdriver: Error running DeviceCreate (CreatePool) dm_task_run faile
d
john@ip-10-164-80-53:~$ docker -v
Docker version 1.7.1, build 786b29d/1.7.1


trying:

yum install --setopt=obsoletes=0 \
   docker-ce-17.03.2.ce-1.el7.centos.x86_64 \
   docker-ce-selinux-17.03.2.ce-1.el7.centos.noarch
(from https://github.com/docker/for-linux/issues/20)
followed https://www.liquidweb.com/kb/how-to-install-docker-on-centos-6/ - DrJ 6/18/18
my problem:
level=error msg="[graphdriver] prior storage driver \"devicemapper\" failed: Error running DeviceCreate (CreatePool) dm_tas
k_run failed"
https://github.com/moby/moby/issues/13008
docker -d -D
...
DEBU[0000] Warning: could not change group /var/run/docker.sock to docker: Group docker not found
INFO[0000] Listening for HTTP on unix (/var/run/docker.sock)
WARN[0000] You are running linux kernel version 2.6.32-131.17.1.el6.x86_64, which might be unstable running docker. Please
upgrade your kernel to 3.10.0.
DEBU[0000] devicemapper: driver version is 4.20.6
DEBU[0000] Generated prefix: docker-202:65-131224
DEBU[0000] Checking for existence of the pool 'docker-202:65-131224-pool'
DEBU[0000] Pool doesn't exist. Creating it.
DEBU[0000] Error retrieving the next available loopback: open /dev/loop-control: no such file or directory
DEBU[0000] Error retrieving the next available loopback: open /dev/loop-control: no such file or directory
ERRO[0000] [graphdriver] prior storage driver "devicemapper" failed: Error running DeviceCreate (CreatePool) dm_task_run fa
iled
FATA[0000] Error starting daemon: error initializing graphdriver: Error running DeviceCreate (CreatePool) dm_task_run faile
d
john@ip-10-164-80-53:~$ docker -v
Docker version 1.7.1, build 786b29d/1.7.1
trying:
yum install --setopt=obsoletes=0 \
docker-ce-17.03.2.ce-1.el7.centos.x86_64 \
docker-ce-selinux-17.03.2.ce-1.el7.centos.noarch
(from https://github.com/docker/for-linux/issues/20)
Conclusion
Running docker on CentOS v 6.9 in 2018 may be impossible or so difficult as to be practically impossible. I give up.
Intro
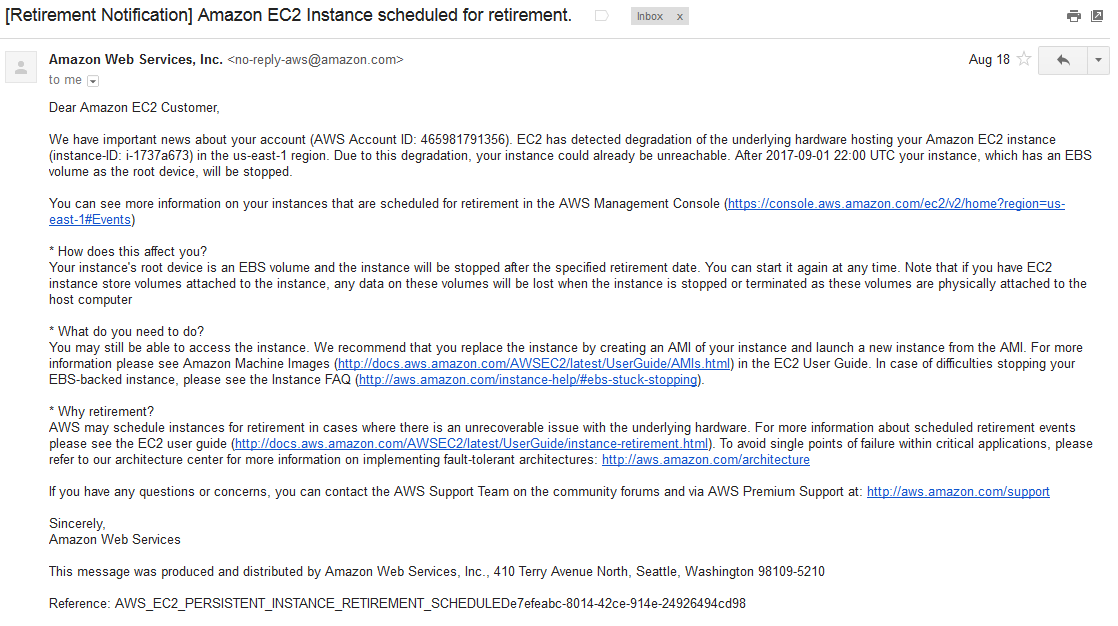
After nearly four years of continuously running my AWS instance I got this scary email:
What to do?
The details
Since I never developed much AWS expertise (never needed to since it just worked) I was afraid to do anything. That’s sort of why I had kept it running for three and a half years – the last time I had to stop it didn’t work out so well.
Some terms
It helps to review the terms. image – that’s like the OS. It has a unique identifier. Mine is ami-03559b6a. instance – that’s a particular image running on a particular virtual server, identified by unique number. Mine is i-1737a673. retired image – the owner of the image decided to no longer make it available for new instances
What it all means
I run a retired image, so for instance I can’t right-click my instance and:
– launch another like this
What I did to keep my instance running
I didn’t! Before the retirement deadline I stopped my instance. That is a painful process because it takes hours in my case. The server becomes unavailable quickly enough, but the status is stuck in state shutting down for at least a couple hours. But, eventually, it does shut down.
Then, I start it again. That’s it!
When it starts, AWS puts it on different hardware, etc, so I guess literally it is a different instance now, running the same image. I re-associate my elastic IP, and all is good.
So when the “retirement” date came along, there was no outage of my instance as I had already stopped/started it and that was all that was needed.
Amazon’s documentation – as good as it is – isn’t that clear on this point, hence this blog posting…
Side preparations
In case I couldn’t restart my image I had taken snapshots of my EBS volumes, and prepared to run Amazon Linux, which looks pretty similar to CentOS which is what I run. But, boy, learning about VPC and routing was a pain. I had to set all that up and gain at least a rudimentary understanding of all that. None of that existed six years ago when I started out! It was much simpler back then.
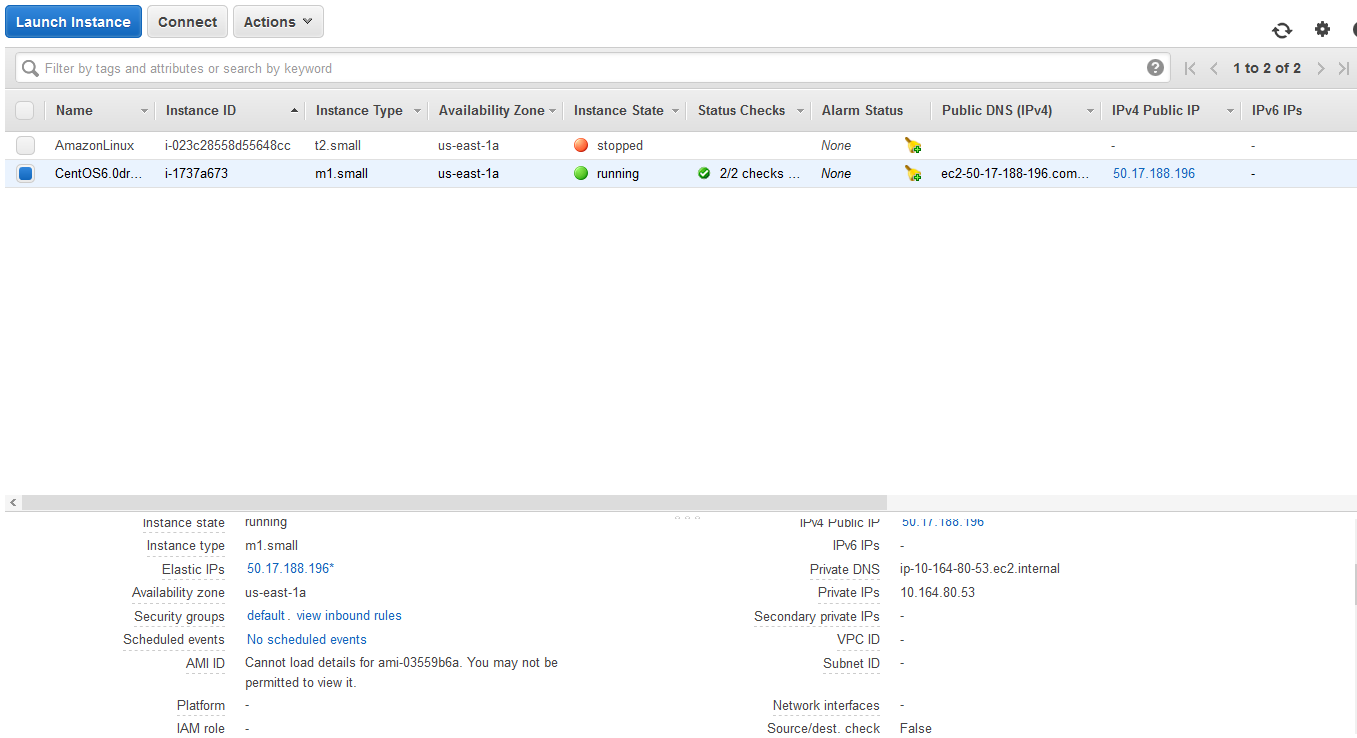
What it looks like
To make things concrete, here is my view on the AWS admin portal of my instances.
Conclusion
Having your Amazon AWS instance retired is not as scary as it initially sounds. Basically, just stop and start it yourself and you’ll be fine.
References and Related
(2024 update) Reserved Instances are now passé! I recently began using the AWS Savings Plans which offers more flexibility.
Intro
I was running a new daemon on my server, factomd, to experiment with digital currency. It’s an old m1.small instance with only 1.7 GB of memory. The first few times I ran it it would 70000 or so blocks, I would let it run overnight, and then it would run out of memory and crash. My admin skills are a little rusty and dated but I eventually realized that adding swap space to my server could help.
The details
I’ve been running this server for five years and never bothered to create a swap area, as it turns out. My CentOS version is, I think, version 6.0, but it’s hard to tell at this point. Anyway, this command shows the lack of an active swap space:
$ sudo swapon ‐s
Filename Type Size Used Priority
Filename Type Size Used Priority
What to do?
Amazon has introduced SSD storage and that is recommended for high I/O demands. That makes sense to me to use for swap, which is basically an extension of your memory. It’s also inexpensive in small volumes. I decided to create a 2 GB swap file – roughly the same size as the machine’s physical memory. So I bought a gp2 – general purpose – SSD volume of 2 GB. It’s only $0.20/month!
Where did it go?
After attaching it to my instance, I got what is apparently a one-time message saying what device it would appear as on my instance – /dev/sdg. I was a little nervous – justifiably as it turns out – that I would not see it from CentOS. I tried to mount it – no go. Then I did Internet research and found these two informative commands:
NAME    TYPE  SIZE FSTYPE MOUNTPOINT LABEL
xvdj    disk  100G ext4   /mnt/vol
xvde    disk    6G
`-xvde1 part    6G ext4   /
xvde3   disk  896M swap
xvdk    disk    2G
NAME TYPE SIZE FSTYPE MOUNTPOINT LABEL
xvdj disk 100G ext4 /mnt/vol
xvde disk 6G
`-xvde1 part 6G ext4 /
xvde3 disk 896M swap
xvdk disk 2G
and
$ sudo fdisk ‐l
Disk /dev/xvdj: 107.4 GB, 107374182400 bytes
255 heads, 63 sectors/track, 13054 cylinders
Units = cylinders of 16065 * 512 = 8225280 bytes
Sector size (logical/physical): 512 bytes / 512 bytes
I/O size (minimum/optimal): 512 bytes / 512 bytes
Disk identifier: 0x00000000


Disk /dev/xvde: 6442 MB, 6442450944 bytes
255 heads, 63 sectors/track, 783 cylinders
Units = cylinders of 16065 * 512 = 8225280 bytes
Sector size (logical/physical): 512 bytes / 512 bytes
I/O size (minimum/optimal): 512 bytes / 512 bytes
Disk identifier: 0xaae7682d

    Device Boot      Start         End      Blocks   Id  System
/dev/xvde1   *           1         783     6289416   83  Linux

Disk /dev/xvde3: 939 MB, 939524096 bytes
255 heads, 63 sectors/track, 114 cylinders
Units = cylinders of 16065 * 512 = 8225280 bytes
Sector size (logical/physical): 512 bytes / 512 bytes
I/O size (minimum/optimal): 512 bytes / 512 bytes
Disk identifier: 0x00000000


Disk /dev/xvdk: 2147 MB, 2147483648 bytes
22 heads, 16 sectors/track, 11915 cylinders
Units = cylinders of 352 * 512 = 180224 bytes
Sector size (logical/physical): 512 bytes / 512 bytes
I/O size (minimum/optimal): 512 bytes / 512 bytes
Disk identifier: 0x83d4c8ed
Disk /dev/xvdj: 107.4 GB, 107374182400 bytes
255 heads, 63 sectors/track, 13054 cylinders
Units = cylinders of 16065 * 512 = 8225280 bytes
Sector size (logical/physical): 512 bytes / 512 bytes
I/O size (minimum/optimal): 512 bytes / 512 bytes
Disk identifier: 0x00000000
Disk /dev/xvde: 6442 MB, 6442450944 bytes
255 heads, 63 sectors/track, 783 cylinders
Units = cylinders of 16065 * 512 = 8225280 bytes
Sector size (logical/physical): 512 bytes / 512 bytes
I/O size (minimum/optimal): 512 bytes / 512 bytes
Disk identifier: 0xaae7682d
Device Boot Start End Blocks Id System
/dev/xvde1 * 1 783 6289416 83 Linux
Disk /dev/xvde3: 939 MB, 939524096 bytes
255 heads, 63 sectors/track, 114 cylinders
Units = cylinders of 16065 * 512 = 8225280 bytes
Sector size (logical/physical): 512 bytes / 512 bytes
I/O size (minimum/optimal): 512 bytes / 512 bytes
Disk identifier: 0x00000000
Disk /dev/xvdk: 2147 MB, 2147483648 bytes
22 heads, 16 sectors/track, 11915 cylinders
Units = cylinders of 352 * 512 = 180224 bytes
Sector size (logical/physical): 512 bytes / 512 bytes
I/O size (minimum/optimal): 512 bytes / 512 bytes
Disk identifier: 0x83d4c8ed
Turns out I had a swap file all along but had never activated it! Further, both these commands show that the new volume is appearing as xvdk, not xvdg. Go figure. I guess I had an xvdj volume and it took the next available letter. The mount command also showed me which of the above volumes was in use so I could see which had been added.
Then I used fdisk to create a swap space on it:
$ fdisk /dev/xvdk
Command (m for help): c
DOS Compatibility flag is not set

Command (m for help): u
Changing display/entry units to sectors

Command (m for help): n
Command action
   e   extended
   p   primary partition (1-4)
p
Partition number (1-4): 1
First sector (2048-4194303, default 2048):
Using default value 2048
Last sector, +sectors or +size{K,M,G} (2048-4194303, default 4194303):
Using default value 4194303

Command (m for help): w
The partition table has been altered!

Calling ioctl() to re-read partition table.
Syncing disks.
Command (m for help): c
DOS Compatibility flag is not set
Command (m for help): u
Changing display/entry units to sectors
Command (m for help): n
Command action
e extended
p primary partition (1-4)
p
Partition number (1-4): 1
First sector (2048-4194303, default 2048):
Using default value 2048
Last sector, +sectors or +size{K,M,G} (2048-4194303, default 4194303):
Using default value 4194303
Command (m for help): w
The partition table has been altered!
Calling ioctl() to re-read partition table.
Syncing disks.
$ ls /dev/xvdk*
/dev/xvdk /dev/xvdk1
/dev/xvdk /dev/xvdk1
$ sudo mkswap /dev/xvdk1
Setting up swapspace version 1, size = 2096124 KiB
no label, UUID=0d782596-03e6-48fd-a0fa-2d0e3174f727
Setting up swapspace version 1, size = 2096124 KiB
no label, UUID=0d782596-03e6-48fd-a0fa-2d0e3174f727
$ sudo swapon /dev/xvdk1
The previous command activated our new swap file. To show that we run this command:
$ sudo swapon ‐s
Filename                                Type            Size    Used    Priority
/dev/xvdk1                              partition       2096120 0       -1
Filename Type Size Used Priority
/dev/xvdk1 partition 2096120 0 -1
Finally to make this swap partition persist after a reboot I added this line to /etc/fstab:
/dev/xvdk1 swap swap defaults 0 0
/dev/xvdk1 swap swap defaults 0 0
Did it help?
Why yes it did! Now I am using over 900 Mb of swap space, so it was needed pretty badly in fact:
$ sudo swapon ‐s
Filename                                Type            Size    Used    Priority
/dev/xvdk1                              partition       2096120 945552  -1
Filename Type Size Used Priority
/dev/xvdk1 partition 2096120 945552 -1
. And my original motivation – keeping factomd from crashing – was achieved as well. Perhaps it wasn’t so important to use an SSD volume. Mostly the i/o per second was well below 100. But I did have the satisfaction of seeing this burst to 1000, a figure I never could have hit with a traditional drive.
Appendix Monitoring i/o
These blockchain verifiers can be killers in terms of resource consumption on little servers like mine. The best tool for analyzing what is going on is iostat:
Always mentally discard the first set of numbers when iostat starts up. It needs to initialize its counters from that reading. But this is chock full of information. The cpu time spent waiting for i/o is too high: 70 – 90 % and a lot of that can be blamed on xvdj (%util column for device xvdj). The way I see it if your i/o were instantaneous this number would drop to 0 and our cpu could be doing other more productive things, hence it shows it is a bottleneck 60% of the time. This also shows my swap, xvdk, being sometimes heavily used and not being too much a bottleneck (20% util).
Then of course there is top, which just confirms that factomd is the resource hog:
$ top
top - 11:45:12 up 1246 days, 14:49,  3 users,  load average: 1.55, 1.73, 1.67
Tasks: 108 total,   1 running, 107 sleeping,   0 stopped,   0 zombie
Cpu(s): 10.6%us,  1.7%sy,  0.0%ni,  4.6%id, 82.3%wa,  0.0%hi,  0.2%si,  0.6%st
Mem:   1695600k total,  1682160k used,    13440k free,     1400k buffers
Swap:  2096120k total,  1003088k used,  1093032k free,    45348k cached

  PID USER      PR  NI  VIRT  RES  SHR S %CPU %MEM    TIME+  COMMAND
29702 john      20   0 2956m 1.3g 3984 S 21.4 77.9 490:35.59 factomd
...
top - 11:45:12 up 1246 days, 14:49, 3 users, load average: 1.55, 1.73, 1.67
Tasks: 108 total, 1 running, 107 sleeping, 0 stopped, 0 zombie
Cpu(s): 10.6%us, 1.7%sy, 0.0%ni, 4.6%id, 82.3%wa, 0.0%hi, 0.2%si, 0.6%st
Mem: 1695600k total, 1682160k used, 13440k free, 1400k buffers
Swap: 2096120k total, 1003088k used, 1093032k free, 45348k cached
PID USER PR NI VIRT RES SHR S %CPU %MEM TIME+ COMMAND
29702 john 20 0 2956m 1.3g 3984 S 21.4 77.9 490:35.59 factomd
...
Type of cpu
Just for the record here’s the type of cpu you get with an m1 small instance:
$ cat /proc/cpuinfo
processor       : 0
vendor_id       : GenuineIntel
cpu family      : 6
model           : 45
model name      : Intel(R) Xeon(R) CPU E5-2650 0 @ 2.00GHz
stepping        : 7
cpu MHz         : 1799.999
cache size      : 20480 KB
fpu             : yes
fpu_exception   : yes
cpuid level     : 13
wp              : yes
flags           : fpu de tsc msr pae cx8 cmov pat clflush mmx fxsr sse sse2 ss ht syscall nx lm constant_tsc up rep_good aperfmperf unfair_spinl
ock pni pclmulqdq ssse3 cx16 sse4_1 sse4_2 x2apic popcnt aes hypervisor lahf_lm arat epb xsaveopt pln pts
bogomips        : 3599.99
clflush size    : 64
cache_alignment : 64
address sizes   : 46 bits physical, 48 bits virtual
power management:
processor : 0
vendor_id : GenuineIntel
cpu family : 6
model : 45
model name : Intel(R) Xeon(R) CPU E5-2650 0 @ 2.00GHz
stepping : 7
cpu MHz : 1799.999
cache size : 20480 KB
fpu : yes
fpu_exception : yes
cpuid level : 13
wp : yes
flags : fpu de tsc msr pae cx8 cmov pat clflush mmx fxsr sse sse2 ss ht syscall nx lm constant_tsc up rep_good aperfmperf unfair_spinl
ock pni pclmulqdq ssse3 cx16 sse4_1 sse4_2 x2apic popcnt aes hypervisor lahf_lm arat epb xsaveopt pln pts
bogomips : 3599.99
clflush size : 64
cache_alignment : 64
address sizes : 46 bits physical, 48 bits virtual
power management:
So that’s a single 2 GHz cpu.
Conclusion
We showed how to economically add swap to a CentOS image on Amazon AWS. We showed factomd successfully running on this small instance and we showed linux commands that can be used to monitor resource consumption. Knowing what I know now – that factomd is i/o limited – in addition to creating a swap space I probably would have put its files onto its own SSD drive, which is their recommendation anyway.
Intro
I know my old Cisco router only has built-in support for two dynamic DNS services, dyndns.org and TZO.com. Nowadays you have to pay for those, if even they work (the web site domain names seem to have changed, but perhaps they still support the old domain names. Or perhaps not!). Maybe this could be fixed by firmware upgrades (to hopefully get more choices and hopefully a free one, or a newer router, or running DD-WRT. I didn’t do any of those things. Being a network person at heart, I wrote my own. I found the samples out there on the Internet needed some updating, so I am sharing my recipe. I didn’t think it was too hard to pull off.
What I used
– GoDaddy DNS hosting (basically any will do)
– my Amazon AWS virtual server running CentOS, where I have sudo access
– my home Raspberry Pi
– a tiny bit of php programming
– my networking skills for debugging
As I have prior experience with all these items this project was right up my alley.
Delegating our DDNS domain from GoDaddy
Just create a nameserver record from the domain, say drj.com, called, say, raspi, which you delegate to your AWS server. Following the example, the subdomain would be raspi.drj.com whose nameserver is drj.com.
DNS Setup on an Amazon AWS server /etc/named.conf
//
// named.conf
//
// Provided by Red Hat bind package to configure the ISC BIND named(8) DNS
// server as a caching only nameserver (as a localhost DNS resolver only).
//
// See /usr/share/doc/bind*/sample/ for example named configuration files.
//

options {
//      listen-on port 53 { 127.0.0.1; };
//      listen-on port 53;
        listen-on-v6 port 53 { ::1; };
        directory       "/var/named";
        dump-file       "/var/named/data/cache_dump.db";
        statistics-file "/var/named/data/named_stats.txt";
        memstatistics-file "/var/named/data/named_mem_stats.txt";
        allow-query     { any; };
        recursion no;

        dnssec-enable yes;
        dnssec-validation yes;
        dnssec-lookaside auto;

        /* Path to ISC DLV key */
        bindkeys-file "/etc/named.iscdlv.key";

        managed-keys-directory "/var/named/dynamic";
};

logging {
        channel default_debug {
                file "data/named.run";
                severity dynamic;
        };
};

zone "." IN {
        type hint;
        file "named.ca";
};

include "/etc/named.rfc1912.zones";
include "/var/named/dynamic.conf";
include "/etc/named.root.key";
//
// named.conf
//
// Provided by Red Hat bind package to configure the ISC BIND named(8) DNS
// server as a caching only nameserver (as a localhost DNS resolver only).
//
// See /usr/share/doc/bind*/sample/ for example named configuration files.
//
options {
// listen-on port 53 { 127.0.0.1; };
// listen-on port 53;
listen-on-v6 port 53 { ::1; };
directory "/var/named";
dump-file "/var/named/data/cache_dump.db";
statistics-file "/var/named/data/named_stats.txt";
memstatistics-file "/var/named/data/named_mem_stats.txt";
allow-query { any; };
recursion no;
dnssec-enable yes;
dnssec-validation yes;
dnssec-lookaside auto;
/* Path to ISC DLV key */
bindkeys-file "/etc/named.iscdlv.key";
managed-keys-directory "/var/named/dynamic";
};
logging {
channel default_debug {
file "data/named.run";
severity dynamic;
};
};
zone "." IN {
type hint;
file "named.ca";
};
include "/etc/named.rfc1912.zones";
include "/var/named/dynamic.conf";
include "/etc/named.root.key";
/var/named/dynamic.conf
zone "raspi.drj.com" {
  type master;
  file "/var/named/db.raspi.drj.com";
// designed to work with nsupdate -l used on same system - DrJ 10/2016
// /var/run/named/session.key
  update-policy local;
};
zone "raspi.drj.com" {
type master;
file "/var/named/db.raspi.drj.com";
// designed to work with nsupdate -l used on same system - DrJ 10/2016
// /var/run/named/session.key
update-policy local;
};
Named re-starting program
Want to make sure your named restarts if it happens to die? nanny.pl is a good, simple monitor to do that. Here is the version I use on my server. Note the customized variables towards the top.
#!/usr/bin/perl## Copyright (C) 2004, 2007, 2012 Internet Systems Consortium, Inc. ("ISC")# Copyright (C) 2000, 2001 Internet Software Consortium.## Permission to use, copy, modify, and/or distribute this software for any# purpose with or without fee is hereby granted, provided that the above# copyright notice and this permission notice appear in all copies.## THE SOFTWARE IS PROVIDED "AS IS" AND ISC DISCLAIMS ALL WARRANTIES WITH# REGARD TO THIS SOFTWARE INCLUDING ALL IMPLIED WARRANTIES OF MERCHANTABILITY# AND FITNESS. IN NO EVENT SHALL ISC BE LIABLE FOR ANY SPECIAL, DIRECT,# INDIRECT, OR CONSEQUENTIAL DAMAGES OR ANY DAMAGES WHATSOEVER RESULTING FROM# LOSS OF USE, DATA OR PROFITS, WHETHER IN AN ACTION OF CONTRACT, NEGLIGENCE# OR OTHER TORTIOUS ACTION, ARISING OUT OF OR IN CONNECTION WITH THE USE OR# PERFORMANCE OF THIS SOFTWARE.# $Id: nanny.pl,v 1.11 2007/06/19 23:47:07 tbox Exp $# A simple nanny to make sure named stays running.$pid_file_location='/var/run/named/named.pid';$nameserver_location='localhost';$dig_program='dig';$named_program='/usr/sbin/named -u named';fork()&&exit();for(;;){$pid=0;open(FILE,$pid_file_location)||goto restart;$pid=<FILE>;close(FILE);chomp($pid);$res=kill0,$pid;goto restart if($res==0);$dig_command="$dig_program +short . \@$nameserver_location > /dev/null";$return=system($dig_command);goto restart if($return==9);sleep30;next;
restart:if($pid!=0){kill15,$pid;sleep30;}system($named_program);sleep120;}
#!/usr/bin/perl
#
# Copyright (C) 2004, 2007, 2012  Internet Systems Consortium, Inc. ("ISC")
# Copyright (C) 2000, 2001  Internet Software Consortium.
#
# Permission to use, copy, modify, and/or distribute this software for any
# purpose with or without fee is hereby granted, provided that the above
# copyright notice and this permission notice appear in all copies.
#
# THE SOFTWARE IS PROVIDED "AS IS" AND ISC DISCLAIMS ALL WARRANTIES WITH
# REGARD TO THIS SOFTWARE INCLUDING ALL IMPLIED WARRANTIES OF MERCHANTABILITY
# AND FITNESS.  IN NO EVENT SHALL ISC BE LIABLE FOR ANY SPECIAL, DIRECT,
# INDIRECT, OR CONSEQUENTIAL DAMAGES OR ANY DAMAGES WHATSOEVER RESULTING FROM
# LOSS OF USE, DATA OR PROFITS, WHETHER IN AN ACTION OF CONTRACT, NEGLIGENCE
# OR OTHER TORTIOUS ACTION, ARISING OUT OF OR IN CONNECTION WITH THE USE OR
# PERFORMANCE OF THIS SOFTWARE.

# $Id: nanny.pl,v 1.11 2007/06/19 23:47:07 tbox Exp $

# A simple nanny to make sure named stays running.

$pid_file_location = '/var/run/named/named.pid';
$nameserver_location = 'localhost';
$dig_program = 'dig';
$named_program =  '/usr/sbin/named -u named';

fork() && exit();

for (;;) {
        $pid = 0;
        open(FILE, $pid_file_location) || goto restart;
        $pid = <FILE>;
        close(FILE);
        chomp($pid);

        $res = kill 0, $pid;

        goto restart if ($res == 0);

        $dig_command =
               "$dig_program +short . \@$nameserver_location > /dev/null";
        $return = system($dig_command);
        goto restart if ($return == 9);

        sleep 30;
        next;

 restart:
        if ($pid != 0) {
                kill 15, $pid;
                sleep 30;
        }
        system ($named_program);
        sleep 120;
}
The PHP updating program myip-update.php
<?php
# DrJ: lifted from http://pablohoffman.com/dynamic-dns-updates-with-a-simple-php-script
# but with some security improvements
# 10/2016
# PHP script for very simple dynamic DNS updates
#
# this script was published in http://pablohoffman.com/articles and
# released to the public domain by Pablo Hoffman on 27 Aug 2006

# CONFIGURATION BEGINS -------------------------------------------------------
# define password here
$mysecret = 'myBigFatsEcreT';
# CONFIGURATION ENDS ---------------------------------------------------------


$ip = $_SERVER['REMOTE_ADDR'];
$host = $_GET['host'];
$secret = $_POST['secret'];
$zone = $_GET['zone'];
$tmpfile = trim(`mktemp /tmp/nsupdate.XXXXXX`);

if ((!$host) or (!$zone) or (!($mysecret == $secret))) {
    echo "FAILED";
    unlink($tmpfile);
    exit;
}

$oldip = trim(`dig +short $host.$zone @localhost`);
if ($ip == $oldip) {
    echo "UNCHANGED. ip: $ip\n";
    unlink($tmpfile);
    exit;
}

echo "$ip - $oldip";

$nsucmd = "update delete $host.$zone A
update add $host.$zone 3600 A $ip
send
";

$fp = fopen($tmpfile, 'w');
fwrite($fp, $nsucmd);
fclose($fp);
`sudo nsupdate -l $tmpfile`;
unlink($tmpfile);
echo "OK ";
echo `date`;
?>
<?php
# DrJ: lifted from http://pablohoffman.com/dynamic-dns-updates-with-a-simple-php-script
# but with some security improvements
# 10/2016
# PHP script for very simple dynamic DNS updates
#
# this script was published in http://pablohoffman.com/articles and
# released to the public domain by Pablo Hoffman on 27 Aug 2006
# CONFIGURATION BEGINS -------------------------------------------------------
# define password here
$mysecret = 'myBigFatsEcreT';
# CONFIGURATION ENDS ---------------------------------------------------------
$ip = $_SERVER['REMOTE_ADDR'];
$host = $_GET['host'];
$secret = $_POST['secret'];
$zone = $_GET['zone'];
$tmpfile = trim(`mktemp /tmp/nsupdate.XXXXXX`);
if ((!$host) or (!$zone) or (!($mysecret == $secret))) {
echo "FAILED";
unlink($tmpfile);
exit;
}
$oldip = trim(`dig +short $host.$zone @localhost`);
if ($ip == $oldip) {
echo "UNCHANGED. ip: $ip\n";
unlink($tmpfile);
exit;
}
echo "$ip - $oldip";
$nsucmd = "update delete $host.$zone A
update add $host.$zone 3600 A $ip
send
";
$fp = fopen($tmpfile, 'w');
fwrite($fp, $nsucmd);
fclose($fp);
`sudo nsupdate -l $tmpfile`;
unlink($tmpfile);
echo "OK ";
echo `date`;
?>
In the above file I added the “sudo” after awhile. See explanation further down below.
Raspberry Pi requirements
I’ve assumed you can run your Pi 24 x 7 and constantly and consistently on your network.
Crontab entry on the Raspberry Pi
Edit the crontab file for periodically checking your IP on the Pi and updating external DNS if it has changed by doing this:
$ crontab ‐e
and adding the line below:
# my own method of dynamic update - DrJ 10/2016
0,10,20,30,40,50 * * * * /usr/bin/curl -s -k -d 'secret=myBigFatsEcreT' 'https://drj.com/myip-update.php?host=raspi&zone=drj.com' >> /tmp/ddns 2>&1
# my own method of dynamic update - DrJ 10/2016
0,10,20,30,40,50 * * * * /usr/bin/curl -s -k -d 'secret=myBigFatsEcreT' 'https://drj.com/myip-update.php?host=raspi&zone=drj.com' >> /tmp/ddns 2>&1
A few highlights
Note that I’ve switched to use of nsupdate -l on the local server. This will be more secure than the previous solution which suggested to have updates from localhost. As far as I can tell localhost updates can be spoofed and so should be considered insecure in a modern infrastructure. I learned a lot by running nsupdate -D -l on my AWS server and observing what happens.
And note that I changed the locations of the secret. The old solution had the secret embedded in the URL in a GET statement, which means it would also be embedded in every single request in the web server’s access file. That’s not a good idea. I switched it to a POSTed variable so that it doesn’t show up in the web server’s access file. This is done with the -d switch of curl.
Contents of temporary file
Here are example contents. This is useful when you’re trying to run nsupdate from the command line.
update delete raspi.drj.com A
update add raspi.drj.com 3600 A 51.32.108.37
send
update delete raspi.drj.com A
update add raspi.drj.com 3600 A 51.32.108.37
send
Permissions problems
If you see something like this on your DNS server:
$ ll /var/run/named
total 8
-rw-r--r-- 1 named www-data   6 Nov  6 03:15 named.pid
-rw------- 1 named www-data 102 Oct 24 09:42 session.key
total 8
-rw-r--r-- 1 named www-data 6 Nov 6 03:15 named.pid
-rw------- 1 named www-data 102 Oct 24 09:42 session.key
your attempt to run nsupdate by your web server will be foiled and produce something like this:
The solution may be to permit group read permission:
$ cd /var/run/named; sudo chmod g+r session.key
and make the group owner of the file your webserver user ID (which I’ve already done here). I’m still working this part out…
That approach doesn’t seem to “stick,” so I came up with this other approach. Put your web server user in sudoers to allow it to run nsupdate (my web server user is www-data for these examples):
Cmnd_Alias     NSUPDATE = /usr/bin/nsupdate
# allow web server to run nsupdate
www-data ALL=(root) NOPASSWD: NSUPDATE
Cmnd_Alias NSUPDATE = /usr/bin/nsupdate
# allow web server to run nsupdate
www-data ALL=(root) NOPASSWD: NSUPDATE
But you may get the dreaded
sudo: sorry, you must have a tty to run sudo
sudo: sorry, you must have a tty to run sudo
if you manage to figure out how to turn on debugging.
So if your sudoers has a line like this:
Defaults requiretty
Defaults requiretty
you will need lines like this:
# turn of tty requirements only for www-data user
Defaults:www-data !requiretty
# turn of tty requirements only for www-data user
Defaults:www-data !requiretty
Debugging
Of course for debugging I commented out the unlink line in the PHP update file and ran the
nsupdate -l /tmp/nsupdate.xxxxx
by hand as user www-data.
During some of the errors I worked through that wasn’t verbose enough so I added debugging arguments:
$ nsupdate ‐D ‐d ‐l /tmp/nsupdate.xxxxx
When that began to work, yet when called via the webserver it wasn’t working, I ran the above command from within PHP, recording the output to a file:
Conclusion
We have shown how to combine a bunch of simple networking tools to create your own DDNS service. The key elements are a Raspberry Pi and your own virtual server at Amazon AWS. We have built upon previous published solutions to this problem and made them more secure in light of the growing sophistication of the bad guys. Let me know if there is interest in an inexpensive commercial service.
References and related
nanny.pl write-up: https://www.safaribooksonline.com/library/view/dns-bind/0596004109/ch05s09.html
Intro
This particular Powershell error I came across yesterday is not well explained in other forums. I present the error and the explanation though not necessarily the solution.
The details
I recently received my new PC running Windows 8.1. On rare occasions I use Windows Powershell to do some light Exchange Online administration, but I am a complete Powershell novice. I have previously documented how to get Powershell to work through proxy, which is also poorly documented. To repeat it here these steps work for me:
And that had always worked under Windows 7. Now this is what I get:
New-PSSession : [outlook.office365.com] Connecting to remote server outlook.office365.com failed with the following
error message : The WinRM client cannot process the request. Basic authentication is currently disabled in the client
configuration. Change the client configuration and try the request again. For more information, see the
about_Remote_Troubleshooting Help topic.
At line:1 char:20
+ $exchangeSession = New-PSSession -ConfigurationName Microsoft.Exchange -Connecti ...
+ ~~~~~~~~~~~~~~~~~~~~~~~~~~~~~~~~~~~~~~~~~~~~~~~~~~~~~~~~~~~~~~~~~~~~~~~~~~~~~~~~
    + CategoryInfo          : OpenError: (System.Manageme....RemoteRunspace:RemoteRunspace) [New-PSSession], PSRemotin
   gTransportException
    + FullyQualifiedErrorId : -2144108321,PSSessionOpenFailed
New-PSSession : [outlook.office365.com] Connecting to remote server outlook.office365.com failed with the following
error message : The WinRM client cannot process the request. Basic authentication is currently disabled in the client
configuration. Change the client configuration and try the request again. For more information, see the
about_Remote_Troubleshooting Help topic.
At line:1 char:20
+ $exchangeSession = New-PSSession -ConfigurationName Microsoft.Exchange -Connecti ...
+ ~~~~~~~~~~~~~~~~~~~~~~~~~~~~~~~~~~~~~~~~~~~~~~~~~~~~~~~~~~~~~~~~~~~~~~~~~~~~~~~~
+ CategoryInfo : OpenError: (System.Manageme....RemoteRunspace:RemoteRunspace) [New-PSSession], PSRemotin
gTransportException
+ FullyQualifiedErrorId : -2144108321,PSSessionOpenFailed
What’s up with that? I independently checked my account credentials – they were correct. Eventually I learned there is a winrm command which can shed some light on this. In particular this command show the problem quite clearly:
So even though I have local admin rights, and I launch Powershell (found in C:\Windows\System32\WindowsPowerShell\v1.0) as administrator, still this rights restriction exists and cannot as far as I know be overridden. The specific issue is that a GPO (group policy) has been enabled that prevents use of Basic authentication.
New idea – try Kerberos authentication
More info about our command is available:
> get‐help new‐pssession ‐full|more
You see that another option for the Authentication switch is Kerberos. So I tried that:
> $exchangeSession = New‐PSSession ‐ConfigurationName Microsoft.Exchange ‐ConnectionUri "https://outlook.office365.com/powershell‐liveid/" ‐Credential $credential ‐Authentication "Kerberos" ‐AllowRedirection ‐SessionOption $drj
This produced the unhappy result:
New-PSSession : [outlook.office365.com] Connecting to remote server
outlook.office365.com failed with the following error message : The WinRM
client cannot process the request. Setting proxy information is not valid when
the authentication mechanism with the remote machine is Kerberos. Remove the
proxy information or change the authentication mechanism and try the request
again. For more information, see the about_Remote_Troubleshooting Help topic.
At line:1 char:20
+ $exchangeSession = New-PSSession -ConfigurationName Microsoft.Exchange
-Connecti ...
+ ~~~~~~~~~~~~~~~~~~~~~~~~~~~~~~~~~~~~~~~~~~~~~~~~~~~~~~~~~~~~~~~~~~~~~~~~~~~~~
~~~
    + CategoryInfo          : OpenError: (System.Manageme....RemoteRunspace:Re
   moteRunspace) [New-PSSession], PSRemotingTransportException
    + FullyQualifiedErrorId : -2144108110,PSSessionOpenFailed
New-PSSession : [outlook.office365.com] Connecting to remote server
outlook.office365.com failed with the following error message : The WinRM
client cannot process the request. Setting proxy information is not valid when
the authentication mechanism with the remote machine is Kerberos. Remove the
proxy information or change the authentication mechanism and try the request
again. For more information, see the about_Remote_Troubleshooting Help topic.
At line:1 char:20
+ $exchangeSession = New-PSSession -ConfigurationName Microsoft.Exchange
-Connecti ...
+ ~~~~~~~~~~~~~~~~~~~~~~~~~~~~~~~~~~~~~~~~~~~~~~~~~~~~~~~~~~~~~~~~~~~~~~~~~~~~~
~~~
+ CategoryInfo : OpenError: (System.Manageme....RemoteRunspace:Re
moteRunspace) [New-PSSession], PSRemotingTransportException
+ FullyQualifiedErrorId : -2144108110,PSSessionOpenFailed
So it seems that because I use a proxy to connect Kerberos authentication is not an option. Drat. Digest? Disabled in my client.
Solution
Unless the security and AD folks can be convinced to make an exception for me to this policy I won’t be able to use this computer for Powershell access to Exchange Online. I guess my home PC would work however. It’s in the cloud after all.
So I tried my home PC. Initially I got an access denied. It was that time of the month when it was time to change the password yet again, sigh, which I learned only by doing a traditional login. With my new password thnigs proceeded further, but in response to the Import-PSSession $exchangeSession I got this new error:
Import-PSSession : Files cannot be loaded because running scripts is disabled on this system. Provide a valid
certificate with which to sign the files.
At line:1 char:2
+  Import-PSSession $exchangeSession
+  ~~~~~~~~~~~~~~~~~~~~~~~~~~~~~~~~~
    + CategoryInfo          : InvalidOperation: (:) [Import-PSSession], PSInvalidOperationException
    + FullyQualifiedErrorId : InvalidOperation,Microsoft.PowerShell.Commands.ImportPSSessionCommand
Import-PSSession : Files cannot be loaded because running scripts is disabled on this system. Provide a valid
certificate with which to sign the files.
At line:1 char:2
+ Import-PSSession $exchangeSession
+ ~~~~~~~~~~~~~~~~~~~~~~~~~~~~~~~~~
+ CategoryInfo : InvalidOperation: (:) [Import-PSSession], PSInvalidOperationException
+ FullyQualifiedErrorId : InvalidOperation,Microsoft.PowerShell.Commands.ImportPSSessionCommand
A quick duckduckgo search shows that this command helps:
> Set-ExecutionPolicy RemoteSigned
And with that, voila, the import worked.
2nd solution
I finally found a Windows server which I have access to and isn’t locked down with that restrictive GPO. I was able to set up my environment on it and it is useable.
3rd solution
I see that as of August 2016 there is an alpha version of powershell that runs on CentOS 7.1. That could be pretty cool since I love Linux. But I’d have to spin up a CentOS 7.1 on Amazon since my server is a bit older (CentOS v 6.6) and (I tried it) it doesn’t run it correctly:
$ sudo powershell
powershell: /usr/lib64/libstdc++.so.6: version `GLIBCXX_3.4.18' not found (required by powershell)
powershell: /usr/lib64/libstdc++.so.6: version `CXXABI_1.3.5' not found (required by powershell)
powershell: /usr/lib64/libstdc++.so.6: version `GLIBCXX_3.4.14' not found (required by powershell)
powershell: /usr/lib64/libstdc++.so.6: version `GLIBCXX_3.4.15' not found (required by powershell)