Categories
Admin Web Site Technologies

Tips for creating a PayPal Donate button for not-not-for-profits

Intro
I am treating my blog as a public service, so I thought it would be appropriate to have a Donation link even though I have not incorporated as a 501c3 non-profit. Is it even possible? Can I keep my anonymity? These were concerns I raised in my head and ones for which there is no good guidance. Short answer: Yes and Yes.

The details
The link to PayPal’s Donate button creation page is pretty well documented. That’s here. Needless to say, you need a PayPal account first!

The PayPal site walks you through a few options. Since Donate is so often associated with not-for-profits I wanted a different word on the button, like Contribute. But customizing the wording was not one of their offered options.

And this is important: you don’t seem to be able to get out of revealing your PayPal email address. It will appear on your Donation page. So what to do?

Well your PayPal account can have up to eight email addresses associated with it. So in my case where the DNS for drjohnstechtalk.com is hosted by GoDaddy (not the web site, mind you, just the DNS), I simply need to set up an arbitrary address like drjohn At drjohnstechtalk DOT com and have it forward to my personal Gmail account. That’s simple enough with GoDaddy’s service, and they don’t even charge extra! Then back to PayPal where you add that address to your account, receive a confirmatory email that they generate, and confirm using their emailed link.

That’s about it. Now you can go back to the button creation page, call it a Donate button, put in your anonymous email address, and let it generate the HTML code. The HTML code is pretty simple and it can be pasted right into a WordPress page if you use or switch to HTML editing.

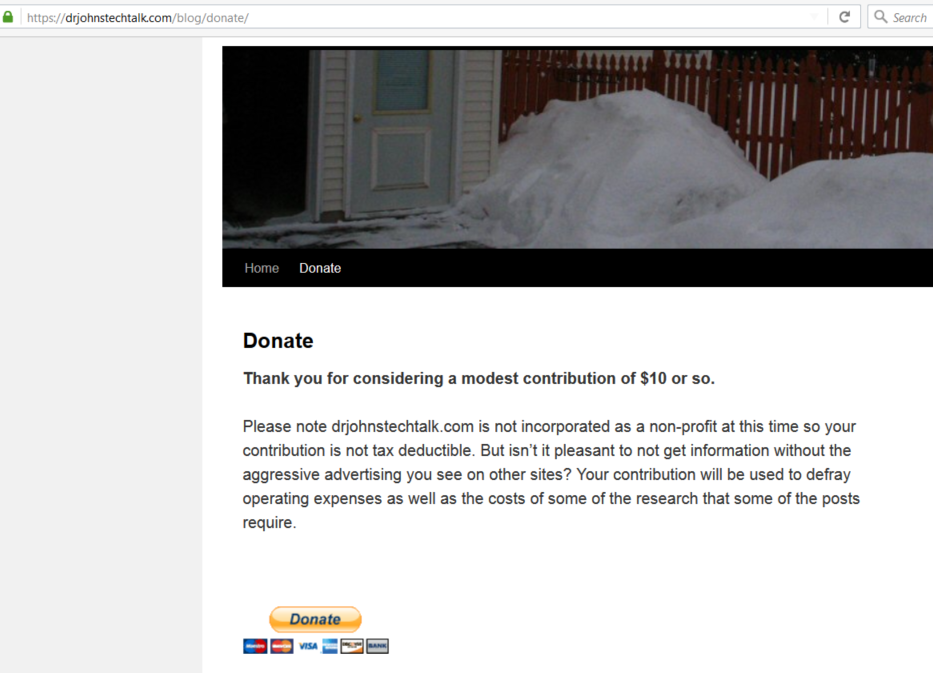
Here’s a screen shot of my donate page with its PayPal donate button.

OK, I lied. You probably also want a Thank you page in case someone actually does contribute! So build a Thank you page on your blog and record the URL. In WordPress I see you can create this as a hidden page – not appearing in any menu yet still using your theme. Here is my hidden thank you page as an example. Now you really have everything you need to build your Paypal button – one of the requested fields is the URL for your thank you page which we now have.

But is it appropriate?

Well, if like me you only expect the occasional, rare contribution, it’s probably akin to finding yourself in public short of money and asking for a few bucks to take the subway, or whatever… If you’re expecting to get thousands a year you’d better incorporate as a 501c3! As a courtesy I remind people that their contribution is not tax deductible. I guess for low volume stuff it can be treated the way gifts are treated for tax purposes.

Conclusion
drjohnstechtalk.com I hope serves as an example of “paying it forward.” I have benefitted from some good advice on the Internet (and suffered from some terrible advice as well), so I hope to benefit others by providing some clear guidance on topics where I can contribute. But I don’t see that as a barrier to asking for a modest contribution to help defray operational and research costs. In this post I show how I did it. It turns out to be simple, but not well documented on balance.

References and related
PayPal’s Donate Button creation web page with step-by-step instructions.
Care to donate to drjohnstechtalk.com? Here’s my donate page.
My thank you page.

Categories
Admin Web Site Technologies

What I’m working on now: saving $69 a year on my certificate costs: Lets Encrypt

Intro
I recently turned off my GoDaddy web site certificate and implemented one that cost me nothing. This will save me $69 per year.

I wrote up my experience in this article: Idea for free web server certificates: Let’s Encrypt

When I originally wrote that article it was a theoretical concept, but since then I’ve encountered web sites using those certificates so I realized that their CA must be widely accepted now and I decided to try for myself. The ACME (automated certificate management environment) environment was something completely new to me and the terminology a little confusing (as a user I don’t “issue” certificates, so whose perspective does the description take anyway?), but I got it to work in the end with the help of a command-line-based utility called acme.sh. I am actually more comfortable with command-line than with GUI programs. You get greater control and greater understanding.

Example of issuing a certificate using the manual DNS method
If you have full control over DNS but not the web server this approach is a good one.

$ sudo acme.sh ‐‐issue ‐‐dns ‐d www2.drjohnstechtalk.com

2021 update

Now the syntax is this:

acme.sh –issue –dns –yes-I-know-dns-manual-mode-enough-go-ahead-please -d www2.drjohnstechtalk.com

and once you’ve made the DNS entries, this:

acme.sh –issue –dns –yes-I-know-dns-manual-mode-enough-go-ahead-please -d www2.drjohnstechtalk.com –renew

[Thu Feb 23 11:55:52 EST 2017] Single domain='www2.drjohnstechtalk.com'
[Thu Feb 23 11:55:52 EST 2017] Getting domain auth token for each domain
[Thu Feb 23 11:55:52 EST 2017] Getting webroot for domain='www2.drjohnstechtalk.com'
[Thu Feb 23 11:55:52 EST 2017] _w='dns'
[Thu Feb 23 11:55:52 EST 2017] Getting new-authz for domain='www2.drjohnstechtalk.com'                                     [Thu Feb 23 11:55:54 EST 2017] The new-authz request is ok.
[Thu Feb 23 11:55:54 EST 2017] Add the following TXT record:
[Thu Feb 23 11:55:54 EST 2017] Domain: '_acme-challenge.www2.drjohnstechtalk.com'
[Thu Feb 23 11:55:54 EST 2017] TXT value: '7kU6pGgcNRtrPKuN2Wu1TIGS7YZDBhuiumLb9aEJwqc'
[Thu Feb 23 11:55:54 EST 2017] Please be aware that you prepend _acme-challenge. before your domain
[Thu Feb 23 11:55:54 EST 2017] so the resulting subdomain will be: _acme-challenge.www2.drjohnstechtalk.com
[Thu Feb 23 11:55:54 EST 2017] Please add the TXT records to the domains, and retry again.
[Thu Feb 23 11:55:54 EST 2017] Please add '--debug' or '--log' to check more details.
[Thu Feb 23 11:55:54 EST 2017] See: https://github.com/Neilpang/acme.sh/wiki/How-to-debug-acme.s/drjohnstechtalk.com/drjohnstechtalk.com/g

If you see an error like:

Usage: acme.sh --issue  -d  a.com  -w /path/to/webroot/a.com/

you probably left out the -d argument or something. I do that all the time for some reason. Go back and check your arguments.

Also note the order of arguments is significant! You have to put the ‐d last!

Anyway, after you’ve worked through any syntax errors like that, make the requested DNS entry in the zone file (do not include the quotes around the TXT value). Verify your entry with a command like this:

$ dig txt www2.drjohnstechtalk.com

Then run acme.sh again like this
$ sudo acme.sh ‐‐renew ‐d www2.drjohnstechtalk.com

[Thu Feb 23 12:02:18 EST 2017] Renew: 'www2.drjohnstechtalk.com'
[Thu Feb 23 12:02:18 EST 2017] Single domain='www2.drjohnstechtalk.com'
[Thu Feb 23 12:02:18 EST 2017] Getting domain auth token for each domain
[Thu Feb 23 12:02:19 EST 2017] Verifying:www2.drjohnstechtalk.com
[Thu Feb 23 12:02:22 EST 2017] Success
[Thu Feb 23 12:02:22 EST 2017] Verify finished, start to sign.
[Thu Feb 23 12:02:23 EST 2017] Cert success.
-----BEGIN CERTIFICATE-----
MIIFDjCCA/agAwIBAgISAzFs92uVHvnQCId6qFoaui9gMA0GCSqGSIb3DQEBCwUA
MEoxCzAJBgNVBAYTAlVTMRYwFAYDVQQKEw1MZXQncyBFbmNyeXB0MSMwIQYDVQQD
ExpMZXQncyBFbmNyeXB0IEF1dGhvcml0eSBYMzAeFw0xNzAyMjMxNjAyMDBaFw0x
NzA1MjQxNjAyMDBaMCAxHjAcBgNVBAMTFXd3dzIucmVmaW5pc2guYmFzZi51czCC
ASIwDQYJKoZIhvcNAQEBBQADggEPADCCAQoCggEBALa9QjcqPSZxXrJmt7kxV9ii
AAI7W0fQdWIk6aDHLfkhsSt55eASOAe05oxnZNqEmcJgXd+2+xUUmm8T5F92l4co
TFiIcMIQ5Jr7Gwg61RnDUe87vI4gctechhhnGcE//4iaJ8Va19exg8HD19dfpdGg
9J2DVnUBqKh4pvItUVe3h8KZOmftQZlLy1QXnEfwEyTj4kGo3phBgOIqh2x15/8Q
tKtM9yr4TKO8clgKLeyXV90ftg4t7kjCdtPx6oRIIq27CO3nwzFq/vFqg6HprE4b
RziUv1yajjw7aHkyhsjWmxdXBlIrokxK3EBrNUo3FUzlLHGGFT2RM1rkbhdaHB0C
AwEAAaOCAhYwggISMA4GA1UdDwEB/wQEAwIFoDAdBgNVHSUEFjAUBggrBgEFBQcD
AQYIKwYBBQUHAwIwDAYDVR0TAQH/BAIwADAdBgNVHQ4EFgQUCvxAhkhpo5Elmge/
3fz5asbprXEwHwYDVR0jBBgwFoAUqEpqYwR93brm0Tm3pkVl7/Oo7KEwcAYIKwYB
BQUHAQEEZDBiMC8GCCsGAQUFBzABhiNodHRwOi8vb2NzcC5pbnQteDMubGV0c2Vu
Y3J5cHQub3JnLzAvBggrBgEFBQcwAoYjaHR0cdrjo2NlcnQuaW50LXgzLmxldHNl
bmNyeXB0Lm9yZy8wIAYDVR0RBBkwF4IVd3d3Mi5yZWZpbmlzaC5iYXNmLnVzMIH+
BgNVHSAEgfYwgfMwCAYGZ4EMAQIBMIHmBgsrBgEEAYLfEwEBATCB1jAmBggrBgEF
BQcCARYaaHR0cDovL2Nwcy5sZXRzZW5jcnlwdC5vcmcwgasGCCsGAQUFBwICMIGe
DIGbVGhpcyBDZXJ0aWZpY2F0ZSBtYXkgb25seSBiZSByZWxpZWQgdXBvbiBieSBS
ZWx5aW5nIFBhcnRpZXMgYW5kIG9ubHkgaW4gYWNjb3JkYW5jZSB3aXRoIHRoZSBD
ZXJ0aWZpY2F0ZSBQb2xpY3kgZm91bmQgYXQgaHR0cHM6Ly9sZXRzZW5jcnlwdC5v
cmcvcmVwb3NpdG9yeS8wDQYJKoZIhvcNAQELBQADggEBADHFgJ3O8v/0zdG48Y1D
ci4wSQqZQSRtalknubVLRC12cr8ct1m0nZ7bxxQnZ/bSFShhcjepFowOfjfdY2ar
GzKP9IRgWavwm259WX5gM5FKUeN/Pjcz++vwUB8ci2+DpZu1tBf0eZcZ6JKsehij
A3lSPb4Ttq/GqDodumeJmvH4/FjCsjIqCJfQQYlz42QdZsLcA2l3oQ8smX0ZK8gh
sIm0SX4RggfiNGuNjw/tkfeC4xfjVNUSjKepUqgsVe63F6gRNjjm+/zsIlPLTdw3
AXGxE71Ww68avev7vRCvp+zPa43DQfVfV98v5M4i0M1/bT0Qh/4hLECma9wBBXb8
jXM=
-----END CERTIFICATE-----
[Thu Feb 23 12:02:23 EST 2017] Your cert is in  /root/.acme.sh/www2.drjohnstechtalk.com/www2.drjohnstechtalk.com.cer
[Thu Feb 23 12:02:23 EST 2017] Your cert key is in  /root/.acme.sh/www2.drjohnstechtalk.com/www2.drjohnstechtalk.com.key
[Thu Feb 23 12:02:23 EST 2017] The intermediate CA cert is in  /root/.acme.sh/www2.drjohnstechtalk.com/ca.cer
[Thu Feb 23 12:02:23 EST 2017] And the full chain certs is there:  /root/.acme.sh/www2.drjohnstechtalk.com/fullchain.cer

More complex example of issuing a SAN certificate using the manual DNS approach

$ ./acme.sh ‐‐issue ‐d johnstechtalk.mobi ‐‐dns ‐d www.johnstechtalk.mobi ‐d drjohnstechtalk.mobi ‐d www.drjohnstechtalk.mobi

[Mon Jan 23 09:21:55 EST 2017] Multi domain='DNS:www.johnstechtalk.mobi,DNS:drjohnstechtalk.mobi,DNS:www.drjohnstechtalk.mobi'
[Mon Jan 23 09:21:55 EST 2017] Getting domain auth token for each domain
[Mon Jan 23 09:21:55 EST 2017] Getting webroot for domain='johnstechtalk.mobi'
[Mon Jan 23 09:21:55 EST 2017] _w='dns'
[Mon Jan 23 09:21:55 EST 2017] Getting new-authz for domain='johnstechtalk.mobi'
[Mon Jan 23 09:21:57 EST 2017] The new-authz request is ok.
[Mon Jan 23 09:21:57 EST 2017] Getting webroot for domain='www.johnstechtalk.mobi'
[Mon Jan 23 09:21:57 EST 2017] _w='dns'
[Mon Jan 23 09:21:57 EST 2017] Getting new-authz for domain='www.johnstechtalk.mobi'
[Mon Jan 23 09:21:57 EST 2017] The new-authz request is ok.
[Mon Jan 23 09:21:57 EST 2017] Getting webroot for domain='drjohnstechtalk.mobi'
[Mon Jan 23 09:21:57 EST 2017] _w='dns'
[Mon Jan 23 09:21:57 EST 2017] Getting new-authz for domain='drjohnstechtalk.mobi'
[Mon Jan 23 09:21:58 EST 2017] The new-authz request is ok.
[Mon Jan 23 09:21:58 EST 2017] Getting webroot for domain='www.drjohnstechtalk.mobi'
[Mon Jan 23 09:21:58 EST 2017] _w='dns'
[Mon Jan 23 09:21:58 EST 2017] Getting new-authz for domain='www.drjohnstechtalk.mobi'
[Mon Jan 23 09:21:58 EST 2017] The new-authz request is ok.
[Mon Jan 23 09:21:58 EST 2017] Add the following TXT record:
[Mon Jan 23 09:21:58 EST 2017] Domain: '_acme-challenge.johnstechtalk.mobi'
[Mon Jan 23 09:21:58 EST 2017] TXT value: 'CDK_dACa_29apV30lc68Vo-mAx3e923ZOh6u-kyhXLo'
[Mon Jan 23 09:21:58 EST 2017] Please be aware that you prepend _acme-challenge. before your domain
[Mon Jan 23 09:21:58 EST 2017] so the resulting subdomain will be: _acme-challenge.johnstechtalk.mobi
[Mon Jan 23 09:21:58 EST 2017] Add the following TXT record:
[Mon Jan 23 09:21:58 EST 2017] Domain: '_acme-challenge.www.johnstechtalk.mobi'
[Mon Jan 23 09:21:58 EST 2017] TXT value: 'UC6JLg1hbXo0oRlYwSyrSRMD5nZgEKgdcIDZfhlqCrU'
[Mon Jan 23 09:21:58 EST 2017] Please be aware that you prepend _acme-challenge. before your domain
[Mon Jan 23 09:21:58 EST 2017] so the resulting subdomain will be: _acme-challenge.www.johnstechtalk.mobi
[Mon Jan 23 09:21:58 EST 2017] Add the following TXT record:
[Mon Jan 23 09:21:58 EST 2017] Domain: '_acme-challenge.drjohnstechtalk.mobi'
[Mon Jan 23 09:21:58 EST 2017] TXT value: 'y8ZCkJ-PXxGbeQFxh7RULCLGKyHH3G7FMFhKpMNF7ow'
[Mon Jan 23 09:21:58 EST 2017] Please be aware that you prepend _acme-challenge. before your domain
[Mon Jan 23 09:21:58 EST 2017] so the resulting subdomain will be: _acme-challenge.drjohnstechtalk.mobi
[Mon Jan 23 09:21:58 EST 2017] Add the following TXT record:
[Mon Jan 23 09:21:58 EST 2017] Domain: '_acme-challenge.www.drjohnstechtalk.mobi'
[Mon Jan 23 09:21:58 EST 2017] TXT value: '8nyb_V7AKaxy0U5pGTKmUejKEXgPv66VKne8yZYZMDg'
[Mon Jan 23 09:21:58 EST 2017] Please be aware that you prepend _acme-challenge. before your domain
[Mon Jan 23 09:21:58 EST 2017] so the resulting subdomain will be: _acme-challenge.www.drjohnstechtalk.mobi
[Mon Jan 23 09:21:59 EST 2017] Please add the TXT records to the domains, and retry again.
[Mon Jan 23 09:21:59 EST 2017] Please add '--debug' or '--log' to check more details.
[Mon Jan 23 09:21:59 EST 2017] See: https://github.com/Neilpang/acme.sh/wiki/How-to-debug-acme.sh

Then you add the DNS records they requested in the zone file, for instance,

_acme-challenge.johnstechtalk.mobi IN TXT CDK_dACa_29apV30lc68Vo-mAx3e923ZOh6u-kyhXLo

Then you rerun acme.sh, but with the renew argument:
$ ./acme.sh ‐‐renew ‐d johnstechtalk.mobi
and you should get your SAN certificate issued to you! All the files – private key, intermediate CERT, newly-issued SAN certificate – in ~/.acme.sh/johnstechtalk.mobi/

Of course just put in your own domain names in place of mine. I don’t know how quickly you have to act to put in your TXT records for the DNS authentication challenge. I edited zone files by hand and got them in within a few minutes.

And note the order of the arguments in the original acme.sh command. Often the switch order is immaterial in Linux, but for this command it matters a bit. You have your first mentioned domain, then the dns switch, then your other domain names.

Authorization expires
I got into trouble today, these many months later because my authorization had expired. The error looks like this:

[Sat Feb  3 17:14:00 EST 2018] _CURL='curl -L --silent --dump-header /root/.acme.sh/http.header '
[Sat Feb  3 17:14:01 EST 2018] _ret='0'
[Sat Feb  3 17:14:01 EST 2018] code='404'
[Sat Feb  3 17:14:01 EST 2018] drjohnstechtalk.com:Challenge error: {"type":"urn:acme:error:malformed","detail":"Expired authorization","status": 404}
[Sat Feb  3 17:14:01 EST 2018] Skip for removelevel:
[Sat Feb  3 17:14:01 EST 2018] pid
[Sat Feb  3 17:14:01 EST 2018] _clearupdns
[Sat Feb  3 17:14:01 EST 2018] Dns not added, skip.
[Sat Feb  3 17:14:01 EST 2018] _on_issue_err
[Sat Feb  3 17:14:01 EST 2018] Please add '--debug' or '--log' to check more details.
[Sat Feb  3 17:14:01 EST 2018] See: https://github.com/Neilpang/acme.sh/wiki/How-to-debug-acme.sh
[Sat Feb  3 17:14:02 EST 2018] Diagnosis versions:

Turns out there was a 10-month validity to my one-time DNS authorization which I did not know. So I switched to web root authorization and that seemed to work. That went like this:

$ acme.sh ‐‐issue ‐d drjohnstechtalk.com ‐w /webroot/drjohns

And I had to run that as root.


References and related

Idea for free web server certificates: Let’s Encrypt
Info about acme.sh
A great review of the state of hosting companies preparedness for offering SSL circa March 2018 in their hosting packages – so you can compare side-by-side – is in this Naked Security article: https://nakedsecurity.sophos.com/2018/03/12/with-4-months-to-switch-on-https-are-web-hosting-companies-ready/

Categories
Admin Apache Network Technologies Security

drjohnstechtalk now uses HTTP Strict Transport Security, HSTS

Intro
I was reading about a kind of amazingly thorough exploit which could be done using a Raspberry Pi zero. Physical access is required, but the scope of what this guy has figured out and put together is really amazing.

Reading the description I decided is a good exercise in making sure I understand the underlying technologies. One was admittedly something I hadn’t seen before: DNS re-binding. That got me to reading about DNS re-binding, and that got me to looking at defenses against DNS rebinding.

HSTS to the rescue
Since in DNS rebinding you may have either a MITM (man in the middle) or a web site impersonated by a hacker, one defense against it is to use HTTPS. (The hacker will not have access to a web site’s private key and therefore has no way to fake a certificate). But what they can do is redirect users from HTTPS to HTTP, where no certificate is required.

HSTS is designed to make that move tip off the user by complaining to the user. Upon first visit the user gets a cookie that says this site should be https. Subsequent visits then are enforced by the user’s browser that the site accessed must be HTTPS.

drjohnstechtalk update
Two years ago I switched the default way I run my blog web site from HTTP to HTTPS due to the encryption offered by HTTPS, and the fact that search engines penalize HTTP sites.

It seems a natural progression in this age of increasing security awareness to up the ante and now also run HSTS. For me this was easy. Since I run my own apache server I simply needed to add the appropriate HTTP Response header to my server responses.

This is done within the virtual server section of the apache configuration like so:

# Guarantee HTTPS for 1/2 Year including Sub Domains  - DrJ 11/22/16
# see https://itigloo.com/security/how-to-configure-http-strict-transport-security-hsts-on-apache-nginx/
    Header always set Strict-Transport-Security "max-age=15811200; includeSubDomains; preload"

Of course this requires that the apache mod_headers is included.

Results
I test it form a linux server like this:

$ curl ‐i ‐k ‐s https://drjohnstechtalk.com/blog/|head ‐15

HTTP/1.1 200 OK
Date: Tue, 22 Nov 2016 20:30:56 GMT
Server: Apache/2
Strict-Transport-Security: max-age=15811200; includeSubDomains
Vary: Cookie,Accept-Encoding
X-Powered-By: PHP/5.4.43
X-Pingback: https://drjohnstechtalk.com/blog/xmlrpc.php
Last-Modified: Tue, 22 Nov 2016 20:30:58 GMT
Transfer-Encoding: chunked
Content-Type: text/html; charset=UTF-8
 
<!DOCTYPE html>
<html lang="en-US">
<head>
<meta charset="UTF-8" />

See that new header Strict-Transport-Security: max-age=15811200; includeSubDomains; preload? That’s the result of what we did. But unless we put that preload at the end it doesn’t verify!

Capture-HSTS-verify-with-error

References and related
drjohnstechtalk is now encrypted – blog posting from 2014
This site has a good description of the requirements for a proper HSTS implementation, and I see that I missed something! https://hstspreload.appspot.com/
You can’t run https without a certificate. I soon will be using the free certificates offered by Let’s Encrypt. Here’s my write-up.

Categories
Admin CentOS

Powershell winrm client error explained

Intro
This particular Powershell error I came across yesterday is not well explained in other forums. I present the error and the explanation though not necessarily the solution.

The details
I recently received my new PC running Windows 8.1. On rare occasions I use Windows Powershell to do some light Exchange Online administration, but I am a complete Powershell novice. I have previously documented how to get Powershell to work through proxy, which is also poorly documented. To repeat it here these steps work for me:

> $credential = Get‐Credential
> $drj = New‐PSSessionOption ‐ProxyAccessType IEConfig
> $exchangeSession = New‐PSSession ‐ConfigurationName Microsoft.Exchange ‐ConnectionUri "https://outlook.office365.com/powershell‐liveid/" ‐Credential $credential ‐Authentication "Basic" ‐AllowRedirection ‐SessionOption $drj
> Import‐PSSession $exchangeSession

And that had always worked under Windows 7. Now this is what I get:

New-PSSession : [outlook.office365.com] Connecting to remote server outlook.office365.com failed with the following
error message : The WinRM client cannot process the request. Basic authentication is currently disabled in the client
configuration. Change the client configuration and try the request again. For more information, see the
about_Remote_Troubleshooting Help topic.
At line:1 char:20
+ $exchangeSession = New-PSSession -ConfigurationName Microsoft.Exchange -Connecti ...
+ ~~~~~~~~~~~~~~~~~~~~~~~~~~~~~~~~~~~~~~~~~~~~~~~~~~~~~~~~~~~~~~~~~~~~~~~~~~~~~~~~
    + CategoryInfo          : OpenError: (System.Manageme....RemoteRunspace:RemoteRunspace) [New-PSSession], PSRemotin
   gTransportException
    + FullyQualifiedErrorId : -2144108321,PSSessionOpenFailed

What’s up with that? I independently checked my account credentials – they were correct. Eventually I learned there is a winrm command which can shed some light on this. In particular this command show the problem quite clearly:

> winrm get winrm/config/client

Client
    NetworkDelayms = 5000
    URLPrefix = wsman
    AllowUnencrypted = false [Source="GPO"]
    Auth
        Basic = false [Source="GPO"]
        Digest = false [Source="GPO"]
        Kerberos = true
        Negotiate = true
        Certificate = true
        CredSSP = false
    DefaultPorts
        HTTP = 5985
        HTTPS = 5986
    TrustedHosts

So even though I have local admin rights, and I launch Powershell (found in C:\Windows\System32\WindowsPowerShell\v1.0) as administrator, still this rights restriction exists and cannot as far as I know be overridden. The specific issue is that a GPO (group policy) has been enabled that prevents use of Basic authentication.

New idea – try Kerberos authentication
More info about our command is available:

> get‐help new‐pssession ‐full|more

You see that another option for the Authentication switch is Kerberos. So I tried that:
> $exchangeSession = New‐PSSession ‐ConfigurationName Microsoft.Exchange ‐ConnectionUri "https://outlook.office365.com/powershell‐liveid/" ‐Credential $credential ‐Authentication "Kerberos" ‐AllowRedirection ‐SessionOption $drj

This produced the unhappy result:

New-PSSession : [outlook.office365.com] Connecting to remote server
outlook.office365.com failed with the following error message : The WinRM
client cannot process the request. Setting proxy information is not valid when
the authentication mechanism with the remote machine is Kerberos. Remove the
proxy information or change the authentication mechanism and try the request
again. For more information, see the about_Remote_Troubleshooting Help topic.
At line:1 char:20
+ $exchangeSession = New-PSSession -ConfigurationName Microsoft.Exchange
-Connecti ...
+ ~~~~~~~~~~~~~~~~~~~~~~~~~~~~~~~~~~~~~~~~~~~~~~~~~~~~~~~~~~~~~~~~~~~~~~~~~~~~~
~~~
    + CategoryInfo          : OpenError: (System.Manageme....RemoteRunspace:Re
   moteRunspace) [New-PSSession], PSRemotingTransportException
    + FullyQualifiedErrorId : -2144108110,PSSessionOpenFailed

So it seems that because I use a proxy to connect Kerberos authentication is not an option. Drat. Digest? Disabled in my client.

Solution
Unless the security and AD folks can be convinced to make an exception for me to this policy I won’t be able to use this computer for Powershell access to Exchange Online. I guess my home PC would work however. It’s in the cloud after all.

So I tried my home PC. Initially I got an access denied. It was that time of the month when it was time to change the password yet again, sigh, which I learned only by doing a traditional login. With my new password thnigs proceeded further, but in response to the Import-PSSession $exchangeSession I got this new error:

Import-PSSession : Files cannot be loaded because running scripts is disabled on this system. Provide a valid
certificate with which to sign the files.
At line:1 char:2
+  Import-PSSession $exchangeSession
+  ~~~~~~~~~~~~~~~~~~~~~~~~~~~~~~~~~
    + CategoryInfo          : InvalidOperation: (:) [Import-PSSession], PSInvalidOperationException
    + FullyQualifiedErrorId : InvalidOperation,Microsoft.PowerShell.Commands.ImportPSSessionCommand

A quick duckduckgo search shows that this command helps:

> Set-ExecutionPolicy RemoteSigned

And with that, voila, the import worked.

2nd solution

I finally found a Windows server which I have access to and isn’t locked down with that restrictive GPO. I was able to set up my environment on it and it is useable.

3rd solution

I see that as of August 2016 there is an alpha version of powershell that runs on CentOS 7.1. That could be pretty cool since I love Linux. But I’d have to spin up a CentOS 7.1 on Amazon since my server is a bit older (CentOS v 6.6) and (I tried it) it doesn’t run it correctly:

$ sudo powershell

powershell: /usr/lib64/libstdc++.so.6: version `GLIBCXX_3.4.18' not found (required by powershell)
powershell: /usr/lib64/libstdc++.so.6: version `CXXABI_1.3.5' not found (required by powershell)
powershell: /usr/lib64/libstdc++.so.6: version `GLIBCXX_3.4.14' not found (required by powershell)
powershell: /usr/lib64/libstdc++.so.6: version `GLIBCXX_3.4.15' not found (required by powershell)

The instructions for installation are here.

Conclusion
Not every problem has a simple solution, but here I’ve at least documented the issues more clearly than it is elsewhere on the Internet.

References and related
Powershell for Linux? Yes! Instructions here.

Categories
Admin Network Technologies

Who’s using the UK Ministry of Defence’s IP addresses?

Intro
When I first came upon a spear phishing email a few months ago which originated from the UK’s Ministry of Defence I thought that was pretty queer. Like, how ironic that an invoice scam is coming from a Defense Ministry. Do they have a bad actor? Are we on the cusp of cracking some big international cybertheft? Do we tell them?

Then their address space came up yet again just a few days ago, this time in a fairly different context. Microsoft’s Exchange Online service hosted in the UK cannot deliver email to a particular domain:

8/5/2016 3:32:35 PM - Server at e********s.net (25.152.12.27) returned '450 4.4.312 DNS query failed(ServerFailure)'

I obscured the domain a bit. But it’s an everyday domain which every DNS server I’ve tested resolves just fine. But Microsoft doesn’t see it that way. Several test messages have shown non-delivery reports using these other addresses as well following the “Server at…”: 25.152.8.27, 25.152.16.27.

The Register sheds the most light – but it still lacks in critical details – on what might have happened to the UK Ministry of Defence’s IPv4 address space, namely, that some was sold. Here’s the article.

How do you show that all these 25.152.8.8 addresses belong to the Ministry of Defence? You use RIPE: http://ripe.net/ and do a search. It shows that 25.0.0.0/8 belongs to them. But according to the article in The Register this is no longer true as of late last year.

Why is Microsoft using these IP addresses? No idea. But something I read got me to suspecting that some outfits decided to use 25/8 address space as though it were private IP addresses!

References and related

Categories
Admin Network Technologies Security

IP address wall of shame

Intro
It can be very time-consuming to report bad actors on the Internet. The results are unpredictable and I suppose in some cases the situation could be worsened. Out of general frustration, I’ve decided to publicly list the worst offenders.

The details
These are individual IPs or networks that have initiated egregious hacking attempts against my server over the past few years.

I can list them as follows:

$ netstat ‐rn|cut ‐c‐16|egrep ‐v ^'10\.|172|169'

Kernel IP routing table
Destination     Gateway         Genmask
46.151.52.61    127.0.0.1       255.255.255.255
23.110.213.91   127.0.0.1       255.255.255.255
183.3.202.105   127.0.0.1       255.255.255.255
94.249.241.48   127.0.0.1       255.255.255.255
82.19.207.212   127.0.0.1       255.255.255.255
46.151.52.37    127.0.0.1       255.255.255.255
43.229.53.13    127.0.0.1       255.255.255.255
93.184.187.75   127.0.0.1       255.255.255.255
43.229.53.14    127.0.0.1       255.255.255.255
144.76.170.101  127.0.0.1       255.255.255.255
198.57.162.53   127.0.0.1       255.255.255.255
146.185.251.252 127.0.0.1       255.255.255.255
123.242.229.75  127.0.0.1       255.255.255.255
113.160.158.43  127.0.0.1       255.255.255.255
46.151.52.0     127.0.0.1       255.255.255.0
121.18.238.0    127.0.0.1       255.255.255.0
58.218.204.0    127.0.0.1       255.255.255.0
221.194.44.0    127.0.0.1       255.255.255.0
43.229.0.0      127.0.0.1       255.255.0.0
0.0.0.0         10.185.21.65    0.0.0.0

Added after the initial post
185.110.132.201/32
69.197.191.202/32 – 8/2016
119.249.54.0/24 – 10/2016
221.194.47.0/24 – 10/2016
79.141.162.0/23 – 10/2016
91.200.12.42 – 11/2016. WP login attempts
83.166.243.120 – 11/2016. WP login attempts
195.154.252.100 – 12/2016. WP login attemtps
195.154.252.0/23 – 12/2016. WP login attempts
91.200.12.155/24 – 12/2016. WP login attempts
185.110.132.202 – 12/2016. ssh attempts
163.172.0.0/16 – 12/2016. ssh attempts
197.88.63.63 – WP login attempts
192.151.151.34 – 4/2017. WP login attempts
193.201.224.223 – 4/2017. WP login attempts
192.187.98.42 – 4/2017. WP login attempts
192.151.159.2 – 5/2017. WP login attempts
192.187.98.43 – 6/2017. WP login attempts

The offense these IPs are guilty of is trying obsessively to log in to my server. Here is how I show login attempts:

$ cd /var/log; sudo last ‐f btmp|more

qwsazx   ssh:notty    175.143.54.193   Tue Jul 12 15:23    gone - no logout
qwsazx   ssh:notty    175.143.54.193   Tue Jul 12 15:23 - 15:23  (00:00)
pi       ssh:notty    185.110.132.201  Tue Jul 12 14:57 - 15:23  (00:26)
pi       ssh:notty    185.110.132.201  Tue Jul 12 14:57 - 14:57  (00:00)
ubnt     ssh:notty    185.110.132.201  Tue Jul 12 14:18 - 14:57  (00:39)
ubnt     ssh:notty    185.110.132.201  Tue Jul 12 14:18 - 14:18  (00:00)
brandon  ssh:notty    175.143.54.193   Tue Jul 12 13:46 - 14:18  (00:31)
brandon  ssh:notty    175.143.54.193   Tue Jul 12 13:46 - 13:46  (00:00)
ubnt     ssh:notty    185.110.132.201  Tue Jul 12 13:41 - 13:46  (00:04)
ubnt     ssh:notty    185.110.132.201  Tue Jul 12 13:41 - 13:41  (00:00)
root     ssh:notty    185.110.132.201  Tue Jul 12 13:08 - 13:41  (00:33)
PlcmSpIp ssh:notty    118.68.248.183   Tue Jul 12 13:03 - 13:08  (00:05)
PlcmSpIp ssh:notty    118.68.248.183   Tue Jul 12 13:02 - 13:03  (00:00)
support  ssh:notty    118.68.248.183   Tue Jul 12 13:02 - 13:02  (00:00)
glassfis ssh:notty    175.143.54.193   Tue Jul 12 12:59 - 13:02  (00:03)
glassfis ssh:notty    175.143.54.193   Tue Jul 12 12:59 - 12:59  (00:00)
support  ssh:notty    185.110.132.201  Tue Jul 12 12:34 - 12:59  (00:24)
support  ssh:notty    185.110.132.201  Tue Jul 12 12:34 - 12:34  (00:00)
amber    ssh:notty    175.143.54.193   Tue Jul 12 12:10 - 12:34  (00:24)
amber    ssh:notty    175.143.54.193   Tue Jul 12 12:10 - 12:10  (00:00)
admin    ssh:notty    185.110.132.201  Tue Jul 12 12:00 - 12:10  (00:09)
admin    ssh:notty    185.110.132.201  Tue Jul 12 12:00 - 12:00  (00:00)
steam1   ssh:notty    175.143.54.193   Tue Jul 12 11:29 - 12:00  (00:31)
steam1   ssh:notty    175.143.54.193   Tue Jul 12 11:29 - 11:29  (00:00)
robyn    ssh:notty    175.143.54.193   Tue Jul 12 08:37 - 11:29  (02:52)
robyn    ssh:notty    175.143.54.193   Tue Jul 12 08:37 - 08:37  (00:00)
postgres ssh:notty    209.92.176.23    Tue Jul 12 08:16 - 08:37  (00:20)
postgres ssh:notty    209.92.176.23    Tue Jul 12 08:16 - 08:16  (00:00)
root     ssh:notty    209.92.176.23    Tue Jul 12 08:16 - 08:16  (00:00)
a        ssh:notty    209.92.176.23    Tue Jul 12 08:16 - 08:16  (00:00)
plex     ssh:notty    175.143.54.193   Tue Jul 12 07:51 - 08:16  (00:24)
plex     ssh:notty    175.143.54.193   Tue Jul 12 07:51 - 07:51  (00:00)
root     ssh:notty    40.76.25.178     Tue Jul 12 06:06 - 07:51  (01:45)
pi       ssh:notty    64.95.100.89     Tue Jul 12 05:49 - 06:06  (00:16)
pi       ssh:notty    64.95.100.89     Tue Jul 12 05:49 - 05:49  (00:00)
...

The above is a sampling from today’s culprits. It’s a small, slow server so logins take a bit of time and brute force dictionary attacks are not going to succeed. But honestly, These IPs ought to be banned from the Internet for such flagrant abuse. I only add the ones to my route table which are multiply repeating offenders.

Here is the syntax on my server I use to add a network to this wall of shame:

$ sudo route add ‐net 221.194.44.0/24 gateway 127.0.0.1

So, yeah, I just send them to the loopback interface which prevents my servers from sending any packets to them. I could have used the Amazon AWS firewall but I find this more convenient – the command is always in my bash shell history.

A word about other approaches like fail2ban
Subject matter experts will point out the existence of tools, notably, fail2ban, which will handle excessive login attempts from a single IP. I already run fail2ban, which you can read about in this posting. The IPs above are generally those that somehow persisted and needed extraordinary measures in my opinion.

August 2017 update
I finally had to reboot my AWS instance after more than three years. I thought about my ssh usage pattern and decided it was really predictable: I either ssh from home or work, both of which have known IPs. And I’m simply tired of seeing all the hack attacks against my server. And I got better with the AWS console out of necessity.
Put it all together and you get a better way to deal with the ssh logins: simply block ssh (tcp port 22) with an AWS security group rule, except from my home and work.

References and related
My original defense began with an implementation of fail2ban. This is the write-up.

Categories
Admin Network Technologies

The IT Detective Agency: the case of the mysterious reset

Intro
An F5 BigIP load balancer equipped with web application firewall worked for everyone, except one app used by one customer. What was going wrong?


Packet trace

I always do a packet trace when there is nothing else to go on, as is so often the case these days. Packet traces themselves are getting increasingly complex, what with encrypted communications and multiple connections, etc. In this case there seemed to be a single TCP connection which was of concern, but it was encrypted (SSL traffic on tcp port 443).

Well, I have access to the private key so I figured out how to insert that into Wireshark so it could decrypt the packets. Pretty cool – I’ve never done that before.

So the communication got a lot further than I had expected. What I had expected to learn is that there was an incompatibility between supported ciphers of the client and the server such that there were no overlapping ciphers. But no! That was not the case at all – the packet trace got well beyond that early stage of packet exchanges between client and server.

In fact the client got so far that it sent these (encrypted) HTTP headers, which I was able to decrypt with Wireshark and the servers’ private key:

POST /cgi-bin/java/JHAutomation.do?perform=login HTTP/1.0
Content-type: application/x-www-form-urlencoded
Content-length: 1816
host: drjohnstechtalk.com:443
 
loginRequest=%3C%3Fxml+version+%3D+'1.0'+encoding...

Then right after that I saw the F5 BigIP device send the client a TCP reset (RST) as though it was unhappy about something and wanted to end it right there!

So, still stuck, I searched and found that you can enable logging of the reason for the TCP RST’s on F5 BigIPs:

Enable RST logging
To enable reset logging to the ltm log:
# tmsh
(tmos)# modify /sys db tm.rstcause.log value enable

And this is the error that was logged:

Logged error

Jun 16 08:09:19 local/tmm err tmm[5072]: 01230140:3: RST sent from 8.29.2.75:443 to 50.17.188.196:56985, [0x11d17ec:1804] No available pool member

It’s just a hint of what was wrong, but it was enough to jog my memory. A WAF (web application firewall) policy exists that matches based on hostname and otherwise exits. The hostname entered is drjohnstechtalk.com. Well, clearly that match is pretty darn literal. When we put the same URL into our browser or into curl we could not reproduce the error. But those clients produce a host header with value drjohnstechtalk.com, not drjohnstechtalk.com:443.

So their client, a strange Java-base client, threw in the :443 into the host header and it was not matching the host header match in the WAF policy! So no pool was selected and the fall-through rule was executed, resulting in a TCP RST to the client!

I added an additional host header to match, drjohnstechtalk.com:443

They tested and it worked!

Case closed.

Conclusion
A mysterious TCP RST sent from an F5 load balancer to just one client is explained in great detail. Some valuable networking tools were learned in the process, namely, how to decrypt an encrypted SSL packet trace.

Analysis
Could I stand on my high horse and complain that they were sending a non-standard header and go fix their stupid client? Well that might have felt satisfying but when I looked at the HTTP standard it does permit the port number to be present in that form! So I was the one in the wrong, even from a protocol standpoint.

References and related
F5’s SOL 13223 describing enabling logging for TCP RST packets https://support.f5.com/kb/en-us/solutions/public/13000/200/sol13223.html
HTTP Request header fields are described in this Wikipedia article.

Categories
Admin Apache CentOS Network Technologies Security Web Site Technologies

Idea for free web server certificates: Let’s Encrypt

Intro
I’ve written various articles about SSL. I just came across a way to get your certificates for free, letsencrypt.org. But their thing is to automate certificate management. I think you have to set up the whole automated certificate management environment just to get one of their free certificates. So that’s a little unfortunate, but I may try it and write up my experience with it in this blog (Update: I did it!). Stay tuned.

Short duration certificates
I recently happened upon a site that uses one of these certificates and was surprised to see that it expires in 90 days. All the certificate I’ve ever bought are valid for at least a year, sometimes two or three. But Let’s Encrypt has a whole page justifying their short certificates which kind of makes sense. It forces you to adopt their automation processes for renewal because it will be too burdensome for site admins to constantly renew these certificates by hand the way they used to.

November 2016 update
Since posting this article I have worked with a hosting firm a little bit. I was surprised by how easily he could get for one of “my” domain names. Apparently all it took was that Let’s Encrypt could verify that he owned the IP address which my domain name resolved to. That’s different from the usual way of verification where the whois registration of the domain gets queried. That never happened here! I think by now the Let’s Encrypt CA, IdenTrust Commercial Root CA 1, is accepted by the major browsers.

Here’s a picture that shows one of these certificates which was just issued November, 2016 with its short expiration.

lets-encrypt-2016-11-22_15-03-39

My own experience in getting a certificate
I studied the ACME protocol a little bit. It’s complicated. Nothing’s easy these days! So you need a program to help you implement it. I went with acme.sh over Certbot because it is much more lightweight – works through bash shell. Certbot wanted to update about 40 packages on my system, which really seems like overkill.

I’m very excited about how easy it was to get my first certificate from letsencrypt! Worked first time. I made sure the account I ran this command from had write access to the HTMLroot (the “webroot”) because an authentication challenge occurs to prove that I administer that web server:

$ acme.sh ‐‐issue ‐d drjohnstechtalk.com ‐w /web/drj

[Wed Nov 30 08:55:54 EST 2016] Registering account
[Wed Nov 30 08:55:56 EST 2016] Registered
[Wed Nov 30 08:55:57 EST 2016] Update success.
[Wed Nov 30 08:55:57 EST 2016] Creating domain key
[Wed Nov 30 08:55:57 EST 2016] Single domain='drjohnstechtalk.com'
[Wed Nov 30 08:55:57 EST 2016] Getting domain auth token for each domain
[Wed Nov 30 08:55:57 EST 2016] Getting webroot for domain='drjohnstechtalk.com'
[Wed Nov 30 08:55:57 EST 2016] _w='/web/drj'
[Wed Nov 30 08:55:57 EST 2016] Getting new-authz for domain='drjohnstechtalk.com'
[Wed Nov 30 08:55:58 EST 2016] The new-authz request is ok.
[Wed Nov 30 08:55:58 EST 2016] Verifying:drjohnstechtalk.com
[Wed Nov 30 08:56:02 EST 2016] Success
[Wed Nov 30 08:56:02 EST 2016] Verify finished, start to sign.
[Wed Nov 30 08:56:03 EST 2016] Cert success.
-----BEGIN CERTIFICATE-----
MIIFCjCCA/KgAwIBAgISA8T7pQeg535pA45tryZv6M4cMA0GCSqGSIb3DQEBCwUA
MEoxCzAJBgNVBAYTAlVTMRYwFAYDVQQKEw1MZXQncyBFbmNyeXB0MSMwIQYDVQQD
ExpMZXQncyBFbmNyeXB0IEF1dGhvcml0eSBYMzAeFw0xNjExMzAxMjU2MDBaFw0x
NzAyMjgxMjU2MDBaMB4xHDAaBgNVBAMTE2Ryam9obnN0ZWNodGFsay5jb20wggEi
MA0GCSqGSIb3DQEBAQUAA4IBDwAwggEKAoIBAQC1PScaoxACI0jhsgkNcbd51YzK
eVI/P/GuFO8VCTYvZAzxjGiDPfkEmYSYw5Ii/c9OHbeJs2Gj5b0tSph8YtQhnpgZ
c+3FGEOxw8mP52452oJEqrUldHI47olVPv+gnlqjQAMPbtMCCcAKf70KFc1MiMzr
2kpGmJzKFzOXmkgq8bv6ej0YSrLijNFLC7DoCpjV5IjjhE+DJm3q0fNM3BBvP94K
jyt4JSS1d5l9hBBIHk+Jjg8+ka1G7wSnqJVLgbRhEki1oh8HqH7JO87QhJA+4MZL
wqYvJdoundl8HahcknJ3ymAlFXQOriF23WaqjAQ0OHOCjodV+CTJGxpl/ninAgMB
AAGjggIUMIICEDAOBgNVHQ8BAf8EBAMCBaAwHQYDVR0lBBYwFAYIKwYBBQUHAwEG
CCsGAQUFBwMCMAwGA1UdEwEB/wQCMAAwHQYDVR0OBBYEFGaLNxVgpSFqgf5eFZCH
1B7qezB6MB8GA1UdIwQYMBaAFKhKamMEfd265tE5t6ZFZe/zqOyhMHAGCCsGAQUF
BwEBBGQwYjAvBggrBgEFBQcwAYYjaHR0cDovL29jc3AuaW50LXgzLmxldHNlbmNy
eXB0Lm9yZy8wLwYIKwYBBQUHMAKGI2h0dHA6Ly9jZXJ0LmludC14My5sZXRzZW5j
cnlwdC5vcmcvMB4GA1UdEQQXMBWCE2Ryam9obnN0ZWNodGFsay5jb20wgf4GA1Ud
IASB9jCB8zAIBgZngQwBAgEwgeYGCysGAQQBgt8TAQEBMIHWMCYGCCsGAQUFBwIB
FhpodHRwOi8vY3BzLmxldHNlbmNyeXB0Lm9yZzCBqwYIKwYBBQUHAgIwgZ4MgZtU
aGlzIENlcnRpZmljYXRlIG1heSBvbmx5IGJlIHJlbGllZCB1cG9uIGJ5IFJlbHlp
bmcgUGFydGllcyBhbmQgb25seSBpbiBhY2NvcmRhbmNlIHdpdGggdGhlIENlcnRp
ZmljYXRlIFBvbGljeSBmb3VuZCBhdCBodHRwczovL2xldHNlbmNyeXB0Lm9yZy9y
ZXBvc2l0b3J5LzANBgkqhkiG9w0BAQsFAAOCAQEAc4w4a+PFpZqpf+6IyrW31lj3
iiFIpWYrmg9sa79hu4rsTxsdUs4K9mOKuwjZ4XRfaxrRKYkb2Fb4O7QY0JN482+w
PslkPbTorotcfAhLxxJE5vTNQ5XZA4LydH1+kkNHDzbrAGFJYmXEu0EeAMlTRMUA
N1+whUECsWBdAfBoSROgSJIxZKr+agcImX9cm4ScYuWB8qGLK98RTpFmGJc5S52U
tQrSJrAFCoylqrOB67PXmxNxhPwGmvPQnsjuVQMvBqUeJMsZZbn7ZMKr7NFMwGD4
BTvUw6gjvN4lWvs82M0tRHbC5z3mALUk7UXrQqULG3uZTlnD7kA8C39ulwOSCQ==
-----END CERTIFICATE-----
[Wed Nov 30 08:56:03 EST 2016] Your cert is in  /home/drj/.acme.sh/drjohnstechtalk.com/drjohnstechtalk.com.cer
[Wed Nov 30 08:56:03 EST 2016] Your cert key is in  /home/drj/.acme.sh/drjohnstechtalk.com/drjohnstechtalk.com.key
[Wed Nov 30 08:56:04 EST 2016] The intermediate CA cert is in  /home/drj/.acme.sh/drjohnstechtalk.com/ca.cer
[Wed Nov 30 08:56:04 EST 2016] And the full chain certs is there:  /home/drj/.acme.sh/drjohnstechtalk.com/fullchain.cer

Behind the scenes the authentication resulted in these two accesses to my web server:

66.133.109.36 - - [30/Nov/2016:08:55:59 -0500] "GET /.well-known/acme-challenge/EJlPv9ar7lxvlegqsdlJvsmXMTyagbBsWrh1p-JoHS8 HTTP/1.1" 301 618 "-" "Mozilla/5.0 (compatible; Let's Encrypt validation server; +https://www.letsencrypt.org)"
66.133.109.36 - - [30/Nov/2016:08:56:00 -0500] "GET /.well-known/acme-challenge/EJlPv9ar7lxvlegqsdlJvsmXMTyagbBsWrh1p-JoHS8 HTTP/1.1" 200 5725 "http://drjohnstechtalk.com/.well-known/acme-challenge/EJlPv9ar7lxvlegqsdlJvsmXMTyagbBsWrh1p-JoHS8" "Mozilla/5.0 (compatible; Let's Encrypt validation server; +https://www.letsencrypt.org)" "drjohnstechtalk.com"

The first was HTTP which I redirect to https while preserving the URL, hence the second request. You see now why I needed write access to the webroot of my web server.

Refine our approach
In the end iI decided to run as root in order to protect the private key from prying eyes. This looked like this:

$ acme.sh ‐‐issue ‐‐force ‐d drjohnstechtalk.com ‐w /web/drj ‐‐reloadcmd "service apache24 reload" ‐‐certpath /etc/apache24/certs/drjohnstechtalk.crt ‐‐keypath /etc/apache24/certs/drjohnstechtalk.key ‐‐fullchainpath /etc/apache24/certs/fullchain.cer

What’s a nice feature about acme.sh is that it remembers parameters you’ve typed by hand and fills them into a single convenient configuration file. So the contents of mine look like this:

Le_Domain='drjohnstechtalk.com'
Le_Alt='no'
Le_Webroot='/web/drj'
Le_PreHook=''
Le_PostHook=''
Le_RenewHook=''
Le_API='https://acme-v01.api.letsencrypt.org'
Le_Keylength=''
Le_LinkCert='https://acme-v01.api.letsencrypt.org/acme/cert/037fe5215bb5f4df6a0098fefd50b83b046b'
Le_LinkIssuer='https://acme-v01.api.letsencrypt.org/acme/issuer-cert'
Le_CertCreateTime='1480710570'
Le_CertCreateTimeStr='Fri Dec  2 20:29:30 UTC 2016'
Le_NextRenewTimeStr='Tue Jan 31 20:29:30 UTC 2017'
Le_NextRenewTime='1485808170'
Le_RealCertPath='/etc/apache24/certs/drjohnstechtalk.crt'
Le_RealCACertPath=''
Le_RealKeyPath='/etc/apache24/certs/drjohnstechtalk.key'
Le_ReloadCmd='service apache24 reload'
Le_RealFullChainPath='/etc/apache24/certs/fullchain.cer'

References and related
Examples of using Lets Encrypt with domain (DNS) validation: How I saved $69 a year on certificate cost.
The Let’s Encrypt web site, letsencrypt.org
When I first switched from http to https: drjohnstechtalk is now an encrypted web site
Ciphers
Let’s Encrypt’s take on those short-lived certificates they issue: Why 90-day certificates
acme.sh script which I used I obtained from this site: https://github.com/Neilpang/acme.sh
CERTbot client which implements ACME protocol: https://certbot.eff.org/
IETF ACME draft proposal: https://datatracker.ietf.org/doc/draft-ietf-acme-acme/?include_text=1

Categories
Admin Network Technologies

Strange problem with Internet fiber connection

Intro
Yesterday the company I’ve been consulting for had a partial outage with their multi-gigabit fiber connection with TWC business class in North Carolina. We’ve never seen an outage with these characteristics.

The details
The outage was mostly unnoticed but various SiteScope monitors that fetch web pages were periodically going off and then working again. So it wasn’t a hard outage. How do you pin something like that down?

It’s easiest to relate to a web site whose IP address isn’t constantly changing, which pretty much rules out the majors like google.com or microsoft.com. I actually used my own site – it’s running on good infrastructure in Amazon’s data center and its IP is fixed. And yes I was occasionally seeing timeouts. Could it be simply waiting for a DNS lookup? That would explain everything. So I ran verbosely:

$ curl ‐vv www.drjohnstechtalk.com

* About to connect() to www.drjohnstechtalk.com port 80 (#0)
*   Trying 50.17.188.196...

That response came quickly, then it froze. So I knew it wasn’t a DNS resolution problem. This could have also been shown by doing a trace, but the curl method was a faster way to get results.

I decided to put a max_time limit on curl of one second just to get a feel for the problem, running this command frequently:

$ curl ‐m1 www.drjohnstechtalk.com

After all when the web site is working and the gigabit connection is working, the answer comes back in 60 msec. So 1 second should be more than enough time.

So while there was some of this:

$ curl ‐m1 www.drjohnstechtalk.com

<!DOCTYPE HTML PUBLIC "-//IETF//DTD HTML 2.0//EN">
<html><head>
<title>301 Moved Permanently</title>
</head><body>
<h1>Moved Permanently</h1>
<p>The document has moved <a href="https://drjohnstechtalk.com/blog/">here</a>.</p>
<hr>
<address>Apache/2 Server at www.drjohnstechtalk.com Port 80</address>
</body></html>

there was also some of this:

$ curl ‐m1 www.drjohnstechtalk.com
curl: (28) connect() timed out!

We determined on our perimeter firewall that it was passing all packets.

Again, the advantage of a fixed, rarely used IP address is that you can throw it into a trace statement and not get overwhelmed with noise. So I could see from a trace taken during one of those timeouts that we weren’t getting a response to our SYN packet.

So I tried to use a SYN packet geneator to reproduce the problem and learn more. scapy. I’ve just improved my write-up of scapy to reflect some of the new ways I used it yesterday!

To begin with, I didn’t know much about scapy except what I had previously posted. But it worked every time! I could not reproduce the problem no matter how hard I tried:

>>> sr(IP(dst=”drjohnstechtalk.com”)/TCP(dport=80))

Begin emission:
........................................................................................Finished to send 1 packets.
.............................................*
Received 134 packets, got 1 answers, remaining 0 packets
(<Results: TCP:1 UDP:0 ICMP:0 Other:0>, <Unanswered: TCP:0 UDP:0 ICMP:0 Other:0>)

I racked my brains, what could be different about these scapy packets?? Also not being a TCP expert the answer is many, many things. But did I give up? No! I quickly scanned the scapy for dummies tutorial and realized a few things. I assumed scapy was randomizing its source port the way all other TCP applications do, but it wasn’t! You need a sport=RandShort() argument in the TCP section to do that. Who knew? So I had been sending packets from the same source port, specifically 20. When I switched it to a randomized port I quickly reproduced the timeout issue! And most amazingly, when I encountered a port that didn’t work, it consistently didn’t work – every single time. Its neighboring ports were fine. Some of its neighbors’ neighbors didn’t work, also consistently.

So for instance
>>> sr(IP(dst=”drjohnstechtalk.com”)/TCP(dport=80,sport=21964))

Begin emission:
........................................................................................Finished to send 1 packets.
........................................

was consistently not working. Same for source port 21962. Source port 21963 was consistently fine.

Well, this explains the intermittent SiteScope errors.

Gotta be the firewall

I know what you’re thinking. Routers don’t care about TCP port information. That’s much more like a firewall connection table thing. And I agree, but our firewall trace showed these SYN packets getting through, and no SYN_ACK coming back.

It’ way too difficult to do a trace on a Cisco router, but I looked at the router config and didn’t see anything amiss.

So I called the ISP, TWC business class. I got a pre-recorded message talking about outages in North Carolina, where this link just happens to be located! The coincidence seems too great. I still don’t have clarity from them – I guess customer service is not their strong suit. They haven’t even bothered to get back to me 24 hours later (and this is for a major fiber circuit).


References and related

The amazingly customizable packet generator known as scapy.
Probably the best write-up of scapy is this scapy for dummies PDF.

Categories
Admin

The IT Detective agency: Correct password fails to unlock laptop

Intro
This has happened to me on two different laptops so maybe it’s a thing. I type in the known, correct password to unlock it and it comes back with invalid password or something similar.

Then I finally figured out what was happening when I observed more carefully.

The solution
I typed in the characters of the password one-by-one and watched the password screen:

···

Then I typed in the fourth character and … nothing! No · was echoed back to the Password field! No wonder it thought I was typing in the wrong password. Technically, from its viewpoint I was. So I typed the fourth character harder until it finally responded by echoing a &middot, and proceeded with the rest of the characters which went more smoothly. Then the laptop unlocked.

I think the two laptops actually suffer from two different problems. The one may have a sticky key that doesn’t always press correctly – a key that I use as part of my password. The other laptop is just bogged down by a lot of bloatware, to the point where it is so slow it doesn’t echo characters back to the screen as fast as I type them in. I learned to repeat the missed character or even re-type it to make it take. Hard to believe but it’s true.

Conclusion
The mystery of the correctly typed password not unlocking the laptop screen has been resolved. Character echo was not occurring correctly, necessitating repeating keys while looking at the results on screen.