This post builds on the success of previous posts and uses elements from them. I don’t honestly expect anyone to repeat all the ingredients I have assembled here. But I have created them in a fairly modular way so you can pick out those elements which will help your project.
But, it is true, I have gotten the user experience of recording audio from, e.g., a band practice, down to a click of the ENTER button to start the recording, another click to stop it, and a click of the UP ARROW button to process the audio recording – turn it into a video – and upload it to YouTube, mark it as UNLISTED, and send the link to me in an email. Pretty cool if I say so myself. I am refining things as I write this to make it more reliable.
This write-up is not terribly detailed. It presumes at least a medium skill level with linux.
Ingredients
RPi 3 or RPi 4
Raspberry OS desktop running Pixel desktop environment
tiger VNC, i.e., the package tigervnc-scraping-server
chromium-browser (but it comes with)
xdotool (apt-get install xdotool)
xsel (apt-get install xsel)
YouTube account
crontab entries – see below
you do not need an HDMI display, except for the OS setup
#!/bin/bash
# DrJ 8/2021
# Control the livestream of audio to youtube
# works in conjunction with an attached keyboard
# I use bash interpreter to give me access to RegEx matching
HOME=/home/pi
log=$HOME/audiocontrol.log
program=ffmpegwireless9.sh
##program=tst.sh # testing
PGM=$HOME/$program
# de-press ENTER button produces this:
matchE="1, 28, 0"
# up arrow
matchU="1, 103, 0"

epochsOld=0
cutoff=3 # seconds
DEBUG=1
ledtime=10
#
echo "$0 starting monitoring at "$(date)
# Note the use of script -q -c to avoid line buffering of the evread output
script  -q -c $HOME/evread.py /dev/null|while read line; do
[[ $DEBUG -eq 1 ]] && echo line is $line
# seconds since the epoch
epochs=$(date +%s)
elapsed=$((epochs-$epochsOld))
if [[ $elapsed -gt $cutoff ]]; then
  if [[ "$line" =~ $matchE ]]; then
# ENTER button section - recording
    echo "#################"
    echo We caught this input: $line at $(date)
# see if we are already running our recording program or not
    pgrep -f $program>/dev/null
# 0 means it's been found
    if [ $? -eq 0 ]; then
# kill it
      echo KILLING $program
      pkill -9 -f $program; pkill -9 arecord; pkill -9 ffmpeg
      pkill -9 -f blinkLED
      echo Shine the PWR LED
      $HOME/shineLED.sh
    else
# start it
      echo Blinking PWR LED
      $HOME/blinkLED.sh &
      echo STARTING $PGM
      $PGM > $PGM.log.$(date +%m-%d-%y:%H:%M) 2>&1 &
    fi
    epochsOld=$epochs
  elif [[ "$line" =~ $matchU ]]; then
# UP ARROW button section - processing
    echo "###########"
    echo processing commencing at $(date)
    $HOME/blinktwiceLED.sh &
    echo start processing of the recording
    $HOME/process.sh >> process.log 2>&1
    pkill -9 -f LED
    $HOME/shineLED.sh
    epochsOld=$epochs
  fi
[[ $DEBUG -eq 1 ]] && echo No action taken. Continue to listen
fi
done
#!/usr/bin/bash
HOME=/home/pi
sleeptime=5
cd $HOME
# loop over all mp3 files in home directory
ls -1 record*mp3|while read line;do
 echo working on $line at $(date)
 video=$(echo ${line}|sed 's/mp3/flv/')
 echo creating flv video file $video
# create the video first
 ./mp32flv.sh $line
 echo move $line to mp3 directory
 [[ -d mp3s ]] || mkdir mp3s
 mv $line mp3s
 echo mv flv to upload directory
 [[ -d 00uploads ]] || mkdir 00uploads
 mv $video 00uploads
 echo start the upload
 ./auto-upload.sh
 echo get the url to this video on YouTube
 url=$(cat clipboard|xargs -0 echo)
 echo test that it worked
 if [[ ! "$url" =~ "http" ]]; then
   echo FAIL. Try once again
   ./auto-upload.sh
 fi
 echo send mail to Drj
 ./announceit.sh
 echo move video $video to flvs directory
 mv ./00uploads/$video flvs
 echo sleep for a bit before starting the next one
 sleep $sleeptime
done
echo All done with processing at $(date)
#!/bin/sh
# DrJ 8/30/2021
# https://www.jeffgeerling.com/blogs/jeff-geerling/controlling-pwr-act-leds-raspberry-pi
# put LED into GPIO mode
echo gpio | sudo tee /sys/class/leds/led1/trigger > /dev/null
# flash the bright RED PWR (power) LED quickly to signal whatever
while /bin/true; do
  echo 0|sudo tee /sys/class/leds/led1/brightness > /dev/null
  sleep 0.5
  echo 1|sudo tee /sys/class/leds/led1/brightness > /dev/null
  sleep 0.5
done
#!/bin/sh
# DrJ 8/30/2021
# https://www.jeffgeerling.com/blogs/jeff-geerling/controlling-pwr-act-leds-raspberry-pi
# put LED into GPIO mode
echo gpio | sudo tee /sys/class/leds/led1/trigger > /dev/null
# turn on the bright RED PWR (power) LED
echo 1|sudo tee /sys/class/leds/led1/brightness > /dev/null
#!/bin/sh
# DrJ 8/30/2021
# https://www.jeffgeerling.com/blogs/jeff-geerling/controlling-pwr-act-leds-raspberry-pi
# put LED into GPIO mode
echo gpio | sudo tee /sys/class/leds/led1/trigger > /dev/null
# flash the bright RED PWR (power) LED quickly to signal whatever
while /bin/true; do
  echo 0|sudo tee /sys/class/leds/led1/brightness > /dev/null
  sleep 3
  echo 1|sudo tee /sys/class/leds/led1/brightness > /dev/null
  sleep 0.35
  echo 0|sudo tee /sys/class/leds/led1/brightness > /dev/null
  sleep 0.35
  echo 1|sudo tee /sys/class/leds/led1/brightness > /dev/null
  sleep 0.35
done
The recordswitch.sh script waits for input from the remote controller. It is programmed to kick off ffmpegwireless9.sh if the ENTER button is pushed, or process.sh if the UPLOAD button is pushed.
For testing purposes you may want to run process.sh by hand, i.e., ./process.sh, while you are viewing the display using a VNC viewer alongside the terminal screen.
The scripts are quite verbose and give lots of helpful output in their log files.
Upgrading from Raspberry Pi Lite to Raspberry Pi Desktop
Unfortunately the plugin I use inserts a blank line at the top. Those should all be removed.
After getting all the script, make them all executable in one go with a command such as chmod +x *sh
To read the input from the remote controller you need to set up evread.py and there may be some python work to do. This post has those details.
The chromium bowser needs to be run by hand one time over your VNC viewer. Its size has to be shrunk to 50% by running CTRL SHIFT – about four times. You need to log in to your YouTube or Gmail account so it remembers your credentials. And you need to og through the motions of uploading a video so it knows to use the 00uploads directory next time.
Don’t run a recording and an upload at the same time. I think the CPU would be taxed so I did not test that out. But you can record one day – even multiple recordings, and upload them a day or days later. That should work OK. It just processes the files one at a time, hopefully (untested).
announceit.sh is pretty dodgy. You have to understand SMTP mail somewhat to have a spitting chance for that to work. Fortunately I was an SMTP admin previously. So my ISP, Optimum, has a filter in place which prevents ordinary residential customers from sending out normal email to arbitrary SMTP addresses. However, to my surprise, they do run a mail relay server which you can connect to on the standard tcp port 25. I don’t really want to give it away but you can find it with the appropriate Internet search. I assume it is only for Optimum customers. Perhaps your ISP has something similar. So after you install exim4, you can configure a “smarthost” with the command dpkg-reconfigure exim4-config. But, again, you have to know a bit what you are doing. Suffice it to say that I got mine to work.
But for everyone else who can’t figure that out, just comment out this line in process.sh ./announceit.sh. put a # character in the front of the line to do that.
I have really only tested recordings of up to 45 minutes. I think an hour should be fine. I would suggest to break it up for longer.
The files can take a lot of space so you may need to clean up older files if you are a frequent user.
I’ve had about one failure during the upload out of about seven tests. So reliability is pretty good, but probably not perfect.
Why not just livestream? True, it’s sooo much easier. And I’ve covered how to do that previously.But, maybe it’s my WiFi, but its reliability was closer to 50% in my actual experience. I needed greater reliability and turns out I didn’t need the live aspect of the whole thing, just the recording for later critiqueing.
The recording approach I’ve taken uses ffmpeg to directly produce a mp3 file – it’s more compact than a WAV file. In and of itself the mp3 file may be useful to you, to, e.g., include as an attachment in email or whatever. For instance for a single song. All the mp3s are finally stored in a folder called mp3s, and all the videos are finally stored in a folder called flvs.
About that upload
The upload itself is super awesome to watch. I captured an actual automated upload with the script running on the right and the X Window display on the left in this YouTube video.
Somehow I managed to use some of these tools the other day and my mp3s ended up sounding like Alvin and the Chipmunks! I wondered if there was a way to recover them. I found there is, though I had to develop it a bit. It uses the new-ish rubberband filter of ffmpeg. I call this tiny script dechipmunk.sh:
In my case I had to slow things down and lower the pitch by the same factor: one third, hence the 0.3333.
How to pass multiple options to an ffmpeg filter
In doing the above I had to work out the syntax for passing more than one option to the new rubberband filter of ffmpeg. I wanted to specify both the pitch and the tempo options. So you see from above they had to be separated with a colon and the whole filter expression enclosed in quotes. Hence the funny-looking
“rubberband=pitch=0.3333:tempo=0.3333”
Future development
Well, I’m thinking of removing the chit-chat from the recording in an automated fashion. That may mean applying machine learning, or maybe something simpler if someone has covered this territory before for the RPi. But it might be a good excuse to do a shallow dive into machine learning.
Conclusion
I’m sure this method of YouTube upload is very flaky and will probably only work once or twice, if at all. But at least in my trials, it did work a few times. So perhaps it could be hardened and made more error-correcting. There are a lot of moving parts for it all to work. But it’s definitely cool to watch it go when it is working!
This post promises more than it actually delivers, ha, ha. It is squarely aimed at the more mid to advanced RPi enthusiast. Most who read this will get discouraged and look for another solution. I did the same in fact and I will review my failures with alternatives.
The essence of this aproach is screen automation with a very nice tool called xdotool. For me it works. It will definitely, 100% require some tweaks for anyone else. This is not run a few installs, copy this code and you’re good to go. But if you have the patience, you wil be rewarded with either fully or at least semi-automated video uploads to YouTube from your Raspberry Pi.
One caveat. Please obey YouTube’s terms of service. In other words, don’t abuse this! As soon as someone starts using this method in an aggressive or abusive fashion, we will all lose this capability. They have crack security experts and could squelch this approach in a heartbeat.
I actually don’t have all the peices in place for myself, but I have enough cool stuff that I wanted to begin to share my findings.
One beautiful thing about what I’m going to show is that you get to see the cursor moving about the screen in response to your automated commands – you see exactly what it;s doing, which screens it’s clicking through, etc. So if there’s an issue – say YouTube changes its layout – you’ll most likely be able to know how to adapt.
What’s wrong with using YouTube’s api?
Plenty. It used to be feasible. It certainly would make all our lives a lot easier. But YouTube is not a charity. They have squeezed out the little guy by making the barrier to entry so high that it’s really only available to highly determined IT folks. It’s just too difficult to figure out all the neeed screens, etc, and all the help guides refer to older api versions where things were different. YouTube clamped down in July 2020 on who or what can use their api. There’s a lot of old HowTos pre-dating that that will just lead you to dead-ends. So, go ahead, I dare you to stop reading this and use the api and report back. Maybe yuo manage to create a project, great, and an api key, great, and even to assign your api key the correct YouTube specific permissions – all great, and associate crednetials – super, and finally borrow someone’s code to upload a video – been there, done that. That video will be listed private. So then you try to root around to see what you have to do to make it public. Ah, a project review. Great. You were only in test mode. So no your confronted with this form. If they cared about the little guy there would be a radio button – “I only wish to upload a few videos a week for a small cadre of users, spare me the bureaucracy,” and that’d be it. But, no… Are you applying for a quota? Huh? I just want to upload a video and have it marked as unlisted. Some users remarked they filled out the form, never got their project reviewed and never heard back. Maybe they’re the exception, I don’t know. It’s just over the top for me so I give up.
OK. So, maybe YoutubeUploader?
Nope. Doesn’t work. It’s based on the old stuff.
OK. What about that guy’s api-less Node.js uploader?
Maybe. I could not get it to work on RPi. But I didn’t try super hard. I just like rolling my own, frankly. My approach is much more transparent. At least this approach inspired me to imagine the approach I am about to share. Because I believe the Node.js guy is just doing screen scraping but you can’t even see the screens.
Or simply do a Livestream?
Agreed. Livestreaming is quite straightforward by comparison with what I developed. My blog post about one click livestreaming covers it. But I have not had good results with reliability. As often as it works, it doesn’t work. With this new approach I’m going to try to create separate steps so that if anything goes wrong, an individual step can be re-run. Another advantage of separating steps is that a recording can be done “in the field” and without WiFi access. Remember an RPi 3 works great for hours with a decent portable USB battery that’s normally used for phones. Then the resulting recording can be converted to video and uploaded once the RPi is back to its usual WiFi SSID.
Preliminary upload, October 2021
In the video below the right screen is a terminal window showing what the script is doing. It needs some tweaking, and the YouTube window gets stuck so it’s not showing some of the screens. But it’s already totally awesome – and it worked!
@reboot sleep 15; /home/pi/recordswitch.sh > recordswitch.log 2>&1
# launch vnc server on display 1
@reboot sleep 65;x0vncserver -localhost no -passwordfile ~/.vnc/passwd -display :0 >  x0vncserver.log 2>&1
Work with chromium the first time by hand. As I recall you should:
Create a directory like 00uploads – so it appears highest in the list
put a single video in 00uploads
Do an upload by hand (to help chromium remember to choose this upload directory)
launch chromium browser
log into your YouTube account at https://studio.youtube.com
shrink the browser until its size is 50% (Ctrl-Shift – about four times)
Don’t add other tabs and stuff to Chromium
Then subsequent launches of chromium should remember a bunch of these settings, specifically, your login info, the shrunken size, the upload directory, and maybe the (lack of) other tabs.
The beauty of this approach is that it is more transparent than the alternatives. You see exactly what your program is doing. You can issue the xdotool commands by hand to, e.g., change up the coordinates a little bit. Or even enter a video title.
So getting back to the idea, the automation idea is to finish a video somehow, then move it to the 00uploads dircetory, invoke this uploader program, then either move it to a uploaded directory or some such.
Imagine the versatility if I used my remote controller for RPi to map one button for audio recording, and a second button for automating video upload! Well, when I find the time that’s what I plan to do. I will make a separate post where the recording and uploading are shown – more or less the culmination of all the pieces.
Oh, and back to the idea again, I wanted to share the unlisted link with band members. So, you see how it is basically in the result of xsel -b since xsel copied the clipboard which contained the YouTube URL for this video we just uploaded? I have to fix up the parsing because some junk characters are getting included, but I plan to email that link to myself first, where I will do a brief manual check, and then forward it to the rest of the band. so, again, it’s really cool that we could even think to pull that off with this simplistic approach.
Techniques developed for this project
Lots.
I “discovered” – in the sense that Columbus discovered America – xdotool as an amazing X Windows screen automation tool. I knew of autohotkey for Windows so inquired what was like it for X Windows. I further learned that xdotool is generally broken when it comes to use with traditional VNC servers such as the native tightvncserver. It simply doesn’t work. But Tiger VNC is a scraping server so it like shares your console screen and makes it available via VNC protocol. That’s required because to develop this approach you have to see what you’re doing. All those coordinates? it comes from experimentation.
I also learned how to embed a YouTube video in my blog post. In fact this is the very first video I made for a blog post. So I did a screen recording for the first time with screen recorder for Windows.
I landed on the idea of a side-by-side video showing my terminal running the automated script in one window and the effect it is having on the chromium browser in the other window running on the RPi.
I put a wrapper around xdotool to make things cleaner. (But it’s not done yet.)
I changed to two-factor authentication to see if it made a difference. It did not. It still remembers the authentication, thankfully, at least for a few days. I wonder for how long though. Hmm.
Kiosk mode. By launching chromium with kiosk mode it not only gives us more screen real estate to work in, it in principle should also permit you to interact with chromium in a regular fashion and still have it come up in a known, fixed position, which is an absolute requirement of this approach. All the buttons have to have the same coordinates from invocation to invocation.
I also developed ffmpeg-based converters which take wav files and converts them to mp3’s (a nice compact format. wav files are space hogs), and another which takes mp3 files and adds a gray screen and converts them to flv ([Adobe] Flash Video, I guess – a compact video file format which YouTube accepts).
I also learned the ffmpeg command to tell exactly how long a recording is.
I also learned how to turn off blocking in ffmpeg so that its constantly writing packets and thus not losing audio data at the end when stopped.
I came up with the idea of randomizing the sleep time between clicks to make it seem more human-like.
And mostly for the purpose of demonstrations, though it also greatly helps in debugging, I introduced around two seconds of sleep both before and after a command is issued. That really makes things a lot clearer.
The results of the clipboard, xsel -b, contains null bytes. I had trouble parsing it to pull out just the url, but finally landed on using xargs -0 which is designed to parse null-delimited strings. And it worked! This was a late edition and did not make it into the video, but is in the provided script above towards the bottom.
ffmpeg chokes on too-complicated filenames. Who knew? I had files containing colon (:) and dash (-) characters which work perfectly fine in linux, but ffmpeg was interpreting part of the filename as a command-line argument it appeared. The way out of that mess was to introduce file: in front of the filename.
I’ll probably put my ffmpeg tricks into my next post because I want to keep this one lean and focused on this one upload automation topic.
Here I’ve combined work I’ve done previously into one single useful application: I can initiate the live streaming of our band practice on YouTube with the click of a single button on a remote control, and stop it with another click.
Equipment
Raspberry Pi 3 or 4 with Raspberry Pi OS, e.g., Raspbian Lite is just fine
Logitech webcam or USB microphone
USB extender (my setup needed this, others may not)
Universal USB-based remote control – see references for a known good one
Method 1
In this method I rapidly blink the onboard red power (PWR) LED of the RPi while streaming is active. Outside of those times it is a solid red. This is my preferred mode – it’s a very visible sign that things are working. I am very excited about this approach.
#!/bin/sh
# DrJ 8/30/2021
# https://www.jeffgeerling.com/blogs/jeff-geerling/controlling-pwr-act-leds-raspberry-pi
# put LED into GPIO mode
echo gpio | sudo tee /sys/class/leds/led1/trigger > /dev/null
# flash the bright RED PWR (power) LED quickly to signal whatever
while /bin/true; do
  echo 0|sudo tee /sys/class/leds/led1/brightness > /dev/null
  sleep 0.5
  echo 1|sudo tee /sys/class/leds/led1/brightness > /dev/null
  sleep 0.5
done
#!/bin/sh
# DrJ 8/30/2021
# https://www.jeffgeerling.com/blogs/jeff-geerling/controlling-pwr-act-leds-raspberry-pi
# put LED into GPIO mode
echo gpio | sudo tee /sys/class/leds/led1/trigger > /dev/null
# turn on the bright RED PWR (power) LED
echo 1|sudo tee /sys/class/leds/led1/brightness > /dev/null
#!/bin/bash
# DrJ 8/2021
# Control the livestream of audio to youtube
# works in conjunction with an attached keyboard
# I use bash interpreter to give me access to RegEx matching
HOME=/home/pi
log=$HOME/audiocontrol.log
program=continuousaudio.sh
##program=tst.sh # testing
PGM=$HOME/$program
# de-press ENTER button produces this:
match="1, 28, 0"
epochsOld=0
cutoff=3 # seconds
DEBUG=1
ledtime=10
#
echo "$0 starting monitoring at "$(date)
# Note the use of script -q -c to avoid line buffering of the evread output
script  -q -c $HOME/evread.py /dev/null|while read line; do
[[ $DEBUG -eq 1 ]] && echo line is $line
# seconds since the epoch
epochs=$(date +%s)
elapsed=$((epochs-$epochsOld))
if [[ $elapsed -gt $cutoff ]]; then
  if [[ "$line" =~ $match ]]; then
    echo "#################"
    echo We caught this inpupt: $line at $(date)
# see if we are already running continuousaudio or not
    pgrep -f $program>/dev/null
# 0 means it's been found
    if [ $? -eq 0 ]; then
# kill it
      echo KILLING $program
      pkill -9 -f $program; pkill -9 ffmpeg
      pkill -9 -f blinkLED
      echo Shine the PWR LED
      $HOME/shineLED.sh
    else
# start it
      echo Blinking PWR LED
      $HOME/blinkLED.sh &
      echo STARTING $PGM
      $PGM > $PGM.log.$(date +%m-%d-%y:%H:%M) 2>&1 &
    fi
    epochsOld=$epochs
  fi
[[ $DEBUG -eq 1 ]] && echo No action taken. Continue to listen
fi
done
The crontab entry and the referenced files are the same as in Method 2.
Method 2
In method 2 I flash the built-in LED on the webcam for a few seconds before starting the audio, and again when the streaming has terminated – as visible signal that the button press registered.
#!/bin/bash
# DrJ 8/2021
# Control the livestream of audio to youtube
# works in conjunction with an attached keyboard
# I use bash interpreter to give me access to RegEx matching
HOME=/home/pi
log=$HOME/audiocontrol.log
program=continuousaudio.sh
##program=tst.sh # testing
PGM=$HOME/$program
# de-press ENTER button produces this:
match="1, 28, 0"
epochsOld=0
cutoff=3 # seconds
DEBUG=1
ledtime=10
#
echo "$0 starting monitoring at "$(date)
# Note the use of script -q -c to avoid line buffering of the evread output
script  -q -c $HOME/evread.py /dev/null|while read line; do
[[ $DEBUG -eq 1 ]] && echo line is $line
# seconds since the epoch
epochs=$(date +%s)
elapsed=$((epochs-$epochsOld))
if [[ $elapsed -gt $cutoff ]]; then
  if [[ "$line" =~ $match ]]; then
    echo "#################"
    echo We caught this inpupt: $line at $(date)
# see if we are already running continuousaudio or not
    pgrep -f $program>/dev/null
# 0 means it's been found
    if [ $? -eq 0 ]; then
# kill it
      echo KILLING $program
      pkill -9 -f $program; pkill -9 ffmpeg
      sleep 1
      echo turn on led for a few seconds
      $HOME/videotst.sh &
      sleep $ledtime
      pkill -9 ffmpeg
    else
# start it
      echo turn on led for a few seconds
      $HOME/videotst.sh &
      sleep $ledtime
      pkill -9 ffmpeg
      sleep 1
      echo STARTING $PGM
      $PGM &
    fi
    epochsOld=$epochs
  fi
[[ $DEBUG -eq 1 ]] && echo No action taken. Continue to listen
fi
done
I press the Enter button once on the remote to begin the livestream to YouTube. I press it a second time to stop.
By extension this could also control other programs as well (like the photo frame). And other keys could be mapped to other functions. Record-only, don’t livestream, anyone?
I want to do these things because it’s a little tight in the room where I want to livestream – hard to get around. So this keeps me from having to squeeze past other people to access the RPi to for instance power cycle it. In my previous treatment, I had livestreaming start up as soon as the RPi booted up, which means it would only stop when it was similarly powered off, which I found somewhat limiting.
The purpose of videotst.sh in Method 2
videotst.sh serves almost no purpose whatsoever! It can simply be commented out. It’s somewhat specific to my webcam.
You see, I wanted to get some feedback that when I pressed the ENTER button the remote control the RPi had read that and was trying to start the livestream. I thought of flashing one of the built-in LEDs on the RPi. I still need to look into that.
With the robotics team we had soldered on an external LED onto one of the GPIO pins, but that’s way too much trouble.
So what videotst.sh does for me is to engage the webcam, specifically its video component, throwing away the actual video but with the net result that the webcam’s built-in green LED illuminates for a few seconds! That lets me know, “Yeah, your button press was registered and we’re beginning to start the livestream.” You see, because when you run ffmpegwireless6.sh with this webcam, it’s all about the audio. It only uses the audio of the webcam and thus the green “in use” LED never illuminates, unfortunately, while it is livestreaming the pure audio stream. So, similarly, when you press ENTER a second time to stop the stream I illuminate the webcam’s LED for a few seconds by using videotst.sh once again.
Techniques developed for this project
evread.py does some nasty buffering of its output, meaning, although it dos read the key presses on the remote, it holds the results “close to its chest,” and then spits them out, all at once, when the buffer is full. Well, that totally defeats the purpose needed here where I want to know if there’s been a single click. After some insightful Internet searches (note that I did not use Google as a verb, a practice I carry into my personal communication) I discovered the program script, which, when armed with the arguments -q -c, allows you to unbuffer the output of a program! And, it actually works. Cool.
And I made the command decision to “eat” the input. You see the timer of 3 seconds in broadcastswitch.sh? After you’ve done any button press it throws away any further button presses for the next three seconds. I just think that’ll reduce the misfires. In fact, I might take up the practice of double-clicking the ENTER button just to be sure I actually pressed it.
I’m using the double bracket notation more in my bash scripts. It permits use of a RegEx comparison operator. =~. I love regular expressions. More the perl style, PCRE, while this uses extended regular expressions, ERE. But I suppose those are good as well.
Getting control over the power LED was a nice coup. I’m only disappointed that you cannot control its brightness. In the dark it throws off quite a bit of light. But you cannot.
The green LED does not seem nearly as bright so I chose not to play with it. What I don’t want is to have to strain to see whether the thing is livestreaming or not.
Of course getting the whole remote control thing to work at all is another great advancement.
Techniques still to be developed
I still might investigate using voice-driven commands in place of a remote. Obviously, that’s a big nut to crack. Even if I managed to turn it on, turning it off while ffmpeg has commandeered the audio channel is even harder. I wonder if ffmpeg can split the audio stream so another process can be run alongside it to listen for voice commands? Or if an upstream process in front of ffmpeg could be used for that purpose? Or simply run with two microphones (seems wasteful of material)?? Needs research.
Suppose you want to take this on the road? Internet service can be unreliable after all. It’s well known you can power the RPi 3 for many hours with a small portable battery. So how about mapping a second button on the remote to a record-only mode (using the arecord utility, for instance)?? Then you can upload the audio at a time of you convenience. That’s something I can definitely program if I find I need it.
Lingering Problems with this approach
Despite all the care I’ve taken with the continuousaudio.sh script, still, there are times when YouTube does not show that a livestream is going on. I have no idea why at this point. If I knew the cause, I’d have fixed it!
As the livestream aspect of this is actual immaterial to me, I will probably switch to a pure recording mode where I upload in a later step – perhaps all done by the remote control for pure convenience.
Since this blog post has become popular, I may keep it preserved as is and start a new one for this recording approach as some people may genuinely be interested in the livestream aspect.
A very rough estimate of the failure rate is maybe as high as 50% but probably no lower than 25%. So, not great odds if you’re relying on success.
There’s another issue which I consider more minor. The beginning of the stream always sounds like a tape played on fast forward for a few seconds. The end also cut off a few seconds early I think.
Conclusion
We have presented a novel approach to livestreaming on a Raspberry Pi 3 using a remote control for added convenience. All the techniques were home-developed at drjohnstechtalk.com. The materials don’t cost much and it really does work.
So of interest here is that it involved a 64×64 LED matrix display, and a “hat” sold by Adafruit to supposedly make things easier to connect.
Now I am not a hardware guy and never pretended to be. When we realized that it required soldering, I bought those supplies but I didn’t want to be the one to mess things up so he volunteered for that. And yes, it was a mess.
Equipment
See later on in the post for the equipment we used.
The story continues
Who knew that gold on the PCB could be ruined so easily after you’ve changed your mind about a soldered joint and decided to undo what you’ve done? The experience pretty much validated my whole approach to staying away from soldering. So we ruined that hat and had to order another one. While we waited for it I developed a certain strtategy to deal with the shortcomings of the partially destroyed hat. See the section at the bottom entitled Recipe for a broken hat.
Comments on the project
I don’t think the guy did a good job. Details left out where needed, extra stuff added. For instance you don’t need to order that Firebeetle – it’s never used! Also, I’ve been told that his python isn’t very good either. But in general we followed his skimpy instructions. So we ordered the LED matrix from DFRobot, not Adafruit, and I think it’s different. In our case we did indeed follow the project suggestion to wire the 2×8 pin as shown in their (DFRobot’s) picture, leaving out the white wire. Once we soldered the white wire to the hat’s gpio pin 24, we were really in business. What we did not need to do is to solder pin E to either pin 8 or 16. (This is something you apparently need to do for the Adafruit LED.) In our testing it didn’t seem to matter whether or not those connections were made so we left it out on our second hat.
You think he might have mentioned just how much soldering is involed. Let’s see you have 2×20 connector, a 2×8 connector plus a single gpio connection = 57 pins to solder. Yuck.
What we got to work
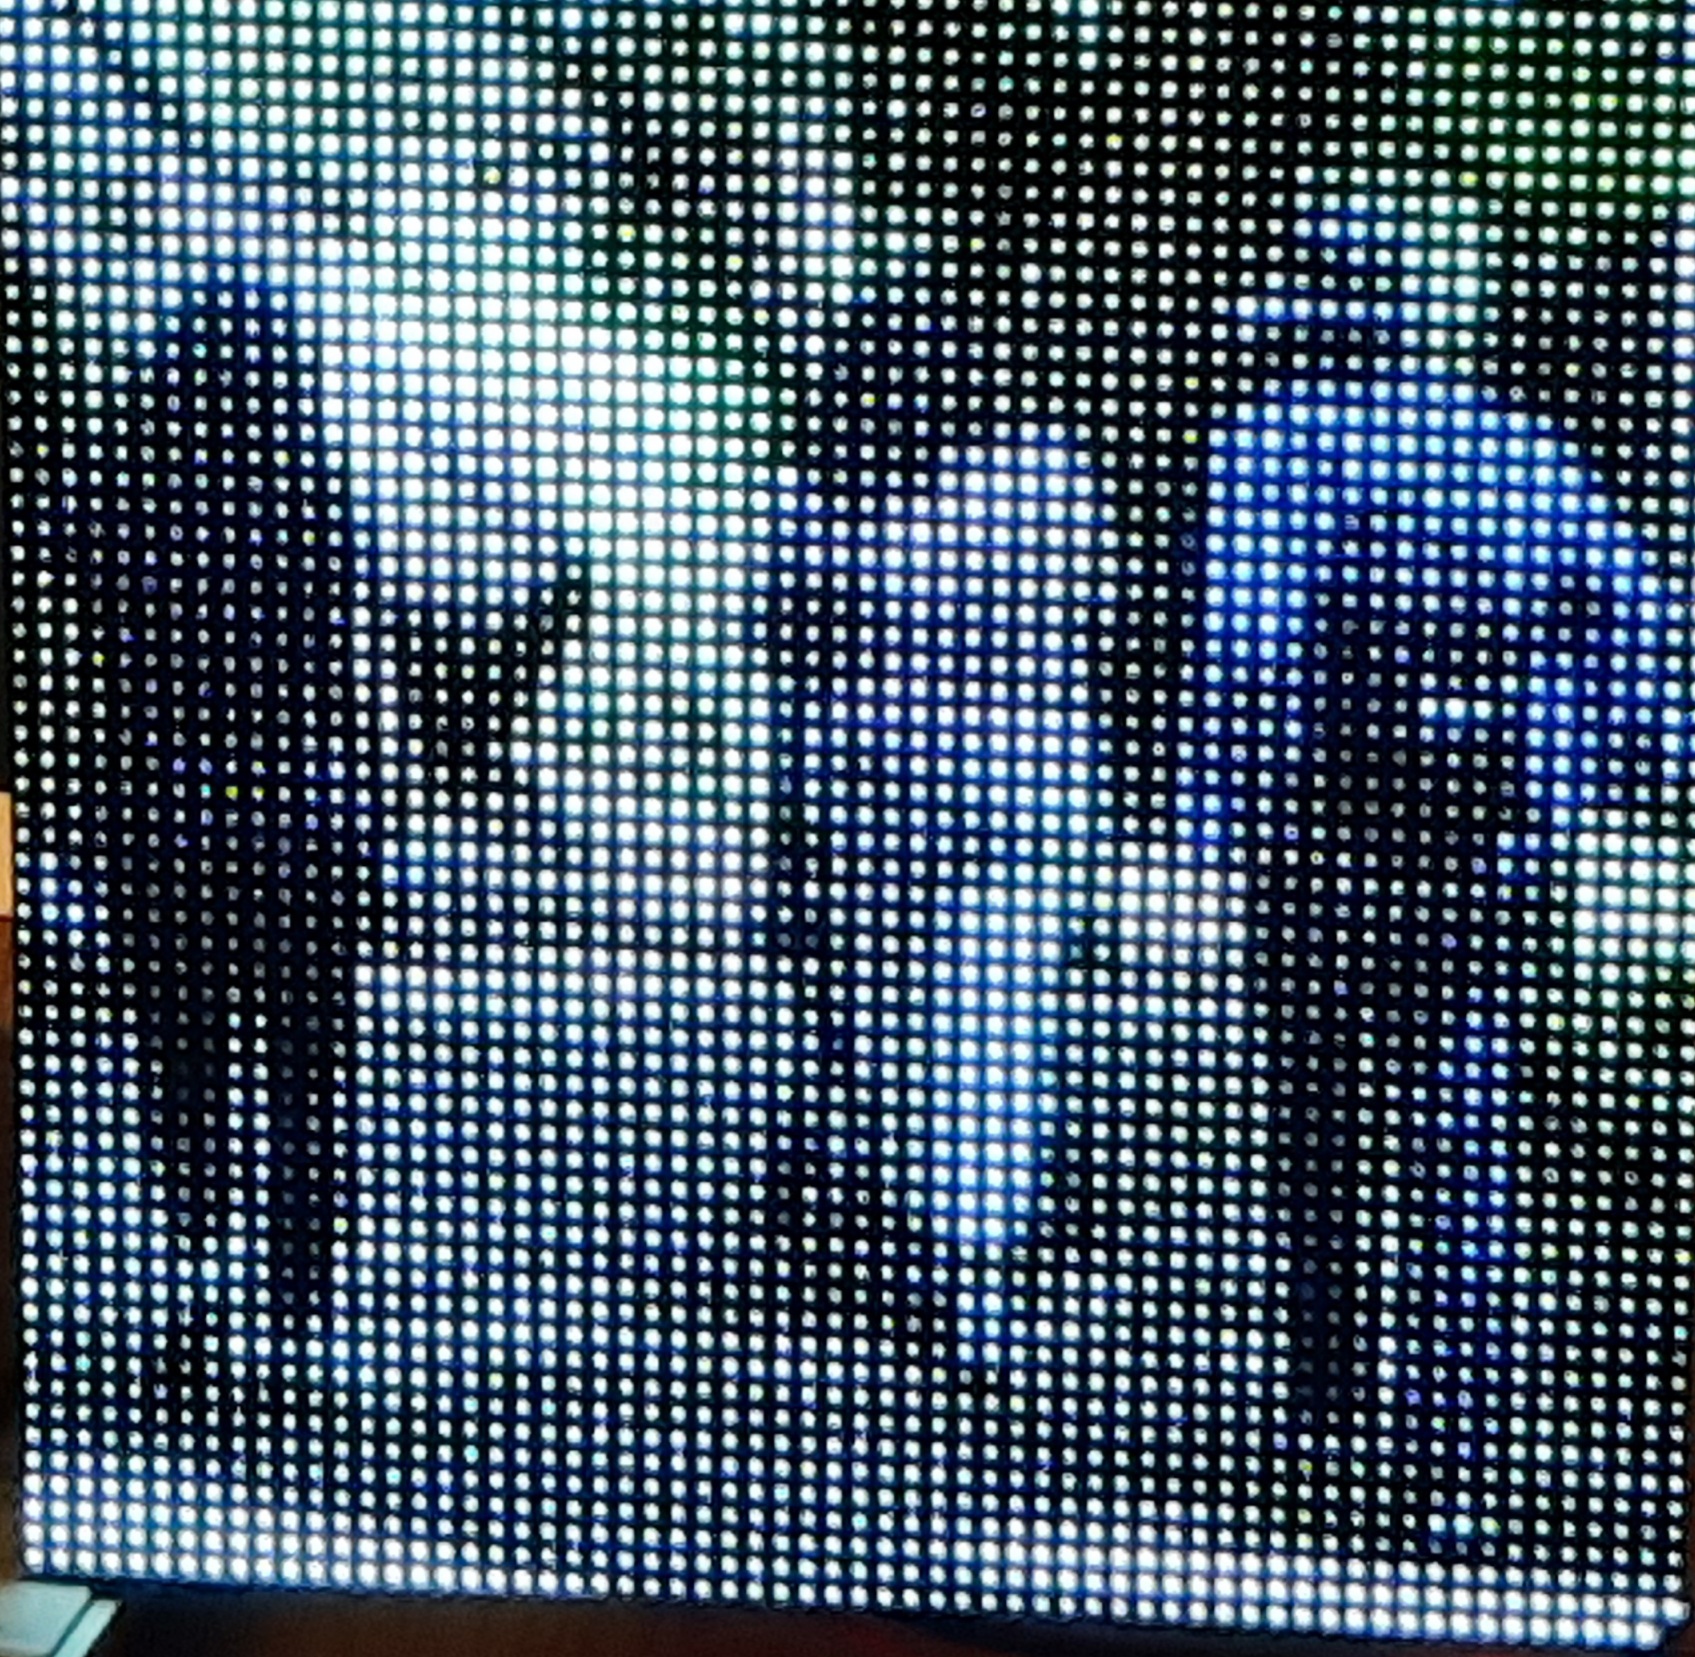
Deploying images on these LED displays is cool. You just kind of have to see it. It’s hard to describe why. The picture below does not do it justice. Think stadium scoreboard.
In rpi-rgb-led-matrix/utils directory we followed the steps in the README.md file to compile the LED viewer:
#!/bin/sh

# invert images because the sound stuff is otherwise upside-down

sudo led-image-viewer –led-pixel-mapper=”U-mapper;Rotate:180″ –led-gpio-mapping=adafruit-hat –led-cols=64 –led-rows=64 /home/pi/walk-in-the-woods.jpg
Walk in the woods
Do we have flicker? Just a tiny bit. You wouldn’t notice it unless yuo were staring at it for a few seconds, and even then it’s just isolated to a small section of the display. Probably shoddy soldering – we are total amateurs.
Tip for your images
Consider that you only have 64 x 64 pixles to work with. So crop your pictures beforehand to focus on the most interesting aspect – people if there are people in the picture (like we’ve done in the above image), specifically faces if there are faces. Otherwise everything will just look like blurs and blobs. You yourself do not have to resize your pictures down to 64 x 64 – the led software will do the resizing. So just focus on cropping down to a square-sized part of the picture you want to draw attention to.
Real-time audio
So my friend got a USB microphone. I developed the following script to make the python example work with real-time sounds – music playing, conversatiom, whatever. It’s really cool – just the slightest lag. But, yes, the LEDs bounce up in response to louder sounds.
So in the directory rpi-rgb-led-matrix/bindings/python/samples I created the script drjexample.sh.
#!/bin/sh
# DrJ 6/21
# make the LED react to live sounds by use of a USB microphone
# I am too lazy to look up how to make the python program read from STDIN so I will just
# make the equivalent thing by creating test.wav as a nmed pipe. It's an old linux trick.

rm test.wav; mkfifo test.wav

# background the python program. It will patiently wait for input
sudo python spectrum_matrix.py &

# Now run ffmpeg
# see my own post, https://drjohnstechtalk.com/blog/2019/04/live-stream-to-youtube-from-a-raspberry-pi-webcam/
ffmpeg \
-thread_queue_size 4096 \
-f alsa -i plughw:1,0 \
-ac 2 \
-y \
test.wav
So note that by having inverted the image (180 degree rotation) we have the sounds bars and images both in the same direction so we can switch between the two modes.
I believe to get the python bindings to work we needed to install some additional python libraries, but that part is kind of a blur now. I think what should work is to follow the directions in the README.md file in the directory rpi-rgb-led-matrix/bindings/python, namely
sudo apt-get update && sudo apt-get install python2.7-dev python-pillow -y
make build-python
sudo make install-python
Hopefully that takes care of it. For sure you need numpy.
Future project ideas
How about a board that normally plays a slideshow, but when the ambient sound reaches a certain level – presumably because music is playing – it switches to real-time sound bar mode?? We think it’s doable.
Recipe for a broken hat
For the LED matrix display we got the DFRobot one since that’s what was linked to in the project guide. But the thing is, the reviewer’s write-up is incomplete so what you need to do involves a little guesswork.
At the end of the day all we could salvage while we wait for a new Adafruit hat to come in is the top fourth of the display! The band below it is either blank, or if we push on the cables a certain way, an unreliable duplicate of the top fourth.
The next band suffers from a different problem. Its blue is non-functional. So it’s no good…
And the last band rarely comes on at all.
OK? So we’re down to a 16 x 64 pixel useable area.
But despite all those problems, it’s still kind of cool, I have to admit! I know at work we have these digital sign boards and this reminds me of that. So first thing I did was to create a custom banner – scrolling text.
I call this display program drjexample2.sh. I put it in the directory rpi-rgb-led-matrix/examples-api-use
But that requires the existence of a ppm file containing the text I wanted to scroll, since I was working by example. So to create that custom PPM file I created this python script.
Once I discovered the problem with the bands – by way of running all the demos and experimenting with the arguments a bit – I noticed this directory: rpi-rgb-led-matrix/utils. I perked right up because it held out the promise of displaying jpeg images. Anyone who has seen any of my posts know that I am constantly putting out raspberry pi based photo displays in one form or another. For instance see https://drjohnstechtalk.com/blog/2021/01/raspberry-pi-photo-frame-using-the-pictures-on-your-google-drive-ii/
But see how cool it is? No? It’s a sleeping, recumbent baby. It’s like the further away from it you get, the clearer it becomes. Trust me in person it does look good. And it feels like creating one of those bright LED displays they use in ballparks.
But this same picture also shows the banding problem.
To get the picture displayed I first cropped it to make it wide and short. I wisely chose a picture which was amenable to that approach. I created this display script:
It went kind of slowly on my RPi 3, but it worked without incident. When I initially ran the led-image-viewer nothing displayed. So the script above shows the results of my experimentation which seems appropriate for our particular matrix display.
How did we get here?
Just to mention it, we followed the general instructions in that project. So I guess no need to repeat the recipe here.
Slideshow
You know I’m not going to let an opportunity to create a slideshow go to waste. So i created a second appropriately horizontal image which I might effectively show in my narrow available band of 16 x 64 pixels. just to share the little script, it is here:
My friend ordered all the stuff listed on the DFRobot project page, including their 64×64 LED matrix. Probably a mistake. They basically don’t document it and refer you to Adafruit, where they deal with a 64×64 LED matrix – their own – which may or may not have the same characteristics, leaving you somewhat in limbo. Next time I would order from Adafruit.
As mentioned above that gold foil on printed circuit boards really does come off pretty easily, and then you’re hosed. Because of the lack of technical specs we were never really sure if we needed to solder the E contact to 8 or to 16 and destroyed all those terminals in the process of backing out.
I actually created custom ppm files of solid colors, red, blue, green, white, so that I could prove my suspicions about the third band. Red and green display fine, blue not at all. White displays as yellow.
Viewed close up, the LED matrix doesn’t look like much, and of course I was close up when I was working with it. But when I stepped back I realized how beautiful a brightly illuminated picture of a baby can be! The pixels merge and your mind fills in the spaces between I guess.
The original idea was to tackle sound but I got stuck on the ability to use it as a photo frame (you know me). But he wants to return to sound which I am dreading….
Testing audio
In our first tests. the audio example wasn’t working. But now it seems to be. The project guy’s python code is named spectrum_matrix.py if I recall correctly. It goes into rpi-rgb-led-matrix/bindings/python/samples. And as he says, you run it from that directory as
$ sudo python spectrum_matrix.py
But, his link to test.wav is dead – yet another deficiency in his write-up. At least in my testing not every possible WAV file may work. This one, moo sounds, does however. http://soundbible.com/grab.php?id=1778&type=wav So, it plays for a few seconds – I can hear it through earphones – and the LEDs kind of go up and down. We recorded a wav file and found that that does not work. The error reads like this:
Home directory not accessible: Permission denied
W: [pulseaudio] core-util.c: Failed to open configuration file '/root/.config/pulse//daemon.conf': Permission denied
W: [pulseaudio] daemon-conf.c: Failed to open configuration file: Permission denied
Traceback (most recent call last):
File "spectrum_matrix.py.orig", line 56, in
matrix = calculate_levels(data,chunk,sample_rate)
File "spectrum_matrix.py.orig", line 49, in calculate_levels
power = np.reshape(power,(64,chunk/64))
File "/usr/lib/python2.7/dist-packages/numpy/core/fromnumeric.py", line 292, in reshape
return _wrapfunc(a, 'reshape', newshape, order=order)
File "/usr/lib/python2.7/dist-packages/numpy/core/fromnumeric.py", line 56, in _wrapfunc
return getattr(obj, method)(*args, **kwds)
ValueError: cannot reshape array of size 2048 into shape (64,64)
Note that I had renamed the original spectrum_matrix.py to spectrum_matrix.py.orig because we started messing with it. Actually, I pretty much get the same error on the file that works; it’s just that I get it at the end of the LED show, not immediately.
Superficially, the two files differ somewhat in their recording format:
I played the voice.wav on a Windows PC – it played just fine. Just a little soft.
So what’s the essential difference between the two files? Well, something that jumps out is that the one is mono, the other stereo. Can we somehow test for that? Yes! I made the simplest possible conversion af a mono to a stereo file with the following ffmpeg command:
I copy converted.wav to test.wav and re-run spectrum_matrix.py. This time it works!
Not sure how my friend produced his wave file. But I want to make one on my own. He had plugged a USB microphone into the RPi. I have done research somewhat related to this – publishing a livestream to Youtube, audio only, video grayed out. That’s in this post: https://drjohnstechtalk.com/blog/2019/04/live-stream-to-youtube-from-a-raspberry-pi-webcam/ So I am not afraid to se ffmpeg any longer. So I created this tiny script, record.sh, with my desired arguments:
My friend wants the LED to respond to live input such as his stereo at home. Being a terrible python programmer but at least middling linux techie, I see a way to accomplish it without his having to touch the sample program by employing an old Unix trick: named pipes. So I create this script, drjexample.sh which combines all the knowledge we gained above into one simple script:
#!/bin/sh
# DrJ 6/21
# make the LED react to live sounds by use of a USB microphone
# I am too lazy to look up how to make the python program read from STDIN so i will just
# make the equivalent thing by creating test.wav as a nmed pipe. It's an old linux trick.

rm test.wav; mkfifo test.wav

# background the python program. It will patiently wait for input
sudo python spectrum_matrix.py &

# Now run ffmpeg
# see my own post, https://drjohnstechtalk.com/blog/2019/04/live-stream-to-youtube-from-a-raspberry-pi-webcam/
ffmpeg \
-thread_queue_size 4096 \
-f alsa -i plughw:1,0 \
-ac 2 \
-y \
test.wav
So a named pipe is just that. Instead of the pipe character we know and love, you coordinate process output from the first process with process input of the second process by way of this special file. The operating system does all the hard work. But it works just as though you had used the | character.
Best of all, this script actually works, to wit, the LED is now responding to live input. I see it jump when I say test into the microphone. Unknown to me is if it will play for extended periods of time – it would be easy for one process to output faster than the other can input for instance, so a backlog builds up. The responsiveness is good, I would guess around no more than 200 ms lag.
Equipment
We used the equipment from this post, except the Firebeetle. You know, that’s just another reason I consider that post to be a sloppy effort. Who lists a piece of equipment that they don’t use?? And again, next time I would rather search for an LED display from Adafruit. We use an RPi 3 and installed the image on a micro SD card with the new-ish Raspberry Pi imager, which works just great:Introducing Raspberry Pi Imager, our new imaging utility – Raspberry Pi
Oh, plus the soldering iron and solder. And a multi-colored ribbon cable with female couplers at one end and a 2×8 connector on the other. Not sure if that came with the LED or not since I didn’t order it.
Our power supply is about 5 amps and plugs into the hat. We do not need power for the RPi.
I haven’t run this in two years. I just revived my scripts today, resuscitated an old Raspberry Pi, and voila, it’s pretty much good to go. When I moved to my new server in 2020 some of the scripts got mangled. I’m trying to fix those. For the record, I use the continuousaudio.sh script + ffmpegwireless6.sh mentioned below. That gives me a live audio stream on YouTube with a solid gray video. I’m researching further enhancements and will post those if I ever manage to pull them off.
What I would like to do is to have it interpret and respond to a couple audio commands as in “start recording” and “stop recording”. Now whether or not I can pull that off is an entirely different story. But you’ll never know if you don’t try…
Intro
I’ve been looking at this off and on for awhile now. I finally made a breakthrough this week and started to generate some decent live streams on my YouTube channel, after a lot of misfires.
Note this is applicable for Raspbian Stretch Lite on a Raspberry Pi 3. However, I firmly believe it will work just the same for regular Raspbian Stretch.
There’s a lot of wrong, misleading or outdated information out there on the Internet. Hopefully this will help others to avoid wasting as much time as I had to do.
This project was prompted by my desire to make a more generalized fishcam! Described in this post, my original fishcam implementation – and I realized this form the get-go – has very limited applicability because very few people are in a position to have their own AWS server. And if you don’t know what you’re doing, please don’t run your own server – the security exposure is too great.
So I eventually realized that maybe I could generalize what I had done – essentially remove the dependency on the AWS server – by utilizing Youtube Live Streaming. And, I believe I was right. It’s still a work in progress however.
The command – ffmpeg
I was playing with ffmpeg. The version I am playing with now comes with Raspbian – no need to compile like in the bad old days. ffmpeg -version shows the version to be 3.2.12. I get the impression that its capabilities are version-dependent, so that’s why this information is particularly relevant in this case.
The details
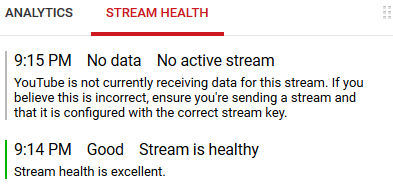
In some of my early attempts I was getting a lot of this (looking at YouTube Live Dashboard)
Dashboard When stream is not quite right
Another attempt
Video works, audio like driving in a car with the windows down. For the record, the command was this:
It is not so pretty to use that hardware address for the Logitech webcam device. Where do you see that hardware address? Either a lsusb or a ls /dev/snd/by-id shows addresses of sound devices. I found a simpler substitute:
With this audio's, not too bad, video's a bit choppy. Google reports the stream quality as OK, check resolution.


So I fix the bandwidth (which was a typo in the above, but one with an interesting result). I set video bandwidth to -b:v 1200k. Now the video is OK once again, but the audio is choppy again! Weird. bandwidth is about 1100 kbps.

This version had OK video and OK audio
But I keep getting inconsistent results! Sometimes a setting will work, and then I come back to it and it doesn’t. Weird.
Part of the problem is that I have no idea what I’m doing and I didn’t know when i was watching a livestream vs a recorded (on-demand) one! I have since learned to look for the little red Live button. A picture is worth 10^3 words in this case.
[Pic no longer available – try the thousand words instead!]
Observed used bandwidth is about 1450 kbits/sec. But still lots of dropped packets. Here is what ffmpeg reports. I’m not sure yet what most of it means:
That is working great – showing the video as before but now with a silent audio track.
Increase Video Quality
Here I’ve increased video quality a tad by requesting more fps (10) and making qscale 0 (which means highest quality). https://www.youtube.com/watch?v=5Aall8w4Y3E
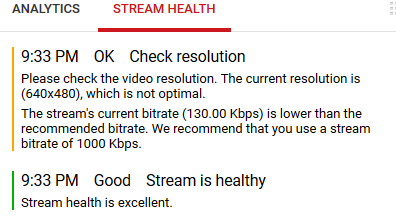
What is observed to happen is that ffmpeg actually chooses 15 fps rather than 30. I’ve read it decides what it is able to do, so maybe that’s the highest fps it can deliver. Video is pretty smooth (See my Livestream link in references if I happen to have it running. Otherwise I will create a video link.) No drops are recorded, but the sound, though not terrible, has some pops. Bandwidth used is about 1900 kbps. So this is definitely my best effort yet. YouTube complains about the unsupported video size of 640×480, but it permits it and I don’t think it’s a real problem.
Reducing bandwidth
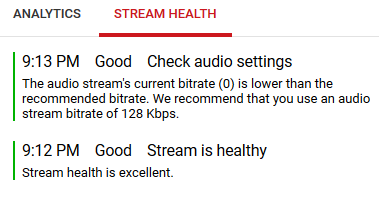
This one is pretty good overall. I have no idea why lowering the audio bandwidth might help. It’s counter intuitive. But video motion is not bad – just a tad blurred. I guess q=23. Audio has good patches and not-as good patches. Not as good spots are staticky, not washboard bad. Total bandwidth used is about 611 kbps. So a great compromise. Why does raising the video bandwidth lower the audio quality? I have no idea… The settings below worked for maybe 20 minutes, then YouTube said this Video is unavailable. I at least found out something about that. That shows a problem with the player, not (for once) your stream. so since I’m only concentrating on the stream, that’s good news. So actually it delivered good sound for three hours straight with a few staticky spots.
The audio is creepily sensitive, easily picking up conversations in adjacent rooms.
But then I monkeyed around with the settings, got the washboard sound, came back to this one – a known good – and got washboard audio! What the heck? Why isn’t it consistent?? No idea… Maybe it’s the player that gets messed up?? Now I’m running it again and it’s OK.
Bandwidth talk
It’s important to talk about bandwidth if you haven’t given this any real thought. You have to have a halfway decent broadband connection for this to work, you see? If you have a mid-speed cable modem or DSL, you have much lower upload than download speeds, and you may not be able to pull off a reliable 1.5 mbps upload. For those lucky enough to have Verizon FIOS this is a non-issue. But for instance in the high school where I volunteer they have throttled the guest WiFi network to such an extent that achieving this modest 1.5 mbps is going to present a real challenge. If you rely on a phone’s hotspot you will also probably be unable to get such a speed. So I may look at more ways to reduce the bandwidth required in the future.
And between YouTube and your ISP, it just seems the whole thing about live video broadcasting seems, well, delicate. Stream Health varies between oK, to Excellent to not receiving – all during the same streaming session! It often takes five minutes or so for the stream to appear to be working.
Comparing two webcams
Someone picked up a really cheap DI Chatcam at Microcenter in Paterson. I think that’s Digital Innovations Chatcam. It’s cute. It has a big clip on the end and shines white LEDs when it’s on. I think it was about $12. With the exact same ffmpeg settings (with audio suppressed), the quality was not nearly as good as with the Logitech webcam. Here’s a link to the YouTube video made with the chatcam: https://www.youtube.com/watch?v=OI2IRV1i__k. Note that it has a ministereo plug for audio. I didn;’t even plug it in now that I know how to suppress audio!
I need to re-run this test now that I know how to increase the video quality.
A breakthrough: publishing an audio-only stream to YouTube
Besides covering your lens with tape, what’s a software way to blacken the video and concentrate on producing the best audio I wondered?
The above gives me good audio, and a sold gray background. I love it – for recording band practice or whatever. The breakthrough is that we can avoid wasting cpu cycles on processing input video but just use a color. Thanks Stackoverflow for the tip. Used bandwidth is about 150 kbs – basically nothing! YouTube Dsahboard complains:
OK Video output low
The stream's current bitrate (138.00 Kbps) is lower than the recommended bitrate.
We recommend that you use a stream bitrate of 2500 Kbps.
OK Video output low
The stream's current bitrate (138.00 Kbps) is lower than the recommended bitrate.
We recommend that you use a stream bitrate of 2500 Kbps.
But of course that is bogus because that assumes we are trying to put out a rich 1280×720 video, which we are not.
Then eventually YouTube has this complaint:
Bad Bad video settings
Please use a keyframe frequency of four seconds or less. Currently, keyframes are not being sent often enough, which will cause buffering.
The current keyframe frequency is 8.5 seconds. Note that ingestion errors can cause incorrect GOP (group of pictures) sizes.
Bad Bad video settings
Please use a keyframe frequency of four seconds or less. Currently, keyframes are not being sent often enough, which will cause buffering.
The current keyframe frequency is 8.5 seconds. Note that ingestion errors can cause incorrect GOP (group of pictures) sizes.
Yet the stream does not seem to suffer in any noticeable way from this problem.
For good measure, we add a few extra arguments allow us to remove the keyframes warning. We need to use the -g parameter (group of pictures) at about twice our frame rate, plus, maybe, a no-scenecut argument. Here’s that version.
Actual fps is 25, quality is 26 and bitrate is 145 kbps. But audio quality is good. I hear white noise in the background, but hey, this isn’t exactly professional equipment we’re working with. But this is a great solution for an audio-only recording that goes straight out to YouTube. stability is also good.
The load average is high – 3.6 (use top to watch it), almost all of it taken by ffmpeg. So it appears ffmpeg is really working it to produce this audio stream. That makes me suspect it just gets overwhelmed when it’s an audio + video stream? Because I never did find setting swhich produced good quality for both…
Switch to Wifi and Yet another problem surfaces
It seems that with this livestreaming project everything that should just work doesn’t! I had been doing all my testing used wired Ethernet connection and WiFi disabled. anticipating a portable solution, I tried it using WiFi and no Ethernet cable. And washboard audio reappeared. quite often ffmpeg hangs as well. I tried a zillion experiments and now my revelation is that essentially, though we tried to minimize and trivialize video, we were probably still overwhelming the CPU. So I reasoned that these actions will make the load easier on the CPU, without compromising the audio quality:
– reduce frame per second dramatically
– reduce key frames
– reduce video size
And…yes, these things in combination really did help and permit me to run over WiFi now. This version, put inside a script I call ffmpegwireless6.sh, looks like this:
It doesn’t start consistently, however, but if you run it enough times it’ll go. So, to provide reliability I also scripted around these deficiencies: I decided to just keep trying to start up ffmpegwireless.sh until I jhave evidence it’s working. I call that script masterwireless.sh:
#!/bin/sh
# DrJ 5/2019
LOG="ff.log"`date +%m-%d-%y:%H:%M`
while /bin/true; do
nohup ./ffmpegwireless6.sh$LOG 2>&1 &
sleep 7
# want s.th like
#Frame= 84 fps= 11 q=16.0 size= 43kB time=00:00:07.50 bitrate= 47.1kbits/s dup=0 drop=431 speed=0.991x
#Frame= 84 fps= 11 q=16.0 size= 43kB time=00:00:07.50 bitrate= 47.1kbits/s dup=0 drop=431 speed= 1x
FFOUT=`tail -1 $LOG`
echo "last line is $FFOUT"
KB=`echo $FFOUT|awk '{print $(NF-4)}'`
echo "orig KB: $KB"
KB=`echo $FFOUT|awk '{print $(NF-5)" "$(NF-4)}'|sed 's/kbits.*//'|awk '{print $NF}'`
date
echo "KB is: $KB"
if [ $KB -gt 129 2>/dev/null ]; then
# let our master process exit - we've got a good audio stream
  echo "Exiting at *** "`date`
  exit
else
# didn't work out: restart and try again
  echo "*** Restarting ffmpeg at *** "`date`
  pkill -9 -f 'ffmpeg '
fi
done
And…it works great! Very briefly what it does is t that it calls ffmpegwireless6.sh and backgrounds it, then tests its output. It gives it a few seconds to get going, then kills it unless observed streaming bandwidth is a healthy 135 kbps or so (essentially the video takes almost no bandwidth in ffmpegwireless6.sh.)
Putting it all together – livestreaming audio stream to YouTube automatically upon boot up
So I want to drag this thing to a performance and have a confederate with minimal technical know-how start it up. So basically I want it to start livestreaming when the RasPi is powered up. To do that I made this crontab entry (using crontab -e):
It takes a few minutes to get going, but it’s been extremely reliable. It’s started a stream successfully more than 10 times out of 10, at least when I was using my home WiFi connection. When I switched to my phone’s Hotspot, I had one error out of five attempts. The one bad stream just would not start according to Youtube, although per the stats from the log files showed the stream reached the usual good bandwidth. So I don’t know…
And once the stream starts, it is running uninterrupted for hours, anywhere from three to six hours.
Eventually I want to write an API program to automatically check the stream. But before then I may just introduce a refined script which checks the output and restarts ffmpeg when it has ended.
For the record, a typical ff.log file looks like this:
frame=   43 fps= 43 q=0.0 size=       0kB time=00:00:00.00 bitrate=N/A dup=0 drop=164 speed=   0x    ed=   0x
orig KB: dup=0
Tue  7 May 12:32:08 BST 2019
KB is: dup=0
*** Restarting ffmpeg at *** Tue 7 May 12:32:08 BST 2019
frame=  213 fps= 35 q=8.0 size=      47kB time=00:01:40.91 bitrate=   3.8kbits/s dup=0 drop=847 speed=16.7x
orig KB: 3.8kbits/s
Tue  7 May 12:38:53 BST 2019
KB is: 3
*** Restarting ffmpeg at *** Tue 7 May 12:38:53 BST 2019
illed=   86 fps= 14 q=8.0 size=     104kB time=00:00:06.21 bitrate= 136.7kbits/s dup=0 drop=336 speed=1.03x
orig KB: 136.7kbits/s
Tue  7 May 12:39:00 BST 2019
KB is: 136
Exiting at *** Tue 7 May 12:39:00 BST 2019
frame= 43 fps= 43 q=0.0 size= 0kB time=00:00:00.00 bitrate=N/A dup=0 drop=164 speed= 0x ed= 0x
orig KB: dup=0
Tue 7 May 12:32:08 BST 2019
KB is: dup=0
*** Restarting ffmpeg at *** Tue 7 May 12:32:08 BST 2019
frame= 213 fps= 35 q=8.0 size= 47kB time=00:01:40.91 bitrate= 3.8kbits/s dup=0 drop=847 speed=16.7x
orig KB: 3.8kbits/s
Tue 7 May 12:38:53 BST 2019
KB is: 3
*** Restarting ffmpeg at *** Tue 7 May 12:38:53 BST 2019
illed= 86 fps= 14 q=8.0 size= 104kB time=00:00:06.21 bitrate= 136.7kbits/s dup=0 drop=336 speed=1.03x
orig KB: 136.7kbits/s
Tue 7 May 12:39:00 BST 2019
KB is: 136
Exiting at *** Tue 7 May 12:39:00 BST 2019
The other file, which has a name like ff.log05-07-19:12:32, looks more like this:
CPU load average is around 1 or so – much less than before. So I think my ideas are on the right track. Why send 30 frames or whatever each and every second to Youtube just to display a gray screen? The CPU has to work to do that. As long as ffmpeg + Youtube has the intelligence to paste together audio snippets 1/5th second in length five times each second the audio should be taken care of, we’re not playing with the sampling rate or anything – is how I reasoned. Key frames are some sort of overhead as well since they’re extra things ffmpeg has to periodically do. Youtube wants one at least every four seconds. We get really close to that limit by multiplying fps * 3.6 s = 5 * 3.6 = 18 for our group-of-pictures (g) parameter. Previously we were sending a key frame more frequently – every two seconds.
Unreliability
Running this command is still hit-or-miss. As often as not it hangs, and then, if it does not hang, as often as not it often outputs washboard audio. You just <Ctrl-C> to get out of it if hangs, or type “q” if it is producing washboard audio.
Note carefully the bandwidth being used, which ffmpeg reports every second. If it is < 128 kbps, you’re hosed and have washboard audio. If it’s about 135 kbps or higher, you’re good. You don’t even need to waste time fiddling with Youtube’s live_dashboard to listen to it. You get this feedback immediately from ffmpeg. And I intend to use these same observed behaviors to script around ffmpeg’s flakiness and keep restarting it automatically until it is producing a good quality audio stream!
Improved startup
This script, which I call continuousaudio.sh, has some debugging at the beginning, then loops to ensure there is always an audio stream being live-streamed as long as the Pi has power. It has been extremely reliable. I settled on this one for my own purposes.
#!/bin/sh
# drJ 5/2019
LOG="ff.log"`date +%m-%d-%y:%H:%M`
# some info for debugging problems
echo "***********"
date; ip add; ping -c2 8.8.8.8; lsusb
nohup ./ffmpegwireless6.sh > $LOG 2>&1 &
while /bin/true; do
 sleep 7
# want s.th like
#Frame=   84 fps= 11 q=16.0 size=      43kB time=00:00:07.50 bitrate=  47.1kbits/s dup=0 drop=431 speed=0.991x
#Frame=   84 fps= 11 q=16.0 size=      43kB time=00:00:07.50 bitrate=  47.1kbits/s dup=0 drop=431 speed= 1x
 FFOUT=`tail -1 $LOG`
# next line only for DrJ debugging - lines are long
#echo "last line is $FFOUT"
# use gawk instead of awk to parse long lines
 KB=`echo $FFOUT|gawk '{print $(NF-5)" "$(NF-4)}'|sed 's/kbits.*//'|gawk '{print $NF}'`
 echo "orig KB: $KB"
 KB=$(echo $KB|sed s/\\..*//)
 date
 echo "KB is: $KB"
 if [ $KB -gt 129 2>/dev/null ]; then
# stream looks good - do nothing
   echo -n ""
 else
# didn't work out: restart and try again
  echo "*** Restarting ffmpeg at *** "`date`
  pkill -9 -f 'ffmpeg '
  nohup ./ffmpegwireless6.sh > $LOG 2>&1 &
 fi
done
gawk
Eventually I found I needed to use gawk instead of awk in continuousaudio.sh because the number of fields exceeded the max of roughly 32700 in the line I was parsing. To install gawk:
$ sudo apt-get install gawk
Note it still calls ffmpegwireless6.sh, which I believe I have provided above.
ff.log now looks like this:
**********
Fri 31 May 01:10:59 BST 2019
1: lo: <loopback,up,lower_up> mtu 65536 qdisc noqueue state UNKNOWN group default qlen 1000
    link/loopback 00:00:00:00:00:00 brd 00:00:00:00:00:00
    inet 127.0.0.1/8 scope host lo
       valid_lft forever preferred_lft forever
    inet6 ::1/128 scope host
       valid_lft forever preferred_lft forever
2: eth0: <no-carrier,broadcast,multicast,up> mtu 1500 qdisc pfifo_fast state DOWN group default qlen 1000
    link/ether b8:27:eb:11:fc:06 brd ff:ff:ff:ff:ff:ff
3: wlan0: <broadcast,multicast,up,lower_up> mtu 1500 qdisc pfifo_fast state UP group default qlen 1000
    link/ether b8:27:eb:44:a9:53 brd ff:ff:ff:ff:ff:ff
    inet 192.168.1.170/24 brd 192.168.1.255 scope global wlan0
       valid_lft forever preferred_lft forever
    inet6 fe80::1119:b46a:cb69:63c9/64 scope link
       valid_lft forever preferred_lft forever
PING 8.8.8.8 (8.8.8.8) 56(84) bytes of data.
64 bytes from 8.8.8.8: icmp_seq=1 ttl=56 time=14.6 ms
64 bytes from 8.8.8.8: icmp_seq=2 ttl=56 time=17.4 ms

--- 8.8.8.8 ping statistics ---
2 packets transmitted, 2 received, 0% packet loss, time 1001ms
rtt min/avg/max/mdev = 14.671/16.065/17.460/1.400 ms
Bus 001 Device 004: ID 046d:0825 Logitech, Inc. Webcam C270
Bus 001 Device 005: ID 0424:7800 Standard Microsystems Corp.
Bus 001 Device 003: ID 0424:2514 Standard Microsystems Corp. USB 2.0 Hub
Bus 001 Device 002: ID 0424:2514 Standard Microsystems Corp. USB 2.0 Hub
Bus 001 Device 001: ID 1d6b:0002 Linux Foundation 2.0 root hub
last line is frame=   19 fps=0.0 q=0.0 size=       0kB time=00:00:00.00 bitrate=N/A dup=0 drop=69 speed=   0x    ^Mframe=   39 fps= 39 q=0.0 size=       0kB time=00:00:00.00 bitrate=N/A dup=0 drop=150 speed=   0x    ^M
orig KB: dup=0
Fri 31 May 01:11:07 BST 2019
KB is: dup=0
*** Restarting ffmpeg at *** Fri 31 May 01:11:07 BST 2019
last line is frame=  193 fps= 35 q=8.0 size=     100kB time=00:00:27.60 bitrate=  29.6kbits/s dup=0 drop=764 speed=4.99x    ^Mframe=  195 fps= 32 q=8.0 size=     108kB time=00:00:28.03 bitrate=  31.4kbits/s dup=0 drop=775 speed=4.65x    ^M
orig KB: 31.4
Fri 31 May 01:11:36 BST 2019
KB is: 31
*** Restarting ffmpeg at *** Fri 31 May 01:11:36 BST 2019
...
</broadcast,multicast,up,lower_up></no-carrier,broadcast,multicast,up></loopback,up,lower_up>
**********
Fri 31 May 01:10:59 BST 2019
1: lo: <loopback,up,lower_up> mtu 65536 qdisc noqueue state UNKNOWN group default qlen 1000
link/loopback 00:00:00:00:00:00 brd 00:00:00:00:00:00
inet 127.0.0.1/8 scope host lo
valid_lft forever preferred_lft forever
inet6 ::1/128 scope host
valid_lft forever preferred_lft forever
2: eth0: <no-carrier,broadcast,multicast,up> mtu 1500 qdisc pfifo_fast state DOWN group default qlen 1000
link/ether b8:27:eb:11:fc:06 brd ff:ff:ff:ff:ff:ff
3: wlan0: <broadcast,multicast,up,lower_up> mtu 1500 qdisc pfifo_fast state UP group default qlen 1000
link/ether b8:27:eb:44:a9:53 brd ff:ff:ff:ff:ff:ff
inet 192.168.1.170/24 brd 192.168.1.255 scope global wlan0
valid_lft forever preferred_lft forever
inet6 fe80::1119:b46a:cb69:63c9/64 scope link
valid_lft forever preferred_lft forever
PING 8.8.8.8 (8.8.8.8) 56(84) bytes of data.
64 bytes from 8.8.8.8: icmp_seq=1 ttl=56 time=14.6 ms
64 bytes from 8.8.8.8: icmp_seq=2 ttl=56 time=17.4 ms
--- 8.8.8.8 ping statistics ---
2 packets transmitted, 2 received, 0% packet loss, time 1001ms
rtt min/avg/max/mdev = 14.671/16.065/17.460/1.400 ms
Bus 001 Device 004: ID 046d:0825 Logitech, Inc. Webcam C270
Bus 001 Device 005: ID 0424:7800 Standard Microsystems Corp.
Bus 001 Device 003: ID 0424:2514 Standard Microsystems Corp. USB 2.0 Hub
Bus 001 Device 002: ID 0424:2514 Standard Microsystems Corp. USB 2.0 Hub
Bus 001 Device 001: ID 1d6b:0002 Linux Foundation 2.0 root hub
last line is frame= 19 fps=0.0 q=0.0 size= 0kB time=00:00:00.00 bitrate=N/A dup=0 drop=69 speed= 0x ^Mframe= 39 fps= 39 q=0.0 size= 0kB time=00:00:00.00 bitrate=N/A dup=0 drop=150 speed= 0x ^M
orig KB: dup=0
Fri 31 May 01:11:07 BST 2019
KB is: dup=0
*** Restarting ffmpeg at *** Fri 31 May 01:11:07 BST 2019
last line is frame= 193 fps= 35 q=8.0 size= 100kB time=00:00:27.60 bitrate= 29.6kbits/s dup=0 drop=764 speed=4.99x ^Mframe= 195 fps= 32 q=8.0 size= 108kB time=00:00:28.03 bitrate= 31.4kbits/s dup=0 drop=775 speed=4.65x ^M
orig KB: 31.4
Fri 31 May 01:11:36 BST 2019
KB is: 31
*** Restarting ffmpeg at *** Fri 31 May 01:11:36 BST 2019
...
</broadcast,multicast,up,lower_up></no-carrier,broadcast,multicast,up></loopback,up,lower_up>
Portability
I wanted to record a practice session in my house where no Ethernet port is available (hence I had to get WiFi working, which I believe I have). And I wanted convenience – to not worry about being tethered to the wall by an adapter. So I decided to look for an economical power solution for Raspberry Pi. And I found the ones purpose-built are just too expensive to justify. Pijuice, I’m talking about you. So, really, I realized any old portable USB power stick would work. But I wanted something which could last hours. This Omars 10000 mAh portable USB charger seemed like it would do the trick. $16. And it did. It works great! Two hours later, the LEDs show three bars instead of four, so I think this will supply power for about 8 – 9 hours if I pushed it. And it has the form factor of a smartphone. Ideally I’d want a little on/off switch to avoid plugging/unplugging the power cable, but I didn’t find that as of yet. Maybe there’s a cheap USB cable with that…?
So now I’m not tethered by Ethernet cables nor by a power plug. See where this is progressing? If I use my smartphone’s hotspot I should be able to livestream anywhere I can get a signal, so, for instance, at band performances. I haven’t tried that yet, but I’m hopeful…
YouTube quirks
As previously mentioned (I think)( you need to be enabled for livestreaming. It takes about 24 hours for the approval. I suppose they check to make sure you aren’t a perceived threat.
Recording NPR will give you a copyright violation flag! This has happened to me more than once. I think because they play snippets of new music which are flagged.
Lag. I’ve seen lag time as short as four seconds and maybe as long as 20 seconds or so. It is never instantaneous.
My longest video was 20 hours but the processing took days. In fact I’m not sure it ever completed. So I guess the service falls apart after video lengths of I don’t know, maybe 12 hours or so. So if the desire is to have a continuous security webcam I guess you’ll have to break it into chunks. That’s what I’m thinking about next.
A livestream gets converted to a video by YouTube. That takes awhile – maybe as long as the video length itself is? It slaps a date and time onto the video which you see in your video manager. Unfortunately, using this ffmpeg streaming method it chooses the Pacific standard time timezone. I actually don’t see a simple way to change that either. It may require use of the API, which is beyond what I’m willing to tackle right now. So for me, being in the Eastern time zone all the timestamps are off by three hours, which is kind of annoying.
I wondered, does my livestream ID remain constant, or will it change from broadcast to broadcast? This is important for future use of the API. Well, it changes each time I start a new livestream, even though I use a single (my own) account. Each livestream gets a unique ID which then becomes the ID for the DVR of the video which you can view on-demand. And this ID is the part that changes in the URL of an “unpublished” Youtube video. Say your unpublished livestream is https://www.youtube.com/watch?v=r1wtZwQ-Tk8.
The part of the URL following the v=, namely, in this example, r1wtZwQ-Tk8, is the ID of that video. I would say YouTube tries to be somewhat robust and will not declare your stream has ended until maybe 30 seconds after you have stopped your program. Or maybe it’s a minute or two, I’m not really sure. But I’ve seen that if you restart the streaming quickly enough you’ll be put onto that same livestream. If on the other hand you wait long enough until you see in live_dashboard that stream ended message then It will assign yuo a new video ID if you start your stream again – and don’t forget to reload the live_dashboard page so it can pick up the new ID.
Can you pause a livestream, and later resume, keeping the same URL? In a word, No. Unfortunately. Youtube livestreaming is pretty limited in this way. And how useful would that be? I would use my smartphone to control ffmpeg on my Raspberry Pi to pause our band practice during our lengthy chat breaks, keeping the stream focussed on the music. But no… Not possible.
Logitech webcam quirks
When you pull both video and audio from your Logitech webcam the usage LED illuminates as you’d expect. However, when you’re pulling just the audio, as I show above, that LED does not illuminate, yet it is being used to record all the sounds in its vicinity. I guess I have accidentally and unintentionally stumbled upon a stealth mode, which is a little disconcerting.
Yeti USB microphone quirks
A Yeti mic is extremely sensitive and seems more suited for conversation than music recording in my opinion. Even with the gain all the way down (a must) a loud sound is often distorted. I felt the omni recording mode was the worst in this regard. Stereo recording tolerated sounds better. But, if you want to pikc up every little sound, Yeti is great. More importantly to me, it just worked with the USB settings I used for Logitech. I didn’t have to change a single thing in the way I used ffmpeg.
Testing if the livestream is still running
My idea to do this is to use the YouTube API and periodically test if the livestream is still working. I have read that it can go down for various reason, and there is no goo way from within ffmpeg itself to tell that your stream is no longer live! It will make for a good project to test the livestream using the Google Developer’s API. that will be a separate post if I ever get it working. If it’s found to be down, the Pi could restart ffmpeg, in my thinking.
To do list
I never really perfected the video. Audio I got pretty well.
I will borrow my friend’s Yeti USB mic to see how my audio stream works with a high quality microphone. DONE.
I would like to have a simple external control to turn stream off/ on, whether it is physical or virtual. DONE – see references.
Scripting to monitor stream and restart it once it fails – to have a recording 24×7 like an audio-only security camera. DONE – continuousaudio.sh as documented above.
Pause feature. PARTIALLY DONE.
Conclusion
A Raspberry Pi 3 running Raspbian Stretch Lite is used, along with a Logitech USB webcam, to livestream to YouTube. I showed how to stream video-only with a silent audio track. Then I turned it around and spent most of my time putting a virtual piece of tape over the lens and doing an audio-only livestream. This, after a crap-load of testing and tweaking, eventually began to work in a reliable fashion. Then I showed how to launch the audio-only livestream upon power-up of the Ras Pi.
Since it is a Raspberry Pi, this whole thing lends itself to portability and interesting use cases. With a $17 portable USB battery source and your own Hotspot, you can stream (audio at least) from anywhere you have 4G cell signal – good for recording a banquet, your band performance, or any other long, live event.
I spoke about some of the many quirks of YouTube which are relevant to this project.
YouTube’s links have me confused. If you’re trying to produce a Live Stream you’ll want the live dashboard page to watch it and check its quality as Youtube judges it. Here’s that link: https://www.youtube.com/live_dashboard
Intro
My trusty and now old Sony Handycam is still a darn capable recoding device. But how to get one of its videos onto YouTube? Everything’s changed since I bought it. Still, you’d think this would be dead easy, right? It really wasn’t.
The details
I also happen to have a Sony DVDirect to create DVDs from my recorded tapes. That works quite well in fact. But the DVDs it creates, which play just great on a standard DVD player, have strange files when examined on the computer. a couple huge VOB files plus some smaller ones.
I tried DVDx.. Failed miserably. It started up OK but it just refused to do anything with my DVD.
Then I saw some forums with those DVDx problems mentioning using good old AutoGK. They kindly provided a link. That, in turn, led to the kind of installation experience I have learned to dread.It proposed to install some spyware and change my search engine – all very bad signs. When I selected Advance options I could turn all that off, so I continued. Then it proposed to install more spyware. Turn off. Then some more. Finally there was what I think was a spyware installation offer which only provided two choices: agree to continue or disagree and exit the installation. I exited the installation.
A friend suggested Camtasia, but to buy is $300 and I just couldn’t see it. And I hate to get comfortable with something for a 30 day trial period and then not be able to re-use it later.
I wondered if my DVD player software, PowerDVD, might be able to do it, at least in the purchased version – the free version doesn’t seem to be able to. I never did figure that out – it wasn’t obvious from the documentation.
In the past I had streamed directly from the Camcorder to my old computer using Sony’s supplied USB cable. But there is no default driver for Windows 7 that can capture that stream. In the past I had used Sony’s suggested program, Imagemixer. I’ve long since lost the CD, if it would even work on Windows 7. Imagemixer was long ago replaced by Pixela. Sony’s site kindly informs that neither is supported and they don’t offer a download any longer. Instead they have some other software, Picture Motion Browser, which wasn’t clearly going to work anyways. But when you try to download it it asks for a CD key. Huh?
So by now I felt like this simple chore was quite the quest, you see.
Frustrated, I decided to look at Microsoft MovieMaker. I actually didn’t think it was going to be able to read my DVD at first since it doesn’t even have those file types in its default search. But switching to browse all files I clicked on one of my VOB files and it read it in!
I was quickly able to cut some from the beginning and some form the end and save it to my computer. I tihnk technically it thereby converted it from an essentially MPEG-2 format to MPEG-4 format. There was a built-in YouTube button, so you think, Cool, I can directly upload it to YouTube. But that required a Microsoft account. Huh? I don’t need yet another account lying around the Internet for no good reason. So I didn’t bother with that.
So we just logged on to YouTube and uploaded it. It’s kind of large-ish (140 MB) so the upload is of course slow on a DSL line. But at least it did work.
I looked again and found a real company that I trust and recognize that has an economical media converter just like I was looking. Arcsoft has its Media Converter for about $27. I’ll probably try that one next time. I don’t mind paying a modest amount for software that does what I want it to.
Conclusion
I’ve documented a simple requirement that turned into a quest. Of course this kind of thing happens frequently. Maybe my quest will help someone else. But even if not, I think this will serve as a nice journalled account which will help me next time I want to post from my Camcorder to YouTube.