Intro
I’ve written various articles about SSL. I just came across a way to get your certificates for free, letsencrypt.org. But their thing is to automate certificate management. I think you have to set up the whole automated certificate management environment just to get one of their free certificates. So that’s a little unfortunate, but I may try it and write up my experience with it in this blog (Update: I did it!). Stay tuned.
Short duration certificates
I recently happened upon a site that uses one of these certificates and was surprised to see that it expires in 90 days. All the certificate I’ve ever bought are valid for at least a year, sometimes two or three. But Let’s Encrypt has a whole page justifying their short certificates which kind of makes sense. It forces you to adopt their automation processes for renewal because it will be too burdensome for site admins to constantly renew these certificates by hand the way they used to.
November 2016 update
Since posting this article I have worked with a hosting firm a little bit. I was surprised by how easily he could get for one of “my” domain names. Apparently all it took was that Let’s Encrypt could verify that he owned the IP address which my domain name resolved to. That’s different from the usual way of verification where the whois registration of the domain gets queried. That never happened here! I think by now the Let’s Encrypt CA, IdenTrust Commercial Root CA 1, is accepted by the major browsers.
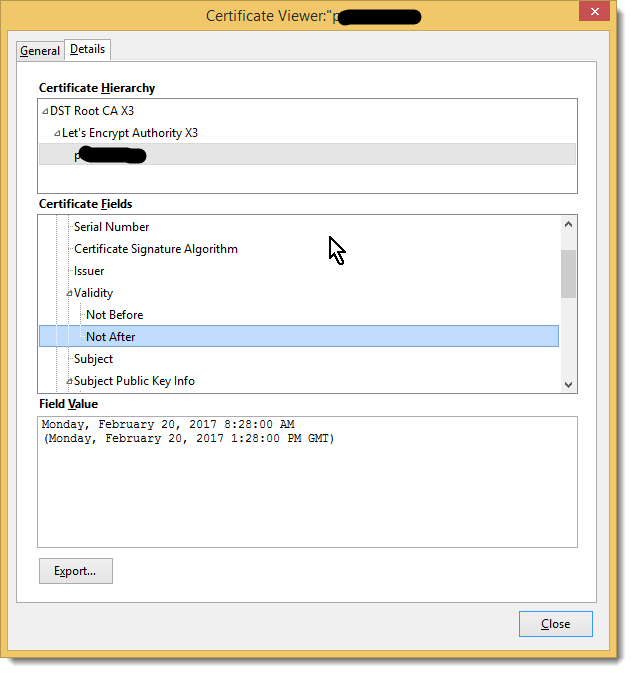
Here’s a picture that shows one of these certificates which was just issued November, 2016 with its short expiration.
My own experience in getting a certificate
I studied the ACME protocol a little bit. It’s complicated. Nothing’s easy these days! So you need a program to help you implement it. I went with acme.sh over Certbot because it is much more lightweight – works through bash shell. Certbot wanted to update about 40 packages on my system, which really seems like overkill.
I’m very excited about how easy it was to get my first certificate from letsencrypt! Worked first time. I made sure the account I ran this command from had write access to the HTMLroot (the “webroot”) because an authentication challenge occurs to prove that I administer that web server:
$ acme.sh ‐‐issue ‐d drjohnstechtalk.com ‐w /web/drj
[Wed Nov 30 08:55:54 EST 2016] Registering account [Wed Nov 30 08:55:56 EST 2016] Registered [Wed Nov 30 08:55:57 EST 2016] Update success. [Wed Nov 30 08:55:57 EST 2016] Creating domain key [Wed Nov 30 08:55:57 EST 2016] Single domain='drjohnstechtalk.com' [Wed Nov 30 08:55:57 EST 2016] Getting domain auth token for each domain [Wed Nov 30 08:55:57 EST 2016] Getting webroot for domain='drjohnstechtalk.com' [Wed Nov 30 08:55:57 EST 2016] _w='/web/drj' [Wed Nov 30 08:55:57 EST 2016] Getting new-authz for domain='drjohnstechtalk.com' [Wed Nov 30 08:55:58 EST 2016] The new-authz request is ok. [Wed Nov 30 08:55:58 EST 2016] Verifying:drjohnstechtalk.com [Wed Nov 30 08:56:02 EST 2016] Success [Wed Nov 30 08:56:02 EST 2016] Verify finished, start to sign. [Wed Nov 30 08:56:03 EST 2016] Cert success. -----BEGIN CERTIFICATE----- MIIFCjCCA/KgAwIBAgISA8T7pQeg535pA45tryZv6M4cMA0GCSqGSIb3DQEBCwUA MEoxCzAJBgNVBAYTAlVTMRYwFAYDVQQKEw1MZXQncyBFbmNyeXB0MSMwIQYDVQQD ExpMZXQncyBFbmNyeXB0IEF1dGhvcml0eSBYMzAeFw0xNjExMzAxMjU2MDBaFw0x NzAyMjgxMjU2MDBaMB4xHDAaBgNVBAMTE2Ryam9obnN0ZWNodGFsay5jb20wggEi MA0GCSqGSIb3DQEBAQUAA4IBDwAwggEKAoIBAQC1PScaoxACI0jhsgkNcbd51YzK eVI/P/GuFO8VCTYvZAzxjGiDPfkEmYSYw5Ii/c9OHbeJs2Gj5b0tSph8YtQhnpgZ c+3FGEOxw8mP52452oJEqrUldHI47olVPv+gnlqjQAMPbtMCCcAKf70KFc1MiMzr 2kpGmJzKFzOXmkgq8bv6ej0YSrLijNFLC7DoCpjV5IjjhE+DJm3q0fNM3BBvP94K jyt4JSS1d5l9hBBIHk+Jjg8+ka1G7wSnqJVLgbRhEki1oh8HqH7JO87QhJA+4MZL wqYvJdoundl8HahcknJ3ymAlFXQOriF23WaqjAQ0OHOCjodV+CTJGxpl/ninAgMB AAGjggIUMIICEDAOBgNVHQ8BAf8EBAMCBaAwHQYDVR0lBBYwFAYIKwYBBQUHAwEG CCsGAQUFBwMCMAwGA1UdEwEB/wQCMAAwHQYDVR0OBBYEFGaLNxVgpSFqgf5eFZCH 1B7qezB6MB8GA1UdIwQYMBaAFKhKamMEfd265tE5t6ZFZe/zqOyhMHAGCCsGAQUF BwEBBGQwYjAvBggrBgEFBQcwAYYjaHR0cDovL29jc3AuaW50LXgzLmxldHNlbmNy eXB0Lm9yZy8wLwYIKwYBBQUHMAKGI2h0dHA6Ly9jZXJ0LmludC14My5sZXRzZW5j cnlwdC5vcmcvMB4GA1UdEQQXMBWCE2Ryam9obnN0ZWNodGFsay5jb20wgf4GA1Ud IASB9jCB8zAIBgZngQwBAgEwgeYGCysGAQQBgt8TAQEBMIHWMCYGCCsGAQUFBwIB FhpodHRwOi8vY3BzLmxldHNlbmNyeXB0Lm9yZzCBqwYIKwYBBQUHAgIwgZ4MgZtU aGlzIENlcnRpZmljYXRlIG1heSBvbmx5IGJlIHJlbGllZCB1cG9uIGJ5IFJlbHlp bmcgUGFydGllcyBhbmQgb25seSBpbiBhY2NvcmRhbmNlIHdpdGggdGhlIENlcnRp ZmljYXRlIFBvbGljeSBmb3VuZCBhdCBodHRwczovL2xldHNlbmNyeXB0Lm9yZy9y ZXBvc2l0b3J5LzANBgkqhkiG9w0BAQsFAAOCAQEAc4w4a+PFpZqpf+6IyrW31lj3 iiFIpWYrmg9sa79hu4rsTxsdUs4K9mOKuwjZ4XRfaxrRKYkb2Fb4O7QY0JN482+w PslkPbTorotcfAhLxxJE5vTNQ5XZA4LydH1+kkNHDzbrAGFJYmXEu0EeAMlTRMUA N1+whUECsWBdAfBoSROgSJIxZKr+agcImX9cm4ScYuWB8qGLK98RTpFmGJc5S52U tQrSJrAFCoylqrOB67PXmxNxhPwGmvPQnsjuVQMvBqUeJMsZZbn7ZMKr7NFMwGD4 BTvUw6gjvN4lWvs82M0tRHbC5z3mALUk7UXrQqULG3uZTlnD7kA8C39ulwOSCQ== -----END CERTIFICATE----- [Wed Nov 30 08:56:03 EST 2016] Your cert is in /home/drj/.acme.sh/drjohnstechtalk.com/drjohnstechtalk.com.cer [Wed Nov 30 08:56:03 EST 2016] Your cert key is in /home/drj/.acme.sh/drjohnstechtalk.com/drjohnstechtalk.com.key [Wed Nov 30 08:56:04 EST 2016] The intermediate CA cert is in /home/drj/.acme.sh/drjohnstechtalk.com/ca.cer [Wed Nov 30 08:56:04 EST 2016] And the full chain certs is there: /home/drj/.acme.sh/drjohnstechtalk.com/fullchain.cer |
Behind the scenes the authentication resulted in these two accesses to my web server:
66.133.109.36 - - [30/Nov/2016:08:55:59 -0500] "GET /.well-known/acme-challenge/EJlPv9ar7lxvlegqsdlJvsmXMTyagbBsWrh1p-JoHS8 HTTP/1.1" 301 618 "-" "Mozilla/5.0 (compatible; Let's Encrypt validation server; +https://www.letsencrypt.org)" 66.133.109.36 - - [30/Nov/2016:08:56:00 -0500] "GET /.well-known/acme-challenge/EJlPv9ar7lxvlegqsdlJvsmXMTyagbBsWrh1p-JoHS8 HTTP/1.1" 200 5725 "http://drjohnstechtalk.com/.well-known/acme-challenge/EJlPv9ar7lxvlegqsdlJvsmXMTyagbBsWrh1p-JoHS8" "Mozilla/5.0 (compatible; Let's Encrypt validation server; +https://www.letsencrypt.org)" "drjohnstechtalk.com" |
The first was HTTP which I redirect to https while preserving the URL, hence the second request. You see now why I needed write access to the webroot of my web server.
Refine our approach
In the end iI decided to run as root in order to protect the private key from prying eyes. This looked like this:
$ acme.sh ‐‐issue ‐‐force ‐d drjohnstechtalk.com ‐w /web/drj ‐‐reloadcmd "service apache24 reload" ‐‐certpath /etc/apache24/certs/drjohnstechtalk.crt ‐‐keypath /etc/apache24/certs/drjohnstechtalk.key ‐‐fullchainpath /etc/apache24/certs/fullchain.cer
What’s a nice feature about acme.sh is that it remembers parameters you’ve typed by hand and fills them into a single convenient configuration file. So the contents of mine look like this:
Le_Domain='drjohnstechtalk.com' Le_Alt='no' Le_Webroot='/web/drj' Le_PreHook='' Le_PostHook='' Le_RenewHook='' Le_API='https://acme-v01.api.letsencrypt.org' Le_Keylength='' Le_LinkCert='https://acme-v01.api.letsencrypt.org/acme/cert/037fe5215bb5f4df6a0098fefd50b83b046b' Le_LinkIssuer='https://acme-v01.api.letsencrypt.org/acme/issuer-cert' Le_CertCreateTime='1480710570' Le_CertCreateTimeStr='Fri Dec 2 20:29:30 UTC 2016' Le_NextRenewTimeStr='Tue Jan 31 20:29:30 UTC 2017' Le_NextRenewTime='1485808170' Le_RealCertPath='/etc/apache24/certs/drjohnstechtalk.crt' Le_RealCACertPath='' Le_RealKeyPath='/etc/apache24/certs/drjohnstechtalk.key' Le_ReloadCmd='service apache24 reload' Le_RealFullChainPath='/etc/apache24/certs/fullchain.cer' |
References and related
Examples of using Lets Encrypt with domain (DNS) validation: How I saved $69 a year on certificate cost.
The Let’s Encrypt web site, letsencrypt.org
When I first switched from http to https: drjohnstechtalk is now an encrypted web site
Ciphers
Let’s Encrypt’s take on those short-lived certificates they issue: Why 90-day certificates
acme.sh script which I used I obtained from this site: https://github.com/Neilpang/acme.sh
CERTbot client which implements ACME protocol: https://certbot.eff.org/
IETF ACME draft proposal: https://datatracker.ietf.org/doc/draft-ietf-acme-acme/?include_text=1