Intro
Wordpress tells me to upgrade to version 5.4. But when I try it says nope, your version of php is too old. Now admittedly, I’m running on an ancient CentOS server, now at version 6.10, which I set up back in 2012 I believe.
I’m pretty comfortable with CentOS so I wanted to continue with it, but just on a newer version at Amazon. I don’t like being taken advantage of, so I also wanted to avoid those outfits which charge by the hour for providing CentOS, which should really be free. Those costs can really add up.
Lots of travails setting up my AWS image, and then…
I managed to find a CentOS amongst the community images. I chose centos-8-minimal-install-201909262151 (ami-01b3337aae1959300).
OK. Brand new CentOS 8 image, 8.1.1911 after patching it, which will be supported for 10 years. Surely it has the latest and greatest??
Well, I’m not so sure…
If only I had known
I really wish I had seen this post earlier. It would have been really, really helpful: https://blog.ssdnodes.com/blog/how-to-install-wordpress-on-centos-7-with-lamp-tutorial/
But I didn’t see it until after I had done all the work below the hard way. Oh well.
When I install php I get version 7.2.11. WordPress is telling me I need a minimum of php version 7.3. If i download the latest php, it tells me to download the latest apache. So I do. Version 2.4.43. I also install gcc, anticipating some compiling in my future…
But apache won’t even configure:
httpd-2.4.43]$ ./configure --enable-so checking for chosen layout... Apache checking for working mkdir -p... yes checking for grep that handles long lines and -e... /usr/bin/grep checking for egrep... /usr/bin/grep -E checking build system type... x86_64-pc-linux-gnu checking host system type... x86_64-pc-linux-gnu checking target system type... x86_64-pc-linux-gnu configure: configure: Configuring Apache Portable Runtime library... configure: checking for APR... no configure: error: APR not found. Please read the documentation. |
  --with-apr=PATH         prefix for installed APR or the full path to
                             apr-config
  --with-apr-util=PATH    prefix for installed APU or the full path to
                             apu-config

(apr-util configure)
checking for APR... no
configure: error: APR could not be located. Please use the --with-apr option.

try:

 ./configure --with-apr=/usr/local/apr

but

-D_GNU_SOURCE   -I/usr/local/src/apr-util-1.6.1/include -I/usr/local/src/apr-util-1.6.1/include/private  -I/usr/local/apr/include/apr-1    -o xml/apr_xml.lo -c xml/apr_xml.c && touch xml/apr_xml.lo
xml/apr_xml.c:35:10: fatal error: expat.h: No such file or directory
 #include
          ^~~~~~~~~
compilation terminated.
make[1]: *** [/usr/local/src/apr-util-1.6.1/build/rules.mk:206: xml/apr_xml.lo] Error 1 |
So I install expat header files:
$ yum install expat-devel
And then the make of apr-util goes through. Not sure this is the right approach or not yet, however.
So following php’s advice, I have:
$ ./configure –enable-so
checking for chosen layout... Apache ... checking for pcre-config... false configure: error: pcre-config for libpcre not found. PCRE is required and available from http://pcre.org/ |
So I install pcre-devel:
$ yum install pcre-devel
Now the apache configure goes through, but the make does not work:
/usr/local/apr/build-1/libtool --silent --mode=link gcc -g -O2 -pthread -o htpasswd htpasswd.lo passwd_common.lo /usr/local/apr/lib/libaprutil-1.la /usr/local/apr/lib/libapr-1.la -lrt -lcrypt -lpthread -ldl -lcrypt /usr/local/apr/lib/libaprutil-1.so: undefined reference to `XML_GetErrorCode' /usr/local/apr/lib/libaprutil-1.so: undefined reference to `XML_SetEntityDeclHandler' /usr/local/apr/lib/libaprutil-1.so: undefined reference to `XML_ParserCreate' /usr/local/apr/lib/libaprutil-1.so: undefined reference to `XML_SetCharacterDataHandler' /usr/local/apr/lib/libaprutil-1.so: undefined reference to `XML_ParserFree' /usr/local/apr/lib/libaprutil-1.so: undefined reference to `XML_SetUserData' /usr/local/apr/lib/libaprutil-1.so: undefined reference to `XML_StopParser' /usr/local/apr/lib/libaprutil-1.so: undefined reference to `XML_Parse' /usr/local/apr/lib/libaprutil-1.so: undefined reference to `XML_ErrorString' /usr/local/apr/lib/libaprutil-1.so: undefined reference to `XML_SetElementHandler' collect2: error: ld returned 1 exit status make[2]: *** [Makefile:48: htpasswd] Error 1 |
So I try configure or apr-util with expat built-in.
$ ./configure –with-expat=builtin –with-apr=/usr/local/apr
But when I do the make of apr-util I now get this error:
/usr/local/apr/build-1/libtool: line 7475: cd: builtin/lib: No such file or directory
libtool:   error: cannot determine absolute directory name of 'builtin/lib'
make[1]: *** [Makefile:93: libaprutil-1.la] Error 1
make[1]: Leaving directory '/usr/local/src/apr-util-1.6.1'
make: *** [/usr/local/src/apr-util-1.6.1/build/rules.mk:118: all-recursive] Error 1
From what I read this new error occurs due to having –expat-built-in! So now what? So I get rid of that in my configure statement for apr-util. For some reason, apr-util goes through and compiles. And so I try this for compiling apache24:
$ ./configure –enable-so –with-apr=/usr/local/apr
And then I make it. And for some reason, now it goes through. I doubt it will work, however… it kind of does work.
It threw the files into /usr/local/apache2, where there is a bin directory containing apachectl. I can launch apachectl start, and then access a default page on port 80. Not bad so far…
I still need to tie in php however.
I just wing it and try
$ ./configure –with-apxs2=/usr/local/apache2/bin/apxs –with-mysql
Hey, maybe for once their instructions will work. Nope.
configure: error: Package requirements (libxml-2.0 >= 2.7.6) were not met:

Package 'libxml-2.0', required by 'virtual:world', not found

Consider adjusting the PKG_CONFIG_PATH environment variable if you
installed software in a non-standard prefix.
So I guess I need to install libxml2-devel:
$ yum install libxm2-devel
Looks like I get past that error. Now it’s on to this one:
configure: error: Package requirements (sqlite3 > 3.7.4) were not met:
So I install sqlite-devel:
$ yum install sqlite-devel
Now my configure almost goes through, except, as I suspected, that was a nonsense argument:
configure: WARNING: unrecognized options: --with-mysql
It’s not there when you look for it! Why the heck did they – php.net – give an example with exactly that?? Annoying. So I leave it out. It goes through. Run make. It takes a long time to compile php! And this server is pretty fast. It’s slower than apache or anything else I’ve compiled.
But eventually the compile finished. It added a LoadModule statement to the apache httpd.conf file. And, after I associated files with php extension to the php handler, a test file seemed to work. So php is beginning to work. Not at all sure about the mysql tie-in, however. In fact see further down below where I confirm my fears that there is no MySQL support when PHP is compiled this way.
Is running SSL asking too much?
Apparently, yes. I don’t think my apache24 has SSL support built-in:
Invalid command 'SSLCipherSuite', perhaps misspelled or defined by a module not included in the server configuration |
So I try
$ ./configure –enable-so –with-apr=/usr/local/apr –enable-ssl
Not good…
checking for OpenSSL... checking for user-provided OpenSSL base directory... none checking for OpenSSL version >= 0.9.8a... FAILED configure: WARNING: OpenSSL version is too old no checking whether to enable mod_ssl... configure: error: mod_ssl has been requested but can not be built due to prerequisite failures |
Where is it pulling that old version of openssl? Cause when I do this:
$ openssl version
OpenSSL 1.1.1c FIPS 28 May 2019 |
That’s not that old…
I also noticed this error:
configure: WARNING: Your APR does not include SSL/EVP support. To enable it: configure --with-crypto
So maybe I will re-compile APR with that argument.
Nope. APR doesn’t even have that argument. But apr-uil does. I’ll try that.
Not so good:
configure: error: Crypto was requested but no crypto library could be enabled; specify the location of a crypto library using --with-openssl, --with-nss, and/or --with-commoncrypto.
I give up. maybe it was a false alarm. I’ll try to ignore it.
So I install openssl-devel:
$ yum install openssl-devel
Then I try to configure apache24 thusly:
$ ./configure –enable-so –with-apr=/usr/local/apr –enable-ssl
This time at least the configure goes through – no ssl-related errors.
I needed to add the Loadmodule statement by hand to httpd.conf since that file was already there from my previous build and so did not get that statement after my re-build with ssl support:
LoadModule ssl_module modules/mod_ssl.so |
Next error please
Now I have this error:
AH00526: Syntax error on line 92 of /usr/local/apache2/conf/extra/drjohns.conf: SSLSessionCache: 'shmcb' session cache not supported (known names: ). Maybe you need to load the appropriate socache module (mod_socache_shmcb?). |
I want results. So I just comment out the lines that talk about SSL Cache and anything to do with SSL cache.
And…it starts…and…it is listening on both ports 80 and 443 and…it is running SSL. So I think i cracked the SSL issue.
Switch focus to Mysql
I didn’t bother to find mysql. I believe people now use mariadb. So I installed the system one with a yum install mariadb. I became root and learned the version with a select version();
+-----------------+ | version() | +-----------------+ | 10.3.17-MariaDB | +-----------------+ 1 row in set (0.000 sec) |
Is that recent enough? Yes! For once we skate by comfortably. The WordPress instructions say:
MySQL 5.6 or MariaDB 10.1 or greater
I setup apache. I try to access wordpress setup but instead get this message:
Forbidden You don't have permission to access this resource. |
every page I try gives this error.
The apache error log says:
client denied by server configuration: /usr/local/apache2/htdocs/ |
Not sure where that’s coming from. I thought I supplied my own documentroot statements, etc.
I threw in a Require all granted within the Directory statement and that seemed to help.
PHP/MySQL communication issue surfaces
Next problem is that PHP wasn’t compiled correctly it seems:
Your PHP installation appears to be missing the MySQL extension which is required by WordPress. |
So I’ll try to re-do it. This time I am trying these arguments to configure:
$ ./configure ‐‐with-apxs2=/usr/local/apache2/bin/apxs ‐‐with-mysqli
Well, I’m not so sure this worked. Trying to setup WordPress, I access wp-config.php and only get:
Error establishing a database connection |
This is roll up your sleeves time. It’s clear we are getting no breaks. I looked into installing PhpMyAdmin, but then I would neeed composer, which may depend on other things, so I lost interest in that rabbit hole. So I decide to simplify the problem. The suggested test is to write a php program like this, which I do, calling it tst2.php:
 <!--?php
$servername = "localhost";
$username = "username";
$password = "password";

// Create connection
$conn = mysqli_connect($servername, $username, $password);

// Check connection
if (!$conn) {
    die("Connection failed: " . mysqli_connect_error());
}
echo "Connected successfully";
?--> |
Run it:
$ php tst2.php
and get:
PHP Warning: mysqli_connect(): (HY000/2002): No such file or directory in /web/drjohns/blog/tst2.php on line 7 Warning: mysqli_connect(): (HY000/2002): No such file or directory in /web/drjohns/blog/tst2.php on line 7 |
Some quick research tells me that php does not know where the file mysql.sock is to be found. I search for it:
$ sudo find / ‐name mysql.sock
and it comes back as
/var/lib/mysql/mysql.sock |
So…the prescription is to update a couple things in pph.ini, which has been put into /usr/local/lib in my case because I compiled php with mostly default values. I add the locatipon of the mysql.sock file in two places for good measure:
pdo_mysql.default_socket = /var/lib/mysql/mysql.sock mysqli.default_socket = /var/lib/mysql/mysql.sock |
And then my little test program goes through!
Connected successfully |
Install WordPress
I begin to install WordPress, creating an initial user and so on. When I go back in I get a directory listing in place of the index.php. So I call index.php by hand and get a worisome error:
Fatal error: Uncaught Error: Call to undefined function gzinflate() in /web/drjohns/blog/wp-includes/class-requests.php:947 Stack trace: #0 /web/drjohns/blog/wp-includes/class-requests.php(886): Requests::compatible_gzinflate('\xA5\x92\xCDn\x830\f\x80\xDF\xC5g\x08\xD5\xD6\xEE...' |
I should have compiled php with zlib is what I determine it means… zlib and zlib-devel packages are on my system so this should be straightforward.
More arguments for php compiling
OK. Let’s be sensible and try to reproduce what I had done in 2017 to compile php instead of finding an resolving mistakes one at a time.
$ ./configure –with-apxs2=/usr/local/apache2/bin/apxs –with-mysqli –disable-cgi –with-zlib –with-gettext –with-gdbm –with-curl –with-openssl
This gives this new issue:
Package 'libcurl', required by 'virtual:world', not found
I will install libcurl-devel in hopes of making this one go away.
Past that error, and onto this one:
configure: error: DBA: Could not find necessary header file(s).
I’m trying to drop the –with-gdbm and skip that whole DBA thing since the database connection seemed to be working without it. Now I see an openssl problem:
make: *** No rule to make target '/tmp/php-7.4.4/ext/openssl/openssl.c', needed by 'ext/openssl/openssl.lo'. Stop. |
Even if I get rid of openssl I still see a problem when running configure:
gawk: ./build/print_include.awk:1: fatal: cannot open file `ext/zlib/*.h*' for reading (No such file or directory) |
Now I can ignore that error because configure exits with 0 status and make, but the make then stops at zlib:
SIGNALS -c /tmp/php-7.4.4/ext/sqlite3/sqlite3.c -o ext/sqlite3/sqlite3.lo make: *** No rule to make target '/tmp/php-7.4.4/ext/zlib/zlib.c', needed by 'ext/zlib/zlib.lo'. Stop. |
Reason for above php compilation errors
I figured it out. My bad. I had done a make distclean in addition to a make clean when i was re-starting with a new set of arguments to configure. i saw it somewhere advised on the Internet and didn’t pay much attention, but it seemed like a good idea. But I think what it was doing was wiping out the files in the ext directory, like ext/zlib.
So now I’m starting over, now with php 7.4.5 since they’ve upgraded in the meanwhile! With this configure command line (I figure I probably don’t need gdb):
./configure –with-apxs2=/usr/local/apache2/bin/apxs –with-mysqli –disable-cgi –with-zlib –with-gettext –with-gdbm –with-curl –with-openssl
Well, the php compile went through, however, I can’t seem to access any WordPress pages (all WordPress pages clock). Yet my simplistic database connection test does work. Hmmm. OK. If they come up at all, they come up exceedingly slowly and without correct formatting.
I think I see the reason for that as well. The source of the wp-login.php page (as viewed in a browser window) includes references to former hostnames my server used to have. Of course fetching all those objects times out. And they’re the ones that provide the formatting. At this point I’m not sure where those references came from. Not from the filesystem, so must be in the database as a result of an earlier WordPress install attempt. Amazon keeps changing my IP, you see. I see it is embedded into WordPress. In Settings | general Settings. I’m going to have this problem every time…
What I’m going to do is to create a temporary fictitious name, johnstechtalk, which I will enter in my hosts file on my Windows PC, in Windows\system32\drivers\etc\hosts, and also enter that name in WordPress’s settings. I will update the IP in my hosts file every time it changes while I am playing around. And now there’s even an issue doing this which has always worked so reliably in the past. Well, I found I actually needed to override the IP for drjohnstechtalk.com in my hosts file. But it seems Firefox has moved on to using DNS over https, so it ignores the hosts file now! i think. Edge still uses it however, thankfully.
WordPress
So WordPress is basically functioning. I managed to install a few of my fav plugins: Akismet anti-spam, Limit Login Attempts, WP-PostViews. Some of the plugins are so old they actually require ftp. Who runs ftp these days? That’s been considered insecure for many years. But to accommodate I installed vsftpd on my server and ran it, temporarily.
Then Mcafee on my PC decided that wordpress.org is an unsafe site, thank you very much, without any logs or pop-ups. I couldn’t reach that site until I disabled the Mcafee firewall. Makes it hard to learn how to do the next steps of the upgrade.
More WordPress difficulties
WordPress is never satisfied with whatever version you’ve installed. You take the latest and two weeks later it’s demanding you upgrade already. My first upgrade didn’t go so well. Then I installed vsftpd. The upgrade likes to use your local FTP server – at least in my case. so for ftp server I just put in 127.0.0.1. Kind of weird. Even still I get this error:
Downloading update from https://downloads.wordpress.org/release/wordpress-5.4.2-no-content.zip…

The authenticity of wordpress-5.4.2-no-content.zip could not be verified as no signature was found.

Unpacking the update…

Could not create directory.

Installation Failed
So I decided it was a permissions problem: my apache was running as user daemon (do a ps -ef to see running processes), while my wordpress blog directory was owned by centos. So I now run apache as user:group centos:centos. In case this helps anyone the apache configurtion commands to do this are:
User centos
Group centos
then I go to my blog directory and run something like:
chown -R centos:centos *
Wordpres Block editor non-functional after the upgrade
When I did the SQL import from my old site, I killed the block editor on my new site! This was disconcerting. That little plus sign just would not show up on new pages, no posts, whatever. So I basically killed wordpress 5.4. So I took a step backwards and started v 5.4 with a clean (empty) database like a fresh install to make sure the block editor works then. It did. Whew! Then I did an RTFM and deactivated my plugins on my old WordPress install before doing the mysql backup. I imported that SQL database, with a very minimal set of plugins activated, and, whew, this time I did not blow away the block editor.
CentOS bogs down
I like my snappy new Centos 8 AMI 80% of the time. But that remaining 20% is very annoying. It freezes. Really bad. I ran a top until the problem happened. Here I’ve caught the problem in action:
top - 16:26:11 up 1 day, 21 min, 2 users, load average: 3.96, 2.93, 5.30
Tasks: 95 total, 1 running, 94 sleeping, 0 stopped, 0 zombie
%Cpu(s): 0.1 us, 2.6 sy, 0.0 ni, 0.0 id, 95.8 wa, 0.4 hi, 0.3 si, 0.7 st
MiB Mem : 1827.1 total, 63.4 free, 1709.8 used, 53.9 buff/cache
MiB Swap: 0.0 total, 0.0 free, 0.0 used. 9.1 avail Mem

PID USER PR NI VIRT RES SHR S %CPU %MEM TIME+ COMMAND
44 root 20 0 0 0 0 S 1.6 0.0 12:47.94 kswapd0
438 root 0 -20 0 0 0 I 0.5 0.0 1:38.84 kworker/0:1H-kblockd
890 mysql 20 0 1301064 92972 0 S 0.4 5.0 1:26.83 mysqld
5282 centos 20 0 1504524 341188 64 S 0.4 18.2 0:06.06 httpd
5344 root 20 0 345936 1008 0 S 0.4 0.1 0:00.09 sudo
560 root 20 0 93504 6436 3340 S 0.2 0.3 0:02.53 systemd-journal
712 polkitd 20 0 1626824 4996 0 S 0.2 0.3 0:00.15 polkitd
817 root 20 0 598816 4424 0 S 0.2 0.2 0:12.62 NetworkManager
821 root 20 0 634088 14772 0 S 0.2 0.8 0:18.67 tuned
1148 root 20 0 216948 7180 3456 S 0.2 0.4 0:16.74 rsyslogd
2346 john 20 0 273640 776 0 R 0.2 0.0 1:20.73 top
1 root 20 0 178656 4300 0 S 0.0 0.2 0:11.34 systemd
So what jumps out at me is the 95.8% wait time – that ain’t good – an that a process which includes the name swap is at the top of ths list, combined with the fact that exactly 0 swap space is allocated. My linux skills may be 15 years out-of-date, but I think I better allocate some swap space (but why does it need it so badly??). On my old system I think I had done it. I’m a little scared to proceed for fear of blowing up my system.
So if you use drjohnstechtalk.com and it freezes, just come back in 10 minutes and it’ll probably be running again – this situation tends to self-correct. No one’s perfect.
Making a swap space
I went ahead and created a swap space right on my existing filesystem. I realized it wasn’t too hard once I found these really clear instructions: https://www.maketecheasier.com/swap-partitions-on-linux/
Some of the commands are dd to create an empty file, mkswap, swapon and swapon -s to see what it’s doing. And it really, really helped. I think sometimes mariadb needed to swap, and sometimes apache did. My system only has 1.8 GB of memory or so. And the drive is solid state, so it should be kind of fast. Because I used 1.2 GB for swap, I also extended my volume size when I happened upon Amazon’s clear instructions on how you can do that. Who knew? See below for more on that. If I got it right, Amazon also gives you more IO for each GB you add. I’m definitely getting good response after this swap space addition.
An aside about i/o
In the old days I perfected a way to study i/o using the iostat utility. You can get it by installing the sysstat package. A good command to run is iostat -t -c -m -x 5
Examing these three consecutive lines of output from running that command is very instructional:
Device r/s w/s rMB/s wMB/s rrqm/s wrqm/s %rrqm %wrqm r_await w_await aqu-sz rareq-sz wareq-sz svctm %util
xvda 2226.40 1408.00 9.35 5.54 1.00 0.20 0.04 0.01 2.37 5.00 10.28 4.30 4.03 0.25 90.14

07/04/2020 04:05:36 PM
avg-cpu: %user %nice %system %iowait %steal %idle
1.00 0.00 1.20 48.59 0.60 48.59

Device r/s w/s rMB/s wMB/s rrqm/s wrqm/s %rrqm %wrqm r_await w_await aqu-sz rareq-sz wareq-sz svctm %util
xvda 130.14 1446.51 0.53 5.66 0.60 0.00 0.46 0.00 4.98 8.03 11.47 4.15 4.01 0.32 51.22

07/04/2020 04:05:41 PM
avg-cpu: %user %nice %system %iowait %steal %idle
0.00 0.00 0.00 0.00 0.00 100.00

Device r/s w/s rMB/s wMB/s rrqm/s wrqm/s %rrqm %wrqm r_await w_await aqu-sz rareq-sz wareq-sz svctm %util
xvda 1.60 0.00 0.00 0.00 0.00 0.00 0.00 0.00 0.50 0.00 0.00 2.69 0.00 0.62 0.10
I tooled around in the admin panel (which previously had brought my server to its knees), and you see the %util shot up to 90%, reads per sec over 2000 , writes per second 1400. So, really demanding. It’s clear my server would die if more than a few people were hitting it hard. And I may need some fine-tuning.
Success!
Given all the above problems, you probably never thought I’d pull this off. I worked in fits and starts – mostly when my significant other was away because this stuff is a time suck. But, believe it or not, I got the new apache/openssl/apr/php/mariadb/wordpress/centos/amazon EC2 VPC/drjohnstechtalk-with-new-2020-theme working to my satisfaction. I have to pat myself on the back for that. So I pulled the plug on the old site, which basically means moving the elastic IP over from old centos 6 site to new centos8 AWS instance. Since my site was so old, I had to first convert the elastic IP from type classic to VPC. It was not too obvious, but I got it eventually.
Damn hackers already at it
Look at the access log of your new apache server running your production WordPress. If you see like I did people already trying to log in (POST accesses for …/wp-login.php), which is really annoying because they’re all hackers, at least install the WPS Hide Login plugin and configure a secret login URL. Don’t use the default login.
Meanwhile I’ve decided to freeze out anyone who triess to access wp-login.php because they can only be up to no good. So I created this script which I call wp-login-freeze.sh:
#!/bin/sh
# freeze hackers who probe for wp-login
# DrJ 6/2020
DIR=/var/log/drjohns
cd $DIR
while /bin/true; do
tail -200 access_log|grep wp-login.php|awk '{print $1}'|sort -u|while read line; do
echo $line
route add -host $line reject
done
sleep 60
done
Works great! Just do a netstat -rn to watch your ever-growing list of systems you’ve frozen out.
But xmlrpc is the worst…
Bots which invoke xmlrpc.php are the worst for little servers like mine. They absolutely bring it to its knees. So I’ve just added something similar to the wp-login freeze above, except it catches xmlrpc bots:
#!/bin/sh
# freeze hackers who are doing God knows what to xmlrpc.php
# DrJ 8/2020
DIR=/var/log/drjohns
cd $DIR
while /bin/true; do
# example offending line:
# 181.214.107.40 - - [21/Aug/2020:08:17:01 -0400] "POST /blog//xmlrpc.php HTTP/1.1" 200 401
tail -100 access_log|grep xmlrpc.php|grep POST|awk '{print $1}'|sort -u|while read line; do
echo $line
route add -host $line reject
done
sleep 30
done
I was still dissatisfied with seeing bots hit me up for 30 seconds or so, so I decided heck with it, I’m going to waste their time first. So I added a few lines to xmlrpc.php (I know you shouldn’t do this, but hackers shouldn’t do what they do either):
// DrJ improvements
if ($_SERVER['REQUEST_METHOD'] === 'POST') {
// just make bot suffer a bit... the freeze out is done by an external script
   sleep(25);
    //
}
// end DrJ enhancements
This freeze out trick within xmlrpc.php was only going to work if the bots run single-threaded, that is, they run serially, waiting for one request to finish before sending the next. I’ve been running it for a couple days and have enthusiasitically frozen out a few IPs. I can attest that the bots do indeed run single-threaded. So I typically get two entries in my access file to xmlrpc from a given bot, and then the bot is completely frozen out by the loopback route which gets added.
Mid-term issues discovered months later
Well, I never needed to send emails form my server, until I did. And when I did I found I couldn’t. It used to work from my old server… From reading a bit I see WordPress uses PHP’s built-in mail() function, which has its limits. But my server did not have mailx or postfix packages. So I did a
$ yum install postfix mailx
$ systemctl enable postfix
$ systemctl start postfix
That still didn’t magically make WordPress mail work, although at that point I could send mail by hand frmo a spoofed address, which is pretty cool, like:
$ mailx -r “[email protected]” -s “testing email” [email protected] <<< “Test of a one-line email test. – drJ”
And I got it in my Gmail account from that sender. Cool.
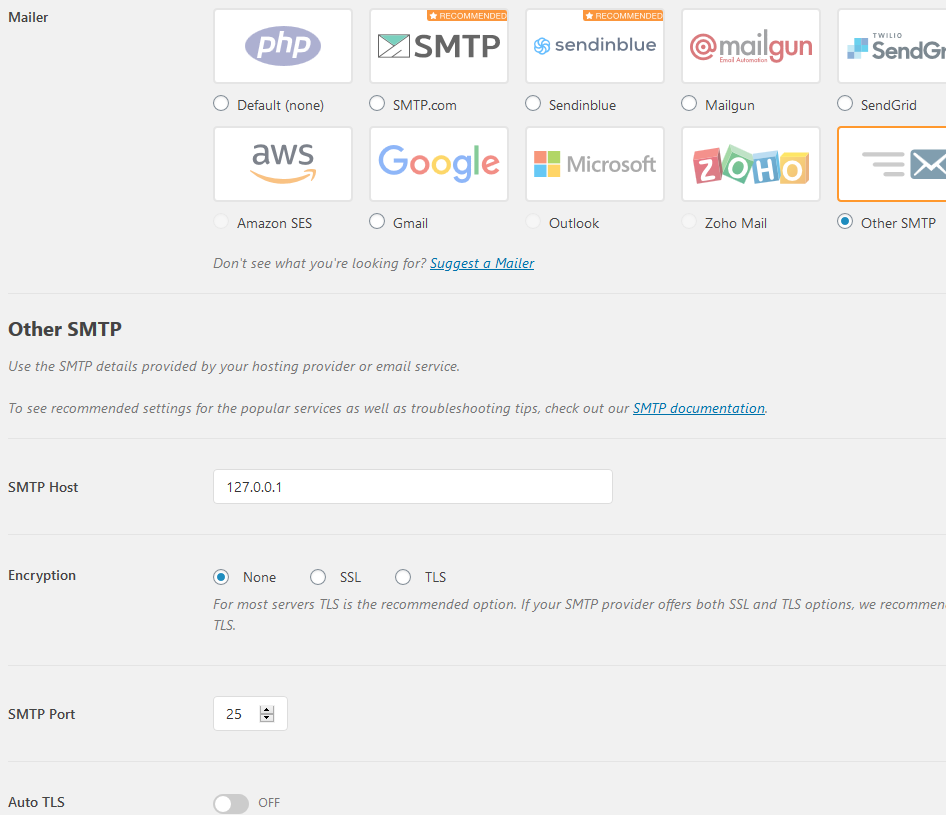
Rather than wasting time debuggin PHP, I saw a promising-looking plug-in, WP Mail SMTP, and installed it. Here is how I configured the important bits:
Another test from WordPress and this time it goes through. Yeah.
Hosting a second WordPress site and Ninja Forms brings it all down
I brushed off my own old notes on hosting more than one WordPress site on my server (it’s nice to be king): https://drjohnstechtalk.com/blog/2014/12/running-a-second-instance-of-wordpress-on-your-server/
Well, wouldn’t you know my friend’s WordPress site I was trying to host brought my server to its knees. Again. Seems to be a common theme. I was hoping it was merely hackers who’d discovered his new site and injected it with the xmlrpc DOS because that would have been easy to treat. But no, no xmlrpc issues so far according to the access_log file. He uses more of the popular plugins like Elementor and Ninja Forms. Well, that Ninja Forms Dashboard is a killer. Reliably brings my server to a crawl. I even caught it in action from a running top and saw swap was the leading cpu-consuming process. And my 1.2 GB swap file was nearly full. So I created a second, larger swap file of 2 GB and did a swapon for that. Then I decommissioned my older swap file. Did you know you can do a swapoff? Yup. I could see the old one descreasing in size and the new one building up. And now the new one is larger than the old ever could be – 1.4 GB. Now Ninja forms dashboard can be launched. Performance is once again OK.
So…hosting second WordPress site now resolved.
Updating failed. The response is not a valid JSON response.
So then he got that error after enabling permalinks. The causes for this are pretty well documented. We took the standard advice and disabled all plugins. Wihtout permalinks we were fine. With them JSON error. I put the .htaccess file in place. Still no go. So unlike most advice, in my case, where I run my own web server, I must have goofed up the config and not enabled reading of the .htaccess file. Fortunately I had a working example in the form of my own blog site. I put all those apache commands which normally go into .htaccess into the vhost config file. All good.
Increasing EBS filesystem size causes worrisome error
As mentioned above I used some of the filesystem for swap so I wanted to enlarge it.
$ sudo growpart /dev/xvda 1
CHANGED: partition=1 start=2048 old: size=16773120 end=16775168 new: size=25163743,end=25165791
root@ip-10-0-0-181:~/hosting$ sudo lsblk
NAME MAJ:MIN RM SIZE RO TYPE MOUNTPOINT
xvda 202:0 0 12G 0 disk
mqxvda1 202:1 0 12G 0 part /
root@ip-10-0-0-181:~/hosting$ df -k
Filesystem 1K-blocks Used Available Use% Mounted on
devtmpfs 912292 0 912292 0% /dev
tmpfs 935468 0 935468 0% /dev/shm
tmpfs 935468 16800 918668 2% /run
tmpfs 935468 0 935468 0% /sys/fs/cgroup
/dev/xvda1 8376320 3997580 4378740 48% /
tmpfs 187092 0 187092 0% /run/user/0
tmpfs 187092 0 187092 0% /run/user/1001
root@ip-10-0-0-181:~/hosting$ sudo resize2fs /dev/xvda1
resize2fs 1.44.6 (5-Mar-2019)
resize2fs: Bad magic number in super-block while trying to open /dev/xvda1
Couldn't find valid filesystem superblock.
The solution is to use xfs_growfs instead of resize2fs. And that worked!
$ sudo xfs_growfs -d /
meta-data=/dev/xvda1 isize=512 agcount=4, agsize=524160 blks
= sectsz=512 attr=2, projid32bit=1
= crc=1 finobt=1, sparse=1, rmapbt=0
= reflink=1
data = bsize=4096 blocks=2096640, imaxpct=25
= sunit=0 swidth=0 blks
naming =version 2 bsize=4096 ascii-ci=0, ftype=1
log =internal log bsize=4096 blocks=2560, version=2
= sectsz=512 sunit=0 blks, lazy-count=1
realtime =none extsz=4096 blocks=0, rtextents=0
data blocks changed from 2096640 to 3145467
root@ip-10-0-0-181:~/hosting$ df -h
Filesystem Size Used Avail Use% Mounted on
devtmpfs 891M 0 891M 0% /dev
tmpfs 914M 0 914M 0% /dev/shm
tmpfs 914M 17M 898M 2% /run
tmpfs 914M 0 914M 0% /sys/fs/cgroup
/dev/xvda1 12G 3.9G 8.2G 33% /
tmpfs 183M 0 183M 0% /run/user/0
tmpfs 183M 0 183M 0% /run/user/1001
PHP found wanting by WordPress health status
Although my site seems to be humming alnog, now I have to find the more obscure errors. WordPress mentioned my site health has problems.
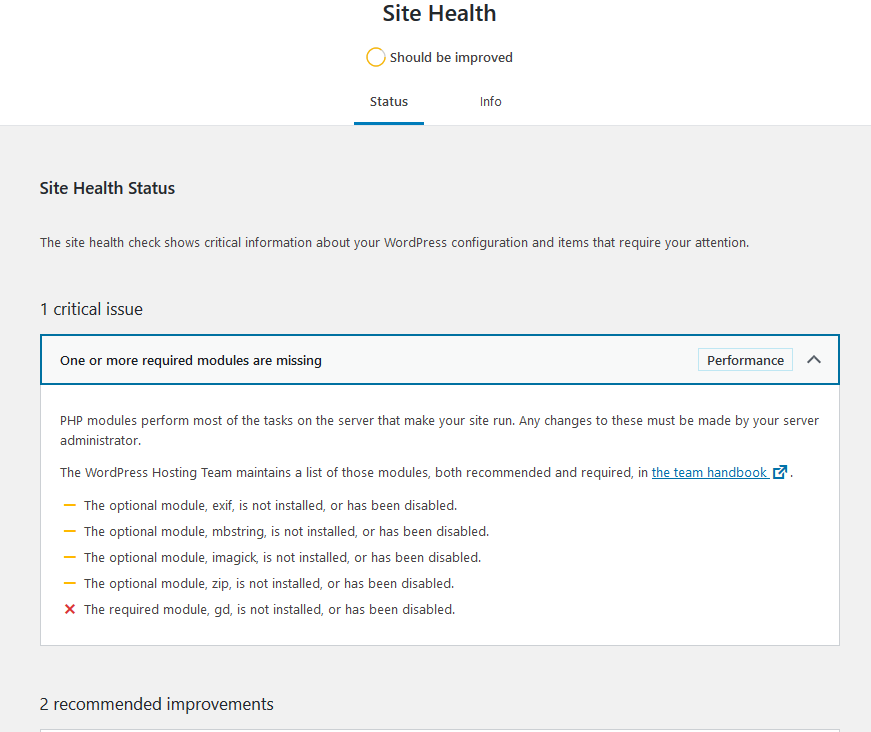
I think gd is used for graphics. I haven’t seen any negative results from this, yet. I may leave it be for the time being.
Lets Encrypt certificate renewal stops working
This one is at the bottom because it only manifests itself after a couple months – when the web site certificate either expires or is about to expire. Remember, this is a new server. I was lazy, of course, and just brought over the .acme.sh from the old server, hoping for the best. I didn’t notice any errors at first, but I eventually observed that my certificate was not getting renewed either even though it had only a few days of validity left.
To see what’s going on I ran this command by hand:
“/root/.acme.sh”/acme.sh –debug –cron –home “/root/.acme.sh”
acme.sh new-authz error: {"type":"urn:acme:error:badNonce","detail":"JWS has no anti-replay nonce","status": 400}
seemed to be the most important error I noticed. The general suggestion for this is an acme.sh –upgrade, which I did run. But the nonce error persisted. It tries 20 times then gives up.
— warning: I know enough to get the job done, but not enough to write the code. Proceed at your own risk —
I read some of my old blogs and played with the command
“/root/.acme.sh”/acme.sh –issue -d drjohnstechtalk.com -w /web/drjohns
My Webroot is /web/drjohns by the way. Now at least there was an error I could understand. I saw it trying to access something like http://drjohnstechtalk.com/.well-known/acme-challenge/askdjhaskjh
which produced a 404 Not Found error. Note the http and not https. Well, I hadn’t put much energy into setting up my http server. In fact it even has a different webroot. So what I did was to make a symbolic link
ln -s /web/drjohns/.well-known /web/insecure
I re-ran the acme.sh –issue command and…it worked. Maybe if I had issued a –renew it would not have bothered using the http server at all, but I didn’t see that switch at the time. So in my crontab instead of how you’re supposed to do it, I’m trying it with these two lines:
# Not how you're supposed to do it, but it worked once for me - DrJ 8/16/20
22 2 * * * "/root/.acme.sh"/acme.sh --issue -d drjohnstechtalk.com -w /web/drjohns > /dev/null 2>&1
22 3 16 * * "/root/.acme.sh"/acme.sh --update-account --issue -d drjohnstechtalk.com -w /web/drjohns > /dev/null 2>&1
The update-account is just for good measure so I don’t run into an account expiry problem which I’ve faced in the past. No idea if it’s really needed. Actually my whole approach is a kludge. But it worked. In two months’ time I’ll know if the cron automation also works.
Why kludge it? I could have spent hours and hours trying to get acme.sh to work as it was intended. I suppose with enough persistence I would have found the root problem.
2021 update. In retrospect
In retrospect, I think I’ll try Amazon Linux next time! I had the opportunity to use it for my job and I have to say it was pretty easy to set up a web server which included php and MariaDB. It feels like it’s based on Redhat, which I’m most familiar with. It doesn’t cost extra. It runs on the same small size on AWS. Oh well.
2022 update
I’m really sick of how far behind Redhat is with their provided software. And since they’ve been taken over by IBM, how they’ve killed CentOS is scandalous. So I’m inclined to go to a Debian-based system for my next go-around, which is much more imminent than I ever expected it to be thanks to the discontinuation of support for CentOS. I asked someone who hosts a lot of WP sites and he said he’d use Ubuntu server 22, PHP 8, MariaDB and NGinx. Boy. Guess I’m way behind. He says performance with PHP 8 is much better. I’ve always used apache but I guess I don’t really rely on it for too many fancy features.
References and related
This blog post is about 1000% better than my own if all you want to do is install WordPress on Centos: https://blog.ssdnodes.com/blog/how-to-install-wordpress-on-centos-7-with-lamp-tutorial/
Here is WordPress’s own extended instructions for upgrading. Of course this should be your starting point: https://wordpress.org/support/article/upgrading-wordpress-extended-instructions/
I’ve been following the php instructions: https://www.php.net/manual/en/install.unix.apache2.php
Before you install WordPress. Requirements and such.
This old article of mine has lots of good tips: Compiling apache 2.4
This is a great article about how Linux systems use swap space and how you can re-configure things: https://www.maketecheasier.com/swap-partitions-on-linux/
I found this guide both helpful and informative as well: https://www.howtogeek.com/455981/how-to-create-a-swap-file-on-linux/
Amazon has this clear article on the linux commands you run after you extend an EBS volume. they worked for me: https://docs.aws.amazon.com/AWSEC2/latest/UserGuide/recognize-expanded-volume-linux.html
My Centos 8 AMI is centos-8-minimal-install-201909262151 (ami-01b3337aae1959300)
My old Lets Encrypt article was helpful in straightening out my certificate errors.
Here’s the acme.sh installation guide for linux.