Categories
Admin Linux Security Web Site Technologies

The IT Detective Agency: the vanishing certificate error

Intro
I was confronted with a web site certificate error. A user was reluctant – correctly – to proceed to an internal web site because he saw a message to the effect:

I tried it myself with IE and got the same thing.
Switch to Chrome and I saw this error:

I wouldn’t bother to document this one except for a twist: the certificate error went away in IE when you clicked through to the login page.

Furthermore, when I examined the certificate with a tool I trust, openssl, it showed the date was not expired.

So what’s going on there?

The details
First thing I dug into was Chrome. I found this particular error can occur if you have an internal certificate issued with a valid common name, but without a Subject Alternative Name. My openssl examination confirmed this was indeed the case for this certificate.

So I decided the Chrome error was a red herring. And confirmed this after checking out other internal web sites which all suffered from this problem.

But that still leaves the IE error unexplained.

As I mentioned in a previous post, I created a shortcut bash function that combines several openssl functions I call examinecert:

examinecert () { echo|openssl s_client -servername "$@" -connect "$@":443|openssl x509 -text|more; }

Use it like this:

$ examinecert drjohnstechtalk.com

Certificate:
    Data:
        Version: 3 (0x2)
        Serial Number:
            04:17:21:b7:12:94:3a:fa:fd:a8:f3:f8:5e:2e:e4:52:35:71
    Signature Algorithm: sha256WithRSAEncryption
        Issuer: C=US, O=Let's Encrypt, CN=Let's Encrypt Authority X3
        Validity
            Not Before: Apr  4 08:34:56 2018 GMT
            Not After : Jul  3 08:34:56 2018 GMT
        Subject: CN=drjohnstechtalk.com
        Subject Public Key Info:
            Public Key Algorithm: rsaEncryption
                Public-Key: (2048 bit)
                Modulus:
                    00:d3:50:98:6d:72:03:b2:e4:01:3f:44:01:3d:eb:
                    ff:fc:68:7d:51:a4:09:90:48:3c:be:43:88:d7:ba:
                    ...
        X509v3 extensions:
                 ...
            X509v3 Subject Alternative Name:
                DNS:drjohnstechtalk.com
                ...

I tried to show a friend the error. I could no longer get IE to show a certificate error. So my friend tried IE. He saw that initial error.

Most people give up at this point. But my position is the kind where problems no one else can resolve go to get resolution. And certificates is somewhat a specialty of mine. So I was not ready to throw in the towel.

I mistrust all browsers. They cache information, try to present you sanitized information. It’s all misleading.

So I ran examinecert again. This time I got a different result. It showed an expired certificate. So I ran it again. It showed a valid, non-expired certificate. And again. It kept switching back-and-forth!

Here it helps to know some peripheral information. The certificate resides on an old F5 BigIP load-balancer which I used to run. It has a known problem with updating certificate if you merely try to replace the certificate in the SSL client profile. It’s clear by looking at the dates the certificate had recently been renewed.

So I now had enough information to say the problem was on the load balancer and I could send the ticket over to the group that maintains it.

As for IE’s strange behavior? Also explainable for the most part. After an initial page with the expired certificate, if you click Continue to this web site it re-loads the page and gets the Good certificate so it no longer shows you the error! So when I clicked on the lock icon to examine the certificate, I always was getting the good version. In fact – and this is an example of the limitation of browsers like IE -you don’t have the option to examine the certificate about which it complained initially. Then IE caches this certificate I think so it persists sometimes even after closing and re-launching the browser.

Case closed.

Conclusion
An intermittent certificate error was explained and traced to a bad load balancer implementation of SSL profiles. The problem could only be understood by going the extra mile, being open-minded about possible causes and “using all my senses.” As I like to joke, that’s why I make the medium bucks!

Other conclusion? openssl is your friend.

References and related
My favorite openssl commands show how to use openssl x509 from any linux server.

Categories
Admin Network Technologies Security

The IT Detective agency: Some insights into 4096-bit SSL keys

Intro
I was recently asked if a new certificate a web site is about to deploy would require any changes to our clients such as needing to import this certificate into their Java keystore.

The details
Well, I saved the certificate on a Linux server calling it my.crt and examined it using openssl:

$ openssl x509 ‐text ‐in my.crt

My greatest hits amongst the openssl commands are listed here: My favorite openssl commands

Anyway, the output begins like this:

Certificate:
    Data:
        Version: 3 (0x2)
        Serial Number:
            68:5f:f8:b6:5e:56:c2:1d
        Signature Algorithm: sha256WithRSAEncryption
        Issuer: C=US, ST=Arizona, L=Scottsdale, O=GoDaddy.com, Inc., OU=http://certs.godaddy.com/repository/, CN=Go Daddy Secure Certificate Authority - G2
        Validity
            Not Before: Apr  5 22:57:01 2018 GMT
            Not After : Apr  5 22:57:01 2020 GMT
        Subject: 1.3.6.1.4.1.311.60.2.1.3=US/1.3.6.1.4.1.311.60.2.1.2=California/2.5.4.15=Private Organization/serialNumber=C2417721, C=US, ST=California, L=Carlsbad, CN=www.drj.com
        Subject Public Key Info:
            Public Key Algorithm: rsaEncryption
            RSA Public Key: (4096 bit)
                Modulus (4096 bit):
                    00:da:c7:18:a2:4d:b5:c9:95:22:b0:64:50:e7:b8:
                    ...

So I checked the text after the Issuer field, C=US, ST=Arizona, L=Scottsdale, O=GoDaddy.com, Inc., OU=http://certs.godaddy.com/repository/, CN=Go Daddy Secure Certificate Authority – G2
This is the intermediate CA. And it exactly matches their current certificate we already trust. So no problem, right, we are good to go, right? Not so fast grasshopper. This certificate contains a totally new element for us. I happened to notice it has a 4096 bit key length. Never seen that before though I have heard about it.

How do we even know our old browsers and even proxy server are going to be good with that? The best way I reasoned is simply to find another site with a 4096 bit certificate. Well, it took me almost an hour before I found one, and DDG and Google searches proved fruitless. I found it by taking logical guesses, as in, surely some security-minded organization has deployed these already??

ssllabs.com. Nope. godaddy.com. Nope. www.google.com. Nope. Gnupg.org, Nah, ah. Lets Encrypt. Also a no. Then I tried nist.org and found the weirdest thing. They send several certificates, one of which is *.bluehost.com which is 4096 bits. But it makes no sense being part of the certificates on nist.org, as an ssllabs.com server eval will tell you. So then I tried www.bluehost.com. Paydirt!

$ examinecert www.bluyehost.com

Certificate:
    Data:
        Version: 3 (0x2)
        Serial Number:
            af:a7:b9:22:4f:d5:7e:6b:78:4b:5a:23:d0:35:50:23
    Signature Algorithm: sha256WithRSAEncryption
        Issuer: C=GB, ST=Greater Manchester, L=Salford, O=COMODO CA Limited, CN=COMODO RSA Domain Validation Secure Server
CA
        Validity
            Not Before: Oct 16 00:00:00 2015 GMT
            Not After : Oct 17 23:59:59 2018 GMT
        Subject: OU=Domain Control Validated, OU=Hosted by BlueHost.Com, INC, OU=PositiveSSL Wildcard, CN=*.unifiedlayer.co
m
        Subject Public Key Info:
            Public Key Algorithm: rsaEncryption
                Public-Key: (4096 bit)
                Modulus:
                    00:c5:2b:10:d2:20:bb:d9:1b:e1:d3:b2:d1:9b:6f:
                    ...

examinecert is a bash function I created defined as:

examinecert () { echo|openssl s_client -connect "$@":443|openssl x509 -text|more; }

And for this company that brings up a host of questions. if their again IE 11 has never encountered a web site with this long of a key length, how will we know what will happen the first time?

Also, some sites get SSL intercepted by Bluecoat proxy. How will that infrastructure handle it? Will it handle it?

That;s why it was so important to find a real-world example, as painful as that exercise proved to be.

The answers are somewhat surprising.

Yes, ancient Internet Explorer probably handles 4096 bit key lengths just fine. I actually haven’t fully tested that one yet.

But it doesn’t matter for this company. Their Bluecoat proxy intercepts the SSL. So, yes, that part works, and re-creates its own certificate, but issued as a standard 2048-bit key length! So that is what IE sees so I know there will be no issue there. I say surprising because usually the generated certificates so carefully preserve all aspects of a certificate: same expiration date, same common name, etc. Whether or not this key length reduction is configurable or not I have yet to find out.

Follow up
As a result of my prodding, badssl.com will include a 4096-bit certificate with which to test things out.

Conclusion
After an arduous search (I’m sure next year this time this will become much easier) we found a public site which can be used to test 4096 bit key lengths: www.bluehost.com. Obviously GoDaddy also issues 4096-bit certificates since that is what this particular web site uses as their issuer, but I have yet to find an actual live example of one.

Bluecoat SSL interception by default does handle this long key length, but generates its private version of it with only a 2048 key length, to our surprise.

Just remember, if you have a Raspberry Pi you can run all these commands that I’ve shown because you have a bone fide Linux system.

Case: closed!

References and related
This site has all sorts of SSL scenarios to test against: https://badssl.com/.
To jump straight to their 4096-bit CERT: https://rsa4096.badssl.com/

Categories
DNS Linux Network Technologies Raspberry Pi Security

Whois information without the pushy hard sell tactics

Intro
Did you ever want to learn about a domain registration but were put off by the hard sell tactics that basically all web-based whois searches subject you to? Me, too. Here’s what you can do.

The details
Linux – so that includes you, Raspberry Pi owners – has a little utility called whois which you can use to get the registrant information of a domain, e.g.,

$ whois johnstechtalk.com

   Domain Name: JOHNSTECHTALK.COM
   Registry Domain ID: 1795918838_DOMAIN_COM-VRSN
   Registrar WHOIS Server: whois.godaddy.com
   Registrar URL: http://www.godaddy.com
   Updated Date: 2017-03-27T00:52:51Z
   Creation Date: 2013-04-23T00:54:17Z
   Registry Expiry Date: 2019-04-23T00:54:17Z
   Registrar: GoDaddy.com, LLC
   Registrar IANA ID: 146
   Registrar Abuse Contact Email: [email protected]
   Registrar Abuse Contact Phone: 480-624-2505
   Domain Status: clientDeleteProhibited https://icann.org/epp#clientDeleteProhibited
   Domain Status: clientRenewProhibited https://icann.org/epp#clientRenewProhibited
   Domain Status: clientTransferProhibited https://icann.org/epp#clientTransferProhibited
   Domain Status: clientUpdateProhibited https://icann.org/epp#clientUpdateProhibited
   Name Server: NS45.DOMAINCONTROL.COM
   Name Server: NS46.DOMAINCONTROL.COM
   DNSSEC: unsigned
   URL of the ICANN Whois Inaccuracy Complaint Form: https://www.icann.org/wicf/
>>> Last update of whois database: 2018-04-19T19:59:35Z <<<
...

Admittedly that did not tell us much, but it points us to another whois server we can try, whois.godaddy.com. So try that:

$ whois ‐h whois.godaddy.com johnstechtalk.com

Domain Name: JOHNSTECHTALK.COM
Registry Domain ID: 1795918838_DOMAIN_COM-VRSN
Registrar WHOIS Server: whois.godaddy.com
Registrar URL: http://www.godaddy.com
Updated Date: 2017-03-27T00:52:50Z
Creation Date: 2013-04-23T00:54:17Z
Registrar Registration Expiration Date: 2019-04-23T00:54:17Z
Registrar: GoDaddy.com, LLC
Registrar IANA ID: 146
Registrar Abuse Contact Email: [email protected]
Registrar Abuse Contact Phone: +1.4806242505
Domain Status: clientTransferProhibited http://www.icann.org/epp#clientTransferProhibited
Domain Status: clientUpdateProhibited http://www.icann.org/epp#clientUpdateProhibited
Domain Status: clientRenewProhibited http://www.icann.org/epp#clientRenewProhibited
Domain Status: clientDeleteProhibited http://www.icann.org/epp#clientDeleteProhibited
Registry Registrant ID: Not Available From Registry
Registrant Name: ******** ******** (see Notes section below on how to view unmasked data)
Registrant Organization:
Registrant Street: ***** ****
Registrant City: Newton
Registrant State/Province: New Jersey
Registrant Postal Code: 078**
Registrant Country: US
Registrant Phone: +*.**********
Registrant Phone Ext:
Registrant Fax:
Registrant Fax Ext:
Registrant Email: ********@*****.***
Registry Admin ID: Not Available From Registry
Admin Name: ******** ******** (see Notes section below on how to view unmasked data)
...

So now we’re getting somewhere. So GoDaddy tries to force you to their web page an sell you stuff in any case. Not at all surprising for anyone who’s ever been a GoDaddy customer (includes yours truly). Because that’s what they do. But not all registrars do that.

Here’s a real-life example which made me decide this technique should be more broadly disseminated. I searched for information on a domain in Argentina:

$ whois buenosaires.com.ar

This TLD has no whois server, but you can access the whois database at
http://www.nic.ar/

Now if you actually try their suggested whois server, it doesn’t even work:

$ whois ‐h www.nic.ar buenosaires.com.ar

Timeout.

What you can do to find the correct whois server is use iana – Internet Assigned Numbers Authority – namely, this page:

https://www.iana.org/domains/root/db

So for Argentina I clicked on .ar (I expected to find a separate listing for .com.ar but that was not the case), leading to the page:

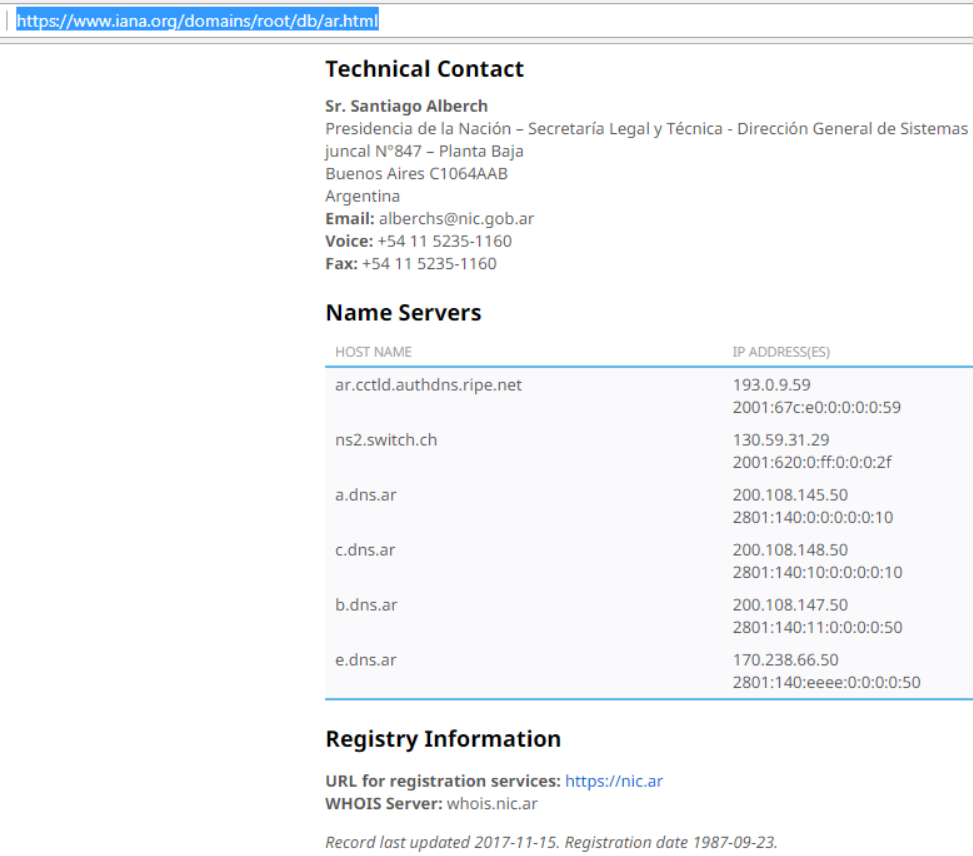
See it? At the bottom it shows Whois server: whois.nic.ar. So I try that and voila, meaningful information is returned, no ads accompanying:

$ whois ‐h whois.nic.ar buenosaires.com.ar

% La información a la que estás accediendo se provee exclusivamente para
% fines relacionados con operaciones sobre nombres de dominios y DNS,
% quedando absolutamente prohibido su uso para otros fines.
%
% La DIRECCIÓN NACIONAL DEL REGISTRO DE DOMINIOS DE INTERNET es depositaria
% de la información que los usuarios declaran con la sola finalidad de
% registrar nombres de dominio en ‘.ar’, para ser publicada en el sitio web
% de NIC Argentina.
%
% La información personal que consta en la base de datos generada a partir
% del sistema de registro de nombres de dominios se encuentra amparada por
% la Ley N° 25326 “Protección de Datos Personales” y el Decreto
% Reglamentario 1558/01.
 
domain:         buenosaires.com.ar
registrant:     50030338720
registrar:      nicar
registered:     2012-07-05 00:00:00
changed:        2017-06-27 17:42:45.944889
expire:         2018-07-05 00:00:00
 
contact:        50030338720
name:           TRAVEL RESERVATIONS SRL
registrar:      nicar
created:        2013-09-05 00:00:00
changed:        2018-04-17 13:14:55.331068
 
nserver:        ns-1588.awsdns-06.co.uk ()
nserver:        ns-925.awsdns-51.net ()
nserver:        ns-1385.awsdns-45.org ()
nserver:        ns-239.awsdns-29.com ()
registrar:      nicar
created:        2016-07-01 00:02:28.608837

2nd example: goto.jobs
I actually needed this one! So I learned of a domain goto.jobs and I wanted to get some background. So here goes…
$ whois goto.jobs

getaddrinfo(jobswhois.verisign-grs.com): Name or service not known

So off to a bad start, right? So we hit up the .jobs link on iana, https://www.iana.org/domains/root/db/jobs.html, and we spy a reference to their whois server:

Registry Information
This domain is managed under ICANN's registrar system. You may register domains in .JOBS through an ICANN accredited registrar. The official list of ICANN accredited registrars is available on ICANN's website.
URL for registration services: http://www.goto.jobs
WHOIS Server: whois.nic.jobs

So we try that:
$ whois ‐h whois.nic.jobs goto.jobs

   Domain Name: GOTO.JOBS
   Registry Domain ID: 91478530_DOMAIN_JOBS-VRSN
   Registrar WHOIS Server: whois-all.nameshare.com
   Registrar URL: http://www.nameshare.com
   Updated Date: 2018-03-29T20:08:46Z
   Creation Date: 2010-02-04T23:54:33Z
   Registry Expiry Date: 2019-02-04T23:54:33Z
   Registrar: Name Share, Inc
   Registrar IANA ID: 667
   Registrar Abuse Contact Email:
   Registrar Abuse Contact Phone:
   Domain Status: clientTransferProhibited https://icann.org/epp#clientTransferProhibited
   Name Server: KATE.NS.CLOUDFLARE.COM
   Name Server: MARK.NS.CLOUDFLARE.COM
   Name Server: NS1.REGISTRY.JOBS
   Name Server: NS2.REGISTRY.JOBS
   DNSSEC: unsigned
   URL of the ICANN Whois Inaccuracy Complaint Form: https://www.icann.org/wicf/
>>> Last update of WHOIS database: 2018-04-23T18:54:31Z <<<

Better, but it seems to merely point to a registrar and its whois server:

Registrar WHOIS Server: whois-all.nameshare.com

So let’s try that:

$ whois ‐h whois-all.nameshare.com goto.jobs

Domain Name: GOTO.JOBS
Registry Domain ID: 91478530_DOMAIN_JOBS-VRSN
Registrar WHOIS Server: whois-jobs.nameshare.com
Registrar URL: http://www.nameshare.com
Updated Date: 2018-03-29T20:08:46Z
Creation Date: 2010-02-04T23:54:33Z
Registrar Registration Expiration Date: 2017-02-04T23:54:33Z
Registrar: NameShare, Inc.
Registrar IANA ID: 667
Registrar Abuse Contact Email: [email protected]
Registrar Abuse Contact Phone: +1.7809429975
Domain Status: clientTransferProhibited http://www.icann.org/epp#clientTransferProhibited
Registry Registrant ID:
Registrant Name: DNS Administrator
Registrant Organization: Employ Media LLC
Registrant Street: 3029 Prospect Avenue
Registrant City: Cleveland
Registrant State/Province: OH
Registrant Postal Code: 44115
Registrant Country: United States
Registrant Phone: +1.2064261500
Registrant Phone Ext:
Registrant Fax: +1.1111111111
Registrant Fax Ext:
Registrant Email: [email protected]
Registry Admin ID:
Admin Name: DNS Administrator
Admin Organization: Employ Media LLC
Admin Street: 3029 Prospect Avenue
...

Bingo! We have hit pay dirt. We have meaningful information about the registrant – an address, phone number and email address – and received no obnoxious ads in return. For me it’s worth the extra steps.

ICANN: another alternative
Most registrar’s whois sites are rate-limited. ICANN’s is not. And they also do not sic ads on you. It is

https://whois.icann.org/en/lookup?name=

ICANN, for the record, it the body that decides what goes on in DNS namespace, for instance, what new gTLDS should be added. You can use its whois tool for all gTLDs, but not in general for ccTLDs.

whois is undergoing changes due to GDPR. Especially the “social” information of the contacts: registrant, admin and technical contacts will be masked, except for perhaps state and country, in the future. But whois is slowly dying and a new standard called RDAP will take its place.

References and related
This page has some great tips. Wish I had seen it first! https://superuser.com/questions/758647/how-to-whois-new-tlds

Here’s that iana root zone database link again: https://www.iana.org/domains/root/db

ICANN’s whois: https://whois.icann.org/en/lookup?name=

Categories
Admin Web Site Technologies

A taste of the Instagram API

Intro
I always want to know more about how things really work behind the scenes, so I was excited when I overheard talk about how one company uses the Instagram API to do some cool things. An API is an application programming interface. It allows you to write programs to automate tasks and do some really cool stuff. So I spoke to one of my sources who shared with me a few companies he knows about who use Instagram’s API to do some cool things. Unfortunately, none of them were willing to reveal the technical details of how they interact with the API, so I am left with only the marketing descriptions of what they have managed to do with it. But what they don’t realize is that as a capable IT person, in some cases I only have to hear that a thing is possible to motivate me. I have literally gone into meetings telling a customer No that’s not possible, hearing from them Yeah, well, they have it running in Europe, and going back to my desk afterwards to totally revise my opinion of what is or isn’t possible and how it could be done. Having said all that, here is what these companies have managed to do, without revealing the secret sauce of how they do it.

Example apps
Post scheduling software
This is used by social media managers to schedule their Instagram posts weeks or months in advance. It allows them to make a bunch of posts at once quickly and saves them time. A friend of a friend in NYC owns a company that does this. His website is bettrsocial.com

Analytic software
Simply Measured offers a free Instagram report for users with up to 25,000 followers. The stats and insights are presented clearly and will help inform your Instagram posting strategy. The report lets you quickly see what has worked well in your Instagram marketing so you can apply these insights to future posts. Web site: https://simplymeasured.com

Automaton software
Some companies connect with Instagram’s API to automate redundant tasks and increase traffic to your Instagram page. Social Network Elite is one of the best sources for growing organic Instagram followers.

Conclusion
Although I don’t even have an Instagram account, I am interested in APIs. The Instagram API does not look too daunting and seems well-documented. I cite a few small businesses that put it to use to do cool stuff. Unfortunately at this time I can’t deliver on the promise of the title of this article – a taste of the API – because I haven’t received any details about the actual usage. Perhaps in some future I will get my own account and develop my own application.

References and related
The Instagram API is documented here: https://www.instagram.com/developer/
My attempt to use the GoDaddy domain API.

Categories
Web Site Technologies

Open Notebook: How does Citrix printing work anyway

Intro
I’m speaking of the old Citrix Receiver client. You launch that and that puts you in a Citrix ICA “jail.” I recently help a company move an app which had been a browser-based app to a browser within Citrix. Users complained they could not print from it… All their local printers were gone. Only a Citrix Universal Printer can be chosen.

What to do?

The solution
When you print, choose the Citrix universal printer.

Click on print again. You get a print preview screen.

Click on the printer symbol in the top bar. You will get your local printer list to choose from

Click on print again and the print job will be sent to the desired printer.

Simple enough, unless you’re going through it for the first time!

How did Citrix Receiver client break out of the jail?
I am told that it uses EMF format. That’s Enhanced Metafile, a successor to WMF, Windows metafile. EMF is a graphics language used in printer drivers. The Wikipedia article on this is surprisingly brief and skeletal: https://en.wikipedia.org/wiki/Windows_Metafile#Variants. So I guess it’s not really a jail at all – that was just my term. And the details beyond this unsatisfactory explanation I do not know. I’ll keep it on the back burner in case I ever get an opportunity to learn more about it.

Open Notebook background
I sometimes write blog posts as a sort of high-quality journal entry. I may very well be the only person who ever refers to them, and that’s OK. It contains enough information to prod my memory though it may not be polished enough to help many others.

References and related
The ICA that I referred to is the communications protocol used between classic Citrix Receiver client and a Citrix server (what we used to call an NFuse server). Wikipedia has a good article on it: https://en.wikipedia.org/wiki/Independent_Computing_Architecture

Categories
Linux Raspberry Pi

Raspberry Pi as Retro Arcade Games emulator

Intro
I am not going to attempt to provide a guide as there are much better guides out there than anything I can produce.

In addition to the arcade function, we wanted to display a slidedeck when not being used for gaming.

Two main approaches I see are

1) install RetroPie, then add X packages
2) install Raspbian, then install RetroPie on top of that

The reason we want X is to run a presentation software such as pipresents, which we are already familiar with.

For approach 1) I roughly followed this installation order.

Notes
Install lightdm and lxde
This takes a long time, maybe 30 minutes:
sudo apt install lxde lxde-core lxterminal lxappearance
sudo apt install lightdm
sudo apt-get install xutils
sudo apt-get install xserver-xorg

But one of my games didn’t run properly afterwards, so I am focused on method 2) for now.

I’m having trouble running startx from a non-console terminal. One thing I’m trying is:
sudo usermod -a -G tty pi
sudo apt-get install xserver-xorg-legacy
These two commands still didn’t do the trick, so I edited this file

/etc/X11/Xwrapper.config

and replaced allowed_user=console with allowed_users=anybody, and that worked! Once.

Then I installed RetroPie, turned it off so it does not autostart, and tried startx from a non-console terminal and I see this error:

(EE) xf86OpenConsole: Cannot open virtual console 2 (Permission denied)

then I re-installed xserver-xorg-legacy and startx once again worked. Hmm.

The instructions for installing RetroPie on top of an existing Raspbian installation are here:

https://retropie.org.uk/docs/Manual-Installation/

You should be comfortable with the linux command line. In the end I like this method of installation the best. I’ve done it several times now.

Equipment ideas
These $15 speakers https://www.amazon.com/gp/product/B003JTHO3U/ref=oh_aui_detailpage_o01_s01?ie=UTF8&psc=1 only use the USB port for power. They have a standard mini-stereo jack that is compatible with the Pi. I bought them. The Pi has enough juice to power them, which is convenient.
I went with NES (Nintendo Entertainment System) games. This pair of USB controllers I am told are a good approximation of the real thing: https://www.amazon.com/gp/product/B075ZN1GXK/ref=oh_aui_detailpage_o02_s00?ie=UTF8&psc=1. they’re only about $14.
Two player arcade quality controller from Recroommasters. About $349.

How to configure two player setup when you have an arcade-style console with only one USB connection
I find the documentation available on the Internet on this particular topic is terrible. In fact I never did find it. This YouTube video was just created. Although it’s specific to their Xtension console it looks to me applicable to any similar console:

https://www.youtube.com/watch?v=E8jHfhM5t_A&feature=youtu.be

Configuration
It takes a little getting used to. There are two main places where you do some configuration. There’s the RetroPie Configuration. Then there’s the emulationstation menu. The main thing to do from the emulationstation menu, which is launched by clicking Start from the main emulationstation screen, is to map the controller keys. For instance I program for an NES controller at home, and bring it to school where there is a cool two-player arcade-style controller which will have to be re-mapped.
The RetroPie configuration shows up from the main screen when you hit the down arrow key or something like that, then A. From here you can launch traditional raspi-config. I also used it to go into RetroPie setup, then into configuration and have emulationstation autolaunch at boot-up. You can also do a reboot from RetroPie setup.

Sound
To force sound out of the 3.5 mm stereo jack, go to RetroPie Configuration|RetroPie Setup|Configuration/tools|801 – audio settings|Headphones – 3.5 mm jack.

To get volume to 100% which you will need with the speakers I list below, go to emulation station menu|sound settings|system volume. By default it seems to be 77% which just isn’t enough juice.

References and related
Good discussion on X windows, display managers and desktop environments: https://raspberrypi.stackexchange.com/questions/26836/possible-to-reinstall-x-server-and-use-graphical-after-having-removed-it
Speakers for about $15: https://www.amazon.com/gp/product/B003JTHO3U/ref=oh_aui_detailpage_o01_s01?ie=UTF8&psc=1
Nintendo style USB controllers, $14: https://www.amazon.com/gp/product/B075ZN1GXK/ref=oh_aui_detailpage_o02_s00?ie=UTF8&psc=1
Two player setup with an arcade controller that has only one USB connection.
Arcade style two player console. Very cool. https://www.recroommasters.com/Xtension-Two-Player-Control-Board-Emulator-Edition-p/rm-xt-sd-board-ee.htm

Categories
Admin Linux Network Technologies

Measuring bandwidth on Checkpoint Gaia

Intro
Sometimes you don’t have the tools you want but you have enough to make do. Such is the case with the command line utilities of the CLI of Checkpoint Gaia. It’s like a basic Linux. The company I consult for is beginning to hit some bandwidth limits and I wanted to understand overall traffic flow better. In the absence of any proper bandwidth monitors I used the netstat command and some approximations. Crude thouigh it may be it already gave me a much better idea about my traffic than I had going into this project.

The details
I call this BASH script netstats.sh

#!/bin/bash
# for Gaia, not IPSO
c=0
sleep=2
while /bin/true; do
  v[1]=`netstat -Ieth1-01 -e|grep RX|grep TX`
  n[1]="vlan 102           "
  v[2]=`netstat -Ieth1-05 -e|grep RX|grep TX`
  n[2]="vlan 103 200.78.39    "
  v[3]=`netstat -Ieth1-02 -e|grep RX|grep TX`
  n[3]="vlan 103 10.31.42"
  v[4]=`netstat -Ieth1-03 -e|grep RX|grep TX`
  n[4]="trunk for VPN      "
# interesting line:
#           RX bytes:4785585828883 (4.3 TiB)  TX bytes:7150474860130 (6.5 TiB)
  date
  for i in {1..4}; do
    RX=`echo ${v[$i]}|cut -d: -f2|awk '{print $1}'`
    TX=`echo ${v[$i]}|cut -d: -f3|awk '{print $1}'`
#    echo "vlan ${n[$i]}        RX,TX: $RX, $TX"
    if [ $c -gt 0 ]; then
      RXdiff=`expr $RX - ${RXold[$i]}`
      TXdiff=`expr $TX - ${TXold[$i]}`
# observed scaling factor: 8.1 bits/byte
      RXrate=$(($RXdiff*81/$sleep/10000000))
      TXrate=$(($TXdiff*81/$sleep/10000000))
      echo "${n[$i]}    RX,TX: $RXrate, $TXrate Mbps"
    fi
# old values
    RXold[$i]=$RX
    TXold[$i]=$TX
  done
  c=$(( $c + 1 ))
  sleep $sleep
done

It’s pretty self-explanatory. I would just note that in the older IPSO OS you don’t have the ability to get the bytes transferred from netstat. Just the number of packets, which is an inherently cruder measure. The calibration of 8.1 bits per byte (there is overhead from the frames) is maybe a little crude but it’s what I measured over the source of a couple minutes.

A quick glance at Redhat or CentOS shows me that this same script, with appropriate modifications for the interface names (eth0, eth1, etc), would also work on those OSes.

IPSO
I really, really wanted some kind of measure for IPSO as well. So I tackled that as best I could. Here is that script:

#!/bin/bash
# for IPSO, not Gaia
c=0
while [ 1 -gt 0 ]; do
# eth1-01: vlan 802; eth1-05: vlan 803 (144.29); eth1-02: vlan 803 (10.201.145)
  v[1]=`netstat -Ieth-s4p1|tail -1`
  n[1]="vlan 208.129.99     "
  v[2]=`netstat -Ieth-s4p2|tail -1`
  n[2]="vlan 208.156.254     "
  v[3]=`netstat -Ieth-s4p3|tail -1`
  n[3]="vlan 208.149.129     "
  v[4]=`netstat -Ieth-s4p4|tail -1`
  n[4]="trunk for Cisco and b2b"
# interesting line:
#Name         Mtu   Network     Address             Ipkts Ierrs    Opkts Oerrs  Coll
#eth-s4p1     16018 <Link>      0:a0:8e:c4:ff:f4 72780201     0 56423000     0     0
  date
  for i in {1..4}; do
    RX=`echo ${v[$i]}|awk '{print $5}'`
    TX=`echo ${v[$i]}|awk '{print $7}'`
#    echo "vlan ${n[$i]}        RX,TX: $RX, $TX"
    if [ $c -gt 0 ]; then
      RXdiff=$(($RX - ${RXold[$i]}))
      TXdiff=$(($TX - ${TXold[$i]}))
# observed: .0043 mbits/packet
      RXrate=$(($RXdiff*43/100000))
# observed: .0056 mbits/packet
      TXrate=$(($TXdiff*56/100000))
      echo "${n[$i]}    RX,TX: $RXrate, $TXrate Mbps"
    fi
# old values
    RXold[$i]=$RX
    TXold[$i]=$TX
  done
  c=$(( $c + 1 ))
  sleep 10
done

The conversion to bits is probably only accurate to +/- 25%, because it depends a lot on the application, i.e., VPN concentrator versus proxy server. I just averaged all applications together because that’s the best I could do. I compared it to a Cisco router’s statistics.

Note that in Gaia cpview can also be run frmo the CLI. Then you can drill down to the specific interface information. I have compared my script to using cpview (which has a default update screen time of 2 seconds) and they’re pretty close. As far as I know there is no way to script cpview. And at the end of the day I suspect it is only doing the same thing my script does.

Conclusion
A script is provided which gives a measure of Mbps bandwidth usage by polling netstat periodically. It’s not exact, but even crude measures can help a network engineer.

Categories
Consumer Tech

Consumer tech: Solar Panels – the things they never tell you

Intro
Since solar panels are a major commitment I did some research first. My criteria (high-efficiency, not manufactured in China, carried by a local installer) was met by Sunpower X-series whose panels generate 345 KWh, which was pretty much at the high end in 2017.

The details
I live in a northern latitude area (41° latitude) with plenty of snowfall. I have a sloped roof.

I just assumed that the snow would melt off the panels at more or less the same rate as off the rest of the roof.

That is not at all the case.

I was working from home one day in the kitchen when I heard someone on the roof. At least that’s what it sounded like. The person seemed to be clearing the snow off my panels, how thoughtful of my installer to send someone to do that. The snow was thundering and avalanching off the roof onto my deck. Eventually I realized the mini-avalanches were real, the person up there on the roof was no more real than Santa Claus.

So yes, the snow slides off those panels in thunderous mini-avalanches. So today after a big snow event, this has been going on this morning, the day after, on and off for hours. Around the panels the roof retains its snow, but the panels themselves have lost all theirs. I see my neighbors’ panels are also cleared so this must be a universal phenomenon.

It’s worth mentioning because it’s a little frightening when you first hear it.

Power consumption vastly overestimated
I suppose this next problem is peculiar to just my installation. Sunpower gives you this nice portal so you see what you’re generating and what you’re using. In my case the generation numbers seem plausible, but the usage numbers are way off.

February bill shows 621 KWh metered, 386 KWh out = 235 KWh billed.

Sunpower shows 1442 KWh used, 531 KWh generated, for a net of -910 KWh.

So we can compare 235 to the 910. The should be about the same yet there is a huge difference.

The usage is almost, but not quite doubled. if we add 235 billed to the 531 generated we’d have 766 used. So usage is overestimated by a factor 1.89. But I doubt it’s a simple formula like that to correct their numbers. During the time of generation – daylight – the usage estimates numbers dip. So I don’t know what they’ve done wrong, and my installer says their support is horrible. It’s been nine months and I’ve just asked for an update. It’s more annoyance than anything.

Categories
Consumer Tech

Verizon Tips I need but can never easily find

Verizon Phone Finder
They will lead you to some page that seems to suggest you needed to buy a premium service from them if you need to find your phone. Don’t fall for it. Or maybe you will get their other page which only sends you on to Google’s page. So, for Android phones, here is the universal phone finder link:

http://google.com/android/find

It’s pretty cool. It shows pretty precisely where the phone is, how much power is left and gives you the chance to ring it for five minutes and even lock it.

Apple iPhones

Use https://icloud.com/find . But you’ll have to know your icloud password. Actually I’ve used the Android finder a few times but never really used the iphone finder. Hopefully it works just as well.

Change your Verizon Wireless Voicemail password
This is even harder to find unless you have just the right search terms.

From a Verizon app on your phone
I haven’t used this method.
https://www.verizonwireless.com/support/knowledge-base-17076/

From the My Verizon web site
I just used this so it works pretty well:
https://wbillpay.verizonwireless.com/vzw/mobilesecure/services/resetVPass.action

How to set up your voicemail so as not to enter a password
Basic idea: add a contact for Voicemail tack on two pauses, then append the password. So that will be

*86,,<YOUR_PASSWORD>

For instance I named this contact VM. If my password were 1234 the number would be

*86,,1234

To generate the “,” character go to the special characters key to the right of # when typing in the number.

Categories
Linux Network Technologies Raspberry Pi

Multiple IPs on the Raspberry Pi

Intro
In my previous post I showed how to turn a Raspberry Pi plus USB camera into something like an IP camera. In the course of that work I found it wasn’t so easy as it was in the past to assign static IPs upon boot. So I came up with my own unique method, which combines a modicum of Linux knowledge with a dash of networking knowledge.

The requirements
I sort of invented these requirements for myself, putting myself in the pickle I found myself in. I am working with a friend’s Pi 3 and didn’t want to mess it up too badly. Yet I wanted to easily work with it at home, and for the Robotics team. How to do it all?

I decided to permit the DHCP client, now called dhcpcd, running. So it will assign an IP address and appropriate gateway if there is a DHCP server present on the network. When I test at home I sometimes don’t use DHCP. When I bring my test setup to Robotics, more often than not I have my own little isolated LAN and no DHCP server. So, knowing that a single interface can have two or even more than two IP adresses, I created the following list of requirements for myself.

Act as DHCP client if there is DHCP server.
Additionally,
Assign static IP of 192.168.1.161/24 so it works in my home.
Assign another static IP of 10.31.42.15 so it works with a predictable IP in the robotics environment.
Let the two above IP assignments work even in the absence of a DHCP server!

Sounds kind of simple, but it’s not so easy.

I’m running a Raspberry Pi 3 with Raspbian Stretch (the release after Jessie).

Initial approach
With this version you’re supposed to use the file

/etc/dhcpcd.conf

to create a static IP.

But it works like c**p, at least when you want to push it and have it meet all the requirements above. It’s got a bug and doesn’t allow you to meet all the above requirements. I experimented. But my method does work.

The final solution
So in the end I leave /etc/dhcpcd.conf alone!

I use this new (to me) feature that crontab has an @reboot feature that calls its argument at boot time – just what we need.

Then I combined some old school use of ifconfig plus newer school command ip.

Here’s the script, which I call ip-assign.sh.

#!/bin/bash
sleep 2
# see if there is a dhcp-assigned IP already. If so 'scope global' appears in the listing
#  ip add show eth0 sample output:
addflag=""
ip add show eth0|grep -q 'scope global'
if [ $? == 0 ]; then
  addflag="add"
fi
# first IP
ifconfig eth0 $addflag 10.31.42.15 netmask 255.255.255.0 broadcast 10.31.42.255
# next IP
ifconfig eth0 add 192.168.1.161 netmask 255.255.255.0 broadcast 192.168.1.255

What I observed is that eth0 already has an IP assigned to it (for instance from a DHCP server), then the string “scope global” appears when you run ip add, otherwise it doesn’t. Furthermore, ifconfig has an optional argument I noticed call add, which seems to exist in order to add additional virtual interfaces – precisely what we want. But if there is no IP yet assigned we should call ifconfig the first time with the add argument. If I had had additional virtual IPs I could have just kept on going…

So to call this at boot time I use my lazy method. I edit the crontab file and insert a line like this:

@reboot sudo ~/ip‐assign.sh > /tmp/ip‐assign.log 2>&1

So without a DHCP server I have after booting:
$ ip add show eth0

2: eth0: <BROADCAST,MULTICAST,UP,LOWER_UP> mtu 1500 qdisc pfifo_fast state UP group default qlen 1000
    link/ether b8:27:eb:e3:02:74 brd ff:ff:ff:ff:ff:ff
    inet 192.168.1.161/24 brd 10.31.42.255 scope global eth0:0
       valid_lft forever preferred_lft forever
    inet 10.31.42.15/24 brd 192.168.1.255 scope global eth0
       valid_lft forever preferred_lft forever
    inet 169.254.159.115/16 brd 169.254.255.255 scope global eth0
       valid_lft forever preferred_lft forever
    inet6 fe80::e923:3131:224c:ecd/64 scope link
       valid_lft forever preferred_lft forever

If you’re lazy like me just type
$ ip add
and you’ll get the other interfaces as well. It’s very easy to type, too!

Note the broadcast (brd) addresses are reversed from how you’d expect them. I decided that it doesn’t matter as long as they’re both present somewhere with the correct value. It’s all using the one physical interface so the interface doesn’t really care. And from all my testing I am right I believe on this point.

Disable WiFi – wlan0
To disable WiFi entirely, which you may want to do if using in a FIRST FRC competition, add this to /boot/config.txt and reboot:
dtoverlay=pi3‐disable‐wifi
After doing that wlan0 does not even show up when you do an ip add.

References and related
Raspberry Pi plus USB camera: brought together like an IP camera.