Categories
Admin Network Technologies Raspberry Pi

Use Raspberry Pi to explore mDNS

Intro
I am confounded by the Bonjour field on my d-Link DCS-931L IP webcam. I should be able to use it to see my desired hostname, but it doesn’t take. Why?

The details
Having a Raspberry Pi on the same network I realized I could at least learn definitively whether or not my new name was being taken, or what the old name was.

You install avahi-discover to do that:

$ sudo apt-get install avahi-discover

Those who follow my blog will realize I am big on Linux command-line, not so much on GUIs. I mention it because unfortunately avahi-discover only works in the GUI. Not having a console I actually had to fire up vncserver and use my vncviewer on my PC! Then I could launch avahi-discover from a terminal window running on the GUI.

The extra fuss was just a few steps anyway, and well worth it.

avahi-discover broke down my home network and all the discovered devices in a very orderly fashion, e.g., the webcam appeared under web servers.

And what did I learn? Indeed, my name had not “taken” for some reason. So the system-supplied name was there instead. For the record that is

dcs931le1a6.local

And testing it:

$ ping dcs931le1a6.local

did indeed show me that it was resolvable by that name form my local network. My PC could reach it by that name as well. I tied to name it DCS-931L-BALL, and I know someone else who did this successfully, and I had even done it in the past, but it was just not taking it this time.

References and related
mDNS is multicast DNS. It’s designed for home networks. It’s pretty common from wjhat I see, yet largely unknown since It people do not encounter it in enterprise environments. As usual Wikipedia has a good article on it.
Superimposing crosshairs on a webcam image.

Categories
Uncategorized

A few thoughts on Universal Basic Income

Intro
I think the time has come to do some large-scale experimentation with this idea for guaranteeing a basic income for all. We’ll need something as our jobs begin to get eliminated by robots, automation and AI!

Some experiments both government-funded and private are ongoing now. Out of Silican Valley’s idealism emerged givedirectly.org, which is providing a modest UBI to all residents of some undisclosed villages in Kenya for 12 years. They are then going to apply metrics to see what difference the UBI has made for these very poor residents.

References and related
Out of this year’s World Economic Forum came this paper which gives a good and cogent argument in favor of Universal Basic Income (UBI).

This ConsenSys paper combines two favorite topics: universal basic income and Blockchain. It also introduced me to Ethereum, an alternative blockchain to bitcoin. My only insight here is based on pragmatic observation. If the ideas proposed are so compelling, why aren’t they already in adoption in failed states with no effective currency, namely Venezuela? I think the idea is that each and everyone should generate their own currency units, say 1000 units per month, and arrange an equivalent exchange rate so that my unit has the same value as yours, and circles of trust so that my village’s exchange rate is equal to your village’s, etc. But I would love to see a long-form critical review from a subject matter expert.

I looked a tiny bit at ethereum, but it looks pretty Windows-based and I’m not too keen on anything I can’t run on my AWS CentOS server so I gave up for the time being. Ethereum is interesting because it’s open source and it’s specifically mentioned as the basis for the ideas in the ConsenSys paper. I would like to know its capabilities better. ethereum.org

To contribute to one of these efforts which are in the experimentation phase, you can go to givedirectly.org, which was recently featured in a New York Times Magazine article. They are applying some science to these efforts in attempting to measure their effects.

Categories
Admin Web Site Technologies

Tips for creating a PayPal Donate button for not-not-for-profits

Intro
I am treating my blog as a public service, so I thought it would be appropriate to have a Donation link even though I have not incorporated as a 501c3 non-profit. Is it even possible? Can I keep my anonymity? These were concerns I raised in my head and ones for which there is no good guidance. Short answer: Yes and Yes.

The details
The link to PayPal’s Donate button creation page is pretty well documented. That’s here. Needless to say, you need a PayPal account first!

The PayPal site walks you through a few options. Since Donate is so often associated with not-for-profits I wanted a different word on the button, like Contribute. But customizing the wording was not one of their offered options.

And this is important: you don’t seem to be able to get out of revealing your PayPal email address. It will appear on your Donation page. So what to do?

Well your PayPal account can have up to eight email addresses associated with it. So in my case where the DNS for drjohnstechtalk.com is hosted by GoDaddy (not the web site, mind you, just the DNS), I simply need to set up an arbitrary address like drjohn At drjohnstechtalk DOT com and have it forward to my personal Gmail account. That’s simple enough with GoDaddy’s service, and they don’t even charge extra! Then back to PayPal where you add that address to your account, receive a confirmatory email that they generate, and confirm using their emailed link.

That’s about it. Now you can go back to the button creation page, call it a Donate button, put in your anonymous email address, and let it generate the HTML code. The HTML code is pretty simple and it can be pasted right into a WordPress page if you use or switch to HTML editing.

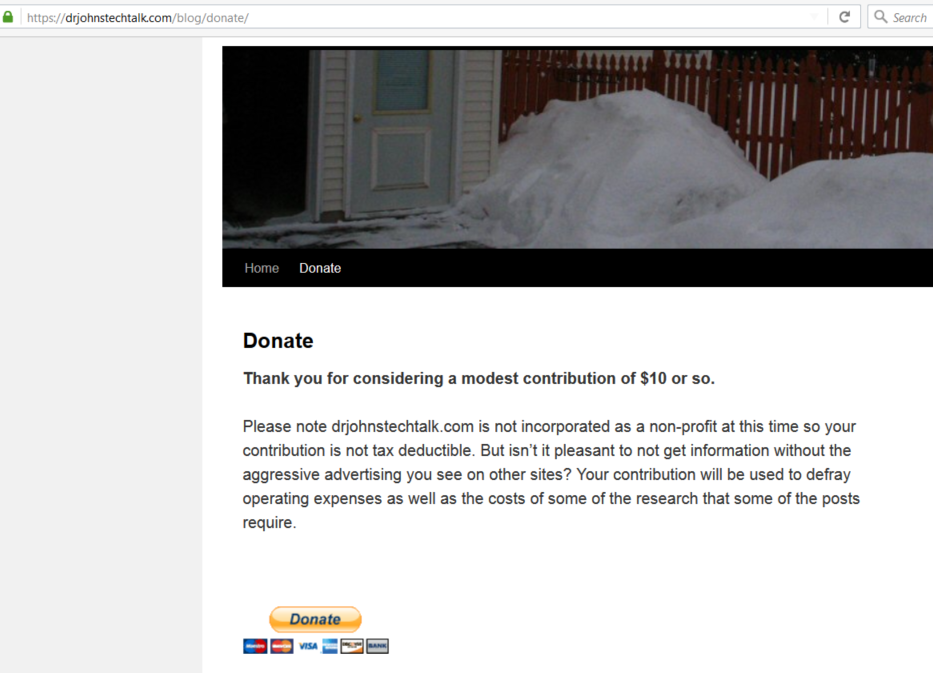
Here’s a screen shot of my donate page with its PayPal donate button.

OK, I lied. You probably also want a Thank you page in case someone actually does contribute! So build a Thank you page on your blog and record the URL. In WordPress I see you can create this as a hidden page – not appearing in any menu yet still using your theme. Here is my hidden thank you page as an example. Now you really have everything you need to build your Paypal button – one of the requested fields is the URL for your thank you page which we now have.

But is it appropriate?

Well, if like me you only expect the occasional, rare contribution, it’s probably akin to finding yourself in public short of money and asking for a few bucks to take the subway, or whatever… If you’re expecting to get thousands a year you’d better incorporate as a 501c3! As a courtesy I remind people that their contribution is not tax deductible. I guess for low volume stuff it can be treated the way gifts are treated for tax purposes.

Conclusion
drjohnstechtalk.com I hope serves as an example of “paying it forward.” I have benefitted from some good advice on the Internet (and suffered from some terrible advice as well), so I hope to benefit others by providing some clear guidance on topics where I can contribute. But I don’t see that as a barrier to asking for a modest contribution to help defray operational and research costs. In this post I show how I did it. It turns out to be simple, but not well documented on balance.

References and related
PayPal’s Donate Button creation web page with step-by-step instructions.
Care to donate to drjohnstechtalk.com? Here’s my donate page.
My thank you page.

Categories
Linux Network Technologies

Switch home router to DD-WRT: FAIL

Intro
I am having problems with my home router, a Cisco E1200, especially with the wireless connections. I thought it might be interesting to try to run it using the open source routing code DD-WRT. Since I am a Linux geek DD-WRT had some attraction for me and I figured it really couldn’t make matters worse. Boy was I wrong.

The details
Dropped connections, slow response, degradation over time – that is all par for the course for my E-1200. Again, mostly affecting WiFi.

Starting from this bare-bones installation write-up, http://www.dd-wrt.com/wiki/index.php/Linksys_E1200v2, I did indeed manage to upgrade the firmware to DD-WRT.

Things they don’t tell you that you probably want to know

Initial login password is blank, and the username is root, not admin.

I wanted to have the SSID I had been using preserved with the same password as well, so that, ideally, I would not have to revisit my devices to get them to learn about a new SSID setup. This was especially important to me due to a wireless Canon 3600 series printer which is particularly difficult to set up. You do it once, fumbling around until it works, and hope to never have to do it again.

And…yes, it auto-created that SSID and I saw client logged into it, so I guess it preserved the password as well. I don’t really know the characteristics that a client uses to decide this is the same SSID as before. The MAC address may be part of that decision. But since this was the same hardware the MAC address was preserved as well.

The results
My hard-wired connection worked pretty well. But WiFi, if you can believe it, was even worse than before! My Office Dell PC just would not pick up an IP address although it did connect to it. When you run ipconfig and only see an address beginning with 169.254. you are in trouble, and that’s what I had. My Dell 2-in-1 laptop could connect OK. But sometimes it worked, sometimes not, over WiFi, and worse than before.

And although some of the Linuxy type things looked somewhat familiar, like bridging with a br0 interface, I didn’t want to invest a lot of time debugging my issues. And the web GUI was a little slow.

ssh was disabled by default. No idea how to turn it on. Do I didn’t have the usual comfort of a Linux command line in working with it.

Issuing commands via the web GUI was just too painfully slow.

Also, come to think of it, it did not grab an IP over its WAN connection. Now I have an unusual ISP that permits me two valid Internet addresses. My Cisco Meraki takes the other address. But rebooting cable modem, Cisco router, etc in any combination just did not permit me to get that 2nd IP address I had been using. Eventually I knocked my Meraki offline. I wasn’t expecting that as it normally runs flawlessly and I hadn’t touched it.

So needless to say I was pretty disgusted and gave up. Question is, could I go back to the Cisco firmware??

Back to Cisco’s embrace
Well it turns out you can go back. Cisco meanwhile had released a newer version of firmware for it and made it available for download over the Internet.

I got the initial Cisco-looking page but had a really tough time logging in! None of the default of previous username/password combinations worked!! root/(blank), admin/admin, (blank)/root, admin/1234, admin/previous_password, none of it let me in! I tried a reset. No go. I read different directions on how to reset. Someone mentioned a 30/30/30 rule. No go. (I guess that was 30 seconds reset, 30 seconds wait, 30 seconds without power). The more official recommendation seemed to be 10 seconds reset. Eventually one of those resets did work – I think the 10 second one, and the default admin/admin got me in. That was a relief!

I figured if my SSID carried over to DD-WRT, surely it would carry over going back to Cisco. But, strangely, it did not. The name was similar, but not the same. Old name: Cisco76538. New: Linksys76538. No way to change it. Thanks Cisco, that was really helpful. CORRECTION. You know how you get used to certain settings? I had WPS enabled. For some reason you enable it in two places. Well, the one place, if you turn it off, allows you to change the SSID! But I need WPS (WiFi protected setup) for some basic Canon printers I have. So I don’t think this is an out.

So I had to visit all my clients one-by-one to re-enter the WiFi info, I still haven’t gotten to that one printer though! And my Wink Hub was no fun to re-configure either.

And performance is inconsistent once again, but much better than under DD-WRT. It’s too early to tell if it is an improvement over the older firmware.

And I gave up on using a 2nd IP address at home. I just channel everything through the Meraki.

Some more thoughts on why the office computer did not get an IP address though it was connected to the DD-WRT network
I’ve seen this problem just this week with a different DHCP server. I think you may only get a 169.254… address if your DHCP server already has your MAC address in its table, so it decides you don’t need another IP, or something like that. But things didn’t seem to get any better after a reboot of the router. So I don’t know.

Some more thoughts on why WiFi performs better through Meraki
The Cisco E1200 is a cheap, 2.4 GHz-band router. It can be set to auto-hop if one of the channels gets interference – that’s one of the WPS buttons. I’m beginning to suspect that is what is happening as I do see the neighbor’s SSIDs. Meraki is dual band, 5 GHz + 2.4 gHz and has the intelligence to use both as needed. I think it has MIMO as well. So it’s almost always going to do better than a cheap home router.

What I ended up doing
In the end I bought a dual-band router: Linksys WRT1200AC for $91 from Amazon. Turns out my Dell computers do not support 5 gHz. who knew?

Conclusion
Upgrade firmware to DD-WRT? Maybe with enough effort I could have gotten DD-WRT to work. It allows more control than Cisco’s firmware. But with the minimal configuration I was willing to do it was basically useless – very inconsistent and just not working with some devices.

References and related
Very brief DD-WRT install instructions for an E1200: http://www.dd-wrt.com/wiki/index.php/Linksys_E1200v2
Official E1200 download site: http://www.linksys.com/us/support-article?articleNum=148523

Categories
DNS Hosting Service

Free DNS services

Intro
I stumbled upon freenom.com, which offers free DNS domain names. So I tested it and successfully registered drjohnstechtalk.ml. .ml is Mali’s top level domain. I’ve heard it’s the only African country to open up its domains for free registration. There are a few other choices like .tk and .gq which are even more obscure.

As far as I can see this is a no strings service. It’s possible that they will share your registration data with third parties, but I don’t think this is the case since freenom is from the Netherlands where privacy tends to be stricter than in the US.

Limitations
Creating an address record is easy enough, but no other kind of resource record seems available to free users. That can be pretty limiting.

References and related
www.freenom.com. In the search field just put the domain name without the extension, e.g., drjohnstechalk. It will tell you which extensions are available for free.
How about putting a free certificate on your free domain? Let’s Encrypt makes it possible.

Categories
Admin Web Site Technologies

What I’m working on now: saving $69 a year on my certificate costs: Lets Encrypt

Intro
I recently turned off my GoDaddy web site certificate and implemented one that cost me nothing. This will save me $69 per year.

I wrote up my experience in this article: Idea for free web server certificates: Let’s Encrypt

When I originally wrote that article it was a theoretical concept, but since then I’ve encountered web sites using those certificates so I realized that their CA must be widely accepted now and I decided to try for myself. The ACME (automated certificate management environment) environment was something completely new to me and the terminology a little confusing (as a user I don’t “issue” certificates, so whose perspective does the description take anyway?), but I got it to work in the end with the help of a command-line-based utility called acme.sh. I am actually more comfortable with command-line than with GUI programs. You get greater control and greater understanding.

Example of issuing a certificate using the manual DNS method
If you have full control over DNS but not the web server this approach is a good one.

$ sudo acme.sh ‐‐issue ‐‐dns ‐d www2.drjohnstechtalk.com

2021 update

Now the syntax is this:

acme.sh –issue –dns –yes-I-know-dns-manual-mode-enough-go-ahead-please -d www2.drjohnstechtalk.com

and once you’ve made the DNS entries, this:

acme.sh –issue –dns –yes-I-know-dns-manual-mode-enough-go-ahead-please -d www2.drjohnstechtalk.com –renew

[Thu Feb 23 11:55:52 EST 2017] Single domain='www2.drjohnstechtalk.com'
[Thu Feb 23 11:55:52 EST 2017] Getting domain auth token for each domain
[Thu Feb 23 11:55:52 EST 2017] Getting webroot for domain='www2.drjohnstechtalk.com'
[Thu Feb 23 11:55:52 EST 2017] _w='dns'
[Thu Feb 23 11:55:52 EST 2017] Getting new-authz for domain='www2.drjohnstechtalk.com'                                     [Thu Feb 23 11:55:54 EST 2017] The new-authz request is ok.
[Thu Feb 23 11:55:54 EST 2017] Add the following TXT record:
[Thu Feb 23 11:55:54 EST 2017] Domain: '_acme-challenge.www2.drjohnstechtalk.com'
[Thu Feb 23 11:55:54 EST 2017] TXT value: '7kU6pGgcNRtrPKuN2Wu1TIGS7YZDBhuiumLb9aEJwqc'
[Thu Feb 23 11:55:54 EST 2017] Please be aware that you prepend _acme-challenge. before your domain
[Thu Feb 23 11:55:54 EST 2017] so the resulting subdomain will be: _acme-challenge.www2.drjohnstechtalk.com
[Thu Feb 23 11:55:54 EST 2017] Please add the TXT records to the domains, and retry again.
[Thu Feb 23 11:55:54 EST 2017] Please add '--debug' or '--log' to check more details.
[Thu Feb 23 11:55:54 EST 2017] See: https://github.com/Neilpang/acme.sh/wiki/How-to-debug-acme.s/drjohnstechtalk.com/drjohnstechtalk.com/g

If you see an error like:

Usage: acme.sh --issue  -d  a.com  -w /path/to/webroot/a.com/

you probably left out the -d argument or something. I do that all the time for some reason. Go back and check your arguments.

Also note the order of arguments is significant! You have to put the ‐d last!

Anyway, after you’ve worked through any syntax errors like that, make the requested DNS entry in the zone file (do not include the quotes around the TXT value). Verify your entry with a command like this:

$ dig txt www2.drjohnstechtalk.com

Then run acme.sh again like this
$ sudo acme.sh ‐‐renew ‐d www2.drjohnstechtalk.com

[Thu Feb 23 12:02:18 EST 2017] Renew: 'www2.drjohnstechtalk.com'
[Thu Feb 23 12:02:18 EST 2017] Single domain='www2.drjohnstechtalk.com'
[Thu Feb 23 12:02:18 EST 2017] Getting domain auth token for each domain
[Thu Feb 23 12:02:19 EST 2017] Verifying:www2.drjohnstechtalk.com
[Thu Feb 23 12:02:22 EST 2017] Success
[Thu Feb 23 12:02:22 EST 2017] Verify finished, start to sign.
[Thu Feb 23 12:02:23 EST 2017] Cert success.
-----BEGIN CERTIFICATE-----
MIIFDjCCA/agAwIBAgISAzFs92uVHvnQCId6qFoaui9gMA0GCSqGSIb3DQEBCwUA
MEoxCzAJBgNVBAYTAlVTMRYwFAYDVQQKEw1MZXQncyBFbmNyeXB0MSMwIQYDVQQD
ExpMZXQncyBFbmNyeXB0IEF1dGhvcml0eSBYMzAeFw0xNzAyMjMxNjAyMDBaFw0x
NzA1MjQxNjAyMDBaMCAxHjAcBgNVBAMTFXd3dzIucmVmaW5pc2guYmFzZi51czCC
ASIwDQYJKoZIhvcNAQEBBQADggEPADCCAQoCggEBALa9QjcqPSZxXrJmt7kxV9ii
AAI7W0fQdWIk6aDHLfkhsSt55eASOAe05oxnZNqEmcJgXd+2+xUUmm8T5F92l4co
TFiIcMIQ5Jr7Gwg61RnDUe87vI4gctechhhnGcE//4iaJ8Va19exg8HD19dfpdGg
9J2DVnUBqKh4pvItUVe3h8KZOmftQZlLy1QXnEfwEyTj4kGo3phBgOIqh2x15/8Q
tKtM9yr4TKO8clgKLeyXV90ftg4t7kjCdtPx6oRIIq27CO3nwzFq/vFqg6HprE4b
RziUv1yajjw7aHkyhsjWmxdXBlIrokxK3EBrNUo3FUzlLHGGFT2RM1rkbhdaHB0C
AwEAAaOCAhYwggISMA4GA1UdDwEB/wQEAwIFoDAdBgNVHSUEFjAUBggrBgEFBQcD
AQYIKwYBBQUHAwIwDAYDVR0TAQH/BAIwADAdBgNVHQ4EFgQUCvxAhkhpo5Elmge/
3fz5asbprXEwHwYDVR0jBBgwFoAUqEpqYwR93brm0Tm3pkVl7/Oo7KEwcAYIKwYB
BQUHAQEEZDBiMC8GCCsGAQUFBzABhiNodHRwOi8vb2NzcC5pbnQteDMubGV0c2Vu
Y3J5cHQub3JnLzAvBggrBgEFBQcwAoYjaHR0cdrjo2NlcnQuaW50LXgzLmxldHNl
bmNyeXB0Lm9yZy8wIAYDVR0RBBkwF4IVd3d3Mi5yZWZpbmlzaC5iYXNmLnVzMIH+
BgNVHSAEgfYwgfMwCAYGZ4EMAQIBMIHmBgsrBgEEAYLfEwEBATCB1jAmBggrBgEF
BQcCARYaaHR0cDovL2Nwcy5sZXRzZW5jcnlwdC5vcmcwgasGCCsGAQUFBwICMIGe
DIGbVGhpcyBDZXJ0aWZpY2F0ZSBtYXkgb25seSBiZSByZWxpZWQgdXBvbiBieSBS
ZWx5aW5nIFBhcnRpZXMgYW5kIG9ubHkgaW4gYWNjb3JkYW5jZSB3aXRoIHRoZSBD
ZXJ0aWZpY2F0ZSBQb2xpY3kgZm91bmQgYXQgaHR0cHM6Ly9sZXRzZW5jcnlwdC5v
cmcvcmVwb3NpdG9yeS8wDQYJKoZIhvcNAQELBQADggEBADHFgJ3O8v/0zdG48Y1D
ci4wSQqZQSRtalknubVLRC12cr8ct1m0nZ7bxxQnZ/bSFShhcjepFowOfjfdY2ar
GzKP9IRgWavwm259WX5gM5FKUeN/Pjcz++vwUB8ci2+DpZu1tBf0eZcZ6JKsehij
A3lSPb4Ttq/GqDodumeJmvH4/FjCsjIqCJfQQYlz42QdZsLcA2l3oQ8smX0ZK8gh
sIm0SX4RggfiNGuNjw/tkfeC4xfjVNUSjKepUqgsVe63F6gRNjjm+/zsIlPLTdw3
AXGxE71Ww68avev7vRCvp+zPa43DQfVfV98v5M4i0M1/bT0Qh/4hLECma9wBBXb8
jXM=
-----END CERTIFICATE-----
[Thu Feb 23 12:02:23 EST 2017] Your cert is in  /root/.acme.sh/www2.drjohnstechtalk.com/www2.drjohnstechtalk.com.cer
[Thu Feb 23 12:02:23 EST 2017] Your cert key is in  /root/.acme.sh/www2.drjohnstechtalk.com/www2.drjohnstechtalk.com.key
[Thu Feb 23 12:02:23 EST 2017] The intermediate CA cert is in  /root/.acme.sh/www2.drjohnstechtalk.com/ca.cer
[Thu Feb 23 12:02:23 EST 2017] And the full chain certs is there:  /root/.acme.sh/www2.drjohnstechtalk.com/fullchain.cer

More complex example of issuing a SAN certificate using the manual DNS approach

$ ./acme.sh ‐‐issue ‐d johnstechtalk.mobi ‐‐dns ‐d www.johnstechtalk.mobi ‐d drjohnstechtalk.mobi ‐d www.drjohnstechtalk.mobi

[Mon Jan 23 09:21:55 EST 2017] Multi domain='DNS:www.johnstechtalk.mobi,DNS:drjohnstechtalk.mobi,DNS:www.drjohnstechtalk.mobi'
[Mon Jan 23 09:21:55 EST 2017] Getting domain auth token for each domain
[Mon Jan 23 09:21:55 EST 2017] Getting webroot for domain='johnstechtalk.mobi'
[Mon Jan 23 09:21:55 EST 2017] _w='dns'
[Mon Jan 23 09:21:55 EST 2017] Getting new-authz for domain='johnstechtalk.mobi'
[Mon Jan 23 09:21:57 EST 2017] The new-authz request is ok.
[Mon Jan 23 09:21:57 EST 2017] Getting webroot for domain='www.johnstechtalk.mobi'
[Mon Jan 23 09:21:57 EST 2017] _w='dns'
[Mon Jan 23 09:21:57 EST 2017] Getting new-authz for domain='www.johnstechtalk.mobi'
[Mon Jan 23 09:21:57 EST 2017] The new-authz request is ok.
[Mon Jan 23 09:21:57 EST 2017] Getting webroot for domain='drjohnstechtalk.mobi'
[Mon Jan 23 09:21:57 EST 2017] _w='dns'
[Mon Jan 23 09:21:57 EST 2017] Getting new-authz for domain='drjohnstechtalk.mobi'
[Mon Jan 23 09:21:58 EST 2017] The new-authz request is ok.
[Mon Jan 23 09:21:58 EST 2017] Getting webroot for domain='www.drjohnstechtalk.mobi'
[Mon Jan 23 09:21:58 EST 2017] _w='dns'
[Mon Jan 23 09:21:58 EST 2017] Getting new-authz for domain='www.drjohnstechtalk.mobi'
[Mon Jan 23 09:21:58 EST 2017] The new-authz request is ok.
[Mon Jan 23 09:21:58 EST 2017] Add the following TXT record:
[Mon Jan 23 09:21:58 EST 2017] Domain: '_acme-challenge.johnstechtalk.mobi'
[Mon Jan 23 09:21:58 EST 2017] TXT value: 'CDK_dACa_29apV30lc68Vo-mAx3e923ZOh6u-kyhXLo'
[Mon Jan 23 09:21:58 EST 2017] Please be aware that you prepend _acme-challenge. before your domain
[Mon Jan 23 09:21:58 EST 2017] so the resulting subdomain will be: _acme-challenge.johnstechtalk.mobi
[Mon Jan 23 09:21:58 EST 2017] Add the following TXT record:
[Mon Jan 23 09:21:58 EST 2017] Domain: '_acme-challenge.www.johnstechtalk.mobi'
[Mon Jan 23 09:21:58 EST 2017] TXT value: 'UC6JLg1hbXo0oRlYwSyrSRMD5nZgEKgdcIDZfhlqCrU'
[Mon Jan 23 09:21:58 EST 2017] Please be aware that you prepend _acme-challenge. before your domain
[Mon Jan 23 09:21:58 EST 2017] so the resulting subdomain will be: _acme-challenge.www.johnstechtalk.mobi
[Mon Jan 23 09:21:58 EST 2017] Add the following TXT record:
[Mon Jan 23 09:21:58 EST 2017] Domain: '_acme-challenge.drjohnstechtalk.mobi'
[Mon Jan 23 09:21:58 EST 2017] TXT value: 'y8ZCkJ-PXxGbeQFxh7RULCLGKyHH3G7FMFhKpMNF7ow'
[Mon Jan 23 09:21:58 EST 2017] Please be aware that you prepend _acme-challenge. before your domain
[Mon Jan 23 09:21:58 EST 2017] so the resulting subdomain will be: _acme-challenge.drjohnstechtalk.mobi
[Mon Jan 23 09:21:58 EST 2017] Add the following TXT record:
[Mon Jan 23 09:21:58 EST 2017] Domain: '_acme-challenge.www.drjohnstechtalk.mobi'
[Mon Jan 23 09:21:58 EST 2017] TXT value: '8nyb_V7AKaxy0U5pGTKmUejKEXgPv66VKne8yZYZMDg'
[Mon Jan 23 09:21:58 EST 2017] Please be aware that you prepend _acme-challenge. before your domain
[Mon Jan 23 09:21:58 EST 2017] so the resulting subdomain will be: _acme-challenge.www.drjohnstechtalk.mobi
[Mon Jan 23 09:21:59 EST 2017] Please add the TXT records to the domains, and retry again.
[Mon Jan 23 09:21:59 EST 2017] Please add '--debug' or '--log' to check more details.
[Mon Jan 23 09:21:59 EST 2017] See: https://github.com/Neilpang/acme.sh/wiki/How-to-debug-acme.sh

Then you add the DNS records they requested in the zone file, for instance,

_acme-challenge.johnstechtalk.mobi IN TXT CDK_dACa_29apV30lc68Vo-mAx3e923ZOh6u-kyhXLo

Then you rerun acme.sh, but with the renew argument:
$ ./acme.sh ‐‐renew ‐d johnstechtalk.mobi
and you should get your SAN certificate issued to you! All the files – private key, intermediate CERT, newly-issued SAN certificate – in ~/.acme.sh/johnstechtalk.mobi/

Of course just put in your own domain names in place of mine. I don’t know how quickly you have to act to put in your TXT records for the DNS authentication challenge. I edited zone files by hand and got them in within a few minutes.

And note the order of the arguments in the original acme.sh command. Often the switch order is immaterial in Linux, but for this command it matters a bit. You have your first mentioned domain, then the dns switch, then your other domain names.

Authorization expires
I got into trouble today, these many months later because my authorization had expired. The error looks like this:

[Sat Feb  3 17:14:00 EST 2018] _CURL='curl -L --silent --dump-header /root/.acme.sh/http.header '
[Sat Feb  3 17:14:01 EST 2018] _ret='0'
[Sat Feb  3 17:14:01 EST 2018] code='404'
[Sat Feb  3 17:14:01 EST 2018] drjohnstechtalk.com:Challenge error: {"type":"urn:acme:error:malformed","detail":"Expired authorization","status": 404}
[Sat Feb  3 17:14:01 EST 2018] Skip for removelevel:
[Sat Feb  3 17:14:01 EST 2018] pid
[Sat Feb  3 17:14:01 EST 2018] _clearupdns
[Sat Feb  3 17:14:01 EST 2018] Dns not added, skip.
[Sat Feb  3 17:14:01 EST 2018] _on_issue_err
[Sat Feb  3 17:14:01 EST 2018] Please add '--debug' or '--log' to check more details.
[Sat Feb  3 17:14:01 EST 2018] See: https://github.com/Neilpang/acme.sh/wiki/How-to-debug-acme.sh
[Sat Feb  3 17:14:02 EST 2018] Diagnosis versions:

Turns out there was a 10-month validity to my one-time DNS authorization which I did not know. So I switched to web root authorization and that seemed to work. That went like this:

$ acme.sh ‐‐issue ‐d drjohnstechtalk.com ‐w /webroot/drjohns

And I had to run that as root.


References and related

Idea for free web server certificates: Let’s Encrypt
Info about acme.sh
A great review of the state of hosting companies preparedness for offering SSL circa March 2018 in their hosting packages – so you can compare side-by-side – is in this Naked Security article: https://nakedsecurity.sophos.com/2018/03/12/with-4-months-to-switch-on-https-are-web-hosting-companies-ready/

Categories
Network Technologies Security

The IT Detective agency: the case of the incompatible sftp client

Intro
I was asked for assistance with this sftp problem:

$ sftp <user@host>

DH_GEX group out of range: 1536 !< 1024 !< 8192
Couldn't read packet: Connection reset by peer

We actually spoke with the operator of the sftp server who said their server is not compatible with openSSH version 6.2

The details
you can see your version of openssh and a lot more by running it again with the <v flag:

$ sftp ‐v [email protected]

OpenSSH_6.2p2, OpenSSL 0.9.8j-fips 07 Jan 2009
debug1: Reading configuration data /etc/ssh/ssh_config
debug1: /etc/ssh/ssh_config line 20: Applying options for *
debug1: Connecting to securefile.drj.com [50.17.188.196] port 22.
debug1: Connection established.
debug1: identity file /home/drj/.ssh/id_rsa type -1
debug1: identity file /home/drj/.ssh/id_dsa type -1
debug1: Enabling compatibility mode for protocol 2.0
debug1: Local version string SSH-2.0-OpenSSH_6.2
debug1: Remote protocol version 2.0, remote software version SSHD
debug1: no match: SSHD
debug1: SSH2_MSG_KEXINIT sent
debug1: SSH2_MSG_KEXINIT received
debug1: kex: server->client aes128-cbc hmac-sha1 none
debug1: kex: client->server aes128-cbc hmac-sha1 none
debug1: SSH2_MSG_KEX_DH_GEX_REQUEST(1536<7680<8192) sent
debug1: expecting SSH2_MSG_KEX_DH_GEX_GROUP
DH_GEX group out of range: 1536 !< 1024 !< 8192
Couldn't read packet: Connection reset by peer

At the same time, I could successfully connect on an older system – SLES 11 SP2 – whose detailed connection looked like this:

Connecting to securefile.drj.com...
OpenSSH_5.1p1, OpenSSL 0.9.8j-fips 07 Jan 2009
debug1: Reading configuration data /etc/ssh/ssh_config
debug1: Applying options for *
debug1: Connecting to securefile.drj.com [50.17.188.196] port 22.
debug1: Connection established.
debug1: identity file /home/drj/.ssh/id_rsa type -1
debug1: identity file /home/drj/.ssh/id_dsa type -1
debug1: Remote protocol version 2.0, remote software version SSHD
debug1: no match: SSHD
debug1: Enabling compatibility mode for protocol 2.0
debug1: Local version string SSH-2.0-OpenSSH_5.1
debug1: SSH2_MSG_KEXINIT sent
debug1: SSH2_MSG_KEXINIT received
debug1: kex: server->client aes128-cbc hmac-sha1 none
debug1: kex: client->server aes128-cbc hmac-sha1 none
debug1: SSH2_MSG_KEX_DH_GEX_REQUEST(1024<2048<8192) sent
debug1: expecting SSH2_MSG_KEX_DH_GEX_GROUP
debug1: SSH2_MSG_KEX_DH_GEX_INIT sent
debug1: expecting SSH2_MSG_KEX_DH_GEX_REPLY
The authenticity of host 'securefile.drj.com (50.17.188.196)' can't be established.
RSA key fingerprint is 13:bb:75:21:86:c0:d6:90:3d:5c:81:32:4c:7e:73:6b.
Are you sure you want to continue connecting (yes/no)?

See that version? it is only openSSH version 5.1. It seems to permit a shorter Diffie Hellman group exchange key length than does the newer version of openssh.

My solution
The standard advice on duckduckgo is to set this parameter in your $HOME/.ssh/config:

KexAlgorithms diffie-hellman-group-exchange-sha256,diffie-hellman-group14-sha1,diffie-hellman-group1-sha1

But this did not work for my case. And I didn’t want to change a setting that would weaken the security of all my other sftp connections. So I settled on using an additional command-line argument which is an openSSH parameter when running sftp:

$ sftp ‐o KexAlgorithms=diffie‐hellman‐group14‐sha1 <host>

And this worked!

And this works as well:

$ sftp ‐o KexAlgorithms=diffie‐hellman‐group1‐sha1 <host>

Why the change?
The minimum key length was changed from 1024 to 1536 and later to 2048 to avoid the logjam vulnerability.

Conclusion
Not all versions of openSSH are equal. In particular openSSH v 6.2 may be incompatible with older sftp servers. I showed a way to make a newer sftp work with an older server. Case closed.

References and related
Novell’s discussion of the issue is here: https://www.novell.com/support/kb/doc.php?id=7016904
Here’s some more information on the logjam vulnerability: https://weakdh.org/

Categories
Admin Apache Network Technologies Security

drjohnstechtalk now uses HTTP Strict Transport Security, HSTS

Intro
I was reading about a kind of amazingly thorough exploit which could be done using a Raspberry Pi zero. Physical access is required, but the scope of what this guy has figured out and put together is really amazing.

Reading the description I decided is a good exercise in making sure I understand the underlying technologies. One was admittedly something I hadn’t seen before: DNS re-binding. That got me to reading about DNS re-binding, and that got me to looking at defenses against DNS rebinding.

HSTS to the rescue
Since in DNS rebinding you may have either a MITM (man in the middle) or a web site impersonated by a hacker, one defense against it is to use HTTPS. (The hacker will not have access to a web site’s private key and therefore has no way to fake a certificate). But what they can do is redirect users from HTTPS to HTTP, where no certificate is required.

HSTS is designed to make that move tip off the user by complaining to the user. Upon first visit the user gets a cookie that says this site should be https. Subsequent visits then are enforced by the user’s browser that the site accessed must be HTTPS.

drjohnstechtalk update
Two years ago I switched the default way I run my blog web site from HTTP to HTTPS due to the encryption offered by HTTPS, and the fact that search engines penalize HTTP sites.

It seems a natural progression in this age of increasing security awareness to up the ante and now also run HSTS. For me this was easy. Since I run my own apache server I simply needed to add the appropriate HTTP Response header to my server responses.

This is done within the virtual server section of the apache configuration like so:

# Guarantee HTTPS for 1/2 Year including Sub Domains  - DrJ 11/22/16
# see https://itigloo.com/security/how-to-configure-http-strict-transport-security-hsts-on-apache-nginx/
    Header always set Strict-Transport-Security "max-age=15811200; includeSubDomains; preload"

Of course this requires that the apache mod_headers is included.

Results
I test it form a linux server like this:

$ curl ‐i ‐k ‐s https://drjohnstechtalk.com/blog/|head ‐15

HTTP/1.1 200 OK
Date: Tue, 22 Nov 2016 20:30:56 GMT
Server: Apache/2
Strict-Transport-Security: max-age=15811200; includeSubDomains
Vary: Cookie,Accept-Encoding
X-Powered-By: PHP/5.4.43
X-Pingback: https://drjohnstechtalk.com/blog/xmlrpc.php
Last-Modified: Tue, 22 Nov 2016 20:30:58 GMT
Transfer-Encoding: chunked
Content-Type: text/html; charset=UTF-8
 
<!DOCTYPE html>
<html lang="en-US">
<head>
<meta charset="UTF-8" />

See that new header Strict-Transport-Security: max-age=15811200; includeSubDomains; preload? That’s the result of what we did. But unless we put that preload at the end it doesn’t verify!

Capture-HSTS-verify-with-error

References and related
drjohnstechtalk is now encrypted – blog posting from 2014
This site has a good description of the requirements for a proper HSTS implementation, and I see that I missed something! https://hstspreload.appspot.com/
You can’t run https without a certificate. I soon will be using the free certificates offered by Let’s Encrypt. Here’s my write-up.

Categories
Consumer Tech

Consumer tech: How to safely add steps to your Fitbit

So my significant other realized after going to the park that she wasn’t wearing her Fitbit Alta. She’s a member of not one but two separate programs that provide certain incentives the more steps taken. So she wanted to add those missing steps – 4000 of them – to her Fitbit.

She put it in the dryer, on a special cycle which doesn’t produce heat. She knew how much it was adding by monitoring it with her smartphone. She believes it only took around 10 minutes to add 4000 steps this way. No harmful effects were noted. I suppose she put it inside of something like a sock or one o those nylons pouches. I was surprised it could have gone that quickly – that’s over 6 “steps” a second. Maybe it took a bit longer she conceded, but not more than 15 minutes.

Categories
CentOS DNS Linux Network Technologies Raspberry Pi Security Web Site Technologies

Roll your own dynamic DNS update service

Intro
I know my old Cisco router only has built-in support for two dynamic DNS services, dyndns.org and TZO.com. Nowadays you have to pay for those, if even they work (the web site domain names seem to have changed, but perhaps they still support the old domain names. Or perhaps not!). Maybe this could be fixed by firmware upgrades (to hopefully get more choices and hopefully a free one, or a newer router, or running DD-WRT. I didn’t do any of those things. Being a network person at heart, I wrote my own. I found the samples out there on the Internet needed some updating, so I am sharing my recipe. I didn’t think it was too hard to pull off.

What I used
– GoDaddy DNS hosting (basically any will do)
– my Amazon AWS virtual server running CentOS, where I have sudo access
– my home Raspberry Pi
– a tiny bit of php programming
– my networking skills for debugging

As I have prior experience with all these items this project was right up my alley.

Delegating our DDNS domain from GoDaddy
Just create a nameserver record from the domain, say drj.com, called, say, raspi, which you delegate to your AWS server. Following the example, the subdomain would be raspi.drj.com whose nameserver is drj.com.


DNS Setup on an Amazon AWS server

/etc/named.conf

//
// named.conf
//
// Provided by Red Hat bind package to configure the ISC BIND named(8) DNS
// server as a caching only nameserver (as a localhost DNS resolver only).
//
// See /usr/share/doc/bind*/sample/ for example named configuration files.
//
 
options {
//      listen-on port 53 { 127.0.0.1; };
//      listen-on port 53;
        listen-on-v6 port 53 { ::1; };
        directory       "/var/named";
        dump-file       "/var/named/data/cache_dump.db";
        statistics-file "/var/named/data/named_stats.txt";
        memstatistics-file "/var/named/data/named_mem_stats.txt";
        allow-query     { any; };
        recursion no;
 
        dnssec-enable yes;
        dnssec-validation yes;
        dnssec-lookaside auto;
 
        /* Path to ISC DLV key */
        bindkeys-file "/etc/named.iscdlv.key";
 
        managed-keys-directory "/var/named/dynamic";
};
 
logging {
        channel default_debug {
                file "data/named.run";
                severity dynamic;
        };
};
 
zone "." IN {
        type hint;
        file "named.ca";
};
 
include "/etc/named.rfc1912.zones";
include "/var/named/dynamic.conf";
include "/etc/named.root.key";

/var/named/dynamic.conf

zone "raspi.drj.com" {
  type master;
  file "/var/named/db.raspi.drj.com";
// designed to work with nsupdate -l used on same system - DrJ 10/2016
// /var/run/named/session.key
  update-policy local;
};

/var/named/db.raspi.drj.com

$ORIGIN .
$TTL 1800       ; 30 minutes
raspi.drj.com      IN SOA  drj.com. postmaster.drj.com. (
                                2016092812 ; serial
                                1700       ; refresh (28 minutes 20 seconds)
                                1700       ; retry (28 minutes 20 seconds)
                                1209600    ; expire (2 weeks)
                                600        ; minimum (10 minutes)
                                )
                        NS      drj.com.
$TTL 3600       ; 1 hour
                        A       125.125.73.145

Named re-starting program
Want to make sure your named restarts if it happens to die? nanny.pl is a good, simple monitor to do that. Here is the version I use on my server. Note the customized variables towards the top.

#!/usr/bin/perl
#
# Copyright (C) 2004, 2007, 2012  Internet Systems Consortium, Inc. ("ISC")
# Copyright (C) 2000, 2001  Internet Software Consortium.
#
# Permission to use, copy, modify, and/or distribute this software for any
# purpose with or without fee is hereby granted, provided that the above
# copyright notice and this permission notice appear in all copies.
#
# THE SOFTWARE IS PROVIDED "AS IS" AND ISC DISCLAIMS ALL WARRANTIES WITH
# REGARD TO THIS SOFTWARE INCLUDING ALL IMPLIED WARRANTIES OF MERCHANTABILITY
# AND FITNESS.  IN NO EVENT SHALL ISC BE LIABLE FOR ANY SPECIAL, DIRECT,
# INDIRECT, OR CONSEQUENTIAL DAMAGES OR ANY DAMAGES WHATSOEVER RESULTING FROM
# LOSS OF USE, DATA OR PROFITS, WHETHER IN AN ACTION OF CONTRACT, NEGLIGENCE
# OR OTHER TORTIOUS ACTION, ARISING OUT OF OR IN CONNECTION WITH THE USE OR
# PERFORMANCE OF THIS SOFTWARE.
 
# $Id: nanny.pl,v 1.11 2007/06/19 23:47:07 tbox Exp $
 
# A simple nanny to make sure named stays running.
 
$pid_file_location = '/var/run/named/named.pid';
$nameserver_location = 'localhost';
$dig_program = 'dig';
$named_program =  '/usr/sbin/named -u named';
 
fork() && exit();
 
for (;;) {
        $pid = 0;
        open(FILE, $pid_file_location) || goto restart;
        $pid = <FILE>;
        close(FILE);
        chomp($pid);
 
        $res = kill 0, $pid;
 
        goto restart if ($res == 0);
 
        $dig_command =
               "$dig_program +short . \@$nameserver_location > /dev/null";
        $return = system($dig_command);
        goto restart if ($return == 9);
 
        sleep 30;
        next;
 
 restart:
        if ($pid != 0) {
                kill 15, $pid;
                sleep 30;
        }
        system ($named_program);
        sleep 120;
}

The PHP updating program myip-update.php

<?php
# DrJ: lifted from http://pablohoffman.com/dynamic-dns-updates-with-a-simple-php-script
# but with some security improvements
# 10/2016
# PHP script for very simple dynamic DNS updates
#
# this script was published in http://pablohoffman.com/articles and
# released to the public domain by Pablo Hoffman on 27 Aug 2006
 
# CONFIGURATION BEGINS -------------------------------------------------------
# define password here
$mysecret = 'myBigFatsEcreT';
# CONFIGURATION ENDS ---------------------------------------------------------
 
 
$ip = $_SERVER['REMOTE_ADDR'];
$host = $_GET['host'];
$secret = $_POST['secret'];
$zone = $_GET['zone'];
$tmpfile = trim(`mktemp /tmp/nsupdate.XXXXXX`);
 
if ((!$host) or (!$zone) or (!($mysecret == $secret))) {
    echo "FAILED";
    unlink($tmpfile);
    exit;
}
 
$oldip = trim(`dig +short $host.$zone @localhost`);
if ($ip == $oldip) {
    echo "UNCHANGED. ip: $ip\n";
    unlink($tmpfile);
    exit;
}
 
echo "$ip - $oldip";
 
$nsucmd = "update delete $host.$zone A
update add $host.$zone 3600 A $ip
send
";
 
$fp = fopen($tmpfile, 'w');
fwrite($fp, $nsucmd);
fclose($fp);
`sudo nsupdate -l $tmpfile`;
unlink($tmpfile);
echo "OK ";
echo `date`;
?>

In the above file I added the “sudo” after awhile. See explanation further down below.

Raspberry Pi requirements
I’ve assumed you can run your Pi 24 x 7 and constantly and consistently on your network.

Crontab entry on the Raspberry Pi
Edit the crontab file for periodically checking your IP on the Pi and updating external DNS if it has changed by doing this:

$ crontab ‐e
and adding the line below:

# my own method of dynamic update - DrJ 10/2016
0,10,20,30,40,50 * * * * /usr/bin/curl -s -k -d 'secret=myBigFatsEcreT' 'https://drj.com/myip-update.php?host=raspi&zone=drj.com' >> /tmp/ddns 2>&1

A few highlights
Note that I’ve switched to use of nsupdate -l on the local server. This will be more secure than the previous solution which suggested to have updates from localhost. As far as I can tell localhost updates can be spoofed and so should be considered insecure in a modern infrastructure. I learned a lot by running nsupdate -D -l on my AWS server and observing what happens.
And note that I changed the locations of the secret. The old solution had the secret embedded in the URL in a GET statement, which means it would also be embedded in every single request in the web server’s access file. That’s not a good idea. I switched it to a POSTed variable so that it doesn’t show up in the web server’s access file. This is done with the -d switch of curl.

Contents of temporary file
Here are example contents. This is useful when you’re trying to run nsupdate from the command line.

update delete raspi.drj.com A
update add raspi.drj.com 3600 A 51.32.108.37
send


Permissions problems

If you see something like this on your DNS server:

$ ll /var/run/named

total 8
-rw-r--r-- 1 named www-data   6 Nov  6 03:15 named.pid
-rw------- 1 named www-data 102 Oct 24 09:42 session.key

your attempt to run nsupdate by your web server will be foiled and produce something like this:

$ /usr/bin/nsupdate ‐l /tmp/nsupdate.LInUmo

06-Nov-2016 17:14:14.780 none:0: open: /var/run/named/session.key: permission denied
can't read key from /var/run/named/session.key: permission denied

The solution may be to permit group read permission:

$ cd /var/run/named; sudo chmod g+r session.key

and make the group owner of the file your webserver user ID (which I’ve already done here). I’m still working this part out…

That approach doesn’t seem to “stick,” so I came up with this other approach. Put your web server user in sudoers to allow it to run nsupdate (my web server user is www-data for these examples):

Cmnd_Alias     NSUPDATE = /usr/bin/nsupdate
# allow web server to run nsupdate
www-data ALL=(root) NOPASSWD: NSUPDATE

But you may get the dreaded

sudo: sorry, you must have a tty to run sudo

if you manage to figure out how to turn on debugging.

So if your sudoers has a line like this:

Defaults    requiretty

you will need lines like this:

# turn of tty requirements only for www-data user
Defaults:www-data !requiretty

Debugging
Of course for debugging I commented out the unlink line in the PHP update file and ran the
nsupdate -l /tmp/nsupdate.xxxxx
by hand as user www-data.

During some of the errors I worked through that wasn’t verbose enough so I added debugging arguments:

$ nsupdate ‐D ‐d ‐l /tmp/nsupdate.xxxxx

When that began to work, yet when called via the webserver it wasn’t working, I ran the above command from within PHP, recording the output to a file:

...
`sudo nsupdate -d -D -l $tmpfile > /tmp/nsupdate-debug 2>&1`

That turned out to be extremely informative.

Conclusion
We have shown how to combine a bunch of simple networking tools to create your own DDNS service. The key elements are a Raspberry Pi and your own virtual server at Amazon AWS. We have built upon previous published solutions to this problem and made them more secure in light of the growing sophistication of the bad guys. Let me know if there is interest in an inexpensive commercial service.

References and related

nanny.pl write-up: https://www.safaribooksonline.com/library/view/dns-bind/0596004109/ch05s09.html