Categories
Network Technologies

Voice and data vlans on one switch port, no vlan tagging: how does that work?

Intro
We had a Cisco video conference unit pick up an IP from a data vlan whereas we expected it to pick it up from a voice vlan, where we had assigned it a static IP. What happened?

The details
I have to admit I never paid attention to the switch ports in the offices. All these years and I didn’t really appreciate the fact that you can plug in either a PC or a Cisco phone to the same switch port, yet the PC “knows” to go onto a data vlan while the phone “knows” to put itself onto a voice vlan. How cuold that be?

Naively, just talking it out, I had this jumble of “facts” in my mind:

– sharing vlans on one switch port is done through vlan tagging
– the equipment plugged in must know the switch port is using vlan tagging or else disastrous results occur (see this post for some examples)
– if in addition you’re a PC using DHCP, how would you know which valn to go onto? How would you learn the connection is tagged?
– well, there can be a native vlan in addition to tagged vlans. Maybe they used that?

Fortunately I have some friends with access to the switch config. Here it is for one specific typical port:

interface FastEthernet0/2
description Data & Voice vlanC
switchport access vlan 103
switchport mode access
switchport voice vlan 703
...

I puzzled over that for awhile because, well, what does it mean?? In my world of servers you have two port types: access ports and truink ports. Trunk ports are the ones that have tagged vlans. Access ports provide a single unttagged vlan’s traffic to the port.

It’s pretty clearly declaring this switch port to be an access port, not a trunk port. And yet two vlans are referred to. There’s this command I’ve never seen or used before swithcport voice. How does this fit with the jumble of facts above? The jumble of facts need to be amended…

I asked another expert and he said he heard that the Cisco phones use something called LLDP – link layer discovery porotocol. From researching the predecessor protocol was CDP – Cisco Discovery protcol.

Switchport voice vlan 703 is something like introducing tagging for vlan703, if I read the Cisco documentation correctly.

The magic happens
This is often described as magic or voodoo so we will treat it like that too! A Cisco phone uses LLDP to learn from the switch that the voice vlan is 703. Then somehow it tags(?) its traffic to use only that vlan, even for its DHCP discover. A PC or any other normal host by contrast does not use LLDP and is only exposed to the data vlan 103 (the “native” vlan) so it gets an IP from doing DHCP discover on that vlan.

Do I believe my own explanation? Not really. It’s the best I got. I really should do a packet trace to confirm but who has the time?

That video conference unit? They say when they boot it a second time it jumps onto the correct vlan and picks up the desired static IP. Again, no one’s really sure why.

Conclusion
Strange DHCP behavious on the part of a Cisco video conference unit forces us to think through how data + voice on one switch port might actually be working on a typical Cisco-powered office environment. We probably – definitely – didn’t nail it, but we must be close to the essentially correct answer.

References and related
As always Wikipedia has an article somewhat explaining LLDP

Categories
Linux Raspberry Pi

Solution to this week’s NPR puzzle using simple Linux commands, again

Intro
As I understood it, this week’s NPR puzzle is as follows. Think of a figure from the Bible with five letters. Move each letter three back, e.g., an “e” becomes a “b.” Find the Biblical figure which becomes an ailment after doing this transformation.

Initial thoughts
I figured this would be eminently amenable to some simple linux commands like I’ve done with previous puzzles (most are not, by the way). I was having a hard time doing these transformations in my head while I was driving, and the first names I tried came up empty, such as Jesus or Moses.

So I figured I could write a program to do the character transformations on each and every word and I could probably find a downloadable text version of the Bible. I didn’t find a pure text version, but I did download an HTML version, which is close enough for our purposes.

Then I was going to just keep the five-letter words and do this transformation on all of them and match against dictionary words. Then I would have taken just those matches and scanned by hand to look for words that are ailments, hoping there wouldn’t be too many matched words to contend with.

Finally settled on a different approach
That looked like a bit of work so I thought about it and decided there had to be a resource for just the figures in the Bible, and voila, there is, in Wikipedia, see the references.

rot13
Rot13 is a famous cipher (encryption is too strong a word to describe this simple approach), where A becomes N, B becomes O, etc. I had a feeling the tr command in linux might be able to do this but didn’t know how. So I searched for linux, tr and rot13 and found an example online. It was easy to adapt.

We need what you could call a rot -3. Here is the command.

$ tr 'A‐Za‐z' 'X‐ZA‐Wx‐za‐w'

So I put the text of the Wikipedia page of Biblical figures into a text file on my linux server, into a file called list-of-biblical-figures. It looks like this:

Adam to David according to the Bible
Creation to Flood
 
    Adam Seth Enos Kenan Mahalalel Jared Enoch Methuselah Lamech Noah Shem
 
Cain line
 
    Adam Cain Enoch Irad Mehujael Methusael Lamech Tubal-cain
 
Patriarchs after Flood
 
    Arpachshad Cainan Shelah Eber Peleg Reu Serug Nahor Terah Abraham Isaac Jacob
 
Tribe of Judah to Kingdom
 
    Judah Perez Hezron Ram Amminadab Nahshon Salmon Boaz Obed Jesse David
...

I was going to tackle just pulling the figures with five-character names, but the whole list isn’t that long so I skipped even that step and just put the list through as is:

$ cat list-of-biblical-figures|tr 'A‐Za‐z' 'X‐ZA‐Wx‐za‐w'

comes back as

Xaxj ql Axsfa xzzloafkd ql qeb Yfyib
Zobxqflk ql Cilla
 
    Xaxj Pbqe Bklp Hbkxk Jxexixibi Gxoba Bklze Jbqerpbixe Ixjbze Klxe Pebj
 
Zxfk ifkb
 
    Xaxj Zxfk Bklze Foxa Jbergxbi Jbqerpxbi Ixjbze Qryxi-zxfk
 
Mxqofxozep xcqbo Cilla
 
    Xomxzepexa Zxfkxk Pebixe Bybo Mbibd Obr Pbord Kxelo Qboxe Xyoxexj Fpxxz Gxzly
 
Qofyb lc Graxe ql Hfkdalj
 
    Graxe Mbobw Ebwolk Oxj Xjjfkxaxy Kxepelk Pxijlk Ylxw Lyba Gbppb Axsfa
...
    Ebola
...

So it’s all gibberish as you might hope. Then towards the end you come across this one thing and it just pops out at you. As is my custom I won’t give it away before the deadline. [update] OK. Submission deadline has passed. Ebola just really popped out. Going back to the original text, you see it lines up with Herod. So there you have it.

I double-checked and confirmed this also works on a Raspberry Pi. I’ve come to realize that most people don’t have their own server, but hundreds of thousands or perhaps millions have a Raspberry Pi, which is a linux server, which makes techiques like this accessible. And fun.

Conclusion
I show a technique for using a linux server such as a Raspberry Pi to solve this week’s NPR puzzle. A very simple approach worked. In fact I was able to solve the puzzle and write this post in about an hour!

References and related
HTML version of Bible: https://ebible.org/Scriptures/eng-web_html.zip
Biblical figures: https://en.wikipedia.org/wiki/List_of_major_biblical_figures
An earlier NPR puzzle solved with linux command line techniques

Categories
DNS

The IT detective agency: rogue IPv6 device messes up DHCP for entire subnet

Intro
This was a fascinating case insofar as it was my first encounter with a real life IPv6 application. So it was trial by fire.

The details
I think the title of the post makes clear what happened. The site people were saying they can ping hosts by IP but not by DNS name. So basically nothing was working. I asked them to do an ipconfig /all and send me the output. At the top of the list of DNS servers was this funny entry:

IPv6 DNS server shows up first

I asked them to run nslookup, and sure enough, it timed out trying to talk to that same IPv6 server. Yet they could PING it.

The DNS servers listed below the IPv6 one were the expected IPv4 our enterprise system hands out.

My quick conclusion: there is a rogue host on their subnet acting as an IPv6 DHCP server! It took some convincing on my part before they got on board with that idea.

But I goofed too. In my haste to move on, I confused an IPv6 address with a MAC address. Rookie IPv6 mistake I suppose. It looked strange, had letters and even colons, so it kind of looks like a MAC address, right? So I gave some quick advice to get rid of the problem: identify this address on the switch, find its port and disable it. So the guy looked for this funny MAC address and of course didn’t find it or anything that looked like it.

My general idea was right – there was a rogue IPv6 DHCP server.

My hypothesis as to what happened
The PCs have both an IPv4 as well as an IPv6 stack, as does just about everyone’s PC. These stacks run independently of each other. Everyone blissfully ignores the IPv6 communication, but that doesn’t mean it’s not occurring. I think these PCs got an IPv4 IP and DNS servers assigned to them in the usual way. All good. Then along came a DHCPv6 server and the PC’s IPv6 stack sent out a DHCPv6 request to the entire subnet (which it probably is doing periodically all along, there just was never a DHCPv6 server answering before this). This time the DHCPv6 server answered and gave out some IPv6-relevant information, including a IPv6 DNS server.

I further hypothesize that what I said above about the IPv4 and IPv6 stacks being independent is not entirely true. These stacks are joined in one place: the resolving nameservers. You only get one set of resolving namesevrers for your combined IPv4/IPv6 stacks, which sort of makes sense because DNS servers can answer queries about IPv6 objects if they are so configured. So, anyway, the DHCPv6 client decides to put the DNS server it has learned about from its DHCPv6 server at the front of the existing nameserver list. This nameserver is totally busted, however and sits on the request and the client’s error handling isn’t good enough to detect the problem and move on to the next nameserver in the list – an IPv4 nameserver which would have worked just great – despite the fact that it is designed to do just that. And all resolution breaks and breaks badly.

What was the offending device? They’re not saying, except we heard it was a router, hence, a host introduced by the LAN vendor who can’t or won’t admit to having made such an error, instead making a quiet correction. Quiet because of course they initially refused the incident and had us look elsewhere for the source of the “DHCP problem.”

Alternate theory
I see that IPv6 devices do not need to get DNS servers via DHCPv6. They can use a new protocol, NDP, neighbor discovery protocol. Maybe the IPv6 stack is periodically trying NDP and finally got a response from the rogue device and put that first on the list of nameservers. No DHCPv6 really used in that scenario, just NDP.

Useful tips for layer 2 stuff
Here’s how you can find the MAC of an IPv6 device which you have just PINGed:

netsh interface ipv6 show neighbors

from a CMD prompt on a Windows machine.

In Linux it’s

ip ‐6 neigh show

Conclusion
Another tough case resolved! We learn some valuable things about IPv6 in the process.

References and related
I found the relevant commands in this article: https://www.midnightfreddie.com/how-to-arp-a-in-ipv6.html

Categories
Web Site Technologies

Where is my IP without the aggressive ads

Intro
To locate where any IP address is located – known as geoip – you can do a simple duckduckgo search and get an idea, but you may also get sucked into one of those sites that provides a service while subjecting you to a lot of advertising. So I prefer to have the option to go to the source.

For that I kind of like this site: https://www.maxmind.com/en/geoip-demo

Maxmind also has a free downloadable database of all IPs known as GeoLite2. If I get time I may explore using it.

References and related
https://www.maxmind.com/en/geoip-demo

Categories
Consumer Tech

What credit card fraud looks like

Intro
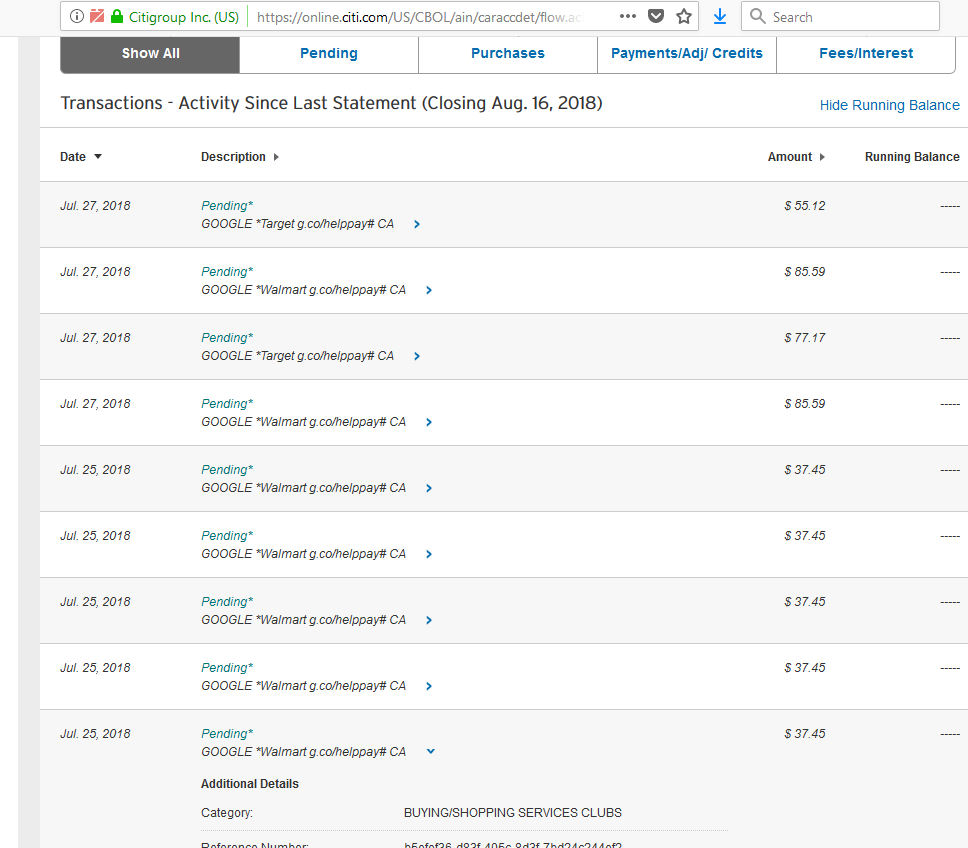
A lost credit card. Or was it misplaced? Months later a whole bunch of “modest” charges appear all at once, a couple days after a few lower-value test charges were made.

Thank goodness I had the presence of mind to lower my alert limit on transactions from $200 to $50. I was not too late to have all the charges disputed despite the test charges being two days old.

What fraudulent credit card charges look like

I do not know how these charges were created – what is Google/Walmart or Google/Target.

I can guess how my address was matched to the card – it’s a sufficiently uncommon last name available from simple public records.

Conclusion
Well, now we know the card was lost or stolen, not misplaced. After all these years that’s the first time that has happened to us. We will not be responsible for the disputed charges.

Categories
Uncategorized

NJ homeowners: how to sell your SRECs from your solar panels

Intro
I was an enthusiast and got solar panels on my roof while there was still a tax credit for doing so. But then i became lazy and didn’t want to bother selling the SRECs I was awarded. Here is what I did.

The details
I got a recommendation from a friend who found a legitimate company who will buy my SRECs with a process so simple no registration is required! And, their prices seem competitive.

Here are the CEPS I’ve accumulated on the PJM-EIS web site. And no, I don’t really know how to use the site other than to report my generation. I just wasn’t that interested.

CEPS from Dr John’s home solar system

CEPS is a synonym for SRECs. SREC is a solar renewable energy credit. It’s a unit of measure = 1 Kilowatt Hour of generation by your system.

Here is the web site of the company I will sell them to: http://njsrec.com/

And their instructions – clearly written for someone not overly familiar with using a computer as everything is spelled out:

NJSREC.COM instructions

I haven’t sold them yet because I will have another one by tomorrow so I’ll wait for that one and bundle them all together. They get credited to your account on the last day of the month. My friend uses them however so I know they are to be trusted. They will simple send you a check in the mail for your CEPS after you follow those simple instructions!

Conclusion
We recommend NJSREC.COM as the simplest way to sell your SRECs and know you are not being taken advantage of. As of this writing July 2018 a quantity of 4 – 10 CEPS is worth $201 per CEPS. The prices have been going down (mostly) and will continue to go down. So don’t hold on too long, i.e., years.

References and related

The GATS web site is https://www.pjm-eis.com/
The buyer’s web site: http://njsrec.com/

Categories
Admin Linux Network Technologies SLES

Linux tip: how to enable remote syslog on SLES

Intro
I write this knowing I still don’t know anything to speak of about syslog, but, sometimes you gotta act without knowing. I needed to send syslog to somewhere in a big hurry so I figured out the absolute minimum I needed to do to get it running on one of my other systems.

The details
This all started because of a deficiency in the F5 ASM. At best it’s do slow when looking through the error log. But in particular there was one error that always timed out when I tried to bring up the details, a severity 5 error, so it looked pretty important. Worse, local logging, even though it is selected, also does not work – the /var/log/asm file exists but contains basically nothing of interest. I suppose there is some super-fancy and complicated MySQL command you could run to view the logs, but that would take a long time to figure out.

So for me the simplest route was to enable remote syslog on a Linux server and send the ASM logging to it. This seems to be working, by the way.

The minimal steps
Again, this was for Suse Enterprise Linux running syslog-ng.

  1. modify /etc/sysconfig/syslog as per the next step
  2. SYSLOGD_PARAMS=”-r”
  3. modify /etc/syslog-ng/syslog-ng.conf as per the next step
  4. uncomment this line: udp(ip(“0.0.0.0”) port(514));
  5. launch yast (I use curses-based yast [no X-Windows] which is really cantankerous)
  6. go to Security and Users -> Firewall -> Allowed services -> Internal Zone -> Advanced
  7. add udp port 514 as additional allowed Ports in internal zone and save it
  8. service syslog stop
  9. service syslog start
  10. You should start seeing entries in /var/log/localmessages as in this suitably anonymized example (I added a couple line breaks for clarity:
Jul 27 14:42:22 f5-drj-mgmt ASM:"7653503868885627313","50.17.188.196","/Common/drjohnstechtalk.com_profile","blocked","/drjcrm/bi/tjhmore345","0","Illegal URL,Attack signature detected","200021075","Automated client access ""curl""","US","<!--?xml version='1.0' encoding='UTF-8'?-->44e7f1ffebff2dfb-800000000000000044f7f1ffebff2dfb-800000000000000044e7f1ffe3ff2dfb-80000000000000000000000000000000-000000000000000042VIOL_ATTACK_SIGNATURErequest200021075
7VXNlci1BZ2VudDogY3VybC83LjE5LjcgKHg4Nl82NC1yZWRoYXQtbGludXgtZ251KSBsaWJjdXJsLzcuMTkuNyBOU1MvMy4yNy4xIHpsaWIvMS4yLjMgbGliaWRuLzEuMTggbGlic3NoMi8xLjQuMg0KSG9zdDogYWctaW50ZWw=
01638
VIOL_URL","GET /drjcrm/bi/tjhmore345 HTTP/1.1\r\nUser-Agent: curl/7.19.7 (x86_64-redhat-linux-gnu) libcurl/7.19.7 NSS/3.27.1 zlib/1.2.3 libidn/1.18 libssh2/1.4.2\r\nHost: drjohnstechtalk.com\r\nAccept: */*\r\n\r\n"

Observations
Interestingly, there is no syslogd on this particular system, and yet the “-r” flag is designed for syslogd – it’s what turns it into a remote syslogging daemon. And yet it works.

It’s easy enough to log these messages to their own file, I just don’t know how to do it yet because I don’t need to. I learn as I need to. just as I learned enough to publish this tip.

Conclusion
We have demonstrated activating the simplest possible remote syslogger on Suse Linux Enterprise Server.

References and related

Want to know what syslog is? Howtonetwork has this very good writeup: https://www.howtonetwork.com/technical/security-technical/syslog-server/

Categories
Security

Suppress /apple-touch-icon URLs on an F5 ASM

Intro
Displaying the ASM event log is slow – it can take minutes on our older equipment. So anything that helps cut out the clutter in the returned log entries may save precious minutes of, e.g., paging to the next screen (also a minute). At some point I realized the logs were mostly filled with complaints about illegal URLs beginning with /apple-touch-icon… So i found a way to suppress those. This is for version 12.1

The problem

Typical example from a typical WAF log

The details

LTM policy to suppress those entries

How to edit policy
These are policies in the Local Traffic section. It’s not that intuitive. Clicking on the policy name will give you a read-only view and no evident way to switch to an edit mode. What you do is click on Create Draft. That creates a “draft policy” which you can edit. There you can introduce the rule above. Drag it to the top. Hit Save and publish draft and it should go live.

The best way?
It’s debatable if this is the best way to suppress these. if they come from legitmate devices mistakenly asking for these URLs it’s probably nicer to send them a 404 Not found. An iRule would be required for that.

Conclusion
We show how to suppress annoying ASM log entries saying illegal URL, /apple-touch-icon… on an F5 web application firewall. What is producing these URL attempts I just don’t know at this point. I suspect them to be innocuous.

Categories
Raspberry Pi SLES Web Site Technologies

Pi-hole: it’s as easy as pi to get rid of your advertisements

Intro
I learned about pi-hole from Bloomberg Businessweek of all places. Seems right up my alley – uses Raspberry Pi in your home to get rid of advertisements. Turns out it was too easy and I don’t have much to contribute except my own experiences with it!

The details
When I read about it I got to thinking big picture and wondered what would prevent us from running an enterprise version of this same thing? Well, large enerprises don’t normally run production critical applications like DNS servers (which this is, by the way) on Raspberry Pis, which is not the world’s most stable hardware! But first I had to try it at home just to learn more about the technology.

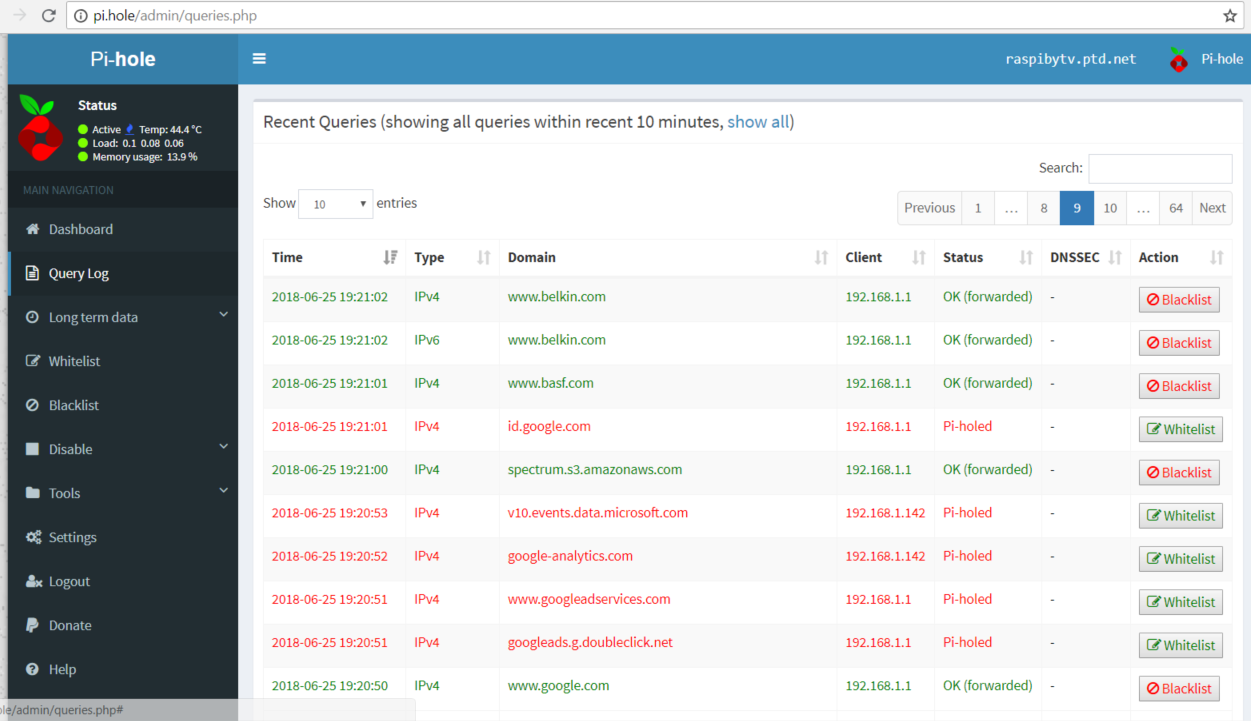
pi-hole admin screen

I was surprised just how optimized it was for the Raspberry Pi, to the neglect of other systems. So the idea of using an old SLES server is out the window.

But I think I got the essence of the idea. It replaces your DNS server with a custom one that resolves normal queries for web sites the usual way, but for DNS queries that would resolve to an Ad server, it clobbers the DNS and returns its own IP address. Why? So that it can send you a harmless blank image or whatever in place of an Internet ad.

You know those sites that obnoxiously throw up those auto-playing videos? That ain’t gonna happen any more when you run pi-hole.

You have to be a little adept at modifying your home router, but they even have a rough tutorial for that.

Installation
For the record on my Rspberry Pi I only did this:
$ sudo su ‐
$ curl ‐sSL https://install.pi‐hole.net | bash

It prompted me for a few configuration details, but the answers were obvious. I chose Google DNS servers because I have a long and positive history using them.

You can see that it installs a bunch of packages – surprisingly many considering how simple in theory the thing is.

Test it
On your Raspberry Pi do a few test resolutions:

$ dig google.com @localhost # should look like it normally does
$ dig pi.hole # should return the IP of your Raspberry Pi
$ dig adservices.google.com # I gotta check this one. Should return IP address of your Pi

It runs a little web server on your Pi so the Pi acts as adservices.google.com and just serves out some white space instead of the ad you would have gotten.

Linksys router
Another word about the home router DHCP settings. You have the option to enter DNS server. So I put the IP address of my raspberry pi, 192.168.1.119. What I expected is that this is the DNS server that would be directly handed out to the DHCP clients on my home network. But that is not the case. Instead it still hands out itself, 192.168.1.1 as DNS server. But in turn it uses the raspberry PI for its resolution. This through me when I did an ipconfig /all on my Windows 10 and didn’t see the DNS server I expected. But it wa all working. About 10% of my DNS queries were pi-holed (see picture of my admin screen above).

I guess pi-hole is run by fanatics, because it works surprisingly well. Those complex sites still worked, like cnn.com, cnet.com. But they probably load faster without the ads.

Two months check up

I checked back with pihole. I know a DNS server is running. The dashboard is broken – the sections just have spinning circle instead of data. It’s already asking me to upgrade to v 3.3.1. I run pihole -up to do the upgrade.

Another little advantage
I can now ssh to my pi by specifying the host as pi.hole – which I can actually remember!

Idea for enterprise
finally, the essence of the idea probably could be ported over to an enterprise. In my opinion the secret sauce are the lists of domain names to clobber. There are five or six of them. Some have 50,000 entries. So you’d probably need a specialized DNS server rather than the default ISC BIND. I remember running a specialized DNS server like that when I ran Puremessage by Sophos. It was optimized to suck in real-time blacklists and the like. I have to dig through my notes to see what we ran. I’m sure it wasn’t dnsmasq, which is what pi-hole runs on the Raspberry Pi! But with these lists and some string manipulation and a simple web server I’d think it’d be possible to replicate in enterprise environment. I may never get the opportunity, more for lack of time than for lack of ability…

Conclusion
Looking for a rewarding project for your Raspberry Pi? Spare yourself Internet advertisements at home by putting it to work.

References and related
The pi-hole web site: https://pi-hole.net/
Another Raspberry Pi project idea: monitor your cable modem and restart it when it goes south.

Categories
CentOS

Docker on CentOS 6: FAIL

Intro
I think I’ve been running CentOS 6 for six years now. With upgrades I’m at v 6.9. It was nice and new six years ago, but not so much anymore. I think it showed its age when I tried to run Docker. It just wouldn’t fly an I don’t feel like debugging it. The conventional wisdom seems to be that it is not possible – the two are incompatible, which further discouraged me.

Here are my notes

followed https://www.liquidweb.com/kb/how-to-install-docker-on-centos-6/ - DrJ 6/18/18
 
my problem:
level=error msg="[graphdriver] prior storage driver \"devicemapper\" failed: Error running DeviceCreate (CreatePool) dm_tas
k_run failed"
https://github.com/moby/moby/issues/13008
 
 
docker -d -D
...
DEBU[0000] Warning: could not change group /var/run/docker.sock to docker: Group docker not found
INFO[0000] Listening for HTTP on unix (/var/run/docker.sock)
WARN[0000] You are running linux kernel version 2.6.32-131.17.1.el6.x86_64, which might be unstable running docker. Please
upgrade your kernel to 3.10.0.
DEBU[0000] devicemapper: driver version is 4.20.6
DEBU[0000] Generated prefix: docker-202:65-131224
DEBU[0000] Checking for existence of the pool 'docker-202:65-131224-pool'
DEBU[0000] Pool doesn't exist. Creating it.
DEBU[0000] Error retrieving the next available loopback: open /dev/loop-control: no such file or directory
ERRO[0000] [graphdriver] prior storage driver "devicemapper" failed: Error running DeviceCreate (CreatePool) dm_task_run fa
iled
FATA[0000] Error starting daemon: error initializing graphdriver: Error running DeviceCreate (CreatePool) dm_task_run faile
d
john@ip-10-164-80-53:~$ docker -v
Docker version 1.7.1, build 786b29d/1.7.1
 
 
trying:
 
yum install --setopt=obsoletes=0 \
   docker-ce-17.03.2.ce-1.el7.centos.x86_64 \
   docker-ce-selinux-17.03.2.ce-1.el7.centos.noarch
(from https://github.com/docker/for-linux/issues/20)

Conclusion
Running docker on CentOS v 6.9 in 2018 may be impossible or so difficult as to be practically impossible. I give up.