Categories
Admin

Cancelling those stuck print jobs in Windows 7

Intro
This is information I assembled from a couple different sources. Sometimes you view your print queue, a job’s not printing for whatever reason, you delete it, it shows cancelled, but won’t go away. Am I right? Here’s what you can do short of rebooting (which I object to as the cure for everything on philosophical grounds).

The rough outline
You’re gonna have to stop the spooler, delete the spooled files and re-start the spooler.

The details
– Launch a CMD window by typing CMD in the run menu.
– right-click on the cmd icon that pops up, choose the option run as administrator
– in that window type:

net stop spooler

You should see this output:

The Print Spooler service is stopping.
The Print Spooler service was stopped successfully.

– In Windows Explorer navigate to the folder

c:\windows\system32\spool\PRINTERS

– delete all the files you find there – those are your stuck print jobs
– back in your CMD window type:

net start spooler

You should see:

The Print Spooler service is starting.
The Print Spooler service was started successfully.

That’s it! If you re-launch your print queue view you should no longer see your stuck print jobs.

Conclusion
Annoyed by my own inability to delete print jobs I researched a time-saving way to do it without a dreaded reboot. Here I share what I’ve learned.

Categories
Admin Apache Hosting Service

running a second, third, …, instance of WordPress on your server

Intro
Since I can host drjohnstechtalk.com myself on my AWS server, why not a second blog, totally unrelated, for a friend? This has not been documented as well as I would have liked though it is very straightforward. So I’ll mention a few things here.

WordPress prep activities
You follow the WordPress regular installation instructions: http://codex.wordpress.org/Installing_WordPress. But I’ll repeat the important steps for the DIY admin with their own server like me:

$ cd /tmp; wget ‐‐no‐check‐certificate https://wordpress.org/latest.tar.gz
$ tar ‐xzvf latest.tar.gz
$ sudo cp ‐r wordpress <YOUR_HTDOC_ROOT>/blog

Set up a dedicated virtual server (apache virtual server) to handle this additional domain (that’s a whole post to explain).

The main thing is to realize you can set up a separate database in your single mysql instance for your second blog:

$ mysql -u adminusername -p
Enter password:
Welcome to the MySQL monitor.  Commands end with ; or \g.
Your MySQL connection id is 5340 to server version: 3.23.54
 
Type 'help;' or '\h' for help. Type '\c' to clear the buffer.
 
mysql&gt; CREATE DATABASE 2nddatabasename;
Query OK, 1 row affected (0.00 sec)
 
mysql&gt; GRANT ALL PRIVILEGES ON 2nddatabasename.* TO "2ndwordpressusername"@"localhost"
    -&gt; IDENTIFIED BY "passwordfor2nddatabase";
Query OK, 0 rows affected (0.00 sec)
 
mysql&gt; FLUSH PRIVILEGES;
Query OK, 0 rows affected (0.01 sec)
 
mysql&gt; EXIT
Bye
$

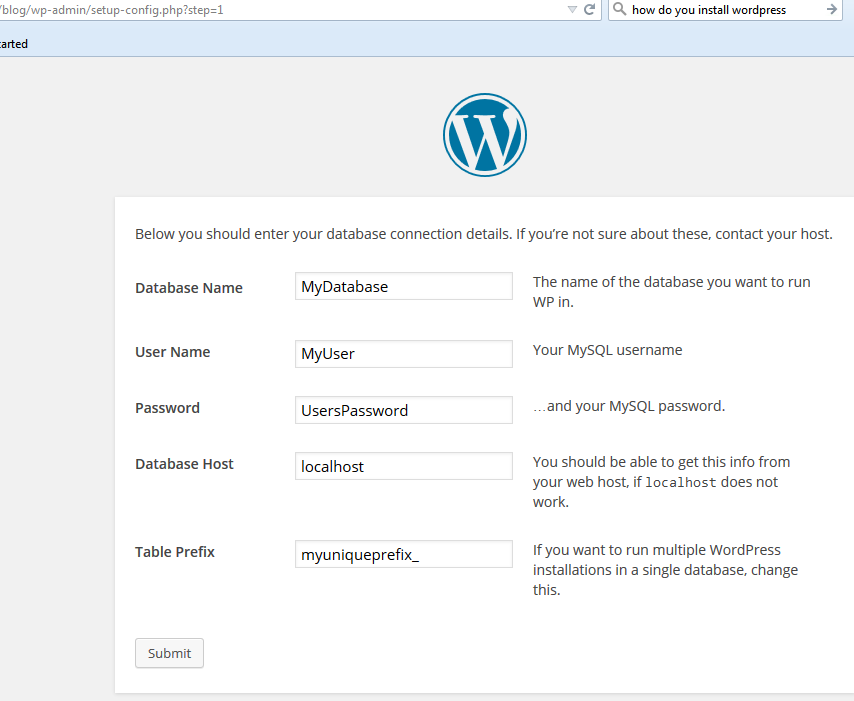
Then access this web site’s WordPress setup page from a browser:

URL: http://example.com/blog/wp-admin/install.php

WP-Setup-capture

Error connecting to the database?

I usually goof up something or other. I have even literally created a username that was ‘username’@’hostname’ because I read that off my example before I corrected it. I needed to specify localhost instead of hostname. But anyway, I didn’t panic. I tried to connect to the MySQL DB with the user I thought I had just created (and it didn’t work), i.e., mysql -u newuser -p – would not accept the password I knew I had just created.

I even had problems droppnig that user, again, because unless I specified the user as ‘username’@’hostname’ it could not find the user!

In the days of MariaDB these types of DB commands still work the same way, for the record.

Categories
Admin Exchange Online Internet Mail

PowerShell and Proxy server

Intro
I’ve used Windows PowerShell for all of a few hours so far. But, still, I think I have something to contribute to the community. The documentation on how to send commands through a standard http proxy is pretty miserable so I’d like to make that more clear. I plan to use PowerShell to administer Exchange online.

The details
Microsoft has some pretty good documentation on PowerShell in general. in particular for my desire to connect to Exchange Online I found this very helpful article. But that article says not a whit about sending your connection through an explicit proxy, which I found bewildering.

But I found some key documentation pages on a few related commands (TBD) which I eventually realized could be chained together to achieve what I wanted.

First I set up a credentials object:

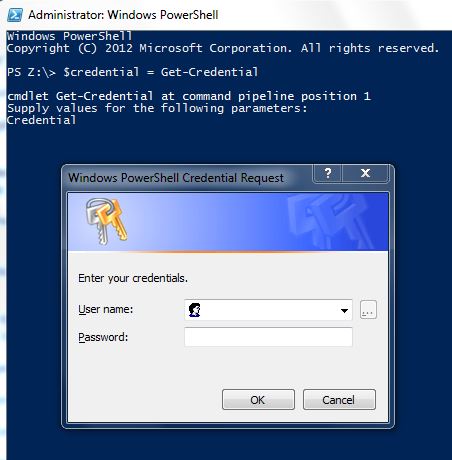
$credential = Get-Credential

This pops up an authentication window so be prepared with your Microsoft administrator credentials.

cap-Get-Cred-popup

Next I make sure Internet Explorer has the correct proxy settings. Then I inherit them from IE like this:

$drj = New-PSSessionOption -ProxyAccessType IEConfig

I refer to this options object in the next command:

$exchangeSession = New-PSSession -ConfigurationName Microsoft.Exchange -ConnectionUri "https://outlook.office365.com/powershell-liveid/" -Credential $credential -Authentication "Basic" -AllowRedirection -SessionOption $drj

One more command to get things going:

Import-PSSession $exchangeSession

and I’m ready to issue real get/set commands!

Conclusion
Hopefully this posting helps to clear up what to do to make certain commands in PowerShell work through a standard http proxy. PowerShell, for a guy who’s only done BASH scripts, is actually pretty cool.

References
The basic idea of connecting to Exchange Online is contained here in this helpful Microsoft article, but you will find no mention of proxy whatsoever on that page. That part I figured out.

Categories
Admin Internet Mail Scams

The latest trend – Google search engine spam

Intro
I’ve been seeing an uptick in brief spams which provide links to a very legitimate site: the Google search engine!

The details
I’ve been getting a lot – several per day – that look like this one:

From: [email protected]
To: [email protected]
Subject: Legal drugs forum
 
Legalize!!! Read about strongest legal drugs in the world, and buy it online: https://www.google.com/url?q=http%3A%2F%2F%77%77%77.le%67a%6C%69z%65r%2EDRJinfo%2F&sa=D&usg=AFQjCNG0coaOvXJMkOn0nEMvP-dl11XKnQ
 
Attention: MDMB(N)-BZ-F is not allowed now!

Here’s another example which appears to be a different spam campaign using the same technique which I received several weeks after initially posting this article:

From: [email protected]
Subject: Turn your bedroom into paradise of satisfaction
 
https://www.google.com/url?q=http%3A%2F%2F%73lip.h%65al%69DRJn%67%73%65%63%75re%65%73hop.%65%75%2F&sa=D&usg=AFQjCNFeP_XevUiXV-m-DtxAJVi3SMRtVQ

I’ve changed the links slightly so no one gets in trouble by actually following it.

The link is changed each time and so is the sender.

How to report this?
I have been reporting these to Google directly on their page to Report malicious software, https://www.google.com/safebrowsing/report_badware/.

I have reported five to then of these and have never received a response from Google. It seems the best we can hope for is that Google engineers are sufficiently annoyed by my reports that they begin to agree hey there’s a problem here and maybe people will think less of us if we continue to do nothing.

Why this is particularly devastating
Because the malware link uses this combination:

– https (which encrypts everything)
– a very legitimate web site, www.google.com
– malware

It is very tricky to defeat. Many URL filters, e.g., those used on explicit proxies, cannot peer into https traffic and so have to make a single judgment for a whole site, even one as complicated as www.google.com. Either it is all good, or it is all bad. Who would have the courage to categorize Google as a source of malware and hence block all users from it?

So these perpetrators have engaged in what amounts to link laundering. Some of the URI is encoded in hex, I suppose to help avoid detection and create many valid patterns that are hard for Google to stamp out.

This started over a month ago and is stronger than ever today, so we know at press time Google, in spite of all its advanced technology, does not have a handle on it.

If you see something similar I suggest to report it directly to Google. They may need a little more motivation than I can single-handedly provide them.

Conclusion
Link laundering is now an avenue to sneak spam through. It uses links that point to the Google search engine itself. It seems to have eluded them or been under their radar in spite of many reports. Let’s hope the bad guys don’t have the upper hand permanently.

Appendix
If you are interested in how the URL looks decoded I figured there would be decoders available on the Internet and indeed there are. For instance at http://meyerweb.com/eric/tools/dencoder/

So the URL mentioned above decodes as (again just slightly obfuscated to not make good people do bad things by mistake:

https://www.google.com/url?q=http://www.legalizerDRJ.info/&sa=D&usg=AFQjCNG0coaOvXJMkOn0nEMvP-dl11XKnQ

References
enom-originated spam is discussed here.

Categories
Admin Apache

How I compile apache2

Intro
This is just for my own documentation.

The details
This worked out on apache v 2.27 where I wanted to have ldap authentication and webDAV support:

$ ./configure –enable-ldap –enable-auth-ldap –with-ldap –enable-headers –enable-rewrite –enable-proxy –enable-auth
nz –enable-auth-basic –enable-authnz-ldap –enable-dav –enable-dav-fs

Note that this is recorded in config.log.

I also compiled this on Solaris 10, where I didn’t need DAV support but needed LDAP. This worked out for me there:

$ ./configure –enable-ldap –enable-auth-ldap –with-ldap –enable-headers –enable-rewrite –enable-proxy –enable-authnz –en
able-auth-basic –enable-authnz-ldap

To prove we got the right version:

$ /usr/local/apache2/bin/httpd -v

and to show all the modules we compiled in:

$ /usr/local/apache2/bin/httpd -l

Conclusion
A reminder on how apache 2.27 was compiled.

Categories
Admin Apache CentOS Security

drjohnstechtalk.com is now an encrypted web site

Intro
I don’t overtly chase search engine rankings. I’m comfortable being the 2,000,000th most visited site on the Internet, or something like that according to alexa. But I still take pride in what I’m producing here. So when I read a couple weeks ago that Google would be boosting the search rank of sites which use encryption, I felt I had to act. For me it is equally a matter of showing that I know how to do it and a chance to write another blog posting which may help others.

Very, very few people have my situation, which is a self-hosted web site, but still there may be snippets of advice which may apply to other situations.

I pulled off the switch to using https instead of http last night. The detail of how I did it are below.

The details
Actually there was nothing earth-shattering. It was a simple matter of applying stuff i already know how to do and putting it all together. of course I made some glitches along the way, but I also resolved them.

First the CERT
I was already running an SSL web server virtual server at https://drjohnstechtalk.com/ , but it was using a self-signed certificate. Being knowledgeable about certificates, I knew the first and easiest thing to do was to get a certificate (cert) issued by a recognized certificate authority (CA). Since my domain was bought from GoDaddy I decided to get my SSL certificate form them as well. It’s $69.99 for a one-year cert. Strangely, there is no economy of scale so a two-year cert costs exactly twice as much. i normally am a strong believer in two-year certs simply to avoid the hassle of renewing, etc, but since I am out-of-practice and feared I could throw my money away if I messed up the cert, I went with a one-year cert this time. It turns out I had nothing to fear…

Paying for a certificate at GoDaddy is easy. Actually figuring out how to get your certificate issued by them? Not so much. But I figured out where to go on their web site and managed to do it.

Before the CERT, the CSR
Let’s back up. Remember I’m self-hosted? I love being the boss and having that Linux prompt on my CentOS VM. So before I could buy a legit cert I needed to generate a private key and certificate signing request (CSR), which I did using openssl, having no other fancy tools available and being a command line lover.

To generate the private key and CSR with one openssl command do this:

$ openssl req -new -nodes -out myreq.csr

It prompts you for field values, e.g.:

Here’s how that dialog went:

Generating a 2048 bit RSA private key
.............+++
..............................+++
writing new private key to 'privkey.pem'
-----
You are about to be asked to enter information that will be incorporated
into your certificate request.
What you are about to enter is what is called a Distinguished Name or a DN.
There are quite a few fields but you can leave some blank
For some fields there will be a default value,
If you enter '.', the field will be left blank.
-----
Country Name (2 letter code) [XX]:US
State or Province Name (full name) []:New Jersey
Locality Name (eg, city) [Default City]:
Organization Name (eg, company) [Default Company Ltd]:drjohnstechtalk.com
Organizational Unit Name (eg, section) []:
Common Name (eg, your name or your server's hostname) []:drjohnstechtalk.com
Email Address []:
 
Please enter the following 'extra' attributes
to be sent with your certificate request
A challenge password []:
An optional company name []:

and the files it created:

$ ls -ltr|tail -2

-rw-rw-r-- 1 john john     1704 Aug 23 09:52 privkey.pem
-rw-rw-r-- 1 john john     1021 Aug 23 09:52 myreq.csr

Before shipping it off to a CA you really ought to examine the CSR for accuracy. Here’s how:

$ openssl req -text -in myreq.csr

Certificate Request:
    Data:
        Version: 0 (0x0)
        Subject: C=US, ST=New Jersey, L=Default City, O=drjohnstechtalk.com, CN=drjohnstechtalk.com
        Subject Public Key Info:
            Public Key Algorithm: rsaEncryption
                Public-Key: (2048 bit)
                Modulus:
                    00:e9:04:ab:7e:e1:c1:87:44:fb:fe:09:e1:8d:e5:
                    29:1c:cb:b5:e8:d0:cc:f4:89:67:23:ab:e5:e7:a6:
                    ...

What are we looking for, anyways? Well, the modulus should be the same as it is for the private key. To list the modulus of your private key:

$ openssl rsa -text -in privkey.pem|more

The other things I am looking for is the common name (CN) which has to exactly match the DNS name that is used to access the secure site.

I’m not pleased about the Default City, but I didn’t want to provide my actual city. We’ll see it doesn’t matter in the end.

For some CAs the Organization field also matters a great deal. Since I am a private individual I decided to use the CN as my organization and that was accepted by GoDaddy. So Probably its value also doesn’t matter.

the other critical thing is the length of the public key, 2048 bits. These days all keys should be 2048 bits. some years ago 1024 bits was perfectly fine. I’m not sure but maybe older openssl releases would have created a 1024 bit key length so that’s why you’ll want to watch out for that.

Examine the CERT
GoDaddy issued the certificate with some random alpha-numeric filename. i renamed it to something more suitable, drjohnstechtalk.crt. Let’s examine it:

$ openssl x509 -text -in drjohnstechtalk.crt|more

Certificate:
    Data:
        Version: 3 (0x2)
        Serial Number:
            27:ab:99:79:cb:55:9f
        Signature Algorithm: sha256WithRSAEncryption
        Issuer: C=US, ST=Arizona, L=Scottsdale, O=GoDaddy.com, Inc., OU=http://certs.godaddy.com/repository/, CN=Go Daddy Secure Certificate Authority - G2
        Validity
            Not Before: Aug 21 00:34:01 2014 GMT
            Not After : Aug 21 00:34:01 2015 GMT
        Subject: OU=Domain Control Validated, CN=drjohnstechtalk.com
        Subject Public Key Info:
            Public Key Algorithm: rsaEncryption
                Public-Key: (2048 bit)
                Modulus:
                    00:e9:04:ab:7e:e1:c1:87:44:fb:fe:09:e1:8d:e5:
                    29:1c:cb:b5:e8:d0:cc:f4:89:67:23:ab:e5:e7:a6:
                     ...

So we’re checking that common name, key length, and what if any organization they used (in the Subject field). Also the modulus should match up. Note that they “cheaped out” and did not provide www.drjohnstechtalk.com as an explicit alternate name! In my opinion this should mean that if someone enters the URL https://www.drjohnstechtalk.com/ they should get a certificate name mismatch error. In practice this does not seem to happen – I’m not sure why. Probably the browsers are somewhat forgiving.

The apache side of the house
I don’t know if this is going to make any sense, but here goes. To begin I have a bare-bones secure virtual server that did essentially nothing. So I modified it to be an apache redirect factory and to use my brand shiny new legit certificate. Once I had that working I planned to swap roles and filenames with my regular configuration file, drjohns.conf.

Objective: don’t break existing links
Why the need for a redirect factory? This I felt as a matter of pride is important: it will permit all the current links to my site, which are all http, not https, to continue to work! That’s a good thing, right? Now most of those links are in search engines, which constantly comb my pages, so I’m sure over time they would automatically be updated if I didn’t bother, but I just felt better about knowing that no links would be broken by switching to https. And it shows I know what I’m doing!

The secure server configuration file on my server is in /etc/apache2/sites-enabled/drjohns.secure.conf. It’s an apache v 2.2 server. I put all the relevant key/cert/intermediate cert files in /etc/apache2/certs. the private key’s permissions were set to 600. The relevant apache configuration directives are here to use this CERT along with the GoDaddy intermediate certificates:

 
   SSLEngine on
    SSLCertificateFile /etc/apache2/certs/drjohnstechtalk.crt
    SSLCertificateKeyFile /etc/apache2/certs/drjohnstechtalk.key
    SSLCertificateChainFile /etc/apache2/certs/gd_bundle-g2-g1.crt

I initially didn’t include the intermediate certs (chain file), which again in my experience should have caused issues. Once again I didn’t observe any issues from omitting it, but my experience says that it should be present.

The redirect factory setup
For the redirect testing I referred to my own blog posting (which I think is underappreciated for whatever reason!) and have these lines:

# I really don't think this does anything other than chase away a scary warning in the error log...
        RewriteLock ${APACHE_LOCK_DIR}/rewrite_lock
<VirtualHost *:80>
 
        ServerAdmin webmaster@localhost
        ServerName      www.drjohnstechtalk.com
        ServerAlias     drjohnstechtalk.com
        ServerAlias     johnstechtalk.com
        ServerAlias     www.johnstechtalk.com
        ServerAlias     vmanswer.com
        ServerAlias     www.vmanswer.com
# Inspired by the dreadful documentation on http://httpd.apache.org/docs/2.0/mod/mod_rewrite.html
        RewriteEngine on
        RewriteMap  redirectMap prg:redirect.pl
        RewriteCond ${redirectMap:%{HTTP_HOST}%{REQUEST_URI}} ^(.+)$
# %N are backreferences to RewriteCond matches, and $N are backreferences to RewriteRule matches
        RewriteRule ^/.* %1 [R=301,L]

Pages look funny after the switch to SSL
One of the first casualties after the switch to SSL was that my pages looked funny. I know from general experience that this can happen if there is hard-wired links to http URLs, and that is what I observed in the page source. In particular my WP-Syntax plugin was now bleeding verbatim entries into the columns to the right if the PRE text contained long lines. Not pretty. The page source mostly had https includes, but in one place it did not. It had:

<link rel="stylesheet" href="http://drjohnstechtalk.com/blog/wp-content/plugins/wp-syntax/wp-syntax.css"

I puzzled over where that originated and I had a few ideas which didn’t turn out so well. For instance you’d think inserting this into wp-config.php would have worked:

define( 'WP_CONTENT_URL','https://drjohnstechtalk.com/blog/wp-content/');

But it had absolutely no effect. Finally I did an RTFM – the M being http://codex.wordpress.org/Editing_wp-config.php which is mentioned in wp-config.hp – and learned that the siteurl is set in the administration settings in the GUI, Settings|General WordPress Address URL and Site Address URL. I changed these to https://drjohnstechtalk.com/blog and bingo, my plugins began to work properly again!

What might go wrong when turning on SSL
In another context I have seen both those errors, which I feel are poorly documented on the Internet, so I wish to mention them here since they are closely related to the topic of this blog post.

SSL routines:SSL23_GET_SERVER_HELLO:unknown protocol:s23_clnt.c:601

and

curl: (35) error:140770FC:SSL routines:SSL23_GET_SERVER_HELLO:unknown protocol

I generated the first error in the process of trying to look at the SSL web site using openssl. What I do to test that certificates are being properly presented is:

$ openssl s_client -showcerts -connect localhost:443

And the second error mentioned above I generated trying to use curl to do something similar:

$ curl -i -k https://localhost/

The solution? Well, I began to suspect that I wasn’t running SSL at all so I tested curl assuming I was running on tcp port 443 but regular http:

$ curl -i http://localhost:443/

Yup. That worked just fine, producing all the usual HTTP response headers plus the content of my home page. So that means I wasn’t running SSL at all.

This virtual host being from a template I inherited and one I didn’t fully understand, I decided to just junk the most suspicious parts of the vhost configuration, which in my case were:

<IfDefine SSL>
<IfDefine !NOSSL>
...
</IfDefine>
</IfDefine>

and comment those guys out, giving,

#<IfDefine SSL>
#<IfDefine !NOSSL>
...
#</IfDefine>
#</IfDefine>

That worked! After a restart I really was running SSL.

Making it stronger
I did not do this immediately, but after the POODLE vulnerability came out and I ran some tests I realized I should have explicitly chosen a cipher suite in my apache server to make the encryption sufficiently unbreakable. This section of my working with ciphers post shows some good settings.

Mixed content
I forgot about something in my delight at running my own SSL web server – not all content was coming to the browser as https and Firefox and Internet Explorer began to complain as they grew more security-conscious over the months. After some investigation I found that what it was is that I had a redirect for favicon.ico to the WordPress favicon.ico. But it was a redirect to their HTTP favicon.ico. I changed it to their secure version, https://s2.wp.com/i/favicon.ico, and all was good!

I never use the Firefox debugging tools so I got lucky. I took a guess to find out more about this mixed content and clicked on Tools|Web developer|Web console. My lucky break was that it immediately told me the element that was still HTTP amidst my HTTPS web page. Knowing that it was a cinch to fix it as mentioned above.

Conclusion
Good-ole search engine optimization (SEO) has prodded us to make the leap to run SSL. In this posting we showed how we did that while preserving all the links that may be floating ou there on the Internet by using our redirect factory.

References
Having an apache instance dedicated to redirects is described in this article.
Some common sense steps to protect your apache server are described here.
Some other openssl commands besides the ones used here are described here.
Choosing an appropriate cipher suite and preventing use of the vulnerable SSLv2/3 is described in this post.
I read about Google’s plans to encrypt the web in this Naked Security article.
Categories
Admin Apache Security SLES Web Site Technologies

RSA Web Agent Installation: what might go wrong

Intro
As usual I ran into a few problems installing the RSA Web agent for a client. With this documentation I hope to jog my memory for my next installation or help someone else out who is experiencing the same problems.

The details
I was installing it on on SLES 11 system, Web Agent version 7.1.

So I ran the CD/install program as root and went through the prompts for the initial setup. I tried to laucnh firefox at the end, which it couldn’t, but I don’t think that is significant. I start up the web server. The error.log file begins to fill up! It looks like this:

acestatus: error while loading shared libraries: libaceclnt.so: cannot open shared object file: No such file or directory
rpc_server 2389 started by 2379
RSALogoffCookieService: error while loading shared libraries: libaceclnt.so: cannot open shared object file: No such file o
r directory
AceShutdown try to kill process 2389
signal 15 received
acestatus: error while loading shared libraries: libaceclnt.so: cannot open shared object file: No such file or directory
RSALogoffCookieService: error while loading shared libraries: libaceclnt.so: cannot open shared object file: No such file o
r directory
start child 2403
[Mon Aug 18 16:17:55 2014] [notice] Apache/2.2.27 (Unix) mod_rsawebagent/7.1.0[639] DAV/2 PHP/5.2.14 with Suhosin-Patch con
figured -- resuming normal operations
Cannot register service: RPC: Authentication error; why = Client credential too weak
unable to register (300760, 1).child 2403 end
start child 2409
Cannot register service: RPC: Authentication error; why = Client credential too weak
unable to register (300760, 1).child 2409 end
start child 2410
Cannot register service: RPC: Authentication error; why = Client credential too weak
unable to register (300760, 1).child 2410 end
start child 2411
Cannot register service: RPC: Authentication error; why = Client credential too weak
unable to register (300760, 1).child 2411 end
start child 2412
Cannot register service: RPC: Authentication error; why = Client credential too weak
unable to register (300760, 1).child 2412 end
start child 2413
...

Not good.

So I eventually realize that my web server is running as user wwwrun and the RSA web agent stuff I installed as root and its directory, rsawebagent, is owned by userid 40959 – there was no attempt by the installer to match that up to the user the web server runs as. So I try a fix by hand like this:

$ chown -R wwwrun rsawebagent

Success! That succeeds in getting rid of the repeating RPC error. Now the error.log file has only a modest level of errors:

acestatus: error while loading shared libraries: libaceclnt.so: cannot open shared object file: No such file or directory
rpc_server 27766 started by 27756
RSALogoffCookieService: error while loading shared libraries: libaceclnt.so: cannot open shared object file: No such file or directory
AceShutdown try to kill process 27766
signal 15 received
acestatus: error while loading shared libraries: libaceclnt.so: cannot open shared object file: No such file or directory
RSALogoffCookieService: error while loading shared libraries: libaceclnt.so: cannot open shared object file: No such file or directory
start child 27780
[Mon Aug 18 16:25:00 2014] [notice] Apache/2.2.27 (Unix) mod_rsawebagent/7.1.0[639] DAV/2 PHP/5.2.14 with Suhosin-Patch configured -- resuming normal operations

But the thing is, it actually, mostly kind of, seems to work. You see a promising Authentication Succeeded screen in your browser after logging in to the home page. But then it directs you back to the RSA login screen. I was actually stuck on this point for a long time.

The error.log file also looks encouraging at this point:

[Mon Aug 18 16:27:28 2014] [notice] Authentication succeeded User: drj.

My insight today is to tackle the libaceclnt.so problem. I actually ran a trace of the startup to see where it was looking for that file so I could put it there. It was looking in system directories like these:

[pid 31974] open("/usr/lib64/tls/x86_64/libaceclnt.so", O_RDONLY) = -1 ENOENT (No such file or directory)
[pid 31974] stat("/usr/lib64/tls/x86_64", 0x7fff93b721b0) = -1 ENOENT (No such file or directory)
[pid 31974] open("/usr/lib64/tls/libaceclnt.so", O_RDONLY) = -1 ENOENT (No such file or directory)
[pid 31974] stat("/usr/lib64/tls", 0x7fff93b721b0) = -1 ENOENT (No such file or directory)
[pid 31974] open("/usr/lib64/x86_64/libaceclnt.so", O_RDONLY) = -1 ENOENT (No such file or directory)
[pid 31974] stat("/usr/lib64/x86_64", 0x7fff93b721b0) = -1 ENOENT (No such file or directory)
[pid 31974] open("/usr/lib64/libaceclnt.so", O_RDONLY) = -1 ENOENT (No such file or directory)
...

So I decided to make a soft link to it from /usr/lib64 such that:

 libaceclnt.so -> /usr/local/apache202/rsawebagent/libaceclnt.so

Note that my ServerRoot was /usr/local/apache202.

Now when I start up my apache202 instance I have this in error.log:

rpc_server 28874 started by 28860
grep RSALogoffCookieService /proc/*/cmdline | sed 's/\/cmdline.*\/proc\// /g' | sed 's/\/cmdline.*/ /'  | sed 's/.*\/proc\// /' | sort -u
start child 28877
grep RSALogoffCookieService /proc/*/cmdline | sed 's/\/cmdline.*\/proc\// /g' | sed 's/\/cmdline.*/ /'  | sed 's/.*\/proc\// /' | sort -u
AceShutdown try to kill process 28874
signal 15 received
grep RSALogoffCookieService /proc/*/cmdline | sed 's/\/cmdline.*\/proc\// /g' | sed 's/\/cmdline.*/ /'  | sed 's/.*\/proc\// /' | sort -u
start child 28913
[Mon Aug 18 16:36:23 2014] [notice] Apache/2.2.27 (Unix) mod_rsawebagent/7.1.0[639] DAV/2 PHP/5.2.14 with Suhosin-Patch configured -- resuming normal operations

And best of all – it actually works!

I get the RSA authentication page initially. I log on and get redirected to the actual server home page. The access.log file records my username in the access line.

Additional error observed months later
You know that symptom I described above? You see a promising Authentication Succeeded screen in your browser after logging in to the home page. But then it directs you back to the RSA login screen. My web server had been running fine for over a month when all of a sudden it behaved that way again. Confounding. So I put on my big boy pants and did an strace. Nothing popped out at me, but I was struck by frequent access to an htdocs filepath. What’s so unusual about that? I don’t use htdocs in my configurations! So where was that coming from? I re-checked my configuration. OK, this is embarrassing. I have a sweeping include statement in my top-level httpd.conf file:

# pick up all vhosts
Include conf/vhosts/*.conf

It seemed like a good idea at the time. In my conf/vhosts directory I actually had two conf files, my rsaauth.conf but also a dflt.conf!! And the dflt.conf had the references to htdocs, but no references to the RSA authentication. So it was being used to establish the location of the home directory and the other conf file to fix the authentication type, I guess.

I removed the dflt.conf file, restarted and everything began to work once again. Whew!

RPC errors returned after a few months
After a year or so of running the RPC errors mentioned above returned and I never could figure out why and I no longer needed this service so I didn’t pursue it.

Conclusion
A few errors were observed installing RSA Web Agent v 7.1 on SLES Linux. I had had similar problems on Redhat as well. I finally found some solutions and now they’re ready to use it!

References
This write-up is partially related to my blog post of installing multiple apache instances.

Categories
Admin Linux

Cognos stopped working. But nothing changed!

Intro
Once again we got into this undesirable situation in which for no apparent reason Cognos logins simply stopped working. As administrator of the Cognos gateway piece and only that piece I was ready to swear up and down it cuoldn’t be my fault, but I took a closer look anyways, just in case. Here is what I found.

The details
We had been running Cognos v 10 without incident for over a year now when the word came from the application owner that logins stopped working in the morning. That is, through the gateway. If they tested through the application server directly that was still still working.

I knew I hadn’t changed anything so I assumed they did, or their LDAP back-end authentication server wasn’t working right.

Checking the apache web server logs showed nothing out of the ordinary. And my gateway had been running for a couple months straight (no reboot) when the problem occurred. I tested myself and saw for myself. You would get the initial pop-up log=in screen, then after submitting your authentication information it would just come back to you blank.

I managed to get a trace to the back-end dispatcher. Even that was pretty unspectacular. There was some HTTP communication back-and-forth in a couple of independent streams. The 2nd stream even contained something that looked promising:

CAMUsername=drjohn&CAMPazzword=NEwBCScGSIb3DQ...

And the server response to that was already to return the user to the login page as though already something had gone wrong.

The app owner said she observed the same problem on the test system, but ignore that comment because that isn’t tested or used much. That’s another environment I hadn’t touched in a long while – 16 months.

I confirmed I could log on to the development dispatcher but not through my gateway. What the heck?

So I decided to look at my own blog posts for inspiration. It seems the thing to do in times like this is to save the configuration. So I tried that on the test system – that’s what it’s for, after all. I breathed a sigh of relief when in fact the save went through – you just never know. But, yes, I got the green checks. And I’ll be darned if that didn’t fix it! So with that small victory, I saved the configuration on my two gateway servers and, yup, logins started working there as well!

I am very annoyed at IBM for making such a faulty product. My private speculation as to what happened is that when you save the configuration you generate cryptographic information, which means PKI which includes certificates which have expiration dates. I suppose the certificates being used to exchange information securely between gateway and dispatcher simply expired and the software inconsiderately produced no errors about the matter other than to stop working. Even when I launched the cogconfig program no errors were displayed initially.

IBM’s role
I strongly suggested to the application owner to open a case with IBM about this ridiculous behaviour. But since it’s IBM I’m not too confident it will go anywhere.

cogconfig.sh
The details of launching the configuration tool in linux is described in the references. But note that unlike that article, this time I did not need to delete any key files or any other files at all. Just save the configuration.

August 16th, 2016 update

Well almost exactly two years later I stepped on that same rake again! Nothing changed yet authentications stopped working. I even took a a packet trace to prove that the gateway was sending packets to the app server, which it was. The app server only reported this very misleading message: unable to authenticate because credentials are invalid. Worse, I was vaguely aware there could be a problem with the cryptographic keys, but I assumed such a problem would scramble all communication to the app server. yet that same app server log file showed the userid of the user correctly! So I was really misled by that.

When they logged on directly to the app server it was fine. See that date? That’s almost exactly two years after my original posting of this article. So I guess the keys were good for two years this last time, then they expired without warning and without any proper logging. Thanks IBM! The solution was exactly the same: run cogconfig.sh and save. That’s it… I obviously forgot my own advice and I did not regenerate the config from time to time.


For the future

I think to avoid a repetition of this problem I may save the configuration every six months or so. 16 months is a strange time in the world of certificates for an expiration to occur. I don’t get that. So maybe my explanation as to what happened is bogus, but it’s all we have for now.

Conclusion
Another mysterious Cognos error. This one we resolved a tad faster than usual because prior experience told us there was one possible action we could reasonably take to help the situation out. There were no panicked reboots of any servers, by the way. Did you have this problem? Welcome to enterprise software!

References
The details on where the configuration program, cogconfig.sh is to be found and run is described in this article.
If you forgot which is your dispatcher, you can grep the file cogstartup.xml for 9300, which is the port it runs on, to give you some hints.

Categories
Admin Linux

Things that went wrong during the HP SiteScope upgrade

Intro
These are my notes of all the stupid things I did during my attempt to upgrade to HP SiteScope version 11.24 in response to a security problem in earlier releases. When you don’t do these things very often you totally forget what you did last time!

The details
I managed to download the “patch,” SIS_00314, from the HP Passport site. That was relatively straightforward.

First mistake: winging it
After baking up my configuration I looked into the zip file and saw an rpm that seemed like the thing I needed: packages/HPSiS1124Core-11.24.241-Linux2.4.rpm. So I decided to just install it directly. That created deep directories like this one:

/opt/HP/SiteScope/installation/HPSiS1124/flvr/SiteScope

and it really looked like it wasn’t going to do anything. And when I tried that with the Java package all kinds of dependent libraries were not found. So I removed that package and went back to the manual.

So I identified the included deployment guide and skimmed through that for inspiration. It seems you should drive the installation through the file HPSiS1124_11.24_setup.bin. So I tried it. First I had to set up my X-Windows stuff:

# vncserver :2
# export DISPLAY=:2.0
(then connect to that display using VNC client)
# xhost +
and to test it (the following command should pop up a new window):
# gnome-terminal

Then finally:

# ./HPSiS1124_11.24_setup.bin

Preparing to install...
Extracting the JRE from the installer archive...
Unpacking the JRE...
Extracting the installation resources from the installer archive...
Configuring the installer for this system's environment...
 (i) Checking display ...
 (-) Display may not be properly configured
Please make sure the display is set properly...

I don’t know what went wrong, but I knew a GUI install was out of the question without a lot of digging. I also knew about silent or console installs. So I looked to that part of the deployment manual.

# ./HPSiS1124_11.24_setup.bin -i silent

Preparing to install...
Extracting the JRE from the installer archive...
Unpacking the JRE...
Extracting the installation resources from the installer archive...
Configuring the installer for this system's environment...
Preparing SILENT Mode Installation...
 
===============================================================================
                                       (created with InstallAnywhere by Zero G)
-------------------------------------------------------------------------------
 
=======================================================
 
Installer User Interface Mode Not Supported
 
Unable to load and to prepare the installer in console or silent mode.
 
=======================================================

I learned this happens if you run silent mode but have a DISPLAY environment variable set! Just unset DISPLAY and re-run.

But that didn’t work out for me either. In /tmp/HPOvInstaller/HPSiS1124_11.24 the file HPSiS1124_11.24_2014.08.11_15_39_HPOvInstallerLog.txt showed:


2014-08-11 15:39:40,065 INFO – Checking free disk space… [FAILED]

However since it was a silent installation it never complained! I only knew there was a problem when I restarted SiteScope and saw it was still showing me version 11.23.

I cleared some more space and the install finally completed successfully.

Conclusion
We ran into quite a few problems doing a simple minor HP SiteScope upgrade, most of our own making. But we persevered and are now running version 11.24.

References
Yearning for the old Freshwater SiteScope? You’ll want to read this blog posting and comments.
The Secunia advisory.

Categories
Admin Network Technologies

Routing based on source MAC address

Intro
As I am not a true network specialist but more a security operations specialist, I am always amazed by discovering network things that they probably teach in networking 101 and seem obvious to those in the know.

I had a “revelation” (to me anyways) like that lately.

The details
For all these years I’ve dabbled setting up interfaces, creating static routes, setting up RIP advertisements, reading BGP configurations, solving martian source problems, or slightly harder things like network address translation, secure network address translation and vpn tunnels, I thought I knew all the mainly relevant things there is to know about how to get packets to where you want them.

For a typical, non-routing device, I had always thought that the only choice on how to send packets out is

– local subnet if destination is on a subnet of one of the interfaces
– static route if configured for that destination IP
– default gateway if configured

And that’s that, right?

This limited number of route selection methods is very important in some architectural designs I’ve been involved with. For instance, an Intranet which has “borrowed” large swaths of valid Internet address space pretty much necessitates a two-stage proxy approach if using explicit proxy settings. Or so I thought.

What I learned
Someone pointed out to me a feature on Bluecoat proxy called return-to-sender. Normally it is disabled. But when enabled, what it does is (to me, because I never thought it possible) amazing: it sends its response packets back to the MAC address of the inbound sender! Thus it will shortcut all the routing decisions mentioned above and use the MAC address of the host which sent it a packet to which it is responding.

If I had know that was possible I might never have implemented a two-stage proxy.

I decided to try the ultimate worst-case scenario:

– use of proxy with this feature enabled and
– proxy client on same internal subnet as proxy server, 10.11.12.0/24
– source IP of proxy client = my AWS server, 50.17.188.196
– requested web site: my AWS web site at http://50.17.188.196/

In other words, steal my own IP, put it on the Intranet, and make the proxy route packets back to me in response while simultaneously connecting to that exact same IP on the Internet.

How I configured the VIP
This is very old school, but I did one of these numbers ona SLES11 system:

$ sudo ifconfig eth0:0 50.17.188.196 up

And that was sufficient to add that IP to the eth0 interface.

Did it work? Yes, it did. Amazing.

I only needed one single request to verify that it worked. Here is that request, using wget from the Linux host which is on the same subnet.

export http_proxy=http://10.11.12.13:8080/
wget --bind-address=50.17.188.196 http://50.17.188.196/

And the proxy log line this produced:

2014-08-04 13:55:08 3 50.17.188.196 - "none" 200 TCP_HIT GET text/html http 50.17.188.196 80 / - - "Wget/1.11.4" OBSERVED 10.11.12.13 769 158 - -

Other appliances can do this, too
On F5 BigIP this feature is also supported. It is called auto last hop and can be configured either globally or for an individual virtual server.

To be continued…