Categories
Admin Network Technologies

Postfix Operational tips

Intro
I’m trying out the system-supplied postfix on a SLES system. i had been using sendmail but there doesn’t seem to be any development on that software.

Some commands I needed right away
Well, right away I had thousands of queued messages so I needed a way to make sense of what was happening.

For these commands to make sense you need to know that I am running a second postfix configuraiton out of /etc/postfixEXT.

Display the queue

postqueue -c /etc/postfixEXT -p

Force delivery from the queue

postqueue -c /etc/postfixEXT -f

List one email in detail

postcat -vq -c /etc/postfixEXT QUEUEID

Delete one email

postsuper -c /etc/postfixEXT -d QUEUEID

Put mail on hold

postsuper -c /etc/postfixEXT -h ALL|QUEUEID

Release mail form hold

postsuper -c /etc/postfixEXT -H ALL|QUEUEID

How to force delivery of a single message
This command is not documented anywhere – because it doesn’t exist so you have to get creative. If you have the luxury of halting all email for a few seconds simply do this:

Display the queue to find the queue ID of the email you want to force delivery of

postqueue -c /etc/postfixEXT -p

Put all mail on hold

postsuper -c /etc/postfixEXT -h ALL

Now release the hold on that one email

postsuper -c /etc/postfixEXT -H QUEUEID

QUEUEID is, of course, the queue id .e.g., F2A1A27891E, of the email in question.

Look for what happened
Check your mail log’s last lines in /var/log/mail

Revert back to normal running

postsuper -c /etc/postfixEXT -H ALL

Since mail is store-and-forward and not real time, you can do these steps, quickly, even on a production system and no one will be the wiser if you are pretty quick. Probably takes two minutes even for a slow typer.

How to run multiple listeners
I didn’t want to disturb the system-installed postfix too much. I would let it “have” the loopback address, 127.0.0.1, leaving me the other IPs for my relay config to listen on. I added these lines to /etc/postfix/main.cf

multi_instance_enable = yes
multi_instance_directories = /etc/postfixEXT

service postfix start starts up the local postfix plus my relay. Grep the process table for either master or postfix to see. However, to be honest, service postfix stop does not kill all processes. So I always end up killing one of the master processes by hand. Update: postmulti -p stop does the trick to kill all. There is also a status or start option instead of stop.

Sendmail to Postfix migration tips
This could be a separate post but I am too lazy to do that.

What happens to the access file? I kept the name of the file access but just list all the IPs, one per line, without any further arguments, to permit just those IPs relay access. In my main.cf I have a line like this to tie it together:

mynetworks = /etc/postfixEXT/access

Note that there is no hashed or .db version of this file any longer, unlike in the sendmail case.

References and related
Since I mentioned sendmail I have to give a shout out to one of my old sendmail posts.

More info on postfix multiple instances. A pretty complete guide.

Categories
Admin Linux SLES

How to add private root CAs in SLES or Redhat or Debian

Intro
From time-to-time I run my own PKI infrastructure, namely issuing my own certificates from my private root CA. I wanted this root CA to be recognized by Linux utilities running on Suse Linux (SLES), in particular, lftp, which I was trying to use to access an ftps site, which itself is a post for another day. In other words, how do you add a certificate to the certificate store in linux?

The details
Let’s say you have your root certificate in the standard form like this example

-----BEGIN CERTIFICATE-----
MIIIPzCCBiegAwIBAgITfgAAAATHCoXJivwKLQAAAAAABDANBgkqhkiG9w0BAQsF\nADA2MQswCQYD
VQQGEwJERTENMAsGA1UEChMEQkFTRjEYMBYGA1UEAxMPQkFTRiBS\nb290IENBIDIxMB4XDTE3MDgxMDEyNDAwOFoXDTI4MDgxMDEyNTAwOFowXDETMBEG\nCgm
...
PEScyptUSAaGjS4JuxsNoL6URXYHxJsR0bPlet\nSct
-----END CERTIFICATE-----

Then you can put the certificate inline and within one script install it so that it permanently joins the other root CAs in /etc/ssl/certs with a script like this example:

DrJ_Root_CA="-----BEGIN CERTIFICATE-----\nMIIIPzCCBiegAwIBAgITfgAAAATHCoXJivwKLQAAAAAABDANBgkqhkiG9w0BAQsF\nADA2MQswCQYD
VQQGEwJERTENMAsGA1UEChMEQkFTRjEYMBYGA1UEAxMPQkFTRiBS\nb290IENBIDIxMB4XDTE3MDgxMDEyNDAwOFoXDTI4MDgxMDEyNTAwOFowXDETMBEG\nCgm
SJomT8ixkARkWA05FVDEUMBIGCgmSJomT8ixkARkWBEJBU0YxFjAUBgoJkiaJ\nk/IsZAEZFgZCQVNGQUQxFzAVBgNVBAMTDkJBU0YgU1VCIENBIDIzMIICIjAN
Bgkq\nhkiG9w0BAQEFAAOCAg8AMIICCgKCAgEAqrfoKxrCPCw/u2PBEaAwW/VHLxBw6JNi\n42F3EhXmligGb/Uu4kcWO016IGFatVrPhdAtShAqmTXis0w57hW
jn1Iptvo7rROY\nGPmH7aSW/fYM/x2Lln7NlltayXspWawqBzWzYGADodyjn/Z5TaLYaG8lajiabCM5\nUJDhlZ/SUR3xylqIIFaQK3k2twjeGoxobhbr9hJcQZ
fXF0V5FCSCzJExDYma6bs1\nZtyqP/yHaiOeWXGdnqM9EPfT8kmIC42ZXq7s2JZI5OUflJBbaebYEbuDad6Rh19E\nRchXABLe68+TF/4AZCw16iRwRgq/2Re2W
WPMtVomyZ2txvn51iizqBkdVGzIRklC\n3yIv5MRzDFTfG940/tSAomHsz+RdGbL+NCBeWSY+rnJQdExJ7bLXFLVsTNGL68lP\nMuYrkxYQKWRtVhvQCHsdd5E0
t9QR4iY1JLWQxq3GHy98tBbCGiKMpBbuj/9I/E6c\nGrikouv2QyNnCN34PXpUxTQmDj5LZGV9w2faqpwUBD2ZWsbyVSgvD8TcjdxzcMcj\nLBnYUaZ8wHFqUj2
DBahctfKQxA8Ptrzt1mDIGOQliZGDwrTVMECd+noQhTlF1eS+\nvNraV3dYRMymVxh58MPEaDJgwIRcBWAAOeBbZlyx76oskXdmjOiz5jqyoR5eweCE\ntS4jfM
EW6UECAwEAAaOCAx4wggMaMAsGA1UdDwQEAwIBhjAQBgkrBgEEAYI3FQEE\nAwIBADAdBgNVHQ4EFgQUdn7nwFGpb8uzpFVs5QWQcsA0Q6IwQwYDVR0gBDwwOjA
4\nBgwrBgEEAYGlZAMCAgEwKDAmBggrBgEFBQcCARYaaHR0cDovL3BraXdlYi5iYXNm\nLmNvbS9jcAAwGQYJKwYBBAGCNxQCBAweCgBTAHUAYgBDAEEwEgYDVR
0TAQH/BAgw\nBgEB/wIBADAfBgNVHSMEGDAWgBSS9auUcX38rmNVmQsv6DKAMZcmXDCCAQkGA1Ud\nHwSCAQAwgf0wgfqggfeggfSGgbZsZGFwOi8vL0NOPUJBU
0YlMjBSb290JTIwQ0El\nMjAyMSxDTj1DRFAsQ049UHVibGljJTIwS2V5JTIwU2VydmljZXMsQ049U2Vydmlj\nZXMsQ049Q29uZmlndXJhdGlvbixEQz1yb290
LERDPWJhc2YsREM9Y29tP2NlcnRp\nZmljYXRlUmV2b2NhdGlvbkxpc3Q/YmFzZT9vYmplY3RDbGFzcz1jUkxEaXN0cmli\ndXRpb25Qb2ludIY5aHR0cDovL3B
raXdlYi5iYXNmLmNvbS9yb290Y2EyMS9CQVNG\nJTIwUm9vdCUyMENBJTIwMjEuY3JsMIIBNgYIKwYBBQUHAQEEggEoNIIBJDCBuQYI\nKwYBBQUHMAKGgaxsZG
FwOi8vL0NOPUJBU0YlMjBSb290JTIwQ0ElMjAyMSxDTj1B\nSUEsQ049UHVibGljJTIwS2V5JTIwU2VydmljZXMsQ049U2VydmljZXMsQ049Q29u\nZmlndXJhd
GlvbixEQz1yb290LERDPWJhc2YsREM9Y29tP2NBQ2VydGlmaWNhdGU/\nYmFzZT9vYmplY3RDbGFzcz1jZXJ0aWZpY2F0aW9uQXV0aG9yaXR5MGYGCCsGAQUF\n
BzAChlpodHRwOi8vcGtpd2ViLmJhc2YuY29tL3Jvb3RjYTIxL1JPT1RDQTIxLnJ6\nLWMwMDctajY1MC5iYXNmLWFnLmRlX0JBU0YlMjBSb290JTIwQ0ElMjAyM
S5jcnQw\nDQYJKoZIhvcNAQELBQADggIBAClCvn9sKo/gbrEygtUPsVy9cj9UOQ2/CciCdzpz\nXhuXfoCIICgc0YFzCajoXBLj4V6zcYKjz8RndaLabDaaSQgj
phXFiZSBH8OII+cp\nTCWW1x+JElJXo9HB7Ziva2PeuU5ajXtvql5PegFYWdmgK2Q1QH0J2f1rr7B4nNGu\noyBi1TOSll+0yJApjx213lM9obt6hkXkjeisjcq
auMVh+8KloM0LQOTAD1bDAvpa\nVVN9wlbytvf4tLxHpvrxEQEmVtTAdVchuQV1QCeIbqIxW41l6nhE2TlPwEmTr+Cv\najMID/ebnc9WzeweyTddb6DSmn4mSc
okGpj8j8Z7cw173Yomhg1tEEfEzip+/Jx6\nd2qblZ9BUih9sHE8rtUBEPLvBZwr2frkXzL3f8D6w36LxuhcqJOmDaIPDpJMH/65\nAbYnJyhwJeGUbrRm3zVtA
5QHIiSHi2gTdEw+9EfyIhuNKS4FO/uonjJJcKBtaufl\nGFL6y0WegbS5xlMV9RwkM22R7sQkBbDTr+79MqJXYCGtbyX0JxIgOGbE4mxvdDVh\nmuPo9IpRc5Jl
pSWUa7HvZUEuLnUicRbfrs1PK/FBF7aSrJLoYprHPgP6421pl08H\nhhJXE9XA2aIfEkJ4BcKw0BqOP/PEScyptUSAaGjS4JuxsNoL6URXYHxJsR0bPlet\nSct
3\n-----END CERTIFICATE-----\n"
 
cd /etc/pki/trust/anchors/
echo -e -n $DrJ_Root_CA > DrJ_Root_CA.pem
c_rehash
update-ca-certificates

So the key commands are c_rehash and update-ca-certificates.

Usually SLES is similar to Redhat. But it seems to be different in this case.

This was tested on a SLES 12 SP3 system.

It copies the certificate to /etc/pki/trust/anchors, which by itself is insufficient. Then it creates some kind of hash symlink to the CA file and makes sure that this new certificate doesn’t get wiped out by subsequent system patching. That’s the purpose of the c_rehash and update-ca-certificates commands.

You may also see these hashes and certificates in /etc/ssl/certs. I’m not sure because that’s where I started with all this. But merely dropping the private root CA into /etc/ssl/certs is insufficient, I can say from experience!

Redhat
Redhat is better documented, but for completeness I include it here. You have your inline certificate as in the SLES script, then following that:

...
cd /etc/pki/ca-trust/source/anchors/
echo -e -n $DrJ_Root_CA > DrJ_Root_CA.pem
update-ca-trust

So update-ca-trust is the key command for Redhat Linux. This was tested on Redhat Linux v 7.6.

Fedora v 33

Put your CA file with a .crt file extension into /etc/pki/ca-trust/source/anchors like for Redhat. Run update-ca-trust extract

Debian Linux circa 2023

Put your private CA file into a new directory /usr/share/ca-certificates/extra. Then run sudo dpkg-reconfigure ca-certificates. When prompted with a list of bundles to include make sure to enable your new extra file. Your certificate file needs to end in ‘crt’, not, e.g., ‘cer’. Seems pretty arbitrary to me, but that’s how it is. Of course it has to be standard PEM format. (—BEGIN CERTIFICATE—, etc.).

Python and self-signed certificates or certificates from private CAs

First, note that those are two different cases and need to be handled slightly differently! You may be in need of these measures if you are getting an error in python like this:

urllib3.exceptions.MaxRetryError: HTTPSConnectionPool(host=’www.myhost.local’, port=443): Max retries exceeded with url: / (Caused by SSLError(SSLCertVerificationError(1, ‘[SSL: CERTIFICATE_VERIFY_FAILED] certificate verify failed: unable to get local issuer certificate (_ssl.c:1123)’)))

Self-signed certificate

If the certificate is truly self-signed, then throw it into a file, let’s call it my-crt.crt in your home directory. Then set an environment variable before running python:

$ export REQUESTS_CA_BUNDLE=~/my-crt.crt

It should now work.

Python reverts to SSL: CERTIFICATE_VERIFY_FAILED after upgrade

So I had it all working. Then the requests package complained about my version of the urllib package. So I upgraded requests with a pip3 –upgrade requests. They the above-mentioned SSL error came back. I noticed that urllib got upgraded when requests was upgraded.

I basically gave up and totally kludged python to fix this. But only after playing with the certifi package etc. So I took the file that is for me the output of certifi.where(): /usr/local/lib/python3.9/site-packages/certifi/cacert.pem

I edited it as root and simply appended by private root CAs to that file. I hated to do it, and I know I should have at least used a virtual env, blah, blah. But at least now my jobs run. By the way, my by-hand tests of urlopen all worked! So it’s just the way some package was using it beyond my control that I had to create this kludge.

Certificate issued from a private CA

I added the private CA to the system CA on Debian with the update-ca-certificates mentioned above. Still no joy. Then I noticed the web server forgot to provide the intermediate certificate so I added that as well. Then, at least, curl began to work. But not python. Strange. For python I still need to define this environment variable:

$ export REQUESTS_CA_BUNDLE=/etc/ssl/certs/ca-certificates.crt

A second method to handle the case of a certificate issued from a private CA is to bundle the certificate + the intermediate certificate + the private root CA all into a single file, let’s call it my-crt.crt, in your home directory, and define the envirnoment variable same as for the self-signed certificate case:

$ export REQUESTS_CA_BUNDLE=~/my-crt.crt

My favorite openssl commands shows some commands to run to examine the certificate of a web server.

lftp usage tip with a private CA
If like me you were doing this work in conjunction with running ftps using a certificate signed by a private CA, and want your ftp client, lftp, to not complain about the unrecognized CA, then this tip will help.

After initiating your lftp and sending the username and password, you can send this command
$ ssl:ca-file <path-to-your-private-CA-file>
lftp is so flexible it offers many other ways to do this as well. But this is the one I use.

Conclusion
We show how to add your own root CA to a SLES 12 system. I did not find a good reference for this informaiton anywhere on the Internet.

References and related
My favorite openssl commands.

The basics of working with cipher settings

For Reedhat/CentOS I am evaluating this blog post on the proper way to add your own private CA: https://www.happyassassin.net/2015/01/14/trusting-additional-cas-in-fedora-rhel-centos-dont-append-to-etcpkitlscertsca-bundle-crt-or-etcpkitlscert-pem/

For the Redhat approach I used this blog post: https://www.happyassassin.net/2015/01/14/trusting-additional-cas-in-fedora-rhel-centos-dont-append-to-etcpkitlscertsca-bundle-crt-or-etcpkitlscert-pem/

Categories
Admin Linux Raspberry Pi

Fishcam using Raspberry Pi and some network tricks

Intro
There are more articles about running a webcam using Raspberry Pi than Carter has pills. Why bother to create another? This one is unique insofar as I created a fishcam at a school with a restricted network. None of the reference articles I found discussed a way to get your stream onto the Internet except the simplistic approach only available to homeowners of setting up a rule on a home router. Pimylifeup’s article is typical of that genre.

Cooperating third party
To push this webcam out to the Internet when I had no way to allow inbound traffic to the Pi, I realized that I needed a cooperating third party. I looked briefly for a commercial service specializing in this. I did not find one. I suppose there is, but I don’t know. It was actually quicker to stop the search and use my own AWS server as the cooperating third party.

With a cooperating third party what you can do is set up a forwarder from the Pi to cooperating server on the Internet. So that’s what I did. More on that below.

Network restrictions
The Pi was given WiFi access to a school’s bring your own device (BYOD) WiFi. By trial and error (I did not initiate extensive port scans, etc so as to avoid acting like a hacker). I’m familiar with running a almost completely open Guest wireless. This BYOD was not that for some reason unknown to me. One of the first things I tried, to ssh to my server, was not going through. So I knew there were restrictions. Also PING 8.8.8.8 did not work. So ICMP was blocked as well. But web browsing worked, and so did DNS queries. So TCP ports 80 and 443 were allowed, as well as UDP port 53 and possibly TCP port 53. I also observed there was no proxy server involved in the communication. So I simply tested a few other ports that I know are used from time-to-time: 2443 and 8443. If you a hit a server that is not protected by a firewall and not listening on a port that you are testing you will get a Connection reset if your packets are not blocked by a local firewall. I tested with the nc utility. nc -v <my_server> <port> I found a couple open ports this way. Next question: does the network care what protocol is running on that port? They might be looking for https and I was planning to run ssh. For a simple port blocker it might not distinguish what’s going on. That was indeed the case as I was able to run ssh on this non-standard port.

The single most comlicated thing was formulating the appropriate ssh command. I created a dedicated account on my server for this purpose. I embedded the password into the startup script I created using a utility called sshpass. This is not super secure but I wanted something running quickly.

Here’s that complicated command

sshpass -p <PASSWORD> ssh ‐f ‐N ‐R 8443:localhost:8081 ‐p 2443 <USERNAME>@<SERVER_IP>

That’s a mouthful! Let’s break it down. sshpass just permits you to run the command and not get a login prompt. It needs to be installed with a sudo apt-get sshpass.

The ssh command sets up a reverse tunnel. I have discussed it in my Access your Raspberry Pi from anywhere blog post, however, some things are different and more complicated here. Here we are setting up port 8443 on my server as the tunnel port which will be accessible to the Internet. It is terminated on the Raspberry Pi’s local port 8081 (the port that the motion package uses for the webcam). We had to use ssh to connect to port 2443 on my server because the school network blocked the standard port 22. Then <PASSWORD>, <USERNAME> and <SERVER_IP> are to be replaced with values specific for my server. I don’t want to publish them.

How I got my server to run ssh on port 2443 as well as port 22
This turned out to be one of the easiest things. It’s good to run your own server… In the file /ets/ssh/sshd_config the listening port was commented out, letting the defaul 22 be in effect. So I uncommented that and added port 2443 like this:

...
# Listen on multiple ports - DrJ 2/1/19
Port 22
Port 2443
...

Then a sudo service sshd restart and the server listens on both ports for ssh connections!

About the webcam itself
I just followed the Pimylife article as I mentioned. It talks about using the motion package which I’ve never used before. Now in my other posts you’ll see I do stuff with video on Raspberry Pi. In those we had to fight to get the lag time down and keep bandwidth low. I have to say by comparison this motion package is awful. Lag is a couple seconds. There is no sense whatsoever of true video. Just image, wait, next image, wait. No matter the fps setting. I did not have time to switch to a video package that works better. Anyway motion may provide some other advantages we could eventually use. So I just set it to 2 fps (frames per second) since it doesn’t really matter.

The fishcam is at fishcam. It’s not working right now – just showing black. I’m not sure why.

Auto starting
I’ve documented elsewhere the poor man’s way to start something upon initially booting the Pi: stuff the appropriate command into the crontab file.

So you edit your crontab file with a crontab -e. Then you enter

@reboot sleep 20; sshpass -p <PASSWORD> ssh ‐f ‐N ‐R 8443:localhost:8081 ‐p 2443 <USERNAME>@<SERVER_IP>

That just sleeps for 20 seconds as your Pi boots up, then establishes the reverse tunnel with that complicated command I explained earlier.

Equipment
Usually thes tutorials start with an equipment list. For me that is the least interesting part. I used a Raspberry Pi 3 running Raspbian. For a camera I used one of my spare USB ELP cameras from my extensive work with USB cameras. While developing the solution I needed a keyboard, mouse and HDMI monitor. Once running, the only thing connected to the Pi is the USB camera and the micro USB power supply.

To be continued…

References and related
A very good guide for your typcial webcam-using-a-Raspberry-Pi situation, i.e., not what I am addressing in my article.

Access your Raspberry Pi from anywhere blog post

Run multiple USB cameras on your Raspberry Pi while keeping lag minimal.

For supplies we love visits to The Micro Center in Paterson, NJ. This past weekend we got Raspberry Pi 3’s for only $29. And the sales tax is only 3% and change.

Categories
Admin DNS Network Technologies Security

The IT Detective agency: Live hack caught, partially stopped

Intro
In my years at cybersecurity I’ve been sufficiently removed from the action that I’ve rarely been involved in an actual case. Until last night. A friend, whom I’ll call Jute, got a formal complaint about one of his hosted Windows servers.

We have detected multiple hacking attempts from your ip address 47.5.105.236 (Hilfer Online) to access our systems.
>
> Log of attempts:
> – Hack attempt failed at 2019-01-17T14:22:41.6539784Z. Attempted user name: Not specified (typical for port scanners or denial of service attacks), system accessed: RDP, ip address accessed: 158.69.241.92
> – Hack attempt failed at 2019-01-17T14:22:26.2213808Z. Attempted user name: Not specified (typical for port scanners or denial of service attacks), system accessed: RDP, ip address accessed: 158.69.241.92
> – Hack attempt failed at 2019-01-17T14:22:10.6304194Z. Attempted user name: Not specified (typical for port scanners or denial of service attacks), system accessed: RDP, ip address accessed: 158.69.241.92
>
>
> Please investigate this problem.
>
> Sent using IP Ban Pro
> http://ipban.com

Hack, cont.
I’ve changed the IPs to protect the guilty! But I’ve conveyed the specificity of the error reporting. Nice and detailed.

Jute has a Windows Server 2012 at that IP. He is not running a web server, so that conveniently and dramatically narrows the hackable footprint of his server. I ran a port scan and found ports 135, 139 and 3389 open. His provider (which is not AWS) offers a simple firewall which I suggested we use to block ports 135 and 139 which are for Microsoft stuff. He was running it as a local sever so I don’t tihnk he needed it.

Bright idea: use good ole netstat
The breakthrough came when I showed him the poor man’s packet trace:

netstat -an

from a CMD prompt. He ran that and I saw not one but two RDP connections. One we easily identified as his, but the other? It was coming form another IP belonging to the same provider! RDP is easily identified by just looking for the port 3389 connections. Clearly we had caught first-hand an unauthorized user.

I suggested a firewall rule to allow only his Verizon range to connect to server on port 3389. But, I am an enterprise guy, used to stateful firewalls. When we set it up we cut off his RDP session to his own server! Why? I quickly concluded this was amateur hour and a primitive, ip-chains-like stateless firewall. So we have to think about rules for each packet, not for each tcp connection.

Once we put in a rule to block access to ports 135 and 139, we also blocked Jute’s own RP session. So the instructions said once you use the firewall, an implicit DENY ALL is added to the bottom of the rules.

So we needed to add a rule like:

SRC: ANY DST: 47.5.105.236 SRC_PORT: ANY DST_PORT: 3389 ACTION: allow

But his server needs to access web sites. That’s a touch difficult with a stateless firewall. You have to enter the “backwards” rule (outbound traffic is not restricted by firewall):

SRC: ANY DST: 47.5.105.236 SRC_PORT: 443 DST_PORT: ANY ACTION: allow

But he also needs to send smtp email, and look up DNS! This is getting messy, but we can do it:

SRC: ANY DST: 47.5.105.236 SRC_PORT: 25 DST_PORT: ANY ACTION: allow
SRC: ANY DST: 47.5.105.236 SRC_PORT: 53 DST_PORT: ANY ACTION: allow

We looked up the users and saw Administrator and another user Update. We did not recognize Update so he deleted it! And changed the password to Administrator.

Finally we decided we had to bump this hacker.

So we made two rules to allow him but deny the zombie computer:

SRC: 158.69.240.92 DST: 47.5.105.236 SRC_PORT: ANY DST_PORT: 3389 ACTION: reject
SRC: ANY DST: 47.5.105.236 SRC_PORT: ANY DST_PORT: 3389 ACTION: allow

Pyrrhic victory
Success. We bumped that user right out while permitting Jute’s access to continue. The bad news? A new interloper replaced it! 95.216.86.217.

OK. So with another rule we can bump that one too.

Yup. Another success. another interloper jumps on in its place. 124.153.74.29. So we bump that one. But I begin to suspect we are bailing the Titanic with a thimble. It’s amazing. Within seconds a blocked IP is being replaced with a new one.

We need a more sweeping restriction. So we reasoned that Jute will RP from his provider where his IP does not really change.

So we replace

SRC: ANY DST: 47.5.105.236 SRC_PORT: ANY DST_PORT: 3389 ACTION: allow

with

SRC: 175.198.0.0/16 DST: 47.5.105.236 SRC_PORT: ANY DST_PORT: 3389 ACTION: allow

and we also delete the specific reject rules.

But now at this point for some reason the implicit DENY ALL rule stops working. From my server I could do an nc -v 47.5.105.236 3389 and see that that port was open, though it should ont have been. So we have to add a cleanup rule at the bottom:

SRC: ANY DST: 47.5.105.236 SRC_PORT: ANY DST_PORT: ANY ACTION: reject

That did the trick. Port no longer opened.

There still appears in netstat -an listing the last interloper, but I think it just hasn’t been timed out yet. netstat -an also clearly shows (to me anyway) what they were doing: scanning large swaths of the Internet for other vulnerable servers! The tables were filled with SYN-SENT to port 3389 of consecutive IPs! Amazing.

So I think Jute’s server was turned into a zombie which was tasked with recruiting new zombies.

We had finally frozen them out.

Later that night
Late that same night he calls me in a panic. He uses a bunch of downstream servers and that wasn’t working! The downstream servers run on a range of ports 14800 – 15200.

Now bear in mind the provider only permits us 10 firewall rules, so it’s getting kind of tight. But we manage to squeeze in another rule:

SRC: ANY DST: 47.5.105.236 SRC_PORT: 14800-15200 DST_PORT: ANY ACTION: allow

He breathes a sigh of relief because this works! But I want him we are opening a slight hole now. Short term there’s nothing we can do. It’s a small exposure: 400 open ports out of 65000 possible. It should hold him for awile with any luck.

He also tried to apply all updates at my suggestion. I’m still not sure what vulnerability was (is) exploited.

Case: tentaively closed

Our first attempt to use the Windows firewall itself was not initially successful. We may return to it.

Conclusion
We catch a zombie computer totally exploiting RDP on a Windows 2012 server. We knocked it off and it was immediately repaced with another zombie doing the same thing. Their task was to find more zombies to join to the botnet. Inbound firewall rules defined on a stateless firewall were identified which stopped this exploitation while permitting desired traffic. Not so easy when you are limited to 10 firewall rules!

This is a case where IPBAN did us a favor. The system worked as it was supposed to. We got the alert, and acted on it immediately.

I’m not 100% sure which RP vulnerability was exploited. It may have been an RCE – remote code execution not even requiring a valid logon.

References and related
The rest of the security world finally caught up with this, with Microsoft releasing a critical patch in May. I believe I was one of the first to publicly document this exploit. https://nakedsecurity.sophos.com/2019/06/10/the-goldbrute-botnet-is-trying-to-crack-open-1-5-million-rdp-servers/?utm_source=Naked+Security+-+Sophos+List&utm_campaign=0fd82f7fce-Naked+Security+-+June+test+-+groups+1+and+3&utm_medium=email&utm_term=0_31623bb782-0fd82f7fce-418487137
Categories
Admin Proxy

Google Hangouts Meet – what do these IPs all have in common?

2021 update

142.250.82.77

142.250.82.113

142.250.82.28

142.250.82.126

2020 update

142.250.82.42

142.250.82.71
142.250.82.78
209.85.144.127
74.125.250.71

Suspected additional IPs

And I observed the user agent “Google Hangouts” trying these IPs, but by the FQDN mtalk.google.com (whose resolution must by very dynamic) rather than raw IP:

142.250.31.188
172.253.122.188
172.253.63.188

Older IPs
173.194.207.127
209.85.232.127
64.233.177.127
64.233.177.103
74.125.196.127

They all have been used by Google’s Hangouts Meet based on my observation.
If you have an environment which uses proxy authentication, the above IPs do not play well with that. So you’ll need to disable proxy authentication for them for Hangouts Meet to work.

Otherwise you can do the initial connect but will be dropped after about 45 seconds.

Finally, although you can look up each individually and learn of its association to Google, Google’s own documentation is devoid of any references to them. That is unfortunate.

So the IPs in actual use is probably much larger, but these are what I’ve observed over the course of a few days of testing.

What I’ve done
Google is very hard to reach. They only provide indirect means for regular users. So not knowing any insiders I submitted feedback at https://meet.google.com/ which is what they suggest. I provided a detailed description. I doubt they will do anything with my feedback. We’ll see. Update. Correct. Months have passed and they never bothered to get back to me.

Conclusion
Google has an undocumented dependency on a whole set of IPs for hangout Meets to actually work through a proxy which requires authentication. Contacting Google for more information is probably impossible, but I will try.

Categories
Admin Security

Great serial port concentrator: Raritan Dominion

Intro
Every now and then you find a product that is a leap ahead of where you were. Such is the case for us with regards to our product of choice for serial consoles.

The old
For Bluecoat (Symantec) proxy and AV systems, we had been using an ancient Avocent CPS device. It permitted ssh connection. It was slow and the menu very limited. But it did permit us to connect multiple serial consoles to one concentrator device at least.
For low-end firewalls we had been using DigiConnects, one per firewall. They are small, which may be thir one advantage. They are tricky to initially set up. Then they are slow to use.

In with the new
We heard about the Raritan Dominion line of products, stranegly enough, from some IT guys in Europe. It’s strange because they are right here in New Jersey – the company name probably comes form the Raritan river. But our usual reseller never heard of them. The specific device is a Dominion SXII.

It’s so much better than those older products. You can use their GUI to connect. This is a vendor who got their act together and eliminated Java. So many other security vendors have yet to do that, incredible as it is to say that.
It tries to autosense the wiring of the serial connector. That doesn’t always work, but it’s very easy for you to hardwire a port as DCE, or if that dosn’t work, try DTE. I use one type for my Symantec devices, another for firewalls.

Labelling the port with meaningful names is a snap, of course.

The Digis would interfere with the reboot process of the firewall so we’d have to detach them if we were going to rbeoot the firewall. These do not. So much better…

You can combine them with power control but we aren’t going to do that.

Don’t want to use the GUI? No problem, console access through ssh is also possible. Of configure dedicated ports that you ssh to for individual consoles.

Sending signals and cleanly disconnecting is easy with their menuss. Connecting to multiple consoles is alsono problem.

They have something called in-the-rack access. I know this will be useful but I haven’t figured out how to use it yet. But if it is what it sounds like it is, it will allow me to be in the server room and access any console by using a direct connection of some sort to the Dominion SXII.

And they’re just plain faster. A lot faster.

And, considering, they’re not so expensive.

They worked so much better than expected that we pretty much immediately filled up the ports with firewalls and other stuff.

Conclusion
A leap forward in productivity was realized by utilizing Raritn’s Dominion SXII serial port concentrator. Commissioning new security gear has never been esaier…

References and related
Raritan’s web site: https://www.raritan.com

Categories
Admin Perl

Counting active leases on an old ISC DHCP server

Intro
Checkpoint Gaia offers a DHCP service, but it ias based on a crude and old dhcp daemon implementation frmo ISC. Doesn’t give you much. Mostly just the file /var/lib/dhcpd/dhcpd.leases, which it constantly updates. A typical dhcp client entry looks like this:

 
lease 10.24.69.22 {
  starts 5 2018/11/16 22:32:59;
  ends 6 2018/11/17 06:32:59;
  binding state active;
  next binding state free;
  hardware ethernet 30:d9:d9:20:ca:4f;
  uid "\0010\331\331 \312O";
  client-hostname "KeNoiPhone";
}


The details

So I modified a perl script to take all those lines and make sense of them.
I called it lease-examine.pl.
Here it is

#!/usr/bin/perl
# from https://askubuntu.com/questions/219609/how-do-i-show-active-dhcp-leases - DrJ 11/15/18
 
my $VERSION=0.03;
 
##my $leases_file = "/var/lib/dhcpd/dhcpd.leases";
my $leases_file = "/tmp/dhcpd.leases";
 
##use strict;
use Date::Parse;
 
my $now = time;
##print $now;
##exit;
# 12:22 PM 11/15/18 EST
#my $now = "1542302555";
my %seen;       # leases file has dupes (because logging failover stuff?). This hash will get rid of them.
 
open(L, $leases_file) or die "Cant open $leases_file : $!\n";
undef $/;
my @records = split /^lease\s+([\d\.]+)\s*\{/m, <L>;
shift @records; # remove stuff before first "lease" block
 
## process 2 array elements at a time: ip and data
foreach my $i (0 .. $#records) {
    next if $i % 2;
    ($ip, $_) = @records[$i, $i+1];
    ($ip, $_) = @records[$i, $i+1];
 
    s/^\n+//;     # && warn "leading spaces removed\n";
    s/[\s\}]+$//; # && warn "trailing junk removed\n";
 
    my ($s) = /^\s* starts \s+ \d+ \s+ (.*?);/xm;
    my ($e) = /^\s* ends   \s+ \d+ \s+ (.*?);/xm;
 
    ##my $start = str2time($s);
    ##my $end   = str2time($e);
    my $start = str2time($s,UTC);
    my $end   = str2time($e,UTC);
 
    my %h; # to hold values we want
 
    foreach my $rx ('binding', 'hardware', 'client-hostname') {
        my ($val) = /^\s*$rx.*?(\S+);/sm;
        $h{$rx} = $val;
    }
 
    my $formatted_output;
 
    if ($end && $end < $now) {
        $formatted_output =
            sprintf "%-15s : %-26s "              . "%19s "         . "%9s "     . "%24s    "              . "%24s\n",
                    $ip,     $h{'client-hostname'}, ""              , $h{binding}, "expired"               , scalar(localti
me $end);
    }
    else {
        $formatted_output =
            sprintf "%-15s : %-26s "              . "%19s "         . "%9s "     . "%24s -- "              . "%24s\n",
                    $ip,     $h{'client-hostname'}, "($h{hardware})", $h{binding}, scalar(localtime $start), scalar(localti
me $end);
    }
 
    next if $seen{$formatted_output};
    $seen{$formatted_output}++;
    print $formatted_output;
}

Even that script produces a thicket of confusing information. So then I further process it. I call this script dhcp-check.sh:

#!/bin/sh
# DrJ 11/15/18
# bring over current dhcp lease file from firewall FW-1
date
echo fetching lease file dhcpd.leases
scp admin@FW-1:/var/lib/dhcpd/dhcpd.leases /tmp
# analyze it. this should show us active leases
echo analyze dhcpd.leases
DIR=`dirname $0`
$DIR/lease-examine.pl|grep active|grep -v expired > /tmp/intermed-results
# intermed-results looks like:
#10.24.76.124   : "android-7fe22a415ce21c55" (50:92:b9:b8:92:a0)    active Thu Nov 15 11:32:13 2018 -- Thu Nov 15 15:32:13 2018
#10.24.76.197   : "android-283a4cb47edf3b8c" (98:39:8e:a6:4f:15)    active Thu Nov 15 11:37:23 2018 -- Thu Nov 15 15:32:14 2018
#10.24.70.236   : "other-Phone"            (38:25:6b:79:31:60)    active Thu Nov 15 11:32:24 2018 -- Thu Nov 15 15:32:24 2018
#10.24.74.133   : "iPhone-de-Lucia"          (34:08:bc:51:0b:ae)    active Thu Nov 15 07:32:26 2018 -- Thu Nov 15 15:32:26 2018
#exit
# further processing. remove the many duplicate lines
echo count active leases
awk '{print $1}' /tmp/intermed-results|sort -u|wc -l > /tmp/dhcp-active-count
echo count is `cat /tmp/dhcp-active-count`

And that script gives my what I believe is an accurate count of the active leases. I run it every 10 minutes from SiteScope and voila, we have a way to make sure we’re coming close to running out of IP addresses.

Categories
Admin Linux Network Technologies SLES

Linux tip: how to enable remote syslog on SLES

Intro
I write this knowing I still don’t know anything to speak of about syslog, but, sometimes you gotta act without knowing. I needed to send syslog to somewhere in a big hurry so I figured out the absolute minimum I needed to do to get it running on one of my other systems.

The details
This all started because of a deficiency in the F5 ASM. At best it’s do slow when looking through the error log. But in particular there was one error that always timed out when I tried to bring up the details, a severity 5 error, so it looked pretty important. Worse, local logging, even though it is selected, also does not work – the /var/log/asm file exists but contains basically nothing of interest. I suppose there is some super-fancy and complicated MySQL command you could run to view the logs, but that would take a long time to figure out.

So for me the simplest route was to enable remote syslog on a Linux server and send the ASM logging to it. This seems to be working, by the way.

The minimal steps
Again, this was for Suse Enterprise Linux running syslog-ng.

  1. modify /etc/sysconfig/syslog as per the next step
  2. SYSLOGD_PARAMS=”-r”
  3. modify /etc/syslog-ng/syslog-ng.conf as per the next step
  4. uncomment this line: udp(ip(“0.0.0.0”) port(514));
  5. launch yast (I use curses-based yast [no X-Windows] which is really cantankerous)
  6. go to Security and Users -> Firewall -> Allowed services -> Internal Zone -> Advanced
  7. add udp port 514 as additional allowed Ports in internal zone and save it
  8. service syslog stop
  9. service syslog start
  10. You should start seeing entries in /var/log/localmessages as in this suitably anonymized example (I added a couple line breaks for clarity:
Jul 27 14:42:22 f5-drj-mgmt ASM:"7653503868885627313","50.17.188.196","/Common/drjohnstechtalk.com_profile","blocked","/drjcrm/bi/tjhmore345","0","Illegal URL,Attack signature detected","200021075","Automated client access ""curl""","US","<!--?xml version='1.0' encoding='UTF-8'?-->44e7f1ffebff2dfb-800000000000000044f7f1ffebff2dfb-800000000000000044e7f1ffe3ff2dfb-80000000000000000000000000000000-000000000000000042VIOL_ATTACK_SIGNATURErequest200021075
7VXNlci1BZ2VudDogY3VybC83LjE5LjcgKHg4Nl82NC1yZWRoYXQtbGludXgtZ251KSBsaWJjdXJsLzcuMTkuNyBOU1MvMy4yNy4xIHpsaWIvMS4yLjMgbGliaWRuLzEuMTggbGlic3NoMi8xLjQuMg0KSG9zdDogYWctaW50ZWw=
01638
VIOL_URL","GET /drjcrm/bi/tjhmore345 HTTP/1.1\r\nUser-Agent: curl/7.19.7 (x86_64-redhat-linux-gnu) libcurl/7.19.7 NSS/3.27.1 zlib/1.2.3 libidn/1.18 libssh2/1.4.2\r\nHost: drjohnstechtalk.com\r\nAccept: */*\r\n\r\n"

Observations
Interestingly, there is no syslogd on this particular system, and yet the “-r” flag is designed for syslogd – it’s what turns it into a remote syslogging daemon. And yet it works.

It’s easy enough to log these messages to their own file, I just don’t know how to do it yet because I don’t need to. I learn as I need to. just as I learned enough to publish this tip.

Conclusion
We have demonstrated activating the simplest possible remote syslogger on Suse Linux Enterprise Server.

References and related

Want to know what syslog is? Howtonetwork has this very good writeup: https://www.howtonetwork.com/technical/security-technical/syslog-server/

Categories
Admin Linux Security Web Site Technologies

The IT Detective Agency: the vanishing certificate error

Intro
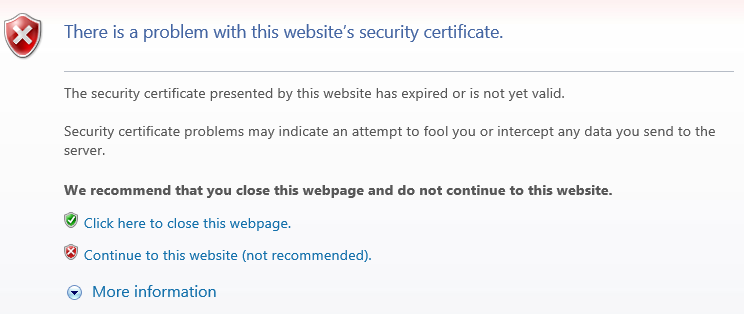
I was confronted with a web site certificate error. A user was reluctant – correctly – to proceed to an internal web site because he saw a message to the effect:

I tried it myself with IE and got the same thing.
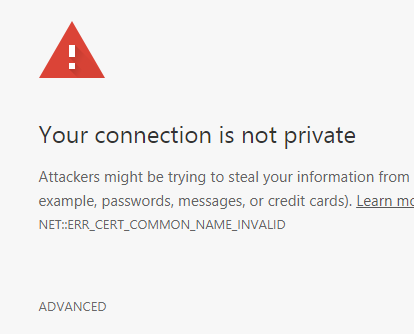
Switch to Chrome and I saw this error:

I wouldn’t bother to document this one except for a twist: the certificate error went away in IE when you clicked through to the login page.

Furthermore, when I examined the certificate with a tool I trust, openssl, it showed the date was not expired.

So what’s going on there?

The details
First thing I dug into was Chrome. I found this particular error can occur if you have an internal certificate issued with a valid common name, but without a Subject Alternative Name. My openssl examination confirmed this was indeed the case for this certificate.

So I decided the Chrome error was a red herring. And confirmed this after checking out other internal web sites which all suffered from this problem.

But that still leaves the IE error unexplained.

As I mentioned in a previous post, I created a shortcut bash function that combines several openssl functions I call examinecert:

examinecert () { echo|openssl s_client -servername "$@" -connect "$@":443|openssl x509 -text|more; }

Use it like this:

$ examinecert drjohnstechtalk.com

Certificate:
    Data:
        Version: 3 (0x2)
        Serial Number:
            04:17:21:b7:12:94:3a:fa:fd:a8:f3:f8:5e:2e:e4:52:35:71
    Signature Algorithm: sha256WithRSAEncryption
        Issuer: C=US, O=Let's Encrypt, CN=Let's Encrypt Authority X3
        Validity
            Not Before: Apr  4 08:34:56 2018 GMT
            Not After : Jul  3 08:34:56 2018 GMT
        Subject: CN=drjohnstechtalk.com
        Subject Public Key Info:
            Public Key Algorithm: rsaEncryption
                Public-Key: (2048 bit)
                Modulus:
                    00:d3:50:98:6d:72:03:b2:e4:01:3f:44:01:3d:eb:
                    ff:fc:68:7d:51:a4:09:90:48:3c:be:43:88:d7:ba:
                    ...
        X509v3 extensions:
                 ...
            X509v3 Subject Alternative Name:
                DNS:drjohnstechtalk.com
                ...

I tried to show a friend the error. I could no longer get IE to show a certificate error. So my friend tried IE. He saw that initial error.

Most people give up at this point. But my position is the kind where problems no one else can resolve go to get resolution. And certificates is somewhat a specialty of mine. So I was not ready to throw in the towel.

I mistrust all browsers. They cache information, try to present you sanitized information. It’s all misleading.

So I ran examinecert again. This time I got a different result. It showed an expired certificate. So I ran it again. It showed a valid, non-expired certificate. And again. It kept switching back-and-forth!

Here it helps to know some peripheral information. The certificate resides on an old F5 BigIP load-balancer which I used to run. It has a known problem with updating certificate if you merely try to replace the certificate in the SSL client profile. It’s clear by looking at the dates the certificate had recently been renewed.

So I now had enough information to say the problem was on the load balancer and I could send the ticket over to the group that maintains it.

As for IE’s strange behavior? Also explainable for the most part. After an initial page with the expired certificate, if you click Continue to this web site it re-loads the page and gets the Good certificate so it no longer shows you the error! So when I clicked on the lock icon to examine the certificate, I always was getting the good version. In fact – and this is an example of the limitation of browsers like IE -you don’t have the option to examine the certificate about which it complained initially. Then IE caches this certificate I think so it persists sometimes even after closing and re-launching the browser.

Case closed.

Conclusion
An intermittent certificate error was explained and traced to a bad load balancer implementation of SSL profiles. The problem could only be understood by going the extra mile, being open-minded about possible causes and “using all my senses.” As I like to joke, that’s why I make the medium bucks!

Other conclusion? openssl is your friend.

References and related
My favorite openssl commands show how to use openssl x509 from any linux server.

Categories
Admin Network Technologies Security

The IT Detective agency: Some insights into 4096-bit SSL keys

Intro
I was recently asked if a new certificate a web site is about to deploy would require any changes to our clients such as needing to import this certificate into their Java keystore.

The details
Well, I saved the certificate on a Linux server calling it my.crt and examined it using openssl:

$ openssl x509 ‐text ‐in my.crt

My greatest hits amongst the openssl commands are listed here: My favorite openssl commands

Anyway, the output begins like this:

Certificate:
    Data:
        Version: 3 (0x2)
        Serial Number:
            68:5f:f8:b6:5e:56:c2:1d
        Signature Algorithm: sha256WithRSAEncryption
        Issuer: C=US, ST=Arizona, L=Scottsdale, O=GoDaddy.com, Inc., OU=http://certs.godaddy.com/repository/, CN=Go Daddy Secure Certificate Authority - G2
        Validity
            Not Before: Apr  5 22:57:01 2018 GMT
            Not After : Apr  5 22:57:01 2020 GMT
        Subject: 1.3.6.1.4.1.311.60.2.1.3=US/1.3.6.1.4.1.311.60.2.1.2=California/2.5.4.15=Private Organization/serialNumber=C2417721, C=US, ST=California, L=Carlsbad, CN=www.drj.com
        Subject Public Key Info:
            Public Key Algorithm: rsaEncryption
            RSA Public Key: (4096 bit)
                Modulus (4096 bit):
                    00:da:c7:18:a2:4d:b5:c9:95:22:b0:64:50:e7:b8:
                    ...

So I checked the text after the Issuer field, C=US, ST=Arizona, L=Scottsdale, O=GoDaddy.com, Inc., OU=http://certs.godaddy.com/repository/, CN=Go Daddy Secure Certificate Authority – G2
This is the intermediate CA. And it exactly matches their current certificate we already trust. So no problem, right, we are good to go, right? Not so fast grasshopper. This certificate contains a totally new element for us. I happened to notice it has a 4096 bit key length. Never seen that before though I have heard about it.

How do we even know our old browsers and even proxy server are going to be good with that? The best way I reasoned is simply to find another site with a 4096 bit certificate. Well, it took me almost an hour before I found one, and DDG and Google searches proved fruitless. I found it by taking logical guesses, as in, surely some security-minded organization has deployed these already??

ssllabs.com. Nope. godaddy.com. Nope. www.google.com. Nope. Gnupg.org, Nah, ah. Lets Encrypt. Also a no. Then I tried nist.org and found the weirdest thing. They send several certificates, one of which is *.bluehost.com which is 4096 bits. But it makes no sense being part of the certificates on nist.org, as an ssllabs.com server eval will tell you. So then I tried www.bluehost.com. Paydirt!

$ examinecert www.bluyehost.com

Certificate:
    Data:
        Version: 3 (0x2)
        Serial Number:
            af:a7:b9:22:4f:d5:7e:6b:78:4b:5a:23:d0:35:50:23
    Signature Algorithm: sha256WithRSAEncryption
        Issuer: C=GB, ST=Greater Manchester, L=Salford, O=COMODO CA Limited, CN=COMODO RSA Domain Validation Secure Server
CA
        Validity
            Not Before: Oct 16 00:00:00 2015 GMT
            Not After : Oct 17 23:59:59 2018 GMT
        Subject: OU=Domain Control Validated, OU=Hosted by BlueHost.Com, INC, OU=PositiveSSL Wildcard, CN=*.unifiedlayer.co
m
        Subject Public Key Info:
            Public Key Algorithm: rsaEncryption
                Public-Key: (4096 bit)
                Modulus:
                    00:c5:2b:10:d2:20:bb:d9:1b:e1:d3:b2:d1:9b:6f:
                    ...

examinecert is a bash function I created defined as:

examinecert () { echo|openssl s_client -connect "$@":443|openssl x509 -text|more; }

And for this company that brings up a host of questions. if their again IE 11 has never encountered a web site with this long of a key length, how will we know what will happen the first time?

Also, some sites get SSL intercepted by Bluecoat proxy. How will that infrastructure handle it? Will it handle it?

That;s why it was so important to find a real-world example, as painful as that exercise proved to be.

The answers are somewhat surprising.

Yes, ancient Internet Explorer probably handles 4096 bit key lengths just fine. I actually haven’t fully tested that one yet.

But it doesn’t matter for this company. Their Bluecoat proxy intercepts the SSL. So, yes, that part works, and re-creates its own certificate, but issued as a standard 2048-bit key length! So that is what IE sees so I know there will be no issue there. I say surprising because usually the generated certificates so carefully preserve all aspects of a certificate: same expiration date, same common name, etc. Whether or not this key length reduction is configurable or not I have yet to find out.

Follow up
As a result of my prodding, badssl.com will include a 4096-bit certificate with which to test things out.

Conclusion
After an arduous search (I’m sure next year this time this will become much easier) we found a public site which can be used to test 4096 bit key lengths: www.bluehost.com. Obviously GoDaddy also issues 4096-bit certificates since that is what this particular web site uses as their issuer, but I have yet to find an actual live example of one.

Bluecoat SSL interception by default does handle this long key length, but generates its private version of it with only a 2048 key length, to our surprise.

Just remember, if you have a Raspberry Pi you can run all these commands that I’ve shown because you have a bone fide Linux system.

Case: closed!

References and related
This site has all sorts of SSL scenarios to test against: https://badssl.com/.
To jump straight to their 4096-bit CERT: https://rsa4096.badssl.com/