I was looking at what Cloudflare could do for my web site. A colleague pointed out that they have a free usage tier which supplies a web application firewall and some anti-bot measures. I checked it out and immedaitely signed up!
The details
What Cloudflare is supplying at no cost (for personal web sites like mine) is amazing. It’s not just a world-class dns service. That would already be amazing. Run dnscheker.org against drjohnstechtalk.com and you will see several different IPs mentioned around the world- just like the big guns! I also get for free some level of mitigation against dns-based attackes.
Web site protections
I don’t fully understand their products so I don’t know what level of protections I am getting in the free tier, but there are at least some! They say they’ve blocked 10 requests in the last few days
Web usage stats
I have to admin using raw linux tools against my apache access file hasn’t bee n the most illuminating until now. Now that I use Cloudflare I get a nice visual presentation showing where (which country) my visitors came from, where the bots come from, how much data was transmitted.
Certificate for HTTPS
Cloudflare automatically takes care of the web site certificate. I had to do nothing at all. So now I can forget my call out to LetsEncrypt. I wonder if GoDaddy is still charging $69 annually for their certificates.
Acceleration
Yeah my web site just feels faster now since the switch. It just does. And Cloudflare stats say that about 30% of the content has been served from their cache – all with zero setup effort on my part! I also believe they use certain tcp acceleration techniques to speed things up.
Cache
And Cloudflare caches some of my objects to boost performance. Considering that I pay for data transfer at Amazon AWS, it’s a fair question to ask if this caching could even be saving me money? I investigated this and found that I get billed maybe $ .02 per GByte, and in a busy month I might use .8 GB or so, so $ .02 per month. So I might occasionally save a penny or so – nothing substantial though!
geoDNS
Even with this free tier you get some geoDNS functionality for free, namely, visitors from around the world will see an IP address which is geographically close to where they are, bossting their performance when using your site. Stop to think about that. That’s a whole lot of infrastructure sophistication that they’re just giving you for free!
Why are they giving this much away?
I think they have the noble aim of improving the security posture of the Internet writ large. Much as letsencrypt greatly accelerated the adoptipon of web page encyrption (https) by making certificates free, Cloudflare hopes to accelerate the adoption of basic security measures for every web site, thereby lifting the security posture of the Internet as a whole. Count me as a booster!
What’s their business model. How will they ever make money?
Well, you’re only supposed to use the free tier for a personal web site, for one. My web sites don’t really have any usage and do not display ads so I think I qualify.
More importantly, the free security protections and acceleration are a kind of teaser and the path to upgrading to profesisonal tier is very visibly marked. So they’re not 100% altruistic.
Why I dislike GoDaddy
Let’s contrast this with offerings from GoDaddy. GoDaddy squeezes cents out of you at every turn. They make it somewhat mysterious what you are actually paying for so they’re counting on fear of screwing up (FOSU, to coin a term). After all, except for the small hit to your wallet, getting that upgraded tier – whois cloaking, anyone? – might be what you need. Who knows. Won’t hurt, right? But I get really tired of it. Amazon AWS is perhaps middle tier in this regards. They do have a free tier virtual server which I used initially. But it really doesn’t work except as a toy. My very modest web site overwhlemed it on too many occasions. So, basically useless. Everything else: you pay for it. But somehow they’re not shaking the pennies out of you at every turn unlike GoDaddy. And AWS even shows you how to optimize your spend.
How I converted my live site to Cloudflare
After signing up for Cloudflare I began to enter my dns domains, e.g., drjohnstechtalk.com, johnstechtalk.com, plsu a few others. They explained how at GoDaddy I had to update the nameserver records for these domains, which I did. Then Cloudflare has to verify these updates. Then my web sites basically stopped working. So I had to switch the encryption mode to full. This is done in Web sites > drjohnstechtalk.com > SSL/TLS > Overview. This mode encrypts the back-end data to my web server, but it accepts a self-signed certificate, no matter if it’s expired or not and no matter who issued it. That is all good because you still get the encrypted channel to your content server.
Then it began to work!
Restoring original visitor IPs to my apache web server logs
Very important to know from a technical standpoint that Cloudflare acts as a reverse proxy to your “content server.” Knowing this, you will also know that your content server’s apache logs get kind of boring because they will only show the Cloudflare IPs. But Cloudflare has a way to fix that so you can see the original IPs, not the Cloudlfare IPs in your apache logs.
Locking down your virtual server
If Internet users can still access the web server of your virtual server directly (bypassing Cloudflare), your security posture is only somewhat improved. To go further you need to use a local firewall. I debated whether to use AWS Network Security Groups or iptables on my centos virtual server. I went with iptables.
Note that this still leaves ssh open, but that’s ok since it is locked down via Network Security Group rules. No urgent need to change those.
Then I made sure that direct access to my content server freezes, which it does, and that access through the official DNS channels which use Cloudflare still works, which it did. So… all good. The setup was not hard at all. But since I have several hosted web sites for the iptables to make any sense I had to be sure to migrate all my hosted sites over to Cloudflare.
Not GoDaddy
I was dreading migrating my other zones (dns domains) over to Cloudflare. Still being in the GoDaddy mindframe I figured, sure, Cloudflare will permit me one zone for free, but then charge me for a second one.
So I plunged ahead. johnstechtalk.com. No charge!
And a third one: vmanswer.com. Also no charge!
And a fourth, and a fifth and a sixth.
I thought perhaps five will be the threshold. But it wasn’t. I only have six “zones” as Cloudflare now calls them. But they are all in my account and all free. Big relief. This is like the anti-GoDaddy.
DNS changes
Making DNS changes is quite fast. The changes are propagated within a minute or two.
I guess it’s accessible through ipv6 but I haven’t quite proven that yet.
Mail forwarding
I originally forgot that I had set up mail forwarding on GoDaddy. It was one of the few free things you could get. I think they switched native Outlook or something so my mail forwarding wasn’t working. On a lark I checked if Cloudflare has complementary mail forwarding for my domains. And they do! So that’s cool – another free service I will use.
Sending mail FROM this Cloudflare domain using your Gmail account
This is more tricky than simple mail forwarding. But I think I’ve got it working now. You use Gmail’s own server (smtp.gmail.com) as your relay. You also need to set up an app password for Gmail. Even though you need to specify a device such as Windows, it seems once enabled, you can send from this new account from any of your devices. I’ve found that you also need to update your TXT record (see link below) with an expanded SPF information:
In words it means the Google and Cloudflare sending servers are authorized to sends emails with this domain in the sender field, mail from elsewhere will be marked.
Even after all that I wasn’t seeing my sent message at work where Microsoft 365 is in use. It landed in the Junk folder! Why? The sending email “appears similar to someone who previously sent you email, but may not be that person.” Since I am a former mail admin I am sympathetic to what they’re trying to do – help hapless users avoid phishing; because it’s true – the characters in my test email did bear similarities to my regular email. My regular email is first_name.last_name @ gmail.com, while mail from this domain was first_name @ last_name + s .com Mail sent to a fellow Gmail user suffered no such fate however. Different providers, different approaches. So I can accept that. Once it’s set up you get a drop-down menu of sending addresses every time you compose a new message! The detailed instructions are at the Cloudflare community site.
Cost savings using Cloudflare
Suppose like me you only use GoDaddy as your registrar and get all your other services in some other way. Well, Cloudflare began to pitch me on transferring my domains to them. I thought, Aha, this is the moment they will make money off me. So I read their pitch. Their offer is to bill me for the charges they incur from ICANN or wherever, i.e., pass-through charges without any additional middleman overhead. It’s like, what? So let’s say at GoDaddy I pay $22 per year per domain. Well with Cloudflare I’d be paying something like $10 per year. For one domain I wouldn’t bother, but since I have more than five, I will be bothering and gladly leaving GoDaddy in the dust. I have just transferred the first two domains. GoDaddy seems to drag out the process as long as possible. I found I could expedite it by approving the transfer in the GoDaddy portal (https://dcc.godaddy.com/control/transfers). The trick there is that that one URL looks very different depending on whether or not a domain transfer is pending. If GoDaddy perceives a domain transfer has been initiated by an other registrar, it will show that page with a Transfer In and Transfer Out tabs. Just select Transfer Out and approve your domain for transfer. Then the transfer happens within five minutes. Otherwise that page is shown with no possibility to do a transfer out. So I guess you have to be patiennt, refresh it, or I don’t know what to get it to draw correctly. Once approved in the GoDaddy transfer out portal, Cloudflare had them within 5 minutes. It’s not super-easy to do a transfer, but also not impossble.
In typical GoDaddy style, executing a domain transfer to another registrar seems essentially impossible if you use their latest Domain portfolio app. Fortunately I eventually noticed the option to switch from “beta” to the old Domain manager, which still has the option and looks a bit more like their documentation. I’ve generated auth codes and unlocked, etc. And I even see the correct domain status (ok as opposed to client transfer prohibited) when I do a whois, but now Cloudflare, which is usually so quick to execute, seems to be lagging in recognizing that the domains have been unlocked and suggests to check back in some hours. Weird. The solution here was to provide my credit card info. Even 12 hours later I was having this trouble where it said none of my domains were eligible for transfer. As soon as I provided my payment information, it recognized two of my domains as eligible for transfer. In other cases Cloudflare recognized that domains were unlocked in a matter of 15 minutes or so. It may help to first unlock the domain in GoDaddy, then to view it in Cloudflare. Not sure.
A plug for GoDaddy
As my favorite sport seems to be bashing GoDaddy I wanted to balance that out and say a few kind words about them. Someone in my houisehold just started a job with a startup who uses GoDaddy. It provides desktop Outlook Email, MS Teams, Sharepoint, helps with consulting, etc. And on day one this person was up and running. So if you use their services, they definitely offer value. My issue is that I tried to restrict my usage to just one service – domain registrar – and they pushed me to use it more extensively, which I resisted. But for a small business which needs those thnigs, it’s fine.
How many domains are you sharing your IP with?
The thnig with Cloudflare is that they assign you to a couple of their IP addresses, often beginning with either 172.67 or 104…. . Now did you ever wonder with how many other web sites you’re sharing those IPs? If not, you should! I found a tool that provides the answer: https://dnslytics.com/ So for this free tier they seem to keep the number around 500 unique domains per IP! Yes that’s a lot, but I’d only be concerned if there was evidence of service degradation, which so far I have not seen. What’s nice about the dnsyltics site is that it lists a few of the domains – far from all of them, but at least it’s 20 or 30 – associated with a given IP. That can be helpful during truobleshooting.
Conclusion
What Cloudflare provides for protective and performance services represents a huge forward advance in the state of the art. They do not niggle you for extra charges (entice is more the word here) for Fear of Screwing Up.
All in all, I am amazed, and I am something of an insider – a professional user of such services. So I heartily endorse using Cloudflare for all personal web servers. I have not been sponsored or even in contact with Cloudflare, by the way!
I have always been somewhat agog at the idea of limiting bandwidth on my linux servers. Users complain about slow web sites and you want to try it for yourself, slowing your connection down to meet the parameters of their slower connection. More recently I happened on librespeed, an alternative to speedtest.net, where you can run both server and client. But in order to avoid transferring too much data and monopolizing the whole line, I wanted to actually put in some bandwidth throttling. I began an exploration of available methods to achieve this and found some satisfactory approaches that are readily available on Redhat-type linuxes.
bandwidth throttling, bandwidth rate limiting, bandwidth classes – these are all synonyms for what is most commonly called traffic shaping.
What doesn’t work so well
I think it’s important to start with the walls that I hit.
Cgroup
I stumbled on cgroups first. The man page starts in a promising way
cgroup - control group based traffic control filter
Then after you research it you see that support was enabled for cgroups in linux kernels already long ago. And there is version 1 and 2. And only version 1 supports bandwidth limits. But if you’re just a mid-level linux person such as myself, it is confusing and unclear how to take advantage of cgroup. My current conclusion is that it is more a subsystem designed for use by systemctl. In fact if you’ve ever looked at a status, for instance of crond, you see a mention of a cgroup:
sudo systemctl status crond
? crond.service - Command Scheduler
Loaded: loaded (/usr/lib/systemd/system/crond.service; enabled; vendor preset: enabled)
Active: active (running) since Mon 2021-08-09 15:44:24 EDT; 5 days ago
Main PID: 1193 (crond)
Tasks: 1 (limit: 11278)
Memory: 2.1M
CGroup: /system.slice/crond.service
mq1193 /usr/sbin/crond -n
I don’t claim to know what it all means, but there it is. Some nice abilities to schedule and allocate finite resources, at a very high level.
So I get the impression that no one really uses cgroups to do traffic shaping.
apache web server to the rescue – not
Since I was mostly interested in my librespeed server and controlling its bandwidth during testing, I wondered if the apache web server has this capability built-in. Essentially, it does! There is the module mod_ratelimit. So, quest over, and let the implementation begin! Except not so fast. In fact I did enable that module. And I set it up on my librespeed server. It kind of works, but mostly, not really, and nothing like its documented design.
That’s their example section. I have no interest in such low limits and tried various values from 4000 to 12000. I only got two different actual rates from librespeed out of all those various configurations. I could either get 83 Mbps or around 162 Mbps. And that’s it. Merely having any statement whatsoever starts limiting to one of these strange values. With the statement commented out I was getting around 300 Mbps. So I got rate-limiting, but not what I was seeking and with almost no control.
So the apache config approach was a bust for me.
Trickle
There are some linux programs that are perhaps promoted too heavily? Within a minute of posting my first draft of this someone comes along and suggests trickle. Well, on CentOS yum search trickle gives no results. My other OS was SLES v 15 and I similarly got no results. So I’m not enamored with trickle.
tc – now that looks promising
Then I discovered tc – traffic control. That sounds like just the thing. I had to search around a bit on one of my OSes to find the appropriate package, but I found it. On CentOS/Redhat/Fedora the package is iproute-tc. On SLES v15 it was iproute2. On FreeBSD I haven’t figured it out yet.
But it looks unwieldy to use, frankly. Not, as they say, user-friendly.
tcconfig + tc – perfect together
Then I stumbled onto tcconfig, a python wrapper for tc that provides convenient utilities and examples. It’s available, assuming you’ve already installed python, through pip or pip3, depending on how you’ve installed python. Something like
$ sudo pip3 install tcconfig
I love the available settings for tcset – just the kinds of things I would have dreamed up on my own. I wanted to limit download speeds, and only on the web server running on port 443, and noly from a specific subnet. You can do all that! My tcset command went something like this:
More importantly – does it work? Yes, it works beautifully. I run a librespeed cli with three concurrent streams against my AWS server thusly configured and I get around 149 Mbps. Every time.
Note that things are opposite of what you first think of. When I want to restrict download speeds from a server but am imposing traffic shaping on the server (as opposed to on the client machine), from its perspective that is upload traffic! And port 443 is the source port, not the destination port!
Raspberry Pi example
I’m going to try regular librespeed tests on my home RPi which is cabled to my router to do the Internet monitoring. So I’m trying
Despite the strange delay-distro appearing in the tcshow output, the results are perfect. Here are my librespeed results, running against my own private AWS server:
Time is Sat 21 Aug 16:17:23 EDT 2021
Ping: 20 ms Jitter: 1 ms
Download rate: 100.01 Mbps
Upload rate: 9.48 Mbps
!
Problems creep in on RPi
I swear I had it all working. This blog post is the proof. Now I’ve rebooted my RPi and that tcset command above gives the result Illegal instruction. Still trying to figure that one out!
March, 2022 update. My RPi had other issues. I’ve re-imaged the micro SD card and all is good once again. I set traffic shaping policies as shown in this post.
Conclusion about tcconfig
It’s clear tcset is just giving you a nice interface to tc, but sometimes that’s all you need to not sweat the details and start getting productive.
Possible issue – missing kernel module
On one of my servers (the CentOS 8 one), I had to do a
$ sudo yum install kernel-modules-extra
$ sudo modprobe sch_netem
before I could get tcconfig to really work.
To do list
Make the tc settings permanent.
Verify tc + tcconfig work on a Raspberry Pi. (tc is definitely available for RPi.)
Conclusion
We have found a pretty nice and effective way to do traffic shaping on linux systems. The best tool is tc and the best wrapper for it is tcconfig.
References and related
Librespeed is a great speedtest.net alternative for hard-code linux types who love command line and being in full control of both ends of a speed test. I describe it here.
Power cycling one’s cable modem automatically via an attached RPi. I refer to this blog post specifically because I intend to expand that RPi to also do periodic, automated speedtesting of my home braodband connection, with traffic shaping in place if all goes well (as it seems to thus far).
Bandwidth management and “queueing discipline” in all its gory detail is explained in this post, including example raw tc commands. I haven’t digested it yet but it may represent a way for me to get my RPi working again without a re-image: http://www.fifi.org/doc/HOWTO/en-html/Adv-Routing-HOWTO-9.html
Intro
Wordpress tells me to upgrade to version 5.4. But when I try it says nope, your version of php is too old. Now admittedly, I’m running on an ancient CentOS server, now at version 6.10, which I set up back in 2012 I believe.
I’m pretty comfortable with CentOS so I wanted to continue with it, but just on a newer version at Amazon. I don’t like being taken advantage of, so I also wanted to avoid those outfits which charge by the hour for providing CentOS, which should really be free. Those costs can really add up.
Lots of travails setting up my AWS image, and then…
I managed to find a CentOS amongst the community images. I chose centos-8-minimal-install-201909262151 (ami-01b3337aae1959300).
OK. Brand new CentOS 8 image, 8.1.1911 after patching it, which will be supported for 10 years. Surely it has the latest and greatest??
But I didn’t see it until after I had done all the work below the hard way. Oh well.
When I install php I get version 7.2.11. WordPress is telling me I need a minimum of php version 7.3. If i download the latest php, it tells me to download the latest apache. So I do. Version 2.4.43. I also install gcc, anticipating some compiling in my future…
But apache won’t even configure:
httpd-2.4.43]$ ./configure --enable-so
checking for chosen layout... Apache
checking for working mkdir -p... yes
checking for grep that handles long lines and -e... /usr/bin/grep
checking for egrep... /usr/bin/grep -E
checking build system type... x86_64-pc-linux-gnu
checking host system type... x86_64-pc-linux-gnu
checking target system type... x86_64-pc-linux-gnu
configure:
configure: Configuring Apache Portable Runtime library...
configure:
checking for APR... no
configure: error: APR not found.  Please read the documentation.
httpd-2.4.43]$ ./configure --enable-so
checking for chosen layout... Apache
checking for working mkdir -p... yes
checking for grep that handles long lines and -e... /usr/bin/grep
checking for egrep... /usr/bin/grep -E
checking build system type... x86_64-pc-linux-gnu
checking host system type... x86_64-pc-linux-gnu
checking target system type... x86_64-pc-linux-gnu
configure:
configure: Configuring Apache Portable Runtime library...
configure:
checking for APR... no
configure: error: APR not found. Please read the documentation.
  --with-apr=PATH         prefix for installed APR or the full path to
                             apr-config
  --with-apr-util=PATH    prefix for installed APU or the full path to
                             apu-config

(apr-util configure)
checking for APR... no
configure: error: APR could not be located. Please use the --with-apr option.

try:

 ./configure --with-apr=/usr/local/apr

but

-D_GNU_SOURCE   -I/usr/local/src/apr-util-1.6.1/include -I/usr/local/src/apr-util-1.6.1/include/private  -I/usr/local/apr/include/apr-1    -o xml/apr_xml.lo -c xml/apr_xml.c && touch xml/apr_xml.lo
xml/apr_xml.c:35:10: fatal error: expat.h: No such file or directory
 #include
          ^~~~~~~~~
compilation terminated.
make[1]: *** [/usr/local/src/apr-util-1.6.1/build/rules.mk:206: xml/apr_xml.lo] Error 1
--with-apr=PATH prefix for installed APR or the full path to
apr-config
--with-apr-util=PATH prefix for installed APU or the full path to
apu-config
(apr-util configure)
checking for APR... no
configure: error: APR could not be located. Please use the --with-apr option.
try:
./configure --with-apr=/usr/local/apr
but
-D_GNU_SOURCE -I/usr/local/src/apr-util-1.6.1/include -I/usr/local/src/apr-util-1.6.1/include/private -I/usr/local/apr/include/apr-1 -o xml/apr_xml.lo -c xml/apr_xml.c && touch xml/apr_xml.lo
xml/apr_xml.c:35:10: fatal error: expat.h: No such file or directory
#include
^~~~~~~~~
compilation terminated.
make[1]: *** [/usr/local/src/apr-util-1.6.1/build/rules.mk:206: xml/apr_xml.lo] Error 1
So I install expat header files:
$ yum install expat-devel
And then the make of apr-util goes through. Not sure this is the right approach or not yet, however.
So following php’s advice, I have:
$ ./configure –enable-so
checking for chosen layout... Apache
...
checking for pcre-config... false
configure: error: pcre-config for libpcre not found. PCRE is required and available from http://pcre.org/
checking for chosen layout... Apache
...
checking for pcre-config... false
configure: error: pcre-config for libpcre not found. PCRE is required and available from http://pcre.org/
So I install pcre-devel:
$ yum install pcre-devel
Now the apache configure goes through, but the make does not work:
/usr/local/apr/build-1/libtool --silent --mode=link gcc  -g -O2 -pthread         -o htpasswd  htpasswd.lo passwd_common.lo       /usr/local/apr/lib/libaprutil-1.la /usr/local/apr/lib/libapr-1.la -lrt -lcrypt -lpthread -ldl -lcrypt
/usr/local/apr/lib/libaprutil-1.so: undefined reference to `XML_GetErrorCode'
/usr/local/apr/lib/libaprutil-1.so: undefined reference to `XML_SetEntityDeclHandler'
/usr/local/apr/lib/libaprutil-1.so: undefined reference to `XML_ParserCreate'
/usr/local/apr/lib/libaprutil-1.so: undefined reference to `XML_SetCharacterDataHandler'
/usr/local/apr/lib/libaprutil-1.so: undefined reference to `XML_ParserFree'
/usr/local/apr/lib/libaprutil-1.so: undefined reference to `XML_SetUserData'
/usr/local/apr/lib/libaprutil-1.so: undefined reference to `XML_StopParser'
/usr/local/apr/lib/libaprutil-1.so: undefined reference to `XML_Parse'
/usr/local/apr/lib/libaprutil-1.so: undefined reference to `XML_ErrorString'
/usr/local/apr/lib/libaprutil-1.so: undefined reference to `XML_SetElementHandler'
collect2: error: ld returned 1 exit status
make[2]: *** [Makefile:48: htpasswd] Error 1
/usr/local/apr/build-1/libtool --silent --mode=link gcc -g -O2 -pthread -o htpasswd htpasswd.lo passwd_common.lo /usr/local/apr/lib/libaprutil-1.la /usr/local/apr/lib/libapr-1.la -lrt -lcrypt -lpthread -ldl -lcrypt
/usr/local/apr/lib/libaprutil-1.so: undefined reference to `XML_GetErrorCode'
/usr/local/apr/lib/libaprutil-1.so: undefined reference to `XML_SetEntityDeclHandler'
/usr/local/apr/lib/libaprutil-1.so: undefined reference to `XML_ParserCreate'
/usr/local/apr/lib/libaprutil-1.so: undefined reference to `XML_SetCharacterDataHandler'
/usr/local/apr/lib/libaprutil-1.so: undefined reference to `XML_ParserFree'
/usr/local/apr/lib/libaprutil-1.so: undefined reference to `XML_SetUserData'
/usr/local/apr/lib/libaprutil-1.so: undefined reference to `XML_StopParser'
/usr/local/apr/lib/libaprutil-1.so: undefined reference to `XML_Parse'
/usr/local/apr/lib/libaprutil-1.so: undefined reference to `XML_ErrorString'
/usr/local/apr/lib/libaprutil-1.so: undefined reference to `XML_SetElementHandler'
collect2: error: ld returned 1 exit status
make[2]: *** [Makefile:48: htpasswd] Error 1
So I try configure or apr-util with expat built-in.
But when I do the make of apr-util I now get this error:
/usr/local/apr/build-1/libtool: line 7475: cd: builtin/lib: No such file or directory
libtool:   error: cannot determine absolute directory name of 'builtin/lib'
make[1]: *** [Makefile:93: libaprutil-1.la] Error 1
make[1]: Leaving directory '/usr/local/src/apr-util-1.6.1'
make: *** [/usr/local/src/apr-util-1.6.1/build/rules.mk:118: all-recursive] Error 1
From what I read this new error occurs due to having –expat-built-in! So now what? So I get rid of that in my configure statement for apr-util. For some reason, apr-util goes through and compiles. And so I try this for compiling apache24:
$ ./configure –enable-so –with-apr=/usr/local/apr
And then I make it. And for some reason, now it goes through. I doubt it will work, however… it kind of does work.
It threw the files into /usr/local/apache2, where there is a bin directory containing apachectl. I can launch apachectl start, and then access a default page on port 80. Not bad so far…
Hey, maybe for once their instructions will work. Nope.
configure: error: Package requirements (libxml-2.0 >= 2.7.6) were not met:

Package 'libxml-2.0', required by 'virtual:world', not found

Consider adjusting the PKG_CONFIG_PATH environment variable if you
installed software in a non-standard prefix.
So I guess I need to install libxml2-devel:
$ yum install libxm2-devel
Looks like I get past that error. Now it’s on to this one:
configure: error: Package requirements (sqlite3 > 3.7.4) were not met:
So I install sqlite-devel:
$ yum install sqlite-devel
Now my configure almost goes through, except, as I suspected, that was a nonsense argument:
It’s not there when you look for it! Why the heck did they – php.net – give an example with exactly that?? Annoying. So I leave it out. It goes through. Run make. It takes a long time to compile php! And this server is pretty fast. It’s slower than apache or anything else I’ve compiled.
But eventually the compile finished. It added a LoadModule statement to the apache httpd.conf file. And, after I associated files with php extension to the php handler, a test file seemed to work. So php is beginning to work. Not at all sure about the mysql tie-in, however. In fact see further down below where I confirm my fears that there is no MySQL support when PHP is compiled this way.
Is running SSL asking too much?
Apparently, yes. I don’t think my apache24 has SSL support built-in:
Invalid command 'SSLCipherSuite', perhaps misspelled or defined by a module not included in the server configuration
Invalid command 'SSLCipherSuite', perhaps misspelled or defined by a module not included in the server configuration
So I try
$ ./configure –enable-so –with-apr=/usr/local/apr –enable-ssl
Not good…
checking for OpenSSL... checking for user-provided OpenSSL base directory... none
checking for OpenSSL version >= 0.9.8a... FAILED
configure: WARNING: OpenSSL version is too old
no
checking whether to enable mod_ssl... configure: error: mod_ssl has been requested but can not be built due to prerequisite failures
Where is it pulling that old version of openssl? Cause when I do this:
$ openssl version
OpenSSL 1.1.1c FIPS 28 May 2019
OpenSSL 1.1.1c FIPS 28 May 2019
That’s not that old…
I also noticed this error:
configure: WARNING: Your APR does not include SSL/EVP support. To enable it: configure --with-crypto
So maybe I will re-compile APR with that argument.
Nope. APR doesn’t even have that argument. But apr-uil does. I’ll try that.
Not so good:
configure: error: Crypto was requested but no crypto library could be enabled; specify the location of a crypto library using --with-openssl, --with-nss, and/or --with-commoncrypto.
I give up. maybe it was a false alarm. I’ll try to ignore it.
This time at least the configure goes through – no ssl-related errors.
I needed to add the Loadmodule statement by hand to httpd.conf since that file was already there from my previous build and so did not get that statement after my re-build with ssl support:
LoadModule ssl_module modules/mod_ssl.so
LoadModule ssl_module modules/mod_ssl.so
Next error please
Now I have this error:
AH00526: Syntax error on line 92 of /usr/local/apache2/conf/extra/drjohns.conf:
SSLSessionCache: 'shmcb' session cache not supported (known names: ). Maybe you need to load the appropriate socache module (mod_socache_shmcb?).
AH00526: Syntax error on line 92 of /usr/local/apache2/conf/extra/drjohns.conf:
SSLSessionCache: 'shmcb' session cache not supported (known names: ). Maybe you need to load the appropriate socache module (mod_socache_shmcb?).
I want results. So I just comment out the lines that talk about SSL Cache and anything to do with SSL cache.
And…it starts…and…it is listening on both ports 80 and 443 and…it is running SSL. So I think i cracked the SSL issue.
Switch focus to Mysql
I didn’t bother to find mysql. I believe people now use mariadb. So I installed the system one with a yum install mariadb. I became root and learned the version with a select version();
+-----------------+
| version()       |
+-----------------+
| 10.3.17-MariaDB |
+-----------------+
1 row in set (0.000 sec)
+-----------------+
| version() |
+-----------------+
| 10.3.17-MariaDB |
+-----------------+
1 row in set (0.000 sec)
Is that recent enough? Yes! For once we skate by comfortably. The WordPress instructions say:
MySQL 5.6 or MariaDB 10.1 or greater
I setup apache. I try to access wordpress setup but instead get this message:
Forbidden

You don't have permission to access this resource.
Forbidden
You don't have permission to access this resource.
every page I try gives this error.
The apache error log says:
client denied by server configuration: /usr/local/apache2/htdocs/
client denied by server configuration: /usr/local/apache2/htdocs/
Not sure where that’s coming from. I thought I supplied my own documentroot statements, etc.
I threw in a Require all granted within the Directory statement and that seemed to help.
PHP/MySQL communication issue surfaces
Next problem is that PHP wasn’t compiled correctly it seems:
Your PHP installation appears to be missing the MySQL extension which is required by WordPress.
Your PHP installation appears to be missing the MySQL extension which is required by WordPress.
So I’ll try to re-do it. This time I am trying these arguments to configure:
$ ./configure ‐‐with-apxs2=/usr/local/apache2/bin/apxs ‐‐with-mysqli
Well, I’m not so sure this worked. Trying to setup WordPress, I access wp-config.php and only get:
Error establishing a database connection
Error establishing a database connection
This is roll up your sleeves time. It’s clear we are getting no breaks. I looked into installing PhpMyAdmin, but then I would neeed composer, which may depend on other things, so I lost interest in that rabbit hole. So I decide to simplify the problem. The suggested test is to write a php program like this, which I do, calling it tst2.php:
PHP Warning:  mysqli_connect(): (HY000/2002): No such file or directory in /web/drjohns/blog/tst2.php on line 7

Warning: mysqli_connect(): (HY000/2002): No such file or directory in /web/drjohns/blog/tst2.php on line 7
PHP Warning: mysqli_connect(): (HY000/2002): No such file or directory in /web/drjohns/blog/tst2.php on line 7
Warning: mysqli_connect(): (HY000/2002): No such file or directory in /web/drjohns/blog/tst2.php on line 7
Some quick research tells me that php does not know where the file mysql.sock is to be found. I search for it:
$ sudo find / ‐name mysql.sock
and it comes back as
/var/lib/mysql/mysql.sock
/var/lib/mysql/mysql.sock
So…the prescription is to update a couple things in pph.ini, which has been put into /usr/local/lib in my case because I compiled php with mostly default values. I add the locatipon of the mysql.sock file in two places for good measure:
Install WordPress
I begin to install WordPress, creating an initial user and so on. When I go back in I get a directory listing in place of the index.php. So I call index.php by hand and get a worisome error:
Fatal error: Uncaught Error: Call to undefined function gzinflate() in /web/drjohns/blog/wp-includes/class-requests.php:947 Stack trace: #0 /web/drjohns/blog/wp-includes/class-requests.php(886): Requests::compatible_gzinflate('\xA5\x92\xCDn\x830\f\x80\xDF\xC5g\x08\xD5\xD6\xEE...'
Fatal error: Uncaught Error: Call to undefined function gzinflate() in /web/drjohns/blog/wp-includes/class-requests.php:947 Stack trace: #0 /web/drjohns/blog/wp-includes/class-requests.php(886): Requests::compatible_gzinflate('\xA5\x92\xCDn\x830\f\x80\xDF\xC5g\x08\xD5\xD6\xEE...'
I should have compiled php with zlib is what I determine it means… zlib and zlib-devel packages are on my system so this should be straightforward.
More arguments for php compiling
OK. Let’s be sensible and try to reproduce what I had done in 2017 to compile php instead of finding an resolving mistakes one at a time.
Package 'libcurl', required by 'virtual:world', not found
I will install libcurl-devel in hopes of making this one go away.
Past that error, and onto this one:
configure: error: DBA: Could not find necessary header file(s).
I’m trying to drop the –with-gdbm and skip that whole DBA thing since the database connection seemed to be working without it. Now I see an openssl problem:
make: *** No rule to make target '/tmp/php-7.4.4/ext/openssl/openssl.c', needed by 'ext/openssl/openssl.lo'. Stop.
make: *** No rule to make target '/tmp/php-7.4.4/ext/openssl/openssl.c', needed by 'ext/openssl/openssl.lo'. Stop.
Even if I get rid of openssl I still see a problem when running configure:
gawk: ./build/print_include.awk:1: fatal: cannot open file `ext/zlib/*.h*' for reading (No such file or directory)
gawk: ./build/print_include.awk:1: fatal: cannot open file `ext/zlib/*.h*' for reading (No such file or directory)
Now I can ignore that error because configure exits with 0 status and make, but the make then stops at zlib:
SIGNALS   -c /tmp/php-7.4.4/ext/sqlite3/sqlite3.c -o ext/sqlite3/sqlite3.lo
make: *** No rule to make target '/tmp/php-7.4.4/ext/zlib/zlib.c', needed by 'ext/zlib/zlib.lo'.  Stop.
SIGNALS -c /tmp/php-7.4.4/ext/sqlite3/sqlite3.c -o ext/sqlite3/sqlite3.lo
make: *** No rule to make target '/tmp/php-7.4.4/ext/zlib/zlib.c', needed by 'ext/zlib/zlib.lo'. Stop.
Reason for above php compilation errors
I figured it out. My bad. I had done a make distclean in addition to a make clean when i was re-starting with a new set of arguments to configure. i saw it somewhere advised on the Internet and didn’t pay much attention, but it seemed like a good idea. But I think what it was doing was wiping out the files in the ext directory, like ext/zlib.
So now I’m starting over, now with php 7.4.5 since they’ve upgraded in the meanwhile! With this configure command line (I figure I probably don’t need gdb):
./configure –with-apxs2=/usr/local/apache2/bin/apxs –with-mysqli –disable-cgi –with-zlib –with-gettext –with-gdbm –with-curl –with-openssl
Well, the php compile went through, however, I can’t seem to access any WordPress pages (all WordPress pages clock). Yet my simplistic database connection test does work. Hmmm. OK. If they come up at all, they come up exceedingly slowly and without correct formatting.
I think I see the reason for that as well. The source of the wp-login.php page (as viewed in a browser window) includes references to former hostnames my server used to have. Of course fetching all those objects times out. And they’re the ones that provide the formatting. At this point I’m not sure where those references came from. Not from the filesystem, so must be in the database as a result of an earlier WordPress install attempt. Amazon keeps changing my IP, you see. I see it is embedded into WordPress. In Settings | general Settings. I’m going to have this problem every time…
What I’m going to do is to create a temporary fictitious name, johnstechtalk, which I will enter in my hosts file on my Windows PC, in Windows\system32\drivers\etc\hosts, and also enter that name in WordPress’s settings. I will update the IP in my hosts file every time it changes while I am playing around. And now there’s even an issue doing this which has always worked so reliably in the past. Well, I found I actually needed to override the IP for drjohnstechtalk.com in my hosts file. But it seems Firefox has moved on to using DNS over https, so it ignores the hosts file now! i think. Edge still uses it however, thankfully.
WordPress
So WordPress is basically functioning. I managed to install a few of my fav plugins: Akismet anti-spam, Limit Login Attempts, WP-PostViews. Some of the plugins are so old they actually require ftp. Who runs ftp these days? That’s been considered insecure for many years. But to accommodate I installed vsftpd on my server and ran it, temporarily.
Then Mcafee on my PC decided that wordpress.org is an unsafe site, thank you very much, without any logs or pop-ups. I couldn’t reach that site until I disabled the Mcafee firewall. Makes it hard to learn how to do the next steps of the upgrade.
More WordPress difficulties
WordPress is never satisfied with whatever version you’ve installed. You take the latest and two weeks later it’s demanding you upgrade already. My first upgrade didn’t go so well. Then I installed vsftpd. The upgrade likes to use your local FTP server – at least in my case. so for ftp server I just put in 127.0.0.1. Kind of weird. Even still I get this error:
Downloading update from https://downloads.wordpress.org/release/wordpress-5.4.2-no-content.zip…

The authenticity of wordpress-5.4.2-no-content.zip could not be verified as no signature was found.

Unpacking the update…

Could not create directory.

Installation Failed
So I decided it was a permissions problem: my apache was running as user daemon (do a ps -ef to see running processes), while my wordpress blog directory was owned by centos. So I now run apache as user:group centos:centos. In case this helps anyone the apache configurtion commands to do this are:
User centos
Group centos
then I go to my blog directory and run something like:
chown -R centos:centos *
Wordpres Block editor non-functional after the upgrade
When I did the SQL import from my old site, I killed the block editor on my new site! This was disconcerting. That little plus sign just would not show up on new pages, no posts, whatever. So I basically killed wordpress 5.4. So I took a step backwards and started v 5.4 with a clean (empty) database like a fresh install to make sure the block editor works then. It did. Whew! Then I did an RTFM and deactivated my plugins on my old WordPress install before doing the mysql backup. I imported that SQL database, with a very minimal set of plugins activated, and, whew, this time I did not blow away the block editor.
CentOS bogs down
I like my snappy new Centos 8 AMI 80% of the time. But that remaining 20% is very annoying. It freezes. Really bad. I ran a top until the problem happened. Here I’ve caught the problem in action:
top - 16:26:11 up 1 day, 21 min, 2 users, load average: 3.96, 2.93, 5.30
Tasks: 95 total, 1 running, 94 sleeping, 0 stopped, 0 zombie
%Cpu(s): 0.1 us, 2.6 sy, 0.0 ni, 0.0 id, 95.8 wa, 0.4 hi, 0.3 si, 0.7 st
MiB Mem : 1827.1 total, 63.4 free, 1709.8 used, 53.9 buff/cache
MiB Swap: 0.0 total, 0.0 free, 0.0 used. 9.1 avail Mem

PID USER PR NI VIRT RES SHR S %CPU %MEM TIME+ COMMAND
44 root 20 0 0 0 0 S 1.6 0.0 12:47.94 kswapd0
438 root 0 -20 0 0 0 I 0.5 0.0 1:38.84 kworker/0:1H-kblockd
890 mysql 20 0 1301064 92972 0 S 0.4 5.0 1:26.83 mysqld
5282 centos 20 0 1504524 341188 64 S 0.4 18.2 0:06.06 httpd
5344 root 20 0 345936 1008 0 S 0.4 0.1 0:00.09 sudo
560 root 20 0 93504 6436 3340 S 0.2 0.3 0:02.53 systemd-journal
712 polkitd 20 0 1626824 4996 0 S 0.2 0.3 0:00.15 polkitd
817 root 20 0 598816 4424 0 S 0.2 0.2 0:12.62 NetworkManager
821 root 20 0 634088 14772 0 S 0.2 0.8 0:18.67 tuned
1148 root 20 0 216948 7180 3456 S 0.2 0.4 0:16.74 rsyslogd
2346 john 20 0 273640 776 0 R 0.2 0.0 1:20.73 top
1 root 20 0 178656 4300 0 S 0.0 0.2 0:11.34 systemd
So what jumps out at me is the 95.8% wait time – that ain’t good – an that a process which includes the name swap is at the top of ths list, combined with the fact that exactly 0 swap space is allocated. My linux skills may be 15 years out-of-date, but I think I better allocate some swap space (but why does it need it so badly??). On my old system I think I had done it. I’m a little scared to proceed for fear of blowing up my system.
So if you use drjohnstechtalk.com and it freezes, just come back in 10 minutes and it’ll probably be running again – this situation tends to self-correct. No one’s perfect.
Some of the commands are dd to create an empty file, mkswap, swapon and swapon -s to see what it’s doing. And it really, really helped. I think sometimes mariadb needed to swap, and sometimes apache did. My system only has 1.8 GB of memory or so. And the drive is solid state, so it should be kind of fast. Because I used 1.2 GB for swap, I also extended my volume size when I happened upon Amazon’s clear instructions on how you can do that. Who knew? See below for more on that. If I got it right, Amazon also gives you more IO for each GB you add. I’m definitely getting good response after this swap space addition.
An aside about i/o
In the old days I perfected a way to study i/o using the iostat utility. You can get it by installing the sysstat package. A good command to run is iostat -t -c -m -x 5
Examing these three consecutive lines of output from running that command is very instructional:
I tooled around in the admin panel (which previously had brought my server to its knees), and you see the %util shot up to 90%, reads per sec over 2000 , writes per second 1400. So, really demanding. It’s clear my server would die if more than a few people were hitting it hard. And I may need some fine-tuning.
Success!
Given all the above problems, you probably never thought I’d pull this off. I worked in fits and starts – mostly when my significant other was away because this stuff is a time suck. But, believe it or not, I got the new apache/openssl/apr/php/mariadb/wordpress/centos/amazon EC2 VPC/drjohnstechtalk-with-new-2020-theme working to my satisfaction. I have to pat myself on the back for that. So I pulled the plug on the old site, which basically means moving the elastic IP over from old centos 6 site to new centos8 AWS instance. Since my site was so old, I had to first convert the elastic IP from type classic to VPC. It was not too obvious, but I got it eventually.
Damn hackers already at it
Look at the access log of your new apache server running your production WordPress. If you see like I did people already trying to log in (POST accesses for …/wp-login.php), which is really annoying because they’re all hackers, at least install the WPS Hide Login plugin and configure a secret login URL. Don’t use the default login.
Meanwhile I’ve decided to freeze out anyone who triess to access wp-login.php because they can only be up to no good. So I created this script which I call wp-login-freeze.sh:
#!/bin/sh
# freeze hackers who probe for wp-login
# DrJ 6/2020
DIR=/var/log/drjohns
cd $DIR
while /bin/true; do
tail -200 access_log|grep wp-login.php|awk '{print $1}'|sort -u|while read line; do
echo $line
route add -host $line reject
done
sleep 60
done
Works great! Just do a netstat -rn to watch your ever-growing list of systems you’ve frozen out.
But xmlrpc is the worst…
Bots which invoke xmlrpc.php are the worst for little servers like mine. They absolutely bring it to its knees. So I’ve just added something similar to the wp-login freeze above, except it catches xmlrpc bots:
#!/bin/sh
# freeze hackers who are doing God knows what to xmlrpc.php
# DrJ 8/2020
DIR=/var/log/drjohns
cd $DIR
while /bin/true; do
# example offending line:
# 181.214.107.40 - - [21/Aug/2020:08:17:01 -0400] "POST /blog//xmlrpc.php HTTP/1.1" 200 401
tail -100 access_log|grep xmlrpc.php|grep POST|awk '{print $1}'|sort -u|while read line; do
echo $line
route add -host $line reject
done
sleep 30
done
I was still dissatisfied with seeing bots hit me up for 30 seconds or so, so I decided heck with it, I’m going to waste their time first. So I added a few lines to xmlrpc.php (I know you shouldn’t do this, but hackers shouldn’t do what they do either):
// DrJ improvements
if ($_SERVER['REQUEST_METHOD'] === 'POST') {
// just make bot suffer a bit... the freeze out is done by an external script
   sleep(25);
    //
}
// end DrJ enhancements
This freeze out trick within xmlrpc.php was only going to work if the bots run single-threaded, that is, they run serially, waiting for one request to finish before sending the next. I’ve been running it for a couple days and have enthusiasitically frozen out a few IPs. I can attest that the bots do indeed run single-threaded. So I typically get two entries in my access file to xmlrpc from a given bot, and then the bot is completely frozen out by the loopback route which gets added.
Mid-term issues discovered months later
Well, I never needed to send emails form my server, until I did. And when I did I found I couldn’t. It used to work from my old server… From reading a bit I see WordPress uses PHP’s built-in mail() function, which has its limits. But my server did not have mailx or postfix packages. So I did a
$ yum install postfix mailx
$ systemctl enable postfix
$ systemctl start postfix
That still didn’t magically make WordPress mail work, although at that point I could send mail by hand frmo a spoofed address, which is pretty cool, like:
Well, wouldn’t you know my friend’s WordPress site I was trying to host brought my server to its knees. Again. Seems to be a common theme. I was hoping it was merely hackers who’d discovered his new site and injected it with the xmlrpc DOS because that would have been easy to treat. But no, no xmlrpc issues so far according to the access_log file. He uses more of the popular plugins like Elementor and Ninja Forms. Well, that Ninja Forms Dashboard is a killer. Reliably brings my server to a crawl. I even caught it in action from a running top and saw swap was the leading cpu-consuming process. And my 1.2 GB swap file was nearly full. So I created a second, larger swap file of 2 GB and did a swapon for that. Then I decommissioned my older swap file. Did you know you can do a swapoff? Yup. I could see the old one descreasing in size and the new one building up. And now the new one is larger than the old ever could be – 1.4 GB. Now Ninja forms dashboard can be launched. Performance is once again OK.
So…hosting second WordPress site now resolved.
Updating failed. The response is not a valid JSON response.
So then he got that error after enabling permalinks. The causes for this are pretty well documented. We took the standard advice and disabled all plugins. Wihtout permalinks we were fine. With them JSON error. I put the .htaccess file in place. Still no go. So unlike most advice, in my case, where I run my own web server, I must have goofed up the config and not enabled reading of the .htaccess file. Fortunately I had a working example in the form of my own blog site. I put all those apache commands which normally go into .htaccess into the vhost config file. All good.
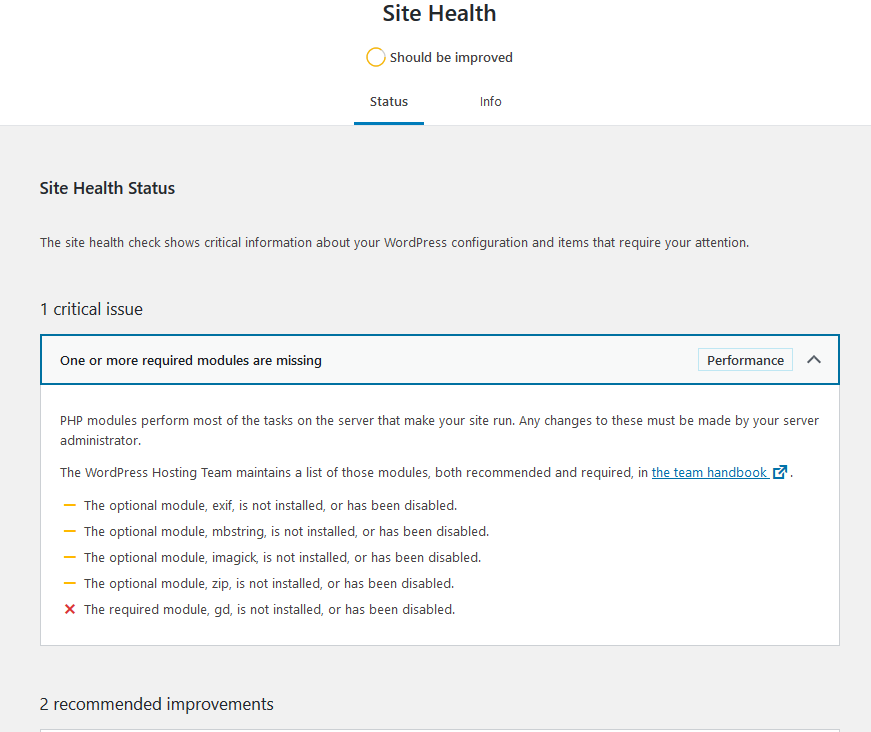
Although my site seems to be humming alnog, now I have to find the more obscure errors. WordPress mentioned my site health has problems.
WordPress site health
I think gd is used for graphics. I haven’t seen any negative results from this, yet. I may leave it be for the time being.
Lets Encrypt certificate renewal stops working
This one is at the bottom because it only manifests itself after a couple months – when the web site certificate either expires or is about to expire. Remember, this is a new server. I was lazy, of course, and just brought over the .acme.sh from the old server, hoping for the best. I didn’t notice any errors at first, but I eventually observed that my certificate was not getting renewed either even though it had only a few days of validity left.
To see what’s going on I ran this command by hand:
acme.sh new-authz error: {"type":"urn:acme:error:badNonce","detail":"JWS has no anti-replay nonce","status": 400}
seemed to be the most important error I noticed. The general suggestion for this is an acme.sh –upgrade, which I did run. But the nonce error persisted. It tries 20 times then gives up.
— warning: I know enough to get the job done, but not enough to write the code. Proceed at your own risk —
I read some of my old blogs and played with the command
My Webroot is /web/drjohns by the way. Now at least there was an error I could understand. I saw it trying to access something like http://drjohnstechtalk.com/.well-known/acme-challenge/askdjhaskjh
which produced a 404 Not Found error. Note the http and not https. Well, I hadn’t put much energy into setting up my http server. In fact it even has a different webroot. So what I did was to make a symbolic link
ln -s /web/drjohns/.well-known /web/insecure
I re-ran the acme.sh –issue command and…it worked. Maybe if I had issued a –renew it would not have bothered using the http server at all, but I didn’t see that switch at the time. So in my crontab instead of how you’re supposed to do it, I’m trying it with these two lines:
# Not how you're supposed to do it, but it worked once for me - DrJ 8/16/20
22 2 * * * "/root/.acme.sh"/acme.sh --issue -d drjohnstechtalk.com -w /web/drjohns > /dev/null 2>&1
22 3 16 * * "/root/.acme.sh"/acme.sh --update-account --issue -d drjohnstechtalk.com -w /web/drjohns > /dev/null 2>&1
The update-account is just for good measure so I don’t run into an account expiry problem which I’ve faced in the past. No idea if it’s really needed. Actually my whole approach is a kludge. But it worked. In two months’ time I’ll know if the cron automation also works.
Why kludge it? I could have spent hours and hours trying to get acme.sh to work as it was intended. I suppose with enough persistence I would have found the root problem.
2021 update. In retrospect
In retrospect, I think I’ll try Amazon Linux next time! I had the opportunity to use it for my job and I have to say it was pretty easy to set up a web server which included php and MariaDB. It feels like it’s based on Redhat, which I’m most familiar with. It doesn’t cost extra. It runs on the same small size on AWS. Oh well.
2022 update
I’m really sick of how far behind Redhat is with their provided software. And since they’ve been taken over by IBM, how they’ve killed CentOS is scandalous. So I’m inclined to go to a Debian-based system for my next go-around, which is much more imminent than I ever expected it to be thanks to the discontinuation of support for CentOS. I asked someone who hosts a lot of WP sites and he said he’d use Ubuntu server 22, PHP 8, MariaDB and NGinx. Boy. Guess I’m way behind. He says performance with PHP 8 is much better. I’ve always used apache but I guess I don’t really rely on it for too many fancy features.
Intro
Just got my SLES 12 SP4 server. That’s a type of commercial Linux I needed to set up a secure reverse proxy in a hurry. There’s a lot of suggestions out there. I share what worked for me. The version of apache that is supplied, for the record, is apache 2.4.
The most significant error
[Tue Aug 13 15:26:24.321549 2019] [proxy:warn] [pid 5992] [client 127.0.0.1:40002] AH01144: No protocol handler was valid for the URL /. If you are using a DSO version of mod_proxy, make sure the proxy submodules are included in the configuration using LoadModule.
[Tue Aug 13 15:26:24.321549 2019] [proxy:warn] [pid 5992] [client 127.0.0.1:40002] AH01144: No protocol handler was valid for the URL /. If you are using a DSO version of mod_proxy, make sure the proxy submodules are included in the configuration using LoadModule.
The solution
In /etc/sysconfig/apache2 (in SLES this is a macro that sets up apache with the needed loadmodule statements) I needed a statement like the following:
APACHE_MODULES="actions alias auth_basic authn_file authz_host authz_groupfile authz_core authz_user autoindex cgi dir env
expires include log_config mime negotiation setenvif ssl socache_shmcb userdir reqtimeout authn_core proxy proxy_html proxy_http xml2enc"
APACHE_MODULES="actions alias auth_basic authn_file authz_host authz_groupfile authz_core authz_user autoindex cgi dir env
expires include log_config mime negotiation setenvif ssl socache_shmcb userdir reqtimeout authn_core proxy proxy_html proxy_http xml2enc"
In my first crack at it I only had mention of modules to include up to proxy. I needed to add proxy_html and proxy_http (I know it doesn’t display correctly in the line above).
In that same file you need a statement like this as well:
APACHE_SERVER_FLAGS="SSL"
APACHE_SERVER_FLAGS="SSL"
The highlights of my virtual host file, based on the ssl template, are:
<VirtualHost *:443>
# https://www.centosblog.com/configure-apache-https-reverse-proxy-centos-linux/
<Location />
            ProxyPass https://10.1.2.181/
            ProxyPassReverse https://10.1.2.181/
</Location>

        #  General setup for the virtual host
##      DocumentRoot "/srv/www/htdocs"
        #ServerName www.example.com:443
        #ServerAdmin [email protected]
        SSLProxyEngine on
        ErrorLog /var/log/apache2/error_log
        TransferLog /var/log/apache2/access_log

        #   SSL Engine Switch:
        #   Enable/Disable SSL for this virtual host.
        SSLEngine on
# from https://superuser.com/questions/829793/how-to-force-all-apache-connections-to-use-tlsv1-1-or-tlsv1-2 -DrJ 8/19
        SSLProtocol all -SSLv2 -SSLV3 -TLSv1
#SSLCipherSuite HIGH:!aNULL:!MD5:!RC4
        SSLCipherSuite ALL:!EXPORT:!EXPORT40:!EXPORT56:!aNULL:!LOW:!RC4:@STRENGTH

        #   You can use per vhost certificates if SNI is supported.
        SSLCertificateFile /etc/apache2/ssl.crt/vhost-example.crt
        SSLCertificateKeyFile /etc/apache2/ssl.key/vhost-example.key
        SSLCertificateChainFile /etc/apache2/ssl.crt/vhost-example-chain.crt


        #   Per-Server Logging:
        #   The home of a custom SSL log file. Use this when you want a
        #   compact non-error SSL logfile on a virtual host basis.
        CustomLog /var/log/apache2/ssl_request_log   ssl_combined

</VirtualHost>
<VirtualHost *:443>
# https://www.centosblog.com/configure-apache-https-reverse-proxy-centos-linux/
<Location />
ProxyPass https://10.1.2.181/
ProxyPassReverse https://10.1.2.181/
</Location>
# General setup for the virtual host
## DocumentRoot "/srv/www/htdocs"
#ServerName www.example.com:443
#ServerAdmin [email protected]
SSLProxyEngine on
ErrorLog /var/log/apache2/error_log
TransferLog /var/log/apache2/access_log
# SSL Engine Switch:
# Enable/Disable SSL for this virtual host.
SSLEngine on
# from https://superuser.com/questions/829793/how-to-force-all-apache-connections-to-use-tlsv1-1-or-tlsv1-2 -DrJ 8/19
SSLProtocol all -SSLv2 -SSLV3 -TLSv1
#SSLCipherSuite HIGH:!aNULL:!MD5:!RC4
SSLCipherSuite ALL:!EXPORT:!EXPORT40:!EXPORT56:!aNULL:!LOW:!RC4:@STRENGTH
# You can use per vhost certificates if SNI is supported.
SSLCertificateFile /etc/apache2/ssl.crt/vhost-example.crt
SSLCertificateKeyFile /etc/apache2/ssl.key/vhost-example.key
SSLCertificateChainFile /etc/apache2/ssl.crt/vhost-example-chain.crt
# Per-Server Logging:
# The home of a custom SSL log file. Use this when you want a
# compact non-error SSL logfile on a virtual host basis.
CustomLog /var/log/apache2/ssl_request_log ssl_combined
</VirtualHost>
except that I used valid paths to my certificate, key and CA chain files.
Errors you may encounter
$ curl ‐i ‐k https://localhost/
HTTP/1.1 500 Proxy Error
Date: Thu, 15 Aug 2019 19:10:13 GMT
Server: Apache
Content-Length: 442
Connection: close
Content-Type: text/html; charset=iso-8859-1
<!DOCTYPE HTML PUBLIC "-//IETF//DTD HTML 2.0//EN">
<html><head>
<title>500 Proxy Error</title>
</head><body>
<h1>Proxy Error</h1>
The proxy server could not handle the request <em><a href="/">GET /</a></em>.<p>
Reason: <strong>Error during SSL Handshake with remote server</strong></p><p />
<p>Additionally, a 500 Internal Server Error
error was encountered while trying to use an ErrorDocument to handle the request.</p>
</body></html>
I traced this error to the fact that initially I did not tell apache to ignore certificate name and other related mismatches. So inserting these directives cured that problem:
SSLProxyVerify none
SSLProxyCheckPeerCN off
SSLProxyCheckPeerName off
SSLProxyCheckPeerExpire off
SSLProxyVerify none
SSLProxyCheckPeerCN off
SSLProxyCheckPeerName off
SSLProxyCheckPeerExpire off
I finally got past the SSL errors but then I still had a 404 error and an xml2enc error.
When I ran a service apache2 status I saw this:
Aug 15 16:09:31 lusytp008850388 start_apache2[28539]: [Thu Aug 15 16:09:31.879604 2019] [proxy_html:notice] [pid 28539] AH01425: I18n support in mod_proxy_html requires mod_xml2enc. Without it, non-ASCII characters in proxied pages are likely to display incorrectly.
Aug 15 16:09:31 lusytp008850388 start_apache2[28539]: [Thu Aug 15 16:09:31.879604 2019] [proxy_html:notice] [pid 28539] AH01425: I18n support in mod_proxy_html requires mod_xml2enc. Without it, non-ASCII characters in proxied pages are likely to display incorrectly.
Not certain whether this was important or not, I simply decided to heed the advice so that’s when I added xml2enc to the list of modules to enable in /etc/sysconfig/apache2:
APACHE_MODLUES=actions alias auth...proxy proxy_html proxy_http xml2enc"
APACHE_MODLUES=actions alias auth...proxy proxy_html proxy_http xml2enc"
HTTP/1.1 404 Not Found
HTTP/1.1 404 Not Found
And that was when I put in a URI that worked just fine if I entered it directly in a browser hitting the web server.
I had a hunch that this could occur if the web server was finicky and insisted on being addressed by a certain name. So originally I had statements like this:
except in place of backendalias.example.com I put in what I felt the web site operators would have used – the known working alias for direct access to this web site. Of course I first made sure that my apache server could resolve backendalias.example.com to 10.1.2.181, which it could.
And, voila, no more 404 error!
Redirects going to the backend server name rather than the public hostname
This was my bad. I actually had in my ProxyPassReverse statement
That’s just not right. And it caused public Internet users to get redirects (the Location HTTP response header) to the private back-end server hostname, which of course they could not resolve or reach. Once I re-read how this was supposed to work and corrected it to
Conclusion
An SSL reverse proxy to an SSL back-end web server was set up under SLES 12 SP4, using TLS 1.2 and apache 2.4.23, in other words, pretty current stuff.
Intro
Sometimes everything is there in place, ready to be used, but you just have to either mistakenly try it, or learn it works by reading about it, because it may be counter-intuitive. Such is the case with Server Name Indication. I thought I knew enough about https to “know” that you can only have one key/certificate for a single IP address. That CERT can be a SAN (subject alternative name) CERT covering multiple names, but you only get one shot at getting your certificate right. Or so I thought. Turns out I was dead wrong.
Some details
Well, SNI guess is a protocol extension to https. You know I always wondered why in proxy server logs it was able to log the domain name? How would it know that if the http protocol conversation is all encrypted? Maybe it’s SNI at work.
Who supports it?
Since this is an extension it has to be supported by both server and browser. It is. Apache24 supports it. IE, Firefox and Chrome support it. Even my venerable curl supports it! What does not support it, right out of the box, is openssl. The openssl s_client command fetches a site’s certificate, but as I found the hard way, you need to add the -servername switch to tell it which certificate you want to examine, i.e., to force it to use SNI.
This is mainly used by big hosting companies so they can easily and flexibly cram lots of web sites onto a single IP, but us small-time self-hosted sites benefit as well. I host a few sites for friends after all.
Testing methodology
This is pretty simple. I have a couple different virtual servers. I set each up with a completely different certificate in my apache virtual server setups. Then I accessed them by name like usual. Each showed me their own, proper, certificate. That’s it! So this is more than theoretical for me. I’ve already begun to use it.
Enterprise usage
F5 BigIP supports this protocol as well, of course. This article describes how to set it up. But it looks limited to only one server name per certificate, which will be inadequate if there are SAN certificates.
Conclusion
https using Server Name Indication allows to run multiple virtual servers, each with its own unique certificate, on a single IP address.
Intro
I decided to monitor guest wireless access to the Internet using a Raspberry Pi. By that I mean a basic, binary, is it working now or not response. The back end is a Cisco wireless LAN Controller (WLC). Like most such systems there is no WiFi password, but your connection is extremely limited until you authenticate to the WLC login page in a browser. Further, this particular system is configured to only permit usage for up to four hours, after which another authentication is required to continue. The system is pretty reliable overall, but there are lots of pieces involved and I decided it would be nice to be the first to know if it isn’t working. And it’d be nice to put one of my spare Raspberry Pi’s to work in this semi-official capacity.
The details
Let’s cut to the chase. This is what my crontab file looks like:
# added for drj4guest WiFi testing - DrJ 4/26/17
# this line should keep us authenticating...
* * * * * curl -d `cat /home/pi/data` https://verify.drj4guests.johnstechtalk.com/login.html > /dev/null 2>&1
# and this is what we actually touch, where we have a separate monitor looking for it...every 2 minutes
*/2 * * * * curl http://johnstechtalk.com/raspberrypidrj4guest?`perl -e 'print time;'` > /dev/null 2>&1
For this to work I need accurate time on the Raspberry Pi. By default it was in the wrong timezone – UTC instead of EDT – and it had anyway drifted by quite a few seconds. I describe how to fix this all up in this post.
Let’s break this down. The WiFi is known as drj4guest, hence some of the naming conventions you see.
Here is the contents of the file data in /home/pi:
So I meticulously reverse engineered all the fields the login form sends over and figured out what it is doing.
In the data file I put my assigned WiFi login username, john (replace it with yours) and my password, which also needs to be replaced with an appropriate value for your situation.
Then I decided to run an attempted authentication every one minute, while running the query to my web server every two minutes. That is what the */2 field does in my crontab. That way I will always have authenticated first, even when my four hours has run out.
I like that this also tests the authentication that has been set up, as this could also be the cause of a failure.
Meanwhile my web server log gets entries like this one every two minutes:
On the webserver
On the webserver being accessed by the Ras Pi I have this Perl script:
#!/usr/bin/perl# check if Raspberry Pi on the DrJ guest WiFi is phoning home# - DrJ 4/26/17## to test good to error transition,# call with a very small maxDiff, such as 0!use Getopt::Std;
getopts('m:d');# maximum allowed time difference$maxDiff=$opt_m;$DEBUG=1if$opt_d;unless(defined($maxDiff)){
usage();exit(1);}$monitorName='Raspberry Pi phone home';# access line looks like:# 96.15.212.173 - - [02/Feb/2013:22:00:02 -0500] "GET /raspberrypidrj4guest?136456789 HTTP/1.1" 200 455 "-" "curl/7.26.0"$magicString="raspberrypidrj4guest";$accessLog="/var/log/apache202/access.log";## pick up timestamp in access file$piTime=`grep $magicString $accessLog|tail -1|cut -d\? -f2|cut -d' ' -f1`;$curTime=time();chomp($time);$date=`date`;chomp($date);# your PID file is somewhere else. It tells us when Apache was started.# you could comment out these next lines just to get started with the program$PID="/var/run/apache202.pid";($atime,$mtime,$ctime)=(stat($PID))[8,9,10];$diff=$curTime-$piTime;if($curTime-$ctime<$maxDiff){print"Apache hasn't been running long enough yet to look for something in the log file. Maybe next time\n";exit(0);}print"magicString, accessLog, piTime, curTime, diff: $magicString, $accessLog, $piTime, $curTime, $diff\n"if$DEBUG;print"accessLog stat. atime, mtime, ctime: $atime,$mtime,$ctime\n"if$DEBUG;print"Freshness: $diff s\n";###############################sub usage {print"usage: $0 -m <maxDiff (seconds)> [-d (debug)]\n";}
#!/usr/bin/perl
# check if Raspberry Pi on the DrJ guest WiFi is phoning home
# - DrJ 4/26/17
#
# to test good to error transition,
# call with a very small maxDiff, such as 0!
use Getopt::Std;
getopts('m:d'); # maximum allowed time difference
$maxDiff = $opt_m;
$DEBUG = 1 if $opt_d;
unless (defined($maxDiff)) {
  usage();
  exit(1);
}
$monitorName = 'Raspberry Pi phone home';
# access line looks like:
# 96.15.212.173 - - [02/Feb/2013:22:00:02 -0500] "GET /raspberrypidrj4guest?136456789 HTTP/1.1" 200 455 "-" "curl/7.26.0"
$magicString = "raspberrypidrj4guest";
$accessLog = "/var/log/apache202/access.log";
#
# pick up timestamp in access file
$piTime = `grep $magicString $accessLog|tail -1|cut -d\? -f2|cut -d' ' -f1`;
$curTime = time();
chomp($time);
$date = `date`;
chomp($date);
# your PID file is somewhere else. It tells us when Apache was started.
# you could comment out these next lines just to get started with the program
$PID = "/var/run/apache202.pid";
($atime,$mtime,$ctime) = (stat($PID))[8,9,10];
$diff = $curTime - $piTime;
if ($curTime - $ctime < $maxDiff) {
  print "Apache hasn't been running long enough yet to look for something in the log file. Maybe next time\n";
  exit(0);
}
print "magicString, accessLog, piTime, curTime, diff: $magicString, $accessLog, $piTime, $curTime, $diff\n" if $DEBUG;
print "accessLog stat. atime, mtime, ctime: $atime,$mtime,$ctime\n" if $DEBUG;
print "Freshness: $diff s\n";
###############################
sub usage {
  print "usage: $0 -m <maxDiff (seconds)> [-d (debug)]\n";
}
It’s designed to be run by SiteScope as a script monitor. You would run it by hand like this:
> ./timecheck.pl ‐m 300
Freshness: 35 s
Freshness: 35 s
If that Freshness time grows too large then the Ras Pi hasn’t been phoning home and you – presumably – have a problem somewhere. /var/log/apache202 happens to be where I have my apache access file on that system.
Conclusion
We showed how to set up a Raspberry Pi to monitor Guest WiFi access on a Cisco Wireless LAN Controller, even though the accounts have to re-authenticated every four hours.
Intro
I was reading about a kind of amazingly thorough exploit which could be done using a Raspberry Pi zero. Physical access is required, but the scope of what this guy has figured out and put together is really amazing.
Reading the description I decided is a good exercise in making sure I understand the underlying technologies. One was admittedly something I hadn’t seen before: DNS re-binding. That got me to reading about DNS re-binding, and that got me to looking at defenses against DNS rebinding.
HSTS to the rescue
Since in DNS rebinding you may have either a MITM (man in the middle) or a web site impersonated by a hacker, one defense against it is to use HTTPS. (The hacker will not have access to a web site’s private key and therefore has no way to fake a certificate). But what they can do is redirect users from HTTPS to HTTP, where no certificate is required.
HSTS is designed to make that move tip off the user by complaining to the user. Upon first visit the user gets a cookie that says this site should be https. Subsequent visits then are enforced by the user’s browser that the site accessed must be HTTPS.
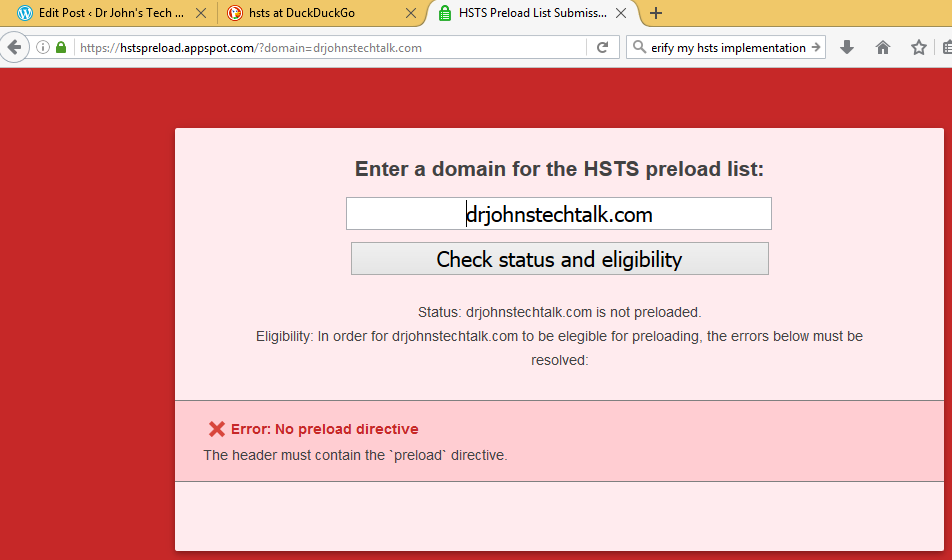
drjohnstechtalk update
Two years ago I switched the default way I run my blog web site from HTTP to HTTPS due to the encryption offered by HTTPS, and the fact that search engines penalize HTTP sites.
It seems a natural progression in this age of increasing security awareness to up the ante and now also run HSTS. For me this was easy. Since I run my own apache server I simply needed to add the appropriate HTTP Response header to my server responses.
This is done within the virtual server section of the apache configuration like so:
# Guarantee HTTPS for 1/2 Year including Sub Domains  - DrJ 11/22/16
# see https://itigloo.com/security/how-to-configure-http-strict-transport-security-hsts-on-apache-nginx/
    Header always set Strict-Transport-Security "max-age=15811200; includeSubDomains; preload"
# Guarantee HTTPS for 1/2 Year including Sub Domains - DrJ 11/22/16
# see https://itigloo.com/security/how-to-configure-http-strict-transport-security-hsts-on-apache-nginx/
Header always set Strict-Transport-Security "max-age=15811200; includeSubDomains; preload"
Of course this requires that the apache mod_headers is included.
See that new header Strict-Transport-Security: max-age=15811200; includeSubDomains; preload? That’s the result of what we did. But unless we put that preload at the end it doesn’t verify!
Intro
I’ve written various articles about SSL. I just came across a way to get your certificates for free, letsencrypt.org. But their thing is to automate certificate management. I think you have to set up the whole automated certificate management environment just to get one of their free certificates. So that’s a little unfortunate, but I may try it and write up my experience with it in this blog (Update: I did it!). Stay tuned.
Short duration certificates
I recently happened upon a site that uses one of these certificates and was surprised to see that it expires in 90 days. All the certificate I’ve ever bought are valid for at least a year, sometimes two or three. But Let’s Encrypt has a whole page justifying their short certificates which kind of makes sense. It forces you to adopt their automation processes for renewal because it will be too burdensome for site admins to constantly renew these certificates by hand the way they used to.
November 2016 update
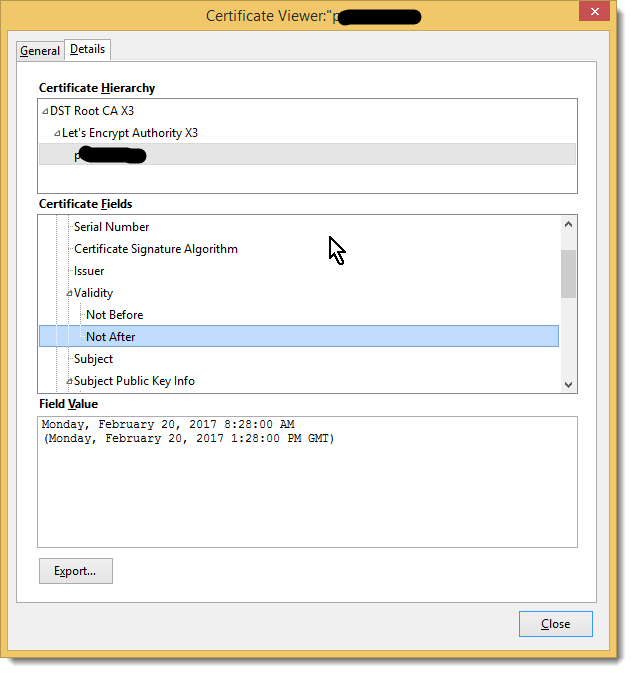
Since posting this article I have worked with a hosting firm a little bit. I was surprised by how easily he could get for one of “my” domain names. Apparently all it took was that Let’s Encrypt could verify that he owned the IP address which my domain name resolved to. That’s different from the usual way of verification where the whois registration of the domain gets queried. That never happened here! I think by now the Let’s Encrypt CA, IdenTrust Commercial Root CA 1, is accepted by the major browsers.
Here’s a picture that shows one of these certificates which was just issued November, 2016 with its short expiration.
My own experience in getting a certificate
I studied the ACME protocol a little bit. It’s complicated. Nothing’s easy these days! So you need a program to help you implement it. I went with acme.sh over Certbot because it is much more lightweight – works through bash shell. Certbot wanted to update about 40 packages on my system, which really seems like overkill.
I’m very excited about how easy it was to get my first certificate from letsencrypt! Worked first time. I made sure the account I ran this command from had write access to the HTMLroot (the “webroot”) because an authentication challenge occurs to prove that I administer that web server:
[Wed Nov 30 08:55:54 EST 2016] Registering account
[Wed Nov 30 08:55:56 EST 2016] Registered
[Wed Nov 30 08:55:57 EST 2016] Update success.
[Wed Nov 30 08:55:57 EST 2016] Creating domain key
[Wed Nov 30 08:55:57 EST 2016] Single domain='drjohnstechtalk.com'
[Wed Nov 30 08:55:57 EST 2016] Getting domain auth token for each domain
[Wed Nov 30 08:55:57 EST 2016] Getting webroot for domain='drjohnstechtalk.com'
[Wed Nov 30 08:55:57 EST 2016] _w='/web/drj'
[Wed Nov 30 08:55:57 EST 2016] Getting new-authz for domain='drjohnstechtalk.com'
[Wed Nov 30 08:55:58 EST 2016] The new-authz request is ok.
[Wed Nov 30 08:55:58 EST 2016] Verifying:drjohnstechtalk.com
[Wed Nov 30 08:56:02 EST 2016] Success
[Wed Nov 30 08:56:02 EST 2016] Verify finished, start to sign.
[Wed Nov 30 08:56:03 EST 2016] Cert success.
-----BEGIN CERTIFICATE-----
MIIFCjCCA/KgAwIBAgISA8T7pQeg535pA45tryZv6M4cMA0GCSqGSIb3DQEBCwUA
MEoxCzAJBgNVBAYTAlVTMRYwFAYDVQQKEw1MZXQncyBFbmNyeXB0MSMwIQYDVQQD
ExpMZXQncyBFbmNyeXB0IEF1dGhvcml0eSBYMzAeFw0xNjExMzAxMjU2MDBaFw0x
NzAyMjgxMjU2MDBaMB4xHDAaBgNVBAMTE2Ryam9obnN0ZWNodGFsay5jb20wggEi
MA0GCSqGSIb3DQEBAQUAA4IBDwAwggEKAoIBAQC1PScaoxACI0jhsgkNcbd51YzK
eVI/P/GuFO8VCTYvZAzxjGiDPfkEmYSYw5Ii/c9OHbeJs2Gj5b0tSph8YtQhnpgZ
c+3FGEOxw8mP52452oJEqrUldHI47olVPv+gnlqjQAMPbtMCCcAKf70KFc1MiMzr
2kpGmJzKFzOXmkgq8bv6ej0YSrLijNFLC7DoCpjV5IjjhE+DJm3q0fNM3BBvP94K
jyt4JSS1d5l9hBBIHk+Jjg8+ka1G7wSnqJVLgbRhEki1oh8HqH7JO87QhJA+4MZL
wqYvJdoundl8HahcknJ3ymAlFXQOriF23WaqjAQ0OHOCjodV+CTJGxpl/ninAgMB
AAGjggIUMIICEDAOBgNVHQ8BAf8EBAMCBaAwHQYDVR0lBBYwFAYIKwYBBQUHAwEG
CCsGAQUFBwMCMAwGA1UdEwEB/wQCMAAwHQYDVR0OBBYEFGaLNxVgpSFqgf5eFZCH
1B7qezB6MB8GA1UdIwQYMBaAFKhKamMEfd265tE5t6ZFZe/zqOyhMHAGCCsGAQUF
BwEBBGQwYjAvBggrBgEFBQcwAYYjaHR0cDovL29jc3AuaW50LXgzLmxldHNlbmNy
eXB0Lm9yZy8wLwYIKwYBBQUHMAKGI2h0dHA6Ly9jZXJ0LmludC14My5sZXRzZW5j
cnlwdC5vcmcvMB4GA1UdEQQXMBWCE2Ryam9obnN0ZWNodGFsay5jb20wgf4GA1Ud
IASB9jCB8zAIBgZngQwBAgEwgeYGCysGAQQBgt8TAQEBMIHWMCYGCCsGAQUFBwIB
FhpodHRwOi8vY3BzLmxldHNlbmNyeXB0Lm9yZzCBqwYIKwYBBQUHAgIwgZ4MgZtU
aGlzIENlcnRpZmljYXRlIG1heSBvbmx5IGJlIHJlbGllZCB1cG9uIGJ5IFJlbHlp
bmcgUGFydGllcyBhbmQgb25seSBpbiBhY2NvcmRhbmNlIHdpdGggdGhlIENlcnRp
ZmljYXRlIFBvbGljeSBmb3VuZCBhdCBodHRwczovL2xldHNlbmNyeXB0Lm9yZy9y
ZXBvc2l0b3J5LzANBgkqhkiG9w0BAQsFAAOCAQEAc4w4a+PFpZqpf+6IyrW31lj3
iiFIpWYrmg9sa79hu4rsTxsdUs4K9mOKuwjZ4XRfaxrRKYkb2Fb4O7QY0JN482+w
PslkPbTorotcfAhLxxJE5vTNQ5XZA4LydH1+kkNHDzbrAGFJYmXEu0EeAMlTRMUA
N1+whUECsWBdAfBoSROgSJIxZKr+agcImX9cm4ScYuWB8qGLK98RTpFmGJc5S52U
tQrSJrAFCoylqrOB67PXmxNxhPwGmvPQnsjuVQMvBqUeJMsZZbn7ZMKr7NFMwGD4
BTvUw6gjvN4lWvs82M0tRHbC5z3mALUk7UXrQqULG3uZTlnD7kA8C39ulwOSCQ==
-----END CERTIFICATE-----
[Wed Nov 30 08:56:03 EST 2016] Your cert is in  /home/drj/.acme.sh/drjohnstechtalk.com/drjohnstechtalk.com.cer
[Wed Nov 30 08:56:03 EST 2016] Your cert key is in  /home/drj/.acme.sh/drjohnstechtalk.com/drjohnstechtalk.com.key
[Wed Nov 30 08:56:04 EST 2016] The intermediate CA cert is in  /home/drj/.acme.sh/drjohnstechtalk.com/ca.cer
[Wed Nov 30 08:56:04 EST 2016] And the full chain certs is there:  /home/drj/.acme.sh/drjohnstechtalk.com/fullchain.cer
[Wed Nov 30 08:55:54 EST 2016] Registering account
[Wed Nov 30 08:55:56 EST 2016] Registered
[Wed Nov 30 08:55:57 EST 2016] Update success.
[Wed Nov 30 08:55:57 EST 2016] Creating domain key
[Wed Nov 30 08:55:57 EST 2016] Single domain='drjohnstechtalk.com'
[Wed Nov 30 08:55:57 EST 2016] Getting domain auth token for each domain
[Wed Nov 30 08:55:57 EST 2016] Getting webroot for domain='drjohnstechtalk.com'
[Wed Nov 30 08:55:57 EST 2016] _w='/web/drj'
[Wed Nov 30 08:55:57 EST 2016] Getting new-authz for domain='drjohnstechtalk.com'
[Wed Nov 30 08:55:58 EST 2016] The new-authz request is ok.
[Wed Nov 30 08:55:58 EST 2016] Verifying:drjohnstechtalk.com
[Wed Nov 30 08:56:02 EST 2016] Success
[Wed Nov 30 08:56:02 EST 2016] Verify finished, start to sign.
[Wed Nov 30 08:56:03 EST 2016] Cert success.
-----BEGIN CERTIFICATE-----
MIIFCjCCA/KgAwIBAgISA8T7pQeg535pA45tryZv6M4cMA0GCSqGSIb3DQEBCwUA
MEoxCzAJBgNVBAYTAlVTMRYwFAYDVQQKEw1MZXQncyBFbmNyeXB0MSMwIQYDVQQD
ExpMZXQncyBFbmNyeXB0IEF1dGhvcml0eSBYMzAeFw0xNjExMzAxMjU2MDBaFw0x
NzAyMjgxMjU2MDBaMB4xHDAaBgNVBAMTE2Ryam9obnN0ZWNodGFsay5jb20wggEi
MA0GCSqGSIb3DQEBAQUAA4IBDwAwggEKAoIBAQC1PScaoxACI0jhsgkNcbd51YzK
eVI/P/GuFO8VCTYvZAzxjGiDPfkEmYSYw5Ii/c9OHbeJs2Gj5b0tSph8YtQhnpgZ
c+3FGEOxw8mP52452oJEqrUldHI47olVPv+gnlqjQAMPbtMCCcAKf70KFc1MiMzr
2kpGmJzKFzOXmkgq8bv6ej0YSrLijNFLC7DoCpjV5IjjhE+DJm3q0fNM3BBvP94K
jyt4JSS1d5l9hBBIHk+Jjg8+ka1G7wSnqJVLgbRhEki1oh8HqH7JO87QhJA+4MZL
wqYvJdoundl8HahcknJ3ymAlFXQOriF23WaqjAQ0OHOCjodV+CTJGxpl/ninAgMB
AAGjggIUMIICEDAOBgNVHQ8BAf8EBAMCBaAwHQYDVR0lBBYwFAYIKwYBBQUHAwEG
CCsGAQUFBwMCMAwGA1UdEwEB/wQCMAAwHQYDVR0OBBYEFGaLNxVgpSFqgf5eFZCH
1B7qezB6MB8GA1UdIwQYMBaAFKhKamMEfd265tE5t6ZFZe/zqOyhMHAGCCsGAQUF
BwEBBGQwYjAvBggrBgEFBQcwAYYjaHR0cDovL29jc3AuaW50LXgzLmxldHNlbmNy
eXB0Lm9yZy8wLwYIKwYBBQUHMAKGI2h0dHA6Ly9jZXJ0LmludC14My5sZXRzZW5j
cnlwdC5vcmcvMB4GA1UdEQQXMBWCE2Ryam9obnN0ZWNodGFsay5jb20wgf4GA1Ud
IASB9jCB8zAIBgZngQwBAgEwgeYGCysGAQQBgt8TAQEBMIHWMCYGCCsGAQUFBwIB
FhpodHRwOi8vY3BzLmxldHNlbmNyeXB0Lm9yZzCBqwYIKwYBBQUHAgIwgZ4MgZtU
aGlzIENlcnRpZmljYXRlIG1heSBvbmx5IGJlIHJlbGllZCB1cG9uIGJ5IFJlbHlp
bmcgUGFydGllcyBhbmQgb25seSBpbiBhY2NvcmRhbmNlIHdpdGggdGhlIENlcnRp
ZmljYXRlIFBvbGljeSBmb3VuZCBhdCBodHRwczovL2xldHNlbmNyeXB0Lm9yZy9y
ZXBvc2l0b3J5LzANBgkqhkiG9w0BAQsFAAOCAQEAc4w4a+PFpZqpf+6IyrW31lj3
iiFIpWYrmg9sa79hu4rsTxsdUs4K9mOKuwjZ4XRfaxrRKYkb2Fb4O7QY0JN482+w
PslkPbTorotcfAhLxxJE5vTNQ5XZA4LydH1+kkNHDzbrAGFJYmXEu0EeAMlTRMUA
N1+whUECsWBdAfBoSROgSJIxZKr+agcImX9cm4ScYuWB8qGLK98RTpFmGJc5S52U
tQrSJrAFCoylqrOB67PXmxNxhPwGmvPQnsjuVQMvBqUeJMsZZbn7ZMKr7NFMwGD4
BTvUw6gjvN4lWvs82M0tRHbC5z3mALUk7UXrQqULG3uZTlnD7kA8C39ulwOSCQ==
-----END CERTIFICATE-----
[Wed Nov 30 08:56:03 EST 2016] Your cert is in /home/drj/.acme.sh/drjohnstechtalk.com/drjohnstechtalk.com.cer
[Wed Nov 30 08:56:03 EST 2016] Your cert key is in /home/drj/.acme.sh/drjohnstechtalk.com/drjohnstechtalk.com.key
[Wed Nov 30 08:56:04 EST 2016] The intermediate CA cert is in /home/drj/.acme.sh/drjohnstechtalk.com/ca.cer
[Wed Nov 30 08:56:04 EST 2016] And the full chain certs is there: /home/drj/.acme.sh/drjohnstechtalk.com/fullchain.cer
Behind the scenes the authentication resulted in these two accesses to my web server:
The first was HTTP which I redirect to https while preserving the URL, hence the second request. You see now why I needed write access to the webroot of my web server.
Refine our approach
In the end iI decided to run as root in order to protect the private key from prying eyes. This looked like this:
What’s a nice feature about acme.sh is that it remembers parameters you’ve typed by hand and fills them into a single convenient configuration file. So the contents of mine look like this:
Le_Domain='drjohnstechtalk.com'
Le_Alt='no'
Le_Webroot='/web/drj'
Le_PreHook=''
Le_PostHook=''
Le_RenewHook=''
Le_API='https://acme-v01.api.letsencrypt.org'
Le_Keylength=''
Le_LinkCert='https://acme-v01.api.letsencrypt.org/acme/cert/037fe5215bb5f4df6a0098fefd50b83b046b'
Le_LinkIssuer='https://acme-v01.api.letsencrypt.org/acme/issuer-cert'
Le_CertCreateTime='1480710570'
Le_CertCreateTimeStr='Fri Dec  2 20:29:30 UTC 2016'
Le_NextRenewTimeStr='Tue Jan 31 20:29:30 UTC 2017'
Le_NextRenewTime='1485808170'
Le_RealCertPath='/etc/apache24/certs/drjohnstechtalk.crt'
Le_RealCACertPath=''
Le_RealKeyPath='/etc/apache24/certs/drjohnstechtalk.key'
Le_ReloadCmd='service apache24 reload'
Le_RealFullChainPath='/etc/apache24/certs/fullchain.cer'
Le_Domain='drjohnstechtalk.com'
Le_Alt='no'
Le_Webroot='/web/drj'
Le_PreHook=''
Le_PostHook=''
Le_RenewHook=''
Le_API='https://acme-v01.api.letsencrypt.org'
Le_Keylength=''
Le_LinkCert='https://acme-v01.api.letsencrypt.org/acme/cert/037fe5215bb5f4df6a0098fefd50b83b046b'
Le_LinkIssuer='https://acme-v01.api.letsencrypt.org/acme/issuer-cert'
Le_CertCreateTime='1480710570'
Le_CertCreateTimeStr='Fri Dec 2 20:29:30 UTC 2016'
Le_NextRenewTimeStr='Tue Jan 31 20:29:30 UTC 2017'
Le_NextRenewTime='1485808170'
Le_RealCertPath='/etc/apache24/certs/drjohnstechtalk.crt'
Le_RealCACertPath=''
Le_RealKeyPath='/etc/apache24/certs/drjohnstechtalk.key'
Le_ReloadCmd='service apache24 reload'
Le_RealFullChainPath='/etc/apache24/certs/fullchain.cer'
Intro
I’ve been looking at GetSimple CMS lately. It allows you to do some basic things so in that sense it’s pretty good.
The details
I know nothing about CMSes, except maybe a tiny bit about WordPress since I use it, but only in a really basic way. I like the idea of a simple CMS however – one that is simple to install and doesn’t even require a database, so this fit the bill.
First problem
My first attempts to use it met with failure. I could create new pages but when I saved them the characters I had typed into the pages were lost, just emptied out. I even went so far as to identify the XML file where these pages are stored and look at the raw xml files. The CDATA that should have contained my typing was blank! At first I was convinced that my version of php was to blame. But I tried different version, 5.3.3, 5.3.17. I still got the problem. So finally I decided that it had to be the fact that I compile my own apache and use somewhat different configuration compared to system defaults. So I switched to a system-supplied apache web server and sure enough, it began to work. Although I would like to believe it’s really something in my configuration, I couldn’t find such a thing and gave up trying. For the record the pages are stored here: <htdocs>/data/pages/<page-name>.xml
Security aspect
I would say this CMS is vulnerable to brute-force attacks. I suggest to randomize the location of the admin login by using the GST-adminlock plugin. You want to have multiple users? The version I used, 3.3.8 accommodates that! It needs just a little fudging to get going. Tie authentication to a back-end database? I doubt that is possible. i did check and it does store the login passwords encrypted. Not sure if there is salt added or not…
Plugins
I’m especially bad at evaluating plugins. I guess there should be better themes out there because the system-supplied one is so basic. It’s strange that you have to manually get the downloaded plugin onto the server with sftp or some similar tool. Unless I’m missing something, which I probably am.
Conclusion
GetSimple CMS may be good for a 15 – 20 page simple site. It doesn’t need a back-end database, doing all that sort of thing through use of PHP’s XML capabilities. Quite a few plugins exist which extend its functionality. The available documentation is pretty good. Security is adequate and should be made better by the person implementing it. The last thing we need is another way for the bad guys to take over legitimate web sites and inject malicious content.
Intro
I was running an apache instance very happily with mostly default options until the day came that I noticed it was taking seconds to serve a simple web page – one that it used to serve in 50 ms or so. I eventually rolled up my sleeves to see what could be done about it. It seems that what had changed is that it was being asked to handle more requests than ever before.
The details
But the load average on a 16-core server was only at 2! sar showed no particular problems with either cpu of I/O systems. Both showed plenty of spare capacity. A process count showed about 258 apache processes running.
An Internet search helped me pinpoint the problem. Now bear in mind I use a version of apache I myself compiled, so the file layout looks different from the system-supplied apache, but the ideas are the same. What you need is to increase the number of allowed processes. On my server with its great capacity I scaled up considerably. These settings are in /conf/extra/httpd-mpm.conf in the compiled version. In the system-supplied version on SLES I found the equivalent to be /etc/apache2/server-tuning.conf. To begin with the key section of that file had these values:
Note that ServerLimit has to be greater than or equal to MaxClients (thank you Apache developers!) or you get an error like this when you start apache:
WARNING: MaxClients of 2048 exceeds ServerLimit value of 256 servers,
 lowering MaxClients to 256.  To increase, please see the ServerLimit
 directive.
WARNING: MaxClients of 2048 exceeds ServerLimit value of 256 servers,
lowering MaxClients to 256. To increase, please see the ServerLimit
directive.
So you make this change, right, stop/start apache and what difference do you see? Probably none whatsoever! Because you probably forgot to uncomment this line in httpd.conf:
#Include conf/extra/httpd-mpm.conf
#Include conf/extra/httpd-mpm.conf
So remove the # at the beginning of that line and stop/start. If like me you’ve changed the usual diretory where the PID file and lock file get written in your httpd.conf file you may need this additional measure which I had to do in the httpd-mpm.conf file:
<IfModule !mpm_netware_module>
#PidFile "logs/httpd.pid"
</IfModule>
## The accept serialization lock file MUST BE STORED ON A LOCAL DISK.#
<IfModule !mpm_winnt_module>
<IfModule !mpm_netware_module>
#LockFile "logs/accept.lock"
</IfModule>
</IfModule>
<IfModule !mpm_netware_module>
    #PidFile "logs/httpd.pid"
</IfModule>

#
# The accept serialization lock file MUST BE STORED ON A LOCAL DISK.
#
<IfModule !mpm_winnt_module>
<IfModule !mpm_netware_module>
#LockFile "logs/accept.lock"
</IfModule>
</IfModule>
In other words I commented out this file’s attempt to place the PID and lock files in a certain place because I have my own way of storing those and it was overwriting my choices!
But with all those changes put together it works much, much better than before and can handle more requests than ever.
Analysis
In creating a simple benchmark we could easily scale to 400 requests / second, and we didn’t really even try to push it – and this was before we changed any parameters. So why couldn’t 250 or so simultaneous processes handle more real world requests? I believe that if all clients were as fast as our server it could have handled them all. But the clients themselves were sometimes distant (thousands of miles) with slow or lossy connections. Then they need to acknowledge every packet sent by the web server and the web server has to wait around for that, unable to go on to the next client request! Real life is not like laboratory testing. As the waiting around bit requires next-to-no cpu the load average didn’t rise even though we had run up against a limit, the limit was an artificial application-imposed one, not a system-imposed resource constraint.
More analysis, what about threads?
Is this the only or best way to scale up your web server? Probably not. It’s probably the most practical however because you probably didn’t compile it with support for threads. I know I didn’t. Or if you’re using the system-provided package it probably doesn’t support threads. Find your httpd binary. Run this command:
$ ./httpd -l|grep prefork
If it returns:
prefork.c
prefork.c
you have the prefork module and not the worker module and the above approach is what you need to do. To me a more modern approach is to scale by using threads – modern cpus are designed to run threads, which are kind of like light-weight processes. But, oh well. The gatekeepers of apache packages seem stuck in this simple-minded one process per request mindset.
Conclusion
My scaled-up apache is handling more requests than ever. I’ve documented how I increased the total process count.