Categories
Admin Web Site Technologies

What I’m working on now: saving $69 a year on my certificate costs: Lets Encrypt

Intro
I recently turned off my GoDaddy web site certificate and implemented one that cost me nothing. This will save me $69 per year.

I wrote up my experience in this article: Idea for free web server certificates: Let’s Encrypt

When I originally wrote that article it was a theoretical concept, but since then I’ve encountered web sites using those certificates so I realized that their CA must be widely accepted now and I decided to try for myself. The ACME (automated certificate management environment) environment was something completely new to me and the terminology a little confusing (as a user I don’t “issue” certificates, so whose perspective does the description take anyway?), but I got it to work in the end with the help of a command-line-based utility called acme.sh. I am actually more comfortable with command-line than with GUI programs. You get greater control and greater understanding.

Example of issuing a certificate using the manual DNS method
If you have full control over DNS but not the web server this approach is a good one.

$ sudo acme.sh ‐‐issue ‐‐dns ‐d www2.drjohnstechtalk.com

2021 update

Now the syntax is this:

acme.sh –issue –dns –yes-I-know-dns-manual-mode-enough-go-ahead-please -d www2.drjohnstechtalk.com

and once you’ve made the DNS entries, this:

acme.sh –issue –dns –yes-I-know-dns-manual-mode-enough-go-ahead-please -d www2.drjohnstechtalk.com –renew

[Thu Feb 23 11:55:52 EST 2017] Single domain='www2.drjohnstechtalk.com'
[Thu Feb 23 11:55:52 EST 2017] Getting domain auth token for each domain
[Thu Feb 23 11:55:52 EST 2017] Getting webroot for domain='www2.drjohnstechtalk.com'
[Thu Feb 23 11:55:52 EST 2017] _w='dns'
[Thu Feb 23 11:55:52 EST 2017] Getting new-authz for domain='www2.drjohnstechtalk.com'                                     [Thu Feb 23 11:55:54 EST 2017] The new-authz request is ok.
[Thu Feb 23 11:55:54 EST 2017] Add the following TXT record:
[Thu Feb 23 11:55:54 EST 2017] Domain: '_acme-challenge.www2.drjohnstechtalk.com'
[Thu Feb 23 11:55:54 EST 2017] TXT value: '7kU6pGgcNRtrPKuN2Wu1TIGS7YZDBhuiumLb9aEJwqc'
[Thu Feb 23 11:55:54 EST 2017] Please be aware that you prepend _acme-challenge. before your domain
[Thu Feb 23 11:55:54 EST 2017] so the resulting subdomain will be: _acme-challenge.www2.drjohnstechtalk.com
[Thu Feb 23 11:55:54 EST 2017] Please add the TXT records to the domains, and retry again.
[Thu Feb 23 11:55:54 EST 2017] Please add '--debug' or '--log' to check more details.
[Thu Feb 23 11:55:54 EST 2017] See: https://github.com/Neilpang/acme.sh/wiki/How-to-debug-acme.s/drjohnstechtalk.com/drjohnstechtalk.com/g

If you see an error like:

Usage: acme.sh --issue  -d  a.com  -w /path/to/webroot/a.com/

you probably left out the -d argument or something. I do that all the time for some reason. Go back and check your arguments.

Also note the order of arguments is significant! You have to put the ‐d last!

Anyway, after you’ve worked through any syntax errors like that, make the requested DNS entry in the zone file (do not include the quotes around the TXT value). Verify your entry with a command like this:

$ dig txt www2.drjohnstechtalk.com

Then run acme.sh again like this
$ sudo acme.sh ‐‐renew ‐d www2.drjohnstechtalk.com

[Thu Feb 23 12:02:18 EST 2017] Renew: 'www2.drjohnstechtalk.com'
[Thu Feb 23 12:02:18 EST 2017] Single domain='www2.drjohnstechtalk.com'
[Thu Feb 23 12:02:18 EST 2017] Getting domain auth token for each domain
[Thu Feb 23 12:02:19 EST 2017] Verifying:www2.drjohnstechtalk.com
[Thu Feb 23 12:02:22 EST 2017] Success
[Thu Feb 23 12:02:22 EST 2017] Verify finished, start to sign.
[Thu Feb 23 12:02:23 EST 2017] Cert success.
-----BEGIN CERTIFICATE-----
MIIFDjCCA/agAwIBAgISAzFs92uVHvnQCId6qFoaui9gMA0GCSqGSIb3DQEBCwUA
MEoxCzAJBgNVBAYTAlVTMRYwFAYDVQQKEw1MZXQncyBFbmNyeXB0MSMwIQYDVQQD
ExpMZXQncyBFbmNyeXB0IEF1dGhvcml0eSBYMzAeFw0xNzAyMjMxNjAyMDBaFw0x
NzA1MjQxNjAyMDBaMCAxHjAcBgNVBAMTFXd3dzIucmVmaW5pc2guYmFzZi51czCC
ASIwDQYJKoZIhvcNAQEBBQADggEPADCCAQoCggEBALa9QjcqPSZxXrJmt7kxV9ii
AAI7W0fQdWIk6aDHLfkhsSt55eASOAe05oxnZNqEmcJgXd+2+xUUmm8T5F92l4co
TFiIcMIQ5Jr7Gwg61RnDUe87vI4gctechhhnGcE//4iaJ8Va19exg8HD19dfpdGg
9J2DVnUBqKh4pvItUVe3h8KZOmftQZlLy1QXnEfwEyTj4kGo3phBgOIqh2x15/8Q
tKtM9yr4TKO8clgKLeyXV90ftg4t7kjCdtPx6oRIIq27CO3nwzFq/vFqg6HprE4b
RziUv1yajjw7aHkyhsjWmxdXBlIrokxK3EBrNUo3FUzlLHGGFT2RM1rkbhdaHB0C
AwEAAaOCAhYwggISMA4GA1UdDwEB/wQEAwIFoDAdBgNVHSUEFjAUBggrBgEFBQcD
AQYIKwYBBQUHAwIwDAYDVR0TAQH/BAIwADAdBgNVHQ4EFgQUCvxAhkhpo5Elmge/
3fz5asbprXEwHwYDVR0jBBgwFoAUqEpqYwR93brm0Tm3pkVl7/Oo7KEwcAYIKwYB
BQUHAQEEZDBiMC8GCCsGAQUFBzABhiNodHRwOi8vb2NzcC5pbnQteDMubGV0c2Vu
Y3J5cHQub3JnLzAvBggrBgEFBQcwAoYjaHR0cdrjo2NlcnQuaW50LXgzLmxldHNl
bmNyeXB0Lm9yZy8wIAYDVR0RBBkwF4IVd3d3Mi5yZWZpbmlzaC5iYXNmLnVzMIH+
BgNVHSAEgfYwgfMwCAYGZ4EMAQIBMIHmBgsrBgEEAYLfEwEBATCB1jAmBggrBgEF
BQcCARYaaHR0cDovL2Nwcy5sZXRzZW5jcnlwdC5vcmcwgasGCCsGAQUFBwICMIGe
DIGbVGhpcyBDZXJ0aWZpY2F0ZSBtYXkgb25seSBiZSByZWxpZWQgdXBvbiBieSBS
ZWx5aW5nIFBhcnRpZXMgYW5kIG9ubHkgaW4gYWNjb3JkYW5jZSB3aXRoIHRoZSBD
ZXJ0aWZpY2F0ZSBQb2xpY3kgZm91bmQgYXQgaHR0cHM6Ly9sZXRzZW5jcnlwdC5v
cmcvcmVwb3NpdG9yeS8wDQYJKoZIhvcNAQELBQADggEBADHFgJ3O8v/0zdG48Y1D
ci4wSQqZQSRtalknubVLRC12cr8ct1m0nZ7bxxQnZ/bSFShhcjepFowOfjfdY2ar
GzKP9IRgWavwm259WX5gM5FKUeN/Pjcz++vwUB8ci2+DpZu1tBf0eZcZ6JKsehij
A3lSPb4Ttq/GqDodumeJmvH4/FjCsjIqCJfQQYlz42QdZsLcA2l3oQ8smX0ZK8gh
sIm0SX4RggfiNGuNjw/tkfeC4xfjVNUSjKepUqgsVe63F6gRNjjm+/zsIlPLTdw3
AXGxE71Ww68avev7vRCvp+zPa43DQfVfV98v5M4i0M1/bT0Qh/4hLECma9wBBXb8
jXM=
-----END CERTIFICATE-----
[Thu Feb 23 12:02:23 EST 2017] Your cert is in  /root/.acme.sh/www2.drjohnstechtalk.com/www2.drjohnstechtalk.com.cer
[Thu Feb 23 12:02:23 EST 2017] Your cert key is in  /root/.acme.sh/www2.drjohnstechtalk.com/www2.drjohnstechtalk.com.key
[Thu Feb 23 12:02:23 EST 2017] The intermediate CA cert is in  /root/.acme.sh/www2.drjohnstechtalk.com/ca.cer
[Thu Feb 23 12:02:23 EST 2017] And the full chain certs is there:  /root/.acme.sh/www2.drjohnstechtalk.com/fullchain.cer

More complex example of issuing a SAN certificate using the manual DNS approach

$ ./acme.sh ‐‐issue ‐d johnstechtalk.mobi ‐‐dns ‐d www.johnstechtalk.mobi ‐d drjohnstechtalk.mobi ‐d www.drjohnstechtalk.mobi

[Mon Jan 23 09:21:55 EST 2017] Multi domain='DNS:www.johnstechtalk.mobi,DNS:drjohnstechtalk.mobi,DNS:www.drjohnstechtalk.mobi'
[Mon Jan 23 09:21:55 EST 2017] Getting domain auth token for each domain
[Mon Jan 23 09:21:55 EST 2017] Getting webroot for domain='johnstechtalk.mobi'
[Mon Jan 23 09:21:55 EST 2017] _w='dns'
[Mon Jan 23 09:21:55 EST 2017] Getting new-authz for domain='johnstechtalk.mobi'
[Mon Jan 23 09:21:57 EST 2017] The new-authz request is ok.
[Mon Jan 23 09:21:57 EST 2017] Getting webroot for domain='www.johnstechtalk.mobi'
[Mon Jan 23 09:21:57 EST 2017] _w='dns'
[Mon Jan 23 09:21:57 EST 2017] Getting new-authz for domain='www.johnstechtalk.mobi'
[Mon Jan 23 09:21:57 EST 2017] The new-authz request is ok.
[Mon Jan 23 09:21:57 EST 2017] Getting webroot for domain='drjohnstechtalk.mobi'
[Mon Jan 23 09:21:57 EST 2017] _w='dns'
[Mon Jan 23 09:21:57 EST 2017] Getting new-authz for domain='drjohnstechtalk.mobi'
[Mon Jan 23 09:21:58 EST 2017] The new-authz request is ok.
[Mon Jan 23 09:21:58 EST 2017] Getting webroot for domain='www.drjohnstechtalk.mobi'
[Mon Jan 23 09:21:58 EST 2017] _w='dns'
[Mon Jan 23 09:21:58 EST 2017] Getting new-authz for domain='www.drjohnstechtalk.mobi'
[Mon Jan 23 09:21:58 EST 2017] The new-authz request is ok.
[Mon Jan 23 09:21:58 EST 2017] Add the following TXT record:
[Mon Jan 23 09:21:58 EST 2017] Domain: '_acme-challenge.johnstechtalk.mobi'
[Mon Jan 23 09:21:58 EST 2017] TXT value: 'CDK_dACa_29apV30lc68Vo-mAx3e923ZOh6u-kyhXLo'
[Mon Jan 23 09:21:58 EST 2017] Please be aware that you prepend _acme-challenge. before your domain
[Mon Jan 23 09:21:58 EST 2017] so the resulting subdomain will be: _acme-challenge.johnstechtalk.mobi
[Mon Jan 23 09:21:58 EST 2017] Add the following TXT record:
[Mon Jan 23 09:21:58 EST 2017] Domain: '_acme-challenge.www.johnstechtalk.mobi'
[Mon Jan 23 09:21:58 EST 2017] TXT value: 'UC6JLg1hbXo0oRlYwSyrSRMD5nZgEKgdcIDZfhlqCrU'
[Mon Jan 23 09:21:58 EST 2017] Please be aware that you prepend _acme-challenge. before your domain
[Mon Jan 23 09:21:58 EST 2017] so the resulting subdomain will be: _acme-challenge.www.johnstechtalk.mobi
[Mon Jan 23 09:21:58 EST 2017] Add the following TXT record:
[Mon Jan 23 09:21:58 EST 2017] Domain: '_acme-challenge.drjohnstechtalk.mobi'
[Mon Jan 23 09:21:58 EST 2017] TXT value: 'y8ZCkJ-PXxGbeQFxh7RULCLGKyHH3G7FMFhKpMNF7ow'
[Mon Jan 23 09:21:58 EST 2017] Please be aware that you prepend _acme-challenge. before your domain
[Mon Jan 23 09:21:58 EST 2017] so the resulting subdomain will be: _acme-challenge.drjohnstechtalk.mobi
[Mon Jan 23 09:21:58 EST 2017] Add the following TXT record:
[Mon Jan 23 09:21:58 EST 2017] Domain: '_acme-challenge.www.drjohnstechtalk.mobi'
[Mon Jan 23 09:21:58 EST 2017] TXT value: '8nyb_V7AKaxy0U5pGTKmUejKEXgPv66VKne8yZYZMDg'
[Mon Jan 23 09:21:58 EST 2017] Please be aware that you prepend _acme-challenge. before your domain
[Mon Jan 23 09:21:58 EST 2017] so the resulting subdomain will be: _acme-challenge.www.drjohnstechtalk.mobi
[Mon Jan 23 09:21:59 EST 2017] Please add the TXT records to the domains, and retry again.
[Mon Jan 23 09:21:59 EST 2017] Please add '--debug' or '--log' to check more details.
[Mon Jan 23 09:21:59 EST 2017] See: https://github.com/Neilpang/acme.sh/wiki/How-to-debug-acme.sh

Then you add the DNS records they requested in the zone file, for instance,

_acme-challenge.johnstechtalk.mobi IN TXT CDK_dACa_29apV30lc68Vo-mAx3e923ZOh6u-kyhXLo

Then you rerun acme.sh, but with the renew argument:
$ ./acme.sh ‐‐renew ‐d johnstechtalk.mobi
and you should get your SAN certificate issued to you! All the files – private key, intermediate CERT, newly-issued SAN certificate – in ~/.acme.sh/johnstechtalk.mobi/

Of course just put in your own domain names in place of mine. I don’t know how quickly you have to act to put in your TXT records for the DNS authentication challenge. I edited zone files by hand and got them in within a few minutes.

And note the order of the arguments in the original acme.sh command. Often the switch order is immaterial in Linux, but for this command it matters a bit. You have your first mentioned domain, then the dns switch, then your other domain names.

Authorization expires
I got into trouble today, these many months later because my authorization had expired. The error looks like this:

[Sat Feb  3 17:14:00 EST 2018] _CURL='curl -L --silent --dump-header /root/.acme.sh/http.header '
[Sat Feb  3 17:14:01 EST 2018] _ret='0'
[Sat Feb  3 17:14:01 EST 2018] code='404'
[Sat Feb  3 17:14:01 EST 2018] drjohnstechtalk.com:Challenge error: {"type":"urn:acme:error:malformed","detail":"Expired authorization","status": 404}
[Sat Feb  3 17:14:01 EST 2018] Skip for removelevel:
[Sat Feb  3 17:14:01 EST 2018] pid
[Sat Feb  3 17:14:01 EST 2018] _clearupdns
[Sat Feb  3 17:14:01 EST 2018] Dns not added, skip.
[Sat Feb  3 17:14:01 EST 2018] _on_issue_err
[Sat Feb  3 17:14:01 EST 2018] Please add '--debug' or '--log' to check more details.
[Sat Feb  3 17:14:01 EST 2018] See: https://github.com/Neilpang/acme.sh/wiki/How-to-debug-acme.sh
[Sat Feb  3 17:14:02 EST 2018] Diagnosis versions:

Turns out there was a 10-month validity to my one-time DNS authorization which I did not know. So I switched to web root authorization and that seemed to work. That went like this:

$ acme.sh ‐‐issue ‐d drjohnstechtalk.com ‐w /webroot/drjohns

And I had to run that as root.


References and related

Idea for free web server certificates: Let’s Encrypt
Info about acme.sh
A great review of the state of hosting companies preparedness for offering SSL circa March 2018 in their hosting packages – so you can compare side-by-side – is in this Naked Security article: https://nakedsecurity.sophos.com/2018/03/12/with-4-months-to-switch-on-https-are-web-hosting-companies-ready/

Categories
Network Technologies Security

The IT Detective agency: the case of the incompatible sftp client

Intro
I was asked for assistance with this sftp problem:

$ sftp <user@host>

DH_GEX group out of range: 1536 !< 1024 !< 8192
Couldn't read packet: Connection reset by peer

We actually spoke with the operator of the sftp server who said their server is not compatible with openSSH version 6.2

The details
you can see your version of openssh and a lot more by running it again with the <v flag:

$ sftp ‐v [email protected]

OpenSSH_6.2p2, OpenSSL 0.9.8j-fips 07 Jan 2009
debug1: Reading configuration data /etc/ssh/ssh_config
debug1: /etc/ssh/ssh_config line 20: Applying options for *
debug1: Connecting to securefile.drj.com [50.17.188.196] port 22.
debug1: Connection established.
debug1: identity file /home/drj/.ssh/id_rsa type -1
debug1: identity file /home/drj/.ssh/id_dsa type -1
debug1: Enabling compatibility mode for protocol 2.0
debug1: Local version string SSH-2.0-OpenSSH_6.2
debug1: Remote protocol version 2.0, remote software version SSHD
debug1: no match: SSHD
debug1: SSH2_MSG_KEXINIT sent
debug1: SSH2_MSG_KEXINIT received
debug1: kex: server->client aes128-cbc hmac-sha1 none
debug1: kex: client->server aes128-cbc hmac-sha1 none
debug1: SSH2_MSG_KEX_DH_GEX_REQUEST(1536<7680<8192) sent
debug1: expecting SSH2_MSG_KEX_DH_GEX_GROUP
DH_GEX group out of range: 1536 !< 1024 !< 8192
Couldn't read packet: Connection reset by peer

At the same time, I could successfully connect on an older system – SLES 11 SP2 – whose detailed connection looked like this:

Connecting to securefile.drj.com...
OpenSSH_5.1p1, OpenSSL 0.9.8j-fips 07 Jan 2009
debug1: Reading configuration data /etc/ssh/ssh_config
debug1: Applying options for *
debug1: Connecting to securefile.drj.com [50.17.188.196] port 22.
debug1: Connection established.
debug1: identity file /home/drj/.ssh/id_rsa type -1
debug1: identity file /home/drj/.ssh/id_dsa type -1
debug1: Remote protocol version 2.0, remote software version SSHD
debug1: no match: SSHD
debug1: Enabling compatibility mode for protocol 2.0
debug1: Local version string SSH-2.0-OpenSSH_5.1
debug1: SSH2_MSG_KEXINIT sent
debug1: SSH2_MSG_KEXINIT received
debug1: kex: server->client aes128-cbc hmac-sha1 none
debug1: kex: client->server aes128-cbc hmac-sha1 none
debug1: SSH2_MSG_KEX_DH_GEX_REQUEST(1024<2048<8192) sent
debug1: expecting SSH2_MSG_KEX_DH_GEX_GROUP
debug1: SSH2_MSG_KEX_DH_GEX_INIT sent
debug1: expecting SSH2_MSG_KEX_DH_GEX_REPLY
The authenticity of host 'securefile.drj.com (50.17.188.196)' can't be established.
RSA key fingerprint is 13:bb:75:21:86:c0:d6:90:3d:5c:81:32:4c:7e:73:6b.
Are you sure you want to continue connecting (yes/no)?

See that version? it is only openSSH version 5.1. It seems to permit a shorter Diffie Hellman group exchange key length than does the newer version of openssh.

My solution
The standard advice on duckduckgo is to set this parameter in your $HOME/.ssh/config:

KexAlgorithms diffie-hellman-group-exchange-sha256,diffie-hellman-group14-sha1,diffie-hellman-group1-sha1

But this did not work for my case. And I didn’t want to change a setting that would weaken the security of all my other sftp connections. So I settled on using an additional command-line argument which is an openSSH parameter when running sftp:

$ sftp ‐o KexAlgorithms=diffie‐hellman‐group14‐sha1 <host>

And this worked!

And this works as well:

$ sftp ‐o KexAlgorithms=diffie‐hellman‐group1‐sha1 <host>

Why the change?
The minimum key length was changed from 1024 to 1536 and later to 2048 to avoid the logjam vulnerability.

Conclusion
Not all versions of openSSH are equal. In particular openSSH v 6.2 may be incompatible with older sftp servers. I showed a way to make a newer sftp work with an older server. Case closed.

References and related
Novell’s discussion of the issue is here: https://www.novell.com/support/kb/doc.php?id=7016904
Here’s some more information on the logjam vulnerability: https://weakdh.org/

Categories
Admin Apache Network Technologies Security

drjohnstechtalk now uses HTTP Strict Transport Security, HSTS

Intro
I was reading about a kind of amazingly thorough exploit which could be done using a Raspberry Pi zero. Physical access is required, but the scope of what this guy has figured out and put together is really amazing.

Reading the description I decided is a good exercise in making sure I understand the underlying technologies. One was admittedly something I hadn’t seen before: DNS re-binding. That got me to reading about DNS re-binding, and that got me to looking at defenses against DNS rebinding.

HSTS to the rescue
Since in DNS rebinding you may have either a MITM (man in the middle) or a web site impersonated by a hacker, one defense against it is to use HTTPS. (The hacker will not have access to a web site’s private key and therefore has no way to fake a certificate). But what they can do is redirect users from HTTPS to HTTP, where no certificate is required.

HSTS is designed to make that move tip off the user by complaining to the user. Upon first visit the user gets a cookie that says this site should be https. Subsequent visits then are enforced by the user’s browser that the site accessed must be HTTPS.

drjohnstechtalk update
Two years ago I switched the default way I run my blog web site from HTTP to HTTPS due to the encryption offered by HTTPS, and the fact that search engines penalize HTTP sites.

It seems a natural progression in this age of increasing security awareness to up the ante and now also run HSTS. For me this was easy. Since I run my own apache server I simply needed to add the appropriate HTTP Response header to my server responses.

This is done within the virtual server section of the apache configuration like so:

# Guarantee HTTPS for 1/2 Year including Sub Domains  - DrJ 11/22/16
# see https://itigloo.com/security/how-to-configure-http-strict-transport-security-hsts-on-apache-nginx/
    Header always set Strict-Transport-Security "max-age=15811200; includeSubDomains; preload"

Of course this requires that the apache mod_headers is included.

Results
I test it form a linux server like this:

$ curl ‐i ‐k ‐s https://drjohnstechtalk.com/blog/|head ‐15

HTTP/1.1 200 OK
Date: Tue, 22 Nov 2016 20:30:56 GMT
Server: Apache/2
Strict-Transport-Security: max-age=15811200; includeSubDomains
Vary: Cookie,Accept-Encoding
X-Powered-By: PHP/5.4.43
X-Pingback: https://drjohnstechtalk.com/blog/xmlrpc.php
Last-Modified: Tue, 22 Nov 2016 20:30:58 GMT
Transfer-Encoding: chunked
Content-Type: text/html; charset=UTF-8
 
<!DOCTYPE html>
<html lang="en-US">
<head>
<meta charset="UTF-8" />

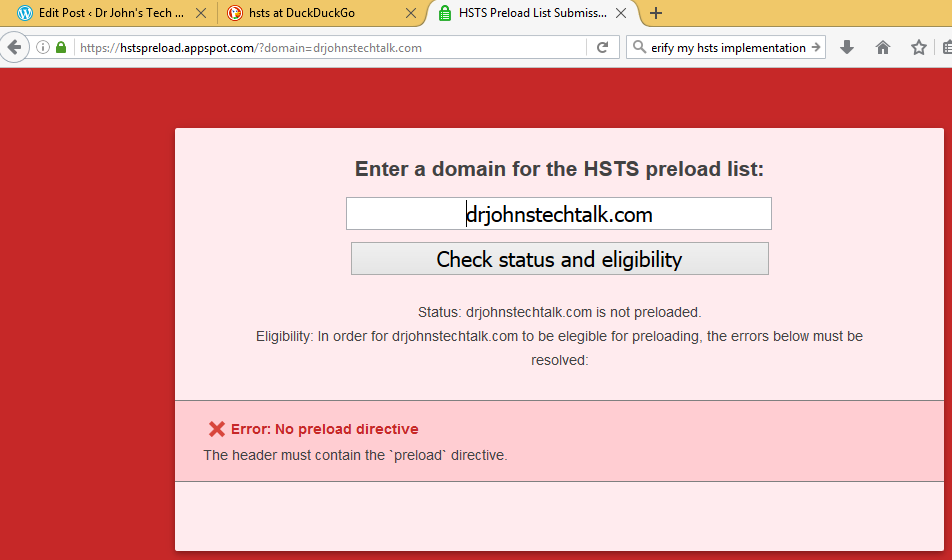
See that new header Strict-Transport-Security: max-age=15811200; includeSubDomains; preload? That’s the result of what we did. But unless we put that preload at the end it doesn’t verify!

Capture-HSTS-verify-with-error

References and related
drjohnstechtalk is now encrypted – blog posting from 2014
This site has a good description of the requirements for a proper HSTS implementation, and I see that I missed something! https://hstspreload.appspot.com/
You can’t run https without a certificate. I soon will be using the free certificates offered by Let’s Encrypt. Here’s my write-up.

Categories
Consumer Tech

Consumer tech: How to safely add steps to your Fitbit

So my significant other realized after going to the park that she wasn’t wearing her Fitbit Alta. She’s a member of not one but two separate programs that provide certain incentives the more steps taken. So she wanted to add those missing steps – 4000 of them – to her Fitbit.

She put it in the dryer, on a special cycle which doesn’t produce heat. She knew how much it was adding by monitoring it with her smartphone. She believes it only took around 10 minutes to add 4000 steps this way. No harmful effects were noted. I suppose she put it inside of something like a sock or one o those nylons pouches. I was surprised it could have gone that quickly – that’s over 6 “steps” a second. Maybe it took a bit longer she conceded, but not more than 15 minutes.

Categories
CentOS DNS Linux Network Technologies Raspberry Pi Security Web Site Technologies

Roll your own dynamic DNS update service

Intro
I know my old Cisco router only has built-in support for two dynamic DNS services, dyndns.org and TZO.com. Nowadays you have to pay for those, if even they work (the web site domain names seem to have changed, but perhaps they still support the old domain names. Or perhaps not!). Maybe this could be fixed by firmware upgrades (to hopefully get more choices and hopefully a free one, or a newer router, or running DD-WRT. I didn’t do any of those things. Being a network person at heart, I wrote my own. I found the samples out there on the Internet needed some updating, so I am sharing my recipe. I didn’t think it was too hard to pull off.

What I used
– GoDaddy DNS hosting (basically any will do)
– my Amazon AWS virtual server running CentOS, where I have sudo access
– my home Raspberry Pi
– a tiny bit of php programming
– my networking skills for debugging

As I have prior experience with all these items this project was right up my alley.

Delegating our DDNS domain from GoDaddy
Just create a nameserver record from the domain, say drj.com, called, say, raspi, which you delegate to your AWS server. Following the example, the subdomain would be raspi.drj.com whose nameserver is drj.com.


DNS Setup on an Amazon AWS server

/etc/named.conf

//
// named.conf
//
// Provided by Red Hat bind package to configure the ISC BIND named(8) DNS
// server as a caching only nameserver (as a localhost DNS resolver only).
//
// See /usr/share/doc/bind*/sample/ for example named configuration files.
//
 
options {
//      listen-on port 53 { 127.0.0.1; };
//      listen-on port 53;
        listen-on-v6 port 53 { ::1; };
        directory       "/var/named";
        dump-file       "/var/named/data/cache_dump.db";
        statistics-file "/var/named/data/named_stats.txt";
        memstatistics-file "/var/named/data/named_mem_stats.txt";
        allow-query     { any; };
        recursion no;
 
        dnssec-enable yes;
        dnssec-validation yes;
        dnssec-lookaside auto;
 
        /* Path to ISC DLV key */
        bindkeys-file "/etc/named.iscdlv.key";
 
        managed-keys-directory "/var/named/dynamic";
};
 
logging {
        channel default_debug {
                file "data/named.run";
                severity dynamic;
        };
};
 
zone "." IN {
        type hint;
        file "named.ca";
};
 
include "/etc/named.rfc1912.zones";
include "/var/named/dynamic.conf";
include "/etc/named.root.key";

/var/named/dynamic.conf

zone "raspi.drj.com" {
  type master;
  file "/var/named/db.raspi.drj.com";
// designed to work with nsupdate -l used on same system - DrJ 10/2016
// /var/run/named/session.key
  update-policy local;
};

/var/named/db.raspi.drj.com

$ORIGIN .
$TTL 1800       ; 30 minutes
raspi.drj.com      IN SOA  drj.com. postmaster.drj.com. (
                                2016092812 ; serial
                                1700       ; refresh (28 minutes 20 seconds)
                                1700       ; retry (28 minutes 20 seconds)
                                1209600    ; expire (2 weeks)
                                600        ; minimum (10 minutes)
                                )
                        NS      drj.com.
$TTL 3600       ; 1 hour
                        A       125.125.73.145

Named re-starting program
Want to make sure your named restarts if it happens to die? nanny.pl is a good, simple monitor to do that. Here is the version I use on my server. Note the customized variables towards the top.

#!/usr/bin/perl
#
# Copyright (C) 2004, 2007, 2012  Internet Systems Consortium, Inc. ("ISC")
# Copyright (C) 2000, 2001  Internet Software Consortium.
#
# Permission to use, copy, modify, and/or distribute this software for any
# purpose with or without fee is hereby granted, provided that the above
# copyright notice and this permission notice appear in all copies.
#
# THE SOFTWARE IS PROVIDED "AS IS" AND ISC DISCLAIMS ALL WARRANTIES WITH
# REGARD TO THIS SOFTWARE INCLUDING ALL IMPLIED WARRANTIES OF MERCHANTABILITY
# AND FITNESS.  IN NO EVENT SHALL ISC BE LIABLE FOR ANY SPECIAL, DIRECT,
# INDIRECT, OR CONSEQUENTIAL DAMAGES OR ANY DAMAGES WHATSOEVER RESULTING FROM
# LOSS OF USE, DATA OR PROFITS, WHETHER IN AN ACTION OF CONTRACT, NEGLIGENCE
# OR OTHER TORTIOUS ACTION, ARISING OUT OF OR IN CONNECTION WITH THE USE OR
# PERFORMANCE OF THIS SOFTWARE.
 
# $Id: nanny.pl,v 1.11 2007/06/19 23:47:07 tbox Exp $
 
# A simple nanny to make sure named stays running.
 
$pid_file_location = '/var/run/named/named.pid';
$nameserver_location = 'localhost';
$dig_program = 'dig';
$named_program =  '/usr/sbin/named -u named';
 
fork() && exit();
 
for (;;) {
        $pid = 0;
        open(FILE, $pid_file_location) || goto restart;
        $pid = <FILE>;
        close(FILE);
        chomp($pid);
 
        $res = kill 0, $pid;
 
        goto restart if ($res == 0);
 
        $dig_command =
               "$dig_program +short . \@$nameserver_location > /dev/null";
        $return = system($dig_command);
        goto restart if ($return == 9);
 
        sleep 30;
        next;
 
 restart:
        if ($pid != 0) {
                kill 15, $pid;
                sleep 30;
        }
        system ($named_program);
        sleep 120;
}

The PHP updating program myip-update.php

<?php
# DrJ: lifted from http://pablohoffman.com/dynamic-dns-updates-with-a-simple-php-script
# but with some security improvements
# 10/2016
# PHP script for very simple dynamic DNS updates
#
# this script was published in http://pablohoffman.com/articles and
# released to the public domain by Pablo Hoffman on 27 Aug 2006
 
# CONFIGURATION BEGINS -------------------------------------------------------
# define password here
$mysecret = 'myBigFatsEcreT';
# CONFIGURATION ENDS ---------------------------------------------------------
 
 
$ip = $_SERVER['REMOTE_ADDR'];
$host = $_GET['host'];
$secret = $_POST['secret'];
$zone = $_GET['zone'];
$tmpfile = trim(`mktemp /tmp/nsupdate.XXXXXX`);
 
if ((!$host) or (!$zone) or (!($mysecret == $secret))) {
    echo "FAILED";
    unlink($tmpfile);
    exit;
}
 
$oldip = trim(`dig +short $host.$zone @localhost`);
if ($ip == $oldip) {
    echo "UNCHANGED. ip: $ip\n";
    unlink($tmpfile);
    exit;
}
 
echo "$ip - $oldip";
 
$nsucmd = "update delete $host.$zone A
update add $host.$zone 3600 A $ip
send
";
 
$fp = fopen($tmpfile, 'w');
fwrite($fp, $nsucmd);
fclose($fp);
`sudo nsupdate -l $tmpfile`;
unlink($tmpfile);
echo "OK ";
echo `date`;
?>

In the above file I added the “sudo” after awhile. See explanation further down below.

Raspberry Pi requirements
I’ve assumed you can run your Pi 24 x 7 and constantly and consistently on your network.

Crontab entry on the Raspberry Pi
Edit the crontab file for periodically checking your IP on the Pi and updating external DNS if it has changed by doing this:

$ crontab ‐e
and adding the line below:

# my own method of dynamic update - DrJ 10/2016
0,10,20,30,40,50 * * * * /usr/bin/curl -s -k -d 'secret=myBigFatsEcreT' 'https://drj.com/myip-update.php?host=raspi&zone=drj.com' >> /tmp/ddns 2>&1

A few highlights
Note that I’ve switched to use of nsupdate -l on the local server. This will be more secure than the previous solution which suggested to have updates from localhost. As far as I can tell localhost updates can be spoofed and so should be considered insecure in a modern infrastructure. I learned a lot by running nsupdate -D -l on my AWS server and observing what happens.
And note that I changed the locations of the secret. The old solution had the secret embedded in the URL in a GET statement, which means it would also be embedded in every single request in the web server’s access file. That’s not a good idea. I switched it to a POSTed variable so that it doesn’t show up in the web server’s access file. This is done with the -d switch of curl.

Contents of temporary file
Here are example contents. This is useful when you’re trying to run nsupdate from the command line.

update delete raspi.drj.com A
update add raspi.drj.com 3600 A 51.32.108.37
send


Permissions problems

If you see something like this on your DNS server:

$ ll /var/run/named

total 8
-rw-r--r-- 1 named www-data   6 Nov  6 03:15 named.pid
-rw------- 1 named www-data 102 Oct 24 09:42 session.key

your attempt to run nsupdate by your web server will be foiled and produce something like this:

$ /usr/bin/nsupdate ‐l /tmp/nsupdate.LInUmo

06-Nov-2016 17:14:14.780 none:0: open: /var/run/named/session.key: permission denied
can't read key from /var/run/named/session.key: permission denied

The solution may be to permit group read permission:

$ cd /var/run/named; sudo chmod g+r session.key

and make the group owner of the file your webserver user ID (which I’ve already done here). I’m still working this part out…

That approach doesn’t seem to “stick,” so I came up with this other approach. Put your web server user in sudoers to allow it to run nsupdate (my web server user is www-data for these examples):

Cmnd_Alias     NSUPDATE = /usr/bin/nsupdate
# allow web server to run nsupdate
www-data ALL=(root) NOPASSWD: NSUPDATE

But you may get the dreaded

sudo: sorry, you must have a tty to run sudo

if you manage to figure out how to turn on debugging.

So if your sudoers has a line like this:

Defaults    requiretty

you will need lines like this:

# turn of tty requirements only for www-data user
Defaults:www-data !requiretty

Debugging
Of course for debugging I commented out the unlink line in the PHP update file and ran the
nsupdate -l /tmp/nsupdate.xxxxx
by hand as user www-data.

During some of the errors I worked through that wasn’t verbose enough so I added debugging arguments:

$ nsupdate ‐D ‐d ‐l /tmp/nsupdate.xxxxx

When that began to work, yet when called via the webserver it wasn’t working, I ran the above command from within PHP, recording the output to a file:

...
`sudo nsupdate -d -D -l $tmpfile > /tmp/nsupdate-debug 2>&1`

That turned out to be extremely informative.

Conclusion
We have shown how to combine a bunch of simple networking tools to create your own DDNS service. The key elements are a Raspberry Pi and your own virtual server at Amazon AWS. We have built upon previous published solutions to this problem and made them more secure in light of the growing sophistication of the bad guys. Let me know if there is interest in an inexpensive commercial service.

References and related

nanny.pl write-up: https://www.safaribooksonline.com/library/view/dns-bind/0596004109/ch05s09.html

Categories
Consumer Tech Linux

What I’m trying out now – Amazon Fire HD 8 Tablet

Intro
I had previously praised an HP Touchpad Tablet, but that was another time and times have moved on. Now I’m trying the new Fire HD 8 Tablet and am quite impressed. It’s not perfect however.

Here are some features I really like.

Pros
Long battery life – the HP Touchpad died too quickly – after a couple hours – giving me recharge anxiety
Bright display
Lightweight and sufficiently small – I often carry it around from room to room in the house
High-def resolution: 1280 x 800
Reasonably good app selection
Quad processor makes it responsive and able to run lots of apps at the same time
Switching between apps is pretty easy

Cons
No Groupme app
no X-windows server
no ability to cast, even to Amazon Fire TV Stick!
Speedtest does not work
Home screen is locked to Amazon advertizing
Very unresponsive to swipes – in general very slow

Apps and features I like
Serverauditor – gives me ssh access to my Raspberry Pi and Amazon hosts
Weatherbug
NY Times
Netflix
Hulu
Silk Browser
Calculator is pretty good
Maps is alright
Fitbit – and the Bluetooth actually works with my Charge device
stereo speakers, but not the best dynamic range
prints to WiFi printer, e.g., Canon printers
Bluetooth enabled – can pump audio out to an external Bluetooth speaker

After several months of use I am less impressed. The thing bogs down with my palette of apps and is slow as a dog. I need a minimum of three swipes to unlock the Amazon home screen advertisement, which gets really tiring really fast. So, this tablet is a no-go. Sad.

References and related
My old HP Touchpad article, just for the historical reference

Categories
DNS Linux Perl Raspberry Pi Web Site Technologies

Roll your own domain drop catching service using GoDaddy

Intro
I’m after a particular domain and have been for years. But as a matter of pride I don’t want to overpay for it, so I don’t want to go through an auction. There are services that can help grab a DNS domain immediately after it expires, but they all want $$. That may make sense for high-demand domains. Mine is pretty obscure. I want to grab it quickly – perhaps within a few seconds after it becomes available, but I don’t expect any competition for it. That is a description of domain drop catching.

Since I am already using GoDaddy as my registrar I thought I’d see if they have a domain catching service. They don’t which is strange because they have other specialized domain services such as domain broker. They have a service which is designed for much the same purpose, however, called backorder. That creates an auction bid for the domain before it has expired. The cost isn’t too bad, but since I started down a different path I will roll my own. Perhaps they have an API which can be used to create my own domain catcher? It turns out they do!

It involves understanding how to read a JSON data file, which is new to me, but otherwise it’s not too bad.

The domain lifecycle
This graphic from ICANN illustrates it perfectly for your typical global top-level domain such as .com, .net, etc:
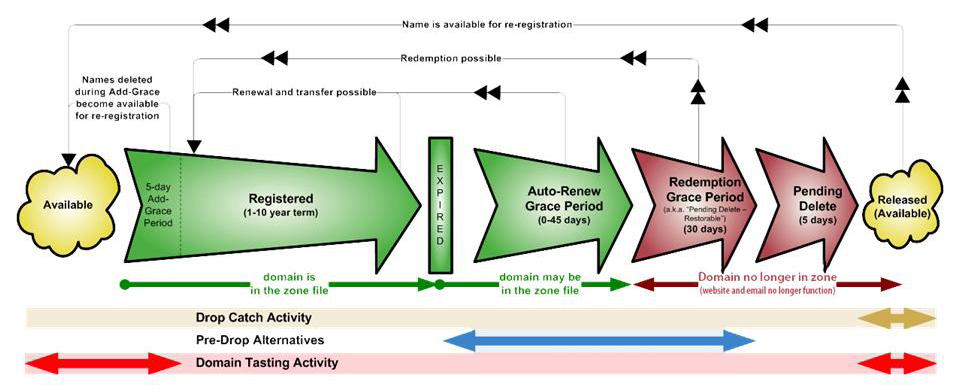
gtld-lifecycle

To put it into words, there is the
initial registration,
optional renewals,
expiration date,
auto-renew grace period of 0 – 45 days,
redemption grace period of 30 days,
pending delete of 5 days, and then
it’s released and available.

So in domain drop catching we are keenly interested in being fully prepared for the pending delete five day window. From an old discussion I’ve read that the precise time .com domains are released is usually between 2 -3 PM EST.

A word about the GoDaddy developer site
It’s developer.godaddy.com. It looks like one day it will be a great site, but for now it is wanting in some areas. Most of the menu items are duds and are placeholders. Really there are only three (mostly) working sections: get started, documentation and demo. Get started is only a few words and one slender snippet of Ajax code, and the demo itself also extremely limited, so the only real resource they provide is Documentation. Documentation is designed as an active documentation that you can try out functions with your data. You run it and it shows you all the needed request headers and data as well as the received response. The thing is that it’s very finicky. It’s supposed to show all the available functions but I couldn’t get it to work under Firefox. And with Internet Explorer/Edge it only worked about half the time. It seems to help to access it with a newly launched browser. The documentation, as good as it is, leaves some things unsaid. I have found:

https://api.ote-godaddy.com/ – use for TEST. Maybe ote stands for optional test environment?
https://api.godaddy.com/ – for production (what I am calling PROD)

The TEST environment does not require authentication for some things that PROD does. This shell script for checking available domains, which I call available-test.sh, works in TEST but not in PROD:

#!/bin/sh
# pass domain as argument
# apparently no AUTH is rquired for this one
curl -k 'https://api.ote-godaddy.com/v1/domains/available?domain='$1'&amp;checkType=FAST&amp;forTransfer=false'

In PROD I had to insert the authorization information – the key and secret they showed me on the screen. I call this script available.sh.

#!/bin/sh
# pass domain as argument
curl -s -k -H 'Authorization: sso-key *******8m_PwFAffjiNmiCUrKe******:**FF73L********' 'https://api.godaddy.com/v1/domains/available?domain='$1'&amp;checkType=FULL&amp;forTransfer=false'

I found that my expiring domain produced different results about five days after expiring if I used checkType of FAST versus checkType of FULL – and FAST was wrong. So I learned you have to use FULL to get an answer you can trust!

Example usage of an available domain

$ ./available.sh dr-johnstechtalk.com

{"available":true,"domain":"dr-johnstechtalk.com","definitive":false,"price":11990000,"currency":"USD","period":1}

2nd example – a non-available domain
$ ./available.sh drjohnstechtalk.com

{"available":false,"domain":"drjohnstechtalk.com","definitive":true,"price":11990000,"currency":"USD","period":1}

Example JSON file
I had to do a lot of search and replace to preserve my anonymity, but I feel this post wouldn’t be complete without showing the real contents of my JSON file I am using for both validate, and, hopefully, as the basis for my API-driven domain purchase:

{
  "domain": "dr-johnstechtalk.com",
  "renewAuto": true,
  "privacy": false,
  "nameServers": [
  ],
  "consent": {
    "agreementKeys": ["DNRA"],
    "agreedBy": "50.17.188.196",
    "agreedAt": "2016-09-29T16:00:00Z"
  },
  "period": 1,
  "contactAdmin": {
    "nameFirst": "Dr","nameLast": "John",
    "email": "[email protected]",
    "addressMailing": {
      "address1": "555 Piney Drive",
      "city": "Smallville","state": "New Jersey","postalCode": "55555",
      "country": "US"
    },
    "phone": "+1.5555551212"
  },
  "contactBilling": {
    "nameFirst": "Dr","nameLast": "John",
    "email": "[email protected]",
    "addressMailing": {
      "address1": "555 Piney Drive",
      "city": "Smallville","state": "New Jersey","postalCode": "55555",
      "country": "US"
    },
    "phone": "+1.5555551212"
  },
  "contactRegistrant": {
    "nameFirst": "Dr","nameLast": "John",
    "email": "[email protected]",
    "phone": "+1.5555551212",
    "addressMailing": {
      "address1": "555 Piney Drive",
      "city": "Smallville","state": "New Jersey","postalCode": "55555",
      "country": "US"
    }
  },
  "contactTech": {
    "nameFirst": "Dr","nameLast": "John",
    "email": "[email protected]",
    "phone": "+1.5555551212",
    "addressMailing": {
      "address1": "555 Piney Drive",
      "city": "Smallville","state": "New Jersey","postalCode": "55555",
      "country": "US"
    }
  }
}

Note the agreementkeys value: DNRA. GoDaddy doesn’t document this very well, but that is what you need to put there! Note also that the nameservers are left empty. I asked GoDaddy and that is what they advised to do. The other values are pretty much what you’d expect. I used my own server’s IP address for agreedBy – use your own IP. I don’t know how important it is to get the agreedAt date close to the current time. I’m going to assume it should be within 24 hours of the current time.

How do we test this JSON input file? I wrote a validate script for that I call validate.sh.

#!/bin/sh
# DrJ 9/2016
# godaddy-json-register was built using GoDaddy's documentation at https://developer.godaddy.com/doc#!/_v1_domains/validate
jsondata=`tr -d '\n' &lt; godaddy-json-register`
 
curl -i -k -H 'Authorization: sso-key *******8m_PwFAffjiNmiCUrKe******:**FF73L********' -H 'Content-Type: application/json' -H 'Accept: application/json' -d "$jsondata" https://api.godaddy.com/v1/domains/purchase/validate

Run the validate script
$ ./validate.sh

HTTP/1.1 100 Continue
 
HTTP/1.1 100 Continue
Via: 1.1 api.godaddy.com
 
HTTP/1.1 200 OK
Date: Thu, 29 Sep 2016 20:11:33 GMT
X-Powered-By: Express
Vary: Origin,Accept-Encoding
Access-Control-Allow-Credentials: true
Content-Type: application/json; charset=utf-8
ETag: W/"2-mZFLkyvTelC5g8XnyQrpOw"
Via: 1.1 api.godaddy.com
Transfer-Encoding: chunked

Revised versions of the above scripts
So we can pass the domain name as argument I revised all the scripts. Also, I provide an agreeddAt date which is current.

The data file: godaddy-json-register

{
  "domain": "DOMAIN",
  "renewAuto": true,
  "privacy": false,
  "nameServers": [
  ],
  "consent": {
    "agreementKeys": ["DNRA"],
    "agreedBy": "50.17.188.196",
    "agreedAt": "DATE"
  },
  "period": 1,
  "contactAdmin": {
    "nameFirst": "Dr","nameLast": "John",
    "email": "[email protected]",
    "addressMailing": {
      "address1": "555 Piney Drive",
      "city": "Smallville","state": "New Jersey","postalCode": "55555",
      "country": "US"
    },
    "phone": "+1.5555551212"
  },
  "contactBilling": {
    "nameFirst": "Dr","nameLast": "John",
    "email": "[email protected]",
    "addressMailing": {
      "address1": "555 Piney Drive",
      "city": "Smallville","state": "New Jersey","postalCode": "55555",
      "country": "US"
    },
    "phone": "+1.5555551212"
  },
  "contactRegistrant": {
    "nameFirst": "Dr","nameLast": "John",
    "email": "[email protected]",
    "phone": "+1.5555551212",
    "addressMailing": {
      "address1": "555 Piney Drive",
      "city": "Smallville","state": "New Jersey","postalCode": "55555",
      "country": "US"
    }
  },
  "contactTech": {
    "nameFirst": "Dr","nameLast": "John",
    "email": "[email protected]",
    "phone": "+1.5555551212",
    "addressMailing": {
      "address1": "555 Piney Drive",
      "city": "Smallville","state": "New Jersey","postalCode": "55555",
      "country": "US"
    }
  }
}

validate.sh

#!/bin/sh
# DrJ 10/2016
# godaddy-json-register was built using GoDaddy's documentation at https://developer.godaddy.com/doc#!/_v1_domains/validate
# pass domain as argument
# get date into accepted format
domain=$1
date=`date -u --rfc-3339=seconds|sed 's/ /T/'|sed 's/+.*/Z/'`
jsondata=`tr -d '\n' &lt; godaddy-json-register`
jsondata=`echo $jsondata|sed 's/DATE/'$date'/'`
jsondata=`echo $jsondata|sed 's/DOMAIN/'$domain'/'`
#echo date is $date
#echo jsondata is $jsondata
curl -i -k -H 'Authorization: sso-key *******8m_PwFAffjiNmiCUrKe******:**FF73L********' -H 'Content-Type: application/json' -H 'Accept: application/json' -d "$jsondata" https://api.godaddy.com/v1/domains/purchase/validate

available.sh
No change. See listing above.

purchase.sh
Exact same as validate.sh, with just a slightly different URL. I need to test that it really works, but based on my reading I think it will.

#!/bin/sh
# DrJ 10/2016
# godaddy-json-register was built using GoDaddy's documentation at https://developer.godaddy.com/doc#!/_v1_domains/purchase
# pass domain as argument
# get date into accepted format
domain=$1
date=`date -u --rfc-3339=seconds|sed 's/ /T/'|sed 's/+.*/Z/'`
jsondata=`tr -d '\n' &lt; godaddy-json-register`
jsondata=`echo $jsondata|sed 's/DATE/'$date'/'`
jsondata=`echo $jsondata|sed 's/DOMAIN/'$domain'/'`
#echo date is $date
#echo jsondata is $jsondata
curl -s -i -k -H 'Authorization: sso-key *******8m_PwFAffjiNmiCUrKe******:**FF73L********' -H 'Content-Type: application/json' -H 'Accept: application/json' -d "$jsondata" https://api.godaddy.com/v1/domains/purchase

Putting it all together
Here’s a looping script I call loop.pl. I switched to perl because it’s easier to do certain control operations.

#!/usr/bin/perl
#DrJ 10/2016
$DEBUG = 0;
$status = 0;
open STDOUT, '&gt;', "loop.log" or die "Can't redirect STDOUT: $!";
                   open STDERR, "&gt;&amp;STDOUT"     or die "Can't dup STDOUT: $!";
 
                   select STDERR; $| = 1;      # make unbuffered
                   select STDOUT; $| = 1;      # make unbuffered
# edit this and change to your about-to-expire domain
$domain = "dr-johnstechtalk.com";
while ($status != 200) {
# show that we're alive and working...
  print "Now it's ".`date` if $i++ % 10 == 0;
  $hr = `date +%H`;
  chomp($hr);
# run loop more aggressively during times of day we think Network Solutions releases domains back to the pool, esp. around 2 - 3 PM EST
  $sleep = $hr &gt; 11 &amp;&amp; $hr &lt; 16 ? 1 : 15;
  print "Hr,sleep: $hr,$sleep\n" if $DEBUG;
  $availRes = `./available.sh $domain`;
# {"available":true,"domain":"dr-johnstechtalk.com","definitive":false,"price":11990000,"currency":"USD","period":1}
  print "$availRes\n" if $DEBUG;
  ($available) = $availRes =~ /^\{"available":([^,]+),/;
  print "$available\n" if $DEBUG;
  if ($available eq "false") {
    print "test comparison OP for false result\n" if $DEBUG;
  } elsif ($available eq "true") {
# available value of true is extremely unreliable with many false positives. Confirm availability by making a 2nd call
    print "available.sh results: $availRes\n";
    $availRes = `./available.sh $domain`;
    print "available.sh re-test results: $availRes\n";
    ($available2) = $availRes =~ /^\{"available":([^,]+),/;
    next if $available2 eq "false";
# We got two available eq true results in a row so let's try to buy it!
    print "$domain is very likely available. Trying to buy it at ".`date`;
    open(BUY,"./purchase.sh $domain|") || die "Cannot run ./purchase.pl $domain!!\n";
    while() {
# print out each line so we can analyze what happened
      print ;
# we got it if we got back
# HTTP/1.1 200 OK
      if (/1.1 200 OK/) {
        print "We just bought $domain at ".`date`;
        $status = 200;
     }
    } # end of loop over results of purchase
    close(BUY);
    print "\n";
    exit if $status == 200;
  } else {
    print "available is neither false nor true: $available\n";
  }
  sleep($sleep);
}

Running the loop script
$ nohup ./loop.pl > loop.log 2>&1 &
Stopping the loop script
$ kill ‐9 %1

Description of loop.pl
I gotta say this loop script started out as a much simpler script. I fortunately started on it many days before my desired domain actually became available so I got to see and work out all the bugs. Contributing to the problem is that GoDaddy’s API results are quite unreliable. I was seeing a lot of false positives – almost 20%. So I decided to require two consecutive calls to available.sh to return true. I could have required available true and definitive true, but I’m afraid that will make me late to the party. The API is not documented to that level of detail so there’s no help there. But so far what I have seen is that when available incorrectly returns true, simultaneously definitive becomes false, whereas all other times definitive is true.

Results of running an earlier and simpler version of loop.pl

This shows all manner of false positives. But at least it never allowed me to buy the domain when it wasn’t available.

Now it's Wed Oct  5 15:20:01 EDT 2016
Now it's Wed Oct  5 15:20:19 EDT 2016
Now it's Wed Oct  5 15:20:38 EDT 2016
available.sh results: {"available":true,"domain":"dr-johnstechtalk.com","definitive":false,"price":11990000,"currency":"USD","period":1}
dr-johnstechtalk.com is available. Trying to buy it at Wed Oct  5 15:20:46 EDT 2016
HTTP/1.1 100 Continue
 
HTTP/1.1 100 Continue
Via: 1.1 api.godaddy.com
 
HTTP/1.1 422 Unprocessable Entity
Date: Wed, 05 Oct 2016 19:20:47 GMT
X-Powered-By: Express
Vary: Origin,Accept-Encoding
Access-Control-Allow-Credentials: true
Content-Type: application/json; charset=utf-8
ETag: W/"7d-O5Dw3WvJGo8h30TqR7j8zg"
Via: 1.1 api.godaddy.com
Transfer-Encoding: chunked
 
{"code":"UNAVAILABLE_DOMAIN","message":"The specified `domain` (dr-johnstechtalk.com) isn't available for purchase","name":"ApiError"}
Now it's Wed Oct  5 15:20:58 EDT 2016
Now it's Wed Oct  5 15:21:16 EDT 2016
Now it's Wed Oct  5 15:21:33 EDT 2016
available.sh results: {"available":true,"domain":"dr-johnstechtalk.com","definitive":false,"price":11990000,"currency":"USD","period":1}
dr-johnstechtalk.com is available. Trying to buy it at Wed Oct  5 15:21:34 EDT 2016
HTTP/1.1 100 Continue
 
HTTP/1.1 100 Continue
Via: 1.1 api.godaddy.com
 
HTTP/1.1 422 Unprocessable Entity
Date: Wed, 05 Oct 2016 19:21:36 GMT
X-Powered-By: Express
Vary: Origin,Accept-Encoding
Access-Control-Allow-Credentials: true
Content-Type: application/json; charset=utf-8
ETag: W/"7d-O5Dw3WvJGo8h30TqR7j8zg"
Via: 1.1 api.godaddy.com
Transfer-Encoding: chunked
 
{"code":"UNAVAILABLE_DOMAIN","message":"The specified `domain` (dr-johnstechtalk.com) isn't available for purchase","name":"ApiError"}
Now it's Wed Oct  5 15:21:55 EDT 2016
Now it's Wed Oct  5 15:22:12 EDT 2016
Now it's Wed Oct  5 15:22:30 EDT 2016
available.sh results: {"available":true,"domain":"dr-johnstechtalk.com","definitive":false,"price":11990000,"currency":"USD","period":1}
dr-johnstechtalk.com is available. Trying to buy it at Wed Oct  5 15:22:30 EDT 2016
...

These results show why i had to further refine the script to reduce the frequent false positives.

Review
What have we done? Our looping script, loop.pl, loops more aggressively during the time of day we think Network Solutions releases expired .com domains (around 2 PM EST). But just in case we’re wrong about that we’ll run it anyway at all hours of the day, but just not as quickly. So during the aggressive period we sleep just one second between calls to available.sh. When the domain finally does become available we call purchase.sh on it and exit and we write some timestamps and the domain we’ve just registered to our log file.

Performance
Miserable. This API seems tuned for relative ease-of-use, not speed. The validate call often takes, oh, say 40 seconds to return! I’m sure the purchase call will be no different. For a domainer that’s a lifetime. So any strategy that relies on speed had better turn to a registrar that’s tuned for it. GoDaddy I think is more aiming at resellers of their services.

Don’t have a linux environment handy?
Of course I’m using my own Amazon AWS server for this, but that needn’t be a barrier to entry. I could have used one of my Raspberry Pi’s. Probably even Cygwin on a Windows PC could be made to work.

Appendix A
How to remove all newline characters from your JSON file

Let’s say you have a nice JSON file which was created for you from the Documentation exercises called godaddy-json-register. It will contain lots of newline (“\n”) characters, assuming you’re using a Linux server. Remove them and put the output into a file called compact-json:

$ tr ‐d ‘\n'<godaddy‐json‐register>compact‐json

I like this because then I can still use curl rather than wget to make my API calls.

Appendix B
What an expiring domain looks like in whois

Run this from a linux server
$ whois <expiring‐domain.com>

Domain Name: expiring-domain.com
...
Creation Date: 2010-09-28T15:55:56Z
Registrar Registration Expiration Date: 2016-09-27T21:00:00Z
...
Domain Status: clientDeleteHold
Domain Status: clientDeleteProhibited
Domain Status: clientTransferProhibited
...

You see that Domain Status: clientDeleteHold? You don’t get that for regular domains whose registration is still good. They’ll usually have the two lines I show below that, but not that one. This is shown for my desired domain just a few days after its official expiration date.

2020 update

Four years later, still hunting for that domain – I am very patient! So I dusted off the program described here. Suprisingly, it all still works. Except maybe the JSON file. The onlything wrong with that was the lack of nameservers. I added some random GoDaddy nameservers and it seemed all good.

Conclusion
We show that GoDaddy’s API works and we provide simple scripts which can automate what is known as domain dropcatching. This approach should attempt to register a domain within a cople seconds of its being released – if we’ve done everything right. The GoDaddy API results are a little unstable however.

References and related
If you don’t mind paying, Fabulous.com has a domain drop catching service.
ICANN’s web site with the domain lifecycle infographic.
GoDaddy’s API documentation: http://developer.godaddy.com/
More about Raspberry Pi: http://raspberrypi.org/
I really wouldn’t bother with Cygwin – just get your hands on real Linux environment.
Curious about some of the curl options I used? Just run curl ‐‐help. I left out the description of the switches I use because it didn’t fit into the narrative.
Something about my Amazon AWS experience from some years ago.
All the perl tricks I used would take another blog post to explain. It’s just stuff I learned over the years so it didn’t take much time at all.
People who buy and sell domains for a living are called domainers. They are professionals and my guide will not make you competitive with them.
Categories
Exchange Online Internet Mail

Web forms: creating today’s Open Relays

Intro
Maybe it’s just me, but I’ve been receiving a lot of non-delivery reports in the past couple weeks. I happen to receive email addressed to webmaster@<large company>.com and as well I am knowledgeable about how email works. This puts me in the rare position of knowing how to interpret the meaning of the many NDRs I started to see.

The details
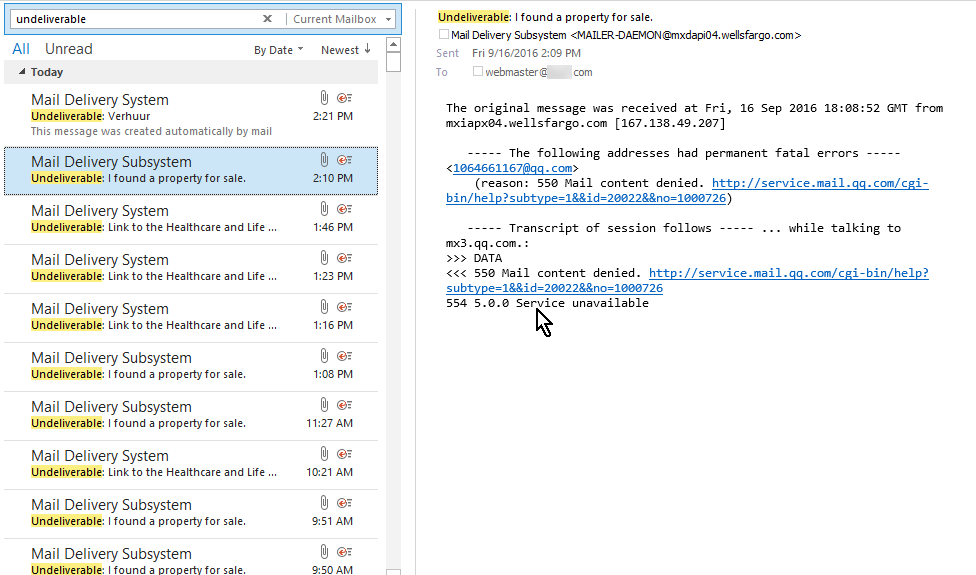
This picture shows the actual state of my inbox if I look for NDRs by searching for the word undeliverable:

NDRs-2016-09-16_14-22-17

Included is the preview panel showing the contents of one of those messages from Wells Fargo.

Actions
Personally, I can live with this level of clutter in my inbox – I actually get hundreds of messages a day like many IT folks. But I put this into a larger context. As a responsible Netizen (not sure if anyone really uses that term, but it was a useful one!) I feel a responsibility to keep the Internet running in an orderly way and stop the abusers as quickly as possible. After all I owe my job to a well-functioning Internet. So I decided rather than to do the easy thing – write rules to shunt these aside, or let clutter go to work, or junk email them, I was going to try to go after the source. Actually sources because you may have noticed that there are multiple domains involved.

First analysis
I thought about how these emails could have originated. I thought, OK, someone spoofs the email address webmaster@<large company>.com, they find a reputable mail server somewhere on the Internet; this mail server has to be an open relay. So the first few mail servers I checked out on Mxtoolbox didn’t show any problems or complaints whatsoever – sterling reputations. Turns out that way of thinking is soooo 20th century. Excusable in my case because I was already running sendmail in the 20th century and in those days that was some of the biggest worries – running an open relay.

Upon further reflection
Someone mentioned it’s probably a web form and I thought, Yes. Did you ever see those forms, like, Share this web page, that allow you to enter your email address and send something to a friend – which they will receive as apparently coming from you? What if in addition you could add your own custom message? Well, that’s the modern way of turning a mail server into an open relay.

The fatal recipe
A web form with the following properties is an open relay enabler:

– permits setting sender address
– permits setting recipient address
– has a comment field which will get sent along to the recipient
– does not employ captcha technology

Only visible from its side effects
The thing is, I am only receiving the NDRs, in other words those emails which had a spoofed sender address (my webmaster address) and a recipient address which for whatever reason decided not to accept the message. The “open relay,” failing to send the message, sends the failure notice to the spoofed sender: my webmaster account. But this NDR does not contain the original message, just vestigial hints about the original message, such as what server it was sent from, who was the recipient and sender, what the subject line was (sometimes), and when the receiving system complained. If a spam email was successfully sent in my name I never get to see it!

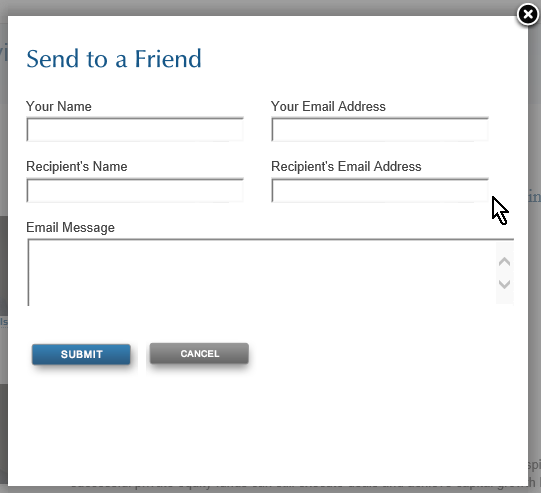
But I was able to actually find one of these dangerous forms that is being abused. Here it is:

open-relay-web-form-2016-09-16_14-41-28

Of course some of these forms are more restrictive than others. And almost all share the characteristic that they always put certain words into the subject and perhaps the body as well, which is beyond the control of the abuser. But that free-form message field is gold for the abuser and allows them to put their spammy or malicious message into the body of the email.

So after checking out a few of these domains for open relay and coming up empty, I do think all the abuse was done through too-lenient web pages. So I guess that is the current method of creating a de facto open relay.

Results
I’ve written very well-informed emails, initially trying to send to abuse@<domain>.com. But I also got more creative, in some cases tracing the domain to an ISP and looking up how to contact that ISP’s abuse department. I’m kind of disappointed that Wells Fargo hasn’t responded. Many other ISPs did. I believe that some have already corrected the problem. Meanwhile new ones crop up.

Over the weeks I’ve worked – successfully – with several offenders. Each one represented unique aspects and I had to do some IT detective work to track down someone who wuold be likely to respond. The ones who haven’t cooperated at all are overseas. Here is the wall of shame:

ecritel.fr (handles emails for marieclaire.fr web site)
ifastfinancial.com
RTHK.com.hk

Update
After about a week Wells Fargo did give a brief reply. They did not ask for any details. But the spam from their server did stop as far as I can tell.

If it turns into a never-ending battle I will give up, except perhaps to spend a few minutes a day.

Permanent fix
I don’t know the best way to fix this. I used to be a fan of SPF, but its limitations make it impossible for some large companies who need to have too many third parties sending email on their behalf. I guess Google is pushing DMARC, but I haven’t had time to think through if it’s feasible for large enterprises.

Conclusion
Poorly constructed web forms are the new open relay enablers. Be very careful before creating such a form and at a minimum use good captcha technology so its usage can not be automated.

This is speculation but I would not be surprised to learn that there is a marketplace for a listing of all the poorly constructed web forms out there – that information could be very valuable to spammers who have been increasingly shut out of our inboxes by improved anti-spam detection.

References and related
I found this site helpful in finding valid contacts for a domain: abuse.net. You enter the domain and spits back a couple of valid abuse contact addresses.
I only reluctantly use Mxtoolbox. It’s like a necessary evil. So i don’t want to give out a link for it. Probably nearly as good to check out a mail server’s reputation is senderbase.org. They’re not trying to sell you anything.
DMARC – perhaps the email authentication mechanism of the future.
My old post advocating SPF, which just never caught on…
PHPMailer remote code execution explanation, which takes advantages of web forms used to send email.

Categories
Consumer Tech

Consumer Tech: Getting pictures off the Samsung Galaxy S7

Intro
This is simple enough, but I keep forgetting how to do it since I only do it every few months. And the options provided seem almost limitless. Still, this approach works best in my opinion.

The details
Plug USB cable from phone into PC.
You may see initial pop-up asking what you’d like to do. I would choose Import files.
Look in File Explorer for the phone. You’ll see when you expand it that there are no files beneath it.
Go to phone. Pull down the status bar by dragging from the top.
One of the notifications concerns what to do when the USB cable is plugged in. The default is charge. Change it to share files.
The phone does not remember this setting. You need to repeat this every time you plug it into a PC and want to transfer your pictures! At least that’s my experience.
Now you can expand the phone in File Explorer and find your pictures in a DCIM folder.

Conclusion
The old-fashioned way of using USB cable to transfer pictures is best. They’ve moved things around however so older advice is no longer applicable.

Categories
Consumer Tech

Consumer Tech: Fitbit Charge tracker disconnected solution

Intro
I don’t want to oversell this solution. But let’s face it, you can lose hours and you probably will if you start rummaging through Fitbit’s own community forums on the solution of what to do when your Fitbit Charge or Charge HR doesn’t sync. You pick up a lot of bad and irrelevant and desperate advice.

What worked for me – the long story

Obviously there can be many reasons this may be happening: Bluetooth is off, Bluetooth pairing has been dropped, perhaps low battery, but those ar things you’d think of on your own, right, and anyway they’d be accompanied by other symptoms.

I have a Windows phone. Fitbit has an app through the Windows store. The syncing has always been very finicky. With my Charge HR I would sometimes have to try and re-try the sync for several minutes. Other times it would work right away. I couldn’t use either my home laptop or home desktop computer – both Dells – because the Windows 10 upgrade I did seemed to have wiped out the Bluetooth driver.

Then one day my spouse bought a Fitbit Alta and the helpful guy at Best Buy “helpfully” added her Fitbit and all her information to my account. You see I had commandeered her Samsung phone as well in a desperate attempt to find some device that would sync my Charge HR. It was a total mess. One day her steps overrode my steps and got synced backwards to my Charge! And it was 6000 steps fewer! So I got the idea to log out of my account. I logged back in and the sync worked quickly (quick means about 30 seconds in my experience). Since then I’ve done that a couple more times and both times I was able to sync right away after logging back in.

The summary
For Windows Phone when you can’t sync, and see the message Tracker disconnected when you know full well it has good batteries, it helps to log out of your Fitbit account and log right back in.

Conclusion
Syncing Fitbits is a finicky business in my experience. Their online help is mediocre and will just as likely lead you down the wrong path. Oh, and the wireless dongle that came with my Charge doesn’t fit the device! But I still like the devices overall – guess I got used to them. hopefully this trick to sync a Charge or Charge HR will help someone.

But don’t get me started on what happens when your battery begins to go.