Intro
As I understood it, this week’s NPR puzzle is as follows. Think of a figure from the Bible with five letters. Move each letter three back, e.g., an “e” becomes a “b.” Find the Biblical figure which becomes an ailment after doing this transformation.
Initial thoughts
I figured this would be eminently amenable to some simple linux commands like I’ve done with previous puzzles (most are not, by the way). I was having a hard time doing these transformations in my head while I was driving, and the first names I tried came up empty, such as Jesus or Moses.
So I figured I could write a program to do the character transformations on each and every word and I could probably find a downloadable text version of the Bible. I didn’t find a pure text version, but I did download an HTML version, which is close enough for our purposes.
Then I was going to just keep the five-letter words and do this transformation on all of them and match against dictionary words. Then I would have taken just those matches and scanned by hand to look for words that are ailments, hoping there wouldn’t be too many matched words to contend with.
Finally settled on a different approach
That looked like a bit of work so I thought about it and decided there had to be a resource for just the figures in the Bible, and voila, there is, in Wikipedia, see the references.
rot13
Rot13 is a famous cipher (encryption is too strong a word to describe this simple approach), where A becomes N, B becomes O, etc. I had a feeling the tr command in linux might be able to do this but didn’t know how. So I searched for linux, tr and rot13 and found an example online. It was easy to adapt.
We need what you could call a rot -3. Here is the command.
$ tr 'A‐Za‐z' 'X‐ZA‐Wx‐za‐w'
So I put the text of the Wikipedia page of Biblical figures into a text file on my linux server, into a file called list-of-biblical-figures. It looks like this:
Adam to David according to the Bible
Creation to Flood

    Adam Seth Enos Kenan Mahalalel Jared Enoch Methuselah Lamech Noah Shem

Cain line

    Adam Cain Enoch Irad Mehujael Methusael Lamech Tubal-cain

Patriarchs after Flood

    Arpachshad Cainan Shelah Eber Peleg Reu Serug Nahor Terah Abraham Isaac Jacob

Tribe of Judah to Kingdom

    Judah Perez Hezron Ram Amminadab Nahshon Salmon Boaz Obed Jesse David
...
Adam to David according to the Bible
Creation to Flood
Adam Seth Enos Kenan Mahalalel Jared Enoch Methuselah Lamech Noah Shem
Cain line
Adam Cain Enoch Irad Mehujael Methusael Lamech Tubal-cain
Patriarchs after Flood
Arpachshad Cainan Shelah Eber Peleg Reu Serug Nahor Terah Abraham Isaac Jacob
Tribe of Judah to Kingdom
Judah Perez Hezron Ram Amminadab Nahshon Salmon Boaz Obed Jesse David
...
I was going to tackle just pulling the figures with five-character names, but the whole list isn’t that long so I skipped even that step and just put the list through as is:
So it’s all gibberish as you might hope. Then towards the end you come across this one thing and it just pops out at you. As is my custom I won’t give it away before the deadline. [update] OK. Submission deadline has passed. Ebola just really popped out. Going back to the original text, you see it lines up with Herod. So there you have it.
I double-checked and confirmed this also works on a Raspberry Pi. I’ve come to realize that most people don’t have their own server, but hundreds of thousands or perhaps millions have a Raspberry Pi, which is a linux server, which makes techiques like this accessible. And fun.
Conclusion
I show a technique for using a linux server such as a Raspberry Pi to solve this week’s NPR puzzle. A very simple approach worked. In fact I was able to solve the puzzle and write this post in about an hour!
Intro I write this knowing I still don’t know anything to speak of about syslog, but, sometimes you gotta act without knowing. I needed to send syslog to somewhere in a big hurry so I figured out the absolute minimum I needed to do to get it running on one of my other systems.
The details This all started because of a deficiency in the F5 ASM. At best it’s do slow when looking through the error log. But in particular there was one error that always timed out when I tried to bring up the details, a severity 5 error, so it looked pretty important. Worse, local logging, even though it is selected, also does not work – the /var/log/asm file exists but contains basically nothing of interest. I suppose there is some super-fancy and complicated MySQL command you could run to view the logs, but that would take a long time to figure out.
So for me the simplest route was to enable remote syslog on a Linux server and send the ASM logging to it. This seems to be working, by the way.
The minimal steps Again, this was for Suse Enterprise Linux running syslog-ng.
modify /etc/sysconfig/syslog as per the next step
SYSLOGD_PARAMS=”-r”
modify /etc/syslog-ng/syslog-ng.conf as per the next step
uncomment this line: udp(ip(“0.0.0.0”) port(514));
launch yast (I use curses-based yast [no X-Windows] which is really cantankerous)
go to Security and Users -> Firewall -> Allowed services -> Internal Zone -> Advanced
add udp port 514 as additional allowed Ports in internal zone and save it
service syslog stop
service syslog start
You should start seeing entries in /var/log/localmessages as in this suitably anonymized example (I added a couple line breaks for clarity:
Observations Interestingly, there is no syslogd on this particular system, and yet the “-r” flag is designed for syslogd – it’s what turns it into a remote syslogging daemon. And yet it works.
It’s easy enough to log these messages to their own file, I just don’t know how to do it yet because I don’t need to. I learn as I need to. just as I learned enough to publish this tip.
Conclusion We have demonstrated activating the simplest possible remote syslogger on Suse Linux Enterprise Server.
Intro
If I had more time and more energy, what I’d like is to explore the Interplanetary Filesystem, perhaps put up a server and create some objects. It seems right up my alley as I was an early adapter and put up one of the first web servers on the Internet. IPFS combines a lot of m interests: Linux (it extends the filesystem), web and computer science concepts.
But I don’t have spare time. Maybe later this year…
One year later
OK, I just heard on the Reveal podcast about an invidious use for IPFS. Although I was too busy before, now I’m simply loathe to embrace a technology that’s been embraced by the alt-right. Specifically, i have heard that Rob Monster has stored hate speech manifestos using IPFS and thereby using IPFS to create what is being called an alt-tech stack (their own web browser, social media sites, streaming video sites, etc, etc). It’s a shame.
Intro
I was confronted with a web site certificate error. A user was reluctant – correctly – to proceed to an internal web site because he saw a message to the effect:
I tried it myself with IE and got the same thing.
Switch to Chrome and I saw this error:
I wouldn’t bother to document this one except for a twist: the certificate error went away in IE when you clicked through to the login page.
Furthermore, when I examined the certificate with a tool I trust, openssl, it showed the date was not expired.
So what’s going on there?
The details
First thing I dug into was Chrome. I found this particular error can occur if you have an internal certificate issued with a valid common name, but without a Subject Alternative Name. My openssl examination confirmed this was indeed the case for this certificate.
So I decided the Chrome error was a red herring. And confirmed this after checking out other internal web sites which all suffered from this problem.
But that still leaves the IE error unexplained.
As I mentioned in a previous post, I created a shortcut bash function that combines several openssl functions I call examinecert:
Certificate:
    Data:
        Version: 3 (0x2)
        Serial Number:
            04:17:21:b7:12:94:3a:fa:fd:a8:f3:f8:5e:2e:e4:52:35:71
    Signature Algorithm: sha256WithRSAEncryption
        Issuer: C=US, O=Let's Encrypt, CN=Let's Encrypt Authority X3
        Validity
            Not Before: Apr  4 08:34:56 2018 GMT
            Not After : Jul  3 08:34:56 2018 GMT
        Subject: CN=drjohnstechtalk.com
        Subject Public Key Info:
            Public Key Algorithm: rsaEncryption
                Public-Key: (2048 bit)
                Modulus:
                    00:d3:50:98:6d:72:03:b2:e4:01:3f:44:01:3d:eb:
                    ff:fc:68:7d:51:a4:09:90:48:3c:be:43:88:d7:ba:
                    ...
        X509v3 extensions:
                 ...
            X509v3 Subject Alternative Name:
                DNS:drjohnstechtalk.com
                ...
Certificate:
Data:
Version: 3 (0x2)
Serial Number:
04:17:21:b7:12:94:3a:fa:fd:a8:f3:f8:5e:2e:e4:52:35:71
Signature Algorithm: sha256WithRSAEncryption
Issuer: C=US, O=Let's Encrypt, CN=Let's Encrypt Authority X3
Validity
Not Before: Apr 4 08:34:56 2018 GMT
Not After : Jul 3 08:34:56 2018 GMT
Subject: CN=drjohnstechtalk.com
Subject Public Key Info:
Public Key Algorithm: rsaEncryption
Public-Key: (2048 bit)
Modulus:
00:d3:50:98:6d:72:03:b2:e4:01:3f:44:01:3d:eb:
ff:fc:68:7d:51:a4:09:90:48:3c:be:43:88:d7:ba:
...
X509v3 extensions:
...
X509v3 Subject Alternative Name:
DNS:drjohnstechtalk.com
...
I tried to show a friend the error. I could no longer get IE to show a certificate error. So my friend tried IE. He saw that initial error.
Most people give up at this point. But my position is the kind where problems no one else can resolve go to get resolution. And certificates is somewhat a specialty of mine. So I was not ready to throw in the towel.
I mistrust all browsers. They cache information, try to present you sanitized information. It’s all misleading.
So I ran examinecert again. This time I got a different result. It showed an expired certificate. So I ran it again. It showed a valid, non-expired certificate. And again. It kept switching back-and-forth!
Here it helps to know some peripheral information. The certificate resides on an old F5 BigIP load-balancer which I used to run. It has a known problem with updating certificate if you merely try to replace the certificate in the SSL client profile. It’s clear by looking at the dates the certificate had recently been renewed.
So I now had enough information to say the problem was on the load balancer and I could send the ticket over to the group that maintains it.
As for IE’s strange behavior? Also explainable for the most part. After an initial page with the expired certificate, if you click Continue to this web site it re-loads the page and gets the Good certificate so it no longer shows you the error! So when I clicked on the lock icon to examine the certificate, I always was getting the good version. In fact – and this is an example of the limitation of browsers like IE -you don’t have the option to examine the certificate about which it complained initially. Then IE caches this certificate I think so it persists sometimes even after closing and re-launching the browser.
Case closed.
Conclusion
An intermittent certificate error was explained and traced to a bad load balancer implementation of SSL profiles. The problem could only be understood by going the extra mile, being open-minded about possible causes and “using all my senses.” As I like to joke, that’s why I make the medium bucks!
Intro
Did you ever want to learn about a domain registration but were put off by the hard sell tactics that basically all web-based whois searches subject you to? Me, too. Here’s what you can do.
The details
Linux – so that includes you, Raspberry Pi owners – has a little utility called whois which you can use to get the registrant information of a domain, e.g.,
Admittedly that did not tell us much, but it points us to another whois server we can try, whois.godaddy.com. So try that:
$ whois ‐h whois.godaddy.com johnstechtalk.com
Domain Name: JOHNSTECHTALK.COM
Registry Domain ID: 1795918838_DOMAIN_COM-VRSN
Registrar WHOIS Server: whois.godaddy.com
Registrar URL: http://www.godaddy.com
Updated Date: 2017-03-27T00:52:50Z
Creation Date: 2013-04-23T00:54:17Z
Registrar Registration Expiration Date: 2019-04-23T00:54:17Z
Registrar: GoDaddy.com, LLC
Registrar IANA ID: 146
Registrar Abuse Contact Email: [email protected]
Registrar Abuse Contact Phone: +1.4806242505
Domain Status: clientTransferProhibited http://www.icann.org/epp#clientTransferProhibited
Domain Status: clientUpdateProhibited http://www.icann.org/epp#clientUpdateProhibited
Domain Status: clientRenewProhibited http://www.icann.org/epp#clientRenewProhibited
Domain Status: clientDeleteProhibited http://www.icann.org/epp#clientDeleteProhibited
Registry Registrant ID: Not Available From Registry
Registrant Name: ******** ******** (see Notes section below on how to view unmasked data)
Registrant Organization:
Registrant Street: ***** ****
Registrant City: Newton
Registrant State/Province: New Jersey
Registrant Postal Code: 078**
Registrant Country: US
Registrant Phone: +*.**********
Registrant Phone Ext:
Registrant Fax:
Registrant Fax Ext:
Registrant Email: ********@*****.***
Registry Admin ID: Not Available From Registry
Admin Name: ******** ******** (see Notes section below on how to view unmasked data)
...
So now we’re getting somewhere. So GoDaddy tries to force you to their web page an sell you stuff in any case. Not at all surprising for anyone who’s ever been a GoDaddy customer (includes yours truly). Because that’s what they do. But not all registrars do that.
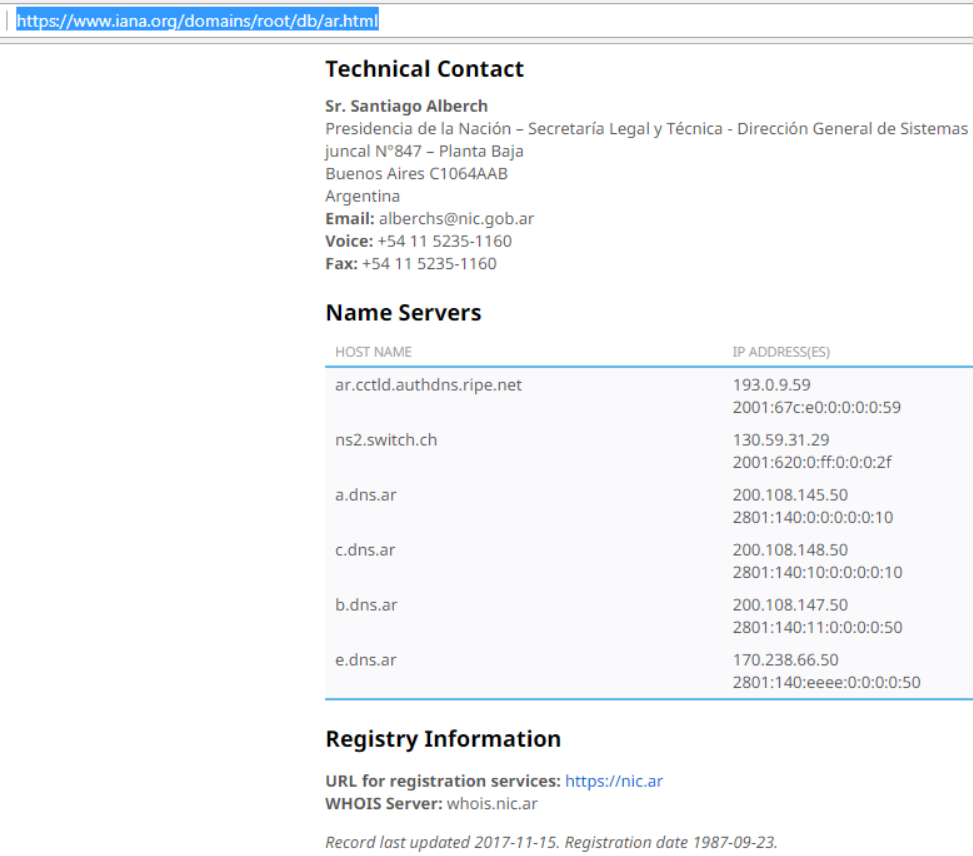
Here’s a real-life example which made me decide this technique should be more broadly disseminated. I searched for information on a domain in Argentina:
$ whois buenosaires.com.ar
This TLD has no whois server, but you can access the whois database at
http://www.nic.ar/
This TLD has no whois server, but you can access the whois database at
http://www.nic.ar/
Now if you actually try their suggested whois server, it doesn’t even work:
$ whois ‐h www.nic.ar buenosaires.com.ar
Timeout.
Timeout.
What you can do to find the correct whois server is use iana – Internet Assigned Numbers Authority – namely, this page:
So for Argentina I clicked on .ar (I expected to find a separate listing for .com.ar but that was not the case), leading to the page:
See it? At the bottom it shows Whois server: whois.nic.ar. So I try that and voila, meaningful information is returned, no ads accompanying:
$ whois ‐h whois.nic.ar buenosaires.com.ar
% La información a la que estás accediendo se provee exclusivamente para
% fines relacionados con operaciones sobre nombres de dominios y DNS,
% quedando absolutamente prohibido su uso para otros fines.
%
% La DIRECCIÓN NACIONAL DEL REGISTRO DE DOMINIOS DE INTERNET es depositaria
% de la información que los usuarios declaran con la sola finalidad de
% registrar nombres de dominio en ‘.ar’, para ser publicada en el sitio web
% de NIC Argentina.
%
% La información personal que consta en la base de datos generada a partir
% del sistema de registro de nombres de dominios se encuentra amparada por
% la Ley N° 25326 “Protección de Datos Personales” y el Decreto
% Reglamentario 1558/01.

domain:         buenosaires.com.ar
registrant:     50030338720
registrar:      nicar
registered:     2012-07-05 00:00:00
changed:        2017-06-27 17:42:45.944889
expire:         2018-07-05 00:00:00

contact:        50030338720
name:           TRAVEL RESERVATIONS SRL
registrar:      nicar
created:        2013-09-05 00:00:00
changed:        2018-04-17 13:14:55.331068

nserver:        ns-1588.awsdns-06.co.uk ()
nserver:        ns-925.awsdns-51.net ()
nserver:        ns-1385.awsdns-45.org ()
nserver:        ns-239.awsdns-29.com ()
registrar:      nicar
created:        2016-07-01 00:02:28.608837
% La información a la que estás accediendo se provee exclusivamente para
% fines relacionados con operaciones sobre nombres de dominios y DNS,
% quedando absolutamente prohibido su uso para otros fines.
%
% La DIRECCIÓN NACIONAL DEL REGISTRO DE DOMINIOS DE INTERNET es depositaria
% de la información que los usuarios declaran con la sola finalidad de
% registrar nombres de dominio en ‘.ar’, para ser publicada en el sitio web
% de NIC Argentina.
%
% La información personal que consta en la base de datos generada a partir
% del sistema de registro de nombres de dominios se encuentra amparada por
% la Ley N° 25326 “Protección de Datos Personales” y el Decreto
% Reglamentario 1558/01.
domain: buenosaires.com.ar
registrant: 50030338720
registrar: nicar
registered: 2012-07-05 00:00:00
changed: 2017-06-27 17:42:45.944889
expire: 2018-07-05 00:00:00
contact: 50030338720
name: TRAVEL RESERVATIONS SRL
registrar: nicar
created: 2013-09-05 00:00:00
changed: 2018-04-17 13:14:55.331068
nserver: ns-1588.awsdns-06.co.uk ()
nserver: ns-925.awsdns-51.net ()
nserver: ns-1385.awsdns-45.org ()
nserver: ns-239.awsdns-29.com ()
registrar: nicar
created: 2016-07-01 00:02:28.608837
2nd example: goto.jobs
I actually needed this one! So I learned of a domain goto.jobs and I wanted to get some background. So here goes…
$ whois goto.jobs
getaddrinfo(jobswhois.verisign-grs.com): Name or service not known
getaddrinfo(jobswhois.verisign-grs.com): Name or service not known
So off to a bad start, right? So we hit up the .jobs link on iana, https://www.iana.org/domains/root/db/jobs.html, and we spy a reference to their whois server:
Registry Information
This domain is managed under ICANN's registrar system. You may register domains in .JOBS through an ICANN accredited registrar. The official list of ICANN accredited registrars is available on ICANN's website.
URL for registration services: http://www.goto.jobs
WHOIS Server: whois.nic.jobs
So we try that:
$ whois ‐h whois.nic.jobs goto.jobs
   Domain Name: GOTO.JOBS
   Registry Domain ID: 91478530_DOMAIN_JOBS-VRSN
   Registrar WHOIS Server: whois-all.nameshare.com
   Registrar URL: http://www.nameshare.com
   Updated Date: 2018-03-29T20:08:46Z
   Creation Date: 2010-02-04T23:54:33Z
   Registry Expiry Date: 2019-02-04T23:54:33Z
   Registrar: Name Share, Inc
   Registrar IANA ID: 667
   Registrar Abuse Contact Email:
   Registrar Abuse Contact Phone:
   Domain Status: clientTransferProhibited https://icann.org/epp#clientTransferProhibited
   Name Server: KATE.NS.CLOUDFLARE.COM
   Name Server: MARK.NS.CLOUDFLARE.COM
   Name Server: NS1.REGISTRY.JOBS
   Name Server: NS2.REGISTRY.JOBS
   DNSSEC: unsigned
   URL of the ICANN Whois Inaccuracy Complaint Form: https://www.icann.org/wicf/
>>> Last update of WHOIS database: 2018-04-23T18:54:31Z <<<
Domain Name: GOTO.JOBS
Registry Domain ID: 91478530_DOMAIN_JOBS-VRSN
Registrar WHOIS Server: whois-all.nameshare.com
Registrar URL: http://www.nameshare.com
Updated Date: 2018-03-29T20:08:46Z
Creation Date: 2010-02-04T23:54:33Z
Registry Expiry Date: 2019-02-04T23:54:33Z
Registrar: Name Share, Inc
Registrar IANA ID: 667
Registrar Abuse Contact Email:
Registrar Abuse Contact Phone:
Domain Status: clientTransferProhibited https://icann.org/epp#clientTransferProhibited
Name Server: KATE.NS.CLOUDFLARE.COM
Name Server: MARK.NS.CLOUDFLARE.COM
Name Server: NS1.REGISTRY.JOBS
Name Server: NS2.REGISTRY.JOBS
DNSSEC: unsigned
URL of the ICANN Whois Inaccuracy Complaint Form: https://www.icann.org/wicf/
>>> Last update of WHOIS database: 2018-04-23T18:54:31Z <<<
Better, but it seems to merely point to a registrar and its whois server:
Bingo! We have hit pay dirt. We have meaningful information about the registrant – an address, phone number and email address – and received no obnoxious ads in return. For me it’s worth the extra steps.
ICANN: another alternative
Most registrar’s whois sites are rate-limited. ICANN’s is not. And they also do not sic ads on you. It is
https://whois.icann.org/en/lookup?name=
ICANN, for the record, it the body that decides what goes on in DNS namespace, for instance, what new gTLDS should be added. You can use its whois tool for all gTLDs, but not in general for ccTLDs.
whois is undergoing changes due to GDPR. Especially the “social” information of the contacts: registrant, admin and technical contacts will be masked, except for perhaps state and country, in the future. But whois is slowly dying and a new standard called RDAP will take its place.
Intro
I am not going to attempt to provide a guide as there are much better guides out there than anything I can produce.
In addition to the arcade function, we wanted to display a slidedeck when not being used for gaming.
Two main approaches I see are
1) install RetroPie, then add X packages
2) install Raspbian, then install RetroPie on top of that
The reason we want X is to run a presentation software such as pipresents, which we are already familiar with.
For approach 1) I roughly followed this installation order.
Notes Install lightdm and lxde
This takes a long time, maybe 30 minutes:
sudo apt install lxde lxde-core lxterminal lxappearance
sudo apt install lightdm
sudo apt-get install xutils
sudo apt-get install xserver-xorg
But one of my games didn’t run properly afterwards, so I am focused on method 2) for now.
I’m having trouble running startx from a non-console terminal. One thing I’m trying is:
sudo usermod -a -G tty pi
sudo apt-get install xserver-xorg-legacy
These two commands still didn’t do the trick, so I edited this file
/etc/X11/Xwrapper.config
and replaced allowed_user=console with allowed_users=anybody, and that worked! Once.
Then I installed RetroPie, turned it off so it does not autostart, and tried startx from a non-console terminal and I see this error:
(EE) xf86OpenConsole: Cannot open virtual console 2 (Permission denied)
(EE) xf86OpenConsole: Cannot open virtual console 2 (Permission denied)
then I re-installed xserver-xorg-legacy and startx once again worked. Hmm.
The instructions for installing RetroPie on top of an existing Raspbian installation are here:
https://retropie.org.uk/docs/Manual-Installation/
You should be comfortable with the linux command line. In the end I like this method of installation the best. I’ve done it several times now.
Equipment ideas
These $15 speakers https://www.amazon.com/gp/product/B003JTHO3U/ref=oh_aui_detailpage_o01_s01?ie=UTF8&psc=1 only use the USB port for power. They have a standard mini-stereo jack that is compatible with the Pi. I bought them. The Pi has enough juice to power them, which is convenient.
I went with NES (Nintendo Entertainment System) games. This pair of USB controllers I am told are a good approximation of the real thing: https://www.amazon.com/gp/product/B075ZN1GXK/ref=oh_aui_detailpage_o02_s00?ie=UTF8&psc=1. they’re only about $14. Two player arcade quality controller from Recroommasters. About $349.
How to configure two player setup when you have an arcade-style console with only one USB connection
I find the documentation available on the Internet on this particular topic is terrible. In fact I never did find it. This YouTube video was just created. Although it’s specific to their Xtension console it looks to me applicable to any similar console:
Configuration
It takes a little getting used to. There are two main places where you do some configuration. There’s the RetroPie Configuration. Then there’s the emulationstation menu. The main thing to do from the emulationstation menu, which is launched by clicking Start from the main emulationstation screen, is to map the controller keys. For instance I program for an NES controller at home, and bring it to school where there is a cool two-player arcade-style controller which will have to be re-mapped.
The RetroPie configuration shows up from the main screen when you hit the down arrow key or something like that, then A. From here you can launch traditional raspi-config. I also used it to go into RetroPie setup, then into configuration and have emulationstation autolaunch at boot-up. You can also do a reboot from RetroPie setup.
Sound
To force sound out of the 3.5 mm stereo jack, go to RetroPie Configuration|RetroPie Setup|Configuration/tools|801 – audio settings|Headphones – 3.5 mm jack.
To get volume to 100% which you will need with the speakers I list below, go to emulation station menu|sound settings|system volume. By default it seems to be 77% which just isn’t enough juice.
Intro
Sometimes you don’t have the tools you want but you have enough to make do. Such is the case with the command line utilities of the CLI of Checkpoint Gaia. It’s like a basic Linux. The company I consult for is beginning to hit some bandwidth limits and I wanted to understand overall traffic flow better. In the absence of any proper bandwidth monitors I used the netstat command and some approximations. Crude thouigh it may be it already gave me a much better idea about my traffic than I had going into this project.
#!/bin/bash
# for Gaia, not IPSO
c=0
sleep=2
while /bin/true; do
  v[1]=`netstat -Ieth1-01 -e|grep RX|grep TX`
  n[1]="vlan 102           "
  v[2]=`netstat -Ieth1-05 -e|grep RX|grep TX`
  n[2]="vlan 103 200.78.39    "
  v[3]=`netstat -Ieth1-02 -e|grep RX|grep TX`
  n[3]="vlan 103 10.31.42"
  v[4]=`netstat -Ieth1-03 -e|grep RX|grep TX`
  n[4]="trunk for VPN      "
# interesting line:
#           RX bytes:4785585828883 (4.3 TiB)  TX bytes:7150474860130 (6.5 TiB)
  date
  for i in {1..4}; do
    RX=`echo ${v[$i]}|cut -d: -f2|awk '{print $1}'`
    TX=`echo ${v[$i]}|cut -d: -f3|awk '{print $1}'`
#    echo "vlan ${n[$i]}        RX,TX: $RX, $TX"
    if [ $c -gt 0 ]; then
      RXdiff=`expr $RX - ${RXold[$i]}`
      TXdiff=`expr $TX - ${TXold[$i]}`
# observed scaling factor: 8.1 bits/byte
      RXrate=$(($RXdiff*81/$sleep/10000000))
      TXrate=$(($TXdiff*81/$sleep/10000000))
      echo "${n[$i]}    RX,TX: $RXrate, $TXrate Mbps"
    fi
# old values
    RXold[$i]=$RX
    TXold[$i]=$TX
  done
  c=$(( $c + 1 ))
  sleep $sleep
done
It’s pretty self-explanatory. I would just note that in the older IPSO OS you don’t have the ability to get the bytes transferred from netstat. Just the number of packets, which is an inherently cruder measure. The calibration of 8.1 bits per byte (there is overhead from the frames) is maybe a little crude but it’s what I measured over the source of a couple minutes.
A quick glance at Redhat or CentOS shows me that this same script, with appropriate modifications for the interface names (eth0, eth1, etc), would also work on those OSes.
IPSO
I really, really wanted some kind of measure for IPSO as well. So I tackled that as best I could. Here is that script:
#!/bin/bash
# for IPSO, not Gaia
c=0
while [ 1 -gt 0 ]; do
# eth1-01: vlan 802; eth1-05: vlan 803 (144.29); eth1-02: vlan 803 (10.201.145)
  v[1]=`netstat -Ieth-s4p1|tail -1`
  n[1]="vlan 208.129.99     "
  v[2]=`netstat -Ieth-s4p2|tail -1`
  n[2]="vlan 208.156.254     "
  v[3]=`netstat -Ieth-s4p3|tail -1`
  n[3]="vlan 208.149.129     "
  v[4]=`netstat -Ieth-s4p4|tail -1`
  n[4]="trunk for Cisco and b2b"
# interesting line:
#Name         Mtu   Network     Address             Ipkts Ierrs    Opkts Oerrs  Coll
#eth-s4p1     16018 <Link>      0:a0:8e:c4:ff:f4 72780201     0 56423000     0     0
  date
  for i in {1..4}; do
    RX=`echo ${v[$i]}|awk '{print $5}'`
    TX=`echo ${v[$i]}|awk '{print $7}'`
#    echo "vlan ${n[$i]}        RX,TX: $RX, $TX"
    if [ $c -gt 0 ]; then
      RXdiff=$(($RX - ${RXold[$i]}))
      TXdiff=$(($TX - ${TXold[$i]}))
# observed: .0043 mbits/packet
      RXrate=$(($RXdiff*43/100000))
# observed: .0056 mbits/packet
      TXrate=$(($TXdiff*56/100000))
      echo "${n[$i]}    RX,TX: $RXrate, $TXrate Mbps"
    fi
# old values
    RXold[$i]=$RX
    TXold[$i]=$TX
  done
  c=$(( $c + 1 ))
  sleep 10
done
The conversion to bits is probably only accurate to +/- 25%, because it depends a lot on the application, i.e., VPN concentrator versus proxy server. I just averaged all applications together because that’s the best I could do. I compared it to a Cisco router’s statistics.
Note that in Gaia cpview can also be run frmo the CLI. Then you can drill down to the specific interface information. I have compared my script to using cpview (which has a default update screen time of 2 seconds) and they’re pretty close. As far as I know there is no way to script cpview. And at the end of the day I suspect it is only doing the same thing my script does.
Conclusion
A script is provided which gives a measure of Mbps bandwidth usage by polling netstat periodically. It’s not exact, but even crude measures can help a network engineer.
Intro
In my previous post I showed how to turn a Raspberry Pi plus USB camera into something like an IP camera. In the course of that work I found it wasn’t so easy as it was in the past to assign static IPs upon boot. So I came up with my own unique method, which combines a modicum of Linux knowledge with a dash of networking knowledge.
The requirements
I sort of invented these requirements for myself, putting myself in the pickle I found myself in. I am working with a friend’s Pi 3 and didn’t want to mess it up too badly. Yet I wanted to easily work with it at home, and for the Robotics team. How to do it all?
I decided to permit the DHCP client, now called dhcpcd, running. So it will assign an IP address and appropriate gateway if there is a DHCP server present on the network. When I test at home I sometimes don’t use DHCP. When I bring my test setup to Robotics, more often than not I have my own little isolated LAN and no DHCP server. So, knowing that a single interface can have two or even more than two IP adresses, I created the following list of requirements for myself.
Act as DHCP client if there is DHCP server.
Additionally,
Assign static IP of 192.168.1.161/24 so it works in my home.
Assign another static IP of 10.31.42.15 so it works with a predictable IP in the robotics environment.
Let the two above IP assignments work even in the absence of a DHCP server!
Sounds kind of simple, but it’s not so easy.
I’m running a Raspberry Pi 3 with Raspbian Stretch (the release after Jessie).
Initial approach
With this version you’re supposed to use the file
/etc/dhcpcd.conf
to create a static IP.
But it works like c**p, at least when you want to push it and have it meet all the requirements above. It’s got a bug and doesn’t allow you to meet all the above requirements. I experimented. But my method does work.
The final solution
So in the end I leave /etc/dhcpcd.conf alone!
I use this new (to me) feature that crontab has an @reboot feature that calls its argument at boot time – just what we need.
Then I combined some old school use of ifconfig plus newer school command ip.
Here’s the script, which I call ip-assign.sh.
#!/bin/bashsleep2# see if there is a dhcp-assigned IP already. If so 'scope global' appears in the listing# ip add show eth0 sample output:addflag=""ip add show eth0|grep-q'scope global'if[$? == 0]; thenaddflag="add"fi# first IPifconfig eth0 $addflag 10.31.42.15 netmask 255.255.255.0 broadcast 10.31.42.255
# next IPifconfig eth0 add 192.168.1.161 netmask 255.255.255.0 broadcast 192.168.1.255
#!/bin/bash
sleep 2
# see if there is a dhcp-assigned IP already. If so 'scope global' appears in the listing
#  ip add show eth0 sample output:
addflag=""
ip add show eth0|grep -q 'scope global'
if [ $? == 0 ]; then
  addflag="add"
fi
# first IP
ifconfig eth0 $addflag 10.31.42.15 netmask 255.255.255.0 broadcast 10.31.42.255
# next IP
ifconfig eth0 add 192.168.1.161 netmask 255.255.255.0 broadcast 192.168.1.255
What I observed is that eth0 already has an IP assigned to it (for instance from a DHCP server), then the string “scope global” appears when you run ip add, otherwise it doesn’t. Furthermore, ifconfig has an optional argument I noticed call add, which seems to exist in order to add additional virtual interfaces – precisely what we want. But if there is no IP yet assigned we should call ifconfig the first time with the add argument. If I had had additional virtual IPs I could have just kept on going…
So to call this at boot time I use my lazy method. I edit the crontab file and insert a line like this:
So without a DHCP server I have after booting:
$ ip add show eth0
2: eth0: <BROADCAST,MULTICAST,UP,LOWER_UP> mtu 1500 qdisc pfifo_fast state UP group default qlen 1000
    link/ether b8:27:eb:e3:02:74 brd ff:ff:ff:ff:ff:ff
    inet 192.168.1.161/24 brd 10.31.42.255 scope global eth0:0
       valid_lft forever preferred_lft forever
    inet 10.31.42.15/24 brd 192.168.1.255 scope global eth0
       valid_lft forever preferred_lft forever
    inet 169.254.159.115/16 brd 169.254.255.255 scope global eth0
       valid_lft forever preferred_lft forever
    inet6 fe80::e923:3131:224c:ecd/64 scope link
       valid_lft forever preferred_lft forever
2: eth0: <BROADCAST,MULTICAST,UP,LOWER_UP> mtu 1500 qdisc pfifo_fast state UP group default qlen 1000
link/ether b8:27:eb:e3:02:74 brd ff:ff:ff:ff:ff:ff
inet 192.168.1.161/24 brd 10.31.42.255 scope global eth0:0
valid_lft forever preferred_lft forever
inet 10.31.42.15/24 brd 192.168.1.255 scope global eth0
valid_lft forever preferred_lft forever
inet 169.254.159.115/16 brd 169.254.255.255 scope global eth0
valid_lft forever preferred_lft forever
inet6 fe80::e923:3131:224c:ecd/64 scope link
valid_lft forever preferred_lft forever
If you’re lazy like me just type
$ ip add
and you’ll get the other interfaces as well. It’s very easy to type, too!
Note the broadcast (brd) addresses are reversed from how you’d expect them. I decided that it doesn’t matter as long as they’re both present somewhere with the correct value. It’s all using the one physical interface so the interface doesn’t really care. And from all my testing I am right I believe on this point.
Disable WiFi – wlan0
To disable WiFi entirely, which you may want to do if using in a FIRST FRC competition, add this to /boot/config.txt and reboot: dtoverlay=pi3‐disable‐wifi
After doing that wlan0 does not even show up when you do an ip add.
Intro
Why would you even want to do this when you can buy a native IP webcam for less? I’m not sure, but i found myself in this situation so it could happen to others, and I found some things that worked and some that required quite some effort.
In my previous post I spoke about using opencv on Raspberry Pi.
This post is more about getting at an image with a minimum of lag time and relatively low bandwidth.
What I did not do
I considered bolting on an add-on to opencv to convert the video stream into mjpeg. But the process looked relatively obscure so I did not feel that was a good way to go.
I skimmed through the mjpeg (motion jpeg) standard. Looks pretty straightforward. i even considered writing my own streamer. It’s probably not too hard to write a bad one! But I feared it would be unreliable so I didn’t go that route. It’s just jpeg, separator, jpeg, separator, jpeg, etc. Here’s the Wikipedia link: https://en.wikipedia.org/wiki/Motion_JPEG.
I think the best software for is mjpg_streamer. It is not available as a simple package. So you have to compile it and patch it.
Mostly! I needed the patch as well (which he also mentions). his instructions for the patch aren’t accurate.
He provides a link. You need to save the contents by launching the downloaded file and saving it as input_uvc_patch.txt after opening it in Windows Notepad (if you’re doing this download through Windows).
On the Pi, you would do these steps:
cd ~/mjpg-streamer
patch -p0 < input_uvc_patch.txt
make USE_LIBV4L2=true clean all
sudo make DESTDIR=/usr/local install
cd ~/mjpg-streamer
patch -p0 < input_uvc_patch.txt
make USE_LIBV4L2=true clean all
sudo make DESTDIR=/usr/local install
That is, assuming you had copied the patch file into that ~/mjpg-streamer directory.
Before we get too far, I wished to mention that the command fswebcam proved somewhat useful for debugging.
Here’s a weird thing about that camera
We had one, then I got another one. The two cameras do not behave the same way!
Device files
I guess Raspberry Pi has its own version of plug-and-play. So what it means is that when you plug in the camera a device file is dynamically created called /dev/video0. Now if you happen to plug in a second USB camera, that one becomes device /dev/video1. Some utilities are designed to work with /dev/video0 and require extra arguments to deal with a camera with a different device number, e.g., fswebcam -d /dev/video1 image.jpg.
But actually running two cameras did not work out too well for me. It seemed to crash and I don’t have time to investigate that.
The working command is…
My livestream.sh file looks like this right now. It will change but this is a good document point.
The main point is that I found this additional -yuv argument seemed to get the one webcam to work, whereas the other USB camera didn’t need that! If you don’t include it launcher.sh may appear to work, but all you see when you connect to the direct video stream looks like this image:
One time when I ran it it crashed and suggested that -yuv argument be added, so I tried it and it actually worked! That’s how i discovered that oddity.
Bandwidth with those settings
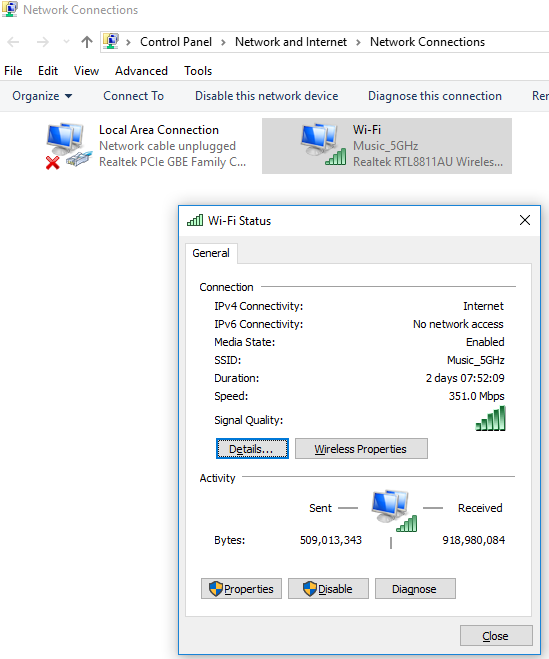
About 2 mbps. How do I measure that? simple. I bring up the web page and tool around the networking stuff until i find Change Adapter Settings (always difficult to find). Then I double-click on my active adapter and stare at the received bytes to get a feel for how much it’s incrementing by each second. Multiply by 10, and voila, you have a crude measure, perhaps +/- 30%, of your bandwidth consumed!
Latency
This is so important it needs its own section.
Latency is pretty good. We’ve measured it to be 0.26 seconds.
fswebcam errors
What happens if you run fswebcam while livestream is running?
$ fswebcam /tmp/image.jpg
--- Opening /dev/video0...
Trying source module v4l2...
/dev/video0 opened.
No input was specified, using the first.
Error selecting input 0
VIDIOC_S_INPUT: Device or resource busy
--- Opening /dev/video0...
Trying source module v4l2...
/dev/video0 opened.
No input was specified, using the first.
Error selecting input 0
VIDIOC_S_INPUT: Device or resource busy
Makes sense. Only one program on the Pi can capture the output form the camera.
Does the simple command fswebcam image.jpg work all the time? No it does not! Sometimes it simply fails, which is scary.
Here is an example of two consecutive calls to fswebcam about a second apart which illustrates the problem:
$ fswebcam /tmp/image.jpg
--- Opening /dev/video0...
Trying source module v4l2...
/dev/video0 opened.
No input was specified, using the first.
Adjusting resolution from 384x288 to 352x288.
--- Capturing frame...
Timed out waiting for frame!
No frames captured.
--- Opening /dev/video0...
Trying source module v4l2...
/dev/video0 opened.
No input was specified, using the first.
Adjusting resolution from 384x288 to 352x288.
--- Capturing frame...
Timed out waiting for frame!
No frames captured.
$ fswebcam /tmp/image.jpg
--- Opening /dev/video0...
Trying source module v4l2...
/dev/video0 opened.
No input was specified, using the first.
Adjusting resolution from 384x288 to 352x288.
--- Capturing frame...
Captured frame in 0.00 seconds.
--- Processing captured image...
Writing JPEG image to '/tmp/image.jpg'.
--- Opening /dev/video0...
Trying source module v4l2...
/dev/video0 opened.
No input was specified, using the first.
Adjusting resolution from 384x288 to 352x288.
--- Capturing frame...
Captured frame in 0.00 seconds.
--- Processing captured image...
Writing JPEG image to '/tmp/image.jpg'.
Running two USB cameras wih a single Ras Pi
This initially did not work in my first attempts but now it does!
It probably helps to be running a Raspebrry Pi 3 with Raspbian Stretch OS.
Maybe this wasn’t needed but we made a directory /usr/local/www2 and copied all the files from /usr/local/www to /usr/local/www2. A 2nd USB camera when plugged in creates /dev/video1 as I mentioned. You have to pick a different port, so we chose port 8090. Putting it all together we have the script below, livestream2.sh:
If a 2nd camera isn’t plugged in then the script errors out and doesn’t run, which is pretty much what we want. Running it by hand we get this:
$ ./livestream2.sh
MJPG Streamer Version: svn rev: 3:172M
 i: Using V4L2 device.: /dev/video1
 i: Desired Resolution: 352 x 288
 i: Frames Per Second.: 12
 i: Format............: YUV
 i: JPEG Quality......: 80
ERROR opening V4L interface: No such file or directory
 Init v4L2 failed !! exit fatal
 i: init_VideoIn failed
MJPG Streamer Version: svn rev: 3:172M
i: Using V4L2 device.: /dev/video1
i: Desired Resolution: 352 x 288
i: Frames Per Second.: 12
i: Format............: YUV
i: JPEG Quality......: 80
ERROR opening V4L interface: No such file or directory
Init v4L2 failed !! exit fatal
i: init_VideoIn failed
Reining in the bandwidth
We found that by lowering the jpeg quality with the -q option we could reduce the bandwidth and the quality, but the quality was still good enough for our purposes. Now the video streams from both cameras comes in around 4.5 mbps, even in bright lighting. So we settled on -q 50 for a 50% quality. Even a quality of 10 (10%) is not all that bad! I believe the default is 80%.
Bandwidth monitor on the Pi
Some of this was written by the student so apologies for the misspellings! Probably will be refined in the future. We can tease out how much bandwidth we’re actually using on the Pi by measuring the transmitted (TX) bytes periodically. We’ll record that during a matcgh so we can prove to ourselves and others that we have our bandwidth under control – far less than 7 mbps despite using two cameras.
Unreliable video stream startup
Sometimes one video stream does not come on correctly after first power-up. This is most perplexing as with computer gear one expects consistent, reproducible behaviour, yet that is not at all what we’ve observed.
This makes no sense, but in one environment we had our two streams running successfully six times in a row. Then I take the equipment home and find only one of the two streams starts up. It seems more likely to fail after sitting powered off for a few hours! I know it doesn’t make sense but that’s how it is.
In any case we have built a monitor which looks for and corrects this situation. It’s pretty clever and effective if I say so myself! And necessary! We created one monitor each for the two video devices. Here’s videomonitor.sh:
#!/bin/bash# DrJ make sure video stream is not stuck. Restart it if it issleep8while/bin/true; dochars=`curl -s-m1 localhost:80/?action=stream|wc -c`if[$chars-lt100]; then# we are stuck!dateecho Video stuck so we will restart it
pid=`ps-ef|grep mjpg|grep'p 80'|grep-vsudo|awk'{print $2}'`sudokill$pidsleep1
~/livestream.sh &# restart...else# we have a good streamtouch/tmp/stream80
fisleep5done
#!/bin/bash
# DrJ make sure video stream is not stuck. Restart it if it is
sleep 8
while /bin/true; do
  chars=`curl -s -m1 localhost:80/?action=stream|wc -c`
  if [ $chars -lt 100 ]; then
# we are stuck!
    date
    echo Video stuck so we will restart it
    pid=`ps -ef|grep mjpg|grep 'p 80'|grep -v sudo|awk '{print $2}'`
    sudo kill $pid
    sleep 1
    ~/livestream.sh &
# restart...
  else
# we have a good stream
    touch /tmp/stream80
  fi
  sleep 5
done
and videomonitor2.sh
#!/bin/bash# DrJ make sure video stream is not stuck. Restart it if it issleep8while/bin/true; dochars=`curl -s-m1 localhost:443/?action=stream|wc -c`if[$chars-lt100]; then# we are stuck!dateecho Video stuck so we will restart it
pid=`ps-ef|grep mjpg|grep'p 443'|grep-vsudo|awk'{print $2}'`sudokill$pidsleep1
~/livestream2.sh &# restart...else# we have a good streamtouch/tmp/stream443
fisleep5done
#!/bin/bash
# DrJ make sure video stream is not stuck. Restart it if it is
sleep 8
while /bin/true; do
  chars=`curl -s -m1 localhost:443/?action=stream|wc -c`
  if [ $chars -lt 100 ]; then
# we are stuck!
    date
    echo Video stuck so we will restart it
    pid=`ps -ef|grep mjpg|grep 'p 443'|grep -v sudo|awk '{print $2}'`
    sudo kill $pid
    sleep 1
    ~/livestream2.sh &
# restart...
  else
# we have a good stream
    touch /tmp/stream443
  fi
  sleep 5
done
And we’ll start these at boot time like the long and growing list of things we are starting at boot time.
Allowed ports
From rule 66…
R66. Communication between the ROBOT and the OPERATOR CONSOLE is restricted as follows:
A. Network Ports:
HTTP 80: Camera connected via switch on the ROBOT, bi-directional
HTTP 443: Camera connected via switch on the ROBOT, bi-directional
...
R66. Communication between the ROBOT and the OPERATOR CONSOLE is restricted as follows:
A. Network Ports:
HTTP 80: Camera connected via switch on the ROBOT, bi-directional
HTTP 443: Camera connected via switch on the ROBOT, bi-directional
...
So…to be safe we are switching from use of ports 8080 and 8090 to ports 80 and 443. But this means we have to preface certain commands – such as mjpg_streamer – with sudo since tcp ports < 1024 are privileged.
Flashing an led when we have a good video stream
Our led is soldered to a gruond pin and GPIO pin 18.
We call this program ledflash.sh
#!/bin/bash
#flashes the led
while /bin/true; do
if [ -f /tmp/stream80 ] && [ -f /tmp/stream443 ]; then
  pin=18
  cd /sys/class/gpio
  echo $pin > export
  cd gpio$pin
  echo out > direction
  while /bin/true; do
#make 5 quick flashes
    for i in `seq 1 5`; do
      echo 1 > value
      sleep 0.1
      echo 0 > value
      sleep 0.1
    done
#now lets make the long flash
    echo 1 > value
    sleep 0.6
  done
fi
sleep 2
done
#!/bin/bash
#flashes the led
while /bin/true; do
if [ -f /tmp/stream80 ] && [ -f /tmp/stream443 ]; then
pin=18
cd /sys/class/gpio
echo $pin > export
cd gpio$pin
echo out > direction
while /bin/true; do
#make 5 quick flashes
for i in `seq 1 5`; do
echo 1 > value
sleep 0.1
echo 0 > value
sleep 0.1
done
#now lets make the long flash
echo 1 > value
sleep 0.6
done
fi
sleep 2
done
We start it at boot time as well. It tells us when both video streams are ready for viewing because only then do the files get created and then the led starts flashing.
It takes about 62 seconds from the time power is supplied to the Raspberry Pi to the time the LED starts flashing (indicating the two video streams are ready).
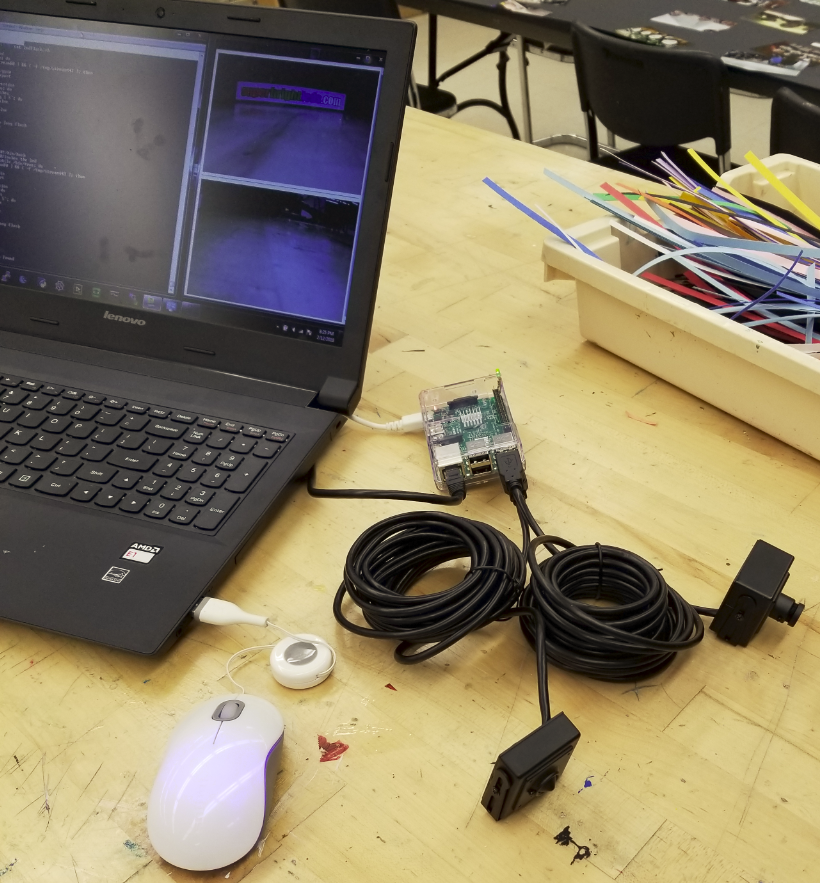
Picture of setup
This picture goes a long way to convey the ideas. 2 USB cameras, 1 Ras Pi, flashing LED
Intro
I’ve done a few things to do some vision processing with OpenCV on a Raspberry Pi 3. I am a rank amateur so my meager efforts will not be of much help to anyone else. My idea is that maybe this could be used on an FRC First Robotics team’s robot. Hence I will be getting into some tangential areas where I am more comfortable.
Even though this is a work in progress I wanted to get some of it down before I forget what I’ve done so far!
Tangential Stuff
Disable WiFi
You shouldn’t have peripheral devices with WiFi enabled. Raspeberry Pi 3 comes with built-in WiFi. Here’s how to turn it off.
Add the following line to your /boot/config.txt file:
dtoverlay=pi3‐disable‐wifi
Reboot.
If it worked you should only see the loopback and eth0 interefaces in response to the ip link command, something like this:
$ ip link
1: lo: mtu 65536 qdisc noqueue state UNKNOWN mode DEFAULT group default qlen 1
link/loopback 00:00:00:00:00:00 brd 00:00:00:00:00:00
2: eth0: mtu 1500 qdisc pfifo_fast state UP mode DEFAULT group default qlen 1000
link/ether b8:27:eb:3f:92:f3 brd ff:ff:ff:ff:ff:ff
Hardcode an IP address the simple-minded way
On a lark I decided to try the old-fashioned method I first used on Sun Solaris, or was it even Dec Ultrix? That is, ifconfig. I thought it was to be deprecated but it works well enough for my purpose.
So something like
$ sudo ifconfig eth0 192.168.1.160
does the job, as long as the network interface is up and connected.
Autolaunch a VNC Server so we can haul the camera image back to the driver station
$ vncserver &hypher;geometry 640×480 ‐Authentication=VncAuth :1
Launch our python-based opencv program and send output to VNC virtual display
The above was just illustrative. What I actually have is a single script, launcher.sh which puts it all together. Here it is.
#!/bin/sh
# DrJ
sleep 2
# set a hard-wired IP - this will have to change!!!
sudo ifconfig eth0 192.168.1.160
# launch small virtual vncserver on DISPLAY 1
vncserver -Authentication=VncAuth :1
# launch UDP server
$HOME/server.py > /tmp/server.log 2>&1 &
# run virtual env
cd $HOME
# don't need virtualenv if we use this version of python...
#. /home/pi/.profile
#workon cv
#
# now launch our python video capture program
#
export DISPLAY=:1
/home/pi/.virtualenvs/cv/bin/python green.py > /tmp/green.log 2>&1 &
OpenCV (open computer Vision)
opencv is a bear and you have to really work to get it onto a Pi 3. There is no apt-get install opencv. You have to download and compile the thing. There are many steps and few accurate documentation sources on the Internet as of this writing (January 2018).
if not "%minimized%"=="" goto :minimized
set minimized=true
start /min cmd /C "%~dpnx0"
goto :EOF
:minimized
c:\apps\ultravnc\vncviewer -password raspberry 192.168.1.160:1
I’m sure there’s a better way but I don’t know it.
The setup
We have a USB camera plugged into the Pi.
A green disc LED light.
A green filter over the camera lens.
A target with two parallel strips of retro-reflective tape we are trying to suss out from everything else.
Some sliders to control the sensitivity of our color matching.
The request to analyze the video in opencv as well as display it on the driver station.
Have opencv calculate the pixel distance (“correction”) from image center of the “target” (the two parallel strips).
Send this correction via a UDP server to any client who wants to know the correction.
Here is our current python program green.py which does these things.
importTkinteras tk
fromthreadingimport Thread,Event
from multiprocessing import Array
from ctypes import c_int32
import cv2
import numpy as np
importsys#from Tkinter import *#cap = cv2.VideoCapture(0)global x
global f
x =1
y =1
f ="green.txt"class CaptureController(tk.Frame):
NSLIDERS =7def__init__(self,parent):
tk.Frame.__init__(self)self.parent= parent
# create a synchronised array that other threads will read fromself.ar= Array(c_int32,self.NSLIDERS)# create NSLIDERS Scale widgetsself.sliders=[]for ii inrange(self.NSLIDERS):
# through the command parameter we ensure that the widget updates the sync'd array
s = tk.Scale(self, from_=0, to=255, length=650, orient=tk.HORIZONTAL,
command=lambda pos,ii=ii:self.update_slider(ii,pos))if ii ==0:
s.set(0)#green minelif ii ==1:
s.set(0)elif ii ==2:
s.set(250)elif ii ==3:
s.set(3)#green maxelif ii ==4:
s.set(255)elif ii ==5:
s.set(255)elif ii ==6:
s.set(249)#way down below
s.pack()self.sliders.append(s)# Define a quit button and quit event to help gracefully shut down threads
tk.Button(self,text="Quit",command=self.quit).pack()self._quit = Event()self.capture_thread=None# This function is called when each Scale widget is moveddef update_slider(self,idx,pos):
self.ar[idx]= c_int32(int(pos))# This function launches a thread to do video capturedef start_capture(self):
self._quit.clear()# Create and launch a thread that will run the video_capture function# self.capture_thread = Thread(cap = cv2.VideoCapture(0), args=(self.ar,self._quit))self.capture_thread= Thread(target=video_capture, args=(self.ar,self._quit))self.capture_thread.daemon=Trueself.capture_thread.start()def quit(self):
self._quit.set()try:
self.capture_thread.join()exceptTypeError:
passself.parent.destroy()# This function simply loops over and over, printing the contents of the array to screendef video_capture(ar,quit):
print ar[:]
cap = cv2.VideoCapture(0)
Xerror =0
Yerror =0
XerrorStr ='0'
YerrorStr ='0'whilenot quit.is_set():
# the slider values are all readily available through the indexes of ar# i.e. w1 = ar[0]# w2 = ar[1]# etc.# Take each frame
_, frame = cap.read()# Convert BGR to HSV
hsv = cv2.cvtColor(frame, cv2.COLOR_BGR2HSV)# define range of blue color in HSV
lower_green = np.array([ar[0],ar[1],ar[2]])
upper_green = np.array([ar[3],ar[4],ar[5]])# Threshold the HSV image to get only green colors
mask = cv2.inRange(hsv, lower_green, upper_green)# Bitwise-AND mask and original image
res = cv2.bitwise_and(frame,frame, mask= mask)
cv2.imshow('frame', frame)# cv2.imshow('mask',mask)# cv2.imshow('res',res)#------------------------------------------------------------------
img = cv2.blur(mask,(5,5))#filter (blur) image to reduce errors
cv2.imshow('img',img)
ret,thresh = cv2.threshold(img,127,255,0)
im2,contours,hierarchy = cv2.findContours(thresh, cv2.RETR_TREE,cv2.CHAIN_APPROX_SIMPLE)print'number of contours==640x480==================== ',len(contours)
target=0iflen(contours)>0:
numbercontours =len(contours)while numbercontours >0:
numbercontours = numbercontours -1# contours start at 0
cnt = contours[numbercontours]#this is getting the first contour found, could look at 1,2,3 etc
x,y,w,h = cv2.boundingRect(cnt)##---line below has the limits of the area of the target-----------------------##if w * h > 4200 and w * h < 100000: #area of capture must exceed to exit loopif h >30and w < h/3: #area of capture must exceed to exit loopprint' X Y W H AREA Xc Yc xEr yEr'
Xerror =(-1) * (320 - (x+(w/2)))
XerrorStr =str(Xerror)
Yerror =240 - (y+(h/2))
YerrorStr =str(Yerror)print x,y,w,h,(w*h),'___',(x+(w/2)),(y+(h/2)),'____',Xerror,Yerror
break#------- draw horizontal and vertical center lines below
cv2.line(img,(320,0),(320,480),(135,0,0),5)
cv2.line(img,(0,240),(640,240),(135,0,0),5)
displaySTR = XerrorStr + ' ' + YerrorStr
font = cv2.FONT_HERSHEY_SIMPLEX
cv2.putText(img,displaySTR,(10,30), font,.75,(255,255,255),2,cv2.LINE_AA)
cv2.imshow('img',img)# wrtie to file for our server'sys.stdout=open(f,"w")print'H,V:',Xerror,Yerror
sys.stdout=sys.__stdout__
target=1##--------------------------------------------------------------------if target==0:
# no target found. print non-physical values out to a filesys.stdout=open(f,"w")print'H,V:',1000,1000sys.stdout=sys.__stdout__
k = cv2.waitKey(1) & 0xFF#parameter is wait in millsecondsif k ==27: # esc key on keboard
cap.release()
cv2.destroyAllWindows()breakif __name__ =="__main__":
root = tk.Tk()
selectors = CaptureController(root)
selectors.pack()# q = tk.Label(root, text=str(x))# q.pack()
selectors.start_capture()
root.mainloop()
import Tkinter as tk
from threading import Thread,Event
from multiprocessing import Array
from ctypes import c_int32
import cv2
import numpy as np
import sys
#from Tkinter import *
#cap = cv2.VideoCapture(0)
global x
global f
x = 1
y = 1
f = "green.txt"

class CaptureController(tk.Frame):
    NSLIDERS = 7
    def __init__(self,parent):
        tk.Frame.__init__(self)
        self.parent = parent

        # create a synchronised array that other threads will read from
        self.ar = Array(c_int32,self.NSLIDERS)

        # create NSLIDERS Scale widgets
        self.sliders = []
        for ii in range(self.NSLIDERS):
            # through the command parameter we ensure that the widget updates the sync'd array
            s = tk.Scale(self, from_=0, to=255, length=650, orient=tk.HORIZONTAL,
                         command=lambda pos,ii=ii:self.update_slider(ii,pos))
            if ii == 0:
                s.set(0)  #green min
            elif ii == 1:
                s.set(0)
            elif ii == 2:
                s.set(250)
            elif ii == 3:
                s.set(3)  #green max
            elif ii == 4:
                s.set(255)
            elif ii == 5:
                s.set(255)
            elif ii == 6:
                s.set(249)  #way down below
            s.pack()
            self.sliders.append(s)

        # Define a quit button and quit event to help gracefully shut down threads
        tk.Button(self,text="Quit",command=self.quit).pack()
        self._quit = Event()
        self.capture_thread = None

    # This function is called when each Scale widget is moved
    def update_slider(self,idx,pos):
        self.ar[idx] = c_int32(int(pos))

    # This function launches a thread to do video capture
    def start_capture(self):
        self._quit.clear()
        # Create and launch a thread that will run the video_capture function
#        self.capture_thread = Thread(cap = cv2.VideoCapture(0), args=(self.ar,self._quit))
        self.capture_thread = Thread(target=video_capture, args=(self.ar,self._quit))
        self.capture_thread.daemon = True
        self.capture_thread.start()

    def quit(self):
        self._quit.set()
        try:
            self.capture_thread.join()
        except TypeError:
            pass
        self.parent.destroy()

# This function simply loops over and over, printing the contents of the array to screen
def video_capture(ar,quit):
    print ar[:]
    cap = cv2.VideoCapture(0)
    Xerror = 0
    Yerror = 0
    XerrorStr = '0'
    YerrorStr = '0'
    while not quit.is_set():
        # the slider values are all readily available through the indexes of ar
        # i.e. w1 = ar[0]
        # w2 = ar[1]
        # etc.
        # Take each frame
        _, frame = cap.read()
        # Convert BGR to HSV
        hsv = cv2.cvtColor(frame, cv2.COLOR_BGR2HSV)
        # define range of blue color in HSV
        lower_green = np.array([ar[0],ar[1],ar[2]])
        upper_green = np.array([ar[3],ar[4],ar[5]])
        # Threshold the HSV image to get only green colors
        mask = cv2.inRange(hsv, lower_green, upper_green)
        # Bitwise-AND mask and original image
        res = cv2.bitwise_and(frame,frame, mask= mask)
        cv2.imshow('frame', frame)
#        cv2.imshow('mask',mask)
#        cv2.imshow('res',res)
        #------------------------------------------------------------------
        img = cv2.blur(mask,(5,5))   #filter (blur) image to reduce errors
        cv2.imshow('img',img)
        ret,thresh = cv2.threshold(img,127,255,0)
        im2,contours,hierarchy = cv2.findContours(thresh, cv2.RETR_TREE,cv2.CHAIN_APPROX_SIMPLE)
        print 'number of contours==640x480====================  ', len(contours)
        target=0
        if len(contours) > 0:
            numbercontours = len(contours)
            while numbercontours > 0:
                numbercontours = numbercontours -1  # contours start at 0
                cnt = contours[numbercontours]   #this is  getting the first contour found, could look at 1,2,3 etc
                x,y,w,h = cv2.boundingRect(cnt)
#
#---line below has the limits of the area of the target-----------------------
#
                #if w * h > 4200 and w * h < 100000:  #area of capture must exceed  to exit loop
                if h > 30 and w < h/3:  #area of capture must exceed  to exit loop
                    print ' X   Y  W  H  AREA      Xc  Yc      xEr yEr'
                    Xerror = (-1) * (320 - (x+(w/2)))
                    XerrorStr = str(Xerror)
                    Yerror = 240 - (y+(h/2))
                    YerrorStr = str(Yerror)
                    print  x,y,w,h,(w*h),'___',(x+(w/2)),(y+(h/2)),'____',Xerror,Yerror
                    break

#-------        draw horizontal and vertical center lines below
                cv2.line(img,(320,0),(320,480),(135,0,0),5)
                cv2.line(img,(0,240),(640,240),(135,0,0),5)
                displaySTR = XerrorStr + '  ' + YerrorStr
                font = cv2.FONT_HERSHEY_SIMPLEX
                cv2.putText(img,displaySTR,(10,30), font, .75,(255,255,255),2,cv2.LINE_AA)
                cv2.imshow('img',img)
# wrtie to file for our server'
                sys.stdout = open(f,"w")
                print 'H,V:',Xerror,Yerror
                sys.stdout = sys.__stdout__
                target=1
                #
                #--------------------------------------------------------------------
        if target==0:
                # no target found. print non-physical values out to a file
                sys.stdout = open(f,"w")
                print 'H,V:',1000,1000
                sys.stdout = sys.__stdout__
        k = cv2.waitKey(1) & 0xFF    #parameter is wait in millseconds
        if k == 27:   # esc key on keboard
            cap.release()
            cv2.destroyAllWindows()
            break

if __name__ == "__main__":
    root = tk.Tk()
    selectors = CaptureController(root)
    selectors.pack()
#    q = tk.Label(root, text=str(x))
#    q.pack()
    selectors.start_capture()
    root.mainloop()
Well, that was a big program by my standards.
Here’s the UDP server that goes with it. I call it server.py.
#!/usr/bin/env python# inspired by https://gist.github.com/Manouchehri/67b53ecdc767919dddf3ec4ea8098b20# first we get client connection, then we read data frmo file. This order is important so we get the latest, freshest data!importsocketimportre
sock =socket.socket(socket.AF_INET,socket.SOCK_DGRAM)
server_address ='0.0.0.0'
server_port =5005
server =(server_address, server_port)
sock.bind(server)print("Listening on " + server_address + ":" + str(server_port))whileTrue:
# read up to 32 bytes from client
payload, client_address = sock.recvfrom(32)print("Request from client: " + payload)# get correction from filewhileTrue:
withopen('green.txt','r')as myfile:
data=myfile.read()#H,V: 9 -14
data = data.split(":")iflen(data)==2:
break
sent = sock.sendto(data[1], client_address)
#!/usr/bin/env python
# inspired by https://gist.github.com/Manouchehri/67b53ecdc767919dddf3ec4ea8098b20
# first we get client connection, then we read data frmo file. This order is important so we get the latest, freshest data!


import socket
import re

sock = socket.socket(socket.AF_INET, socket.SOCK_DGRAM)

server_address = '0.0.0.0'
server_port = 5005

server = (server_address, server_port)
sock.bind(server)
print("Listening on " + server_address + ":" + str(server_port))

while True:
# read up to 32 bytes from client
        payload, client_address = sock.recvfrom(32)
        print("Request from client: " + payload)
# get correction from file
        while True:
                with open('green.txt','r') as myfile:
                        data=myfile.read()
#H,V:  9 -14
                data = data.split(":")
                if len(data) == 2:
                        break
        sent = sock.sendto(data[1], client_address)
For development testing I wrote a UDP client to go along with that server. I called it recvudp.py.
#!/usr/bin/env pythonimportsocket
UDP_IP ="127.0.0.1"
UDP_PORT =5005print"UDP target IP:", UDP_IP
print"UDP target port:", UDP_PORT
sock =socket.socket(socket.AF_INET,# Internetsocket.SOCK_DGRAM)# UDP# need to send one newline minimum to receive server's message...
MESSAGE ="correction";
sock.sendto(MESSAGE,(UDP_IP, UDP_PORT))# get data
data, addr = sock.recvfrom(1024)# buffer size is 1024 bytesprint"received message:", data
#!/usr/bin/env python
import socket
UDP_IP = "127.0.0.1"
UDP_PORT = 5005

print "UDP target IP:", UDP_IP
print "UDP target port:", UDP_PORT

sock = socket.socket(socket.AF_INET, # Internet
                 socket.SOCK_DGRAM) # UDP
# need to send one newline minimum to receive server's message...
MESSAGE = "correction";
sock.sendto(MESSAGE, (UDP_IP, UDP_PORT))
# get data
data, addr = sock.recvfrom(1024) # buffer size is 1024 bytes
print "received message:", data
Problems
Lag is bad. Probably 1.5 seconds or so.
Video is green, but then we designed it that way.
Bandwidth consumption of VNC is way too high. We’re supposed to be under 7 mbps and it is closer to 12 mbps right now.
Probably won’t work under the bright lights or an arena or gym.
Sliders should be labelled.
Have to turn a pixel correction into an angle.
Have to suppress initial warning about ssh default password.