Categories
Admin Linux SLES

How to add private root CAs in SLES or Redhat or Debian

Intro
From time-to-time I run my own PKI infrastructure, namely issuing my own certificates from my private root CA. I wanted this root CA to be recognized by Linux utilities running on Suse Linux (SLES), in particular, lftp, which I was trying to use to access an ftps site, which itself is a post for another day. In other words, how do you add a certificate to the certificate store in linux?

The details
Let’s say you have your root certificate in the standard form like this example

-----BEGIN CERTIFICATE-----
MIIIPzCCBiegAwIBAgITfgAAAATHCoXJivwKLQAAAAAABDANBgkqhkiG9w0BAQsF\nADA2MQswCQYD
VQQGEwJERTENMAsGA1UEChMEQkFTRjEYMBYGA1UEAxMPQkFTRiBS\nb290IENBIDIxMB4XDTE3MDgxMDEyNDAwOFoXDTI4MDgxMDEyNTAwOFowXDETMBEG\nCgm
...
PEScyptUSAaGjS4JuxsNoL6URXYHxJsR0bPlet\nSct
-----END CERTIFICATE-----

Then you can put the certificate inline and within one script install it so that it permanently joins the other root CAs in /etc/ssl/certs with a script like this example:

DrJ_Root_CA="-----BEGIN CERTIFICATE-----\nMIIIPzCCBiegAwIBAgITfgAAAATHCoXJivwKLQAAAAAABDANBgkqhkiG9w0BAQsF\nADA2MQswCQYD
VQQGEwJERTENMAsGA1UEChMEQkFTRjEYMBYGA1UEAxMPQkFTRiBS\nb290IENBIDIxMB4XDTE3MDgxMDEyNDAwOFoXDTI4MDgxMDEyNTAwOFowXDETMBEG\nCgm
SJomT8ixkARkWA05FVDEUMBIGCgmSJomT8ixkARkWBEJBU0YxFjAUBgoJkiaJ\nk/IsZAEZFgZCQVNGQUQxFzAVBgNVBAMTDkJBU0YgU1VCIENBIDIzMIICIjAN
Bgkq\nhkiG9w0BAQEFAAOCAg8AMIICCgKCAgEAqrfoKxrCPCw/u2PBEaAwW/VHLxBw6JNi\n42F3EhXmligGb/Uu4kcWO016IGFatVrPhdAtShAqmTXis0w57hW
jn1Iptvo7rROY\nGPmH7aSW/fYM/x2Lln7NlltayXspWawqBzWzYGADodyjn/Z5TaLYaG8lajiabCM5\nUJDhlZ/SUR3xylqIIFaQK3k2twjeGoxobhbr9hJcQZ
fXF0V5FCSCzJExDYma6bs1\nZtyqP/yHaiOeWXGdnqM9EPfT8kmIC42ZXq7s2JZI5OUflJBbaebYEbuDad6Rh19E\nRchXABLe68+TF/4AZCw16iRwRgq/2Re2W
WPMtVomyZ2txvn51iizqBkdVGzIRklC\n3yIv5MRzDFTfG940/tSAomHsz+RdGbL+NCBeWSY+rnJQdExJ7bLXFLVsTNGL68lP\nMuYrkxYQKWRtVhvQCHsdd5E0
t9QR4iY1JLWQxq3GHy98tBbCGiKMpBbuj/9I/E6c\nGrikouv2QyNnCN34PXpUxTQmDj5LZGV9w2faqpwUBD2ZWsbyVSgvD8TcjdxzcMcj\nLBnYUaZ8wHFqUj2
DBahctfKQxA8Ptrzt1mDIGOQliZGDwrTVMECd+noQhTlF1eS+\nvNraV3dYRMymVxh58MPEaDJgwIRcBWAAOeBbZlyx76oskXdmjOiz5jqyoR5eweCE\ntS4jfM
EW6UECAwEAAaOCAx4wggMaMAsGA1UdDwQEAwIBhjAQBgkrBgEEAYI3FQEE\nAwIBADAdBgNVHQ4EFgQUdn7nwFGpb8uzpFVs5QWQcsA0Q6IwQwYDVR0gBDwwOjA
4\nBgwrBgEEAYGlZAMCAgEwKDAmBggrBgEFBQcCARYaaHR0cDovL3BraXdlYi5iYXNm\nLmNvbS9jcAAwGQYJKwYBBAGCNxQCBAweCgBTAHUAYgBDAEEwEgYDVR
0TAQH/BAgw\nBgEB/wIBADAfBgNVHSMEGDAWgBSS9auUcX38rmNVmQsv6DKAMZcmXDCCAQkGA1Ud\nHwSCAQAwgf0wgfqggfeggfSGgbZsZGFwOi8vL0NOPUJBU
0YlMjBSb290JTIwQ0El\nMjAyMSxDTj1DRFAsQ049UHVibGljJTIwS2V5JTIwU2VydmljZXMsQ049U2Vydmlj\nZXMsQ049Q29uZmlndXJhdGlvbixEQz1yb290
LERDPWJhc2YsREM9Y29tP2NlcnRp\nZmljYXRlUmV2b2NhdGlvbkxpc3Q/YmFzZT9vYmplY3RDbGFzcz1jUkxEaXN0cmli\ndXRpb25Qb2ludIY5aHR0cDovL3B
raXdlYi5iYXNmLmNvbS9yb290Y2EyMS9CQVNG\nJTIwUm9vdCUyMENBJTIwMjEuY3JsMIIBNgYIKwYBBQUHAQEEggEoNIIBJDCBuQYI\nKwYBBQUHMAKGgaxsZG
FwOi8vL0NOPUJBU0YlMjBSb290JTIwQ0ElMjAyMSxDTj1B\nSUEsQ049UHVibGljJTIwS2V5JTIwU2VydmljZXMsQ049U2VydmljZXMsQ049Q29u\nZmlndXJhd
GlvbixEQz1yb290LERDPWJhc2YsREM9Y29tP2NBQ2VydGlmaWNhdGU/\nYmFzZT9vYmplY3RDbGFzcz1jZXJ0aWZpY2F0aW9uQXV0aG9yaXR5MGYGCCsGAQUF\n
BzAChlpodHRwOi8vcGtpd2ViLmJhc2YuY29tL3Jvb3RjYTIxL1JPT1RDQTIxLnJ6\nLWMwMDctajY1MC5iYXNmLWFnLmRlX0JBU0YlMjBSb290JTIwQ0ElMjAyM
S5jcnQw\nDQYJKoZIhvcNAQELBQADggIBAClCvn9sKo/gbrEygtUPsVy9cj9UOQ2/CciCdzpz\nXhuXfoCIICgc0YFzCajoXBLj4V6zcYKjz8RndaLabDaaSQgj
phXFiZSBH8OII+cp\nTCWW1x+JElJXo9HB7Ziva2PeuU5ajXtvql5PegFYWdmgK2Q1QH0J2f1rr7B4nNGu\noyBi1TOSll+0yJApjx213lM9obt6hkXkjeisjcq
auMVh+8KloM0LQOTAD1bDAvpa\nVVN9wlbytvf4tLxHpvrxEQEmVtTAdVchuQV1QCeIbqIxW41l6nhE2TlPwEmTr+Cv\najMID/ebnc9WzeweyTddb6DSmn4mSc
okGpj8j8Z7cw173Yomhg1tEEfEzip+/Jx6\nd2qblZ9BUih9sHE8rtUBEPLvBZwr2frkXzL3f8D6w36LxuhcqJOmDaIPDpJMH/65\nAbYnJyhwJeGUbrRm3zVtA
5QHIiSHi2gTdEw+9EfyIhuNKS4FO/uonjJJcKBtaufl\nGFL6y0WegbS5xlMV9RwkM22R7sQkBbDTr+79MqJXYCGtbyX0JxIgOGbE4mxvdDVh\nmuPo9IpRc5Jl
pSWUa7HvZUEuLnUicRbfrs1PK/FBF7aSrJLoYprHPgP6421pl08H\nhhJXE9XA2aIfEkJ4BcKw0BqOP/PEScyptUSAaGjS4JuxsNoL6URXYHxJsR0bPlet\nSct
3\n-----END CERTIFICATE-----\n"
 
cd /etc/pki/trust/anchors/
echo -e -n $DrJ_Root_CA > DrJ_Root_CA.pem
c_rehash
update-ca-certificates

So the key commands are c_rehash and update-ca-certificates.

Usually SLES is similar to Redhat. But it seems to be different in this case.

This was tested on a SLES 12 SP3 system.

It copies the certificate to /etc/pki/trust/anchors, which by itself is insufficient. Then it creates some kind of hash symlink to the CA file and makes sure that this new certificate doesn’t get wiped out by subsequent system patching. That’s the purpose of the c_rehash and update-ca-certificates commands.

You may also see these hashes and certificates in /etc/ssl/certs. I’m not sure because that’s where I started with all this. But merely dropping the private root CA into /etc/ssl/certs is insufficient, I can say from experience!

Redhat
Redhat is better documented, but for completeness I include it here. You have your inline certificate as in the SLES script, then following that:

...
cd /etc/pki/ca-trust/source/anchors/
echo -e -n $DrJ_Root_CA > DrJ_Root_CA.pem
update-ca-trust

So update-ca-trust is the key command for Redhat Linux. This was tested on Redhat Linux v 7.6.

Fedora v 33

Put your CA file with a .crt file extension into /etc/pki/ca-trust/source/anchors like for Redhat. Run update-ca-trust extract

Debian Linux circa 2023

Put your private CA file into a new directory /usr/share/ca-certificates/extra. Then run sudo dpkg-reconfigure ca-certificates. When prompted with a list of bundles to include make sure to enable your new extra file. Your certificate file needs to end in ‘crt’, not, e.g., ‘cer’. Seems pretty arbitrary to me, but that’s how it is. Of course it has to be standard PEM format. (—BEGIN CERTIFICATE—, etc.).

Python and self-signed certificates or certificates from private CAs

First, note that those are two different cases and need to be handled slightly differently! You may be in need of these measures if you are getting an error in python like this:

urllib3.exceptions.MaxRetryError: HTTPSConnectionPool(host=’www.myhost.local’, port=443): Max retries exceeded with url: / (Caused by SSLError(SSLCertVerificationError(1, ‘[SSL: CERTIFICATE_VERIFY_FAILED] certificate verify failed: unable to get local issuer certificate (_ssl.c:1123)’)))

Self-signed certificate

If the certificate is truly self-signed, then throw it into a file, let’s call it my-crt.crt in your home directory. Then set an environment variable before running python:

$ export REQUESTS_CA_BUNDLE=~/my-crt.crt

It should now work.

Python reverts to SSL: CERTIFICATE_VERIFY_FAILED after upgrade

So I had it all working. Then the requests package complained about my version of the urllib package. So I upgraded requests with a pip3 –upgrade requests. They the above-mentioned SSL error came back. I noticed that urllib got upgraded when requests was upgraded.

I basically gave up and totally kludged python to fix this. But only after playing with the certifi package etc. So I took the file that is for me the output of certifi.where(): /usr/local/lib/python3.9/site-packages/certifi/cacert.pem

I edited it as root and simply appended by private root CAs to that file. I hated to do it, and I know I should have at least used a virtual env, blah, blah. But at least now my jobs run. By the way, my by-hand tests of urlopen all worked! So it’s just the way some package was using it beyond my control that I had to create this kludge.

Certificate issued from a private CA

I added the private CA to the system CA on Debian with the update-ca-certificates mentioned above. Still no joy. Then I noticed the web server forgot to provide the intermediate certificate so I added that as well. Then, at least, curl began to work. But not python. Strange. For python I still need to define this environment variable:

$ export REQUESTS_CA_BUNDLE=/etc/ssl/certs/ca-certificates.crt

A second method to handle the case of a certificate issued from a private CA is to bundle the certificate + the intermediate certificate + the private root CA all into a single file, let’s call it my-crt.crt, in your home directory, and define the envirnoment variable same as for the self-signed certificate case:

$ export REQUESTS_CA_BUNDLE=~/my-crt.crt

My favorite openssl commands shows some commands to run to examine the certificate of a web server.

lftp usage tip with a private CA
If like me you were doing this work in conjunction with running ftps using a certificate signed by a private CA, and want your ftp client, lftp, to not complain about the unrecognized CA, then this tip will help.

After initiating your lftp and sending the username and password, you can send this command
$ ssl:ca-file <path-to-your-private-CA-file>
lftp is so flexible it offers many other ways to do this as well. But this is the one I use.

Conclusion
We show how to add your own root CA to a SLES 12 system. I did not find a good reference for this informaiton anywhere on the Internet.

References and related
My favorite openssl commands.

The basics of working with cipher settings

For Reedhat/CentOS I am evaluating this blog post on the proper way to add your own private CA: https://www.happyassassin.net/2015/01/14/trusting-additional-cas-in-fedora-rhel-centos-dont-append-to-etcpkitlscertsca-bundle-crt-or-etcpkitlscert-pem/
For the Redhat approach I used this blog post: https://www.happyassassin.net/2015/01/14/trusting-additional-cas-in-fedora-rhel-centos-dont-append-to-etcpkitlscertsca-bundle-crt-or-etcpkitlscert-pem/

Categories
Admin Linux Raspberry Pi

Fishcam using Raspberry Pi and some network tricks

Intro
There are more articles about running a webcam using Raspberry Pi than Carter has pills. Why bother to create another? This one is unique insofar as I created a fishcam at a school with a restricted network. None of the reference articles I found discussed a way to get your stream onto the Internet except the simplistic approach only available to homeowners of setting up a rule on a home router. Pimylifeup’s article is typical of that genre.

Cooperating third party
To push this webcam out to the Internet when I had no way to allow inbound traffic to the Pi, I realized that I needed a cooperating third party. I looked briefly for a commercial service specializing in this. I did not find one. I suppose there is, but I don’t know. It was actually quicker to stop the search and use my own AWS server as the cooperating third party.

With a cooperating third party what you can do is set up a forwarder from the Pi to cooperating server on the Internet. So that’s what I did. More on that below.

Network restrictions
The Pi was given WiFi access to a school’s bring your own device (BYOD) WiFi. By trial and error (I did not initiate extensive port scans, etc so as to avoid acting like a hacker). I’m familiar with running a almost completely open Guest wireless. This BYOD was not that for some reason unknown to me. One of the first things I tried, to ssh to my server, was not going through. So I knew there were restrictions. Also PING 8.8.8.8 did not work. So ICMP was blocked as well. But web browsing worked, and so did DNS queries. So TCP ports 80 and 443 were allowed, as well as UDP port 53 and possibly TCP port 53. I also observed there was no proxy server involved in the communication. So I simply tested a few other ports that I know are used from time-to-time: 2443 and 8443. If you a hit a server that is not protected by a firewall and not listening on a port that you are testing you will get a Connection reset if your packets are not blocked by a local firewall. I tested with the nc utility. nc -v <my_server> <port> I found a couple open ports this way. Next question: does the network care what protocol is running on that port? They might be looking for https and I was planning to run ssh. For a simple port blocker it might not distinguish what’s going on. That was indeed the case as I was able to run ssh on this non-standard port.

The single most comlicated thing was formulating the appropriate ssh command. I created a dedicated account on my server for this purpose. I embedded the password into the startup script I created using a utility called sshpass. This is not super secure but I wanted something running quickly.

Here’s that complicated command

sshpass -p <PASSWORD> ssh ‐f ‐N ‐R 8443:localhost:8081 ‐p 2443 <USERNAME>@<SERVER_IP>

That’s a mouthful! Let’s break it down. sshpass just permits you to run the command and not get a login prompt. It needs to be installed with a sudo apt-get sshpass.

The ssh command sets up a reverse tunnel. I have discussed it in my Access your Raspberry Pi from anywhere blog post, however, some things are different and more complicated here. Here we are setting up port 8443 on my server as the tunnel port which will be accessible to the Internet. It is terminated on the Raspberry Pi’s local port 8081 (the port that the motion package uses for the webcam). We had to use ssh to connect to port 2443 on my server because the school network blocked the standard port 22. Then <PASSWORD>, <USERNAME> and <SERVER_IP> are to be replaced with values specific for my server. I don’t want to publish them.

How I got my server to run ssh on port 2443 as well as port 22
This turned out to be one of the easiest things. It’s good to run your own server… In the file /ets/ssh/sshd_config the listening port was commented out, letting the defaul 22 be in effect. So I uncommented that and added port 2443 like this:

...
# Listen on multiple ports - DrJ 2/1/19
Port 22
Port 2443
...

Then a sudo service sshd restart and the server listens on both ports for ssh connections!

About the webcam itself
I just followed the Pimylife article as I mentioned. It talks about using the motion package which I’ve never used before. Now in my other posts you’ll see I do stuff with video on Raspberry Pi. In those we had to fight to get the lag time down and keep bandwidth low. I have to say by comparison this motion package is awful. Lag is a couple seconds. There is no sense whatsoever of true video. Just image, wait, next image, wait. No matter the fps setting. I did not have time to switch to a video package that works better. Anyway motion may provide some other advantages we could eventually use. So I just set it to 2 fps (frames per second) since it doesn’t really matter.

The fishcam is at fishcam. It’s not working right now – just showing black. I’m not sure why.

Auto starting
I’ve documented elsewhere the poor man’s way to start something upon initially booting the Pi: stuff the appropriate command into the crontab file.

So you edit your crontab file with a crontab -e. Then you enter

@reboot sleep 20; sshpass -p <PASSWORD> ssh ‐f ‐N ‐R 8443:localhost:8081 ‐p 2443 <USERNAME>@<SERVER_IP>

That just sleeps for 20 seconds as your Pi boots up, then establishes the reverse tunnel with that complicated command I explained earlier.

Equipment
Usually thes tutorials start with an equipment list. For me that is the least interesting part. I used a Raspberry Pi 3 running Raspbian. For a camera I used one of my spare USB ELP cameras from my extensive work with USB cameras. While developing the solution I needed a keyboard, mouse and HDMI monitor. Once running, the only thing connected to the Pi is the USB camera and the micro USB power supply.

To be continued…

References and related
A very good guide for your typcial webcam-using-a-Raspberry-Pi situation, i.e., not what I am addressing in my article.

Access your Raspberry Pi from anywhere blog post

Run multiple USB cameras on your Raspberry Pi while keeping lag minimal.

For supplies we love visits to The Micro Center in Paterson, NJ. This past weekend we got Raspberry Pi 3’s for only $29. And the sales tax is only 3% and change.

Categories
Admin DNS Network Technologies Security

The IT Detective agency: Live hack caught, partially stopped

Intro
In my years at cybersecurity I’ve been sufficiently removed from the action that I’ve rarely been involved in an actual case. Until last night. A friend, whom I’ll call Jute, got a formal complaint about one of his hosted Windows servers.

We have detected multiple hacking attempts from your ip address 47.5.105.236 (Hilfer Online) to access our systems.
>
> Log of attempts:
> – Hack attempt failed at 2019-01-17T14:22:41.6539784Z. Attempted user name: Not specified (typical for port scanners or denial of service attacks), system accessed: RDP, ip address accessed: 158.69.241.92
> – Hack attempt failed at 2019-01-17T14:22:26.2213808Z. Attempted user name: Not specified (typical for port scanners or denial of service attacks), system accessed: RDP, ip address accessed: 158.69.241.92
> – Hack attempt failed at 2019-01-17T14:22:10.6304194Z. Attempted user name: Not specified (typical for port scanners or denial of service attacks), system accessed: RDP, ip address accessed: 158.69.241.92
>
>
> Please investigate this problem.
>
> Sent using IP Ban Pro
> http://ipban.com

Hack, cont.
I’ve changed the IPs to protect the guilty! But I’ve conveyed the specificity of the error reporting. Nice and detailed.

Jute has a Windows Server 2012 at that IP. He is not running a web server, so that conveniently and dramatically narrows the hackable footprint of his server. I ran a port scan and found ports 135, 139 and 3389 open. His provider (which is not AWS) offers a simple firewall which I suggested we use to block ports 135 and 139 which are for Microsoft stuff. He was running it as a local sever so I don’t tihnk he needed it.

Bright idea: use good ole netstat
The breakthrough came when I showed him the poor man’s packet trace:

netstat -an

from a CMD prompt. He ran that and I saw not one but two RDP connections. One we easily identified as his, but the other? It was coming form another IP belonging to the same provider! RDP is easily identified by just looking for the port 3389 connections. Clearly we had caught first-hand an unauthorized user.

I suggested a firewall rule to allow only his Verizon range to connect to server on port 3389. But, I am an enterprise guy, used to stateful firewalls. When we set it up we cut off his RDP session to his own server! Why? I quickly concluded this was amateur hour and a primitive, ip-chains-like stateless firewall. So we have to think about rules for each packet, not for each tcp connection.

Once we put in a rule to block access to ports 135 and 139, we also blocked Jute’s own RP session. So the instructions said once you use the firewall, an implicit DENY ALL is added to the bottom of the rules.

So we needed to add a rule like:

SRC: ANY DST: 47.5.105.236 SRC_PORT: ANY DST_PORT: 3389 ACTION: allow

But his server needs to access web sites. That’s a touch difficult with a stateless firewall. You have to enter the “backwards” rule (outbound traffic is not restricted by firewall):

SRC: ANY DST: 47.5.105.236 SRC_PORT: 443 DST_PORT: ANY ACTION: allow

But he also needs to send smtp email, and look up DNS! This is getting messy, but we can do it:

SRC: ANY DST: 47.5.105.236 SRC_PORT: 25 DST_PORT: ANY ACTION: allow
SRC: ANY DST: 47.5.105.236 SRC_PORT: 53 DST_PORT: ANY ACTION: allow

We looked up the users and saw Administrator and another user Update. We did not recognize Update so he deleted it! And changed the password to Administrator.

Finally we decided we had to bump this hacker.

So we made two rules to allow him but deny the zombie computer:

SRC: 158.69.240.92 DST: 47.5.105.236 SRC_PORT: ANY DST_PORT: 3389 ACTION: reject
SRC: ANY DST: 47.5.105.236 SRC_PORT: ANY DST_PORT: 3389 ACTION: allow

Pyrrhic victory
Success. We bumped that user right out while permitting Jute’s access to continue. The bad news? A new interloper replaced it! 95.216.86.217.

OK. So with another rule we can bump that one too.

Yup. Another success. another interloper jumps on in its place. 124.153.74.29. So we bump that one. But I begin to suspect we are bailing the Titanic with a thimble. It’s amazing. Within seconds a blocked IP is being replaced with a new one.

We need a more sweeping restriction. So we reasoned that Jute will RP from his provider where his IP does not really change.

So we replace

SRC: ANY DST: 47.5.105.236 SRC_PORT: ANY DST_PORT: 3389 ACTION: allow

with

SRC: 175.198.0.0/16 DST: 47.5.105.236 SRC_PORT: ANY DST_PORT: 3389 ACTION: allow

and we also delete the specific reject rules.

But now at this point for some reason the implicit DENY ALL rule stops working. From my server I could do an nc -v 47.5.105.236 3389 and see that that port was open, though it should ont have been. So we have to add a cleanup rule at the bottom:

SRC: ANY DST: 47.5.105.236 SRC_PORT: ANY DST_PORT: ANY ACTION: reject

That did the trick. Port no longer opened.

There still appears in netstat -an listing the last interloper, but I think it just hasn’t been timed out yet. netstat -an also clearly shows (to me anyway) what they were doing: scanning large swaths of the Internet for other vulnerable servers! The tables were filled with SYN-SENT to port 3389 of consecutive IPs! Amazing.

So I think Jute’s server was turned into a zombie which was tasked with recruiting new zombies.

We had finally frozen them out.

Later that night
Late that same night he calls me in a panic. He uses a bunch of downstream servers and that wasn’t working! The downstream servers run on a range of ports 14800 – 15200.

Now bear in mind the provider only permits us 10 firewall rules, so it’s getting kind of tight. But we manage to squeeze in another rule:

SRC: ANY DST: 47.5.105.236 SRC_PORT: 14800-15200 DST_PORT: ANY ACTION: allow

He breathes a sigh of relief because this works! But I want him we are opening a slight hole now. Short term there’s nothing we can do. It’s a small exposure: 400 open ports out of 65000 possible. It should hold him for awile with any luck.

He also tried to apply all updates at my suggestion. I’m still not sure what vulnerability was (is) exploited.

Case: tentaively closed

Our first attempt to use the Windows firewall itself was not initially successful. We may return to it.

Conclusion
We catch a zombie computer totally exploiting RDP on a Windows 2012 server. We knocked it off and it was immediately repaced with another zombie doing the same thing. Their task was to find more zombies to join to the botnet. Inbound firewall rules defined on a stateless firewall were identified which stopped this exploitation while permitting desired traffic. Not so easy when you are limited to 10 firewall rules!

This is a case where IPBAN did us a favor. The system worked as it was supposed to. We got the alert, and acted on it immediately.

I’m not 100% sure which RP vulnerability was exploited. It may have been an RCE – remote code execution not even requiring a valid logon.

References and related
The rest of the security world finally caught up with this, with Microsoft releasing a critical patch in May. I believe I was one of the first to publicly document this exploit. https://nakedsecurity.sophos.com/2019/06/10/the-goldbrute-botnet-is-trying-to-crack-open-1-5-million-rdp-servers/?utm_source=Naked+Security+-+Sophos+List&utm_campaign=0fd82f7fce-Naked+Security+-+June+test+-+groups+1+and+3&utm_medium=email&utm_term=0_31623bb782-0fd82f7fce-418487137

Categories
Linux Raspberry Pi

Evaluation of WPI’s multiple camera coprocessor using Raspberry Pi

Intro
There’s some good and some not-so-good about the new WPI-provided way to handle multiple video streams using a Raspebrry Pi.

ELP Cameras problems
I have bought many of these ELP cameras last year and this. I may be a slow learner, but eventually it dawned on me that the problems I noticed seem to occur because of this model of USB camera. Finally this year we got a chance to explore this further. I got my hands on a Logitech webcam, the kind you use perched on top of a display monitor. We had this set up as a second camera while an ELP camera was the first. Then we rebooted the Pi a whole bunch of times to gather some stats. About 25% of the time there were problems with the ELP over about 10 tries. There were no problems with the Logitech. Here are various problems we’e seen:
– horizontal lines superimposed over image, and image dull
– ghosting, a corner of the field of view is shown in the center of the image
– sometimes the stream never starts and we’re not yet sure if that’s a camera problem or a software problem though I begin to suspect it’s an ELP problem
– one of my pinhole ELP cameras died

So: Logitech webcam is decidedly better.

Power problem
We pay extra attention to the power draw of the Pi. With two cameras attached and a 2 amp or 1.8 amp power supply the red LED power flashes. That is not good. It’s a sign of undervoltage. The command

vcgencmd get_throttled

on your Pi will tell you if there was an undervoltage condition. I see

throttled=0x50005

when using a 2 amp power supply. Note that as far as we can see the camera display itself works just as well. We also have a 3 amp power supply. That produces a solid red led light and vcgencmd get_throttled produces a response of

throttled=0x0,

which probably indicates there were no undervoltage conditions.

The problem we need to avoid for the Pi to attempt to draw more than 2 amps from the regulator. Doing so may shut it down. So we will try to use the Pi along with a powered USB hub.

Bandwidth constraints
We want to be well below 3 mbps for two cameras. How to get there while still providing a useful service. Initially we felt we could run the cameras at 320×240 resolution, 10 fps. But after much playing we found conditions under which we exceed 3 mbps though normally we were below that. I believe that the compressibility of the image is what matters. So a “rich” visudal field with lots of contrasting objects is the least compressible. That vaguely fits our findings as well. So we felt it important to prepare for the worst case. So we actually looked at supported resolutions and settled on 176×144 pixels! It sure isn’t much, agreed, but it’s still helpful. We blow up the images during the display. We use YUYV mode. MJPEG uses considerably more bandwidth.

Refresh trick
With this WPI software, the video streams never display the first time. You have to refresh the page for some reason. We wished to have a one click operation for viewing, however, to minimize the risk of operator error. So we used some old-fashioned META HTML tags to force a page refresh.

Our initial approach was to simply have the web page refresh itself every five seconds. This worked, but caused instability in the video stream itself and given a few minutes, would always crash the video stream. So we came up with an alternative that does a single page refresh. Unfortunately we’re not that conversant in Javascript (I’m sure there’s a way to do this with Javascript) so instead we wrote two HTML pages: a source page with the refresh, and a target page that does not refresh.

Initial page HTML source

<html><head>
<meta http-equiv="Refresh" content="1;url=file:///C:/users/aperture/Desktop/2019-no-refresh.htm">
<title>stream</title></head>
<body>
<img src="http://10.31.42.18:1182/stream.mjpg" width=560 height=400>
<img src="http://10.31.42.18:1181/stream.mjpg" width=560 height=400>
</body>
</html>

And we size the browser window to just fit the two video streams side-by-side.

Target HTML source for 2019-no-refresh.htm

<html><head>
<title>stream</title></head>
<body>
<img src="http://10.31.42.18:1182/stream.mjpg" width=560 height=400>
<img src="http://10.31.42.18:1181/stream.mjpg" width=560 height=400>
</body>
</html>

Timing and sequence of events
After the Ras Pi is powered up, we launch the initial page from the task bar where it was pinned, 20 seconds later.

It takes a bit of time, then it displays the side-by-side video streams as broken images.

The red LEDs on the Logitech webcams begin to glow.

(We know when we see both red LEDs glowing we are good to go by the way).

the refresh occurs automatically to the 2019-no-refresh.htm web page.

Two side-by-side video streams are displayed, each with 560×400 display dimensions.

References and related
My 2018 version of using the Raspebrry Pi to handle two USB cameras: USB webcam on Raspberry Pi

Field Management System spec for 2019

https://s3.amazonaws.com/screensteps_live/exported/Wpilib/2078/103766/Using_a_Raspberry_PI_as_a_video_coprocessor.pdf?1546622998
WPI PDF manual, Using a Ras Pi as Video coprocessor

Download compressed image from Github: https://github.com/wpilibsuite/FRCVision-pi-gen/releases/. Scroll down to Assets and look for FRCVision_image_2019xxxx.zip. (2019.3.1 is the latest at time of this writing.

Logitech webcam: https://smile.amazon.com/gp/product/B01IC2UDMC/ref=ppx_yo_dt_b_asin_title_o00__o00_s00?ie=UTF8&psc=1

FIRST FRC Networking Basics

Categories
Admin Proxy

Google Hangouts Meet – what do these IPs all have in common?

2021 update

142.250.82.77

142.250.82.113

142.250.82.28

142.250.82.126

2020 update

142.250.82.42

142.250.82.71
142.250.82.78
209.85.144.127
74.125.250.71

Suspected additional IPs

And I observed the user agent “Google Hangouts” trying these IPs, but by the FQDN mtalk.google.com (whose resolution must by very dynamic) rather than raw IP:

142.250.31.188
172.253.122.188
172.253.63.188

Older IPs
173.194.207.127
209.85.232.127
64.233.177.127
64.233.177.103
74.125.196.127

They all have been used by Google’s Hangouts Meet based on my observation.
If you have an environment which uses proxy authentication, the above IPs do not play well with that. So you’ll need to disable proxy authentication for them for Hangouts Meet to work.

Otherwise you can do the initial connect but will be dropped after about 45 seconds.

Finally, although you can look up each individually and learn of its association to Google, Google’s own documentation is devoid of any references to them. That is unfortunate.

So the IPs in actual use is probably much larger, but these are what I’ve observed over the course of a few days of testing.

What I’ve done
Google is very hard to reach. They only provide indirect means for regular users. So not knowing any insiders I submitted feedback at https://meet.google.com/ which is what they suggest. I provided a detailed description. I doubt they will do anything with my feedback. We’ll see. Update. Correct. Months have passed and they never bothered to get back to me.

Conclusion
Google has an undocumented dependency on a whole set of IPs for hangout Meets to actually work through a proxy which requires authentication. Contacting Google for more information is probably impossible, but I will try.

Categories
Consumer Tech

Consumer Tech: amazing little Bluetooth adapter for your car

Intro
My old car I decided finally needed a touch of Bluetooth connectivity. But how to do it without spending a fortune?

The details
I found this amazingly inexpensive gadget on Amazon that describes itself as follows: Handsfree Call Car Charger,Wireless Bluetooth FM Transmitter Radio Receiver&Mp3 Music Stereo Adapter,Dual USB Port Charger Compatible for All Smartphones,Samsung Galaxy,LG,HTC,etc.

I guess it’s normally $16 but I bought on Cyber Monday so it was about $12. 12 dollars! I think if I had gone to the dealer for an after-market solution it would have been $500.

The bad first
Let’s get the bad out of the way, bearing in mind my expectations were rather low so I may be leaving out some obvious “of course it doesn’t have that…” type of stuff.

This device does an FM broadcast and you pick an unoccupied FM frequency to listen to it. On the other side it connects to a Bluetooth device such as a phone. In IT terms I’d call it a gateway since it converts one protocl to another (Bluetooth to FM). Having read the reviews, but not finding anything addressing my interests, my idea was to continue to use my FM stations, and put the station used by this device on a preset so when a call comes in to my phone I hit the station preset and accept the call on the device.
Well, you basically can’t listen to other FM stations as long as this thing is powered up. So even tuned to 88.7 at the far end of the dial, it interferes with stations up and down the dial for some reason. It’ not impossible but you’d have to have a high tolerance for static to use it that way.

Also, I’ve read that these little things break on some people after a few months. But I would no feel cheated, remember, low expectations?

The good
– microphone is good
– compatible with Samsung
– capable of audio program controls
– boots up quickly, maybe 10 seconds

My solution
I only really listen to NPR. I tried the WNYC app in the Playstore. I used to think it was buggy – stopping at random times. But I’ve had good luck my first few trips. Plays great through this thing! In many ways it’s better than FM because I don’t have to change NPR stations as I drive to work, etc, and its signal is often better. There is some static background however. Now my phone GPS talks to me through the speakers (it used to be silent in the car).

The unknown
Not sure about outbound calls to much. If you hit the button twice it seems to call the last dialed number. There are these settings U01, U02, U30. maybe those are for speed dialing?
Precisely why it has to so broadly interfere with all FM stations is a mystery.

Being a thoughtful person, I also wonder what it does to the FM reception of cars around me, ha ha? Could they pick up my call? Now that I think of it, I do remember hearing someone’s phone call on my FM radio once, many years ago. Use of an aux cord would be a way around that, but this little device does not support that.

The amazing
How cuold they pack all this tech, make something that basically works as it’s supposed to, and sell it for $12? I’m in awe.

References and related
https://smile.amazon.com/gp/product/B01M0SFMIH/ref=oh_aui_detailpage_o02_s00?ie=UTF8&psc=1

Categories
Admin Security

Great serial port concentrator: Raritan Dominion

Intro
Every now and then you find a product that is a leap ahead of where you were. Such is the case for us with regards to our product of choice for serial consoles.

The old
For Bluecoat (Symantec) proxy and AV systems, we had been using an ancient Avocent CPS device. It permitted ssh connection. It was slow and the menu very limited. But it did permit us to connect multiple serial consoles to one concentrator device at least.
For low-end firewalls we had been using DigiConnects, one per firewall. They are small, which may be thir one advantage. They are tricky to initially set up. Then they are slow to use.

In with the new
We heard about the Raritan Dominion line of products, stranegly enough, from some IT guys in Europe. It’s strange because they are right here in New Jersey – the company name probably comes form the Raritan river. But our usual reseller never heard of them. The specific device is a Dominion SXII.

It’s so much better than those older products. You can use their GUI to connect. This is a vendor who got their act together and eliminated Java. So many other security vendors have yet to do that, incredible as it is to say that.
It tries to autosense the wiring of the serial connector. That doesn’t always work, but it’s very easy for you to hardwire a port as DCE, or if that dosn’t work, try DTE. I use one type for my Symantec devices, another for firewalls.

Labelling the port with meaningful names is a snap, of course.

The Digis would interfere with the reboot process of the firewall so we’d have to detach them if we were going to rbeoot the firewall. These do not. So much better…

You can combine them with power control but we aren’t going to do that.

Don’t want to use the GUI? No problem, console access through ssh is also possible. Of configure dedicated ports that you ssh to for individual consoles.

Sending signals and cleanly disconnecting is easy with their menuss. Connecting to multiple consoles is alsono problem.

They have something called in-the-rack access. I know this will be useful but I haven’t figured out how to use it yet. But if it is what it sounds like it is, it will allow me to be in the server room and access any console by using a direct connection of some sort to the Dominion SXII.

And they’re just plain faster. A lot faster.

And, considering, they’re not so expensive.

They worked so much better than expected that we pretty much immediately filled up the ports with firewalls and other stuff.

Conclusion
A leap forward in productivity was realized by utilizing Raritn’s Dominion SXII serial port concentrator. Commissioning new security gear has never been esaier…

References and related
Raritan’s web site: https://www.raritan.com

Categories
Admin Perl

Counting active leases on an old ISC DHCP server

Intro
Checkpoint Gaia offers a DHCP service, but it ias based on a crude and old dhcp daemon implementation frmo ISC. Doesn’t give you much. Mostly just the file /var/lib/dhcpd/dhcpd.leases, which it constantly updates. A typical dhcp client entry looks like this:

 
lease 10.24.69.22 {
  starts 5 2018/11/16 22:32:59;
  ends 6 2018/11/17 06:32:59;
  binding state active;
  next binding state free;
  hardware ethernet 30:d9:d9:20:ca:4f;
  uid "\0010\331\331 \312O";
  client-hostname "KeNoiPhone";
}


The details

So I modified a perl script to take all those lines and make sense of them.
I called it lease-examine.pl.
Here it is

#!/usr/bin/perl
# from https://askubuntu.com/questions/219609/how-do-i-show-active-dhcp-leases - DrJ 11/15/18
 
my $VERSION=0.03;
 
##my $leases_file = "/var/lib/dhcpd/dhcpd.leases";
my $leases_file = "/tmp/dhcpd.leases";
 
##use strict;
use Date::Parse;
 
my $now = time;
##print $now;
##exit;
# 12:22 PM 11/15/18 EST
#my $now = "1542302555";
my %seen;       # leases file has dupes (because logging failover stuff?). This hash will get rid of them.
 
open(L, $leases_file) or die "Cant open $leases_file : $!\n";
undef $/;
my @records = split /^lease\s+([\d\.]+)\s*\{/m, <L>;
shift @records; # remove stuff before first "lease" block
 
## process 2 array elements at a time: ip and data
foreach my $i (0 .. $#records) {
    next if $i % 2;
    ($ip, $_) = @records[$i, $i+1];
    ($ip, $_) = @records[$i, $i+1];
 
    s/^\n+//;     # && warn "leading spaces removed\n";
    s/[\s\}]+$//; # && warn "trailing junk removed\n";
 
    my ($s) = /^\s* starts \s+ \d+ \s+ (.*?);/xm;
    my ($e) = /^\s* ends   \s+ \d+ \s+ (.*?);/xm;
 
    ##my $start = str2time($s);
    ##my $end   = str2time($e);
    my $start = str2time($s,UTC);
    my $end   = str2time($e,UTC);
 
    my %h; # to hold values we want
 
    foreach my $rx ('binding', 'hardware', 'client-hostname') {
        my ($val) = /^\s*$rx.*?(\S+);/sm;
        $h{$rx} = $val;
    }
 
    my $formatted_output;
 
    if ($end && $end < $now) {
        $formatted_output =
            sprintf "%-15s : %-26s "              . "%19s "         . "%9s "     . "%24s    "              . "%24s\n",
                    $ip,     $h{'client-hostname'}, ""              , $h{binding}, "expired"               , scalar(localti
me $end);
    }
    else {
        $formatted_output =
            sprintf "%-15s : %-26s "              . "%19s "         . "%9s "     . "%24s -- "              . "%24s\n",
                    $ip,     $h{'client-hostname'}, "($h{hardware})", $h{binding}, scalar(localtime $start), scalar(localti
me $end);
    }
 
    next if $seen{$formatted_output};
    $seen{$formatted_output}++;
    print $formatted_output;
}

Even that script produces a thicket of confusing information. So then I further process it. I call this script dhcp-check.sh:

#!/bin/sh
# DrJ 11/15/18
# bring over current dhcp lease file from firewall FW-1
date
echo fetching lease file dhcpd.leases
scp admin@FW-1:/var/lib/dhcpd/dhcpd.leases /tmp
# analyze it. this should show us active leases
echo analyze dhcpd.leases
DIR=`dirname $0`
$DIR/lease-examine.pl|grep active|grep -v expired > /tmp/intermed-results
# intermed-results looks like:
#10.24.76.124   : "android-7fe22a415ce21c55" (50:92:b9:b8:92:a0)    active Thu Nov 15 11:32:13 2018 -- Thu Nov 15 15:32:13 2018
#10.24.76.197   : "android-283a4cb47edf3b8c" (98:39:8e:a6:4f:15)    active Thu Nov 15 11:37:23 2018 -- Thu Nov 15 15:32:14 2018
#10.24.70.236   : "other-Phone"            (38:25:6b:79:31:60)    active Thu Nov 15 11:32:24 2018 -- Thu Nov 15 15:32:24 2018
#10.24.74.133   : "iPhone-de-Lucia"          (34:08:bc:51:0b:ae)    active Thu Nov 15 07:32:26 2018 -- Thu Nov 15 15:32:26 2018
#exit
# further processing. remove the many duplicate lines
echo count active leases
awk '{print $1}' /tmp/intermed-results|sort -u|wc -l > /tmp/dhcp-active-count
echo count is `cat /tmp/dhcp-active-count`

And that script gives my what I believe is an accurate count of the active leases. I run it every 10 minutes from SiteScope and voila, we have a way to make sure we’re coming close to running out of IP addresses.

Categories
Web Site Technologies

The IT Detective Agency: Cisco Jabber Carriage Return problem fixed

Intro
Cisco Jabber is a pretty good IM application. I’ve seen how it is a true productivity enhancer. But not so much when it doesn’t work right.

The symptoms
I hadn’t rebooted for awhile. I had a bunch of open conversations. Then all of a sudden, I could no longer send additional Jabbers (IMs, messages, or whatever you call them). I would type my message, hit ENTER (<CR>), and that action would just give send the cursor to the beginnning of a new line below the one I typed in my message box, like a typewriter. I soon realized that I had no way to SEND what I was typing because you use ENTER to do that!

A quick Internet search revaled nothing (hence this article). So I restarted Jabber and that got things working again, but of course I lost all my conversations.

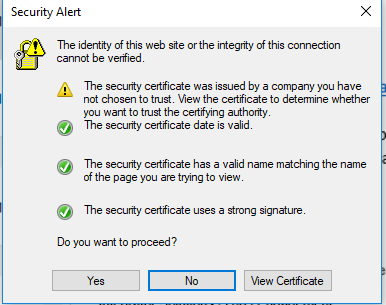
As this happened again, I looked more closely. I eventually noticed this security pop-up was associated with this ENTER problem:

Being a security-minded person I kept clicking No to this pop-up.

Then I noticed the correlation. As soon a I clicked No on that pop-up, my ‘s began to work as expecetd. After a few minutes they stop working again, I hunt for the pop-up, and click No again. And it goes on like this all day.

Hint on finding the pop-up
Jabber has a main narrow window which cpontains all the contacts and other links, and the conversation window. Highlight the main narrow wnidow and the pop-up will appear (if therer is one). Otherwise it can be hard to find.

Why is there a security alert?
Being a srot of certificate expert, I felt obliged to delve into the certificate itself to help whoever may try to solve this. I captured the certificate and found that it is a self-signed certificate! No wonder it’s not accepted. So our Unified Communications vendor, in their infinite wisdom, used self-signed certificates for some of this infrastructure. Bad idea.

I suppose I could accept it, but I’d prefer they fix this. I don’t want end users becoming comfortable overriding security pop-ups.

Conclusion
The sudden inability to use ENTER within Cisco Jabber is explained and a corrective action is outlined.

Case closed!

Categories
Scams Spam

Latest spear phishing: your password plus extortion

Intro
Three users that I know at a certain company have all received spear phishing emails worded very much like this one:

Spear Phishing shows you your password and extorts you

The details
I don’t really have many more details. One user described it to me as follows. He got this email at work. It displayed to him a password which he uses for some of his personal accounts and maybe for a few work-related logins. He said the wording was very similar to the one I showed in the above screenshot.

This one comes from IP 40.92.6.45, which is a legitimate Microsoft-owned IP. So it has an air of legitimacy to traditoinal spam filters.

I htikn all the users are reluctant to pursue the normal methods o reporting phishing, which involve sending the entire email to some unknown group of analysts because the email does in fatc contain a legitimate password of theirs. This makes it that much harder for an incident repsonse team to kick into gear and start a detailed analysis.

I mentioned three users – those are just the ones brought to my attention, and I’m not even in the business any more. So by extrapolation, this has probably occurred to many more users at just this one company. It’s disturbing…

November update
Another one came in to a different user. I have the text of this one and have only changed the recipient information.

From: a2603510@owlpic.com <a2603510@owlpic.com>
Sent: Thursday, November 29, 2018 11:55 AM
To: Dr J <drj@drj.com>
Subject: drj@drj.com has been hacked! Change your password immediately!
 
Hello!
 
I have very bad news for you.                                                                                                                                 03/08/2018 - on this day I hacked your OS and got full access to your account drj@drj.com On this day your account drj@drj.com has password: drj1234
 
So, you can change the password, yes.. But my malware intercepts it every time.
 
How I made it:
In the software of the router, through which you went online, was a vulnerability.
I just hacked this router and placed my malicious code on it.
When you went online, my trojan was installed on the OS of your device.
 
After that, I made a full dump of your disk (I have all your address book, history of viewing sites, all files, phone numbers and addresses of all your contacts).
 
A month ago, I wanted to lock your device and ask for a not big amount of btc to unlock.
But I looked at the sites that you regularly visit, and I was shocked by what I saw!!!
I'm talk you about sites for adults.
 
I want to say - you are a BIG pervert. Your fantasy is shifted far away from the normal course!
 
And I got an idea....
I made a screenshot of the adult sites where you have fun (do you understand what it is about, huh?).
After that, I made a screenshot of your joys (using the camera of your device) and glued them together.
Turned out amazing! You are so spectacular!
 
I'm know that you would not like to show these screenshots to your friends, relatives or colleagues.
I think $709 is a very, very small amount for my silence.
Besides, I have been spying on you for so long, having spent a lot of time!
 
Pay ONLY in Bitcoins!
My BTC wallet: 1FgfdebSqbXRciP2DXKJyqPSffX3Sx57RF
 
You do not know how to use bitcoins?
Enter a query in any search engine: "how to replenish btc wallet".
It's extremely easy
 
For this payment I give you two days (48 hours).
As soon as this letter is opened, the timer will work.
 
After payment, my virus and dirty screenshots with your enjoys will be self-destruct automatically.
If I do not receive from you the specified amount, then your device will be locked, and all your contacts will receive a screenshots with your "enjoys".
 
I hope you understand your situation.
- Do not try to find and destroy my virus! (All your data, files and screenshots is already uploaded to a remote server)
- Do not try to contact me (you yourself will see that this is impossible, the sender address is automatically generated)
- Various security services will not help you; formatting a disk or destroying a device will not help, since your data is already on a remote server.
 
P.S. You are not my single victim. so, I guarantee you that I will not disturb you again after payment!
 This is the word of honor hacker
 
I also ask you to regularly update your antiviruses in the future. This way you will no longer fall into a similar situation.
 
Do not hold evil! I just do my job.
Good luck.

Conclusion
A new disturbing type of spear phishing campaign is presented. The email presents an actual password (no hint as to how the hacker obtained it) and then tries to extort the user for quite a bit of money to avoid reputation-damaging disclosures to their close associates.

References and related
This is a useful site, albeit a little frightening, that shows you the many sites that have leaked your Email address due to a data breach: https://haveibeenpwned.com/