Verizon Phone Finder
They will lead you to some page that seems to suggest you needed to buy a premium service from them if you need to find your phone. Don’t fall for it. Or maybe you will get their other page which only sends you on to Google’s page. So, for Android phones, here is the universal phone finder link:
It’s pretty cool. It shows pretty precisely where the phone is, how much power is left and gives you the chance to ring it for five minutes and even lock it.
Apple iPhones
Use https://icloud.com/find . But you’ll have to know your icloud password. Actually I’ve used the Android finder a few times but never really used the iphone finder. Hopefully it works just as well.
Change your Verizon Wireless Voicemail password
This is even harder to find unless you have just the right search terms.
From a Verizon app on your phone
I haven’t used this method.
https://www.verizonwireless.com/support/knowledge-base-17076/
How to set up your voicemail so as not to enter a password
Basic idea: add a contact for Voicemail tack on two pauses, then append the password. So that will be
*86,,<YOUR_PASSWORD>
For instance I named this contact VM. If my password were 1234 the number would be
*86,,1234
To generate the “,” character go to the special characters key to the right of # when typing in the number.
Intro
In my previous post I showed how to turn a Raspberry Pi plus USB camera into something like an IP camera. In the course of that work I found it wasn’t so easy as it was in the past to assign static IPs upon boot. So I came up with my own unique method, which combines a modicum of Linux knowledge with a dash of networking knowledge.
The requirements
I sort of invented these requirements for myself, putting myself in the pickle I found myself in. I am working with a friend’s Pi 3 and didn’t want to mess it up too badly. Yet I wanted to easily work with it at home, and for the Robotics team. How to do it all?
I decided to permit the DHCP client, now called dhcpcd, running. So it will assign an IP address and appropriate gateway if there is a DHCP server present on the network. When I test at home I sometimes don’t use DHCP. When I bring my test setup to Robotics, more often than not I have my own little isolated LAN and no DHCP server. So, knowing that a single interface can have two or even more than two IP adresses, I created the following list of requirements for myself.
Act as DHCP client if there is DHCP server.
Additionally,
Assign static IP of 192.168.1.161/24 so it works in my home.
Assign another static IP of 10.31.42.15 so it works with a predictable IP in the robotics environment.
Let the two above IP assignments work even in the absence of a DHCP server!
Sounds kind of simple, but it’s not so easy.
I’m running a Raspberry Pi 3 with Raspbian Stretch (the release after Jessie).
Initial approach
With this version you’re supposed to use the file
/etc/dhcpcd.conf
to create a static IP.
But it works like c**p, at least when you want to push it and have it meet all the requirements above. It’s got a bug and doesn’t allow you to meet all the above requirements. I experimented. But my method does work.
The final solution
So in the end I leave /etc/dhcpcd.conf alone!
I use this new (to me) feature that crontab has an @reboot feature that calls its argument at boot time – just what we need.
Then I combined some old school use of ifconfig plus newer school command ip.
Here’s the script, which I call ip-assign.sh.
#!/bin/bashsleep2# see if there is a dhcp-assigned IP already. If so 'scope global' appears in the listing# ip add show eth0 sample output:addflag=""ip add show eth0|grep-q'scope global'if[$? == 0]; thenaddflag="add"fi# first IPifconfig eth0 $addflag 10.31.42.15 netmask 255.255.255.0 broadcast 10.31.42.255
# next IPifconfig eth0 add 192.168.1.161 netmask 255.255.255.0 broadcast 192.168.1.255
#!/bin/bash
sleep 2
# see if there is a dhcp-assigned IP already. If so 'scope global' appears in the listing
#  ip add show eth0 sample output:
addflag=""
ip add show eth0|grep -q 'scope global'
if [ $? == 0 ]; then
  addflag="add"
fi
# first IP
ifconfig eth0 $addflag 10.31.42.15 netmask 255.255.255.0 broadcast 10.31.42.255
# next IP
ifconfig eth0 add 192.168.1.161 netmask 255.255.255.0 broadcast 192.168.1.255
What I observed is that eth0 already has an IP assigned to it (for instance from a DHCP server), then the string “scope global” appears when you run ip add, otherwise it doesn’t. Furthermore, ifconfig has an optional argument I noticed call add, which seems to exist in order to add additional virtual interfaces – precisely what we want. But if there is no IP yet assigned we should call ifconfig the first time with the add argument. If I had had additional virtual IPs I could have just kept on going…
So to call this at boot time I use my lazy method. I edit the crontab file and insert a line like this:
So without a DHCP server I have after booting:
$ ip add show eth0
2: eth0: <BROADCAST,MULTICAST,UP,LOWER_UP> mtu 1500 qdisc pfifo_fast state UP group default qlen 1000
    link/ether b8:27:eb:e3:02:74 brd ff:ff:ff:ff:ff:ff
    inet 192.168.1.161/24 brd 10.31.42.255 scope global eth0:0
       valid_lft forever preferred_lft forever
    inet 10.31.42.15/24 brd 192.168.1.255 scope global eth0
       valid_lft forever preferred_lft forever
    inet 169.254.159.115/16 brd 169.254.255.255 scope global eth0
       valid_lft forever preferred_lft forever
    inet6 fe80::e923:3131:224c:ecd/64 scope link
       valid_lft forever preferred_lft forever
2: eth0: <BROADCAST,MULTICAST,UP,LOWER_UP> mtu 1500 qdisc pfifo_fast state UP group default qlen 1000
link/ether b8:27:eb:e3:02:74 brd ff:ff:ff:ff:ff:ff
inet 192.168.1.161/24 brd 10.31.42.255 scope global eth0:0
valid_lft forever preferred_lft forever
inet 10.31.42.15/24 brd 192.168.1.255 scope global eth0
valid_lft forever preferred_lft forever
inet 169.254.159.115/16 brd 169.254.255.255 scope global eth0
valid_lft forever preferred_lft forever
inet6 fe80::e923:3131:224c:ecd/64 scope link
valid_lft forever preferred_lft forever
If you’re lazy like me just type
$ ip add
and you’ll get the other interfaces as well. It’s very easy to type, too!
Note the broadcast (brd) addresses are reversed from how you’d expect them. I decided that it doesn’t matter as long as they’re both present somewhere with the correct value. It’s all using the one physical interface so the interface doesn’t really care. And from all my testing I am right I believe on this point.
Disable WiFi – wlan0
To disable WiFi entirely, which you may want to do if using in a FIRST FRC competition, add this to /boot/config.txt and reboot: dtoverlay=pi3‐disable‐wifi
After doing that wlan0 does not even show up when you do an ip add.
Intro
Why would you even want to do this when you can buy a native IP webcam for less? I’m not sure, but i found myself in this situation so it could happen to others, and I found some things that worked and some that required quite some effort.
In my previous post I spoke about using opencv on Raspberry Pi.
This post is more about getting at an image with a minimum of lag time and relatively low bandwidth.
What I did not do
I considered bolting on an add-on to opencv to convert the video stream into mjpeg. But the process looked relatively obscure so I did not feel that was a good way to go.
I skimmed through the mjpeg (motion jpeg) standard. Looks pretty straightforward. i even considered writing my own streamer. It’s probably not too hard to write a bad one! But I feared it would be unreliable so I didn’t go that route. It’s just jpeg, separator, jpeg, separator, jpeg, etc. Here’s the Wikipedia link: https://en.wikipedia.org/wiki/Motion_JPEG.
I think the best software for is mjpg_streamer. It is not available as a simple package. So you have to compile it and patch it.
Mostly! I needed the patch as well (which he also mentions). his instructions for the patch aren’t accurate.
He provides a link. You need to save the contents by launching the downloaded file and saving it as input_uvc_patch.txt after opening it in Windows Notepad (if you’re doing this download through Windows).
On the Pi, you would do these steps:
cd ~/mjpg-streamer
patch -p0 < input_uvc_patch.txt
make USE_LIBV4L2=true clean all
sudo make DESTDIR=/usr/local install
cd ~/mjpg-streamer
patch -p0 < input_uvc_patch.txt
make USE_LIBV4L2=true clean all
sudo make DESTDIR=/usr/local install
That is, assuming you had copied the patch file into that ~/mjpg-streamer directory.
Before we get too far, I wished to mention that the command fswebcam proved somewhat useful for debugging.
Here’s a weird thing about that camera
We had one, then I got another one. The two cameras do not behave the same way!
Device files
I guess Raspberry Pi has its own version of plug-and-play. So what it means is that when you plug in the camera a device file is dynamically created called /dev/video0. Now if you happen to plug in a second USB camera, that one becomes device /dev/video1. Some utilities are designed to work with /dev/video0 and require extra arguments to deal with a camera with a different device number, e.g., fswebcam -d /dev/video1 image.jpg.
But actually running two cameras did not work out too well for me. It seemed to crash and I don’t have time to investigate that.
The working command is…
My livestream.sh file looks like this right now. It will change but this is a good document point.
The main point is that I found this additional -yuv argument seemed to get the one webcam to work, whereas the other USB camera didn’t need that! If you don’t include it launcher.sh may appear to work, but all you see when you connect to the direct video stream looks like this image:
One time when I ran it it crashed and suggested that -yuv argument be added, so I tried it and it actually worked! That’s how i discovered that oddity.
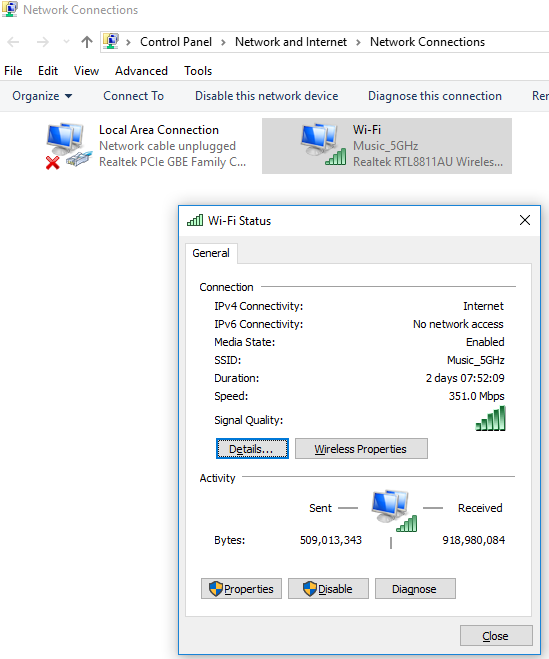
Bandwidth with those settings
About 2 mbps. How do I measure that? simple. I bring up the web page and tool around the networking stuff until i find Change Adapter Settings (always difficult to find). Then I double-click on my active adapter and stare at the received bytes to get a feel for how much it’s incrementing by each second. Multiply by 10, and voila, you have a crude measure, perhaps +/- 30%, of your bandwidth consumed!
Latency
This is so important it needs its own section.
Latency is pretty good. We’ve measured it to be 0.26 seconds.
fswebcam errors
What happens if you run fswebcam while livestream is running?
$ fswebcam /tmp/image.jpg
--- Opening /dev/video0...
Trying source module v4l2...
/dev/video0 opened.
No input was specified, using the first.
Error selecting input 0
VIDIOC_S_INPUT: Device or resource busy
--- Opening /dev/video0...
Trying source module v4l2...
/dev/video0 opened.
No input was specified, using the first.
Error selecting input 0
VIDIOC_S_INPUT: Device or resource busy
Makes sense. Only one program on the Pi can capture the output form the camera.
Does the simple command fswebcam image.jpg work all the time? No it does not! Sometimes it simply fails, which is scary.
Here is an example of two consecutive calls to fswebcam about a second apart which illustrates the problem:
$ fswebcam /tmp/image.jpg
--- Opening /dev/video0...
Trying source module v4l2...
/dev/video0 opened.
No input was specified, using the first.
Adjusting resolution from 384x288 to 352x288.
--- Capturing frame...
Timed out waiting for frame!
No frames captured.
--- Opening /dev/video0...
Trying source module v4l2...
/dev/video0 opened.
No input was specified, using the first.
Adjusting resolution from 384x288 to 352x288.
--- Capturing frame...
Timed out waiting for frame!
No frames captured.
$ fswebcam /tmp/image.jpg
--- Opening /dev/video0...
Trying source module v4l2...
/dev/video0 opened.
No input was specified, using the first.
Adjusting resolution from 384x288 to 352x288.
--- Capturing frame...
Captured frame in 0.00 seconds.
--- Processing captured image...
Writing JPEG image to '/tmp/image.jpg'.
--- Opening /dev/video0...
Trying source module v4l2...
/dev/video0 opened.
No input was specified, using the first.
Adjusting resolution from 384x288 to 352x288.
--- Capturing frame...
Captured frame in 0.00 seconds.
--- Processing captured image...
Writing JPEG image to '/tmp/image.jpg'.
Running two USB cameras wih a single Ras Pi
This initially did not work in my first attempts but now it does!
It probably helps to be running a Raspebrry Pi 3 with Raspbian Stretch OS.
Maybe this wasn’t needed but we made a directory /usr/local/www2 and copied all the files from /usr/local/www to /usr/local/www2. A 2nd USB camera when plugged in creates /dev/video1 as I mentioned. You have to pick a different port, so we chose port 8090. Putting it all together we have the script below, livestream2.sh:
If a 2nd camera isn’t plugged in then the script errors out and doesn’t run, which is pretty much what we want. Running it by hand we get this:
$ ./livestream2.sh
MJPG Streamer Version: svn rev: 3:172M
 i: Using V4L2 device.: /dev/video1
 i: Desired Resolution: 352 x 288
 i: Frames Per Second.: 12
 i: Format............: YUV
 i: JPEG Quality......: 80
ERROR opening V4L interface: No such file or directory
 Init v4L2 failed !! exit fatal
 i: init_VideoIn failed
MJPG Streamer Version: svn rev: 3:172M
i: Using V4L2 device.: /dev/video1
i: Desired Resolution: 352 x 288
i: Frames Per Second.: 12
i: Format............: YUV
i: JPEG Quality......: 80
ERROR opening V4L interface: No such file or directory
Init v4L2 failed !! exit fatal
i: init_VideoIn failed
Reining in the bandwidth
We found that by lowering the jpeg quality with the -q option we could reduce the bandwidth and the quality, but the quality was still good enough for our purposes. Now the video streams from both cameras comes in around 4.5 mbps, even in bright lighting. So we settled on -q 50 for a 50% quality. Even a quality of 10 (10%) is not all that bad! I believe the default is 80%.
Bandwidth monitor on the Pi
Some of this was written by the student so apologies for the misspellings! Probably will be refined in the future. We can tease out how much bandwidth we’re actually using on the Pi by measuring the transmitted (TX) bytes periodically. We’ll record that during a matcgh so we can prove to ourselves and others that we have our bandwidth under control – far less than 7 mbps despite using two cameras.
Unreliable video stream startup
Sometimes one video stream does not come on correctly after first power-up. This is most perplexing as with computer gear one expects consistent, reproducible behaviour, yet that is not at all what we’ve observed.
This makes no sense, but in one environment we had our two streams running successfully six times in a row. Then I take the equipment home and find only one of the two streams starts up. It seems more likely to fail after sitting powered off for a few hours! I know it doesn’t make sense but that’s how it is.
In any case we have built a monitor which looks for and corrects this situation. It’s pretty clever and effective if I say so myself! And necessary! We created one monitor each for the two video devices. Here’s videomonitor.sh:
#!/bin/bash# DrJ make sure video stream is not stuck. Restart it if it issleep8while/bin/true; dochars=`curl -s-m1 localhost:80/?action=stream|wc -c`if[$chars-lt100]; then# we are stuck!dateecho Video stuck so we will restart it
pid=`ps-ef|grep mjpg|grep'p 80'|grep-vsudo|awk'{print $2}'`sudokill$pidsleep1
~/livestream.sh &# restart...else# we have a good streamtouch/tmp/stream80
fisleep5done
#!/bin/bash
# DrJ make sure video stream is not stuck. Restart it if it is
sleep 8
while /bin/true; do
  chars=`curl -s -m1 localhost:80/?action=stream|wc -c`
  if [ $chars -lt 100 ]; then
# we are stuck!
    date
    echo Video stuck so we will restart it
    pid=`ps -ef|grep mjpg|grep 'p 80'|grep -v sudo|awk '{print $2}'`
    sudo kill $pid
    sleep 1
    ~/livestream.sh &
# restart...
  else
# we have a good stream
    touch /tmp/stream80
  fi
  sleep 5
done
and videomonitor2.sh
#!/bin/bash# DrJ make sure video stream is not stuck. Restart it if it issleep8while/bin/true; dochars=`curl -s-m1 localhost:443/?action=stream|wc -c`if[$chars-lt100]; then# we are stuck!dateecho Video stuck so we will restart it
pid=`ps-ef|grep mjpg|grep'p 443'|grep-vsudo|awk'{print $2}'`sudokill$pidsleep1
~/livestream2.sh &# restart...else# we have a good streamtouch/tmp/stream443
fisleep5done
#!/bin/bash
# DrJ make sure video stream is not stuck. Restart it if it is
sleep 8
while /bin/true; do
  chars=`curl -s -m1 localhost:443/?action=stream|wc -c`
  if [ $chars -lt 100 ]; then
# we are stuck!
    date
    echo Video stuck so we will restart it
    pid=`ps -ef|grep mjpg|grep 'p 443'|grep -v sudo|awk '{print $2}'`
    sudo kill $pid
    sleep 1
    ~/livestream2.sh &
# restart...
  else
# we have a good stream
    touch /tmp/stream443
  fi
  sleep 5
done
And we’ll start these at boot time like the long and growing list of things we are starting at boot time.
Allowed ports
From rule 66…
R66. Communication between the ROBOT and the OPERATOR CONSOLE is restricted as follows:
A. Network Ports:
HTTP 80: Camera connected via switch on the ROBOT, bi-directional
HTTP 443: Camera connected via switch on the ROBOT, bi-directional
...
R66. Communication between the ROBOT and the OPERATOR CONSOLE is restricted as follows:
A. Network Ports:
HTTP 80: Camera connected via switch on the ROBOT, bi-directional
HTTP 443: Camera connected via switch on the ROBOT, bi-directional
...
So…to be safe we are switching from use of ports 8080 and 8090 to ports 80 and 443. But this means we have to preface certain commands – such as mjpg_streamer – with sudo since tcp ports < 1024 are privileged.
Flashing an led when we have a good video stream
Our led is soldered to a gruond pin and GPIO pin 18.
We call this program ledflash.sh
#!/bin/bash
#flashes the led
while /bin/true; do
if [ -f /tmp/stream80 ] && [ -f /tmp/stream443 ]; then
  pin=18
  cd /sys/class/gpio
  echo $pin > export
  cd gpio$pin
  echo out > direction
  while /bin/true; do
#make 5 quick flashes
    for i in `seq 1 5`; do
      echo 1 > value
      sleep 0.1
      echo 0 > value
      sleep 0.1
    done
#now lets make the long flash
    echo 1 > value
    sleep 0.6
  done
fi
sleep 2
done
#!/bin/bash
#flashes the led
while /bin/true; do
if [ -f /tmp/stream80 ] && [ -f /tmp/stream443 ]; then
pin=18
cd /sys/class/gpio
echo $pin > export
cd gpio$pin
echo out > direction
while /bin/true; do
#make 5 quick flashes
for i in `seq 1 5`; do
echo 1 > value
sleep 0.1
echo 0 > value
sleep 0.1
done
#now lets make the long flash
echo 1 > value
sleep 0.6
done
fi
sleep 2
done
We start it at boot time as well. It tells us when both video streams are ready for viewing because only then do the files get created and then the led starts flashing.
It takes about 62 seconds from the time power is supplied to the Raspberry Pi to the time the LED starts flashing (indicating the two video streams are ready).
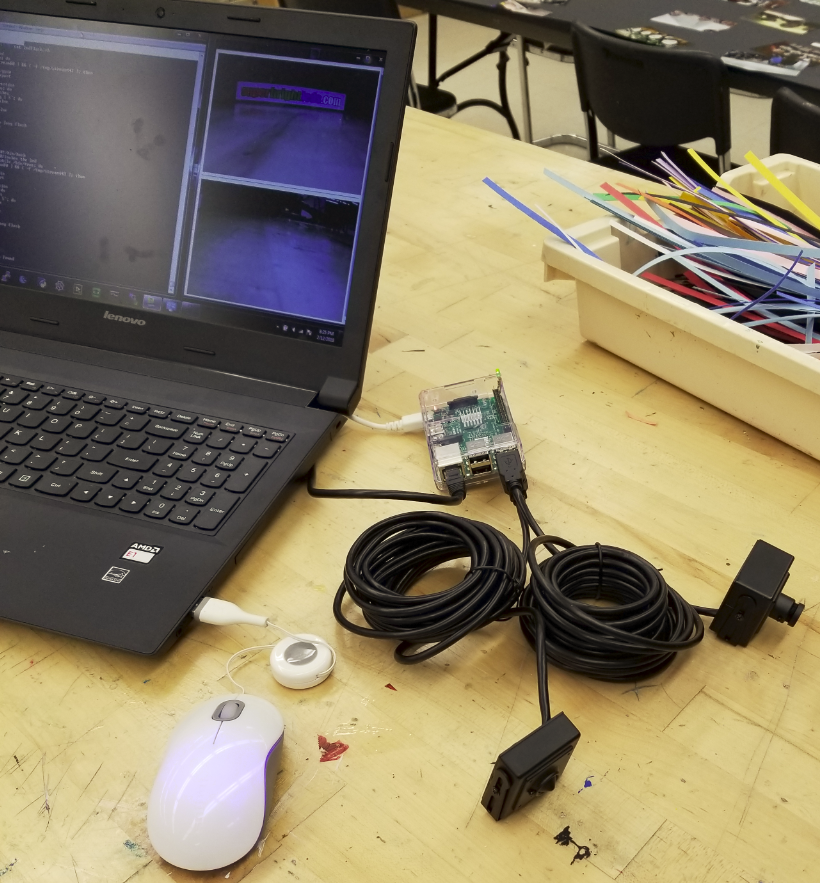
Picture of setup
This picture goes a long way to convey the ideas. 2 USB cameras, 1 Ras Pi, flashing LED
Intro
I’ve done a few things to do some vision processing with OpenCV on a Raspberry Pi 3. I am a rank amateur so my meager efforts will not be of much help to anyone else. My idea is that maybe this could be used on an FRC First Robotics team’s robot. Hence I will be getting into some tangential areas where I am more comfortable.
Even though this is a work in progress I wanted to get some of it down before I forget what I’ve done so far!
Tangential Stuff
Disable WiFi
You shouldn’t have peripheral devices with WiFi enabled. Raspeberry Pi 3 comes with built-in WiFi. Here’s how to turn it off.
Add the following line to your /boot/config.txt file:
dtoverlay=pi3‐disable‐wifi
Reboot.
If it worked you should only see the loopback and eth0 interefaces in response to the ip link command, something like this:
$ ip link
1: lo: mtu 65536 qdisc noqueue state UNKNOWN mode DEFAULT group default qlen 1
link/loopback 00:00:00:00:00:00 brd 00:00:00:00:00:00
2: eth0: mtu 1500 qdisc pfifo_fast state UP mode DEFAULT group default qlen 1000
link/ether b8:27:eb:3f:92:f3 brd ff:ff:ff:ff:ff:ff
Hardcode an IP address the simple-minded way
On a lark I decided to try the old-fashioned method I first used on Sun Solaris, or was it even Dec Ultrix? That is, ifconfig. I thought it was to be deprecated but it works well enough for my purpose.
So something like
$ sudo ifconfig eth0 192.168.1.160
does the job, as long as the network interface is up and connected.
Autolaunch a VNC Server so we can haul the camera image back to the driver station
$ vncserver &hypher;geometry 640×480 ‐Authentication=VncAuth :1
Launch our python-based opencv program and send output to VNC virtual display
The above was just illustrative. What I actually have is a single script, launcher.sh which puts it all together. Here it is.
#!/bin/sh
# DrJ
sleep 2
# set a hard-wired IP - this will have to change!!!
sudo ifconfig eth0 192.168.1.160
# launch small virtual vncserver on DISPLAY 1
vncserver -Authentication=VncAuth :1
# launch UDP server
$HOME/server.py > /tmp/server.log 2>&1 &
# run virtual env
cd $HOME
# don't need virtualenv if we use this version of python...
#. /home/pi/.profile
#workon cv
#
# now launch our python video capture program
#
export DISPLAY=:1
/home/pi/.virtualenvs/cv/bin/python green.py > /tmp/green.log 2>&1 &
OpenCV (open computer Vision)
opencv is a bear and you have to really work to get it onto a Pi 3. There is no apt-get install opencv. You have to download and compile the thing. There are many steps and few accurate documentation sources on the Internet as of this writing (January 2018).
if not "%minimized%"=="" goto :minimized
set minimized=true
start /min cmd /C "%~dpnx0"
goto :EOF
:minimized
c:\apps\ultravnc\vncviewer -password raspberry 192.168.1.160:1
I’m sure there’s a better way but I don’t know it.
The setup
We have a USB camera plugged into the Pi.
A green disc LED light.
A green filter over the camera lens.
A target with two parallel strips of retro-reflective tape we are trying to suss out from everything else.
Some sliders to control the sensitivity of our color matching.
The request to analyze the video in opencv as well as display it on the driver station.
Have opencv calculate the pixel distance (“correction”) from image center of the “target” (the two parallel strips).
Send this correction via a UDP server to any client who wants to know the correction.
Here is our current python program green.py which does these things.
importTkinteras tk
fromthreadingimport Thread,Event
from multiprocessing import Array
from ctypes import c_int32
import cv2
import numpy as np
importsys#from Tkinter import *#cap = cv2.VideoCapture(0)global x
global f
x =1
y =1
f ="green.txt"class CaptureController(tk.Frame):
NSLIDERS =7def__init__(self,parent):
tk.Frame.__init__(self)self.parent= parent
# create a synchronised array that other threads will read fromself.ar= Array(c_int32,self.NSLIDERS)# create NSLIDERS Scale widgetsself.sliders=[]for ii inrange(self.NSLIDERS):
# through the command parameter we ensure that the widget updates the sync'd array
s = tk.Scale(self, from_=0, to=255, length=650, orient=tk.HORIZONTAL,
command=lambda pos,ii=ii:self.update_slider(ii,pos))if ii ==0:
s.set(0)#green minelif ii ==1:
s.set(0)elif ii ==2:
s.set(250)elif ii ==3:
s.set(3)#green maxelif ii ==4:
s.set(255)elif ii ==5:
s.set(255)elif ii ==6:
s.set(249)#way down below
s.pack()self.sliders.append(s)# Define a quit button and quit event to help gracefully shut down threads
tk.Button(self,text="Quit",command=self.quit).pack()self._quit = Event()self.capture_thread=None# This function is called when each Scale widget is moveddef update_slider(self,idx,pos):
self.ar[idx]= c_int32(int(pos))# This function launches a thread to do video capturedef start_capture(self):
self._quit.clear()# Create and launch a thread that will run the video_capture function# self.capture_thread = Thread(cap = cv2.VideoCapture(0), args=(self.ar,self._quit))self.capture_thread= Thread(target=video_capture, args=(self.ar,self._quit))self.capture_thread.daemon=Trueself.capture_thread.start()def quit(self):
self._quit.set()try:
self.capture_thread.join()exceptTypeError:
passself.parent.destroy()# This function simply loops over and over, printing the contents of the array to screendef video_capture(ar,quit):
print ar[:]
cap = cv2.VideoCapture(0)
Xerror =0
Yerror =0
XerrorStr ='0'
YerrorStr ='0'whilenot quit.is_set():
# the slider values are all readily available through the indexes of ar# i.e. w1 = ar[0]# w2 = ar[1]# etc.# Take each frame
_, frame = cap.read()# Convert BGR to HSV
hsv = cv2.cvtColor(frame, cv2.COLOR_BGR2HSV)# define range of blue color in HSV
lower_green = np.array([ar[0],ar[1],ar[2]])
upper_green = np.array([ar[3],ar[4],ar[5]])# Threshold the HSV image to get only green colors
mask = cv2.inRange(hsv, lower_green, upper_green)# Bitwise-AND mask and original image
res = cv2.bitwise_and(frame,frame, mask= mask)
cv2.imshow('frame', frame)# cv2.imshow('mask',mask)# cv2.imshow('res',res)#------------------------------------------------------------------
img = cv2.blur(mask,(5,5))#filter (blur) image to reduce errors
cv2.imshow('img',img)
ret,thresh = cv2.threshold(img,127,255,0)
im2,contours,hierarchy = cv2.findContours(thresh, cv2.RETR_TREE,cv2.CHAIN_APPROX_SIMPLE)print'number of contours==640x480==================== ',len(contours)
target=0iflen(contours)>0:
numbercontours =len(contours)while numbercontours >0:
numbercontours = numbercontours -1# contours start at 0
cnt = contours[numbercontours]#this is getting the first contour found, could look at 1,2,3 etc
x,y,w,h = cv2.boundingRect(cnt)##---line below has the limits of the area of the target-----------------------##if w * h > 4200 and w * h < 100000: #area of capture must exceed to exit loopif h >30and w < h/3: #area of capture must exceed to exit loopprint' X Y W H AREA Xc Yc xEr yEr'
Xerror =(-1) * (320 - (x+(w/2)))
XerrorStr =str(Xerror)
Yerror =240 - (y+(h/2))
YerrorStr =str(Yerror)print x,y,w,h,(w*h),'___',(x+(w/2)),(y+(h/2)),'____',Xerror,Yerror
break#------- draw horizontal and vertical center lines below
cv2.line(img,(320,0),(320,480),(135,0,0),5)
cv2.line(img,(0,240),(640,240),(135,0,0),5)
displaySTR = XerrorStr + ' ' + YerrorStr
font = cv2.FONT_HERSHEY_SIMPLEX
cv2.putText(img,displaySTR,(10,30), font,.75,(255,255,255),2,cv2.LINE_AA)
cv2.imshow('img',img)# wrtie to file for our server'sys.stdout=open(f,"w")print'H,V:',Xerror,Yerror
sys.stdout=sys.__stdout__
target=1##--------------------------------------------------------------------if target==0:
# no target found. print non-physical values out to a filesys.stdout=open(f,"w")print'H,V:',1000,1000sys.stdout=sys.__stdout__
k = cv2.waitKey(1) & 0xFF#parameter is wait in millsecondsif k ==27: # esc key on keboard
cap.release()
cv2.destroyAllWindows()breakif __name__ =="__main__":
root = tk.Tk()
selectors = CaptureController(root)
selectors.pack()# q = tk.Label(root, text=str(x))# q.pack()
selectors.start_capture()
root.mainloop()
import Tkinter as tk
from threading import Thread,Event
from multiprocessing import Array
from ctypes import c_int32
import cv2
import numpy as np
import sys
#from Tkinter import *
#cap = cv2.VideoCapture(0)
global x
global f
x = 1
y = 1
f = "green.txt"

class CaptureController(tk.Frame):
    NSLIDERS = 7
    def __init__(self,parent):
        tk.Frame.__init__(self)
        self.parent = parent

        # create a synchronised array that other threads will read from
        self.ar = Array(c_int32,self.NSLIDERS)

        # create NSLIDERS Scale widgets
        self.sliders = []
        for ii in range(self.NSLIDERS):
            # through the command parameter we ensure that the widget updates the sync'd array
            s = tk.Scale(self, from_=0, to=255, length=650, orient=tk.HORIZONTAL,
                         command=lambda pos,ii=ii:self.update_slider(ii,pos))
            if ii == 0:
                s.set(0)  #green min
            elif ii == 1:
                s.set(0)
            elif ii == 2:
                s.set(250)
            elif ii == 3:
                s.set(3)  #green max
            elif ii == 4:
                s.set(255)
            elif ii == 5:
                s.set(255)
            elif ii == 6:
                s.set(249)  #way down below
            s.pack()
            self.sliders.append(s)

        # Define a quit button and quit event to help gracefully shut down threads
        tk.Button(self,text="Quit",command=self.quit).pack()
        self._quit = Event()
        self.capture_thread = None

    # This function is called when each Scale widget is moved
    def update_slider(self,idx,pos):
        self.ar[idx] = c_int32(int(pos))

    # This function launches a thread to do video capture
    def start_capture(self):
        self._quit.clear()
        # Create and launch a thread that will run the video_capture function
#        self.capture_thread = Thread(cap = cv2.VideoCapture(0), args=(self.ar,self._quit))
        self.capture_thread = Thread(target=video_capture, args=(self.ar,self._quit))
        self.capture_thread.daemon = True
        self.capture_thread.start()

    def quit(self):
        self._quit.set()
        try:
            self.capture_thread.join()
        except TypeError:
            pass
        self.parent.destroy()

# This function simply loops over and over, printing the contents of the array to screen
def video_capture(ar,quit):
    print ar[:]
    cap = cv2.VideoCapture(0)
    Xerror = 0
    Yerror = 0
    XerrorStr = '0'
    YerrorStr = '0'
    while not quit.is_set():
        # the slider values are all readily available through the indexes of ar
        # i.e. w1 = ar[0]
        # w2 = ar[1]
        # etc.
        # Take each frame
        _, frame = cap.read()
        # Convert BGR to HSV
        hsv = cv2.cvtColor(frame, cv2.COLOR_BGR2HSV)
        # define range of blue color in HSV
        lower_green = np.array([ar[0],ar[1],ar[2]])
        upper_green = np.array([ar[3],ar[4],ar[5]])
        # Threshold the HSV image to get only green colors
        mask = cv2.inRange(hsv, lower_green, upper_green)
        # Bitwise-AND mask and original image
        res = cv2.bitwise_and(frame,frame, mask= mask)
        cv2.imshow('frame', frame)
#        cv2.imshow('mask',mask)
#        cv2.imshow('res',res)
        #------------------------------------------------------------------
        img = cv2.blur(mask,(5,5))   #filter (blur) image to reduce errors
        cv2.imshow('img',img)
        ret,thresh = cv2.threshold(img,127,255,0)
        im2,contours,hierarchy = cv2.findContours(thresh, cv2.RETR_TREE,cv2.CHAIN_APPROX_SIMPLE)
        print 'number of contours==640x480====================  ', len(contours)
        target=0
        if len(contours) > 0:
            numbercontours = len(contours)
            while numbercontours > 0:
                numbercontours = numbercontours -1  # contours start at 0
                cnt = contours[numbercontours]   #this is  getting the first contour found, could look at 1,2,3 etc
                x,y,w,h = cv2.boundingRect(cnt)
#
#---line below has the limits of the area of the target-----------------------
#
                #if w * h > 4200 and w * h < 100000:  #area of capture must exceed  to exit loop
                if h > 30 and w < h/3:  #area of capture must exceed  to exit loop
                    print ' X   Y  W  H  AREA      Xc  Yc      xEr yEr'
                    Xerror = (-1) * (320 - (x+(w/2)))
                    XerrorStr = str(Xerror)
                    Yerror = 240 - (y+(h/2))
                    YerrorStr = str(Yerror)
                    print  x,y,w,h,(w*h),'___',(x+(w/2)),(y+(h/2)),'____',Xerror,Yerror
                    break

#-------        draw horizontal and vertical center lines below
                cv2.line(img,(320,0),(320,480),(135,0,0),5)
                cv2.line(img,(0,240),(640,240),(135,0,0),5)
                displaySTR = XerrorStr + '  ' + YerrorStr
                font = cv2.FONT_HERSHEY_SIMPLEX
                cv2.putText(img,displaySTR,(10,30), font, .75,(255,255,255),2,cv2.LINE_AA)
                cv2.imshow('img',img)
# wrtie to file for our server'
                sys.stdout = open(f,"w")
                print 'H,V:',Xerror,Yerror
                sys.stdout = sys.__stdout__
                target=1
                #
                #--------------------------------------------------------------------
        if target==0:
                # no target found. print non-physical values out to a file
                sys.stdout = open(f,"w")
                print 'H,V:',1000,1000
                sys.stdout = sys.__stdout__
        k = cv2.waitKey(1) & 0xFF    #parameter is wait in millseconds
        if k == 27:   # esc key on keboard
            cap.release()
            cv2.destroyAllWindows()
            break

if __name__ == "__main__":
    root = tk.Tk()
    selectors = CaptureController(root)
    selectors.pack()
#    q = tk.Label(root, text=str(x))
#    q.pack()
    selectors.start_capture()
    root.mainloop()
Well, that was a big program by my standards.
Here’s the UDP server that goes with it. I call it server.py.
#!/usr/bin/env python# inspired by https://gist.github.com/Manouchehri/67b53ecdc767919dddf3ec4ea8098b20# first we get client connection, then we read data frmo file. This order is important so we get the latest, freshest data!importsocketimportre
sock =socket.socket(socket.AF_INET,socket.SOCK_DGRAM)
server_address ='0.0.0.0'
server_port =5005
server =(server_address, server_port)
sock.bind(server)print("Listening on " + server_address + ":" + str(server_port))whileTrue:
# read up to 32 bytes from client
payload, client_address = sock.recvfrom(32)print("Request from client: " + payload)# get correction from filewhileTrue:
withopen('green.txt','r')as myfile:
data=myfile.read()#H,V: 9 -14
data = data.split(":")iflen(data)==2:
break
sent = sock.sendto(data[1], client_address)
#!/usr/bin/env python
# inspired by https://gist.github.com/Manouchehri/67b53ecdc767919dddf3ec4ea8098b20
# first we get client connection, then we read data frmo file. This order is important so we get the latest, freshest data!


import socket
import re

sock = socket.socket(socket.AF_INET, socket.SOCK_DGRAM)

server_address = '0.0.0.0'
server_port = 5005

server = (server_address, server_port)
sock.bind(server)
print("Listening on " + server_address + ":" + str(server_port))

while True:
# read up to 32 bytes from client
        payload, client_address = sock.recvfrom(32)
        print("Request from client: " + payload)
# get correction from file
        while True:
                with open('green.txt','r') as myfile:
                        data=myfile.read()
#H,V:  9 -14
                data = data.split(":")
                if len(data) == 2:
                        break
        sent = sock.sendto(data[1], client_address)
For development testing I wrote a UDP client to go along with that server. I called it recvudp.py.
#!/usr/bin/env pythonimportsocket
UDP_IP ="127.0.0.1"
UDP_PORT =5005print"UDP target IP:", UDP_IP
print"UDP target port:", UDP_PORT
sock =socket.socket(socket.AF_INET,# Internetsocket.SOCK_DGRAM)# UDP# need to send one newline minimum to receive server's message...
MESSAGE ="correction";
sock.sendto(MESSAGE,(UDP_IP, UDP_PORT))# get data
data, addr = sock.recvfrom(1024)# buffer size is 1024 bytesprint"received message:", data
#!/usr/bin/env python
import socket
UDP_IP = "127.0.0.1"
UDP_PORT = 5005

print "UDP target IP:", UDP_IP
print "UDP target port:", UDP_PORT

sock = socket.socket(socket.AF_INET, # Internet
                 socket.SOCK_DGRAM) # UDP
# need to send one newline minimum to receive server's message...
MESSAGE = "correction";
sock.sendto(MESSAGE, (UDP_IP, UDP_PORT))
# get data
data, addr = sock.recvfrom(1024) # buffer size is 1024 bytes
print "received message:", data
Problems
Lag is bad. Probably 1.5 seconds or so.
Video is green, but then we designed it that way.
Bandwidth consumption of VNC is way too high. We’re supposed to be under 7 mbps and it is closer to 12 mbps right now.
Probably won’t work under the bright lights or an arena or gym.
Sliders should be labelled.
Have to turn a pixel correction into an angle.
Have to suppress initial warning about ssh default password.
Intro
systemd can be pretty formidable to master. Say you have your own little script you like to run but you don’t want to bother with inserting it into the systemd facility. What can you do?
The details
A simple trick is to insert the startup of the script into a crontab like this:
@reboot <path-to-your-script>
@reboot <path-to-your-script>
For more details on how and why this works and some other crontab oddities try
$ man ‐s5 crcontab
An old Unix hand pointed this out to me recently. I am going to make a lot more use of it…
Of course niceties such as run levels, order of startup, etc are not really controllable (I guess). Or maybe it is the case that all your @reboot scripts are processed in order, top to bottom.
The problem with my cable modem is back. So I’ve revisited my own project and just slightly tweaked things. I am also using an RPi model 4 now. Works great…
Original Intro
I lose my Internet far too often – sometimes once a day. Of course I have lots of network gear in a rat’s nest of cables. I narrowed the problem down to the cable modem, which simply needs to be power cycled and all is good. Most people would call their cable company at this point. I decided to make a little project of it to see if I could get my Raspberry Pi to
– monitor the Internet connection and
– automatically power-cycle the cable modem
Cool, right?
Needless to say, if I can power cycle a modem, I can control power to all kinds of devices with the RPi.
Is there a product already on the market?
Why yes, there is. Normally that would shut me down in my tracks because what’s the point? But the product is relatively expensive – $100, so my DIY solution is considerably less since I already own the RPi. See references for a link to the commercial solution to this problem.
Getting a control cable
This is pathetic, but, in 2017 I originally cut out a cable from an old computer that no longer works. The jumper has more pins than I need, but I could make it work. In 2021 I used proper jumper cables. It’s neater. Thing is, I’ve had them for awhile and I forget where I got them from. perhaps a friend.
Setting up my GPIO, just for testing
The following is only there to show you how easy it is to send signals out the GPIO pin. The script I wrote below, connTest.sh, does all this setup for you if you just want to quickly get down to business.
I am plugged into the end so I need to manipulate GPIO pin 21. Become root
$ sudo su – Get to the right directory
$ cd /sys/class/gpio Create the pin for user manipulation
$ echo 21 > export Move to that pin’s directory
$ cd gpio21 Set up pin for sending signal OUT
$ echo out > direction Test what we have so far
$ cat direction
out
out
$ cat value
0
connTest.sh script
I put this in /usr/local/etc and called it connTest.sh. I’m still tinkering with it a bit. But it shows what we’re basically trying to do.
#!/usr/bin/bash
# DrJ 8/2021
# Test if Internet connection is still good and send signal to relay if it is not
# see https://drjohnstechtalk.com/blog/2017/10/raspberry-pi-automates-cable-modem-power-cycling-task/?preview_id=3121&preview_nonce=9b896f248d&post_format=standard&_thumbnail_id=-1&preview=true
Break=300
Sleep=11
pingpadding=30 # if no response ping takes longer to run
log=/var/log/connTest
pinglog=/tmp/ping.log
#
# one-time setup of our GPIO pin so we can control it
# if the power is on the right, GPIO pin 21 is the lower right pin
pin=21
cd /sys/class/gpio
echo $pin > export
cd gpio$pin
echo out > direction

# divert STDOUT and STDERR to log file
exec 1>$log
exec 2>&1
echo "$0 starting monitoring at "$(date)
# report our external IP
curl -s ipinfo.io|head -2|tail -1
while /bin/true; do
try1=$(curl -is --connect-timeout 6 www.google.com|wc -c)
[[ $try1 -lt 300 ]] && {
  echo google came up short. Trying amazon next. characters: $try1
  sleep 60
  try2=$(curl -is --connect-timeout 6 https://www.amazon.com|wc -c)
  [[ $try2 -lt 300 ]] && {
    echo "#################"
    echo "We have a connection problem at "$(date)
    echo character counts. google: $try1, amazon, $try2
    echo "Power cycling router and waiting for $Break seconds"
# start a ping job
    ping -c $Break 1.1.1.1 > $pinglog 2>&1 &

# this will shut power off
    echo 1 > value
    sleep 4
# and this will turn it back on
    echo 0 > value
# this prevents us from too aggressively power-cycling
    sleep $(($Break+$pingpadding))
# report on ping results
#22 packets transmitted, 22 received, 0% packet loss, time 53ms
#rtt min/avg/max/mdev = 6.536/15.533/24.705/4.510 ms
    echo printing last three lines from ping results log:
    tail -3 $pinglog
    line=`tail -2 $pinglog|head -1`
    t1=`echo -n $line|awk '{print $1}'`
    t2=`echo -n $line|awk '{print $4}'`
#  downtime=$(($t1-$t2))
# test for integer inputs
    [[ "$t1" =~ ^[0-9]+$ ]] && [[ "$t2" =~ ^[0-9]+$ ]] && downtime=$(($t1-$t2))
    echo  DOWNTIME: $downtime seconds
# report our external IP
    curl -s ipinfo.io|head -2|tail -1
    echo "#################"
  }
}
sleep $Sleep
done
Starting on boot
These days I just use my crontab trick – much easier. You edit your crontab by saying sudo crontab -e. Then put in these lines at the bottom:
# DrJ 7/13/21

@reboot sleep 45; /usr/local/etc/connTest.sh > /tmp/connTestRun.log 2>&1

# bring down wireless after awhile – assume we have a wired connection

@reboot sleep 120; /usr/sbin/ifconfig wlan0 down
Only include that last line if you have an ethernet cable connection, which, for monitoring purposes, you should. WiFi is just not as reliable.
In all this I had the most trouble getting the startup script to bend to my will! But I think it’s functioning now. It may not be the most efficient, but it’s workable, meaning, it starts up connTest.sh after a reboot, and sends the log to /var/log/connTest.
My conntest file looks like this after I rebooted a few days ago:
/usr/local/etc/connTest.sh starting monitoring at Sat 18 Sep 08:11:47 EDT 2021
“ip”: “67.83.122.167”,
#################
We have a connection problem at Mon 20 Sep 14:13:03 EDT 2021
Power cycling router and waiting for 300 seconds
printing last three lines from ping results log:
— 1.1.1.1 ping statistics —
300 packets transmitted, 202 received, +9 errors, 32.6667% packet loss, time 563ms
rtt min/avg/max/mdev = 7.581/13.387/35.981/3.622 ms
DOWNTIME: 98 seconds
“ip”: “67.83.122.167”,
So it needs to restart my cable modem about every other day and often during those critical daytime hours when I am working from home.
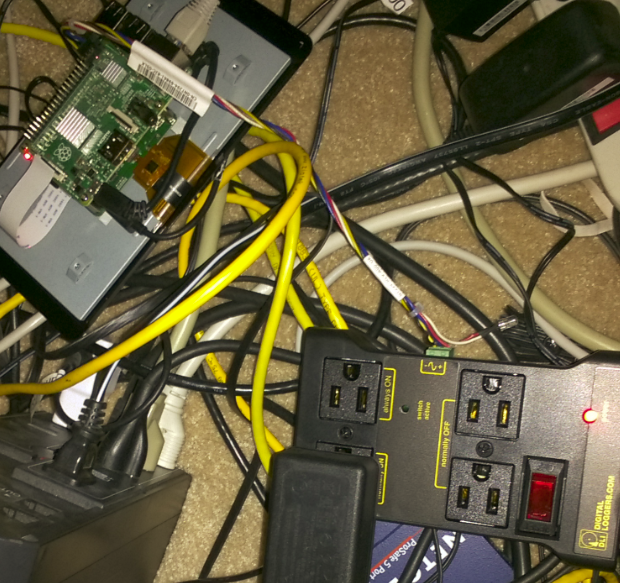
Substitute below for one thousand words
Raspberry Pi GPIO pins 21 plus ground connected to the power relay
So you can almost make out the different outlets from the power relay: always on; normally on; normally off. Makes perfect sense, right?
See that green plug on the side of the relay? I was such a newbie I was shoving the wires into it, unsure how to make a good connection. Well, with a little effort it simply pulls out, revealing a screws that can be used to secure the wires in the holes.
Some conclusions about my cable modem problems
The problems always occur during the day, i.e., when it is being used more heavily (the monitoring is 24×7 so it doesn’t distinguish). So somehow it’s actual usage which triggers failure. I wonder if it outputs more heat and overheats when the Internet is used more heavily? Just a hypothesis.
Outage can be reduced to about 90 seconds with this script based on the ping drop testing. Your mileage may vary, as they say.
My ISP does not give me a new IP after I reboot.
A strange error pops up
After running for awhile I noticed this error in the log:
I’ve still got to look into that root cause of that issue. A reboot cleared it up however.
Conclusion
It’s fun to actually turn off and on 110V AC power using your Raspberry Pi! Especially when there is a useful purpose behind it such as a cable modem which starts to perform better after being power cycled. At only $30 this is a pretty affordable DIY project. I provide some scripts which shows how to work with GPIO pins using the command line. That turns out to be not so mysterious after all…
If the switching can work fast enough, I’m thinking of a next project with lights set to musical beats…!
Intro
Sometimes everything is there in place, ready to be used, but you just have to either mistakenly try it, or learn it works by reading about it, because it may be counter-intuitive. Such is the case with Server Name Indication. I thought I knew enough about https to “know” that you can only have one key/certificate for a single IP address. That CERT can be a SAN (subject alternative name) CERT covering multiple names, but you only get one shot at getting your certificate right. Or so I thought. Turns out I was dead wrong.
Some details
Well, SNI guess is a protocol extension to https. You know I always wondered why in proxy server logs it was able to log the domain name? How would it know that if the http protocol conversation is all encrypted? Maybe it’s SNI at work.
Who supports it?
Since this is an extension it has to be supported by both server and browser. It is. Apache24 supports it. IE, Firefox and Chrome support it. Even my venerable curl supports it! What does not support it, right out of the box, is openssl. The openssl s_client command fetches a site’s certificate, but as I found the hard way, you need to add the -servername switch to tell it which certificate you want to examine, i.e., to force it to use SNI.
This is mainly used by big hosting companies so they can easily and flexibly cram lots of web sites onto a single IP, but us small-time self-hosted sites benefit as well. I host a few sites for friends after all.
Testing methodology
This is pretty simple. I have a couple different virtual servers. I set each up with a completely different certificate in my apache virtual server setups. Then I accessed them by name like usual. Each showed me their own, proper, certificate. That’s it! So this is more than theoretical for me. I’ve already begun to use it.
Enterprise usage
F5 BigIP supports this protocol as well, of course. This article describes how to set it up. But it looks limited to only one server name per certificate, which will be inadequate if there are SAN certificates.
Conclusion
https using Server Name Indication allows to run multiple virtual servers, each with its own unique certificate, on a single IP address.
The situation
A server in Europe needs to transfer a log file which is written every hour from a server in the US. The filename format is
20171013-1039.log.gz
And we want the transfer to be done every hour.
How we did it
I learned something about the date command. I wanted to do date arithmetic, like calculate the previous hour. I’ve only ever done this in Perl. Then I saw how someone did it within a bash script.
First the timezone
export TZ=America/New_York
export TZ=America/New_York
sets the timezone to that of the server which is writing the log files. This is important.
Then get the previous hour
$ onehourago=`date ‐‐date='1 hours ago' '+%Y%m%d‐%H'`
That’s it!
Then the ftp command looks like
$ get $onehourago
If we needed the log from two hours ago we would have had
$ onedayago=`date ‐‐date='1 days ago' '+%Y%m%d‐%H'`
One hour from now
$ onedayago=`date ‐‐date='+1 hours' '+%Y%m%d‐%H'`
etc.
Why the timezone setting?
Initially I skipped the timezone setting and I simply put 7 hours ago, given that Europe and New York are six hours apart, and that’ll work 95% of the time. But because Daylight Savings time starts and ends at different times in the two continents, that will produce bad results for a few weeks a year. So it’s cleaner to simply switch the timezone before doing the date arithmetic.
Conclusion
The linux date command has more features than I thought. We’ve shown how to create some relative dates.
References and related
On a linux system
$ info date
will give you more information and lots of examples to work from.
Intro
I’ve sung the praises of fail2ban as a modern way to shutdown those annoying probes of your cloud server. I recently got to work with a Redhat v 7.4 system, so much newer than my old CentOS 6 server. And fail2ban failed even to work! Instead of the usual extensive debugging I just wrote my own. I’m sharing it here.
The details
I have a bare-bones RHEL 7.4 system. A yum search fail2ban does not find that package. Supposedly you simply need to add the EPEL repository to make that package available but the recipe on how to do that is not obvious. So I got the source for fail2ban and built it. Although it runs, you gotta build a local jail to block ssh attempts and that’s where it fails. So instead of going down that rabbit hole – I was already too deep, I decided to heck with it and I’m building my own.
All I really wanted was to ban IPs which are hitting my sshd server endlessly, often once per second or more. I take it personally.
RHEL 7 has a new firewall concept, firewalld. It’s all new to me and I don’t want to go down that rabbit hole either, at least not right down. So I rely on that old standard of mine: cut off an attacker by making an invalid route to his IP address, along the lines of
$ route add ‐host gw 127.0.0.1
And voila, they can no longer establish a TCP connection. It’s not quite as good as a firewall rule because their source UDP packets could still get through, but come on, we don’t need to be purists. And furthermore, in practice it produces the desired behaviour: stops the ssh dictionary attacks cold.
I knocked tghis out in one night, avoiding the rabbit hole of “fixing” fail2ban. So I had to use the old stuff I know so well, perl and stupid little tricks. I call drjfail2ban.
#!/bin/perl# suppress IPs with failed logins# DrJ - 2017/10/07$DEBUG=0;$sleep=30;$cutoff=3;$headlines=60;@goodusers=("drjohn1","user57");%blockedips=();while(1){# $time = `date +%Y%m%d%H%M%S`;
main();sleep($sleep);}sub main(){if($DEBUG){for$ips(keys%blockedips){print"blocked ip: $ips "}}# man last shows what this means: -i forces IP to be displayed, etc.open(LINES,"last -$headlines -i -f /var/log/btmp|")||die"Problem with running last -f btmp!!\n";# output:#ubnt ssh:notty 185.165.29.197 Sat Oct 7 19:30 gone - no logoutwhile(<LINES>){($user,$ip)=/^(\S+)\s+\S+\s+(\S+)/;print"user,ip: $user,$ip\n"if$DEBUG;nextif$blockedips{$ip};#we can't handle hostnames right nownextif$ip=~/[a-z]/i;$candidateips{$ip}+=1;$bannedusers{$ip}=$user;}for(keys%candidateips){$ip=$_;# allow my usual source IPs without blocking...nextif$ip=~/^(50\.17\.188\.196|51\.29\.208\.176)/;nextif$blockedips{$ip};$usr=$bannedusers{$ip};$ipct=$candidateips{$ip};print"ip, usr, ipct: $ip, $usr, $ipct\n"if$DEBUG;# block$block=1;for$gu(@goodusers){print"gu: $gu\n"if$DEBUG;$block=0if$usreq$gu;}if($block){# more tests: persistence of attempt$hitcnt=$candidateips{$ip};if($hitcnt<$cutoff){# do not block and reset counter for next go-aroundprint"Not blocking ip $ip and resetting counter\n"if$DEBUG;$candidateips{$ip}=0;}else{$blockedips{$ip}=1;print"Blocking ip $ip with hit count $hitcnt at ".`date`;# prevent further communication...system("route add -host $ip gw 127.0.0.1");}}#print "route add -host $ip gw 127.0.0.1\n";}close(LINES);}# end main function
#!/bin/perl
# suppress IPs with failed logins
# DrJ - 2017/10/07
$DEBUG = 0;
$sleep = 30;
$cutoff = 3;
$headlines = 60;
@goodusers =("drjohn1","user57");
%blockedips = ();
while(1) {
#  $time = `date +%Y%m%d%H%M%S`;
  main();
  sleep($sleep);
}

sub main() {
if ($DEBUG) {
  for $ips (keys %blockedips) {
    print "blocked ip: $ips "
  }
}
# man last shows what this means: -i forces IP to be displayed, etc.
open(LINES,"last -$headlines -i -f /var/log/btmp|") || die "Problem with running last -f btmp!!\n";
# output:
#ubnt     ssh:notty    185.165.29.197   Sat Oct  7 19:30    gone - no logout
while(<LINES>) {
  ($user,$ip) = /^(\S+)\s+\S+\s+(\S+)/;
  print "user,ip: $user,$ip\n" if $DEBUG;
  next if $blockedips{$ip};
#we can't handle hostnames right now
  next if $ip =~ /[a-z]/i;
  $candidateips{$ip} += 1;
  $bannedusers{$ip} = $user;
}
for (keys %candidateips) {
  $ip = $_;
# allow my usual source IPs without blocking...
  next if $ip =~ /^(50\.17\.188\.196|51\.29\.208\.176)/;
  next if $blockedips{$ip};
  $usr = $bannedusers{$ip};
  $ipct = $candidateips{$ip};
  print "ip, usr, ipct: $ip, $usr, $ipct\n" if $DEBUG;
# block
  $block = 1;
  for $gu (@goodusers) {
    print "gu: $gu\n" if $DEBUG;
    $block = 0 if $usr eq $gu;
  }
  if ($block) {
# more tests: persistence of attempt
    $hitcnt = $candidateips{$ip};
    if ($hitcnt < $cutoff) {
# do not block and reset counter for next go-around
      print "Not blocking ip $ip and resetting counter\n" if $DEBUG;
      $candidateips{$ip} = 0;
    } else {
      $blockedips{$ip} = 1;
      print "Blocking ip $ip with hit count $hitcnt at " . `date`;
# prevent further communication...
      system("route add -host $ip gw 127.0.0.1");
   }
  }
  #print "route add -host $ip gw 127.0.0.1\n";
}
close(LINES);
} # end main function
Highlights from the program
The comments are pretty self-explanatory. Just a note about the philosophy. I fear making a goof and locking myself out! So I was conservative and try to not do any blocking if the source IP matches one of my favored source IPs, or if the user matches one of my usual usernames like drjohn1. I use obscure userids and the hackers try the stupid stuff like root, admin, etc. So they may be dictionary attacking the password, but they certainly aren’t dictionary attacking the username!
I don’t mind wiping the slate clean of all created routes after sever reboot so I only plan to run this from the command line. To make it persistent until the next reboot you just run it from the root account like so (let’s say we put it in /usr/local/sbin):
And it just sits there and runs, even after you log out.
Results
Since it hasn’t been running for long I can provide a partial log file as of this publication.
Blocking ip 103.80.117.74 with hit count 6 at Sun Oct  8 17:34:43 CEST 2017
SIOCADDRT: File exists
Blocking ip 89.176.96.45 with hit count 5 at Sun Oct  8 17:34:43 CEST 2017
SIOCADDRT: File exists
Blocking ip 31.162.51.206 with hit count 3 at Sun Oct  8 17:34:43 CEST 2017
SIOCADDRT: File exists
Blocking ip 218.95.142.218 with hit count 6 at Sun Oct  8 17:34:43 CEST 2017
SIOCADDRT: File exists
Blocking ip 202.168.8.54 with hit count 5 at Sun Oct  8 17:34:43 CEST 2017
SIOCADDRT: File exists
Blocking ip 13.94.29.182 with hit count 4 at Sun Oct  8 17:34:43 CEST 2017
SIOCADDRT: File exists
Blocking ip 40.71.185.73 with hit count 4 at Sun Oct  8 17:34:43 CEST 2017
SIOCADDRT: File exists
Blocking ip 77.72.85.100 with hit count 13 at Sun Oct  8 17:34:43 CEST 2017
SIOCADDRT: File exists
Blocking ip 201.180.104.63 with hit count 7 at Sun Oct  8 17:34:43 CEST 2017
SIOCADDRT: File exists
Blocking ip 121.14.27.58 with hit count 4 at Sun Oct  8 17:40:43 CEST 2017
Blocking ip 36.108.234.99 with hit count 6 at Sun Oct  8 17:47:13 CEST 2017
Blocking ip 185.165.29.69 with hit count 6 at Sun Oct  8 18:02:43 CEST 2017
Blocking ip 190.175.40.195 with hit count 6 at Sun Oct  8 19:05:43 CEST 2017
Blocking ip 139.199.167.21 with hit count 4 at Sun Oct  8 19:29:13 CEST 2017
Blocking ip 186.60.67.51 with hit count 5 at Sun Oct  8 20:49:14 CEST 2017
Blocking ip 103.80.117.74 with hit count 6 at Sun Oct 8 17:34:43 CEST 2017
SIOCADDRT: File exists
Blocking ip 89.176.96.45 with hit count 5 at Sun Oct 8 17:34:43 CEST 2017
SIOCADDRT: File exists
Blocking ip 31.162.51.206 with hit count 3 at Sun Oct 8 17:34:43 CEST 2017
SIOCADDRT: File exists
Blocking ip 218.95.142.218 with hit count 6 at Sun Oct 8 17:34:43 CEST 2017
SIOCADDRT: File exists
Blocking ip 202.168.8.54 with hit count 5 at Sun Oct 8 17:34:43 CEST 2017
SIOCADDRT: File exists
Blocking ip 13.94.29.182 with hit count 4 at Sun Oct 8 17:34:43 CEST 2017
SIOCADDRT: File exists
Blocking ip 40.71.185.73 with hit count 4 at Sun Oct 8 17:34:43 CEST 2017
SIOCADDRT: File exists
Blocking ip 77.72.85.100 with hit count 13 at Sun Oct 8 17:34:43 CEST 2017
SIOCADDRT: File exists
Blocking ip 201.180.104.63 with hit count 7 at Sun Oct 8 17:34:43 CEST 2017
SIOCADDRT: File exists
Blocking ip 121.14.27.58 with hit count 4 at Sun Oct 8 17:40:43 CEST 2017
Blocking ip 36.108.234.99 with hit count 6 at Sun Oct 8 17:47:13 CEST 2017
Blocking ip 185.165.29.69 with hit count 6 at Sun Oct 8 18:02:43 CEST 2017
Blocking ip 190.175.40.195 with hit count 6 at Sun Oct 8 19:05:43 CEST 2017
Blocking ip 139.199.167.21 with hit count 4 at Sun Oct 8 19:29:13 CEST 2017
Blocking ip 186.60.67.51 with hit count 5 at Sun Oct 8 20:49:14 CEST 2017
And what my route table looks like currently:
$ netstat ‐rn|grep 127.0.0.1
Kernel IP routing table
Destination     Gateway         Genmask         Flags   MSS Window  irtt Iface
2.177.217.155   127.0.0.1       255.255.255.255 UGH       0 0          0 lo
13.94.29.182    127.0.0.1       255.255.255.255 UGH       0 0          0 lo
31.162.51.206   127.0.0.1       255.255.255.255 UGH       0 0          0 lo
36.108.234.99   127.0.0.1       255.255.255.255 UGH       0 0          0 lo
37.204.23.84    127.0.0.1       255.255.255.255 UGH       0 0          0 lo
40.71.185.73    127.0.0.1       255.255.255.255 UGH       0 0          0 lo
42.7.26.15      127.0.0.1       255.255.255.255 UGH       0 0          0 lo
46.6.60.240     127.0.0.1       255.255.255.255 UGH       0 0          0 lo
59.16.74.234    127.0.0.1       255.255.255.255 UGH       0 0          0 lo
77.72.85.100    127.0.0.1       255.255.255.255 UGH       0 0          0 lo
89.176.96.45    127.0.0.1       255.255.255.255 UGH       0 0          0 lo
103.80.117.74   127.0.0.1       255.255.255.255 UGH       0 0          0 lo
109.205.136.10  127.0.0.1       255.255.255.255 UGH       0 0          0 lo
113.195.145.13  127.0.0.1       255.255.255.255 UGH       0 0          0 lo
118.32.27.85    127.0.0.1       255.255.255.255 UGH       0 0          0 lo
121.14.27.58    127.0.0.1       255.255.255.255 UGH       0 0          0 lo
139.199.167.21  127.0.0.1       255.255.255.255 UGH       0 0          0 lo
162.213.39.235  127.0.0.1       255.255.255.255 UGH       0 0          0 lo
176.50.95.41    127.0.0.1       255.255.255.255 UGH       0 0          0 lo
176.209.89.99   127.0.0.1       255.255.255.255 UGH       0 0          0 lo
181.113.82.213  127.0.0.1       255.255.255.255 UGH       0 0          0 lo
185.165.29.69   127.0.0.1       255.255.255.255 UGH       0 0          0 lo
185.165.29.197  127.0.0.1       255.255.255.255 UGH       0 0          0 lo
185.165.29.198  127.0.0.1       255.255.255.255 UGH       0 0          0 lo
185.190.58.181  127.0.0.1       255.255.255.255 UGH       0 0          0 lo
186.57.12.131   127.0.0.1       255.255.255.255 UGH       0 0          0 lo
186.60.67.51    127.0.0.1       255.255.255.255 UGH       0 0          0 lo
190.42.185.25   127.0.0.1       255.255.255.255 UGH       0 0          0 lo
190.175.40.195  127.0.0.1       255.255.255.255 UGH       0 0          0 lo
193.201.224.232 127.0.0.1       255.255.255.255 UGH       0 0          0 lo
201.180.104.63  127.0.0.1       255.255.255.255 UGH       0 0          0 lo
201.255.71.14   127.0.0.1       255.255.255.255 UGH       0 0          0 lo
202.100.182.250 127.0.0.1       255.255.255.255 UGH       0 0          0 lo
202.168.8.54    127.0.0.1       255.255.255.255 UGH       0 0          0 lo
203.190.163.125 127.0.0.1       255.255.255.255 UGH       0 0          0 lo
213.186.50.82   127.0.0.1       255.255.255.255 UGH       0 0          0 lo
218.95.142.218  127.0.0.1       255.255.255.255 UGH       0 0          0 lo
221.192.142.24  127.0.0.1       255.255.255.255 UGH       0 0          0 lo
Kernel IP routing table
Destination Gateway Genmask Flags MSS Window irtt Iface
2.177.217.155 127.0.0.1 255.255.255.255 UGH 0 0 0 lo
13.94.29.182 127.0.0.1 255.255.255.255 UGH 0 0 0 lo
31.162.51.206 127.0.0.1 255.255.255.255 UGH 0 0 0 lo
36.108.234.99 127.0.0.1 255.255.255.255 UGH 0 0 0 lo
37.204.23.84 127.0.0.1 255.255.255.255 UGH 0 0 0 lo
40.71.185.73 127.0.0.1 255.255.255.255 UGH 0 0 0 lo
42.7.26.15 127.0.0.1 255.255.255.255 UGH 0 0 0 lo
46.6.60.240 127.0.0.1 255.255.255.255 UGH 0 0 0 lo
59.16.74.234 127.0.0.1 255.255.255.255 UGH 0 0 0 lo
77.72.85.100 127.0.0.1 255.255.255.255 UGH 0 0 0 lo
89.176.96.45 127.0.0.1 255.255.255.255 UGH 0 0 0 lo
103.80.117.74 127.0.0.1 255.255.255.255 UGH 0 0 0 lo
109.205.136.10 127.0.0.1 255.255.255.255 UGH 0 0 0 lo
113.195.145.13 127.0.0.1 255.255.255.255 UGH 0 0 0 lo
118.32.27.85 127.0.0.1 255.255.255.255 UGH 0 0 0 lo
121.14.27.58 127.0.0.1 255.255.255.255 UGH 0 0 0 lo
139.199.167.21 127.0.0.1 255.255.255.255 UGH 0 0 0 lo
162.213.39.235 127.0.0.1 255.255.255.255 UGH 0 0 0 lo
176.50.95.41 127.0.0.1 255.255.255.255 UGH 0 0 0 lo
176.209.89.99 127.0.0.1 255.255.255.255 UGH 0 0 0 lo
181.113.82.213 127.0.0.1 255.255.255.255 UGH 0 0 0 lo
185.165.29.69 127.0.0.1 255.255.255.255 UGH 0 0 0 lo
185.165.29.197 127.0.0.1 255.255.255.255 UGH 0 0 0 lo
185.165.29.198 127.0.0.1 255.255.255.255 UGH 0 0 0 lo
185.190.58.181 127.0.0.1 255.255.255.255 UGH 0 0 0 lo
186.57.12.131 127.0.0.1 255.255.255.255 UGH 0 0 0 lo
186.60.67.51 127.0.0.1 255.255.255.255 UGH 0 0 0 lo
190.42.185.25 127.0.0.1 255.255.255.255 UGH 0 0 0 lo
190.175.40.195 127.0.0.1 255.255.255.255 UGH 0 0 0 lo
193.201.224.232 127.0.0.1 255.255.255.255 UGH 0 0 0 lo
201.180.104.63 127.0.0.1 255.255.255.255 UGH 0 0 0 lo
201.255.71.14 127.0.0.1 255.255.255.255 UGH 0 0 0 lo
202.100.182.250 127.0.0.1 255.255.255.255 UGH 0 0 0 lo
202.168.8.54 127.0.0.1 255.255.255.255 UGH 0 0 0 lo
203.190.163.125 127.0.0.1 255.255.255.255 UGH 0 0 0 lo
213.186.50.82 127.0.0.1 255.255.255.255 UGH 0 0 0 lo
218.95.142.218 127.0.0.1 255.255.255.255 UGH 0 0 0 lo
221.192.142.24 127.0.0.1 255.255.255.255 UGH 0 0 0 lo
Here’s a partial listing of the many failed logins, just to keep it real:
...
root     ssh:notty    190.175.40.195   Sun Oct  8 19:05 - 19:28  (00:23)
root     ssh:notty    190.175.40.195   Sun Oct  8 19:05 - 19:05  (00:00)
root     ssh:notty    190.175.40.195   Sun Oct  8 19:05 - 19:05  (00:00)
root     ssh:notty    190.175.40.195   Sun Oct  8 19:05 - 19:05  (00:00)
root     ssh:notty    190.175.40.195   Sun Oct  8 19:05 - 19:05  (00:00)
root     ssh:notty    190.175.40.195   Sun Oct  8 19:05 - 19:05  (00:00)
admin    ssh:notty    185.165.29.69    Sun Oct  8 18:02 - 19:05  (01:02)
admin    ssh:notty    185.165.29.69    Sun Oct  8 18:02 - 18:02  (00:00)
admin    ssh:notty    185.165.29.69    Sun Oct  8 18:02 - 18:02  (00:00)
admin    ssh:notty    185.165.29.69    Sun Oct  8 18:02 - 18:02  (00:00)
root     ssh:notty    185.165.29.69    Sun Oct  8 18:02 - 18:02  (00:00)
root     ssh:notty    185.165.29.69    Sun Oct  8 18:02 - 18:02  (00:00)
root     ssh:notty    185.165.29.69    Sun Oct  8 18:02 - 18:02  (00:00)
root     ssh:notty    36.108.234.99    Sun Oct  8 17:47 - 18:02  (00:15)
root     ssh:notty    36.108.234.99    Sun Oct  8 17:47 - 17:47  (00:00)
root     ssh:notty    36.108.234.99    Sun Oct  8 17:47 - 17:47  (00:00)
root     ssh:notty    36.108.234.99    Sun Oct  8 17:47 - 17:47  (00:00)
root     ssh:notty    36.108.234.99    Sun Oct  8 17:47 - 17:47  (00:00)
root     ssh:notty    36.108.234.99    Sun Oct  8 17:46 - 17:47  (00:00)
ubuntu   ssh:notty    121.14.27.58     Sun Oct  8 17:40 - 17:46  (00:06)
ubuntu   ssh:notty    121.14.27.58     Sun Oct  8 17:40 - 17:40  (00:00)
aaaaaaaa ssh:notty    121.14.27.58     Sun Oct  8 17:40 - 17:40  (00:00)
aaaaaaaa ssh:notty    121.14.27.58     Sun Oct  8 17:40 - 17:40  (00:00)
root     ssh:notty    206.71.63.4      Sun Oct  8 17:34 - 17:40  (00:06)
root     ssh:notty    206.71.63.4      Sun Oct  8 17:34 - 17:34  (00:00)
root     ssh:notty    89.176.96.45     Sun Oct  8 16:15 - 17:34  (01:19)
root     ssh:notty    89.176.96.45     Sun Oct  8 16:15 - 16:15  (00:00)
root     ssh:notty    89.176.96.45     Sun Oct  8 16:15 - 16:15  (00:00)
root     ssh:notty    89.176.96.45     Sun Oct  8 16:15 - 16:15  (00:00)
...
...
root ssh:notty 190.175.40.195 Sun Oct 8 19:05 - 19:28 (00:23)
root ssh:notty 190.175.40.195 Sun Oct 8 19:05 - 19:05 (00:00)
root ssh:notty 190.175.40.195 Sun Oct 8 19:05 - 19:05 (00:00)
root ssh:notty 190.175.40.195 Sun Oct 8 19:05 - 19:05 (00:00)
root ssh:notty 190.175.40.195 Sun Oct 8 19:05 - 19:05 (00:00)
root ssh:notty 190.175.40.195 Sun Oct 8 19:05 - 19:05 (00:00)
admin ssh:notty 185.165.29.69 Sun Oct 8 18:02 - 19:05 (01:02)
admin ssh:notty 185.165.29.69 Sun Oct 8 18:02 - 18:02 (00:00)
admin ssh:notty 185.165.29.69 Sun Oct 8 18:02 - 18:02 (00:00)
admin ssh:notty 185.165.29.69 Sun Oct 8 18:02 - 18:02 (00:00)
root ssh:notty 185.165.29.69 Sun Oct 8 18:02 - 18:02 (00:00)
root ssh:notty 185.165.29.69 Sun Oct 8 18:02 - 18:02 (00:00)
root ssh:notty 185.165.29.69 Sun Oct 8 18:02 - 18:02 (00:00)
root ssh:notty 36.108.234.99 Sun Oct 8 17:47 - 18:02 (00:15)
root ssh:notty 36.108.234.99 Sun Oct 8 17:47 - 17:47 (00:00)
root ssh:notty 36.108.234.99 Sun Oct 8 17:47 - 17:47 (00:00)
root ssh:notty 36.108.234.99 Sun Oct 8 17:47 - 17:47 (00:00)
root ssh:notty 36.108.234.99 Sun Oct 8 17:47 - 17:47 (00:00)
root ssh:notty 36.108.234.99 Sun Oct 8 17:46 - 17:47 (00:00)
ubuntu ssh:notty 121.14.27.58 Sun Oct 8 17:40 - 17:46 (00:06)
ubuntu ssh:notty 121.14.27.58 Sun Oct 8 17:40 - 17:40 (00:00)
aaaaaaaa ssh:notty 121.14.27.58 Sun Oct 8 17:40 - 17:40 (00:00)
aaaaaaaa ssh:notty 121.14.27.58 Sun Oct 8 17:40 - 17:40 (00:00)
root ssh:notty 206.71.63.4 Sun Oct 8 17:34 - 17:40 (00:06)
root ssh:notty 206.71.63.4 Sun Oct 8 17:34 - 17:34 (00:00)
root ssh:notty 89.176.96.45 Sun Oct 8 16:15 - 17:34 (01:19)
root ssh:notty 89.176.96.45 Sun Oct 8 16:15 - 16:15 (00:00)
root ssh:notty 89.176.96.45 Sun Oct 8 16:15 - 16:15 (00:00)
root ssh:notty 89.176.96.45 Sun Oct 8 16:15 - 16:15 (00:00)
...
Before running drjfail2ban it was much more obnoxious, with the same IP hitting my server every second or so.
Conclusion
I found it easier to roll my own than battle someone else’s errors. It’s kind of fun for me to create these little scripts. I don’t care if anyone else uses them. I will refer to this post myself and probably re-use it elsewhere!
Intro I was at home during the great eclipse of August 2017. I didn’t buy the special viewing glasses. I remembered the general advice that anything with holes in it would show off the shape of the moon covering the sun by its shadow.
Initially I tried paper with three holes from a hole punch. Result were OK but not that impressive.
I was idly pulling disk=hes out of the dishwasher when I came across our cheese grater. Lots and lots of holes all over. This was the thing!
Everyone I’ve shown these two loved the novelty.
The setup I’m standing just inside the garage – nice smooth surface for shadows – by the doorway. I find a way to simultaneously hold my phone and the cheese grater, and (mostly) get sufficiently out of the way that the cheese grater’s shadow is cast unobstructed onto the garage floor. It was a little tricky.
I’ll present the full picture and then the shadow of the cheese grater blown up at two different times – 2:27 PM and 2:41 PM EST.
And, yes, the holes in the grater are actualklky round and the normal shadow would be full of round circles of light where the sun passes through the grater’s holes!
It was a hot day. I could feel the air cool down during the eclipse! And cicadas started their shrill cry. 2:41 PM pics Click on any of these pictures to see it blown up.
2:41 PM eclipse shadow pic
And focussing on the cheese grater’s shadow:
Cheese grater shadow during the eclipse
2:27 PM pics This time is probably closer to the greatest coverage of the moon over the sun.
Eclipse full pictureEclipse cheese grater pic
Conclusion A common cheese grater gives us a good idea of what the sun looked like during the eclipse, and creates something marvelous at the same time.
Discussion – 2022 update
The 2017 eclipse was a blown opportunity for citizen astronomers to contribute to one of the most difficult-to-measure astronomical metrics: the bending of nearby starlight by the sun. Believe it or not, the eclipse measurements of this effect from 1919, which proved Einstien’s prediction about gravity’s effect on the path of light, is still about the most precise we have. And it’s not very good! Unlike everything else we measure through scientific experiements, it didn’t improve with time.
References and related
The book No Shadow of a Doubt discusses how they (Eddington and Dyson) measured the bending of starlight by the sun during the 1919 solar eclipse, and all the problems with those attempts.