Categories
Admin Linux Network Technologies

Measuring bandwidth on Checkpoint Gaia

Intro
Sometimes you don’t have the tools you want but you have enough to make do. Such is the case with the command line utilities of the CLI of Checkpoint Gaia. It’s like a basic Linux. The company I consult for is beginning to hit some bandwidth limits and I wanted to understand overall traffic flow better. In the absence of any proper bandwidth monitors I used the netstat command and some approximations. Crude thouigh it may be it already gave me a much better idea about my traffic than I had going into this project.

The details
I call this BASH script netstats.sh

#!/bin/bash
# for Gaia, not IPSO
c=0
sleep=2
while /bin/true; do
  v[1]=`netstat -Ieth1-01 -e|grep RX|grep TX`
  n[1]="vlan 102           "
  v[2]=`netstat -Ieth1-05 -e|grep RX|grep TX`
  n[2]="vlan 103 200.78.39    "
  v[3]=`netstat -Ieth1-02 -e|grep RX|grep TX`
  n[3]="vlan 103 10.31.42"
  v[4]=`netstat -Ieth1-03 -e|grep RX|grep TX`
  n[4]="trunk for VPN      "
# interesting line:
#           RX bytes:4785585828883 (4.3 TiB)  TX bytes:7150474860130 (6.5 TiB)
  date
  for i in {1..4}; do
    RX=`echo ${v[$i]}|cut -d: -f2|awk '{print $1}'`
    TX=`echo ${v[$i]}|cut -d: -f3|awk '{print $1}'`
#    echo "vlan ${n[$i]}        RX,TX: $RX, $TX"
    if [ $c -gt 0 ]; then
      RXdiff=`expr $RX - ${RXold[$i]}`
      TXdiff=`expr $TX - ${TXold[$i]}`
# observed scaling factor: 8.1 bits/byte
      RXrate=$(($RXdiff*81/$sleep/10000000))
      TXrate=$(($TXdiff*81/$sleep/10000000))
      echo "${n[$i]}    RX,TX: $RXrate, $TXrate Mbps"
    fi
# old values
    RXold[$i]=$RX
    TXold[$i]=$TX
  done
  c=$(( $c + 1 ))
  sleep $sleep
done

It’s pretty self-explanatory. I would just note that in the older IPSO OS you don’t have the ability to get the bytes transferred from netstat. Just the number of packets, which is an inherently cruder measure. The calibration of 8.1 bits per byte (there is overhead from the frames) is maybe a little crude but it’s what I measured over the source of a couple minutes.

A quick glance at Redhat or CentOS shows me that this same script, with appropriate modifications for the interface names (eth0, eth1, etc), would also work on those OSes.

IPSO
I really, really wanted some kind of measure for IPSO as well. So I tackled that as best I could. Here is that script:

#!/bin/bash
# for IPSO, not Gaia
c=0
while [ 1 -gt 0 ]; do
# eth1-01: vlan 802; eth1-05: vlan 803 (144.29); eth1-02: vlan 803 (10.201.145)
  v[1]=`netstat -Ieth-s4p1|tail -1`
  n[1]="vlan 208.129.99     "
  v[2]=`netstat -Ieth-s4p2|tail -1`
  n[2]="vlan 208.156.254     "
  v[3]=`netstat -Ieth-s4p3|tail -1`
  n[3]="vlan 208.149.129     "
  v[4]=`netstat -Ieth-s4p4|tail -1`
  n[4]="trunk for Cisco and b2b"
# interesting line:
#Name         Mtu   Network     Address             Ipkts Ierrs    Opkts Oerrs  Coll
#eth-s4p1     16018 <Link>      0:a0:8e:c4:ff:f4 72780201     0 56423000     0     0
  date
  for i in {1..4}; do
    RX=`echo ${v[$i]}|awk '{print $5}'`
    TX=`echo ${v[$i]}|awk '{print $7}'`
#    echo "vlan ${n[$i]}        RX,TX: $RX, $TX"
    if [ $c -gt 0 ]; then
      RXdiff=$(($RX - ${RXold[$i]}))
      TXdiff=$(($TX - ${TXold[$i]}))
# observed: .0043 mbits/packet
      RXrate=$(($RXdiff*43/100000))
# observed: .0056 mbits/packet
      TXrate=$(($TXdiff*56/100000))
      echo "${n[$i]}    RX,TX: $RXrate, $TXrate Mbps"
    fi
# old values
    RXold[$i]=$RX
    TXold[$i]=$TX
  done
  c=$(( $c + 1 ))
  sleep 10
done

The conversion to bits is probably only accurate to +/- 25%, because it depends a lot on the application, i.e., VPN concentrator versus proxy server. I just averaged all applications together because that’s the best I could do. I compared it to a Cisco router’s statistics.

Note that in Gaia cpview can also be run frmo the CLI. Then you can drill down to the specific interface information. I have compared my script to using cpview (which has a default update screen time of 2 seconds) and they’re pretty close. As far as I know there is no way to script cpview. And at the end of the day I suspect it is only doing the same thing my script does.

Conclusion
A script is provided which gives a measure of Mbps bandwidth usage by polling netstat periodically. It’s not exact, but even crude measures can help a network engineer.

Categories
Linux Network Technologies Raspberry Pi

Multiple IPs on the Raspberry Pi

Intro
In my previous post I showed how to turn a Raspberry Pi plus USB camera into something like an IP camera. In the course of that work I found it wasn’t so easy as it was in the past to assign static IPs upon boot. So I came up with my own unique method, which combines a modicum of Linux knowledge with a dash of networking knowledge.

The requirements
I sort of invented these requirements for myself, putting myself in the pickle I found myself in. I am working with a friend’s Pi 3 and didn’t want to mess it up too badly. Yet I wanted to easily work with it at home, and for the Robotics team. How to do it all?

I decided to permit the DHCP client, now called dhcpcd, running. So it will assign an IP address and appropriate gateway if there is a DHCP server present on the network. When I test at home I sometimes don’t use DHCP. When I bring my test setup to Robotics, more often than not I have my own little isolated LAN and no DHCP server. So, knowing that a single interface can have two or even more than two IP adresses, I created the following list of requirements for myself.

Act as DHCP client if there is DHCP server.
Additionally,
Assign static IP of 192.168.1.161/24 so it works in my home.
Assign another static IP of 10.31.42.15 so it works with a predictable IP in the robotics environment.
Let the two above IP assignments work even in the absence of a DHCP server!

Sounds kind of simple, but it’s not so easy.

I’m running a Raspberry Pi 3 with Raspbian Stretch (the release after Jessie).

Initial approach
With this version you’re supposed to use the file

/etc/dhcpcd.conf

to create a static IP.

But it works like c**p, at least when you want to push it and have it meet all the requirements above. It’s got a bug and doesn’t allow you to meet all the above requirements. I experimented. But my method does work.

The final solution
So in the end I leave /etc/dhcpcd.conf alone!

I use this new (to me) feature that crontab has an @reboot feature that calls its argument at boot time – just what we need.

Then I combined some old school use of ifconfig plus newer school command ip.

Here’s the script, which I call ip-assign.sh.

#!/bin/bash
sleep 2
# see if there is a dhcp-assigned IP already. If so 'scope global' appears in the listing
#  ip add show eth0 sample output:
addflag=""
ip add show eth0|grep -q 'scope global'
if [ $? == 0 ]; then
  addflag="add"
fi
# first IP
ifconfig eth0 $addflag 10.31.42.15 netmask 255.255.255.0 broadcast 10.31.42.255
# next IP
ifconfig eth0 add 192.168.1.161 netmask 255.255.255.0 broadcast 192.168.1.255

What I observed is that eth0 already has an IP assigned to it (for instance from a DHCP server), then the string “scope global” appears when you run ip add, otherwise it doesn’t. Furthermore, ifconfig has an optional argument I noticed call add, which seems to exist in order to add additional virtual interfaces – precisely what we want. But if there is no IP yet assigned we should call ifconfig the first time with the add argument. If I had had additional virtual IPs I could have just kept on going…

So to call this at boot time I use my lazy method. I edit the crontab file and insert a line like this:

@reboot sudo ~/ip‐assign.sh > /tmp/ip‐assign.log 2>&1

So without a DHCP server I have after booting:
$ ip add show eth0

2: eth0: <BROADCAST,MULTICAST,UP,LOWER_UP> mtu 1500 qdisc pfifo_fast state UP group default qlen 1000
    link/ether b8:27:eb:e3:02:74 brd ff:ff:ff:ff:ff:ff
    inet 192.168.1.161/24 brd 10.31.42.255 scope global eth0:0
       valid_lft forever preferred_lft forever
    inet 10.31.42.15/24 brd 192.168.1.255 scope global eth0
       valid_lft forever preferred_lft forever
    inet 169.254.159.115/16 brd 169.254.255.255 scope global eth0
       valid_lft forever preferred_lft forever
    inet6 fe80::e923:3131:224c:ecd/64 scope link
       valid_lft forever preferred_lft forever

If you’re lazy like me just type
$ ip add
and you’ll get the other interfaces as well. It’s very easy to type, too!

Note the broadcast (brd) addresses are reversed from how you’d expect them. I decided that it doesn’t matter as long as they’re both present somewhere with the correct value. It’s all using the one physical interface so the interface doesn’t really care. And from all my testing I am right I believe on this point.

Disable WiFi – wlan0
To disable WiFi entirely, which you may want to do if using in a FIRST FRC competition, add this to /boot/config.txt and reboot:
dtoverlay=pi3‐disable‐wifi
After doing that wlan0 does not even show up when you do an ip add.

References and related
Raspberry Pi plus USB camera: brought together like an IP camera.

Categories
Consumer Tech Network Technologies Raspberry Pi

WAN load-balancing routers

Intro
I got an offer for $20/month broadband access from Centurylink. It got me to thinking, could I somehow use that as a backup connection to my current cable ISP? How would that work? Could I use a Raspberry Pi as a WAN load-balancing router?

The details
Well I’m not sure about using Raspberry Pi. It’s not so simple.

But I just wanted to mention there are solutions out there in the marketplace to this very problem. They’re not that easy to find, hence this article. They’re mostly aimed at small businesses where Internet connectivity is very important, like an Internet cafe.

This Cisco dual WAN router for $157 would do the trick:

https://www.amazon.com/Cisco-Dual-Gigabit-Router-RV042G-NA/dp/B008CWW6VY/ref=pd_cp_147_2?_encoding=UTF8&pd_rd_i=B008CWW6VY&pd_rd_r=5XFRCAG9PT7THJW8BMJZ&pd_rd_w=PQrlm&pd_rd_wg=FUaoX&psc=1&refRID=5XFRCAG9PT7THJW8BMJZ

Or for about the same price, this Linksys Dual WAN router:

https://www.amazon.com/Linksys-Business-Gigabit-Router-LRT224/dp/B00GK640D6/ref=pd_sbs_147_6?_encoding=UTF8&pd_rd_i=B00GK640D6&pd_rd_r=5XFRCAG9PT7THJW8BMJZ&pd_rd_w=rmOWr&pd_rd_wg=FUaoX&psc=1&refRID=5XFRCAG9PT7THJW8BMJZ

Want to go consumer grade and save money? This TP-Link model is only about $85:

https://www.amazon.com/TP-LINK-TL-R480T-Balance-Broadband-Configurable/dp/B002T4D3L8/ref=pd_ybh_a_4?_encoding=UTF8&psc=1&refRID=36DXNVKPFB8MN844NVNP

But it’s ports are only 100 mbps, which is kind of surprising in this day and age.

DIY approach for the intrepid

There now appears to be a Raspberry Pi solution since the advent of RPi 4 and OpenWRT support for ARM. This post is amazingly detailed: Raspberry Pi as a home router. The latest generation of Raspberry Pi… | by Vladimír Záhradník | The Startup | Medium

So the idea there would be to get OpenWRT running on an RPi 4, then explore running multi-WAN on OpenWRT: LEDE/OpenWRT — Setting Up Multi-WAN | by CT WiFi | LEDE/OpenWrt & IoT | Medium

Conclusion
We have identified commercial solutions to the question: can I use two ISPs at home to provide high availability and load-balancing. I have my doubts however and I think running OpenWRT may be the best option.

Categories
Network Technologies

Obscure curl error explained – partially

Intro
Are you, like me, vexed by this curl error:

curl: (51) SSL peer certificate or SSH remote key was not OK

?

More details
I have many Linux systems from which to test. But I can only produce this error on some of them. It’s rather strange. I know most of the conditions which create this problem, but not all of them.

As you will see elsewhere on the Internet the error is in general produced by a DNS name/URL mismatch. The funny thing is that I always use the -k switch when running curl. This particular error occurred on some systems even with the -k switch! Now trhat’s noteworthy.

Circumstances which lead to the error

hostname in url does not match name in the certificate, e.g.,

curl -i -k https://vmanswer.com/

For me I only see the error on an older SLES 11 SP2 system. But I’m not sure how significant that is.

Additional debug info can be gleaned by adding the -v switch.

Circumstances which will not produce this error

If the URL hostname and the name on the certificate match, all is good.
If the URL uses an IP rather than a hostname all is good.
Perhaps certain implementations of curl and/or openssl will never produce this error as long as the -k switch is used??

Conclusion
The curl error curl: (51) SSL peer certificate or SSH remote key was not OK has been slightly better explained. It’s generally a hostname/certificate name mismatch and it only occurs on some curl versions.

Categories
Network Technologies Web Site Technologies

SSL Interception: troubleshooting

Intro
SSl Interception is a reality at some larger companies. From a security perspective it is vital as it permits you to extend your AV scanning, botnet detection, 0-day, DLP, cloud security, etc to your https traffic which is normally just an encrypted blur to the edge devices through which the traffic flows.

Bluecoat has a good solution for SSL interception, but it is possible to make some mistakes. Here I document one of those and provide a few other tips.

The details
The general idea is that within your large company – let’s call it “B” – there is an existing PKI infrastructure which is in use. In particular a private root CA has been included in the certificate store on B’s standard PC image. B users use explicit proxy. This is a requirement for SSL interception by the way. Now B’s PKI team issues an intermediate certificate to B’s proxy server such that it can sign certificates. That’s a so-called signing certificate because in the extensions it explicitly mentions:

            X509v3 Basic Constraints: critical
                CA:TRUE, pathlen:0
            X509v3 Key Usage: critical
                Certificate Sign, CRL Sign

B’s proxy, when asked to access an external https site by a desktop PC, then acts as an SSL client, decrypts the traffic, does all its AV, 0-day, DLP inspections, then re-encrypts it with its own on-the-fly issued certificate before sending it along to the desktop! In the PKI world, a signing certificate is a big deal because in the wrong hands havoc could result.

For instance, user requests https://www.google.com/. What user gets is https://www.google.com, but when user inspects the certificate, he sees the a www.google.com certificate issued by the proxy, which was issued from B’s own root CA (screenshot further down below).

Results if implemented badly
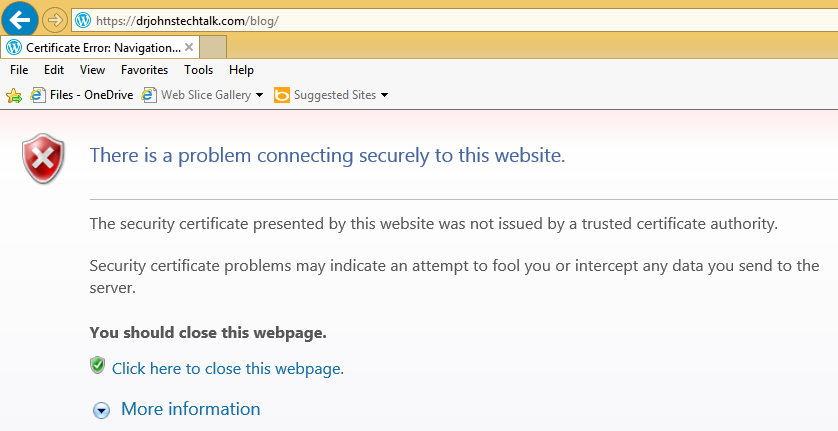
You might see this in Internet Explorer for every https site you access:

The security certificate presented by this website was not issued by a trusted certificate authority.

Security certificate problems may indicate an attempt to fool you or intercept any data you send to the server.

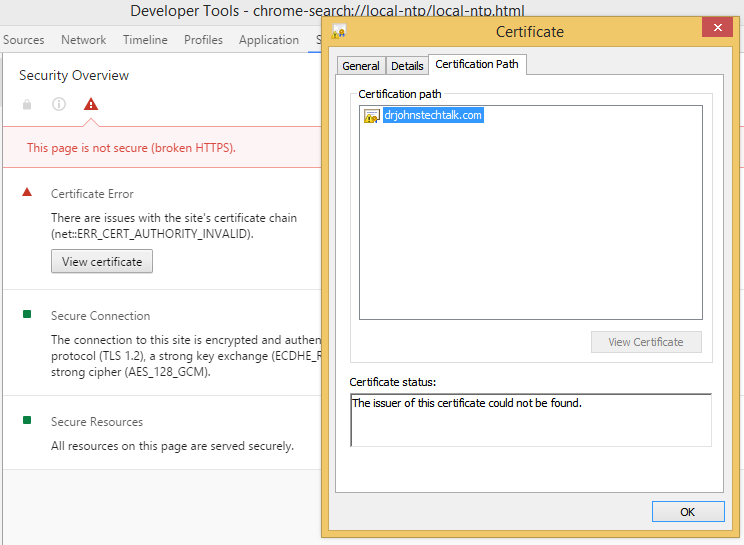
Looking at the certificate in Chrome (the only way I know how) shows the problem:

Certificate Error
There are issues with the site’s certificate chain (net::ERR_CERT_AUTHORITY_INVALID).

And indeed in examining the certificate it appears stand-alone. The whole chain should normally be displayed there but there is only the end certificate. So browsers won’t trust it.

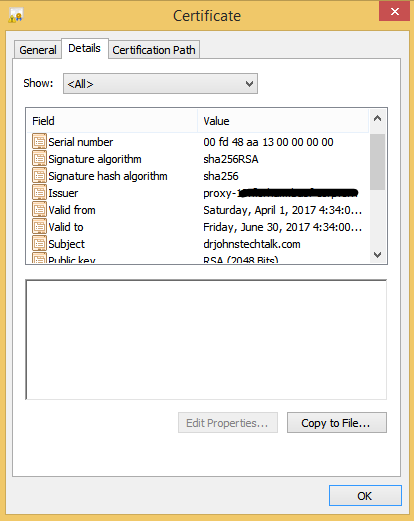
What is happening in this case is that the proxy is intercepting, but its not providing the intermediate CERT.

Here is a screen shot showing that the proxy is the issuer for the certificate:

What to check
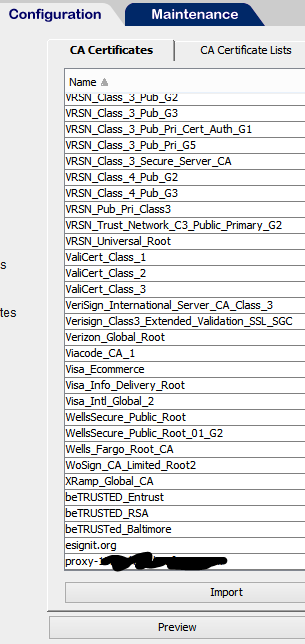
In our experience this can happen if the proxy’s signer certificate is present in a keyring on the proxy, but not present in the CA Certificates. We added this CERT to the CA Certificates and it behaved much better. Here’s a view of the CA Certificates after fixing it:

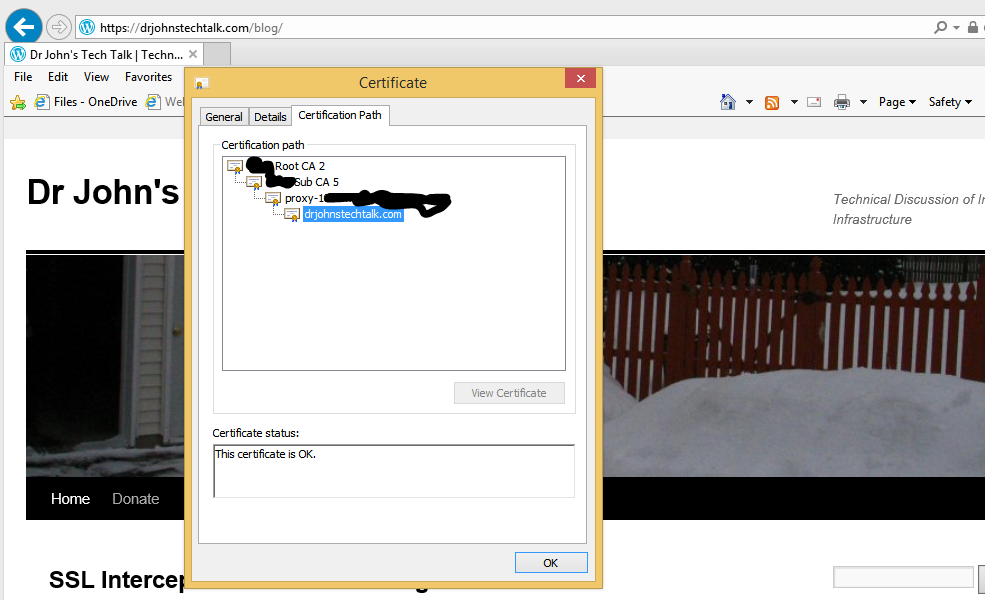
And a view of the certificate chain:


2022 Update

So the guy who normally does this retired and it fell onto my shoulders – getting the new signing certificates installed. I’ll be danged if I didn’t run into the exact same problem and waste an entire afternoon on it. Until. I discovered my own blog post from five years ago! And it still works! And it’s the only place where this specific problem is discussed and a solution presented. Kudos: me! Now Bluecoat -> Broadcom, but it’s the exact same stuff under the hood.

Other tips
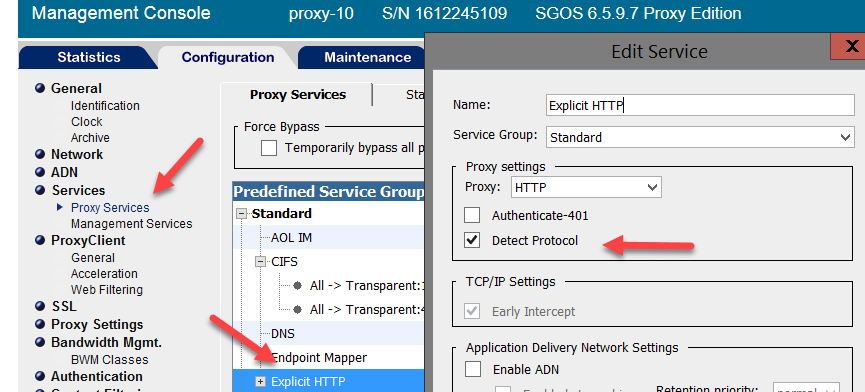
We got no results whatsoever when we initiated an SSL layer until we turned on Detect Protocol:

On the other hand we had a site break just from enabling Detect Protocol. Even when SSLInterception was set to action: Disabled.

We found that action: None worked better for these cases. That sets the behaviour back to what you had before you enabled Detect Protocol. The idea being that Detect Protocol invokes the SSL Proxy component of Bluecoat. The SSL Proxy can mess things up a bit for some SSL sites. Our problem was with a Java SSL site.

What about pinned certificates
Certificate Pinning provides the browser an independent way to verify who was supposed to have issued the site’s certificate. This would seem to be a doomsday scenario for SSL interception, but most browsers have built in an exception so that if the browser is on the local network it will ignore the pin.


Great resource for anyone doing SSL interception

There are many scenarios to consider when you have a Man In The Middle. OWS is Origin Web Server in the following. How will it behave if:

  • the OWS CERT is expired
  • the OWS CERT is self-signed
  • the OWS CERT is revoked
  • the OWS only offers weak ciphers
  • the OWS CERT is from a CA not trusted by the browser
  • the OWS CERT contains the wrong common name
  • the OWS CERT lacks the intermediate CERT
  • the OWS CERT is pinned
  • etc.

Get the idea? Lots of things to consider here – the scenarios, how your SSL intercepting device actually behaves, and how you want your SSL interception to behave for that scenario.

A great resource where they’re done the job for you to build certificates with almost every defect you can think of, is badssl.com.

Regrets
Man I wish openssl supported usage through proxy, in particular openssl s_client. But it doesn’t. Examining certificates with the various browsers is a pain, and I don’t fully trust them. For me openssl is truth.


References and related

All different kinds of faulty certificate scenarios to test with: badssl.com

You can now get “real” certificate for free! I’ve used them myself several times: Lets Encrypt

My article concerning Lets Encrypt usage: Saving money using Lets Encrypt

An article I wrote explaining ciphers.

Some openssl commands I’ve found useful: My favorite openssl commands.

Somehow related to all this is a web site that guarantees to never use SSL, which can be useful when you are using a guest WiFi requiring sign-on and want to hit a “safe” site (a non-SSL site can be hard to find these days): http://neverssl.com/

Categories
Network Technologies Web Site Technologies

Fail: What I’m working on now: Poor man’s version of Speedtest.net

Intro
Now that I have a dual-band router I wanted to run some tests to see if 5 GHz is really faster and more stable than 2.4 GHz, as my intuition was telling me. But my only 5 GHz device where I had a chance to measure was my amazon Fired HD tablet, and wouldn’t you know that it’s incapable of running speedtest (speedtest.net). The web site forced it to a mobile app version, but amazon’s app store, being limited in its offerings, doesn’t have a speedtest app!

Anyway speedtest.net runs ads pretty aggressively, which I don’t like.

So I decided to try to write my own.

This turned out to be very hard to do. It turns out I suck at Javascript.

Some details
Normally I show all my false starts in the hopes that others can learn frmo my mistakes, but my Javascript blunders are just too painful and I never did sort them out. When I use javascript methods to set page timers I got completely inconsistent and hence unreliable results. So I settled on this simplistic PHP approach to gauge download speed:

<!--?php
// - DrJ 3/2017
// the weakness of this method is that it is a single stream
echo "Date: " . date('h:i:s') . "<br-->\n";
$starttime = microtime(true);
for ($x = 0; $x &lt; 750000; $x++) {
  $string .= mt_rand(1000000,9999999);
}
 
echo "<!-- $string -->\n";
//start again
//echo date('h:i:s');
echo "
\n";
$endtime = microtime(true);
$timediff = $endtime - $starttime;
$timediff = $timediff;
//echo "php timer: starttime: " . $starttime . " endtime: " . $endtime . " diff: " . $timediff . "
\n";
echo "Page load time: " . $timediff . " s
\n";
// 1.04 is observed overhead of IP + tcp. try ip -s link show eth0 before and after running curl
$dataset = 1.04*(strlen($string) + 200)/1000000.0;
$mbps = $dataset*8.0/$timediff;
echo "Mbytes downloaded in test: " . $dataset . " Mbytes
\n";
echo "Bandwidth: " . $mbps ." mbps
\n";
?&gt;
 

I called the file index.php and put it on my server in a directory of my choosing, let’s say, downloadtimer, and run it. The results look like this:

Date: 07:30:33
Page load time: 6.9666068553925 s
Mbytes downloaded in test: 5.460208 Mbytes
Bandwidth: 6.270149142432 mbps
 
Test again

Conclusion
I pretty much gave up. Use fast.com instead. It’s much better than speedtest.net. There is also a mobile app for fast.com.

References and related

I just leanred there is a linux script (written in python) which runs speedtest! That is awesome. It is speedtest-clihttps://pypi.org/project/speedtest-cli/

It gives you the download speed, the upload speed. It calculates the closest server. It is really the full monty.

Everyone uses speedtest.net.

I just learned about speedcheck (speedcheck dot org). Initially it seemed promising but too often it simply doesn’t work. And its advertising is just about as aggressive as Okla’s speedtest.net that everyone uses.

Meanwhile a friend pointed out a couple superior speed test web sites. At&t’s Speedtest is a good choice. There are few if any ads, and it runs on my Fire HD tablet and it’s fun to watch. speedtest.att.com

This one seems only slightly less aggressive than speedtest.net: Internet Frog. Internet Frog works on my tablet but with limited functionality and a non-flashy interface.

This site is simplest of all so probably the best: fast.com. It’s run by Netflix who have an obvious interest in helping users establish what their download speed is. It only displays download speed by default, but just click Show more info and you will get ping time and upload speed as well. Also, they actually explain in a transparent way what the heck they are doing: https://medium.com/netflix-techblog/building-fast-com-4857fe0f8adb. And most importantly, they don’t shower you with ads.

Want a large file to experiment with downloading? speed test has a variety through an FTP server: ftp://speedtest.tele2.net/ . On linux I use a command like this:

$ curl ftp://speedtest.tele2.net/50MB.zip > /dev/null

 % Total    % Received % Xferd  Average Speed   Time    Time     Time  Current
                                 Dload  Upload   Total   Spent    Left  Speed
100 50.0M  100 50.0M    0     0  6099k      0  0:00:08  0:00:08 --:--:-- 11.3M

For faster speeds you should download the larger files.

I have also just discovered this site with large files you can download with HTTP:

https://www.thinkbroadband.com/download

For instance here is a direct link to their 100MB file which is nice to work with: http://ipv4.download.thinkbroadband.com/100MB.zip

Categories
Admin DNS Network Technologies

Bluecoat ProxySG and DNS using edns seem incompatible

Intro
Imagine your DNS server had this behaviour when queried using dig:

$ dig drjohnstechtalk.com @146.201.145.30

; <<>> DiG 9.9.2-P2 <<>> drjohnstechtalk.com @10.201.145.30
;; global options: +cmd
;; Got answer:
;; ->>HEADER<<- opcode: QUERY, status: FORMERR, id: 48905
;; flags: qr rd ra ad; QUERY: 1, ANSWER: 0, AUTHORITY: 0, ADDITIONAL: 1
 
;; OPT PSEUDOSECTION:
; EDNS: version: 0, flags:; udp: 4096
;; QUESTION SECTION:
;drjohnstechtalk.com.           IN      A
 
;; Query time: 1 msec
;; SERVER: 10.201.145.30#53(146.201.145.30)
;; WHEN: Fri Feb 24 12:16:42 2017
;; MSG SIZE  rcvd: 48

That would be pretty disturbing, right? The only way to get dig to behave is to turn off edns like this:

$ dig +noedns drjohnstechtalk.com @146.201.145.30

; <<>> DiG 9.9.2-P2 <<>> +noedns drjohnstechtalk.com @10.201.145.30
;; global options: +cmd
;; Got answer:
;; ->>HEADER<<- opcode: QUERY, status: NOERROR, id: 31299
;; flags: qr rd ra ad; QUERY: 1, ANSWER: 1, AUTHORITY: 0, ADDITIONAL: 0
 
;; QUESTION SECTION:
;drjohnstechtalk.com.           IN      A
 
;; ANSWER SECTION:
drjohnstechtalk.com.    3277    IN      A       50.17.188.196
 
;; Query time: 3 msec
;; SERVER: 10.201.145.30#53(146.201.145.30)
;; WHEN: Fri Feb 24 12:17:00 2017
;; MSG SIZE  rcvd: 53

Nslookup works. But who uses nslookup anyway?

Furthermore, imagine that DNS client and server are on the same subnet, so there is no firewall intermediating their traffic. so we know we can’t blame firewall cutting off large DNS packets, unlike the suggestions made in the references section.

Well, this is exactly the situation in a large company where I consult. The DNS server is unusual: a Bluecoat ProxySG, which can conveniently combine replies from nameservers from two different namespaces.

There does not seem to be an option to handle edns queries correctly on a Bluecoat device.

The client is running SLES version 11. The real question is how will applications behave? Which type of query will they make?

Bluecoat Response
Bluecoat does not support eDNS and gives a response permitted by RFC2671. RFC2671 also encourages clients to account for error responses and drop the use of eDNS in a retry.

References and related
EDNS: What is it all about? is a really good explanation of edns and how it came about, how it’s supposed to work, etc.
This post suggests some scenarios where edns may not work, though it does not address the Bluecoat issue: http://blog.fpweb.net/strange-dns-issues-better-check-out-edns/#.WLBmw3dvDkk
RFC 2671

Categories
Admin Network Technologies Raspberry Pi

Use Raspberry Pi to explore mDNS

Intro
I am confounded by the Bonjour field on my d-Link DCS-931L IP webcam. I should be able to use it to see my desired hostname, but it doesn’t take. Why?

The details
Having a Raspberry Pi on the same network I realized I could at least learn definitively whether or not my new name was being taken, or what the old name was.

You install avahi-discover to do that:

$ sudo apt-get install avahi-discover

Those who follow my blog will realize I am big on Linux command-line, not so much on GUIs. I mention it because unfortunately avahi-discover only works in the GUI. Not having a console I actually had to fire up vncserver and use my vncviewer on my PC! Then I could launch avahi-discover from a terminal window running on the GUI.

The extra fuss was just a few steps anyway, and well worth it.

avahi-discover broke down my home network and all the discovered devices in a very orderly fashion, e.g., the webcam appeared under web servers.

And what did I learn? Indeed, my name had not “taken” for some reason. So the system-supplied name was there instead. For the record that is

dcs931le1a6.local

And testing it:

$ ping dcs931le1a6.local

did indeed show me that it was resolvable by that name form my local network. My PC could reach it by that name as well. I tied to name it DCS-931L-BALL, and I know someone else who did this successfully, and I had even done it in the past, but it was just not taking it this time.

References and related
mDNS is multicast DNS. It’s designed for home networks. It’s pretty common from wjhat I see, yet largely unknown since It people do not encounter it in enterprise environments. As usual Wikipedia has a good article on it.
Superimposing crosshairs on a webcam image.

Categories
Linux Network Technologies

Switch home router to DD-WRT: FAIL

Intro
I am having problems with my home router, a Cisco E1200, especially with the wireless connections. I thought it might be interesting to try to run it using the open source routing code DD-WRT. Since I am a Linux geek DD-WRT had some attraction for me and I figured it really couldn’t make matters worse. Boy was I wrong.

The details
Dropped connections, slow response, degradation over time – that is all par for the course for my E-1200. Again, mostly affecting WiFi.

Starting from this bare-bones installation write-up, http://www.dd-wrt.com/wiki/index.php/Linksys_E1200v2, I did indeed manage to upgrade the firmware to DD-WRT.

Things they don’t tell you that you probably want to know

Initial login password is blank, and the username is root, not admin.

I wanted to have the SSID I had been using preserved with the same password as well, so that, ideally, I would not have to revisit my devices to get them to learn about a new SSID setup. This was especially important to me due to a wireless Canon 3600 series printer which is particularly difficult to set up. You do it once, fumbling around until it works, and hope to never have to do it again.

And…yes, it auto-created that SSID and I saw client logged into it, so I guess it preserved the password as well. I don’t really know the characteristics that a client uses to decide this is the same SSID as before. The MAC address may be part of that decision. But since this was the same hardware the MAC address was preserved as well.

The results
My hard-wired connection worked pretty well. But WiFi, if you can believe it, was even worse than before! My Office Dell PC just would not pick up an IP address although it did connect to it. When you run ipconfig and only see an address beginning with 169.254. you are in trouble, and that’s what I had. My Dell 2-in-1 laptop could connect OK. But sometimes it worked, sometimes not, over WiFi, and worse than before.

And although some of the Linuxy type things looked somewhat familiar, like bridging with a br0 interface, I didn’t want to invest a lot of time debugging my issues. And the web GUI was a little slow.

ssh was disabled by default. No idea how to turn it on. Do I didn’t have the usual comfort of a Linux command line in working with it.

Issuing commands via the web GUI was just too painfully slow.

Also, come to think of it, it did not grab an IP over its WAN connection. Now I have an unusual ISP that permits me two valid Internet addresses. My Cisco Meraki takes the other address. But rebooting cable modem, Cisco router, etc in any combination just did not permit me to get that 2nd IP address I had been using. Eventually I knocked my Meraki offline. I wasn’t expecting that as it normally runs flawlessly and I hadn’t touched it.

So needless to say I was pretty disgusted and gave up. Question is, could I go back to the Cisco firmware??

Back to Cisco’s embrace
Well it turns out you can go back. Cisco meanwhile had released a newer version of firmware for it and made it available for download over the Internet.

I got the initial Cisco-looking page but had a really tough time logging in! None of the default of previous username/password combinations worked!! root/(blank), admin/admin, (blank)/root, admin/1234, admin/previous_password, none of it let me in! I tried a reset. No go. I read different directions on how to reset. Someone mentioned a 30/30/30 rule. No go. (I guess that was 30 seconds reset, 30 seconds wait, 30 seconds without power). The more official recommendation seemed to be 10 seconds reset. Eventually one of those resets did work – I think the 10 second one, and the default admin/admin got me in. That was a relief!

I figured if my SSID carried over to DD-WRT, surely it would carry over going back to Cisco. But, strangely, it did not. The name was similar, but not the same. Old name: Cisco76538. New: Linksys76538. No way to change it. Thanks Cisco, that was really helpful. CORRECTION. You know how you get used to certain settings? I had WPS enabled. For some reason you enable it in two places. Well, the one place, if you turn it off, allows you to change the SSID! But I need WPS (WiFi protected setup) for some basic Canon printers I have. So I don’t think this is an out.

So I had to visit all my clients one-by-one to re-enter the WiFi info, I still haven’t gotten to that one printer though! And my Wink Hub was no fun to re-configure either.

And performance is inconsistent once again, but much better than under DD-WRT. It’s too early to tell if it is an improvement over the older firmware.

And I gave up on using a 2nd IP address at home. I just channel everything through the Meraki.

Some more thoughts on why the office computer did not get an IP address though it was connected to the DD-WRT network
I’ve seen this problem just this week with a different DHCP server. I think you may only get a 169.254… address if your DHCP server already has your MAC address in its table, so it decides you don’t need another IP, or something like that. But things didn’t seem to get any better after a reboot of the router. So I don’t know.

Some more thoughts on why WiFi performs better through Meraki
The Cisco E1200 is a cheap, 2.4 GHz-band router. It can be set to auto-hop if one of the channels gets interference – that’s one of the WPS buttons. I’m beginning to suspect that is what is happening as I do see the neighbor’s SSIDs. Meraki is dual band, 5 GHz + 2.4 gHz and has the intelligence to use both as needed. I think it has MIMO as well. So it’s almost always going to do better than a cheap home router.

What I ended up doing
In the end I bought a dual-band router: Linksys WRT1200AC for $91 from Amazon. Turns out my Dell computers do not support 5 gHz. who knew?

Conclusion
Upgrade firmware to DD-WRT? Maybe with enough effort I could have gotten DD-WRT to work. It allows more control than Cisco’s firmware. But with the minimal configuration I was willing to do it was basically useless – very inconsistent and just not working with some devices.

References and related
Very brief DD-WRT install instructions for an E1200: http://www.dd-wrt.com/wiki/index.php/Linksys_E1200v2
Official E1200 download site: http://www.linksys.com/us/support-article?articleNum=148523

Categories
Network Technologies Security

The IT Detective agency: the case of the incompatible sftp client

Intro
I was asked for assistance with this sftp problem:

$ sftp <user@host>

DH_GEX group out of range: 1536 !< 1024 !< 8192
Couldn't read packet: Connection reset by peer

We actually spoke with the operator of the sftp server who said their server is not compatible with openSSH version 6.2

The details
you can see your version of openssh and a lot more by running it again with the <v flag:

$ sftp ‐v [email protected]

OpenSSH_6.2p2, OpenSSL 0.9.8j-fips 07 Jan 2009
debug1: Reading configuration data /etc/ssh/ssh_config
debug1: /etc/ssh/ssh_config line 20: Applying options for *
debug1: Connecting to securefile.drj.com [50.17.188.196] port 22.
debug1: Connection established.
debug1: identity file /home/drj/.ssh/id_rsa type -1
debug1: identity file /home/drj/.ssh/id_dsa type -1
debug1: Enabling compatibility mode for protocol 2.0
debug1: Local version string SSH-2.0-OpenSSH_6.2
debug1: Remote protocol version 2.0, remote software version SSHD
debug1: no match: SSHD
debug1: SSH2_MSG_KEXINIT sent
debug1: SSH2_MSG_KEXINIT received
debug1: kex: server->client aes128-cbc hmac-sha1 none
debug1: kex: client->server aes128-cbc hmac-sha1 none
debug1: SSH2_MSG_KEX_DH_GEX_REQUEST(1536<7680<8192) sent
debug1: expecting SSH2_MSG_KEX_DH_GEX_GROUP
DH_GEX group out of range: 1536 !< 1024 !< 8192
Couldn't read packet: Connection reset by peer

At the same time, I could successfully connect on an older system – SLES 11 SP2 – whose detailed connection looked like this:

Connecting to securefile.drj.com...
OpenSSH_5.1p1, OpenSSL 0.9.8j-fips 07 Jan 2009
debug1: Reading configuration data /etc/ssh/ssh_config
debug1: Applying options for *
debug1: Connecting to securefile.drj.com [50.17.188.196] port 22.
debug1: Connection established.
debug1: identity file /home/drj/.ssh/id_rsa type -1
debug1: identity file /home/drj/.ssh/id_dsa type -1
debug1: Remote protocol version 2.0, remote software version SSHD
debug1: no match: SSHD
debug1: Enabling compatibility mode for protocol 2.0
debug1: Local version string SSH-2.0-OpenSSH_5.1
debug1: SSH2_MSG_KEXINIT sent
debug1: SSH2_MSG_KEXINIT received
debug1: kex: server->client aes128-cbc hmac-sha1 none
debug1: kex: client->server aes128-cbc hmac-sha1 none
debug1: SSH2_MSG_KEX_DH_GEX_REQUEST(1024<2048<8192) sent
debug1: expecting SSH2_MSG_KEX_DH_GEX_GROUP
debug1: SSH2_MSG_KEX_DH_GEX_INIT sent
debug1: expecting SSH2_MSG_KEX_DH_GEX_REPLY
The authenticity of host 'securefile.drj.com (50.17.188.196)' can't be established.
RSA key fingerprint is 13:bb:75:21:86:c0:d6:90:3d:5c:81:32:4c:7e:73:6b.
Are you sure you want to continue connecting (yes/no)?

See that version? it is only openSSH version 5.1. It seems to permit a shorter Diffie Hellman group exchange key length than does the newer version of openssh.

My solution
The standard advice on duckduckgo is to set this parameter in your $HOME/.ssh/config:

KexAlgorithms diffie-hellman-group-exchange-sha256,diffie-hellman-group14-sha1,diffie-hellman-group1-sha1

But this did not work for my case. And I didn’t want to change a setting that would weaken the security of all my other sftp connections. So I settled on using an additional command-line argument which is an openSSH parameter when running sftp:

$ sftp ‐o KexAlgorithms=diffie‐hellman‐group14‐sha1 <host>

And this worked!

And this works as well:

$ sftp ‐o KexAlgorithms=diffie‐hellman‐group1‐sha1 <host>

Why the change?
The minimum key length was changed from 1024 to 1536 and later to 2048 to avoid the logjam vulnerability.

Conclusion
Not all versions of openSSH are equal. In particular openSSH v 6.2 may be incompatible with older sftp servers. I showed a way to make a newer sftp work with an older server. Case closed.

References and related
Novell’s discussion of the issue is here: https://www.novell.com/support/kb/doc.php?id=7016904
Here’s some more information on the logjam vulnerability: https://weakdh.org/