Intro
To locate where any IP address is located – known as geoip – you can do a simple duckduckgo search and get an idea, but you may also get sucked into one of those sites that provides a service while subjecting you to a lot of advertising. So I prefer to have the option to go to the source.
Intro
I learned about pi-hole from Bloomberg Businessweek of all places. Seems right up my alley – uses Raspberry Pi in your home to get rid of advertisements. Turns out it was too easy and I don’t have much to contribute except my own experiences with it!
The details
When I read about it I got to thinking big picture and wondered what would prevent us from running an enterprise version of this same thing? Well, large enerprises don’t normally run production critical applications like DNS servers (which this is, by the way) on Raspberry Pis, which is not the world’s most stable hardware! But first I had to try it at home just to learn more about the technology.
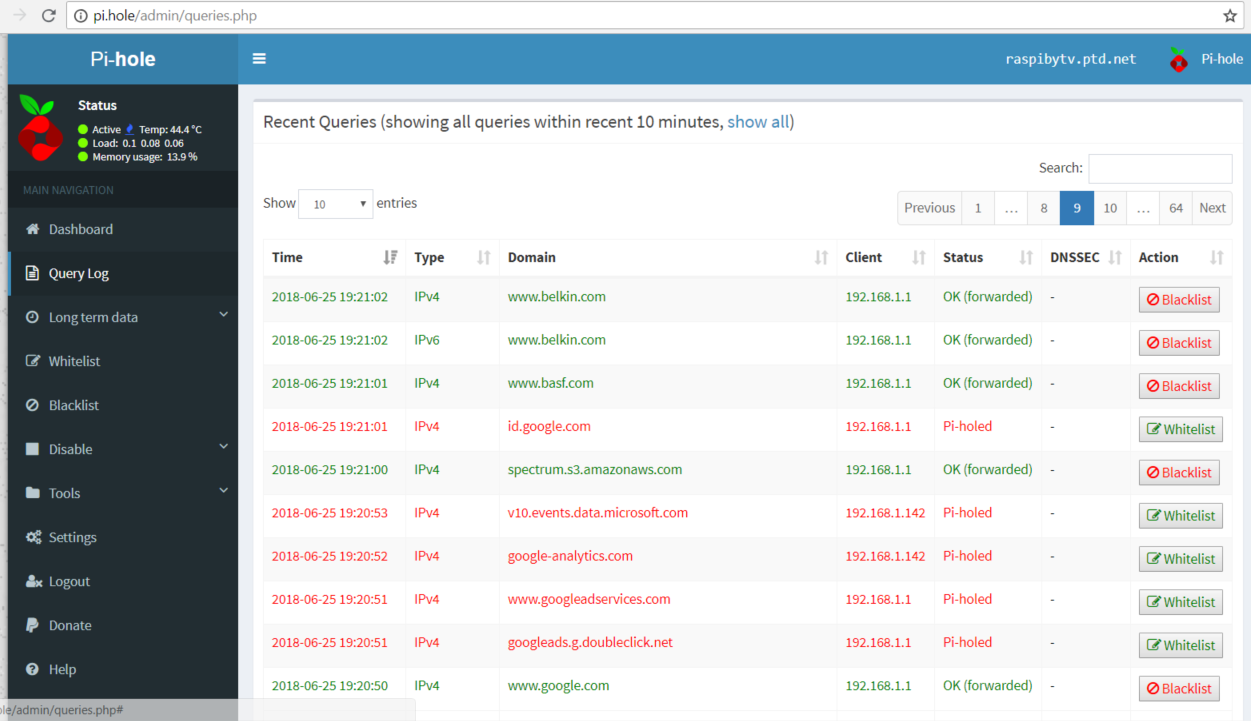
pi-hole admin screen
I was surprised just how optimized it was for the Raspberry Pi, to the neglect of other systems. So the idea of using an old SLES server is out the window.
But I think I got the essence of the idea. It replaces your DNS server with a custom one that resolves normal queries for web sites the usual way, but for DNS queries that would resolve to an Ad server, it clobbers the DNS and returns its own IP address. Why? So that it can send you a harmless blank image or whatever in place of an Internet ad.
You know those sites that obnoxiously throw up those auto-playing videos? That ain’t gonna happen any more when you run pi-hole.
You have to be a little adept at modifying your home router, but they even have a rough tutorial for that.
Installation
For the record on my Rspberry Pi I only did this:
$ sudo su ‐
$ curl ‐sSL https://install.pi‐hole.net | bash
It prompted me for a few configuration details, but the answers were obvious. I chose Google DNS servers because I have a long and positive history using them.
You can see that it installs a bunch of packages – surprisingly many considering how simple in theory the thing is.
Test it
On your Raspberry Pi do a few test resolutions:
$ dig google.com @localhost # should look like it normally does
$ dig pi.hole # should return the IP of your Raspberry Pi
$ dig adservices.google.com # I gotta check this one. Should return IP address of your Pi
It runs a little web server on your Pi so the Pi acts as adservices.google.com and just serves out some white space instead of the ad you would have gotten.
Linksys router
Another word about the home router DHCP settings. You have the option to enter DNS server. So I put the IP address of my raspberry pi, 192.168.1.119. What I expected is that this is the DNS server that would be directly handed out to the DHCP clients on my home network. But that is not the case. Instead it still hands out itself, 192.168.1.1 as DNS server. But in turn it uses the raspberry PI for its resolution. This through me when I did an ipconfig /all on my Windows 10 and didn’t see the DNS server I expected. But it wa all working. About 10% of my DNS queries were pi-holed (see picture of my admin screen above).
I guess pi-hole is run by fanatics, because it works surprisingly well. Those complex sites still worked, like cnn.com, cnet.com. But they probably load faster without the ads.
Two months check up
I checked back with pihole. I know a DNS server is running. The dashboard is broken – the sections just have spinning circle instead of data. It’s already asking me to upgrade to v 3.3.1. I run pihole -up to do the upgrade.
Another little advantage
I can now ssh to my pi by specifying the host as pi.hole – which I can actually remember!
Idea for enterprise
finally, the essence of the idea probably could be ported over to an enterprise. In my opinion the secret sauce are the lists of domain names to clobber. There are five or six of them. Some have 50,000 entries. So you’d probably need a specialized DNS server rather than the default ISC BIND. I remember running a specialized DNS server like that when I ran Puremessage by Sophos. It was optimized to suck in real-time blacklists and the like. I have to dig through my notes to see what we ran. I’m sure it wasn’t dnsmasq, which is what pi-hole runs on the Raspberry Pi! But with these lists and some string manipulation and a simple web server I’d think it’d be possible to replicate in enterprise environment. I may never get the opportunity, more for lack of time than for lack of ability…
Conclusion
Looking for a rewarding project for your Raspberry Pi? Spare yourself Internet advertisements at home by putting it to work.
Intro
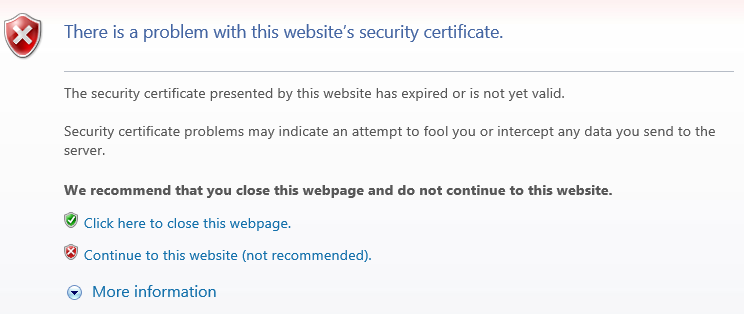
I was confronted with a web site certificate error. A user was reluctant – correctly – to proceed to an internal web site because he saw a message to the effect:
I tried it myself with IE and got the same thing.
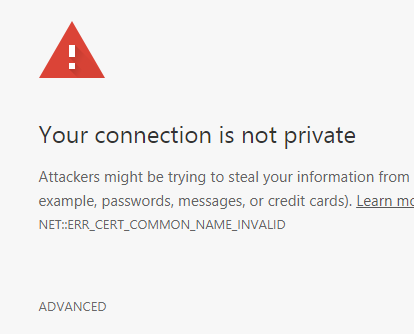
Switch to Chrome and I saw this error:
I wouldn’t bother to document this one except for a twist: the certificate error went away in IE when you clicked through to the login page.
Furthermore, when I examined the certificate with a tool I trust, openssl, it showed the date was not expired.
So what’s going on there?
The details
First thing I dug into was Chrome. I found this particular error can occur if you have an internal certificate issued with a valid common name, but without a Subject Alternative Name. My openssl examination confirmed this was indeed the case for this certificate.
So I decided the Chrome error was a red herring. And confirmed this after checking out other internal web sites which all suffered from this problem.
But that still leaves the IE error unexplained.
As I mentioned in a previous post, I created a shortcut bash function that combines several openssl functions I call examinecert:
Certificate:
    Data:
        Version: 3 (0x2)
        Serial Number:
            04:17:21:b7:12:94:3a:fa:fd:a8:f3:f8:5e:2e:e4:52:35:71
    Signature Algorithm: sha256WithRSAEncryption
        Issuer: C=US, O=Let's Encrypt, CN=Let's Encrypt Authority X3
        Validity
            Not Before: Apr  4 08:34:56 2018 GMT
            Not After : Jul  3 08:34:56 2018 GMT
        Subject: CN=drjohnstechtalk.com
        Subject Public Key Info:
            Public Key Algorithm: rsaEncryption
                Public-Key: (2048 bit)
                Modulus:
                    00:d3:50:98:6d:72:03:b2:e4:01:3f:44:01:3d:eb:
                    ff:fc:68:7d:51:a4:09:90:48:3c:be:43:88:d7:ba:
                    ...
        X509v3 extensions:
                 ...
            X509v3 Subject Alternative Name:
                DNS:drjohnstechtalk.com
                ...
Certificate:
Data:
Version: 3 (0x2)
Serial Number:
04:17:21:b7:12:94:3a:fa:fd:a8:f3:f8:5e:2e:e4:52:35:71
Signature Algorithm: sha256WithRSAEncryption
Issuer: C=US, O=Let's Encrypt, CN=Let's Encrypt Authority X3
Validity
Not Before: Apr 4 08:34:56 2018 GMT
Not After : Jul 3 08:34:56 2018 GMT
Subject: CN=drjohnstechtalk.com
Subject Public Key Info:
Public Key Algorithm: rsaEncryption
Public-Key: (2048 bit)
Modulus:
00:d3:50:98:6d:72:03:b2:e4:01:3f:44:01:3d:eb:
ff:fc:68:7d:51:a4:09:90:48:3c:be:43:88:d7:ba:
...
X509v3 extensions:
...
X509v3 Subject Alternative Name:
DNS:drjohnstechtalk.com
...
I tried to show a friend the error. I could no longer get IE to show a certificate error. So my friend tried IE. He saw that initial error.
Most people give up at this point. But my position is the kind where problems no one else can resolve go to get resolution. And certificates is somewhat a specialty of mine. So I was not ready to throw in the towel.
I mistrust all browsers. They cache information, try to present you sanitized information. It’s all misleading.
So I ran examinecert again. This time I got a different result. It showed an expired certificate. So I ran it again. It showed a valid, non-expired certificate. And again. It kept switching back-and-forth!
Here it helps to know some peripheral information. The certificate resides on an old F5 BigIP load-balancer which I used to run. It has a known problem with updating certificate if you merely try to replace the certificate in the SSL client profile. It’s clear by looking at the dates the certificate had recently been renewed.
So I now had enough information to say the problem was on the load balancer and I could send the ticket over to the group that maintains it.
As for IE’s strange behavior? Also explainable for the most part. After an initial page with the expired certificate, if you click Continue to this web site it re-loads the page and gets the Good certificate so it no longer shows you the error! So when I clicked on the lock icon to examine the certificate, I always was getting the good version. In fact – and this is an example of the limitation of browsers like IE -you don’t have the option to examine the certificate about which it complained initially. Then IE caches this certificate I think so it persists sometimes even after closing and re-launching the browser.
Case closed.
Conclusion
An intermittent certificate error was explained and traced to a bad load balancer implementation of SSL profiles. The problem could only be understood by going the extra mile, being open-minded about possible causes and “using all my senses.” As I like to joke, that’s why I make the medium bucks!
Intro
I always want to know more about how things really work behind the scenes, so I was excited when I overheard talk about how one company uses the Instagram API to do some cool things. An API is an application programming interface. It allows you to write programs to automate tasks and do some really cool stuff. So I spoke to one of my sources who shared with me a few companies he knows about who use Instagram’s API to do some cool things. Unfortunately, none of them were willing to reveal the technical details of how they interact with the API, so I am left with only the marketing descriptions of what they have managed to do with it. But what they don’t realize is that as a capable IT person, in some cases I only have to hear that a thing is possible to motivate me. I have literally gone into meetings telling a customer No that’s not possible, hearing from them Yeah, well, they have it running in Europe, and going back to my desk afterwards to totally revise my opinion of what is or isn’t possible and how it could be done. Having said all that, here is what these companies have managed to do, without revealing the secret sauce of how they do it.
Example apps Post scheduling software
This is used by social media managers to schedule their Instagram posts weeks or months in advance. It allows them to make a bunch of posts at once quickly and saves them time. A friend of a friend in NYC owns a company that does this. His website is bettrsocial.com
Analytic software
Simply Measured offers a free Instagram report for users with up to 25,000 followers. The stats and insights are presented clearly and will help inform your Instagram posting strategy. The report lets you quickly see what has worked well in your Instagram marketing so you can apply these insights to future posts. Web site: https://simplymeasured.com
Automaton software
Some companies connect with Instagram’s API to automate redundant tasks and increase traffic to your Instagram page. Social Network Elite is one of the best sources for growing organic Instagram followers.
Conclusion
Although I don’t even have an Instagram account, I am interested in APIs. The Instagram API does not look too daunting and seems well-documented. I cite a few small businesses that put it to use to do cool stuff. Unfortunately at this time I can’t deliver on the promise of the title of this article – a taste of the API – because I haven’t received any details about the actual usage. Perhaps in some future I will get my own account and develop my own application.
Intro
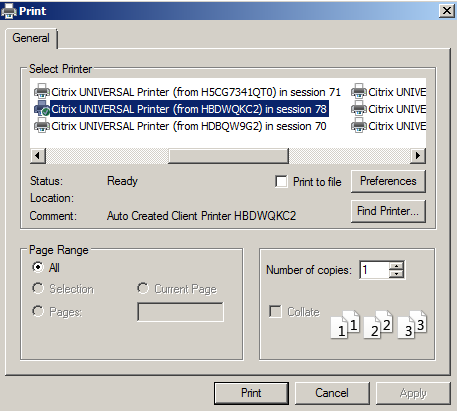
I’m speaking of the old Citrix Receiver client. You launch that and that puts you in a Citrix ICA “jail.” I recently help a company move an app which had been a browser-based app to a browser within Citrix. Users complained they could not print from it… All their local printers were gone. Only a Citrix Universal Printer can be chosen.
What to do?
The solution
When you print, choose the Citrix universal printer.
Click on print again. You get a print preview screen.
Click on the printer symbol in the top bar. You will get your local printer list to choose from
Click on print again and the print job will be sent to the desired printer.
Simple enough, unless you’re going through it for the first time!
How did Citrix Receiver client break out of the jail?
I am told that it uses EMF format. That’s Enhanced Metafile, a successor to WMF, Windows metafile. EMF is a graphics language used in printer drivers. The Wikipedia article on this is surprisingly brief and skeletal: https://en.wikipedia.org/wiki/Windows_Metafile#Variants. So I guess it’s not really a jail at all – that was just my term. And the details beyond this unsatisfactory explanation I do not know. I’ll keep it on the back burner in case I ever get an opportunity to learn more about it.
Open Notebook background
I sometimes write blog posts as a sort of high-quality journal entry. I may very well be the only person who ever refers to them, and that’s OK. It contains enough information to prod my memory though it may not be polished enough to help many others.
References and related
The ICA that I referred to is the communications protocol used between classic Citrix Receiver client and a Citrix server (what we used to call an NFuse server). Wikipedia has a good article on it: https://en.wikipedia.org/wiki/Independent_Computing_Architecture
Intro
Why would you even want to do this when you can buy a native IP webcam for less? I’m not sure, but i found myself in this situation so it could happen to others, and I found some things that worked and some that required quite some effort.
In my previous post I spoke about using opencv on Raspberry Pi.
This post is more about getting at an image with a minimum of lag time and relatively low bandwidth.
What I did not do
I considered bolting on an add-on to opencv to convert the video stream into mjpeg. But the process looked relatively obscure so I did not feel that was a good way to go.
I skimmed through the mjpeg (motion jpeg) standard. Looks pretty straightforward. i even considered writing my own streamer. It’s probably not too hard to write a bad one! But I feared it would be unreliable so I didn’t go that route. It’s just jpeg, separator, jpeg, separator, jpeg, etc. Here’s the Wikipedia link: https://en.wikipedia.org/wiki/Motion_JPEG.
I think the best software for is mjpg_streamer. It is not available as a simple package. So you have to compile it and patch it.
Mostly! I needed the patch as well (which he also mentions). his instructions for the patch aren’t accurate.
He provides a link. You need to save the contents by launching the downloaded file and saving it as input_uvc_patch.txt after opening it in Windows Notepad (if you’re doing this download through Windows).
On the Pi, you would do these steps:
cd ~/mjpg-streamer
patch -p0 < input_uvc_patch.txt
make USE_LIBV4L2=true clean all
sudo make DESTDIR=/usr/local install
cd ~/mjpg-streamer
patch -p0 < input_uvc_patch.txt
make USE_LIBV4L2=true clean all
sudo make DESTDIR=/usr/local install
That is, assuming you had copied the patch file into that ~/mjpg-streamer directory.
Before we get too far, I wished to mention that the command fswebcam proved somewhat useful for debugging.
Here’s a weird thing about that camera
We had one, then I got another one. The two cameras do not behave the same way!
Device files
I guess Raspberry Pi has its own version of plug-and-play. So what it means is that when you plug in the camera a device file is dynamically created called /dev/video0. Now if you happen to plug in a second USB camera, that one becomes device /dev/video1. Some utilities are designed to work with /dev/video0 and require extra arguments to deal with a camera with a different device number, e.g., fswebcam -d /dev/video1 image.jpg.
But actually running two cameras did not work out too well for me. It seemed to crash and I don’t have time to investigate that.
The working command is…
My livestream.sh file looks like this right now. It will change but this is a good document point.
The main point is that I found this additional -yuv argument seemed to get the one webcam to work, whereas the other USB camera didn’t need that! If you don’t include it launcher.sh may appear to work, but all you see when you connect to the direct video stream looks like this image:
One time when I ran it it crashed and suggested that -yuv argument be added, so I tried it and it actually worked! That’s how i discovered that oddity.
Bandwidth with those settings
About 2 mbps. How do I measure that? simple. I bring up the web page and tool around the networking stuff until i find Change Adapter Settings (always difficult to find). Then I double-click on my active adapter and stare at the received bytes to get a feel for how much it’s incrementing by each second. Multiply by 10, and voila, you have a crude measure, perhaps +/- 30%, of your bandwidth consumed!
Latency
This is so important it needs its own section.
Latency is pretty good. We’ve measured it to be 0.26 seconds.
fswebcam errors
What happens if you run fswebcam while livestream is running?
$ fswebcam /tmp/image.jpg
--- Opening /dev/video0...
Trying source module v4l2...
/dev/video0 opened.
No input was specified, using the first.
Error selecting input 0
VIDIOC_S_INPUT: Device or resource busy
--- Opening /dev/video0...
Trying source module v4l2...
/dev/video0 opened.
No input was specified, using the first.
Error selecting input 0
VIDIOC_S_INPUT: Device or resource busy
Makes sense. Only one program on the Pi can capture the output form the camera.
Does the simple command fswebcam image.jpg work all the time? No it does not! Sometimes it simply fails, which is scary.
Here is an example of two consecutive calls to fswebcam about a second apart which illustrates the problem:
$ fswebcam /tmp/image.jpg
--- Opening /dev/video0...
Trying source module v4l2...
/dev/video0 opened.
No input was specified, using the first.
Adjusting resolution from 384x288 to 352x288.
--- Capturing frame...
Timed out waiting for frame!
No frames captured.
--- Opening /dev/video0...
Trying source module v4l2...
/dev/video0 opened.
No input was specified, using the first.
Adjusting resolution from 384x288 to 352x288.
--- Capturing frame...
Timed out waiting for frame!
No frames captured.
$ fswebcam /tmp/image.jpg
--- Opening /dev/video0...
Trying source module v4l2...
/dev/video0 opened.
No input was specified, using the first.
Adjusting resolution from 384x288 to 352x288.
--- Capturing frame...
Captured frame in 0.00 seconds.
--- Processing captured image...
Writing JPEG image to '/tmp/image.jpg'.
--- Opening /dev/video0...
Trying source module v4l2...
/dev/video0 opened.
No input was specified, using the first.
Adjusting resolution from 384x288 to 352x288.
--- Capturing frame...
Captured frame in 0.00 seconds.
--- Processing captured image...
Writing JPEG image to '/tmp/image.jpg'.
Running two USB cameras wih a single Ras Pi
This initially did not work in my first attempts but now it does!
It probably helps to be running a Raspebrry Pi 3 with Raspbian Stretch OS.
Maybe this wasn’t needed but we made a directory /usr/local/www2 and copied all the files from /usr/local/www to /usr/local/www2. A 2nd USB camera when plugged in creates /dev/video1 as I mentioned. You have to pick a different port, so we chose port 8090. Putting it all together we have the script below, livestream2.sh:
If a 2nd camera isn’t plugged in then the script errors out and doesn’t run, which is pretty much what we want. Running it by hand we get this:
$ ./livestream2.sh
MJPG Streamer Version: svn rev: 3:172M
 i: Using V4L2 device.: /dev/video1
 i: Desired Resolution: 352 x 288
 i: Frames Per Second.: 12
 i: Format............: YUV
 i: JPEG Quality......: 80
ERROR opening V4L interface: No such file or directory
 Init v4L2 failed !! exit fatal
 i: init_VideoIn failed
MJPG Streamer Version: svn rev: 3:172M
i: Using V4L2 device.: /dev/video1
i: Desired Resolution: 352 x 288
i: Frames Per Second.: 12
i: Format............: YUV
i: JPEG Quality......: 80
ERROR opening V4L interface: No such file or directory
Init v4L2 failed !! exit fatal
i: init_VideoIn failed
Reining in the bandwidth
We found that by lowering the jpeg quality with the -q option we could reduce the bandwidth and the quality, but the quality was still good enough for our purposes. Now the video streams from both cameras comes in around 4.5 mbps, even in bright lighting. So we settled on -q 50 for a 50% quality. Even a quality of 10 (10%) is not all that bad! I believe the default is 80%.
Bandwidth monitor on the Pi
Some of this was written by the student so apologies for the misspellings! Probably will be refined in the future. We can tease out how much bandwidth we’re actually using on the Pi by measuring the transmitted (TX) bytes periodically. We’ll record that during a matcgh so we can prove to ourselves and others that we have our bandwidth under control – far less than 7 mbps despite using two cameras.
Unreliable video stream startup
Sometimes one video stream does not come on correctly after first power-up. This is most perplexing as with computer gear one expects consistent, reproducible behaviour, yet that is not at all what we’ve observed.
This makes no sense, but in one environment we had our two streams running successfully six times in a row. Then I take the equipment home and find only one of the two streams starts up. It seems more likely to fail after sitting powered off for a few hours! I know it doesn’t make sense but that’s how it is.
In any case we have built a monitor which looks for and corrects this situation. It’s pretty clever and effective if I say so myself! And necessary! We created one monitor each for the two video devices. Here’s videomonitor.sh:
#!/bin/bash# DrJ make sure video stream is not stuck. Restart it if it issleep8while/bin/true; dochars=`curl -s-m1 localhost:80/?action=stream|wc -c`if[$chars-lt100]; then# we are stuck!dateecho Video stuck so we will restart it
pid=`ps-ef|grep mjpg|grep'p 80'|grep-vsudo|awk'{print $2}'`sudokill$pidsleep1
~/livestream.sh &# restart...else# we have a good streamtouch/tmp/stream80
fisleep5done
#!/bin/bash
# DrJ make sure video stream is not stuck. Restart it if it is
sleep 8
while /bin/true; do
  chars=`curl -s -m1 localhost:80/?action=stream|wc -c`
  if [ $chars -lt 100 ]; then
# we are stuck!
    date
    echo Video stuck so we will restart it
    pid=`ps -ef|grep mjpg|grep 'p 80'|grep -v sudo|awk '{print $2}'`
    sudo kill $pid
    sleep 1
    ~/livestream.sh &
# restart...
  else
# we have a good stream
    touch /tmp/stream80
  fi
  sleep 5
done
and videomonitor2.sh
#!/bin/bash# DrJ make sure video stream is not stuck. Restart it if it issleep8while/bin/true; dochars=`curl -s-m1 localhost:443/?action=stream|wc -c`if[$chars-lt100]; then# we are stuck!dateecho Video stuck so we will restart it
pid=`ps-ef|grep mjpg|grep'p 443'|grep-vsudo|awk'{print $2}'`sudokill$pidsleep1
~/livestream2.sh &# restart...else# we have a good streamtouch/tmp/stream443
fisleep5done
#!/bin/bash
# DrJ make sure video stream is not stuck. Restart it if it is
sleep 8
while /bin/true; do
  chars=`curl -s -m1 localhost:443/?action=stream|wc -c`
  if [ $chars -lt 100 ]; then
# we are stuck!
    date
    echo Video stuck so we will restart it
    pid=`ps -ef|grep mjpg|grep 'p 443'|grep -v sudo|awk '{print $2}'`
    sudo kill $pid
    sleep 1
    ~/livestream2.sh &
# restart...
  else
# we have a good stream
    touch /tmp/stream443
  fi
  sleep 5
done
And we’ll start these at boot time like the long and growing list of things we are starting at boot time.
Allowed ports
From rule 66…
R66. Communication between the ROBOT and the OPERATOR CONSOLE is restricted as follows:
A. Network Ports:
HTTP 80: Camera connected via switch on the ROBOT, bi-directional
HTTP 443: Camera connected via switch on the ROBOT, bi-directional
...
R66. Communication between the ROBOT and the OPERATOR CONSOLE is restricted as follows:
A. Network Ports:
HTTP 80: Camera connected via switch on the ROBOT, bi-directional
HTTP 443: Camera connected via switch on the ROBOT, bi-directional
...
So…to be safe we are switching from use of ports 8080 and 8090 to ports 80 and 443. But this means we have to preface certain commands – such as mjpg_streamer – with sudo since tcp ports < 1024 are privileged.
Flashing an led when we have a good video stream
Our led is soldered to a gruond pin and GPIO pin 18.
We call this program ledflash.sh
#!/bin/bash
#flashes the led
while /bin/true; do
if [ -f /tmp/stream80 ] && [ -f /tmp/stream443 ]; then
  pin=18
  cd /sys/class/gpio
  echo $pin > export
  cd gpio$pin
  echo out > direction
  while /bin/true; do
#make 5 quick flashes
    for i in `seq 1 5`; do
      echo 1 > value
      sleep 0.1
      echo 0 > value
      sleep 0.1
    done
#now lets make the long flash
    echo 1 > value
    sleep 0.6
  done
fi
sleep 2
done
#!/bin/bash
#flashes the led
while /bin/true; do
if [ -f /tmp/stream80 ] && [ -f /tmp/stream443 ]; then
pin=18
cd /sys/class/gpio
echo $pin > export
cd gpio$pin
echo out > direction
while /bin/true; do
#make 5 quick flashes
for i in `seq 1 5`; do
echo 1 > value
sleep 0.1
echo 0 > value
sleep 0.1
done
#now lets make the long flash
echo 1 > value
sleep 0.6
done
fi
sleep 2
done
We start it at boot time as well. It tells us when both video streams are ready for viewing because only then do the files get created and then the led starts flashing.
It takes about 62 seconds from the time power is supplied to the Raspberry Pi to the time the LED starts flashing (indicating the two video streams are ready).
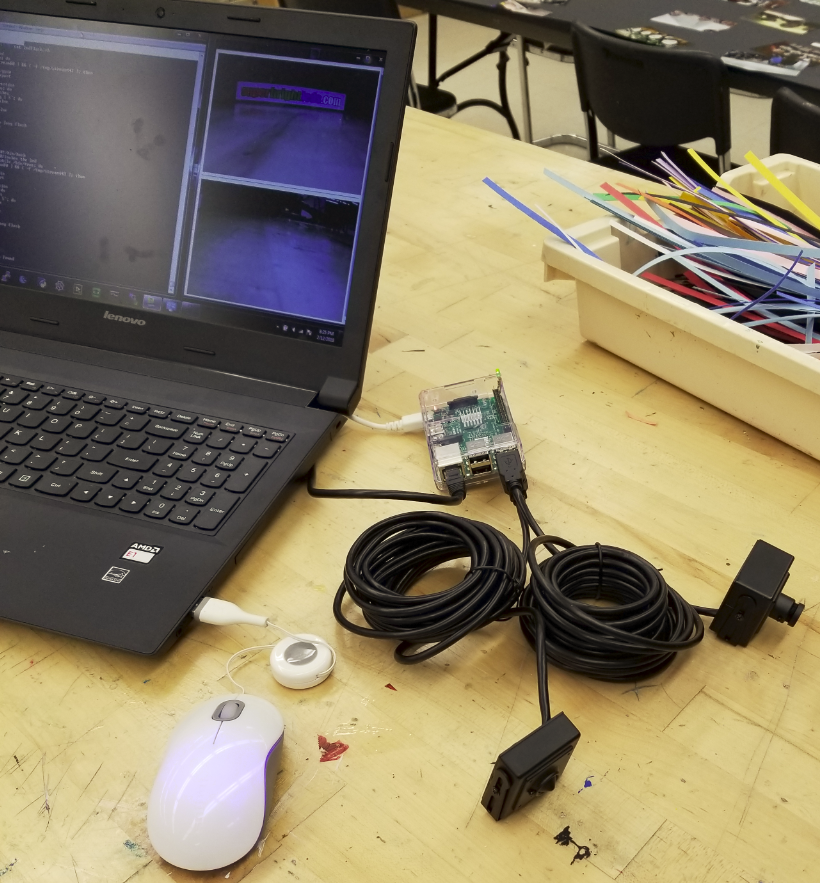
Picture of setup
This picture goes a long way to convey the ideas. 2 USB cameras, 1 Ras Pi, flashing LED
Intro
Sometimes everything is there in place, ready to be used, but you just have to either mistakenly try it, or learn it works by reading about it, because it may be counter-intuitive. Such is the case with Server Name Indication. I thought I knew enough about https to “know” that you can only have one key/certificate for a single IP address. That CERT can be a SAN (subject alternative name) CERT covering multiple names, but you only get one shot at getting your certificate right. Or so I thought. Turns out I was dead wrong.
Some details
Well, SNI guess is a protocol extension to https. You know I always wondered why in proxy server logs it was able to log the domain name? How would it know that if the http protocol conversation is all encrypted? Maybe it’s SNI at work.
Who supports it?
Since this is an extension it has to be supported by both server and browser. It is. Apache24 supports it. IE, Firefox and Chrome support it. Even my venerable curl supports it! What does not support it, right out of the box, is openssl. The openssl s_client command fetches a site’s certificate, but as I found the hard way, you need to add the -servername switch to tell it which certificate you want to examine, i.e., to force it to use SNI.
This is mainly used by big hosting companies so they can easily and flexibly cram lots of web sites onto a single IP, but us small-time self-hosted sites benefit as well. I host a few sites for friends after all.
Testing methodology
This is pretty simple. I have a couple different virtual servers. I set each up with a completely different certificate in my apache virtual server setups. Then I accessed them by name like usual. Each showed me their own, proper, certificate. That’s it! So this is more than theoretical for me. I’ve already begun to use it.
Enterprise usage
F5 BigIP supports this protocol as well, of course. This article describes how to set it up. But it looks limited to only one server name per certificate, which will be inadequate if there are SAN certificates.
Conclusion
https using Server Name Indication allows to run multiple virtual servers, each with its own unique certificate, on a single IP address.
Intro
I have an ancient Redhat system which I’m not in a position to upgrade. I like to use curl to test web sites, but it’s getting to the point that my ancient version has no SSL versions in common with some secure web sites. I desperately wanted to upgrade curl while leaving the rest of the system as is. Is it even possible? How would you do it? All these things and more are explained in today’s riveting blog post.
The details Redhat version
I don’t know the proper command so I do this:
$ cat /etc/system-release
ed Hat Enterprise Linux Server release 6.6 (Santiago)
ed Hat Enterprise Linux Server release 6.6 (Santiago)
     --ssl           Try SSL/TLS
     --ssl-allow-beast Allow security flaw to improve interop
     --ssl-no-revoke Disable cert revocation checks (WinSSL)
     --ssl-reqd      Require SSL/TLS
 -2, --sslv2         Use SSLv2
 -3, --sslv3         Use SSLv3
...
     --tls-max <VERSION> Use TLSv1.0 or greater
     --tlsauthtype <type> TLS authentication type
     --tlspassword   TLS password
     --tlsuser <name> TLS user name
 -1, --tlsv1         Use TLSv1.0 or greater
     --tlsv1.0       Use TLSv1.0
     --tlsv1.1       Use TLSv1.1
     --tlsv1.2       Use TLSv1.2
     --tlsv1.3       Use TLSv1.3
--ssl Try SSL/TLS
--ssl-allow-beast Allow security flaw to improve interop
--ssl-no-revoke Disable cert revocation checks (WinSSL)
--ssl-reqd Require SSL/TLS
-2, --sslv2 Use SSLv2
-3, --sslv3 Use SSLv3
...
--tls-max <VERSION> Use TLSv1.0 or greater
--tlsauthtype <type> TLS authentication type
--tlspassword TLS password
--tlsuser <name> TLS user name
-1, --tlsv1 Use TLSv1.0 or greater
--tlsv1.0 Use TLSv1.0
--tlsv1.1 Use TLSv1.1
--tlsv1.2 Use TLSv1.2
--tlsv1.3 Use TLSv1.3
Now that’s an upgrade! How did we get to this point?
Well, I tried to get a curl RPM – seems like the appropriate path for a lazy system administrator, right? Well, not so fast. It’s not hard to find an RPM, but trying to install one showed a lot of missing dependencies, as in this example:
$ sudo rpm ‐i curl‐minimal‐7.55.1‐2.0.cf.fc27.x86_64.rpm
warning: curl-minimal-7.55.1-2.0.cf.fc27.x86_64.rpm: Header V4 DSA/SHA1 Signature, key ID b56a8bac: NOKEY
error: Failed dependencies:
        libc.so.6(GLIBC_2.14)(64bit) is needed by curl-minimal-7.55.1-2.0.cf.fc27.x86_64
        libc.so.6(GLIBC_2.17)(64bit) is needed by curl-minimal-7.55.1-2.0.cf.fc27.x86_64
        libcrypto.so.1.1()(64bit) is needed by curl-minimal-7.55.1-2.0.cf.fc27.x86_64
        libcurl(x86-64) >= 7.55.1-2.0.cf.fc27 is needed by curl-minimal-7.55.1-2.0.cf.fc27.x86_64
        libssl.so.1.1()(64bit) is needed by curl-minimal-7.55.1-2.0.cf.fc27.x86_64
        curl conflicts with curl-minimal-7.55.1-2.0.cf.fc27.x86_64
warning: curl-minimal-7.55.1-2.0.cf.fc27.x86_64.rpm: Header V4 DSA/SHA1 Signature, key ID b56a8bac: NOKEY
error: Failed dependencies:
libc.so.6(GLIBC_2.14)(64bit) is needed by curl-minimal-7.55.1-2.0.cf.fc27.x86_64
libc.so.6(GLIBC_2.17)(64bit) is needed by curl-minimal-7.55.1-2.0.cf.fc27.x86_64
libcrypto.so.1.1()(64bit) is needed by curl-minimal-7.55.1-2.0.cf.fc27.x86_64
libcurl(x86-64) >= 7.55.1-2.0.cf.fc27 is needed by curl-minimal-7.55.1-2.0.cf.fc27.x86_64
libssl.so.1.1()(64bit) is needed by curl-minimal-7.55.1-2.0.cf.fc27.x86_64
curl conflicts with curl-minimal-7.55.1-2.0.cf.fc27.x86_64
So I looked at the libcurl RPM, but it had its own set of dependencies. Pretty soon it looks like a full-time job to get this thing compiled!
I found the instructions mentioned in the reference, but they didn’t work for me exactly like that. Besides, I don’t have a working git program. So here’s what I did.
Compiling openssl
I downloaded the latest openssl, 1.1.0f, from https://www.openssl.org/source/ , untar it, go into the openssl-1.1.0f directory, and then:
$ ./config ‐Wl,‐‐enable‐new‐dtags ‐‐prefix=/usr/local/ssl ‐‐openssldir=/usr/local/ssl
$ make depend
$ make
$ sudo make install
So far so good.
Compiling zlib
For zlib I was lazy and mostly followed the other guy’s commands. Went something like this:
$ lib=zlib-1.2.11
$ wget http://zlib.net/$lib.tar.gz
$ tar xzvf $lib.tar.gz
$ mv $lib zlib
$ cd zlib
$ ./configure
$ make
$ cd ..
$ CD=$(pwd)
No problems there…
Compiling curl
curl was tricky and when I followed the guy’s instructions I got the very problem he sought to avoid.
vtls/openssl.c: In function ‘Curl_ossl_seed’:
vtls/openssl.c:276: error: implicit declaration of function ‘RAND_egd’
make[2]: *** [libcurl_la-openssl.lo] Error 1
make[2]: Leaving directory `/usr/local/src/curl/curl-7.55.1/lib'
make[1]: *** [all] Error 2
make[1]: Leaving directory `/usr/local/src/curl/curl-7.55.1/lib'
make: *** [all-recursive] Error 1
I looked at the source and decided that what might help is to add a hint where the openssl stuff could be found.
Backing up a bit, I got the source from https://curl.haxx.se/download.html. I chose the file curl-7.55.1.tar.gz. Untar it, go into the curl-7.55.1 directory,
$ ./buildconf
$ PKG_CONFIG_PATH=/usr/local/ssl/lib/pkgconfig LIBS=”‐ldl”
and then – here is the single most important point in the whole blog – configure it thusly:
So my insight was to add the ‐‐with‐ssl=/usr/local/ssl to the configure command.
Then of course you make it:
$ make
and maybe even install it:
$ make install
This put curl into /usr/local/bin. I actually made a sym link and made this the default version with this kludge (the following commands were run as root):
$ cd /usr/bin; mv curl{,.orig}; ln ‐s /usr/local/bin/curl
That’s it! That worked and produced a working, modern curl.
By the way it mentions TLS1.3, but when you try to use it:
curl: (4) OpenSSL was built without TLS 1.3 support
curl: (4) OpenSSL was built without TLS 1.3 support
It’s a no go. But at least TLS1.2 works just fine in this version.
One other thing – put shared libraries in a common area
I copied my compiled curl from Redhat to a SLES 11 SP 3 system. It didn’t quite run. Only thing is, it was missing the openssl libraries. So I guess it’s also important to copy over
libssl.so.1.1
libcrypto.so.1.1
to /usr/lib64 from /usr/local/lib64.
Once I did that, it worked like a charm!
Conclusion
We show how to compile the latest version of openssl and curl on an older Redhat 6.x OS. The motivation for doing so was to remain compatible with web sites which are already or soon dropping their support for TLS 1.0. With the compiled version curl and openssl supports TLS 1.2 which should keep it useful for a long while.
Intro
A large organization needed to have considerable flexibility in serving out its proxy PAC file to web browsers. The legacy approach – perl script on web servers – was replaced by a TCL script I developed which runs on one of their F5 load balancers. In this post I lay out the requirements and how I tackled an unfamiliar language, TCL, to come up with an efficient and elegant solution.
Even if you have no interest in PAC files, if you are developing an irule you’ll probably scratch your head figuring out the oddities of TCL programming. This post may help in that case too.
The irule
# - DrJ 8/3/17
when CLIENT_ACCEPTED {set cip [IP::client_addr]}
when HTTP_REQUEST {set debug 0# supply an X-DRJ-PAC, e.g., w/ curl, to debug: curl -H 'X-DRJ-PAC: 1.2.3.4' 50.17.188.196/proxy.pacif{[HTTP::header exists "X-DRJ-PAC"]}{
# overwrite client ip from header value for debugging purposes
log local0. "DEBUG enabled. Original ip: $cip"set cip [HTTP::header value "X-DRJ-PAC"]set debug 1
log local0. "DEBUG. overwritten ip: $cip"}
# security precaution: don't accept any old uriif{!([HTTP::uri] starts_with "/proxy.pac" || [HTTP::uri] starts_with "/proxy/proxy.cgi")}{
drop
log local0. "uri: [HTTP::uri], drop section. cip: $cip"}else{
#set LDAPSUFFIX ""if{[HTTP::uri] ends_with "cgi"}{set LDAPSUFFIX "-ldap"}# determine which central location to useif{[class match $cip equals PAC-subnet-list]}{
# If client IP is in the datagroup, send user to appropriate locationset LOCATION [class lookup $cip PAC-subnet-list]if{$debug}{log local0. "DEBUG. match list: LOCATION: $LOCATION"}}elseif{$cip ends_with "0" || $cip ends_with "1" || $cip ends_with "4" || $cip ends_with "5"}{
# client IP was not amongst the subnets, use matching of last digit of last octet to set the NJ proxy (01)set LOCATION "01"if{$debug}{log local0. "DEBUG. match last digit prefers NJ : LOCATION: $LOCATION"}}else{
# set LA proxy (02) as the default choiceset LOCATION "02"if{$debug}{log local0. "DEBUG. neither match list nor match digit matched: LOCATION: $LOCATION"}}
HTTP::respond200 content "
function FindProxyForURL(url, host)
{
// o365 and other enterprise sites handled by dedicated proxy...
var cesiteslist = \"*.aadrm.com;*.activedirectory.windowsazure.com;*.cloudapp.net;*.live.com;*.microsoft.com;*.microsoftonline-p.com;*.microsoftonline-p.net;*.microsoftonline.com;*.microsoftonlineimages.com;*.microsoftonlinesupport.net;*.msecnd.net;*.msn.co.jp;*.msn.co.uk;*.msn.com;*.msocdn.com;*.office.com;*.office.net;*.office365.com;*.onmicrosoft.com;*.outlook.com;*.phonefactor.net;*.sharepoint.com;*.windows.net;*.live.net;*.msedge.net;*.onenote.com;*.windows.com\";
var cesites = cesiteslist.split(\";\");
for (var i = 0; i < cesites.length; ++i){
if (shExpMatch(host, cesites\[i\])) {
return \"PROXY http-ceproxy-$LOCATION.drjohns.net:8081\" ;
}
}
// client IP: $cip.
// Direct connections to local domain
if (dnsDomainIs(host, \"127.0.0.1\") ||
dnsDomainIs(host, \".drjohns.com\") ||
dnsDomainIs(host, \".drjohnstechtalk.com\") ||
dnsDomainIs(host, \".vmanswer.com\") ||
dnsDomainIs(host, \".johnstechtalk.com\") ||
dnsDomainIs(host, \"localdomain\") ||
dnsDomainIs(host, \".drjohns.net\") ||
dnsDomainIs(host, \".local\") ||
shExpMatch(host, \"10.*\") ||
shExpMatch(host, \"192.168.*\") ||
shExpMatch(host, \"172.16.*\") ||
isPlainHostName(host)
) {
return \"DIRECT\";
}
else
{
return \"PROXY http-proxy-$LOCATION$LDAPSUFFIX.drjohns.net:8081\" ;
}
}
" \
"Content-Type""application/x-ns-proxy-autoconfig" \
"Expires""[clock format [expr ([clock seconds]+7200)] -format "%a, %d %h %Y %T GMT" -gmt true]"}}
# - DrJ 8/3/17
when CLIENT_ACCEPTED {
set cip [IP::client_addr]
}
when HTTP_REQUEST {
set debug 0
# supply an X-DRJ-PAC, e.g., w/ curl, to debug: curl -H 'X-DRJ-PAC: 1.2.3.4' 50.17.188.196/proxy.pac
if {[HTTP::header exists "X-DRJ-PAC"]} {
# overwrite client ip from header value for debugging purposes
  log local0. "DEBUG enabled. Original ip: $cip"
  set cip [HTTP::header value "X-DRJ-PAC"]
  set debug 1
  log local0. "DEBUG. overwritten ip: $cip"
}

# security precaution: don't accept any old uri
if { ! ([HTTP::uri] starts_with "/proxy.pac" || [HTTP::uri] starts_with "/proxy/proxy.cgi") } {
  drop
  log local0. "uri: [HTTP::uri], drop section. cip: $cip"
} else {
#
set LDAPSUFFIX ""
if {[HTTP::uri] ends_with "cgi"} {
  set LDAPSUFFIX "-ldap"
}
# determine which central location to use
if { [class match $cip equals PAC-subnet-list] } {
# If client IP is in the datagroup, send user to appropriate location
    set LOCATION [class lookup $cip PAC-subnet-list]
    if {$debug} {log local0. "DEBUG. match list: LOCATION: $LOCATION"}
} elseif {  $cip ends_with "0" || $cip ends_with "1" || $cip ends_with "4" || $cip ends_with "5" } {
# client IP was not amongst the subnets, use matching of last digit of last octet to set the NJ proxy (01)
    set LOCATION "01"
    if {$debug} {log local0. "DEBUG. match last digit prefers NJ : LOCATION: $LOCATION"}
} else {
# set LA proxy (02) as the default choice
    set LOCATION "02"
    if {$debug} {log local0. "DEBUG. neither match list nor match digit matched: LOCATION: $LOCATION"}
}

HTTP::respond 200 content "
function FindProxyForURL(url, host)
{
// o365 and other enterprise sites handled by dedicated proxy...
var cesiteslist = \"*.aadrm.com;*.activedirectory.windowsazure.com;*.cloudapp.net;*.live.com;*.microsoft.com;*.microsoftonline-p.com;*.microsoftonline-p.net;*.microsoftonline.com;*.microsoftonlineimages.com;*.microsoftonlinesupport.net;*.msecnd.net;*.msn.co.jp;*.msn.co.uk;*.msn.com;*.msocdn.com;*.office.com;*.office.net;*.office365.com;*.onmicrosoft.com;*.outlook.com;*.phonefactor.net;*.sharepoint.com;*.windows.net;*.live.net;*.msedge.net;*.onenote.com;*.windows.com\";
var cesites = cesiteslist.split(\";\");
for (var i = 0; i < cesites.length; ++i){
  if (shExpMatch(host, cesites\[i\])) {
    return \"PROXY http-ceproxy-$LOCATION.drjohns.net:8081\" ;
  }
}
// client IP: $cip.
// Direct connections to local domain
if (dnsDomainIs(host, \"127.0.0.1\") ||
           dnsDomainIs(host, \".drjohns.com\") ||
           dnsDomainIs(host, \".drjohnstechtalk.com\") ||
           dnsDomainIs(host, \".vmanswer.com\") ||
           dnsDomainIs(host, \".johnstechtalk.com\") ||
           dnsDomainIs(host, \"localdomain\") ||
           dnsDomainIs(host, \".drjohns.net\") ||
           dnsDomainIs(host, \".local\") ||
           shExpMatch(host, \"10.*\") ||
           shExpMatch(host, \"192.168.*\") ||
           shExpMatch(host, \"172.16.*\") ||
           isPlainHostName(host)
        ) {
           return \"DIRECT\";
        }
        else
        {
           return \"PROXY http-proxy-$LOCATION$LDAPSUFFIX.drjohns.net:8081\" ;
        }

}
" \
"Content-Type" "application/x-ns-proxy-autoconfig" \
"Expires" "[clock format [expr ([clock seconds]+7200)] -format "%a, %d %h %Y %T GMT" -gmt true]"
}
}
I know general programming concepts but before starting on this project, not how to realize my ideas in F5’s version of TCL. So I broke all the tasks into little pieces and demonstrated that I had mastered each one. I describe in this blog post all that I leanred.
How to use the browser’s IP in an iRule
If you’ve ever written an iRule you’ve probably used the section that starts with when HTTP_REQUEST. But that is not where you pick up the web browser’s IP. For that you go to a different section, when CLIENT_ACCEPTED. Then you throw it into a variable cip like this:
set cip [IP::client_addr]
And you can subsequently refer back to $cip in the when HTTP_REQUEST section.
How to send HTML (or Javascript) body content
It’s also not clear you can use an iRule by itself to send either HTML or Javascript in this case. After all until this point I’ve always had a back-end load balancer for that purpose. But in fact you don’t need a back-end web server at all. The secret is this line:
HTTP::respond200 content "
function FindProxyForURL(url, host)
...
HTTP::respond 200 content "
function FindProxyForURL(url, host)
...
So with this command you set the HTTP response status (200 is an OK) as well as send the body.
Variable interpolation in the body
If the body begins with ” it will do variable interpolation (that’s what we Perl programmers call it, anyway, where your variables like $cip get turned into their value before being delivered to the user). You can also begin the body with a {, but what follows that is a string literal which means no variable interpolation.
The bad thing about the ” character is that if your body contains the ” character, or a [ or ], you have to escape each and every one. And mine does – a lot of them in fact.
But if you use { you don’t have to escape characters, even $, but you also don’t have a way to say “these bits are variables, interpolate them.” So if your string is dynamic you pretty mcuh have to use “.
Defeat scanners
This irule will be the resource for a VS (virtual server) which effectively acts like a web server. So dumb enterprise scanners will probably come across it and scan for vulnerabilities, whether it makes sense or not. A common thing is for these scanners to scan with random URIs that some web servers are vulnerable to. My first implementation had this VS respond to any URI with the PAC file! I don’t think that’s desirable. Just my gut feeling. We’re expecting to be called by one of two different names. Hence this logic:
if { ! ([HTTP::uri] starts_with "/proxy.pac" || [HTTP::uri] starts_with "/proxy/proxy.cgi") } {
  drop
...
else
  (send PAC file)
The original match operator was equals, but I found that some rogue program actually appends ?Type=WMT to the normal PAC URL! How annoying. That rogue application, by the way, seems to be Windows Media Player. You can kind of see where they were goinog with this, for Windows Media PLayer you might want to present a different set of proxies, I suppose.
Match IP against a list of subnets and pull out value
Some background. Company has two proxies with identical names except one ends in 01, the other in 02. 01 and 02 are in different locales. So we created a data group of type address: PAC-subnet-list. The idea is you put in a subnet, e.g., 10.9.7.0/24 and a proxy value, either “01” or “02”. This TCL line checks if the client IP matches one of the subnets we’ve entered into the datagroup:
if{[class match $cip equals PAC-subnet-list]}{
if { [class match $cip equals PAC-subnet-list] } {
Then this tcl line is used to match the client IP against one of those subnets and retrieve the value and store it into variable LOCATION:
set LOCATION [class lookup $cip PAC-subnet-list]
set LOCATION [class lookup $cip PAC-subnet-list]
The reason for the datagroup is to have subnets with LAN-speed connection to one of the proxies use that proxy.
Something weird
Now something weird happens. For clients within a subnet that doesn’t match our list, we more-or-less distribute their use of both proxies equally. So at a remote site, users with IPs ending in 0, 1, 4, or 5 use proxy 01:
and everyone else uses proxy 02. So users can be sitting right next to each other, each using a proxy at a different location.
Why didn’t we use a regular expression, besides the fact that we don’t know the syntax 😉 ? You read about regular expressions in the F5 Devcentral web site and the first thing it says is don’t use them! Use something else like start_with, ends_with, … I guess the alternatives will be more efficient.
Further complexity: different proxies if called by different name
Some specialized desktops are configured to use a PAC file which ends in /proxy/proxy.cgi. This PAC file hands out different proxies which do LDAP authentication, as opposed to NTLM/IWA authentication.. Hence the use of the variable LDAPSUFFIX. The rest of the logic is the same however.
Debugging help
I like this part – where it helps you debug the thing. Because you want to know what it’s really doing and that can be pretty hard to find out, right? You could run a trace but that’s not fun. So I create this way to do debugging.
if {[HTTP::header exists "X-DRJ-PAC"]} {
# overwrite client ip from header value for debugging purposes
  log local0. "DEBUG enabled. Original ip: $cip"
  set cip [HTTP::header value "X-DRJ-PAC"]
  set debug 1
  log local0. "DEBUG. overwritten ip: $cip"
}
if {[HTTP::header exists "X-DRJ-PAC"]} {
# overwrite client ip from header value for debugging purposes
log local0. "DEBUG enabled. Original ip: $cip"
set cip [HTTP::header value "X-DRJ-PAC"]
set debug 1
log local0. "DEBUG. overwritten ip: $cip"
}
It checks for a custom HTTP request header, X-DRJ-PAC. You can call it with that header, from anywhere, and for the value put the client iP you wish to test, e.g., 1.2.3.4. That will overwrite the client IP varibale, cip, set the debug variable, and add some log lines which get nicely printed out into your /var/log/ltm file. So your ltm file may log info about your script’s goings-on like this:
Aug  8 14:06:48 f5drj1 info tmm[17767]: Rule /Common/PAC-irule : DEBUG enabled. Original ip: 11.195.136.89
Aug  8 14:06:48 f5drj1 info tmm[17767]: Rule /Common/PAC-irule : DEBUG. overwritten ip: 12.196.68.91
Aug  8 14:06:48 f5drj1 info tmm[17767]: Rule /Common/PAC-irule : DEBUG. match last digit prefers NJ : LOCATION: 01
Aug 8 14:06:48 f5drj1 info tmm[17767]: Rule /Common/PAC-irule : DEBUG enabled. Original ip: 11.195.136.89
Aug 8 14:06:48 f5drj1 info tmm[17767]: Rule /Common/PAC-irule : DEBUG. overwritten ip: 12.196.68.91
Aug 8 14:06:48 f5drj1 info tmm[17767]: Rule /Common/PAC-irule : DEBUG. match last digit prefers NJ : LOCATION: 01
And with curl it is not hard at all to send this custom header as I mention in the comments:
Expires header
We add an expires header so that the PAC file is good for two hours (7200 seconds). I don’t think it does much good but it seems like the right thing to do. Don’t ask me, I just stole the whole line from f5devcentral.
A PAC file should have the MIME type application/x-ns-proxy-autoconfig. So we set that explicit MIME type with
The “\” at the end of some lines is a line continuation character.
Performance
They basically need this to run several hundred times per second. Occasionally PAC file requests “go crazy.” Will it? This part I don’t know. It has yet to be battle-tested. But it is production tested. It’s been in production for over a week. The virtual server consumes 0% of the load balancer’s CPU, which is great. And for the record, the traffic is 0.17% of total traffic from the proxy server, so very modest. So at this point I believe it will survive a usage storm much better than my apache web servers did.
Why bother?
After I did all this work someone pointed out that this all could have been done within the Javascript of the PAC file itself! I hadn’t really thought that through. But we agreed that doesn’t feel right and may force the browser to do more evaluation than what we want. But maybe it would have executed once and the results cached somehow?? It’s hard to see how since each encountered web site could have potentially a different proxy or none at all so an evaluation should be done each time. So we always try to pass out a minimal PAC file for that reason.
Why not use Bluecoat native PAC handling ability?
Bluecoat proxySG is great at handing out a single, fixed PAC file. It’s not so good at handing out different PAC files, and I felt it was just too much work to force it to do so.
References and related
F5’s DevCentral site is invaluable and the place where I learned virtually everything that went into the irule shown above. devcentral.f5.com Excessive calls to PAC file.
Intro
I’ve used curl as a debugging tool for a long time. But time moves on and my testing system didn’t. So now for the first time I saw an error that is produced by this situation, and I will explain it.
The details
The error
$ curl ‐i ‐k https://julialang.org/
curl: (35) error:1407742E:SSL routines:SSL23_GET_SERVER_HELLO:tlsv1 alert protocol version
curl: (35) error:1407742E:SSL routines:SSL23_GET_SERVER_HELLO:tlsv1 alert protocol version
$ curl ‐help
...
 -2/--sslv2         Use SSLv2 (SSL)
 -3/--sslv3         Use SSLv3 (SSL)
...
 -1/--tlsv1         Use TLSv1 (SSL)
...
...
-2/--sslv2 Use SSLv2 (SSL)
-3/--sslv3 Use SSLv3 (SSL)
...
-1/--tlsv1 Use TLSv1 (SSL)
...
Compare this to a server which I’ve kept up-to-date with openssl and curl:
...
 -2/--sslv2         Use SSLv2 (SSL)
 -3/--sslv3         Use SSLv3 (SSL)
...
 -1/--tlsv1         Use => TLSv1 (SSL)
    --tlsv1.0       Use TLSv1.0 (SSL)
    --tlsv1.1       Use TLSv1.1 (SSL)
    --tlsv1.2       Use TLSv1.2 (SSL)
...
...
-2/--sslv2 Use SSLv2 (SSL)
-3/--sslv3 Use SSLv3 (SSL)
...
-1/--tlsv1 Use => TLSv1 (SSL)
--tlsv1.0 Use TLSv1.0 (SSL)
--tlsv1.1 Use TLSv1.1 (SSL)
--tlsv1.2 Use TLSv1.2 (SSL)
...
On this server I can fetch the home page with curl.
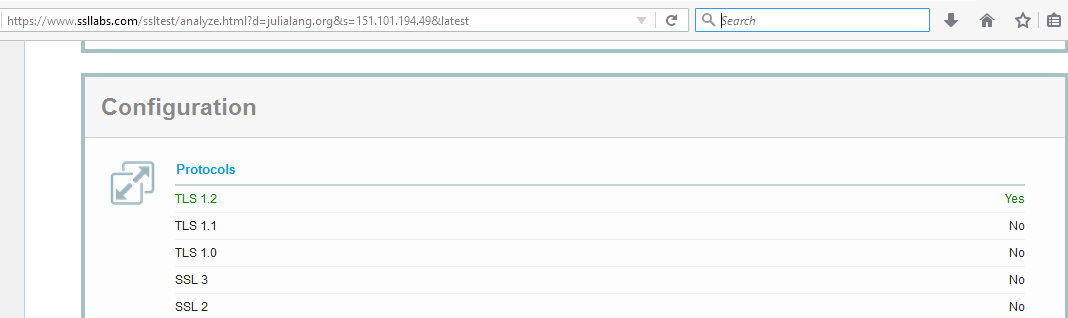
So it appears the older system does not have a compatible version of TLS. To confirm this use SSLLABS. We see this:
SSLLabs evaluation of julialang.org
Sure enough, only TLS 1.2 is supported by the server, and my poor old curl doesn’t have that! Too bad for me, but it shows it’s time to upgrade.
Another problem site
askapache.com is another vexing site. On a curl version which supposedly supports tls 1.2 I get this error:
$ curl ‐‐tlsv1.2 ‐‐verbose ‐k https://askapache.com/
* About to connect() to askapache.com port 443 (#0)
*   Trying 192.237.251.158... connected
* Connected to askapache.com (192.237.251.158) port 443 (#0)
* Initializing NSS with certpath: sql:/etc/pki/nssdb
* warning: ignoring value of ssl.verifyhost
* NSS error -12286
* Closing connection #0
* SSL connect error
curl: (35) SSL connect error
* About to connect() to askapache.com port 443 (#0)
* Trying 192.237.251.158... connected
* Connected to askapache.com (192.237.251.158) port 443 (#0)
* Initializing NSS with certpath: sql:/etc/pki/nssdb
* warning: ignoring value of ssl.verifyhost
* NSS error -12286
* Closing connection #0
* SSL connect error
curl: (35) SSL connect error
This is with curl version 7.19.7 on my CentOS 6.8 system.
This same site works fine on my compiled version of curl with the latest openssl, version 7.55.1. The system-supplied curl is missing support for some cipher suites.
Here’s my compiled curl and openssl list of cipher suites:
$ openssl ciphers
Note that when curl successfully connects it shows which cipher suite was chosen if you use the -v switch:
$ curl ‐v ‐k https://drjohnstechtalk.com/
* About to connect() to drjohnstechtalk.com port 443 (#0)
*   Trying 50.17.188.196... connected
* Connected to drjohnstechtalk.com (50.17.188.196) port 443 (#0)
...
* SSL connection using TLS_ECDHE_RSA_WITH_AES_128_GCM_SHA256
...
* About to connect() to drjohnstechtalk.com port 443 (#0)
* Trying 50.17.188.196... connected
* Connected to drjohnstechtalk.com (50.17.188.196) port 443 (#0)
...
* SSL connection using TLS_ECDHE_RSA_WITH_AES_128_GCM_SHA256
...
On a more demanding server – one that does not work with old curl, this dialog is longer, TLS 1.2 is preferred and a more secure cipher suite is chosen – one not available on the other system:
* About to connect() to drjohnstechtalk.com port 443 (#0)
*   Trying 50.17.188.196... connected
* Connected to drjohnstechtalk.com (50.17.188.196) port 443 (#0)
* Initializing NSS with certpath: sql:/etc/pki/nssdb
* warning: ignoring value of ssl.verifyhost
* skipping SSL peer certificate verification
* SSL connection using TLS_ECDHE_RSA_WITH_AES_128_GCM_SHA256
* Server certificate:
*       subject: CN=drjohnstechtalk.com,C=US
*       start date: Apr 03 00:00:00 2017 GMT
*       expire date: Apr 03 23:59:59 2019 GMT
*       common name: drjohnstechtalk.com
*       issuer: CN=Trusted Secure Certificate Authority 5,O=Corporation Service Company,L=Wilmington,ST=NJ,C=US
> GET / HTTP/1.1
> Host: drjohnstechtalk.com
> Accept: */*
> User-Agent: Mozilla/4.0 (compatible; MSIE 8.0; Windows NT 5.1; Trident/4.0; .NET CLR 1.0.3705; .NET CLR 1.1.4322; .NET CLR 2.0.50727; InfoPath.1; .NET CLR 3.0.04506.30;
>
* SSL read: errno -5961
* Closing connection #0
curl: (56) SSL read: errno -5961
* About to connect() to drjohnstechtalk.com port 443 (#0)
* Trying 50.17.188.196... connected
* Connected to drjohnstechtalk.com (50.17.188.196) port 443 (#0)
* Initializing NSS with certpath: sql:/etc/pki/nssdb
* warning: ignoring value of ssl.verifyhost
* skipping SSL peer certificate verification
* SSL connection using TLS_ECDHE_RSA_WITH_AES_128_GCM_SHA256
* Server certificate:
* subject: CN=drjohnstechtalk.com,C=US
* start date: Apr 03 00:00:00 2017 GMT
* expire date: Apr 03 23:59:59 2019 GMT
* common name: drjohnstechtalk.com
* issuer: CN=Trusted Secure Certificate Authority 5,O=Corporation Service Company,L=Wilmington,ST=NJ,C=US
> GET / HTTP/1.1
> Host: drjohnstechtalk.com
> Accept: */*
> User-Agent: Mozilla/4.0 (compatible; MSIE 8.0; Windows NT 5.1; Trident/4.0; .NET CLR 1.0.3705; .NET CLR 1.1.4322; .NET CLR 2.0.50727; InfoPath.1; .NET CLR 3.0.04506.30;
>
* SSL read: errno -5961
* Closing connection #0
curl: (56) SSL read: errno -5961
What’s going on?
In this test drjohnstechtalk.com was behind a load balancer. The load balancer had SSL configured. The back-end server was not running however though the load balancer’s health check did not detect that condition. So the load balancer permitted the initial connection, but then shut things off when it could not open a connection to the back-end server. So this error has nothing to do with curl showing its age, but I didn’t know that when I started debugging it.
errno 104
Then there’s this one:
$ curl ‐v ‐i ‐k https://lb.drjohnstechtalk.com/
*   Trying 50.17.188.196...
* TCP_NODELAY set
* Connected to fw-change-request.bdrj.net (50.17.188.196) port 443 (#0)
* ALPN, offering http/1.1
* Cipher selection: ALL:!EXPORT:!EXPORT40:!EXPORT56:!aNULL:!LOW:!RC4:@STRENGTH
* successfully set certificate verify locations:
*   CAfile: /etc/pki/tls/certs/ca-bundle.crt
  CApath: none
* TLSv1.2 (OUT), TLS handshake, Client hello (1):
* TLSv1.2 (IN), TLS handshake, Server hello (2):
* TLSv1.2 (IN), TLS handshake, Certificate (11):
* TLSv1.2 (IN), TLS handshake, Server key exchange (12):
* TLSv1.2 (IN), TLS handshake, Server finished (14):
* TLSv1.2 (OUT), TLS handshake, Client key exchange (16):
* TLSv1.2 (OUT), TLS change cipher, Client hello (1):
* TLSv1.2 (OUT), TLS handshake, Finished (20):
* TLSv1.2 (IN), TLS handshake, Finished (20):
* SSL connection using TLSv1.2 / ECDHE-RSA-AES256-GCM-SHA384
* ALPN, server did not agree to a protocol
* Server certificate:
*  subject: C=US; ST=NJ; CN=lb.drjohnstechtalk.com
*  start date: Nov 14 12:06:02 2017 GMT
*  expire date: Nov 14 12:06:02 2018 GMT
*  SSL certificate verify result: unable to get local issuer certificate (20), continuing anyway.
> GET / HTTP/1.1
> Host: lb.drjohnstechtalk.com
> User-Agent: curl/7.55.1
> Accept: */*
>
* OpenSSL SSL_read: SSL_ERROR_SYSCALL, errno 104
* Closing connection 0
curl: (56) OpenSSL SSL_read: SSL_ERROR_SYSCALL, errno 104
* Trying 50.17.188.196...
* TCP_NODELAY set
* Connected to fw-change-request.bdrj.net (50.17.188.196) port 443 (#0)
* ALPN, offering http/1.1
* Cipher selection: ALL:!EXPORT:!EXPORT40:!EXPORT56:!aNULL:!LOW:!RC4:@STRENGTH
* successfully set certificate verify locations:
* CAfile: /etc/pki/tls/certs/ca-bundle.crt
CApath: none
* TLSv1.2 (OUT), TLS handshake, Client hello (1):
* TLSv1.2 (IN), TLS handshake, Server hello (2):
* TLSv1.2 (IN), TLS handshake, Certificate (11):
* TLSv1.2 (IN), TLS handshake, Server key exchange (12):
* TLSv1.2 (IN), TLS handshake, Server finished (14):
* TLSv1.2 (OUT), TLS handshake, Client key exchange (16):
* TLSv1.2 (OUT), TLS change cipher, Client hello (1):
* TLSv1.2 (OUT), TLS handshake, Finished (20):
* TLSv1.2 (IN), TLS handshake, Finished (20):
* SSL connection using TLSv1.2 / ECDHE-RSA-AES256-GCM-SHA384
* ALPN, server did not agree to a protocol
* Server certificate:
* subject: C=US; ST=NJ; CN=lb.drjohnstechtalk.com
* start date: Nov 14 12:06:02 2017 GMT
* expire date: Nov 14 12:06:02 2018 GMT
* SSL certificate verify result: unable to get local issuer certificate (20), continuing anyway.
> GET / HTTP/1.1
> Host: lb.drjohnstechtalk.com
> User-Agent: curl/7.55.1
> Accept: */*
>
* OpenSSL SSL_read: SSL_ERROR_SYSCALL, errno 104
* Closing connection 0
curl: (56) OpenSSL SSL_read: SSL_ERROR_SYSCALL, errno 104
This also seems to occur as I’ve seen when there’s a load balancer in front of a web server where the load balancer is working fine but the web server is not.
Another example challenging web site
$ curl ‐‐version
* About to connect() to e1st.smapply.org port 443 (#0)
*   Trying 72.55.140.155... connected
* Connected to e1st.smapply.org (72.55.140.155) port 443 (#0)
* Initializing NSS with certpath: sql:/etc/pki/nssdb
* warning: ignoring value of ssl.verifyhost
* NSS error -12286
* Closing connection #0
* SSL connect error
curl: (35) SSL connect error
* About to connect() to e1st.smapply.org port 443 (#0)
* Trying 72.55.140.155... connected
* Connected to e1st.smapply.org (72.55.140.155) port 443 (#0)
* Initializing NSS with certpath: sql:/etc/pki/nssdb
* warning: ignoring value of ssl.verifyhost
* NSS error -12286
* Closing connection #0
* SSL connect error
curl: (35) SSL connect error
I have seen this suggestion on the Internet to fix the system-supplied curl on a CentOS 6.8 system:
yum update -y nss curl libcurl
It didn’t work!
Rationale
I tried to give the owners of e1st.smapply.org a hard time for supporting such a limited set of ciphersuites – essentially only the latest thing (which you can see yourself by running it through sslabs.com): TLS_ECDHE_RSA_WITH_AES_256_GCM_SHA384. If I run this through SSL interception on a Symantec proxy with an older image, that ciphersuite isn’t present! I had to upgrade, then it was fine. But getting back to the rationale, they told me they have future-proofed their site for the new requirements of PCI and they would not budge.
Another curl error
curl: (3) Illegal characters found in URL
curl: (3) Illegal characters found in URL
If your url looks visibly OK, mkae sure you don’t have and non-printed characters in it. Put it through the linux od -c utility. In my case I culled the url from a Location header after parsing it with awk. Unbeknownst to me, tagging along at the end, unseen, was an extra \n\r characters. I had to get rid of those.
Conclusion
A TLS version error is explained, as well as the way it came about. Another curl/SSL error is also explained.