Categories
Linux Web Site Technologies

curl showing its age with SSL error

Intro
I’ve used curl as a debugging tool for a long time. But time moves on and my testing system didn’t. So now for the first time I saw an error that is produced by this situation, and I will explain it.

The details

The error

$ curl ‐i ‐k https://julialang.org/

curl: (35) error:1407742E:SSL routines:SSL23_GET_SERVER_HELLO:tlsv1 alert protocol version

$ curl ‐help

...
 -2/--sslv2         Use SSLv2 (SSL)
 -3/--sslv3         Use SSLv3 (SSL)
...
 -1/--tlsv1         Use TLSv1 (SSL)
...

Compare this to a server which I’ve kept up-to-date with openssl and curl:

...
 -2/--sslv2         Use SSLv2 (SSL)
 -3/--sslv3         Use SSLv3 (SSL)
...
 -1/--tlsv1         Use => TLSv1 (SSL)
    --tlsv1.0       Use TLSv1.0 (SSL)
    --tlsv1.1       Use TLSv1.1 (SSL)
    --tlsv1.2       Use TLSv1.2 (SSL)
...

On this server I can fetch the home page with curl.

So it appears the older system does not have a compatible version of TLS. To confirm this use SSLLABS. We see this:

SSLLabs evaluation of julialang.org

Sure enough, only TLS 1.2 is supported by the server, and my poor old curl doesn’t have that! Too bad for me, but it shows it’s time to upgrade.

Another problem site
askapache.com is another vexing site. On a curl version which supposedly supports tls 1.2 I get this error:
$ curl ‐‐tlsv1.2 ‐‐verbose ‐k https://askapache.com/

* About to connect() to askapache.com port 443 (#0)
*   Trying 192.237.251.158... connected
* Connected to askapache.com (192.237.251.158) port 443 (#0)
* Initializing NSS with certpath: sql:/etc/pki/nssdb
* warning: ignoring value of ssl.verifyhost
* NSS error -12286
* Closing connection #0
* SSL connect error
curl: (35) SSL connect error

This is with curl version 7.19.7 on my CentOS 6.8 system.

This same site works fine on my compiled version of curl with the latest openssl, version 7.55.1. The system-supplied curl is missing support for some cipher suites.

Here’s my compiled curl and openssl list of cipher suites:
$ openssl ciphers

ECDHE-ECDSA-AES256-GCM-SHA384:ECDHE-RSA-AES256-GCM-SHA384:DHE-RSA-AES256-GCM-SHA384:
ECDHE-ECDSA-CHACHA20-POLY1305:ECDHE-RSA-CHACHA20-POLY1305:DHE-RSA-CHACHA20-POLY1305:
ECDHE-ECDSA-AES128-GCM-SHA256:ECDHE-RSA-AES128-GCM-SHA256:DHE-RSA-AES128-GCM-SHA256:
ECDHE-ECDSA-AES256-SHA384:ECDHE-RSA-AES256-SHA384:DHE-RSA-AES256-SHA256:ECDHE-ECDSA-AES128-SHA256:ECDHE-RSA-AES128-SHA256:DHE-RSA-AES128-SHA256:ECDHE-ECDSA-AES256-SHA:
ECDHE-RSA-AES256-SHA:DHE-RSA-AES256-SHA:ECDHE-ECDSA-AES128-SHA:ECDHE-RSA-AES128-SHA:DHE-RSA-AES128-SHA:RSA-PSK-AES256-GCM-SHA384:
DHE-PSK-AES256-GCM-SHA384:RSA-PSK-CHACHA20-POLY1305:DHE-PSK-CHACHA20-POLY1305:
ECDHE-PSK-CHACHA20-POLY1305:AES256-GCM-SHA384:PSK-AES256-GCM-SHA384:PSK-CHACHA20-POLY1305:
RSA-PSK-AES128-GCM-SHA256:DHE-PSK-AES128-GCM-SHA256:AES128-GCM-SHA256:PSK-AES128-GCM-SHA256:
AES256-SHA256:AES128-SHA256:ECDHE-PSK-AES256-CBC-SHA384:ECDHE-PSK-AES256-CBC-SHA:SRP-RSA-AES-256-CBC-SHA:SRP-AES-256-CBC-SHA:RSA-PSK-AES256-CBC-SHA384:DHE-PSK-AES256-CBC-SHA384:RSA-PSK-AES256-CBC-SHA:
DHE-PSK-AES256-CBC-SHA:AES256-SHA:PSK-AES256-CBC-SHA384:PSK-AES256-CBC-SHA:ECDHE-PSK-AES128-CBC-SHA256:ECDHE-PSK-AES128-CBC-SHA:SRP-RSA-AES-128-CBC-SHA:SRP-AES-128-CBC-SHA:
RSA-PSK-AES128-CBC-SHA256:DHE-PSK-AES128-CBC-SHA256:RSA-PSK-AES128-CBC-SHA:DHE-PSK-AES128-CBC-SHA:AES128-SHA:PSK-AES128-CBC-SHA256:PSK-AES128-CBC-SHA

and what I see on my older system:
$ openssl ciphers

DHE-RSA-AES256-SHA:DHE-DSS-AES256-SHA:AES256-SHA:DHE-RSA-CAMELLIA256-SHA:DHE-DSS-CAMELLIA256-SHA:
CAMELLIA256-SHA:EDH-RSA-DES-CBC3-SHA:EDH-DSS-DES-CBC3-SHA:DES-CBC3-SHA:DES-CBC3-MD5:
DHE-RSA-AES128-SHA:DHE-DSS-AES128-SHA:AES128-SHA:DHE-RSA-CAMELLIA128-SHA:DHE-DSS-CAMELLIA128-SHA:
CAMELLIA128-SHA:RC2-CBC-MD5:RC4-SHA:RC4-MD5:RC4-MD5:EDH-RSA-DES-CBC-SHA:EDH-DSS-DES-CBC-SHA:DES-CBC-SHA:
DES-CBC-MD5:EXP-EDH-RSA-DES-CBC-SHA:EXP-EDH-DSS-DES-CBC-SHA:EXP-DES-CBC-SHA:EXP-RC2-CBC-MD5:EXP-RC2-CBC-MD5:EXP-RC4-MD5:EXP-RC4-MD5

Note that when curl successfully connects it shows which cipher suite was chosen if you use the -v switch:

$ curl ‐v ‐k https://drjohnstechtalk.com/

* About to connect() to drjohnstechtalk.com port 443 (#0)
*   Trying 50.17.188.196... connected
* Connected to drjohnstechtalk.com (50.17.188.196) port 443 (#0)
...
* SSL connection using TLS_ECDHE_RSA_WITH_AES_128_GCM_SHA256
...

On a more demanding server – one that does not work with old curl, this dialog is longer, TLS 1.2 is preferred and a more secure cipher suite is chosen – one not available on the other system:

(issue standard curl -k -v <server_name>)

*   Trying 50.17.188.197...
* TCP_NODELAY set
* Connected to 50.17.188.197 port 443 (#0)
* ALPN, offering http/1.1
* Cipher selection: ALL:!EXPORT:!EXPORT40:!EXPORT56:!aNULL:!LOW:!RC4:@STRENGTH
* TLSv1.2 (OUT), TLS handshake, Client hello (1):
* TLSv1.2 (IN), TLS handshake, Server hello (2):
* TLSv1.2 (IN), TLS handshake, Certificate (11):
* TLSv1.2 (IN), TLS handshake, Server key exchange (12):
* TLSv1.2 (IN), TLS handshake, Server finished (14):
* TLSv1.2 (OUT), TLS handshake, Client key exchange (16):
* TLSv1.2 (OUT), TLS change cipher, Client hello (1):
* TLSv1.2 (OUT), TLS handshake, Finished (20):
* TLSv1.2 (IN), TLS handshake, Finished (20):
* SSL connection using TLSv1.2 / ECDHE-RSA-AES256-GCM-SHA384

Another curl error explained
While running

$ curl -v -i -k https://drjohnstechtalk.com/

* About to connect() to drjohnstechtalk.com port 443 (#0)
*   Trying 50.17.188.196... connected
* Connected to drjohnstechtalk.com (50.17.188.196) port 443 (#0)
* Initializing NSS with certpath: sql:/etc/pki/nssdb
* warning: ignoring value of ssl.verifyhost
* skipping SSL peer certificate verification
* SSL connection using TLS_ECDHE_RSA_WITH_AES_128_GCM_SHA256
* Server certificate:
*       subject: CN=drjohnstechtalk.com,C=US
*       start date: Apr 03 00:00:00 2017 GMT
*       expire date: Apr 03 23:59:59 2019 GMT
*       common name: drjohnstechtalk.com
*       issuer: CN=Trusted Secure Certificate Authority 5,O=Corporation Service Company,L=Wilmington,ST=NJ,C=US
&gt; GET / HTTP/1.1
&gt; Host: drjohnstechtalk.com
&gt; Accept: */*
&gt; User-Agent: Mozilla/4.0 (compatible; MSIE 8.0; Windows NT 5.1; Trident/4.0; .NET CLR 1.0.3705; .NET CLR 1.1.4322; .NET CLR 2.0.50727; InfoPath.1; .NET CLR 3.0.04506.30;
&gt;
* SSL read: errno -5961
* Closing connection #0
curl: (56) SSL read: errno -5961

What’s going on?
In this test drjohnstechtalk.com was behind a load balancer. The load balancer had SSL configured. The back-end server was not running however though the load balancer’s health check did not detect that condition. So the load balancer permitted the initial connection, but then shut things off when it could not open a connection to the back-end server. So this error has nothing to do with curl showing its age, but I didn’t know that when I started debugging it.

errno 104
Then there’s this one:

$ curl ‐v ‐i ‐k https://lb.drjohnstechtalk.com/

*   Trying 50.17.188.196...
* TCP_NODELAY set
* Connected to fw-change-request.bdrj.net (50.17.188.196) port 443 (#0)
* ALPN, offering http/1.1
* Cipher selection: ALL:!EXPORT:!EXPORT40:!EXPORT56:!aNULL:!LOW:!RC4:@STRENGTH
* successfully set certificate verify locations:
*   CAfile: /etc/pki/tls/certs/ca-bundle.crt
  CApath: none
* TLSv1.2 (OUT), TLS handshake, Client hello (1):
* TLSv1.2 (IN), TLS handshake, Server hello (2):
* TLSv1.2 (IN), TLS handshake, Certificate (11):
* TLSv1.2 (IN), TLS handshake, Server key exchange (12):
* TLSv1.2 (IN), TLS handshake, Server finished (14):
* TLSv1.2 (OUT), TLS handshake, Client key exchange (16):
* TLSv1.2 (OUT), TLS change cipher, Client hello (1):
* TLSv1.2 (OUT), TLS handshake, Finished (20):
* TLSv1.2 (IN), TLS handshake, Finished (20):
* SSL connection using TLSv1.2 / ECDHE-RSA-AES256-GCM-SHA384
* ALPN, server did not agree to a protocol
* Server certificate:
*  subject: C=US; ST=NJ; CN=lb.drjohnstechtalk.com
*  start date: Nov 14 12:06:02 2017 GMT
*  expire date: Nov 14 12:06:02 2018 GMT
*  SSL certificate verify result: unable to get local issuer certificate (20), continuing anyway.
&gt; GET / HTTP/1.1
&gt; Host: lb.drjohnstechtalk.com
&gt; User-Agent: curl/7.55.1
&gt; Accept: */*
&gt;
* OpenSSL SSL_read: SSL_ERROR_SYSCALL, errno 104
* Closing connection 0
curl: (56) OpenSSL SSL_read: SSL_ERROR_SYSCALL, errno 104

This also seems to occur as I’ve seen when there’s a load balancer in front of a web server where the load balancer is working fine but the web server is not.

Another example challenging web site
$ curl ‐‐version

curl 7.19.7 (x86_64-redhat-linux-gnu) libcurl/7.19.7 NSS/3.27.1 zlib/1.2.3 libidn/1.18 libssh2/1.4.2
Protocols: tftp ftp telnet dict ldap ldaps http file https ftps scp sftp
Features: GSS-Negotiate IDN IPv6 Largefile NTLM SSL libz

$ curl ‐v ‐k https://e1st.smapply.org/

* About to connect() to e1st.smapply.org port 443 (#0)
*   Trying 72.55.140.155... connected
* Connected to e1st.smapply.org (72.55.140.155) port 443 (#0)
* Initializing NSS with certpath: sql:/etc/pki/nssdb
* warning: ignoring value of ssl.verifyhost
* NSS error -12286
* Closing connection #0
* SSL connect error
curl: (35) SSL connect error

I have seen this suggestion on the Internet to fix the system-supplied curl on a CentOS 6.8 system:

yum update -y nss curl libcurl

It didn’t work!

Rationale
I tried to give the owners of e1st.smapply.org a hard time for supporting such a limited set of ciphersuites – essentially only the latest thing (which you can see yourself by running it through sslabs.com): TLS_ECDHE_RSA_WITH_AES_256_GCM_SHA384. If I run this through SSL interception on a Symantec proxy with an older image, that ciphersuite isn’t present! I had to upgrade, then it was fine. But getting back to the rationale, they told me they have future-proofed their site for the new requirements of PCI and they would not budge.

Another curl error

curl: (3) Illegal characters found in URL

If your url looks visibly OK, mkae sure you don’t have and non-printed characters in it. Put it through the linux od -c utility. In my case I culled the url from a Location header after parsing it with awk. Unbeknownst to me, tagging along at the end, unseen, was an extra \n\r characters. I had to get rid of those.

Conclusion
A TLS version error is explained, as well as the way it came about. Another curl/SSL error is also explained.

References and related
I eventually came up with the solution: compile my own updated version of curl! I describe how I did it in this blog post.

A more recent TLS versioning problem which I could have only resolved by using curl is described in this post.

Categories
Security Web Site Technologies

Google Authenticator – not tough to self-host

Intro
I wanted to learn a bit more about digital currencies. I’ll certainly be posting about them in the future. The best way to get some is to open an account with coinbase. But for security reasons – and I am all for securing things as digital currency thefts are notorious – they require two-factor authentication. The least secure method is to have an SMS code sent to your phone.

Well, my phone is a work phone that i use for light personal use. I’ve never owned a personal cell phone. So I’m not even sure my number will be portable if I retire or am severed from the company that supplies the phone. It would be just like me to forget all about it years from now when I’m facing that situation.

They said a more secure method is Google Authenticator. That sounds a bit daunting and perhaps tied to Google? Upon investigation it turns out that neither of those statements is true.

The details

Turns out the Google Authenticator is really an implementation of open standards based on a couple RFCs, RFC 6238 and RFC 4226. So there are other available implementations besides Google’s.

I used this implementation. It works fine for me once I understood how it works! https://github.com/gbraad/gauth

How gauth works
The main thing to understand – and the author doesn’t really explain it – is that the secrets are stored locally on the browser. I didn’t look but it must be in a cookie. So from the same desktop, different browsers you’ll see one sees your added account and the other does not. No secrets are stored on the server so the web server only passively contains the HTML and Javascript files.

So in my opinion you ought to make a secure copy of the secret so it doesn’t vanish when you clear your browser cookies, or your computer crashes, or whatever.

It’s a TOTP: time-dependent one-time password. I am personally familiar and comfortable with the concept having been a long-time RSA token user, back to the days when it was Security Dynamics! So my account cannot be compromised by sharing a one-time code as I do in the screen shot below!


What it looks like

gauth running at Drjohnstechtalk.com

Note the time remaining on the right side. These one-time passwords only last for 30 seconds and then new ones will be displayed.

Keep up your time
Since these codes are time-dependent, it is actually important that your computer be synced to an Internet time source. I hadn’t really messed with that on my Windows 10 system and when I checked the time I found it off by seven seconds which is way too much in my opinion. Being off by a couple minutes is probably fatal. I was syncing to a time source about every five days, which is far too infrequent in my opinion.

Too lazy or unable to host your own?
You can use the one the author hosts: http://gauth.apps.gbraad.nl/. Of course that’s putting your trust in the author so I don’t recommend using that.

How to host it
You basically just download the zip file form the git repository and unzip it somewhere onto your web server. In my case I am keeping the location a secret but it doesn’t really matter as there is nothing really there on the server to hide.

Conclusion
Until now I have wanted two-factor authentication but have hesitated due to my incorrect notion that this would actually tie me down to Google’s Ecosystem. Today I found a simple, independent (of Google) implementation that works with Coinbase. I hope to expand my use of 2FA to my banking apps, WordPress and perhaps other areas now that I am comfortable with it.

References and related
A “simple” implementation of Google Authenticator which can be self-hosted: https://github.com/gbraad/gauth
Wikipedia article on Google Authenticator: https://en.wikipedia.org/wiki/Google_Authenticator. It’s very helpful.

Categories
Network Technologies Web Site Technologies

SSL Interception: troubleshooting

Intro
SSl Interception is a reality at some larger companies. From a security perspective it is vital as it permits you to extend your AV scanning, botnet detection, 0-day, DLP, cloud security, etc to your https traffic which is normally just an encrypted blur to the edge devices through which the traffic flows.

Bluecoat has a good solution for SSL interception, but it is possible to make some mistakes. Here I document one of those and provide a few other tips.

The details
The general idea is that within your large company – let’s call it “B” – there is an existing PKI infrastructure which is in use. In particular a private root CA has been included in the certificate store on B’s standard PC image. B users use explicit proxy. This is a requirement for SSL interception by the way. Now B’s PKI team issues an intermediate certificate to B’s proxy server such that it can sign certificates. That’s a so-called signing certificate because in the extensions it explicitly mentions:

            X509v3 Basic Constraints: critical
                CA:TRUE, pathlen:0
            X509v3 Key Usage: critical
                Certificate Sign, CRL Sign

B’s proxy, when asked to access an external https site by a desktop PC, then acts as an SSL client, decrypts the traffic, does all its AV, 0-day, DLP inspections, then re-encrypts it with its own on-the-fly issued certificate before sending it along to the desktop! In the PKI world, a signing certificate is a big deal because in the wrong hands havoc could result.

For instance, user requests https://www.google.com/. What user gets is https://www.google.com, but when user inspects the certificate, he sees the a www.google.com certificate issued by the proxy, which was issued from B’s own root CA (screenshot further down below).

Results if implemented badly
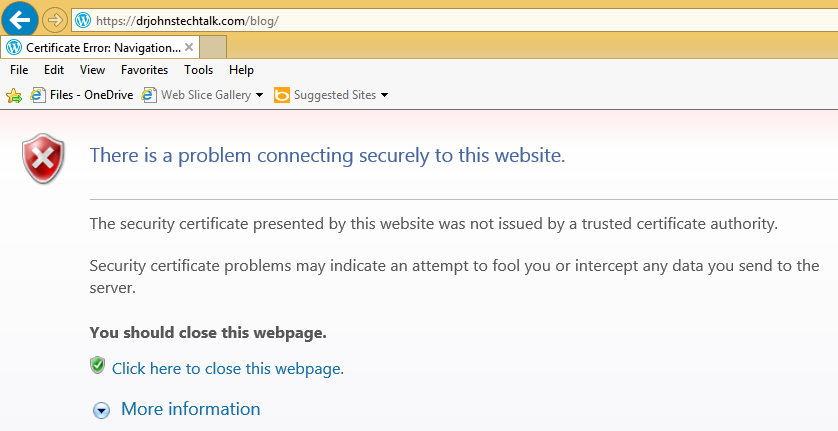
You might see this in Internet Explorer for every https site you access:

The security certificate presented by this website was not issued by a trusted certificate authority.

Security certificate problems may indicate an attempt to fool you or intercept any data you send to the server.

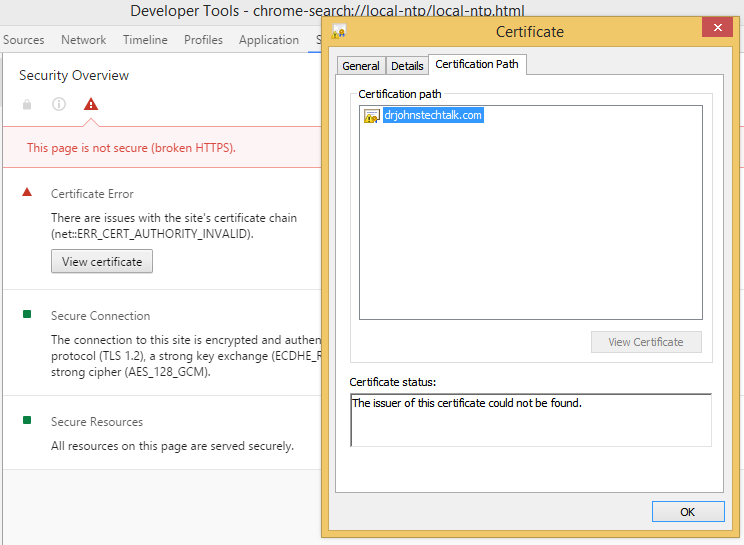
Looking at the certificate in Chrome (the only way I know how) shows the problem:

Certificate Error
There are issues with the site’s certificate chain (net::ERR_CERT_AUTHORITY_INVALID).

And indeed in examining the certificate it appears stand-alone. The whole chain should normally be displayed there but there is only the end certificate. So browsers won’t trust it.

What is happening in this case is that the proxy is intercepting, but its not providing the intermediate CERT.

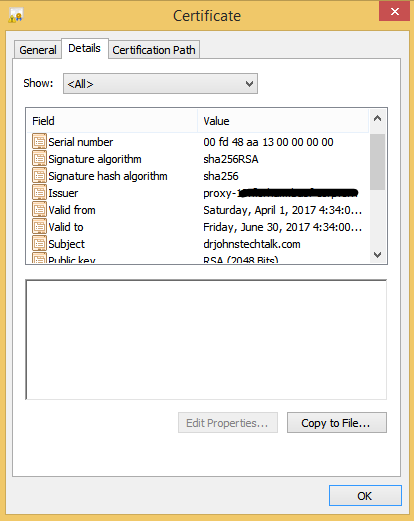
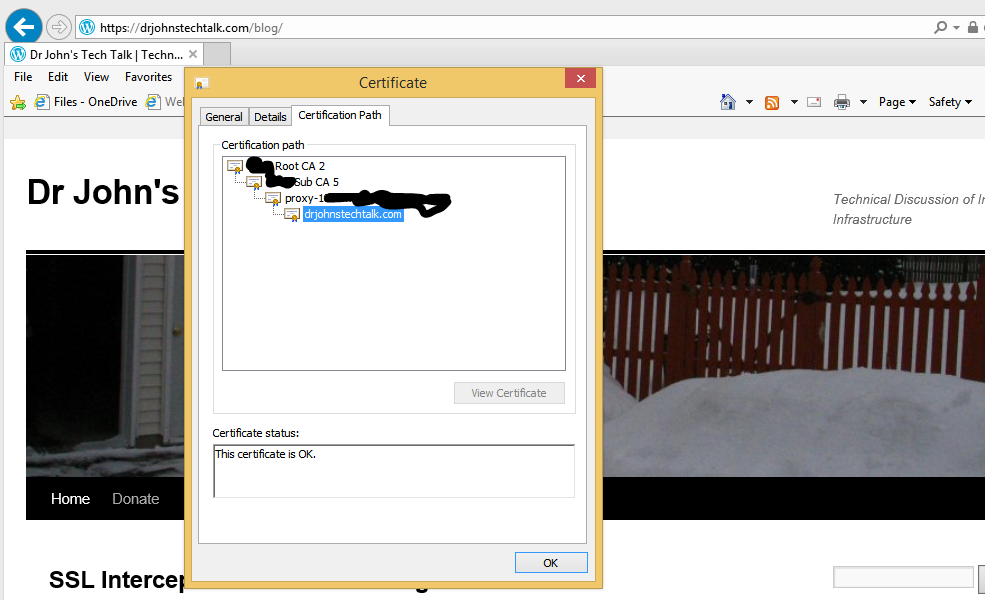
Here is a screen shot showing that the proxy is the issuer for the certificate:

What to check
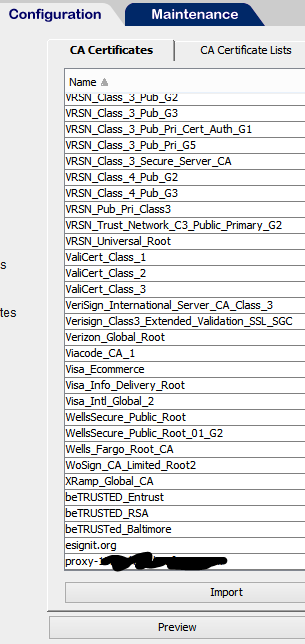
In our experience this can happen if the proxy’s signer certificate is present in a keyring on the proxy, but not present in the CA Certificates. We added this CERT to the CA Certificates and it behaved much better. Here’s a view of the CA Certificates after fixing it:

And a view of the certificate chain:


2022 Update

So the guy who normally does this retired and it fell onto my shoulders – getting the new signing certificates installed. I’ll be danged if I didn’t run into the exact same problem and waste an entire afternoon on it. Until. I discovered my own blog post from five years ago! And it still works! And it’s the only place where this specific problem is discussed and a solution presented. Kudos: me! Now Bluecoat -> Broadcom, but it’s the exact same stuff under the hood.

Other tips
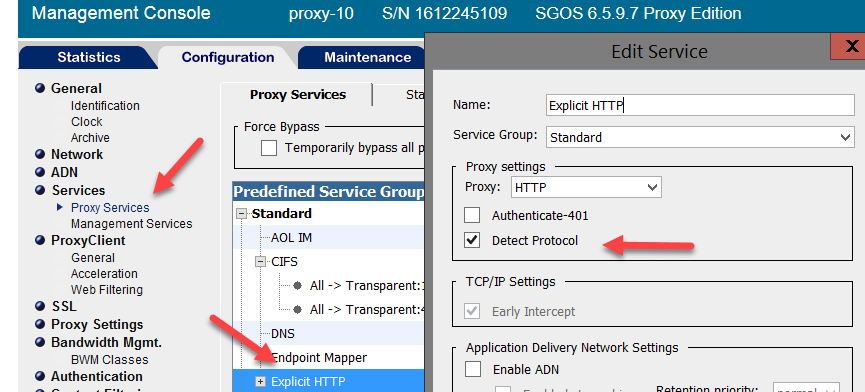
We got no results whatsoever when we initiated an SSL layer until we turned on Detect Protocol:

On the other hand we had a site break just from enabling Detect Protocol. Even when SSLInterception was set to action: Disabled.

We found that action: None worked better for these cases. That sets the behaviour back to what you had before you enabled Detect Protocol. The idea being that Detect Protocol invokes the SSL Proxy component of Bluecoat. The SSL Proxy can mess things up a bit for some SSL sites. Our problem was with a Java SSL site.

What about pinned certificates
Certificate Pinning provides the browser an independent way to verify who was supposed to have issued the site’s certificate. This would seem to be a doomsday scenario for SSL interception, but most browsers have built in an exception so that if the browser is on the local network it will ignore the pin.


Great resource for anyone doing SSL interception

There are many scenarios to consider when you have a Man In The Middle. OWS is Origin Web Server in the following. How will it behave if:

  • the OWS CERT is expired
  • the OWS CERT is self-signed
  • the OWS CERT is revoked
  • the OWS only offers weak ciphers
  • the OWS CERT is from a CA not trusted by the browser
  • the OWS CERT contains the wrong common name
  • the OWS CERT lacks the intermediate CERT
  • the OWS CERT is pinned
  • etc.

Get the idea? Lots of things to consider here – the scenarios, how your SSL intercepting device actually behaves, and how you want your SSL interception to behave for that scenario.

A great resource where they’re done the job for you to build certificates with almost every defect you can think of, is badssl.com.

Regrets
Man I wish openssl supported usage through proxy, in particular openssl s_client. But it doesn’t. Examining certificates with the various browsers is a pain, and I don’t fully trust them. For me openssl is truth.


References and related

All different kinds of faulty certificate scenarios to test with: badssl.com

You can now get “real” certificate for free! I’ve used them myself several times: Lets Encrypt

My article concerning Lets Encrypt usage: Saving money using Lets Encrypt

An article I wrote explaining ciphers.

Some openssl commands I’ve found useful: My favorite openssl commands.

Somehow related to all this is a web site that guarantees to never use SSL, which can be useful when you are using a guest WiFi requiring sign-on and want to hit a “safe” site (a non-SSL site can be hard to find these days): http://neverssl.com/

Categories
Network Technologies Web Site Technologies

Fail: What I’m working on now: Poor man’s version of Speedtest.net

Intro
Now that I have a dual-band router I wanted to run some tests to see if 5 GHz is really faster and more stable than 2.4 GHz, as my intuition was telling me. But my only 5 GHz device where I had a chance to measure was my amazon Fired HD tablet, and wouldn’t you know that it’s incapable of running speedtest (speedtest.net). The web site forced it to a mobile app version, but amazon’s app store, being limited in its offerings, doesn’t have a speedtest app!

Anyway speedtest.net runs ads pretty aggressively, which I don’t like.

So I decided to try to write my own.

This turned out to be very hard to do. It turns out I suck at Javascript.

Some details
Normally I show all my false starts in the hopes that others can learn frmo my mistakes, but my Javascript blunders are just too painful and I never did sort them out. When I use javascript methods to set page timers I got completely inconsistent and hence unreliable results. So I settled on this simplistic PHP approach to gauge download speed:

<!--?php
// - DrJ 3/2017
// the weakness of this method is that it is a single stream
echo "Date: " . date('h:i:s') . "<br-->\n";
$starttime = microtime(true);
for ($x = 0; $x &lt; 750000; $x++) {
  $string .= mt_rand(1000000,9999999);
}
 
echo "<!-- $string -->\n";
//start again
//echo date('h:i:s');
echo "
\n";
$endtime = microtime(true);
$timediff = $endtime - $starttime;
$timediff = $timediff;
//echo "php timer: starttime: " . $starttime . " endtime: " . $endtime . " diff: " . $timediff . "
\n";
echo "Page load time: " . $timediff . " s
\n";
// 1.04 is observed overhead of IP + tcp. try ip -s link show eth0 before and after running curl
$dataset = 1.04*(strlen($string) + 200)/1000000.0;
$mbps = $dataset*8.0/$timediff;
echo "Mbytes downloaded in test: " . $dataset . " Mbytes
\n";
echo "Bandwidth: " . $mbps ." mbps
\n";
?&gt;
 

I called the file index.php and put it on my server in a directory of my choosing, let’s say, downloadtimer, and run it. The results look like this:

Date: 07:30:33
Page load time: 6.9666068553925 s
Mbytes downloaded in test: 5.460208 Mbytes
Bandwidth: 6.270149142432 mbps
 
Test again

Conclusion
I pretty much gave up. Use fast.com instead. It’s much better than speedtest.net. There is also a mobile app for fast.com.

References and related

I just leanred there is a linux script (written in python) which runs speedtest! That is awesome. It is speedtest-clihttps://pypi.org/project/speedtest-cli/

It gives you the download speed, the upload speed. It calculates the closest server. It is really the full monty.

Everyone uses speedtest.net.

I just learned about speedcheck (speedcheck dot org). Initially it seemed promising but too often it simply doesn’t work. And its advertising is just about as aggressive as Okla’s speedtest.net that everyone uses.

Meanwhile a friend pointed out a couple superior speed test web sites. At&t’s Speedtest is a good choice. There are few if any ads, and it runs on my Fire HD tablet and it’s fun to watch. speedtest.att.com

This one seems only slightly less aggressive than speedtest.net: Internet Frog. Internet Frog works on my tablet but with limited functionality and a non-flashy interface.

This site is simplest of all so probably the best: fast.com. It’s run by Netflix who have an obvious interest in helping users establish what their download speed is. It only displays download speed by default, but just click Show more info and you will get ping time and upload speed as well. Also, they actually explain in a transparent way what the heck they are doing: https://medium.com/netflix-techblog/building-fast-com-4857fe0f8adb. And most importantly, they don’t shower you with ads.

Want a large file to experiment with downloading? speed test has a variety through an FTP server: ftp://speedtest.tele2.net/ . On linux I use a command like this:

$ curl ftp://speedtest.tele2.net/50MB.zip > /dev/null

 % Total    % Received % Xferd  Average Speed   Time    Time     Time  Current
                                 Dload  Upload   Total   Spent    Left  Speed
100 50.0M  100 50.0M    0     0  6099k      0  0:00:08  0:00:08 --:--:-- 11.3M

For faster speeds you should download the larger files.

I have also just discovered this site with large files you can download with HTTP:

https://www.thinkbroadband.com/download

For instance here is a direct link to their 100MB file which is nice to work with: http://ipv4.download.thinkbroadband.com/100MB.zip

Categories
Consumer Tech Web Site Technologies

White web page: maximizes your backlight with no invasion of privacy

Intro
Maybe it’s just me, but I’ve always had some issues getting my flashlight app to work on my phones. First there’s the issue of finding one from a trusted source (many contain spyware: access to my contacts?? for a flashlight?? I don’t think so…). So I trusted Swiss Army Knife, but then I had to launch that, then drill down to the flashlight, blah, blah. And the flashlight app on the Windows phone also looks a little seedy. And anyway sometimes you don’t want to overwhelm with your camera’s LED. Maybe just a simple glow from the backlight of your screen is enough to guide you down the hallway int he dark… I know I found myself using both my Fire HD tablet and my Windows phone in exactly that way.

Then I decided to scan a slide, using the backlight of my tablet to permit the scanner to see the colors, etc. That did not work out, by the way. It sounds like a good idea, though, doesn’t it? i guess the backlight is not sufficiently bright. maybe if I play with screen brightness…

Anyway, for all the above reasons I realized I could use a white backlight app. Rather than pay $0.99 for another dodgy app, I decided to write a web page that displays an all-white background. Then i could bookmark it and use it on both my Windows phone and my tablet!

White backlight web page
This is really complicated – don’t try this for yourself. Ha, ha just kidding. This is about as simple as it gets. Falls into the catgeory of “wish I had thought of it sooner,” or “Duh.”

White backlight web page

The HTML code
Want to put this on your own web server? Here is the code.

<html><head><body bgcolor="white"></htnml>

Conclusion
No banners, no ads, no intrusive permissions: this is a web page that maximizes the soft glow of your device’s backlight. You could play with your screen brightness to possibly make it still brighter, adjust the length it glows for, etc. For convenience to pull it up in a jiffy I’ve bookmarked my White backlight web page.


References and related

White backlight web page.

Categories
Admin Web Site Technologies

Tips for creating a PayPal Donate button for not-not-for-profits

Intro
I am treating my blog as a public service, so I thought it would be appropriate to have a Donation link even though I have not incorporated as a 501c3 non-profit. Is it even possible? Can I keep my anonymity? These were concerns I raised in my head and ones for which there is no good guidance. Short answer: Yes and Yes.

The details
The link to PayPal’s Donate button creation page is pretty well documented. That’s here. Needless to say, you need a PayPal account first!

The PayPal site walks you through a few options. Since Donate is so often associated with not-for-profits I wanted a different word on the button, like Contribute. But customizing the wording was not one of their offered options.

And this is important: you don’t seem to be able to get out of revealing your PayPal email address. It will appear on your Donation page. So what to do?

Well your PayPal account can have up to eight email addresses associated with it. So in my case where the DNS for drjohnstechtalk.com is hosted by GoDaddy (not the web site, mind you, just the DNS), I simply need to set up an arbitrary address like drjohn At drjohnstechtalk DOT com and have it forward to my personal Gmail account. That’s simple enough with GoDaddy’s service, and they don’t even charge extra! Then back to PayPal where you add that address to your account, receive a confirmatory email that they generate, and confirm using their emailed link.

That’s about it. Now you can go back to the button creation page, call it a Donate button, put in your anonymous email address, and let it generate the HTML code. The HTML code is pretty simple and it can be pasted right into a WordPress page if you use or switch to HTML editing.

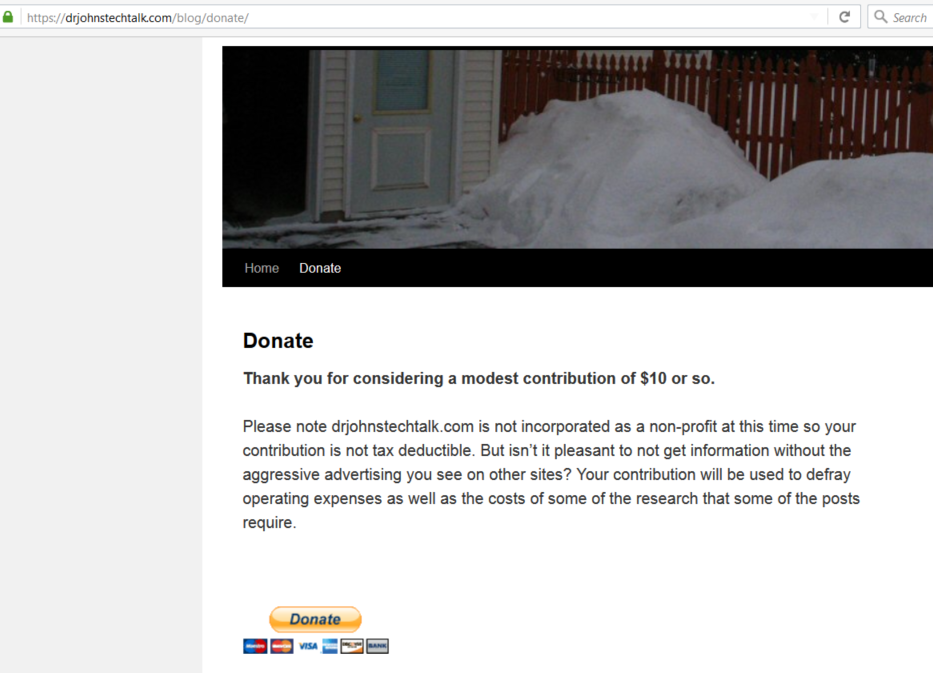
Here’s a screen shot of my donate page with its PayPal donate button.

OK, I lied. You probably also want a Thank you page in case someone actually does contribute! So build a Thank you page on your blog and record the URL. In WordPress I see you can create this as a hidden page – not appearing in any menu yet still using your theme. Here is my hidden thank you page as an example. Now you really have everything you need to build your Paypal button – one of the requested fields is the URL for your thank you page which we now have.

But is it appropriate?

Well, if like me you only expect the occasional, rare contribution, it’s probably akin to finding yourself in public short of money and asking for a few bucks to take the subway, or whatever… If you’re expecting to get thousands a year you’d better incorporate as a 501c3! As a courtesy I remind people that their contribution is not tax deductible. I guess for low volume stuff it can be treated the way gifts are treated for tax purposes.

Conclusion
drjohnstechtalk.com I hope serves as an example of “paying it forward.” I have benefitted from some good advice on the Internet (and suffered from some terrible advice as well), so I hope to benefit others by providing some clear guidance on topics where I can contribute. But I don’t see that as a barrier to asking for a modest contribution to help defray operational and research costs. In this post I show how I did it. It turns out to be simple, but not well documented on balance.

References and related
PayPal’s Donate Button creation web page with step-by-step instructions.
Care to donate to drjohnstechtalk.com? Here’s my donate page.
My thank you page.

Categories
Admin Web Site Technologies

What I’m working on now: saving $69 a year on my certificate costs: Lets Encrypt

Intro
I recently turned off my GoDaddy web site certificate and implemented one that cost me nothing. This will save me $69 per year.

I wrote up my experience in this article: Idea for free web server certificates: Let’s Encrypt

When I originally wrote that article it was a theoretical concept, but since then I’ve encountered web sites using those certificates so I realized that their CA must be widely accepted now and I decided to try for myself. The ACME (automated certificate management environment) environment was something completely new to me and the terminology a little confusing (as a user I don’t “issue” certificates, so whose perspective does the description take anyway?), but I got it to work in the end with the help of a command-line-based utility called acme.sh. I am actually more comfortable with command-line than with GUI programs. You get greater control and greater understanding.

Example of issuing a certificate using the manual DNS method
If you have full control over DNS but not the web server this approach is a good one.

$ sudo acme.sh ‐‐issue ‐‐dns ‐d www2.drjohnstechtalk.com

2021 update

Now the syntax is this:

acme.sh –issue –dns –yes-I-know-dns-manual-mode-enough-go-ahead-please -d www2.drjohnstechtalk.com

and once you’ve made the DNS entries, this:

acme.sh –issue –dns –yes-I-know-dns-manual-mode-enough-go-ahead-please -d www2.drjohnstechtalk.com –renew

[Thu Feb 23 11:55:52 EST 2017] Single domain='www2.drjohnstechtalk.com'
[Thu Feb 23 11:55:52 EST 2017] Getting domain auth token for each domain
[Thu Feb 23 11:55:52 EST 2017] Getting webroot for domain='www2.drjohnstechtalk.com'
[Thu Feb 23 11:55:52 EST 2017] _w='dns'
[Thu Feb 23 11:55:52 EST 2017] Getting new-authz for domain='www2.drjohnstechtalk.com'                                     [Thu Feb 23 11:55:54 EST 2017] The new-authz request is ok.
[Thu Feb 23 11:55:54 EST 2017] Add the following TXT record:
[Thu Feb 23 11:55:54 EST 2017] Domain: '_acme-challenge.www2.drjohnstechtalk.com'
[Thu Feb 23 11:55:54 EST 2017] TXT value: '7kU6pGgcNRtrPKuN2Wu1TIGS7YZDBhuiumLb9aEJwqc'
[Thu Feb 23 11:55:54 EST 2017] Please be aware that you prepend _acme-challenge. before your domain
[Thu Feb 23 11:55:54 EST 2017] so the resulting subdomain will be: _acme-challenge.www2.drjohnstechtalk.com
[Thu Feb 23 11:55:54 EST 2017] Please add the TXT records to the domains, and retry again.
[Thu Feb 23 11:55:54 EST 2017] Please add '--debug' or '--log' to check more details.
[Thu Feb 23 11:55:54 EST 2017] See: https://github.com/Neilpang/acme.sh/wiki/How-to-debug-acme.s/drjohnstechtalk.com/drjohnstechtalk.com/g

If you see an error like:

Usage: acme.sh --issue  -d  a.com  -w /path/to/webroot/a.com/

you probably left out the -d argument or something. I do that all the time for some reason. Go back and check your arguments.

Also note the order of arguments is significant! You have to put the ‐d last!

Anyway, after you’ve worked through any syntax errors like that, make the requested DNS entry in the zone file (do not include the quotes around the TXT value). Verify your entry with a command like this:

$ dig txt www2.drjohnstechtalk.com

Then run acme.sh again like this
$ sudo acme.sh ‐‐renew ‐d www2.drjohnstechtalk.com

[Thu Feb 23 12:02:18 EST 2017] Renew: 'www2.drjohnstechtalk.com'
[Thu Feb 23 12:02:18 EST 2017] Single domain='www2.drjohnstechtalk.com'
[Thu Feb 23 12:02:18 EST 2017] Getting domain auth token for each domain
[Thu Feb 23 12:02:19 EST 2017] Verifying:www2.drjohnstechtalk.com
[Thu Feb 23 12:02:22 EST 2017] Success
[Thu Feb 23 12:02:22 EST 2017] Verify finished, start to sign.
[Thu Feb 23 12:02:23 EST 2017] Cert success.
-----BEGIN CERTIFICATE-----
MIIFDjCCA/agAwIBAgISAzFs92uVHvnQCId6qFoaui9gMA0GCSqGSIb3DQEBCwUA
MEoxCzAJBgNVBAYTAlVTMRYwFAYDVQQKEw1MZXQncyBFbmNyeXB0MSMwIQYDVQQD
ExpMZXQncyBFbmNyeXB0IEF1dGhvcml0eSBYMzAeFw0xNzAyMjMxNjAyMDBaFw0x
NzA1MjQxNjAyMDBaMCAxHjAcBgNVBAMTFXd3dzIucmVmaW5pc2guYmFzZi51czCC
ASIwDQYJKoZIhvcNAQEBBQADggEPADCCAQoCggEBALa9QjcqPSZxXrJmt7kxV9ii
AAI7W0fQdWIk6aDHLfkhsSt55eASOAe05oxnZNqEmcJgXd+2+xUUmm8T5F92l4co
TFiIcMIQ5Jr7Gwg61RnDUe87vI4gctechhhnGcE//4iaJ8Va19exg8HD19dfpdGg
9J2DVnUBqKh4pvItUVe3h8KZOmftQZlLy1QXnEfwEyTj4kGo3phBgOIqh2x15/8Q
tKtM9yr4TKO8clgKLeyXV90ftg4t7kjCdtPx6oRIIq27CO3nwzFq/vFqg6HprE4b
RziUv1yajjw7aHkyhsjWmxdXBlIrokxK3EBrNUo3FUzlLHGGFT2RM1rkbhdaHB0C
AwEAAaOCAhYwggISMA4GA1UdDwEB/wQEAwIFoDAdBgNVHSUEFjAUBggrBgEFBQcD
AQYIKwYBBQUHAwIwDAYDVR0TAQH/BAIwADAdBgNVHQ4EFgQUCvxAhkhpo5Elmge/
3fz5asbprXEwHwYDVR0jBBgwFoAUqEpqYwR93brm0Tm3pkVl7/Oo7KEwcAYIKwYB
BQUHAQEEZDBiMC8GCCsGAQUFBzABhiNodHRwOi8vb2NzcC5pbnQteDMubGV0c2Vu
Y3J5cHQub3JnLzAvBggrBgEFBQcwAoYjaHR0cdrjo2NlcnQuaW50LXgzLmxldHNl
bmNyeXB0Lm9yZy8wIAYDVR0RBBkwF4IVd3d3Mi5yZWZpbmlzaC5iYXNmLnVzMIH+
BgNVHSAEgfYwgfMwCAYGZ4EMAQIBMIHmBgsrBgEEAYLfEwEBATCB1jAmBggrBgEF
BQcCARYaaHR0cDovL2Nwcy5sZXRzZW5jcnlwdC5vcmcwgasGCCsGAQUFBwICMIGe
DIGbVGhpcyBDZXJ0aWZpY2F0ZSBtYXkgb25seSBiZSByZWxpZWQgdXBvbiBieSBS
ZWx5aW5nIFBhcnRpZXMgYW5kIG9ubHkgaW4gYWNjb3JkYW5jZSB3aXRoIHRoZSBD
ZXJ0aWZpY2F0ZSBQb2xpY3kgZm91bmQgYXQgaHR0cHM6Ly9sZXRzZW5jcnlwdC5v
cmcvcmVwb3NpdG9yeS8wDQYJKoZIhvcNAQELBQADggEBADHFgJ3O8v/0zdG48Y1D
ci4wSQqZQSRtalknubVLRC12cr8ct1m0nZ7bxxQnZ/bSFShhcjepFowOfjfdY2ar
GzKP9IRgWavwm259WX5gM5FKUeN/Pjcz++vwUB8ci2+DpZu1tBf0eZcZ6JKsehij
A3lSPb4Ttq/GqDodumeJmvH4/FjCsjIqCJfQQYlz42QdZsLcA2l3oQ8smX0ZK8gh
sIm0SX4RggfiNGuNjw/tkfeC4xfjVNUSjKepUqgsVe63F6gRNjjm+/zsIlPLTdw3
AXGxE71Ww68avev7vRCvp+zPa43DQfVfV98v5M4i0M1/bT0Qh/4hLECma9wBBXb8
jXM=
-----END CERTIFICATE-----
[Thu Feb 23 12:02:23 EST 2017] Your cert is in  /root/.acme.sh/www2.drjohnstechtalk.com/www2.drjohnstechtalk.com.cer
[Thu Feb 23 12:02:23 EST 2017] Your cert key is in  /root/.acme.sh/www2.drjohnstechtalk.com/www2.drjohnstechtalk.com.key
[Thu Feb 23 12:02:23 EST 2017] The intermediate CA cert is in  /root/.acme.sh/www2.drjohnstechtalk.com/ca.cer
[Thu Feb 23 12:02:23 EST 2017] And the full chain certs is there:  /root/.acme.sh/www2.drjohnstechtalk.com/fullchain.cer

More complex example of issuing a SAN certificate using the manual DNS approach

$ ./acme.sh ‐‐issue ‐d johnstechtalk.mobi ‐‐dns ‐d www.johnstechtalk.mobi ‐d drjohnstechtalk.mobi ‐d www.drjohnstechtalk.mobi

[Mon Jan 23 09:21:55 EST 2017] Multi domain='DNS:www.johnstechtalk.mobi,DNS:drjohnstechtalk.mobi,DNS:www.drjohnstechtalk.mobi'
[Mon Jan 23 09:21:55 EST 2017] Getting domain auth token for each domain
[Mon Jan 23 09:21:55 EST 2017] Getting webroot for domain='johnstechtalk.mobi'
[Mon Jan 23 09:21:55 EST 2017] _w='dns'
[Mon Jan 23 09:21:55 EST 2017] Getting new-authz for domain='johnstechtalk.mobi'
[Mon Jan 23 09:21:57 EST 2017] The new-authz request is ok.
[Mon Jan 23 09:21:57 EST 2017] Getting webroot for domain='www.johnstechtalk.mobi'
[Mon Jan 23 09:21:57 EST 2017] _w='dns'
[Mon Jan 23 09:21:57 EST 2017] Getting new-authz for domain='www.johnstechtalk.mobi'
[Mon Jan 23 09:21:57 EST 2017] The new-authz request is ok.
[Mon Jan 23 09:21:57 EST 2017] Getting webroot for domain='drjohnstechtalk.mobi'
[Mon Jan 23 09:21:57 EST 2017] _w='dns'
[Mon Jan 23 09:21:57 EST 2017] Getting new-authz for domain='drjohnstechtalk.mobi'
[Mon Jan 23 09:21:58 EST 2017] The new-authz request is ok.
[Mon Jan 23 09:21:58 EST 2017] Getting webroot for domain='www.drjohnstechtalk.mobi'
[Mon Jan 23 09:21:58 EST 2017] _w='dns'
[Mon Jan 23 09:21:58 EST 2017] Getting new-authz for domain='www.drjohnstechtalk.mobi'
[Mon Jan 23 09:21:58 EST 2017] The new-authz request is ok.
[Mon Jan 23 09:21:58 EST 2017] Add the following TXT record:
[Mon Jan 23 09:21:58 EST 2017] Domain: '_acme-challenge.johnstechtalk.mobi'
[Mon Jan 23 09:21:58 EST 2017] TXT value: 'CDK_dACa_29apV30lc68Vo-mAx3e923ZOh6u-kyhXLo'
[Mon Jan 23 09:21:58 EST 2017] Please be aware that you prepend _acme-challenge. before your domain
[Mon Jan 23 09:21:58 EST 2017] so the resulting subdomain will be: _acme-challenge.johnstechtalk.mobi
[Mon Jan 23 09:21:58 EST 2017] Add the following TXT record:
[Mon Jan 23 09:21:58 EST 2017] Domain: '_acme-challenge.www.johnstechtalk.mobi'
[Mon Jan 23 09:21:58 EST 2017] TXT value: 'UC6JLg1hbXo0oRlYwSyrSRMD5nZgEKgdcIDZfhlqCrU'
[Mon Jan 23 09:21:58 EST 2017] Please be aware that you prepend _acme-challenge. before your domain
[Mon Jan 23 09:21:58 EST 2017] so the resulting subdomain will be: _acme-challenge.www.johnstechtalk.mobi
[Mon Jan 23 09:21:58 EST 2017] Add the following TXT record:
[Mon Jan 23 09:21:58 EST 2017] Domain: '_acme-challenge.drjohnstechtalk.mobi'
[Mon Jan 23 09:21:58 EST 2017] TXT value: 'y8ZCkJ-PXxGbeQFxh7RULCLGKyHH3G7FMFhKpMNF7ow'
[Mon Jan 23 09:21:58 EST 2017] Please be aware that you prepend _acme-challenge. before your domain
[Mon Jan 23 09:21:58 EST 2017] so the resulting subdomain will be: _acme-challenge.drjohnstechtalk.mobi
[Mon Jan 23 09:21:58 EST 2017] Add the following TXT record:
[Mon Jan 23 09:21:58 EST 2017] Domain: '_acme-challenge.www.drjohnstechtalk.mobi'
[Mon Jan 23 09:21:58 EST 2017] TXT value: '8nyb_V7AKaxy0U5pGTKmUejKEXgPv66VKne8yZYZMDg'
[Mon Jan 23 09:21:58 EST 2017] Please be aware that you prepend _acme-challenge. before your domain
[Mon Jan 23 09:21:58 EST 2017] so the resulting subdomain will be: _acme-challenge.www.drjohnstechtalk.mobi
[Mon Jan 23 09:21:59 EST 2017] Please add the TXT records to the domains, and retry again.
[Mon Jan 23 09:21:59 EST 2017] Please add '--debug' or '--log' to check more details.
[Mon Jan 23 09:21:59 EST 2017] See: https://github.com/Neilpang/acme.sh/wiki/How-to-debug-acme.sh

Then you add the DNS records they requested in the zone file, for instance,

_acme-challenge.johnstechtalk.mobi IN TXT CDK_dACa_29apV30lc68Vo-mAx3e923ZOh6u-kyhXLo

Then you rerun acme.sh, but with the renew argument:
$ ./acme.sh ‐‐renew ‐d johnstechtalk.mobi
and you should get your SAN certificate issued to you! All the files – private key, intermediate CERT, newly-issued SAN certificate – in ~/.acme.sh/johnstechtalk.mobi/

Of course just put in your own domain names in place of mine. I don’t know how quickly you have to act to put in your TXT records for the DNS authentication challenge. I edited zone files by hand and got them in within a few minutes.

And note the order of the arguments in the original acme.sh command. Often the switch order is immaterial in Linux, but for this command it matters a bit. You have your first mentioned domain, then the dns switch, then your other domain names.

Authorization expires
I got into trouble today, these many months later because my authorization had expired. The error looks like this:

[Sat Feb  3 17:14:00 EST 2018] _CURL='curl -L --silent --dump-header /root/.acme.sh/http.header '
[Sat Feb  3 17:14:01 EST 2018] _ret='0'
[Sat Feb  3 17:14:01 EST 2018] code='404'
[Sat Feb  3 17:14:01 EST 2018] drjohnstechtalk.com:Challenge error: {"type":"urn:acme:error:malformed","detail":"Expired authorization","status": 404}
[Sat Feb  3 17:14:01 EST 2018] Skip for removelevel:
[Sat Feb  3 17:14:01 EST 2018] pid
[Sat Feb  3 17:14:01 EST 2018] _clearupdns
[Sat Feb  3 17:14:01 EST 2018] Dns not added, skip.
[Sat Feb  3 17:14:01 EST 2018] _on_issue_err
[Sat Feb  3 17:14:01 EST 2018] Please add '--debug' or '--log' to check more details.
[Sat Feb  3 17:14:01 EST 2018] See: https://github.com/Neilpang/acme.sh/wiki/How-to-debug-acme.sh
[Sat Feb  3 17:14:02 EST 2018] Diagnosis versions:

Turns out there was a 10-month validity to my one-time DNS authorization which I did not know. So I switched to web root authorization and that seemed to work. That went like this:

$ acme.sh ‐‐issue ‐d drjohnstechtalk.com ‐w /webroot/drjohns

And I had to run that as root.


References and related

Idea for free web server certificates: Let’s Encrypt
Info about acme.sh
A great review of the state of hosting companies preparedness for offering SSL circa March 2018 in their hosting packages – so you can compare side-by-side – is in this Naked Security article: https://nakedsecurity.sophos.com/2018/03/12/with-4-months-to-switch-on-https-are-web-hosting-companies-ready/

Categories
CentOS DNS Linux Network Technologies Raspberry Pi Security Web Site Technologies

Roll your own dynamic DNS update service

Intro
I know my old Cisco router only has built-in support for two dynamic DNS services, dyndns.org and TZO.com. Nowadays you have to pay for those, if even they work (the web site domain names seem to have changed, but perhaps they still support the old domain names. Or perhaps not!). Maybe this could be fixed by firmware upgrades (to hopefully get more choices and hopefully a free one, or a newer router, or running DD-WRT. I didn’t do any of those things. Being a network person at heart, I wrote my own. I found the samples out there on the Internet needed some updating, so I am sharing my recipe. I didn’t think it was too hard to pull off.

What I used
– GoDaddy DNS hosting (basically any will do)
– my Amazon AWS virtual server running CentOS, where I have sudo access
– my home Raspberry Pi
– a tiny bit of php programming
– my networking skills for debugging

As I have prior experience with all these items this project was right up my alley.

Delegating our DDNS domain from GoDaddy
Just create a nameserver record from the domain, say drj.com, called, say, raspi, which you delegate to your AWS server. Following the example, the subdomain would be raspi.drj.com whose nameserver is drj.com.


DNS Setup on an Amazon AWS server

/etc/named.conf

//
// named.conf
//
// Provided by Red Hat bind package to configure the ISC BIND named(8) DNS
// server as a caching only nameserver (as a localhost DNS resolver only).
//
// See /usr/share/doc/bind*/sample/ for example named configuration files.
//
 
options {
//      listen-on port 53 { 127.0.0.1; };
//      listen-on port 53;
        listen-on-v6 port 53 { ::1; };
        directory       "/var/named";
        dump-file       "/var/named/data/cache_dump.db";
        statistics-file "/var/named/data/named_stats.txt";
        memstatistics-file "/var/named/data/named_mem_stats.txt";
        allow-query     { any; };
        recursion no;
 
        dnssec-enable yes;
        dnssec-validation yes;
        dnssec-lookaside auto;
 
        /* Path to ISC DLV key */
        bindkeys-file "/etc/named.iscdlv.key";
 
        managed-keys-directory "/var/named/dynamic";
};
 
logging {
        channel default_debug {
                file "data/named.run";
                severity dynamic;
        };
};
 
zone "." IN {
        type hint;
        file "named.ca";
};
 
include "/etc/named.rfc1912.zones";
include "/var/named/dynamic.conf";
include "/etc/named.root.key";

/var/named/dynamic.conf

zone "raspi.drj.com" {
  type master;
  file "/var/named/db.raspi.drj.com";
// designed to work with nsupdate -l used on same system - DrJ 10/2016
// /var/run/named/session.key
  update-policy local;
};

/var/named/db.raspi.drj.com

$ORIGIN .
$TTL 1800       ; 30 minutes
raspi.drj.com      IN SOA  drj.com. postmaster.drj.com. (
                                2016092812 ; serial
                                1700       ; refresh (28 minutes 20 seconds)
                                1700       ; retry (28 minutes 20 seconds)
                                1209600    ; expire (2 weeks)
                                600        ; minimum (10 minutes)
                                )
                        NS      drj.com.
$TTL 3600       ; 1 hour
                        A       125.125.73.145

Named re-starting program
Want to make sure your named restarts if it happens to die? nanny.pl is a good, simple monitor to do that. Here is the version I use on my server. Note the customized variables towards the top.

#!/usr/bin/perl
#
# Copyright (C) 2004, 2007, 2012  Internet Systems Consortium, Inc. ("ISC")
# Copyright (C) 2000, 2001  Internet Software Consortium.
#
# Permission to use, copy, modify, and/or distribute this software for any
# purpose with or without fee is hereby granted, provided that the above
# copyright notice and this permission notice appear in all copies.
#
# THE SOFTWARE IS PROVIDED "AS IS" AND ISC DISCLAIMS ALL WARRANTIES WITH
# REGARD TO THIS SOFTWARE INCLUDING ALL IMPLIED WARRANTIES OF MERCHANTABILITY
# AND FITNESS.  IN NO EVENT SHALL ISC BE LIABLE FOR ANY SPECIAL, DIRECT,
# INDIRECT, OR CONSEQUENTIAL DAMAGES OR ANY DAMAGES WHATSOEVER RESULTING FROM
# LOSS OF USE, DATA OR PROFITS, WHETHER IN AN ACTION OF CONTRACT, NEGLIGENCE
# OR OTHER TORTIOUS ACTION, ARISING OUT OF OR IN CONNECTION WITH THE USE OR
# PERFORMANCE OF THIS SOFTWARE.
 
# $Id: nanny.pl,v 1.11 2007/06/19 23:47:07 tbox Exp $
 
# A simple nanny to make sure named stays running.
 
$pid_file_location = '/var/run/named/named.pid';
$nameserver_location = 'localhost';
$dig_program = 'dig';
$named_program =  '/usr/sbin/named -u named';
 
fork() && exit();
 
for (;;) {
        $pid = 0;
        open(FILE, $pid_file_location) || goto restart;
        $pid = <FILE>;
        close(FILE);
        chomp($pid);
 
        $res = kill 0, $pid;
 
        goto restart if ($res == 0);
 
        $dig_command =
               "$dig_program +short . \@$nameserver_location > /dev/null";
        $return = system($dig_command);
        goto restart if ($return == 9);
 
        sleep 30;
        next;
 
 restart:
        if ($pid != 0) {
                kill 15, $pid;
                sleep 30;
        }
        system ($named_program);
        sleep 120;
}

The PHP updating program myip-update.php

<?php
# DrJ: lifted from http://pablohoffman.com/dynamic-dns-updates-with-a-simple-php-script
# but with some security improvements
# 10/2016
# PHP script for very simple dynamic DNS updates
#
# this script was published in http://pablohoffman.com/articles and
# released to the public domain by Pablo Hoffman on 27 Aug 2006
 
# CONFIGURATION BEGINS -------------------------------------------------------
# define password here
$mysecret = 'myBigFatsEcreT';
# CONFIGURATION ENDS ---------------------------------------------------------
 
 
$ip = $_SERVER['REMOTE_ADDR'];
$host = $_GET['host'];
$secret = $_POST['secret'];
$zone = $_GET['zone'];
$tmpfile = trim(`mktemp /tmp/nsupdate.XXXXXX`);
 
if ((!$host) or (!$zone) or (!($mysecret == $secret))) {
    echo "FAILED";
    unlink($tmpfile);
    exit;
}
 
$oldip = trim(`dig +short $host.$zone @localhost`);
if ($ip == $oldip) {
    echo "UNCHANGED. ip: $ip\n";
    unlink($tmpfile);
    exit;
}
 
echo "$ip - $oldip";
 
$nsucmd = "update delete $host.$zone A
update add $host.$zone 3600 A $ip
send
";
 
$fp = fopen($tmpfile, 'w');
fwrite($fp, $nsucmd);
fclose($fp);
`sudo nsupdate -l $tmpfile`;
unlink($tmpfile);
echo "OK ";
echo `date`;
?>

In the above file I added the “sudo” after awhile. See explanation further down below.

Raspberry Pi requirements
I’ve assumed you can run your Pi 24 x 7 and constantly and consistently on your network.

Crontab entry on the Raspberry Pi
Edit the crontab file for periodically checking your IP on the Pi and updating external DNS if it has changed by doing this:

$ crontab ‐e
and adding the line below:

# my own method of dynamic update - DrJ 10/2016
0,10,20,30,40,50 * * * * /usr/bin/curl -s -k -d 'secret=myBigFatsEcreT' 'https://drj.com/myip-update.php?host=raspi&zone=drj.com' >> /tmp/ddns 2>&1

A few highlights
Note that I’ve switched to use of nsupdate -l on the local server. This will be more secure than the previous solution which suggested to have updates from localhost. As far as I can tell localhost updates can be spoofed and so should be considered insecure in a modern infrastructure. I learned a lot by running nsupdate -D -l on my AWS server and observing what happens.
And note that I changed the locations of the secret. The old solution had the secret embedded in the URL in a GET statement, which means it would also be embedded in every single request in the web server’s access file. That’s not a good idea. I switched it to a POSTed variable so that it doesn’t show up in the web server’s access file. This is done with the -d switch of curl.

Contents of temporary file
Here are example contents. This is useful when you’re trying to run nsupdate from the command line.

update delete raspi.drj.com A
update add raspi.drj.com 3600 A 51.32.108.37
send


Permissions problems

If you see something like this on your DNS server:

$ ll /var/run/named

total 8
-rw-r--r-- 1 named www-data   6 Nov  6 03:15 named.pid
-rw------- 1 named www-data 102 Oct 24 09:42 session.key

your attempt to run nsupdate by your web server will be foiled and produce something like this:

$ /usr/bin/nsupdate ‐l /tmp/nsupdate.LInUmo

06-Nov-2016 17:14:14.780 none:0: open: /var/run/named/session.key: permission denied
can't read key from /var/run/named/session.key: permission denied

The solution may be to permit group read permission:

$ cd /var/run/named; sudo chmod g+r session.key

and make the group owner of the file your webserver user ID (which I’ve already done here). I’m still working this part out…

That approach doesn’t seem to “stick,” so I came up with this other approach. Put your web server user in sudoers to allow it to run nsupdate (my web server user is www-data for these examples):

Cmnd_Alias     NSUPDATE = /usr/bin/nsupdate
# allow web server to run nsupdate
www-data ALL=(root) NOPASSWD: NSUPDATE

But you may get the dreaded

sudo: sorry, you must have a tty to run sudo

if you manage to figure out how to turn on debugging.

So if your sudoers has a line like this:

Defaults    requiretty

you will need lines like this:

# turn of tty requirements only for www-data user
Defaults:www-data !requiretty

Debugging
Of course for debugging I commented out the unlink line in the PHP update file and ran the
nsupdate -l /tmp/nsupdate.xxxxx
by hand as user www-data.

During some of the errors I worked through that wasn’t verbose enough so I added debugging arguments:

$ nsupdate ‐D ‐d ‐l /tmp/nsupdate.xxxxx

When that began to work, yet when called via the webserver it wasn’t working, I ran the above command from within PHP, recording the output to a file:

...
`sudo nsupdate -d -D -l $tmpfile > /tmp/nsupdate-debug 2>&1`

That turned out to be extremely informative.

Conclusion
We have shown how to combine a bunch of simple networking tools to create your own DDNS service. The key elements are a Raspberry Pi and your own virtual server at Amazon AWS. We have built upon previous published solutions to this problem and made them more secure in light of the growing sophistication of the bad guys. Let me know if there is interest in an inexpensive commercial service.

References and related

nanny.pl write-up: https://www.safaribooksonline.com/library/view/dns-bind/0596004109/ch05s09.html

Categories
DNS Linux Perl Raspberry Pi Web Site Technologies

Roll your own domain drop catching service using GoDaddy

Intro
I’m after a particular domain and have been for years. But as a matter of pride I don’t want to overpay for it, so I don’t want to go through an auction. There are services that can help grab a DNS domain immediately after it expires, but they all want $$. That may make sense for high-demand domains. Mine is pretty obscure. I want to grab it quickly – perhaps within a few seconds after it becomes available, but I don’t expect any competition for it. That is a description of domain drop catching.

Since I am already using GoDaddy as my registrar I thought I’d see if they have a domain catching service. They don’t which is strange because they have other specialized domain services such as domain broker. They have a service which is designed for much the same purpose, however, called backorder. That creates an auction bid for the domain before it has expired. The cost isn’t too bad, but since I started down a different path I will roll my own. Perhaps they have an API which can be used to create my own domain catcher? It turns out they do!

It involves understanding how to read a JSON data file, which is new to me, but otherwise it’s not too bad.

The domain lifecycle
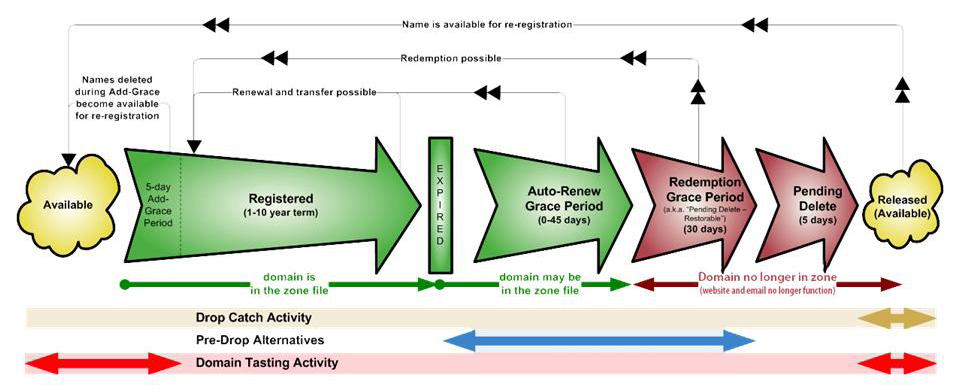
This graphic from ICANN illustrates it perfectly for your typical global top-level domain such as .com, .net, etc:
gtld-lifecycle

To put it into words, there is the
initial registration,
optional renewals,
expiration date,
auto-renew grace period of 0 – 45 days,
redemption grace period of 30 days,
pending delete of 5 days, and then
it’s released and available.

So in domain drop catching we are keenly interested in being fully prepared for the pending delete five day window. From an old discussion I’ve read that the precise time .com domains are released is usually between 2 -3 PM EST.

A word about the GoDaddy developer site
It’s developer.godaddy.com. It looks like one day it will be a great site, but for now it is wanting in some areas. Most of the menu items are duds and are placeholders. Really there are only three (mostly) working sections: get started, documentation and demo. Get started is only a few words and one slender snippet of Ajax code, and the demo itself also extremely limited, so the only real resource they provide is Documentation. Documentation is designed as an active documentation that you can try out functions with your data. You run it and it shows you all the needed request headers and data as well as the received response. The thing is that it’s very finicky. It’s supposed to show all the available functions but I couldn’t get it to work under Firefox. And with Internet Explorer/Edge it only worked about half the time. It seems to help to access it with a newly launched browser. The documentation, as good as it is, leaves some things unsaid. I have found:

https://api.ote-godaddy.com/ – use for TEST. Maybe ote stands for optional test environment?
https://api.godaddy.com/ – for production (what I am calling PROD)

The TEST environment does not require authentication for some things that PROD does. This shell script for checking available domains, which I call available-test.sh, works in TEST but not in PROD:

#!/bin/sh
# pass domain as argument
# apparently no AUTH is rquired for this one
curl -k 'https://api.ote-godaddy.com/v1/domains/available?domain='$1'&amp;checkType=FAST&amp;forTransfer=false'

In PROD I had to insert the authorization information – the key and secret they showed me on the screen. I call this script available.sh.

#!/bin/sh
# pass domain as argument
curl -s -k -H 'Authorization: sso-key *******8m_PwFAffjiNmiCUrKe******:**FF73L********' 'https://api.godaddy.com/v1/domains/available?domain='$1'&amp;checkType=FULL&amp;forTransfer=false'

I found that my expiring domain produced different results about five days after expiring if I used checkType of FAST versus checkType of FULL – and FAST was wrong. So I learned you have to use FULL to get an answer you can trust!

Example usage of an available domain

$ ./available.sh dr-johnstechtalk.com

{"available":true,"domain":"dr-johnstechtalk.com","definitive":false,"price":11990000,"currency":"USD","period":1}

2nd example – a non-available domain
$ ./available.sh drjohnstechtalk.com

{"available":false,"domain":"drjohnstechtalk.com","definitive":true,"price":11990000,"currency":"USD","period":1}

Example JSON file
I had to do a lot of search and replace to preserve my anonymity, but I feel this post wouldn’t be complete without showing the real contents of my JSON file I am using for both validate, and, hopefully, as the basis for my API-driven domain purchase:

{
  "domain": "dr-johnstechtalk.com",
  "renewAuto": true,
  "privacy": false,
  "nameServers": [
  ],
  "consent": {
    "agreementKeys": ["DNRA"],
    "agreedBy": "50.17.188.196",
    "agreedAt": "2016-09-29T16:00:00Z"
  },
  "period": 1,
  "contactAdmin": {
    "nameFirst": "Dr","nameLast": "John",
    "email": "[email protected]",
    "addressMailing": {
      "address1": "555 Piney Drive",
      "city": "Smallville","state": "New Jersey","postalCode": "55555",
      "country": "US"
    },
    "phone": "+1.5555551212"
  },
  "contactBilling": {
    "nameFirst": "Dr","nameLast": "John",
    "email": "[email protected]",
    "addressMailing": {
      "address1": "555 Piney Drive",
      "city": "Smallville","state": "New Jersey","postalCode": "55555",
      "country": "US"
    },
    "phone": "+1.5555551212"
  },
  "contactRegistrant": {
    "nameFirst": "Dr","nameLast": "John",
    "email": "[email protected]",
    "phone": "+1.5555551212",
    "addressMailing": {
      "address1": "555 Piney Drive",
      "city": "Smallville","state": "New Jersey","postalCode": "55555",
      "country": "US"
    }
  },
  "contactTech": {
    "nameFirst": "Dr","nameLast": "John",
    "email": "[email protected]",
    "phone": "+1.5555551212",
    "addressMailing": {
      "address1": "555 Piney Drive",
      "city": "Smallville","state": "New Jersey","postalCode": "55555",
      "country": "US"
    }
  }
}

Note the agreementkeys value: DNRA. GoDaddy doesn’t document this very well, but that is what you need to put there! Note also that the nameservers are left empty. I asked GoDaddy and that is what they advised to do. The other values are pretty much what you’d expect. I used my own server’s IP address for agreedBy – use your own IP. I don’t know how important it is to get the agreedAt date close to the current time. I’m going to assume it should be within 24 hours of the current time.

How do we test this JSON input file? I wrote a validate script for that I call validate.sh.

#!/bin/sh
# DrJ 9/2016
# godaddy-json-register was built using GoDaddy's documentation at https://developer.godaddy.com/doc#!/_v1_domains/validate
jsondata=`tr -d '\n' &lt; godaddy-json-register`
 
curl -i -k -H 'Authorization: sso-key *******8m_PwFAffjiNmiCUrKe******:**FF73L********' -H 'Content-Type: application/json' -H 'Accept: application/json' -d "$jsondata" https://api.godaddy.com/v1/domains/purchase/validate

Run the validate script
$ ./validate.sh

HTTP/1.1 100 Continue
 
HTTP/1.1 100 Continue
Via: 1.1 api.godaddy.com
 
HTTP/1.1 200 OK
Date: Thu, 29 Sep 2016 20:11:33 GMT
X-Powered-By: Express
Vary: Origin,Accept-Encoding
Access-Control-Allow-Credentials: true
Content-Type: application/json; charset=utf-8
ETag: W/"2-mZFLkyvTelC5g8XnyQrpOw"
Via: 1.1 api.godaddy.com
Transfer-Encoding: chunked

Revised versions of the above scripts
So we can pass the domain name as argument I revised all the scripts. Also, I provide an agreeddAt date which is current.

The data file: godaddy-json-register

{
  "domain": "DOMAIN",
  "renewAuto": true,
  "privacy": false,
  "nameServers": [
  ],
  "consent": {
    "agreementKeys": ["DNRA"],
    "agreedBy": "50.17.188.196",
    "agreedAt": "DATE"
  },
  "period": 1,
  "contactAdmin": {
    "nameFirst": "Dr","nameLast": "John",
    "email": "[email protected]",
    "addressMailing": {
      "address1": "555 Piney Drive",
      "city": "Smallville","state": "New Jersey","postalCode": "55555",
      "country": "US"
    },
    "phone": "+1.5555551212"
  },
  "contactBilling": {
    "nameFirst": "Dr","nameLast": "John",
    "email": "[email protected]",
    "addressMailing": {
      "address1": "555 Piney Drive",
      "city": "Smallville","state": "New Jersey","postalCode": "55555",
      "country": "US"
    },
    "phone": "+1.5555551212"
  },
  "contactRegistrant": {
    "nameFirst": "Dr","nameLast": "John",
    "email": "[email protected]",
    "phone": "+1.5555551212",
    "addressMailing": {
      "address1": "555 Piney Drive",
      "city": "Smallville","state": "New Jersey","postalCode": "55555",
      "country": "US"
    }
  },
  "contactTech": {
    "nameFirst": "Dr","nameLast": "John",
    "email": "[email protected]",
    "phone": "+1.5555551212",
    "addressMailing": {
      "address1": "555 Piney Drive",
      "city": "Smallville","state": "New Jersey","postalCode": "55555",
      "country": "US"
    }
  }
}

validate.sh

#!/bin/sh
# DrJ 10/2016
# godaddy-json-register was built using GoDaddy's documentation at https://developer.godaddy.com/doc#!/_v1_domains/validate
# pass domain as argument
# get date into accepted format
domain=$1
date=`date -u --rfc-3339=seconds|sed 's/ /T/'|sed 's/+.*/Z/'`
jsondata=`tr -d '\n' &lt; godaddy-json-register`
jsondata=`echo $jsondata|sed 's/DATE/'$date'/'`
jsondata=`echo $jsondata|sed 's/DOMAIN/'$domain'/'`
#echo date is $date
#echo jsondata is $jsondata
curl -i -k -H 'Authorization: sso-key *******8m_PwFAffjiNmiCUrKe******:**FF73L********' -H 'Content-Type: application/json' -H 'Accept: application/json' -d "$jsondata" https://api.godaddy.com/v1/domains/purchase/validate

available.sh
No change. See listing above.

purchase.sh
Exact same as validate.sh, with just a slightly different URL. I need to test that it really works, but based on my reading I think it will.

#!/bin/sh
# DrJ 10/2016
# godaddy-json-register was built using GoDaddy's documentation at https://developer.godaddy.com/doc#!/_v1_domains/purchase
# pass domain as argument
# get date into accepted format
domain=$1
date=`date -u --rfc-3339=seconds|sed 's/ /T/'|sed 's/+.*/Z/'`
jsondata=`tr -d '\n' &lt; godaddy-json-register`
jsondata=`echo $jsondata|sed 's/DATE/'$date'/'`
jsondata=`echo $jsondata|sed 's/DOMAIN/'$domain'/'`
#echo date is $date
#echo jsondata is $jsondata
curl -s -i -k -H 'Authorization: sso-key *******8m_PwFAffjiNmiCUrKe******:**FF73L********' -H 'Content-Type: application/json' -H 'Accept: application/json' -d "$jsondata" https://api.godaddy.com/v1/domains/purchase

Putting it all together
Here’s a looping script I call loop.pl. I switched to perl because it’s easier to do certain control operations.

#!/usr/bin/perl
#DrJ 10/2016
$DEBUG = 0;
$status = 0;
open STDOUT, '&gt;', "loop.log" or die "Can't redirect STDOUT: $!";
                   open STDERR, "&gt;&amp;STDOUT"     or die "Can't dup STDOUT: $!";
 
                   select STDERR; $| = 1;      # make unbuffered
                   select STDOUT; $| = 1;      # make unbuffered
# edit this and change to your about-to-expire domain
$domain = "dr-johnstechtalk.com";
while ($status != 200) {
# show that we're alive and working...
  print "Now it's ".`date` if $i++ % 10 == 0;
  $hr = `date +%H`;
  chomp($hr);
# run loop more aggressively during times of day we think Network Solutions releases domains back to the pool, esp. around 2 - 3 PM EST
  $sleep = $hr &gt; 11 &amp;&amp; $hr &lt; 16 ? 1 : 15;
  print "Hr,sleep: $hr,$sleep\n" if $DEBUG;
  $availRes = `./available.sh $domain`;
# {"available":true,"domain":"dr-johnstechtalk.com","definitive":false,"price":11990000,"currency":"USD","period":1}
  print "$availRes\n" if $DEBUG;
  ($available) = $availRes =~ /^\{"available":([^,]+),/;
  print "$available\n" if $DEBUG;
  if ($available eq "false") {
    print "test comparison OP for false result\n" if $DEBUG;
  } elsif ($available eq "true") {
# available value of true is extremely unreliable with many false positives. Confirm availability by making a 2nd call
    print "available.sh results: $availRes\n";
    $availRes = `./available.sh $domain`;
    print "available.sh re-test results: $availRes\n";
    ($available2) = $availRes =~ /^\{"available":([^,]+),/;
    next if $available2 eq "false";
# We got two available eq true results in a row so let's try to buy it!
    print "$domain is very likely available. Trying to buy it at ".`date`;
    open(BUY,"./purchase.sh $domain|") || die "Cannot run ./purchase.pl $domain!!\n";
    while() {
# print out each line so we can analyze what happened
      print ;
# we got it if we got back
# HTTP/1.1 200 OK
      if (/1.1 200 OK/) {
        print "We just bought $domain at ".`date`;
        $status = 200;
     }
    } # end of loop over results of purchase
    close(BUY);
    print "\n";
    exit if $status == 200;
  } else {
    print "available is neither false nor true: $available\n";
  }
  sleep($sleep);
}

Running the loop script
$ nohup ./loop.pl > loop.log 2>&1 &
Stopping the loop script
$ kill ‐9 %1

Description of loop.pl
I gotta say this loop script started out as a much simpler script. I fortunately started on it many days before my desired domain actually became available so I got to see and work out all the bugs. Contributing to the problem is that GoDaddy’s API results are quite unreliable. I was seeing a lot of false positives – almost 20%. So I decided to require two consecutive calls to available.sh to return true. I could have required available true and definitive true, but I’m afraid that will make me late to the party. The API is not documented to that level of detail so there’s no help there. But so far what I have seen is that when available incorrectly returns true, simultaneously definitive becomes false, whereas all other times definitive is true.

Results of running an earlier and simpler version of loop.pl

This shows all manner of false positives. But at least it never allowed me to buy the domain when it wasn’t available.

Now it's Wed Oct  5 15:20:01 EDT 2016
Now it's Wed Oct  5 15:20:19 EDT 2016
Now it's Wed Oct  5 15:20:38 EDT 2016
available.sh results: {"available":true,"domain":"dr-johnstechtalk.com","definitive":false,"price":11990000,"currency":"USD","period":1}
dr-johnstechtalk.com is available. Trying to buy it at Wed Oct  5 15:20:46 EDT 2016
HTTP/1.1 100 Continue
 
HTTP/1.1 100 Continue
Via: 1.1 api.godaddy.com
 
HTTP/1.1 422 Unprocessable Entity
Date: Wed, 05 Oct 2016 19:20:47 GMT
X-Powered-By: Express
Vary: Origin,Accept-Encoding
Access-Control-Allow-Credentials: true
Content-Type: application/json; charset=utf-8
ETag: W/"7d-O5Dw3WvJGo8h30TqR7j8zg"
Via: 1.1 api.godaddy.com
Transfer-Encoding: chunked
 
{"code":"UNAVAILABLE_DOMAIN","message":"The specified `domain` (dr-johnstechtalk.com) isn't available for purchase","name":"ApiError"}
Now it's Wed Oct  5 15:20:58 EDT 2016
Now it's Wed Oct  5 15:21:16 EDT 2016
Now it's Wed Oct  5 15:21:33 EDT 2016
available.sh results: {"available":true,"domain":"dr-johnstechtalk.com","definitive":false,"price":11990000,"currency":"USD","period":1}
dr-johnstechtalk.com is available. Trying to buy it at Wed Oct  5 15:21:34 EDT 2016
HTTP/1.1 100 Continue
 
HTTP/1.1 100 Continue
Via: 1.1 api.godaddy.com
 
HTTP/1.1 422 Unprocessable Entity
Date: Wed, 05 Oct 2016 19:21:36 GMT
X-Powered-By: Express
Vary: Origin,Accept-Encoding
Access-Control-Allow-Credentials: true
Content-Type: application/json; charset=utf-8
ETag: W/"7d-O5Dw3WvJGo8h30TqR7j8zg"
Via: 1.1 api.godaddy.com
Transfer-Encoding: chunked
 
{"code":"UNAVAILABLE_DOMAIN","message":"The specified `domain` (dr-johnstechtalk.com) isn't available for purchase","name":"ApiError"}
Now it's Wed Oct  5 15:21:55 EDT 2016
Now it's Wed Oct  5 15:22:12 EDT 2016
Now it's Wed Oct  5 15:22:30 EDT 2016
available.sh results: {"available":true,"domain":"dr-johnstechtalk.com","definitive":false,"price":11990000,"currency":"USD","period":1}
dr-johnstechtalk.com is available. Trying to buy it at Wed Oct  5 15:22:30 EDT 2016
...

These results show why i had to further refine the script to reduce the frequent false positives.

Review
What have we done? Our looping script, loop.pl, loops more aggressively during the time of day we think Network Solutions releases expired .com domains (around 2 PM EST). But just in case we’re wrong about that we’ll run it anyway at all hours of the day, but just not as quickly. So during the aggressive period we sleep just one second between calls to available.sh. When the domain finally does become available we call purchase.sh on it and exit and we write some timestamps and the domain we’ve just registered to our log file.

Performance
Miserable. This API seems tuned for relative ease-of-use, not speed. The validate call often takes, oh, say 40 seconds to return! I’m sure the purchase call will be no different. For a domainer that’s a lifetime. So any strategy that relies on speed had better turn to a registrar that’s tuned for it. GoDaddy I think is more aiming at resellers of their services.

Don’t have a linux environment handy?
Of course I’m using my own Amazon AWS server for this, but that needn’t be a barrier to entry. I could have used one of my Raspberry Pi’s. Probably even Cygwin on a Windows PC could be made to work.

Appendix A
How to remove all newline characters from your JSON file

Let’s say you have a nice JSON file which was created for you from the Documentation exercises called godaddy-json-register. It will contain lots of newline (“\n”) characters, assuming you’re using a Linux server. Remove them and put the output into a file called compact-json:

$ tr ‐d ‘\n'<godaddy‐json‐register>compact‐json

I like this because then I can still use curl rather than wget to make my API calls.

Appendix B
What an expiring domain looks like in whois

Run this from a linux server
$ whois <expiring‐domain.com>

Domain Name: expiring-domain.com
...
Creation Date: 2010-09-28T15:55:56Z
Registrar Registration Expiration Date: 2016-09-27T21:00:00Z
...
Domain Status: clientDeleteHold
Domain Status: clientDeleteProhibited
Domain Status: clientTransferProhibited
...

You see that Domain Status: clientDeleteHold? You don’t get that for regular domains whose registration is still good. They’ll usually have the two lines I show below that, but not that one. This is shown for my desired domain just a few days after its official expiration date.

2020 update

Four years later, still hunting for that domain – I am very patient! So I dusted off the program described here. Suprisingly, it all still works. Except maybe the JSON file. The onlything wrong with that was the lack of nameservers. I added some random GoDaddy nameservers and it seemed all good.

Conclusion
We show that GoDaddy’s API works and we provide simple scripts which can automate what is known as domain dropcatching. This approach should attempt to register a domain within a cople seconds of its being released – if we’ve done everything right. The GoDaddy API results are a little unstable however.

References and related
If you don’t mind paying, Fabulous.com has a domain drop catching service.
ICANN’s web site with the domain lifecycle infographic.
GoDaddy’s API documentation: http://developer.godaddy.com/
More about Raspberry Pi: http://raspberrypi.org/
I really wouldn’t bother with Cygwin – just get your hands on real Linux environment.
Curious about some of the curl options I used? Just run curl ‐‐help. I left out the description of the switches I use because it didn’t fit into the narrative.
Something about my Amazon AWS experience from some years ago.
All the perl tricks I used would take another blog post to explain. It’s just stuff I learned over the years so it didn’t take much time at all.
People who buy and sell domains for a living are called domainers. They are professionals and my guide will not make you competitive with them.

Categories
Web Site Technologies

How to escape Linux commands for the WordPress editor

Intro
I develop a lot of stuff on Linux command line. Then I want to share it on my blog, which is implemented in WordPress. I only use HTML editing mode because the alternative was disastrous. But my commands were being mangled, even when they displayed OK. Put into the clipboard and pasted spit out some really strange characters and not at all what I had in my original command. What to do?

The details
An example will go a long way to show what I mean. Say I want to examine what static routes I’ve created on my server and send the results to a file. This came up a couple posts ago. So I developed the command:

$ netstat ‐rn|cut ‐c‐16|egrep ‐v ^'10\.|172|169' > /tmp/results

Now if I enter it literally in my blog with those characters it would appear like this:

$ netstat -rn|cut -c-16|egrep -v ^’10\.|172|169′ > /tmp/results

I can avoid formatting issues by using the <pre> tag, but then I can’t bold my commands. Stylistically I try to follow the style where commands typed in by the user are in boldface.

A python program solves the problem
I developed the following python program which spits out properly encoded characters that I’ve determined are at risk of being misrepresented in my blog. I call it htmlescape.

#!/usr/bin/python
# mostly lifted from https://wiki.python.org/moin/EscapingHtml
# DrJ - 7/22/16
import sys
import cgi
html_escape_table = {
    "&": "&amp;",
    '"': "&quot;",
    "'": "&apos;",
    ">": "&gt;",
    "<": "&lt;",
    "-": "&hyphen;",
    }
def html_escape(text):
    """Produce entities within text."""
    return "".join(html_escape_table.get(c,c) for c in text)
sys.stdout.write("Enter your command string: ")
code = sys.stdin.readline()
print code
print html_escape(code)

Why the command string prompt
I realized that if I allowed the shell to intervene it would mangle my single quotes, double quotes, dollar signs and a whole lot more. So I wanted to be in the context of a special shell, which python provides with its sys.stdin/stdout functions. They are perfect – they do not do any character manipulation.

A few comments about the characters

Why encode the hyphen? It comes up all the time as prefix character to command arguments. A single hyphen gets represented OK, but some commands actually require a double hyphen, ‐‐, and that gets mangled. Also, I’ve noticed that minus sign and hyphen are represented differently in HTML. The minus sign is shown to be longer and just doesn’t look right. And that is the default representation of the “-” character, even though in shell commands you almost always mean it as a hyphen, ‐.

The apostrophe is important to prevent the shell from interpolating variables inside a set of apostrophes. In the context of the shell it is more appropriately to be called a single quote or a tick mark. In HTML browsers try to be fancy and look for pairs of single quotes and turns one upside-down – rendering it as an entirely different character. Same thing for double quotes.

Strangely, the back tick ` does not suffer a similar fate. That does not get mangled so no need to represent it in encoded form. At least as far as I’ve seen. I suspect that somewhere under some circumstances it too might get mangled, but I can’t produce those conditions right now.

Example 2
$ curl –noproxy –show-error

Those are double hyphens, which is the correct syntax for using curl! But it renders as a long dash, which is bad enough, and put it in your clipboard and paste it into a shell and it produces garbage characters. At the end I put a <url> but that just became totally invisible! Running htmlescape on it makes the same look like this:

$ curl ‐‐noproxy ‐‐show‐error <url>

In my editor screen I have entered this:

$ curl &hyphen;&hyphen;noproxy &hyphen;&hyphen;show&hyphen;error &lt;url&gt;

And how did I produce that line? Why I took the previous rendering and ran it through htmlescape one more time!

Alternatives considered
I hate looking for plugins. None work exactly the way you want, they are poorly documented, fall out of support, etc. So yes there are plugins which may be able to work, but I think for my situation I like to maintain full control and go my own way.
Up until yesterday I was doing all the character substitutions by hand! That’s another alternative, but it gets tiresome.

Conclusion
A python program is presented which properly escapes Linux command line strings for suitable publication in a WordPress blog.