Categories
Admin Consumer Interest Consumer Tech Firewall Home Computing Linux Scams Security Spam Web Site Technologies

Types of Cyberattacks and other terms from the world of cyber security

Intro

It’s convenient to name drop different types of cyber attacks at a party. I often struggle to name more than a few. I will try to maintain a running list of them.

But I find you cannot speak about cybersecurity unless you also have a basic understanding of information technology so I am including some of those terms as well.

As I write this I am painfully aware that you could simply ask ChatGPT to generate a list of all relevant terms in cybersecurity along with their definitions – at least I think you could – and come up with a much better and more complete list. But I refuse to go that route. These are terms I have personally come across so they have special significance for me personally. In other words, this list has been organically grown. For instance I plowed through a report by a major vendor specializing in reviewing other vendor’s offerings and it’s just incredible just how dense with jargon and acronyms each paragragh is: a mother lode of state-of-the-art tech jargon.

Credential Stuffing Attack

I.e., password re-use. Takes advantage of users re-using passwords for different applications. Nearly three of four consumers re-use password this way. Source: F5. Date: 3/2024

Password spraying

A type of attack in which the threat actor tries the same password with multiple accounts, until one combination works. 

Supply Chain attack
Social Engineering
Hacking
Living off the land
Data Breach
Keylogger
Darknet
Captcha
Click farms
Jackpotting

This is one of my favorite terms. Imagine crooks implanted malware into an ATM and were able to convince it to dispense all its available cash to them on the spot! something like this actually happened. Scary.

Skimmer
bot
Anti-bot, bot defense
Spoofing
Mitigation
SOC
Selenium (Se) or headless browser
WAF
Obfuscation
PII, Personally Identifiable Information
api service
Reverse proxy
Inline
endpoint, e.g., login, checkout
scraping
Layer 7
DDOS
DOS
Visibility
Automation
Token
Post
JavaScript
Replay
Browser Fingerprint
OS
Browser
GDPR
PCI DSS
AICPA Trust Services
GUI
(JavaScript) Injection
Command Injection
Hotfix
SDK
URL
GET|POST Request
Method
RegEx
Virtual Server
TLS
Clear text
MTTR
RCA
SD-WAN
PoV
PoC
X-Forwarded-For
JSON
Client/server
Threat Intelligence
Use case
Carding attack
WebHook
Source code
CEO Fraud
Phishing
Vishing

(Voice Phishing) A form of cyber-attack where scammers use phone calls to trick individuals into revealing sensitive information or performing certain actions.

Business email compromise (BEC)
Deepfakes
Threat Intelligence
Social engineering
Cybercriminal
SIM box
Command and control (C2)
Typo squatting
Voice squatting

A technique similar to typo squatting, where Alexa and Google Home devices can be tricked into opening attacker-owned apps instead of legitimate ones.

North-South
East-West
Exfiltrate
Malware
Infostealer
Obfuscation
Antivirus
Payload
Sandbox
Control flow obfuscation
Indicators of Compromise
AMSI (Windows Antimalware Scan Interface)
Polymorphic behavior
WebDAV
Protocol handler
Firewall
Security Service Edge (SSE)
Secure Access Service Edge (SASE)
Zero Trust

Zero Trust is a security model that assumes that all users, devices, and applications are inherently untrustworthy and must be verified before being granted access to any resources or data.

Zero Trust Network Access (ZTNA)
Zero Trust Edge (ZTE)
Secure Web Gateway (SWG)
Cloud Access Security Broker (CASB)
Remote Browser Isolation (RBI)
Content Disarm and Reconstruction (CDR)
Firewall as a service
Egress address
Data residency
Data Loss Prevention (DLP)
Magic Quadrant
Managed Service Provider (MSP)
0-day or Zero day
User Experience (UX)
Watermark
DevOps
Multitenant
MSSP
Remote Access Trojan (RAT)
Object Linking and Embedding
(Powershell) dropper
Backdoor
TTP (Tactics, Techniques and Procedures)
Infostealer
Shoulder surfing
Ransomware
Pig butchering

This is particularly disturbing to me because there is a human element, a foreign component, crypto currency, probably a type of slave trade, etc. See the Bloomberg Businessweek story about this.

Forensic analysis
Attack vector
Attack surface
Economic espionage
Gap analysis
AAL (Authentication Assurance Level)
IAL (Identity Assurance Level)
CSPM (Cloud Security Posture Management)
Trust level
Remediation
Network perimeter
DMZ (Demilitarized zone)
Defense in depth
Lateral movement
Access policy
Micro segmentation
Least privilege
Elevated privileges
Breach
Intrusion
Insider threat
Cache poisoning

I know it as DNS cache poisoning. If an attacker manages to fill the DNS resolver’s cache with records that have been altered or “poisoned.”

Verify explicitly
Network-based attack
Adaptive response
Telemetry
Analytics
Identity Provider (IDP)
Consuming entity
Behavior analysis
Authentication
Authorization
Real-time
Lifecycle management
Flat network
Inherent trust
Cloud native
Integrity
Confidentiality
Data encryption
EDR
BSI

German Federal Office for Information Security (Bundesamt für Sicherheit in der Informationstechnik)

ICS (Industrial Control System)
Reverse shell

A text-based interfaces that allow for remote server control.

A RCE (Remote Code Execution)
Threat Actor
APT (Advanced Persistent Threat)
Compromise
Vulnerability
Bug
Worm
Remote Access VPN (RAVPN)
XDR (Extended Detection and Response)
SIEM (Security Information and Event Management)
User Entity Behavior Analytics (UEBA)
Tombstoning

Famous named attacks

Agent Tesla
Heartbleed
log4j
Morris Worm

Famous attackers

APT29 (Cozy Bear)

A Russia-nexus threat actor often in the news

IT terminology

Active Directory
Browser
Data at rest
Data in motion
DLL
DLP (Data Loss Prevention)
Domain
Exact Data Matching (EDM)
Link
.NET
OCR (Optical Character Recognition)
Patch
PaaS (Platform as a Service)
Portable Executable (PE)
Private Cloud
Ray

An open-source unified compute framework used by the likes of OpenAI, Uber, and Amazon which simplifies the scaling of AI and Python workloads, including everything from reinforcement learning and deep learning to tuning and model serving.

Redirect
Retrieval-Augmented Generation (RAG)
SaaS (Software as a Service)
SMTP
URL
VPN – Virtual Private Network
Website
Categories
CentOS Web Site Technologies

CentOS is dead

Intro

As my devoted followers will be aware, I nearly kiled myself converting my Centos 6 VM to CentOS 8. For instance see Upgrading WordPress brings a thicket of problems. That is an experience I only want to go through every 10 years, and fortunately, CentOS was just the right platform as its support was supposed to last 10 years I started this blog in either 2011 I believe. I went to CentOS 8 in 2020.

But instead of eight more good years, I’ve learned that CentOS is basically a dead product. EOL in industry parlance. IBM killed it. The last upgrades to CentOS 8 came at the end of 2021. There is a sort of CentOS, now called CentOS Stream, but it should be basically thought of a another Fedora. Probably IBM was losing too much money with people choosing CentOS (free) over RedHat paid subscription.

But anyway, I’ve come to resent how out-of-date the packages are on CentOS and I am much more favorable to plain old Debian linux, largely due to my work on the Raspberry Pi. There the packages like python are much more uptodate. I guess the support is for five years.

The other VM I would consider for my next iteration is Amazon Linux. It has a lot of what I need already installed, so less fuss. But I think they’re only supported for three years.

Rocky Linux, the CentOS replacement

After three years I finally hard about the best CentOS replacement. Rocky Linux. I guess it’s still a bit obscure, but you can find it as an AMI on the marketplace. It has no cost and its stated aim is to be bug-for-bug compatible with Redhat! See the Wikipedia article.

References and related

There is a snarky commentary about this topic which inspired this article. I don’t have the link right now but it is enlightening. I will post it if I ever find it.

Upgrading WordPress brings a thicket of problems

Rocky Linux the CentOS successor on Wikipedia

Categories
Consumer Tech Web Site Technologies

Starlink Internet service: a first look: UPDATED

Intro

Many of us were quite enthusiastically awaiting the availability of SpaceX’s Starlink Internet service. On paper it sounded promising. the first results came in and the reality was far less impressive, but the update I got yesterday (July 2023) is that the service got better and better.

July 2023 Update

I guess they continued to add more satellites making the coverage better and better. When there is an outage it is only for a second – short enough for even real-time media to easily recover.

The original post, written when the service was newer, is below.

The details

I do not have this service but spoke with someone who does. He lives in Puerto Rico where the broadband option are limited. There’s the local cable company, then maybe some boutique services where you use microwave dishes, and this year, finally, Starlink. He had just a couple users on it. I think the net results are that it basically works, but with a big caveat. It sucks for real-time communication. And that’s precisely what he needed it for.

So you know when you’re streaming a movie, that downloads the movie in six(?) second chunks, so it’s a bit robust in the face of brief outages. But when you’re doing web conferencing an outage is very noticeable. And that’s what they experienced, time and again. Brief outages that interrupted their real-time applications. Perhaps lasting for a few seconds, but enough to spoil the broadcast.

Then one night, knowing their cable provider, Liberty, was out, they tested it again. It seemed fine at night. But during the day next day it failed in the same way – brief, disruptive outages.

Maybe some of it is due to holes in the satellite coverage and will get better as the fleet fills out. We’re not sure at this point.

And, yes, the dish was placed in a place where the app showed something like 98% visibility to the satellites in the sky.

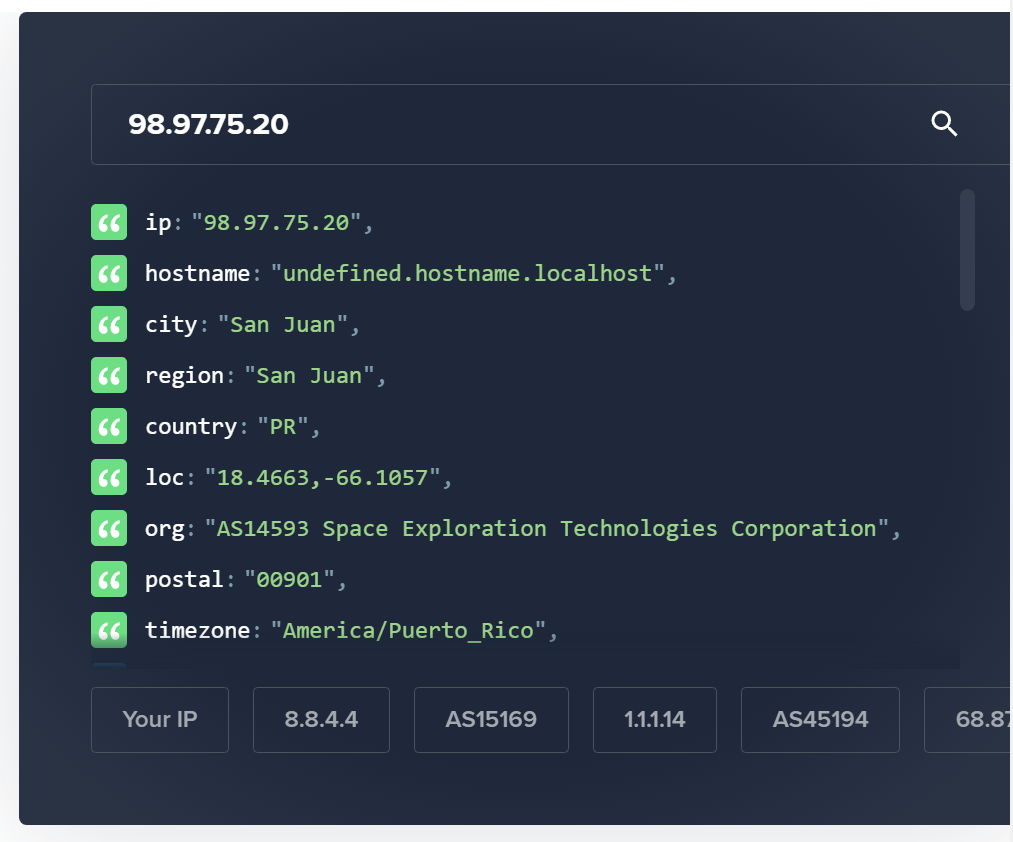
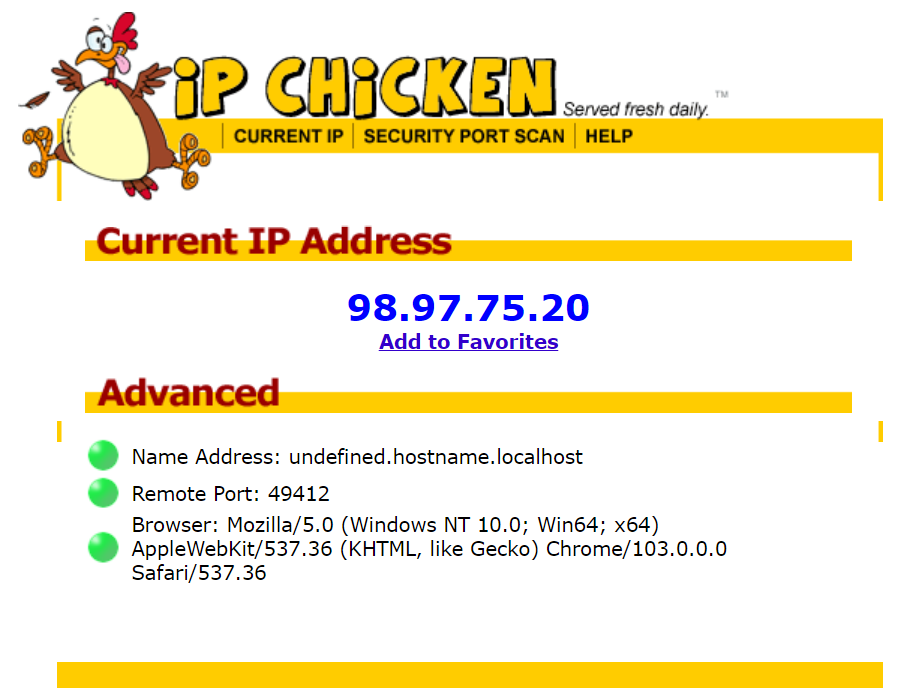
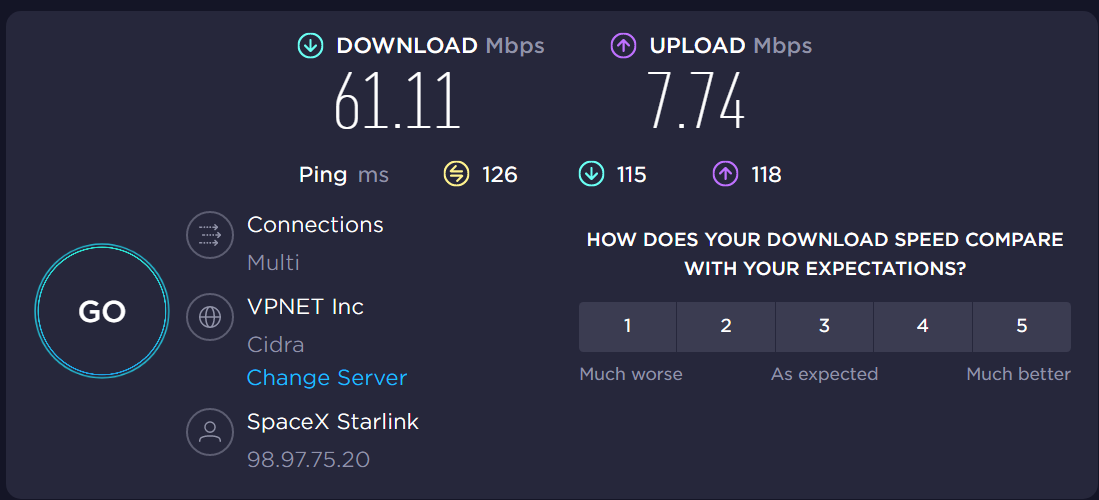
Some interesting screenshots of what a Starlink IP looks like in Puerto Rico
ipinfo.io
ipchicken.com
speedtest results

That speedtest looks quite good to me!

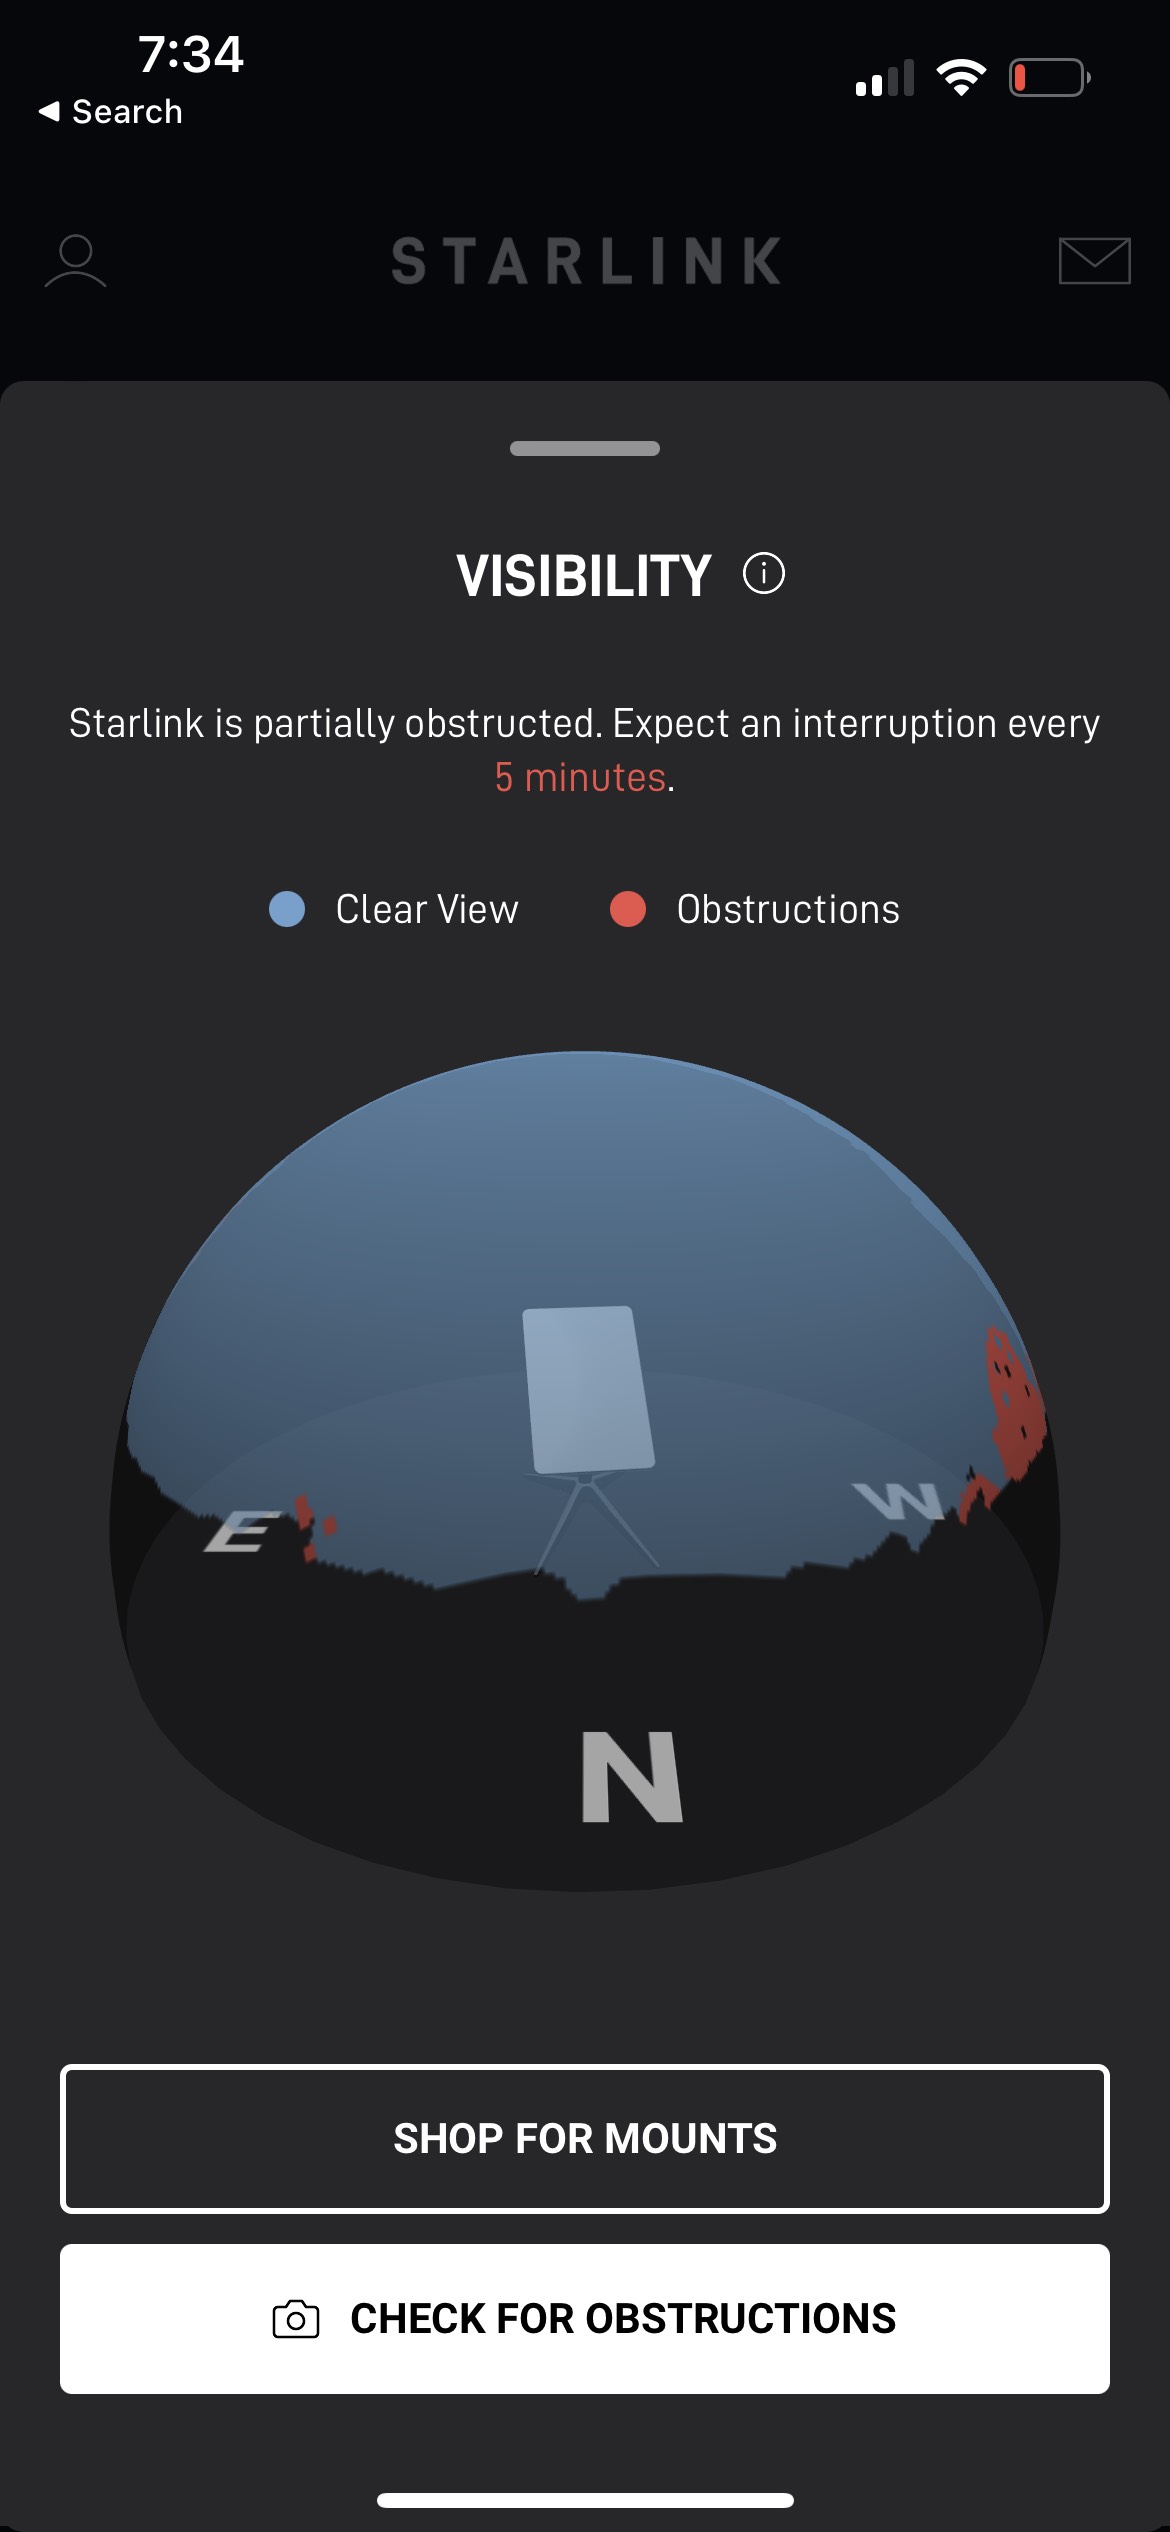
Results of Starlink app for this actual user in Puerto Rico
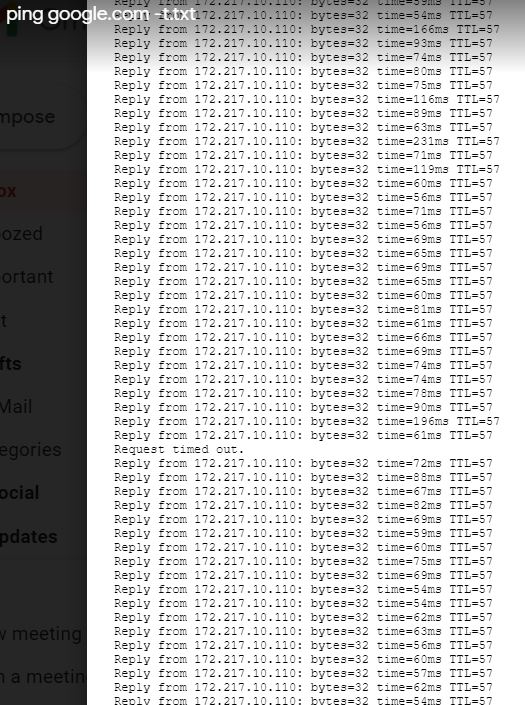
Running PING to google.com shows a single dropped packet
A few words from the actual user

Liberty Cable is not working even after a change of the cable modem. So this past two weeks his household has been exclusively using Starlink. In his own words:

“The single most important thing to consider when using Starlink is how obstructed your northern facing view of the sky is. I am attaching a screenshot from my Starlink app. The red shows the obstructed area. My placement is 2.5% obstructed but I still get an interruption every 4 minutes the app says. In reality it might be every 20 minutes for a few seconds. 

“While my Liberty service has been out Starlink has been a life saver for us. A second user can still do her video calls but it will freeze during those 20-ish minute intervals for a few seconds. It’s not the end of the world for her but not totally idea.


“For me, my VPN will disconnect for those same few seconds and then will reconnect. If I’m entering a trade that can be a crucial few seconds while my vpn and software reconnects, but it’s workable. 


“The Starlink app is free and available for everyone to use. I would suggest that anyone who is interested in the service to first download the app and scan the sky where they think they have the freest point of view north. They will only get purely uninterrupted service if the app registers 100% obstacle-free view. The properties that are most suited for Starlink are the ones at the top of a hill, with a field, or a roof taller than the surrounding trees, especially the trees to the north. An obstructed view like mine is perfectly suitable for streaming movies as they tend to buffer a few minutes in advance, downloading files, and surfing the web. Without a completely obstructed view of the sky, video calls, VPN connection, Remote desktop connection, and online gaming will be interrupted in a frustrating manner. 


“I am also attaching a text file of my results from running a  ping -t to google.com from my Starlink connection. This test ran for about 25 minutes. The request time outs are the times when the Starlink satellite was not able to connect due to my obstructions. However, also notice that during these times it only lost 1 ping and was immediately able to reconnect. Again, somewhat frustrating but it’s a usable product. 

And during Hurricane Fiona?

Starlink performed like a champ during the hurricane. I assumed that coverage would be spotty during the drenching downpour but the user said no he was streaming Netflix. It was just a little more spotty than usual. Now that the island is without power as I write this, his Internet service is as good as usual and the day after the hurricane was a normal (remote) work day like any other.

Conclusion

Don’t throw away your cable modem*. In general as of this writing in June 2022, Starlink is a good solution for those working from home, but be prepared to be bumped every 20 minutes or so from your video conferencing or other real time uses. And of course it’s good for surfing the web or on-demand streaming.

I don’t cnosider this the final word however. There’s still hope. I’ll update this post if the quality of service ever improves.

*Unless you’re one of the many whose cable modem service isn’t all that great to begin with.

References and related

https://en.wikipedia.org/wiki/Starlink

This is a fascinating article providing insight into how the StarLink network of satellites is being built and the problems that can occur: https://www.msn.com/en-us/news/technology/destruction-event-from-sun-annihilated-dozens-of-spacex-satellites/ar-AA11TIwE?ocid=winp1taskbar&cvid=4c9b1b5306484cdcd2ab6bf99748bf01

Categories
Consumer Tech Web Site Technologies

Consumer tech: Edge new tab in Chinese

Intro

If you’ve ever had the misfortune to access a web site in China in your Edge browser, you may find that from that point onwards all your new tab pages display in Chinese despite of your best efforts to eradicate it.

The details

I was in that same boar until today. There are many bad leads out there on the Internet. In fact I never did find the solution on the Internet. I got it from a colleague.

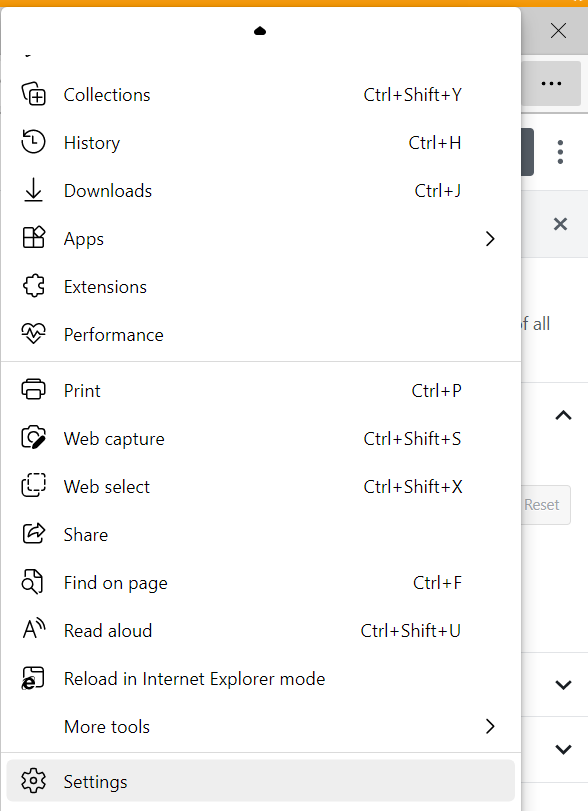
You click on the three dots, go to Settings and search for reset.

Do the Reset. It is a little disruptive, as i have found. It does not delete everything, but it certainly resets some things. As soon as that’s done you will no longer have new tab pages be in Chinese.

Categories
Admin Linux Network Technologies Web Site Technologies

The IT Detective Agency: This site can’t be reached

Intro

It’s been awhile since I’ve had the opportunity to relatean IT mystery. After awhile they are repates of what’s already happened in the past, or it’s too complex to relate, or I was only peripherally involved. But today I came across a good one. It falls into the never been seen before category.

The details

A web server behind my web application firewall became unreachable. In the browser they get a message This site can’t be reached. The app owners came to me looking for input. I checked the WAF and it was fine. The virtual server was looking healthy. So I took a packet trace, something to this effect:

$ tcpdump -nni 0.0 host 192.168.2.124

14:00:45.180349 IP 192.68.1.13.42045 > 192.68.2.124.443: Flags [S], seq 1106553901, win 23360, options [mss 1460,sackOK,TS val 3715803515 ecr 0], length 0 out slot1/tmm3 lis=/Common/was90extqa.drjohn.com.app/was90extqa.drjohn.com_vs port=0.53 trunk=
14:00:45.181081 IP 192.68.2.124 > 192.68.1.13: ICMP host 192.68.2.124 unreachable - admin prohibited filter, length 64 in slot1/tmm2 lis= port=0.47 trunk=
14:00:45.181239 IP 192.68.1.13.42045 > 192.68.2.124.443: Flags [R.], seq 1106553902, ack 0, win 0, length 0 out slot1/tmm3 lis=/Common/was90extqa.drjohn.com.app/was9
0extqa.drjohn.com port=0.53 trunk=

I’ve never seen that before, ICMP host 192.68.2.124 unreachable – admin prohibited filter. But I know ICMP can be used to relay out-of-band routing information on occasion, though I do not see it often. I suspect it is a BAD THING and forces the connection to be shut down. Question is, where was it coming from?

The communication is via a firewall so I check the firewall. I see a little more traffic so I narrow the filter down:

$ tcpdump -nni 0.0 host 192.168.2.124 host 443

And then I only see the initial SYN packet followed by the RST – from the same source IP! So since I didn’t see the bad ICMP packet on the firewall, but I do see it on the WAF, I preliminarily conclude the problem exists on the WAF.

Rookie mistake! Did you fall for it? So very, very often, in the heat of debugging, we invent some unit test which we’ve never done before, and we have to be satisified with the uncertainty in the testing method and hope to find a control test somehow, somewhere to validate our new unit test.

Although I very commonly do compound filters, in this case it makes no sense, as I realized a few minutes later. My port 443 filter would of course exclude logging the bad ICMP packets because ICMP does not use tcp port 443! So I took that out and re-run it. Yup. bad ICMP packet still present on the firewall, even on the interface of the firewall directly connected to the server.

So at this point I have proven to my satisfaction that this packet, which is ruining the communication, really comes frmo the server.

What the server guys say

Server support is outsourced. The vendor replies

As far as the patching activities go , there is nothing changed to the server except distro upgrading from 15.2 to 15.3. no other configs were changed. This is a regular procedure executed on almost all 15.2 servers in your environment. No other complains received so far…

So, the usual It’s not us, look somewhere else. So the app owner asks me for further guidance. I find it’s helpful to create a test that will convince the other party of the error with their service. And what is one test I would have liked to have seen but didn’t cnoduct? A packet trace on the server itself. So I write

I would suggest they (or you) do a packet trace on the server itself to prove to themselves that this server is not behaving ini an acceptable way, network-wise, if they see that same ICMP packet which I see.

The resolution

This kind of thing can often come to a stand-off, or many days can be wasted as an issue gets escalated to sufficiently competent technicians. In this case it wasn’t so bad. A few hours later the app owners write and mention that the home-grown local firewall seemed suspect to them. They dsabled it and this traffic began to work.

They are reaching out to the vendor to understand what may have happened.

Case: closed!

Conclusion

An IT mystery was resolved today – something we’ve never seen but were able to diagnose and overcome. We learned it’s sometimes a good thing to throw a wider net when seeing unexpected reset packets because maybe just maybe there is an ICMP host unreachable packet somewhere in the mix.

Most firewalls would just drop packets and you wait for a timeout. But this was a homegrown firewall running on SLES 15. So it abides by its own ways of working, I guess. So because of the RST, your connection closes quickly, not timing out as with a normal network firewall.

As always, one has to maintain an open mind as to the true source of an issue. What was working yesterday does not today. No one admits to changing anything. Finding clever ad hoc unit tests is the way forward, and don’t forget to validate the ad hoc test. We use curl a lot for these kinds of tests. A browser is a complex beast and too much of a black box.

Categories
Linux Raspberry Pi Web Site Technologies

Raspberry Pi Project: YouTube livestreaming with a click of a button

Intro

Here I’ve combined work I’ve done previously into one single useful application: I can initiate the live streaming of our band practice on YouTube with the click of a single button on a remote control, and stop it with another click.

Equipment

Raspberry Pi 3 or 4 with Raspberry Pi OS, e.g., Raspbian Lite is just fine

Logitech webcam or USB microphone

USB extender (my setup needed this, others may not)

Universal USB-based remote control – see references for a known good one

Method 1

In this method I rapidly blink the onboard red power (PWR) LED of the RPi while streaming is active. Outside of those times it is a solid red. This is my preferred mode – it’s a very visible sign that things are working. I am very excited about this approach.

blinkLED.sh

#!/bin/sh
# DrJ 8/30/2021
# https://www.jeffgeerling.com/blogs/jeff-geerling/controlling-pwr-act-leds-raspberry-pi
# put LED into GPIO mode
echo gpio | sudo tee /sys/class/leds/led1/trigger > /dev/null
# flash the bright RED PWR (power) LED quickly to signal whatever
while /bin/true; do
  echo 0|sudo tee /sys/class/leds/led1/brightness > /dev/null
  sleep 0.5
  echo 1|sudo tee /sys/class/leds/led1/brightness > /dev/null
  sleep 0.5
done

shineLED.sh

#!/bin/sh
# DrJ 8/30/2021
# https://www.jeffgeerling.com/blogs/jeff-geerling/controlling-pwr-act-leds-raspberry-pi
# put LED into GPIO mode
echo gpio | sudo tee /sys/class/leds/led1/trigger > /dev/null
# turn on the bright RED PWR (power) LED
echo 1|sudo tee /sys/class/leds/led1/brightness > /dev/null

broadcastswitch.sh

#!/bin/bash
# DrJ 8/2021
# Control the livestream of audio to youtube
# works in conjunction with an attached keyboard
# I use bash interpreter to give me access to RegEx matching
HOME=/home/pi
log=$HOME/audiocontrol.log
program=continuousaudio.sh
##program=tst.sh # testing
PGM=$HOME/$program
# de-press ENTER button produces this:
match="1, 28, 0"
epochsOld=0
cutoff=3 # seconds
DEBUG=1
ledtime=10
#
echo "$0 starting monitoring at "$(date)
# Note the use of script -q -c to avoid line buffering of the evread output
script  -q -c $HOME/evread.py /dev/null|while read line; do
[[ $DEBUG -eq 1 ]] && echo line is $line
# seconds since the epoch
epochs=$(date +%s)
elapsed=$((epochs-$epochsOld))
if [[ $elapsed -gt $cutoff ]]; then
  if [[ "$line" =~ $match ]]; then
    echo "#################"
    echo We caught this inpupt: $line at $(date)
# see if we are already running continuousaudio or not
    pgrep -f $program>/dev/null
# 0 means it's been found
    if [ $? -eq 0 ]; then
# kill it
      echo KILLING $program
      pkill -9 -f $program; pkill -9 ffmpeg
      pkill -9 -f blinkLED
      echo Shine the PWR LED
      $HOME/shineLED.sh
    else
# start it
      echo Blinking PWR LED
      $HOME/blinkLED.sh &
      echo STARTING $PGM
      $PGM > $PGM.log.$(date +%m-%d-%y:%H:%M) 2>&1 &
    fi
    epochsOld=$epochs
  fi
[[ $DEBUG -eq 1 ]] && echo No action taken. Continue to listen
fi
done

The crontab entry and the referenced files are the same as in Method 2.

Method 2

In method 2 I flash the built-in LED on the webcam for a few seconds before starting the audio, and again when the streaming has terminated – as visible signal that the button press registered.

broadcastswitch.sh

#!/bin/bash
# DrJ 8/2021
# Control the livestream of audio to youtube
# works in conjunction with an attached keyboard
# I use bash interpreter to give me access to RegEx matching
HOME=/home/pi
log=$HOME/audiocontrol.log
program=continuousaudio.sh
##program=tst.sh # testing
PGM=$HOME/$program
# de-press ENTER button produces this:
match="1, 28, 0"
epochsOld=0
cutoff=3 # seconds
DEBUG=1
ledtime=10
#
echo "$0 starting monitoring at "$(date)
# Note the use of script -q -c to avoid line buffering of the evread output
script  -q -c $HOME/evread.py /dev/null|while read line; do
[[ $DEBUG -eq 1 ]] && echo line is $line
# seconds since the epoch
epochs=$(date +%s)
elapsed=$((epochs-$epochsOld))
if [[ $elapsed -gt $cutoff ]]; then
  if [[ "$line" =~ $match ]]; then
    echo "#################"
    echo We caught this inpupt: $line at $(date)
# see if we are already running continuousaudio or not
    pgrep -f $program>/dev/null
# 0 means it's been found
    if [ $? -eq 0 ]; then
# kill it
      echo KILLING $program
      pkill -9 -f $program; pkill -9 ffmpeg
      sleep 1
      echo turn on led for a few seconds
      $HOME/videotst.sh &
      sleep $ledtime
      pkill -9 ffmpeg
    else
# start it
      echo turn on led for a few seconds
      $HOME/videotst.sh &
      sleep $ledtime
      pkill -9 ffmpeg
      sleep 1
      echo STARTING $PGM
      $PGM &
    fi
    epochsOld=$epochs
  fi
[[ $DEBUG -eq 1 ]] && echo No action taken. Continue to listen
fi
done

videotst.sh

#!/bin/sh
# just to get the webcam to light up...
ffmpeg -i /dev/video0 -f null - < /dev/null > /dev/null 2>1 &

crontab entry

@reboot sleep 15; /home/pi/broadcastswitch.sh > broadcastswitch.log 2>&1

continuousaudio.sh and ffmpegwireless6.sh

See this post: https://drjohnstechtalk.com/blog/2019/04/live-stream-to-youtube-from-a-raspberry-pi-webcam/

evread.py

See this post: https://drjohnstechtalk.com/blog/2020/12/how-to-create-a-software-keyboard/

The idea

I press the Enter button once on the remote to begin the livestream to YouTube. I press it a second time to stop.

By extension this could also control other programs as well (like the photo frame). And other keys could be mapped to other functions. Record-only, don’t livestream, anyone?

I want to do these things because it’s a little tight in the room where I want to livestream – hard to get around. So this keeps me from having to squeeze past other people to access the RPi to for instance power cycle it. In my previous treatment, I had livestreaming start up as soon as the RPi booted up, which means it would only stop when it was similarly powered off, which I found somewhat limiting.

The purpose of videotst.sh in Method 2

videotst.sh serves almost no purpose whatsoever! It can simply be commented out. It’s somewhat specific to my webcam.

You see, I wanted to get some feedback that when I pressed the ENTER button the remote control the RPi had read that and was trying to start the livestream. I thought of flashing one of the built-in LEDs on the RPi. I still need to look into that.

With the robotics team we had soldered on an external LED onto one of the GPIO pins, but that’s way too much trouble.

So what videotst.sh does for me is to engage the webcam, specifically its video component, throwing away the actual video but with the net result that the webcam’s built-in green LED illuminates for a few seconds! That lets me know, “Yeah, your button press was registered and we’re beginning to start the livestream.” You see, because when you run ffmpegwireless6.sh with this webcam, it’s all about the audio. It only uses the audio of the webcam and thus the green “in use” LED never illuminates, unfortunately, while it is livestreaming the pure audio stream. So, similarly, when you press ENTER a second time to stop the stream I illuminate the webcam’s LED for a few seconds by using videotst.sh once again.

Techniques developed for this project

evread.py does some nasty buffering of its output, meaning, although it dos read the key presses on the remote, it holds the results “close to its chest,” and then spits them out, all at once, when the buffer is full. Well, that totally defeats the purpose needed here where I want to know if there’s been a single click. After some insightful Internet searches (note that I did not use Google as a verb, a practice I carry into my personal communication) I discovered the program script, which, when armed with the arguments -q -c, allows you to unbuffer the output of a program! And, it actually works. Cool.

And I made the command decision to “eat” the input. You see the timer of 3 seconds in broadcastswitch.sh? After you’ve done any button press it throws away any further button presses for the next three seconds. I just think that’ll reduce the misfires. In fact, I might take up the practice of double-clicking the ENTER button just to be sure I actually pressed it.

I’m using the double bracket notation more in my bash scripts. It permits use of a RegEx comparison operator. =~. I love regular expressions. More the perl style, PCRE, while this uses extended regular expressions, ERE. But I suppose those are good as well.

Getting control over the power LED was a nice coup. I’m only disappointed that you cannot control its brightness. In the dark it throws off quite a bit of light. But you cannot.

The green LED does not seem nearly as bright so I chose not to play with it. What I don’t want is to have to strain to see whether the thing is livestreaming or not.

Of course getting the whole remote control thing to work at all is another great advancement.

Techniques still to be developed

I still might investigate using voice-driven commands in place of a remote. Obviously, that’s a big nut to crack. Even if I managed to turn it on, turning it off while ffmpeg has commandeered the audio channel is even harder. I wonder if ffmpeg can split the audio stream so another process can be run alongside it to listen for voice commands? Or if an upstream process in front of ffmpeg could be used for that purpose? Or simply run with two microphones (seems wasteful of material)?? Needs research.

Suppose you want to take this on the road? Internet service can be unreliable after all. It’s well known you can power the RPi 3 for many hours with a small portable battery. So how about mapping a second button on the remote to a record-only mode (using the arecord utility, for instance)?? Then you can upload the audio at a time of you convenience. That’s something I can definitely program if I find I need it.

Lingering Problems with this approach

Despite all the care I’ve taken with the continuousaudio.sh script, still, there are times when YouTube does not show that a livestream is going on. I have no idea why at this point. If I knew the cause, I’d have fixed it!

As the livestream aspect of this is actual immaterial to me, I will probably switch to a pure recording mode where I upload in a later step – perhaps all done by the remote control for pure convenience.

Since this blog post has become popular, I may keep it preserved as is and start a new one for this recording approach as some people may genuinely be interested in the livestream aspect.

A very rough estimate of the failure rate is maybe as high as 50% but probably no lower than 25%. So, not great odds if you’re relying on success.

There’s another issue which I consider more minor. The beginning of the stream always sounds like a tape played on fast forward for a few seconds. The end also cut off a few seconds early I think.

Conclusion

We have presented a novel approach to livestreaming on a Raspberry Pi 3 using a remote control for added convenience. All the techniques were home-developed at drjohnstechtalk.com. The materials don’t cost much and it really does work.

References and related

Rii infrared remote control – only $12: Amazon.com: Rii MX3 Multifunction 2.4G Fly Mouse Mini Wireless Keyboard & Infrared Remote Control & 3-Gyro + 3-Gsensor for Google Android TV/Box, IPTV, HTPC, Windows, MAC OS, PS3 : Electronics

25′ USB 2 extender for placing a webcam or USB mic at a distance from the RPi, $15: Amazon.com: HDE USB Extension Cable (USB 2.0 Type A Male to Female) High Speed Data and Power Extension Cable with Active Repeater (25 ft) : Electronics

Reading keyboard input.

Using Remote control to interact with a RPi-based photo frame.

ffmpeg settings to send just audio to YouTube, suppressing video

Battery to make the RPi 3 portable, $17: Amazon.com: Omars Power Bank 10000mAh USB C Battery Pack Slimline Portable Charger with Dual USB Output Compatible with iPhone Xs/XR/XS Max/X, iPad, Galaxy S9 / Note 9 : Cell Phones & Accessories. I’m not exactly sure what to do for an RPi 4 however.

Exetended Regular Expressions

How to control the power to the RPi’s LEDs: https://github.com/mlagerberg/raspberry-pi-setup/blob/master/5.2-leds.md

Categories
Admin Apache CentOS Python Raspberry Pi Web Site Technologies

Traffic shaping on linux – an exploration

Intro

I have always been somewhat agog at the idea of limiting bandwidth on my linux servers. Users complain about slow web sites and you want to try it for yourself, slowing your connection down to meet the parameters of their slower connection. More recently I happened on librespeed, an alternative to speedtest.net, where you can run both server and client. But in order to avoid transferring too much data and monopolizing the whole line, I wanted to actually put in some bandwidth throttling. I began an exploration of available methods to achieve this and found some satisfactory approaches that are readily available on Redhat-type linuxes.

bandwidth throttling, bandwidth rate limiting, bandwidth classes – these are all synonyms for what is most commonly called traffic shaping.

What doesn’t work so well

I think it’s important to start with the walls that I hit.

Cgroup

I stumbled on cgroups first. The man page starts in a promising way

cgroup - control group based traffic control filter

Then after you research it you see that support was enabled for cgroups in linux kernels already long ago. And there is version 1 and 2. And only version 1 supports bandwidth limits. But if you’re just a mid-level linux person such as myself, it is confusing and unclear how to take advantage of cgroup. My current conclusion is that it is more a subsystem designed for use by systemctl. In fact if you’ve ever looked at a status, for instance of crond, you see a mention of a cgroup:

sudo systemctl status crond
? crond.service - Command Scheduler
Loaded: loaded (/usr/lib/systemd/system/crond.service; enabled; vendor preset: enabled)
Active: active (running) since Mon 2021-08-09 15:44:24 EDT; 5 days ago
Main PID: 1193 (crond)
Tasks: 1 (limit: 11278)
Memory: 2.1M
CGroup: /system.slice/crond.service
mq1193 /usr/sbin/crond -n

I don’t claim to know what it all means, but there it is. Some nice abilities to schedule and allocate finite resources, at a very high level.

So I get the impression that no one really uses cgroups to do traffic shaping.

apache web server to the rescue – not

Since I was mostly interested in my librespeed server and controlling its bandwidth during testing, I wondered if the apache web server has this capability built-in. Essentially, it does! There is the module mod_ratelimit. So, quest over, and let the implementation begin! Except not so fast. In fact I did enable that module. And I set it up on my librespeed server. It kind of works, but mostly, not really, and nothing like its documented design.


    SetOutputFilter RATE_LIMIT
    SetEnv rate-limit 400 
    SetEnv rate-initial-burst 512

That’s their example section. I have no interest in such low limits and tried various values from 4000 to 12000. I only got two different actual rates from librespeed out of all those various configurations. I could either get 83 Mbps or around 162 Mbps. And that’s it. Merely having any statement whatsoever starts limiting to one of these strange values. With the statement commented out I was getting around 300 Mbps. So I got rate-limiting, but not what I was seeking and with almost no control.

So the apache config approach was a bust for me.

Trickle

There are some linux programs that are perhaps promoted too heavily? Within a minute of posting my first draft of this someone comes along and suggests trickle. Well, on CentOS yum search trickle gives no results. My other OS was SLES v 15 and I similarly got no results. So I’m not enamored with trickle.

tc – now that looks promising

Then I discovered tc – traffic control. That sounds like just the thing. I had to search around a bit on one of my OSes to find the appropriate package, but I found it. On CentOS/Redhat/Fedora the package is iproute-tc. On SLES v15 it was iproute2. On FreeBSD I haven’t figured it out yet.

But it looks unwieldy to use, frankly. Not, as they say, user-friendly.

tcconfig + tc – perfect together

Then I stumbled onto tcconfig, a python wrapper for tc that provides convenient utilities and examples. It’s available, assuming you’ve already installed python, through pip or pip3, depending on how you’ve installed python. Something like

$ sudo pip3 install tcconfig

I love the available settings for tcset – just the kinds of things I would have dreamed up on my own. I wanted to limit download speeds, and only on the web server running on port 443, and noly from a specific subnet. You can do all that! My tcset command went something like this:

$ cd /usr/local/bin; sudo ./tcset eth0 --direction outgoing --src-port 443 --rate 150Mbps --network 134.12.0.0/16

$ sudo ./tcshow eth0

{
"eth0": {
"outgoing": {
"src-port=443, dst-network=134.12.0.0/16, protocol=ip": {
"filter_id": "800::800",
"rate": "150Mbps"
}
},
"incoming": {}
}
}

More importantly – does it work? Yes, it works beautifully. I run a librespeed cli with three concurrent streams against my AWS server thusly configured and I get around 149 Mbps. Every time.

Note that things are opposite of what you first think of. When I want to restrict download speeds from a server but am imposing traffic shaping on the server (as opposed to on the client machine), from its perspective that is upload traffic! And port 443 is the source port, not the destination port!

Raspberry Pi example

I’m going to try regular librespeed tests on my home RPi which is cabled to my router to do the Internet monitoring. So I’m trying

$ sudo tcset eth0 --direction incoming --rate 100Mbps
$ sudo tcset eth0 --direction outgoing --rate 9Mbps --add

This reflects the reality of the asymmetric rate you typically get from a home Internet connection. tcshow looks a bit peculiar however:

{
"eth0": {
"outgoing": {
"protocol=ip": {
"filter_id": "800::800",
"delay": "274.9s",
"delay-distro": "274.9s",
"rate": "9Mbps"
}
},
"incoming": {
"protocol=ip": {
"filter_id": "800::800",
"delay": "274.9s",
"delay-distro": "274.9s",
"rate": "100Mbps"
}
}
}
}
Results on the RPi

Despite the strange delay-distro appearing in the tcshow output, the results are perfect. Here are my librespeed results, running against my own private AWS server:

Time is Sat 21 Aug 16:17:23 EDT 2021
Ping: 20 ms Jitter: 1 ms
Download rate: 100.01 Mbps
Upload rate: 9.48 Mbps

!

Problems creep in on RPi

I swear I had it all working. This blog post is the proof. Now I’ve rebooted my RPi and that tcset command above gives the result Illegal instruction. Still trying to figure that one out!

March, 2022 update. My RPi had other issues. I’ve re-imaged the micro SD card and all is good once again. I set traffic shaping policies as shown in this post.

Conclusion about tcconfig

It’s clear tcset is just giving you a nice interface to tc, but sometimes that’s all you need to not sweat the details and start getting productive.

Possible issue – missing kernel module

On one of my servers (the CentOS 8 one), I had to do a

$ sudo yum install kernel-modules-extra

$ sudo modprobe sch_netem

before I could get tcconfig to really work.

To do list

Make the tc settings permanent.

Verify tc + tcconfig work on a Raspberry Pi. (tc is definitely available for RPi.)

Conclusion

We have found a pretty nice and effective way to do traffic shaping on linux systems. The best tool is tc and the best wrapper for it is tcconfig.

References and related

Librespeed is a great speedtest.net alternative for hard-code linux types who love command line and being in full control of both ends of a speed test. I describe it here.

tcconfig’s project page on PyPi.

Power cycling one’s cable modem automatically via an attached RPi. I refer to this blog post specifically because I intend to expand that RPi to also do periodic, automated speedtesting of my home braodband connection, with traffic shaping in place if all goes well (as it seems to thus far).

Bandwidth management and “queueing discipline” in all its gory detail is explained in this post, including example raw tc commands. I haven’t digested it yet but it may represent a way for me to get my RPi working again without a re-image: http://www.fifi.org/doc/HOWTO/en-html/Adv-Routing-HOWTO-9.html

Categories
Security Web Site Technologies

Setting up lftp to do ftp over ssl

Intro

I have seen too much advice on the Internet for resolving problems when one encounters erroers of this sort when using the lftp client on linux:

mput: myfile.log: Fatal error: Certificate verification: unable to get local issuer certificate (3E:...)

or this one:

mput: myfile.log: Fatal error: Certificate verification: unable to get issuer certificate (4A:...)

You research that and get a lot of htis that recommend to

“set ssl:verify-certificate false inside the lftp command”

But, you know, security-wise, that isn’t such a hot approach. And you can do better with just a bit more effort.

The details

Examine what certificate the ftp server is using with this openssl command:

$ openssl s_client -showcerts -connect example.com:21 -starttls ftp

The privatre pki scenario

I’m imagining a scenario where yuo are in a world where a private pki reigns. In that case you want to just make sure lftp knows where to find the private root CA and possibly the intermediate CA.

To be continued…

Categories
Admin Web Site Technologies

TCL iRule program with comments for F5 BigIP

Intro

A publicity-adverse colleague of mine wrote this amazing program. I wanted to publish it not so much for what it specifically does, but as well for the programming techniques it uses. I personally find i relatively hard to look up concepts when using TCL for an F5 iRule.

Program Introduction

Test


# RULE_INIT is executed once every time the iRule is saved or on reboot. So it is ideal for persistent data that is shared accross all sessions.
# In our case it is used to define a template with some variables that are later substituted

when RULE_INIT {
# "static" variables in iRules are global and read only. Unlike regular TCL global variables they are CMP-friendly, that means they don't break the F5 clustered multi-processing mechanism. They exist in memory once per CMP instance. Unlike regular variables that exist once per session / iRule execution. Read more about it here: https://devcentral.f5.com/s/articles/getting-started-with-irules-variables-20403
#
# One thing to be careful about is not to define the same static variable twice in multiple iRules. As they are global, the last iRule saved overwrites any previous values.
# Originally the idea was to load an iFile here. That's also the main reason to even use RULE_INIT and static variables. The reasoning was (and I don't even know if this is true), that loading the iFile into memory once would have to be more efficient than to do it every time the iRule is executed. However, it is entirely possible that F5 already optimized iFiles in a way that loads them into memory automatically at opportune times, so this might be completely unnecessary.
# Either way, as you can tell, in the end I didn't even use iFiles. The reason for that is simply visibility. iFiles can't be easily viewed from the web UI, so it would be quite inconvenient to work with.
# The template idea and the RULE_INIT event stayed, even though it doesn't really serve a purpose, except maybe visually separating the templates from the rest of the code.
#
# As for the actual content of the variable: First thing to note is the use of  {} to escape the entire string. Works perfectly, even though the string itself contains braces. TCL magic.
# The rest is just the actual PAC file, with strategically placed TCL variables in the form of $name (this becomes important later)

            set static::pacfiletemplate {function FindProxyForURL(url, host)
{
            var globalbypass = "$globalbypass";
            var localbypass = "$localbypass";
            var ceglobalbypass = "$ceglobalbypass";
            var zpaglobalbypass = "$zpaglobalbypass";
            var zscalerbypassexception = "$zscalerbypassexception";

            var bypass = globalbypass.split(";").concat(localbypass.split(";"));
            var cebypass = ceglobalbypass.split(";");
            var zscalerbypass = zpaglobalbypass.split(";");
            var zpaexception = zscalerbypassexception.split(";");

            if(isPlainHostName(host)) {
                        return "DIRECT";
            }

            for (var i = 0; i < zpaexception.length; ++i){
                        if (shExpMatch(host, zpaexception[i])) {
                                   return "PROXY $clientproxy";
                        }
            }

            for (var i = 0; i < zscalerbypass.length; ++i){
                        if (shExpMatch(host, zscalerbypass[i])) {
                                   return "DIRECT";
                        }
            }

            for (var i = 0; i < bypass.length; ++i){
                        if (shExpMatch(host, bypass[i])) {
                                   return "DIRECT";
                        }
            }

            for (var i = 0; i < cebypass.length; ++i) {
                        if (shExpMatch(host, cebypass[i])) {
                                   return "PROXY $ceproxy";
                        }
            }

            return "PROXY $clientproxy";
}
}

            set static::forwardingpactemplate {function FindProxyForURL(url, host)
{
            var forwardinglist = "$forwardinglist";
            var forwarding = forwardinglist.split(";");

            for (var i = 0; i < forwarding.length; ++i){
                        if (shExpMatch(host, forwarding[i])) {
                                   return "PROXY $clientproxy";
                        }
            }

            return "DIRECT";
}
}
}

# Now for the actual code (executed every time a user accesses the vserver)
when HTTP_REQUEST {
    # The request URI can of course be used to differentiate between multiple PAC files or to restrict access.
    # So can basically any other request attribute. Client IP, host, etc.
            if {[HTTP::uri] eq "/proxy.pac"} {

                        # Here we set variables with the exact same name as used in the template above.
                        # In our case the values come from a data group, but of course they could also be defined
                        # directly in this iRule. Using data groups makes the code a bit more compact and it
                        # limits the amount of times anyone needs to edit the iRule (potentially making a mistake)
                        # for simple changes like adding a host to the bypass list
                        # These variables are all set unconditionally. Of course it is possible to set them based
                        # on for example client IP (to give different bypass lists or proxy entries to different groups of users)
                        set globalbypass [ class lookup globalbypass ProxyBypassLists ]
                        set localbypass [ class lookup localbypassEU ProxyBypassLists ]
                        set ceglobalbypass [ class lookup ceglobalbypass ProxyBypassLists ]
                        set zpaglobalbypass [ class lookup zpaglobalbypass ProxyBypassLists ]
                        set zscalerbypassexception [ class lookup zscalerbypassexception ProxyBypassLists ]
                        set ceproxy [ class lookup ceproxyEU ProxyHosts ]

                        # Here's a bit of conditionals, setting the proxy variable based on which virtual server the
                        # iRule is currently executed from (makes sense only if the same iRule is attached to multiple
                        # vservers of course)
                        if {[virtual name] eq "/Common/proxy_pac_http_90_vserver"} {
                            set clientproxy [ class lookup formauthproxyEU ProxyHosts ]
                        } elseif {[virtual name] eq "/Common/testproxy_pac_http_81_vserver"} {
                            set clientproxy [ class lookup testproxyEU ProxyHosts]
                        } elseif {[virtual name] eq "/Common/proxy_pac_http_O365_vserver"} {
                            set clientproxy [ class lookup ceproxyEU ProxyHosts]
                        } else {
                            set clientproxy [ class lookup clientproxyEU ProxyHosts ]
                }

                        # Now this is the actual magic. As noted above we have now set TCL variables named for example
                        # $globalbypass and our template includes the string "$globalbypass"

                        # What we want to do next is substitute the variable name in the template with the variable values
                        # from the code.
                        # "subst" does exactly that. It performs one level of TCL execution. Think of "eval" in basically
                        # any language. It takes a string and executes it as code.
                        # Except for "subst" there are two in this context very useful parameters: -nocommands and -nobackslashes.
                        # Those prevent it from executing commands (like if there was a ping or rm or ssh or find or anything
                        # in the string being subst'd it wouldn't actually try to execute those commands) and from normalizing
                        # backslashes (we don't have any in our PAC file, but if we did, it would still work).
                        # So what is left that it DOES do? Substituting variables! Exactly what we want and nothing else.
                        # Now since the static variable is read only, we can't do this substitution on the template itself.
                        # And if we could it wouldn't be a good idea, because it is shared accross all sessions. So assuming
                        # there are multiple versions of the PAC file with different proxies or bypass lists, we would
                        # constantly overwrite them with each other.
                        # The solution is simply to save the output of the subst in a new local variable that exists in
                        # session context only.
                        # So from a memory point of view the static/global template doesn't really gain us anything.
                        # In the end we have the template in memory once per CMP and then a substituted copy of the template
                        # once per session. So as noted earlier, could've probably just removed the entire RULE_INIT block,
                        # set the template in session context (HTTP_REQUEST event) and get the same result,
                        # maybe even slightly more efficient.
                        set pacfile [subst -nocommands -nobackslashes $static::pacfiletemplate]

                        # All that's left to do is actually respond to the client. Simple stuff.
                        HTTP::respond 200 content $pacfile "Content-Type" "application/x-ns-proxy-autoconfig" "Cache-Control" "private,no-cache,no-store,max-age=0"
            # In this example we have two different PAC files with different templates on different URLs
            # Other iRules we use have more differentiation based on client IP. In theory we could have one big iRule
            # with all the PAC files in the world and it would still scale very well (just a few more if/else or switch cases)
            } elseif { [HTTP::uri] eq "/forwarding.pac" } {
                set clientproxy [ class lookup clientproxyEU ProxyHosts]
                set forwardinglist [ class lookup forwardinglist ProxyBypassLists ]
            set forwardingpac [subst -nocommands -nobackslashes $static::forwardingpactemplate]
            HTTP::respond 200 content $forwardingpac "Content-Type" "application/x-ns-proxy-autoconfig" "Cache-Control" "private,no-cache,no-store,max-age=0"
            } else {
                # If someone tries to access a different path, give them a 404 and the right URL
                HTTP::respond 404 content "Please try http://webproxy.drjohns.com/proxy.pac" "Content-Type" "text/plain" "Cache-Control" "private,no-cache,no-store,max-age=0"
            }
}

To be continued...

Categories
Linux Perl Raspberry Pi Web Site Technologies

Convert GPS Coordinates into town name or address or GMT offset

Intro

This is a small piece of a larger project – displaying your photos on Google Drive using a Raspberry Pi. That project will require completion of many small investigations, this being just one of them.

I thought, wouldn’t it be cool to ask your photo frame when and where a certain picture was taken? I thought that information was typically embedded into the picture by modern smartphones. Turns out this is disappointingly not the case – at least not on our smartphones, except in a small minority of pictures. But since I got somewhere with my investigation, I wanted to share the results, regardless.

Also, I naively assumed that there surely is a web service that permits one to easily convert GPS coordinates into the name – in text – of the closest town. After all, you can enter GPS coordinates into Google Maps and get back a map showing the exact location. Why shouldn’t it be just as easy to extract the nearest town name as text? Again, this assumption turns out to be faulty. But, I found a way to do it that is not toooo difficult.

Example for Cape May, New Jersey

$ curl -s http://api.geonames.org/address?lat=38.9302957777778&lng=-74.9183310833333&username=drjohns

<geonames>
<address>
<street>Beach Dr</street>
<houseNumber>690</houseNumber>
<locality>Cape May</locality>
<postalcode>08204</postalcode>
<lng>-74.91835</lng>
<lat>38.93054</lat>
<adminCode1>NJ</adminCode1>
<adminName1>New Jersey</adminName1>
<adminCode2>009</adminCode2>
<adminName2>Cape May</adminName2>
<adminCode3/>
<adminCode4/>
<countryCode>US</countryCode>
<distance>0.03</distance>
</address>
</geonames>

The above example used the address service. The results in this case are unusually complete. Sometime the lookups simply fail for no obvious reason, or provide incomplete information, such as a missing locality. In those cases the town name is usually still reported in the adminName2 element. I haven’t checked the address accuracy much, but it seems pretty accurate, like, representing an actual address within 100 yards, usually better, of where the picture was taken.

They have another service, findNearbyPlaceName, which sometimes works even when address fails. However its results are also unpredictable. I was in Merrillville, Indiana and it gave the toponym as Chapel Manor, which is the name of the subdivision! In Virginia it gave the name The Hamlet – still not sure where that came from, but I trust it is some hyper-local name for a section of the town (James City). Just as often it does spit back the town or city name, for instance, Atlantic City. So, it’s better than nothing.

The example for Nantucket

From a browser – here I use curl in the linux command line – you enter:

$ curl -s http://api.geonames.org/findNearbyPlaceName?lat=41.282778&lng=-70.099444&username=drjohns

<?xml version="1.0" encoding="UTF-8" standalone="no"?>
<geonames>
<geoname>
<toponymName>Nantucket</toponymName>
<name>Nantucket</name>
<lat>41.28346</lat>
<lng>-70.09946</lng>
<geonameId>4944903</geonameId>
<countryCode>US</countryCode>
<countryName>United States</countryName>
<fcl>P</fcl>
<fcode>PPLA2</fcode>
<distance>0.07534</distance>
</geoname>
</geonames>

So what did we do? For this example I looked up Nantucket in Wikipedia to find its GPS coordinates. Then I used the geonames api to convert those coordinates into the town name, Nantucket.

Note that drjohns is an actual registered username with geonames. I am counting on the unpopularity of my posts to prevent an onslaught of usage as the usage credits are limited for free accounts. If I understood the terms, a few lookups per hour would not be an issue.

I’m finding the PlaceName lookup pretty useless, the address lookup fails about 30% of the time, so I’m thinking as a backstop to use this sort of lookup:

$ curl ‘http://api.geonames.org/extendedFindNearby?lat=41.00050&lng=-74.65329&username=drjohn’

<?xml version=”1.0″ encoding=”UTF-8″ standalone=”no”?>
<geonames>
<address>
<street>Stanhope Rd</street>
<mtfcc>S1400</mtfcc>
<streetNumber>439</streetNumber>
<lat>41.00072</lat>
<lng>-74.6554</lng>
<distance>0.18</distance>
<postalcode>07871</postalcode>
<placename>Lake Mohawk</placename>
<adminCode2>037</adminCode2>
<adminName2>Sussex</adminName2>
<adminCode1>NJ</adminCode1>
<adminName1>New Jersey</adminName1>
<countryCode>US</countryCode>
</address>
</geonames>

Note that gets a reasonably close address, and more importantly, a zipcode. The placename is too local and I will probably discard it. But another lookup can turn a zipcode into a town or city name which is what I am after.

$ curl ‘http://api.geonames.org/postalCodeSearch?country=US&postalcode=07871&username=drjohns’

<?xml version=”1.0″ encoding=”UTF-8″ standalone=”no”?>
<geonames>
<totalResultsCount>1</totalResultsCount>
<code>
<postalcode>07871</postalcode>
<name>Sparta</name>
<countryCode>US</countryCode>
<lat>41.0277</lat>
<lng>-74.6407</lng>
<adminCode1 ISO3166-2=”NJ”>NJ</adminCode1>
<adminName1>New Jersey</adminName1>
<adminCode2>037</adminCode2>
<adminName2>Sussex</adminName2>
<adminCode3/>
<adminName3/>
</code>
</geonames>

See? It was a lot of work, but we finally got the township name, Sparta, returned to us.

Ocean GPS?

I was whale-watching and took some pictures with GPS info. Trying to apply the methods above worked, but just barely. Basically all I could get out of the extended find nearby search was a name field with value North Atlantic Ocean! Well, that makes it sounds like I was on some Titanic-style ocean crossing. In fact I was in the Gulf of Maine a few miles from Provincetown. So they really could have done a better job there… Of course it’s understandable to not have a postalcode and street address and such. But still, bodies of waters have names and geographical boundaries as well. Casinos seem to be the main sponsors of geonames.org, and I guess they don’t care. Yesterday my script came up with a location Earth! But now I see geonames proposed several locations and I only look at the first one. I am creating a refinement which will perform better in such cases. Stay tuned… And…yes…the refinement is done. I had to do a wee bit of xml parsing, which I now do.

To get your own account at geonames.org

The process of getting your own account isn’t too difficult, just a bit squirrelly. For the record, here is what you do.

Go to http://www.geonames.org/login to create your account. It sends an email confirmation. Oh. Be sure to use a unique browser-generated password for this one. The security level is off-the-charts awful – just assume that any and all hackers who want that password are going to get it. It sends you a confirmation email. so far so good. But when you then try to use it in an api call it will tell you that that username isn’t known. This is the tricky part.

So go to https://www.geonames.org/manageaccount . It will say:

Free Web Services
the account is not yet enabled to use the free web services. Click here to enable. 

And that link, in turn is https://www.geonames.org/enablefreewebservice . And having enabled your account for the api web service, the URL, where you’ve put your username in place of drjohns, ought to work!

For a complete overview of all the different things you can find out from the GPS coordinates from geonames, look at this link: https://www.geonames.org/export/ws-overview.html

Working with pictures

Please look at this post for the python code to extract the metadata from an image, including, if available GPS info. I called the python program getinfo.py.

Here’s an actual example of running it to learn the GPS info:

$ ../getinfo.py 20170520_102248.jpg|grep -ai gps

GPSInfo = {0: b'\x02\x02\x00\x00', 1: 'N', 2: (42.0, 2.0, 18.6838), 3: 'W', 4: (70.0, 4.0, 27.5448), 5: b'\x00', 6: 0.0, 7: (14.0, 22.0, 25.0), 29: '2017:05:20'}

I don’t know if it’s good or bad, but the GPS coordinates seem to be encoded in the degrees, minutes, seconds format.

A nice little program to put things together

I call it analyzeGPS.pl and a, using it on a Raspberry Pi, but could easily be adapted to any linux system.


#!/usr/bin/perl
# use in combination with this post https://drjohnstechtalk.com/blog/2020/12/convert-gps-coordinates-into-town-name/
use POSIX;
$DEBUG = 1;
$HOME = "/home/pi";
#$file = "Pictures/20180422_134220.jpg";
while(<>){
$GPS = $date = 0;
$gpsinfo = "";
$file = $_;
open(ANAL,"$HOME/getinfo.py \"$file\"|") || die "Cannot open file: $file!!\n";
#open(ANAL,"cat \"$file\"|") || die "Cannot open file: $file!!\n";
print STDERR "filename: $file\n" if $DEBUG;
while(<ANAL>){
  $postalcode = $town = $name = "";
  if (/GPS/i) {
    print STDERR "GPS: $_" if $DEBUG;
# GPSInfo = {1: 'N', 2: (39.0, 21.0, 22.5226), 3: 'W', 4: (74.0, 25.0, 40.0267), 5: 1.7, 6: 0.0, 7: (23.0, 4.0, 14.0), 29: '2016:07:22'}
   ($pole,$deg,$min,$sec,$hemi,$lngdeg,$lngmin,$lngsec) = /1: '([NS])', 2: \(([\d\.]+), ([\d\.]+), ([\d\.]+)...3: '([EW])', 4: \(([\d\.]+), ([\d\.]+), ([\d\.]+)\)/i;
   print STDERR "$pole,$deg,$min,$sec,$hemi,$lngdeg,$lngmin,$lngsec\n" if $DEBUG;
   $lat = $deg + $min/60.0 + $sec/3600.0;
   $lat = -$lat if $pole eq "S";
   $lng = $lngdeg + $lngmin/60.0 + $lngsec/3600.0;
   $lng = -$lng if $hemi = "W" || $hemi eq "w";
   print STDERR "lat,lng: $lat, $lng\n" if $DEBUG;
   #$placename = `curl -s "$url"|grep -i toponym`;
   next if $lat == 0 && $lng == 0;
# the address API is the most precise
   $url = "http://api.geonames.org/address?lat=$lat\&lng=$lng\&username=drjohns";
   print STDERR "Url: $url\n" if $DEBUG;
   $results = `curl -s "$url"|egrep -i 'street|house|locality|postal|adminName'`;
   print STDERR "results: $results\n" if $DEBUG;
   ($street) = $results =~ /street>(.+)</;
   ($houseNumber) = $results =~ /houseNumber>(.+)</;
   ($postalcode) = $results =~ /postalcode>(.+)</;
   ($state) = $results =~ /adminName1>(.+)</;
   ($town) = $results =~ /locality>(.+)</;
   print STDERR "street, houseNumber, postalcode, state, town: $street, $houseNumber, $postalcode, $state, $town\n" if $DEBUG;
# I think locality is pretty good name. If it exists, don't go  further
   $postalcode = "" if $town;
   if (!$postalcode && !$town){
# we are here if we didn't get interesting results from address reverse loookup, which often happens.
     $url = "http://api.geonames.org/extendedFindNearby?lat=$lat\&lng=$lng\&username=drjohns";
     print STDERR "Address didn't work out. Trying extendedFindNearby instead. Url: $url\n" if $DEBUG;
     $results = `curl -s "$url"`;
# parse results - there may be several objects returned
     $topelemnt = $results =~ /<geoname>/i ? "geoname" : "geonames";
     @elmnts = ("street","streetnumber","lat","lng","locality","postalcode","countrycode","countryname","name","adminName2","adminName1");
     $cnt = xml1levelparse($results,$topelemnt,@elmnts);

     @lati = @{ $xmlhash{lat}};
     @long = @{ $xmlhash{lng}};
# find the closest entry
     $distmax = 1E7;
     for($i=0;$i<$cnt;$i++){
       $dist = ($lat - $lati[$i])**2 + ($lng - $long[$i])**2;
       print STDERR "dist,lati,long: $dist, $lati[$i], $long[$i]\n" if $DEBUG;
       if ($dist < $distmax) {
         print STDERR "dist < distmax condition. i is: $i\n";
         $isave = $i;
       }
     }
     $street = @{ $xmlhash{street}}[$isave];
     $houseNumber = @{ $xmlhash{streetnumber}}[$isave];
     $admn2 = @{ $xmlhash{adminName2}}[$isave];
     $postalcode = @{ $xmlhash{postalcode}}[$isave];
     $name = @{ $xmlhash{name}}[$isave];
     $countrycode = @{ $xmlhash{countrycode}}[$isave];
     $countryname = @{ $xmlhash{countryname}}[$isave];
     $state = @{ $xmlhash{adminName1}}[$isave];
     print STDERR "street, houseNumber, postalcode, state, admn2, name: $street, $houseNumber, $postalcode, $state, $admn2, $name\n" if $DEBUG;
     if ($countrycode ne "US"){
       $state .= " $countryname";
     }
     $state .= " (approximate)";
   }
# turn zipcode into town name with this call
   if ($postalcode) {
     print STDERR "postalcode $postalcode exists, let's convert to a town name\n";
     print STDERR "url: $url\n";
     $url = "http://api.geonames.org/postalCodeSearch?country=US\&postalcode=$postalcode\&username=drjohns";
     $results = `curl -s "$url"|egrep -i 'name|locality|adminName'`;
     ($town) = $results =~ /<name>(.+)</i;
     print STDERR "results,town: $results,$town\n";
   }
   if (!$town) {
# no town name, use adminname2 which is who knows what in general
     print STDERR "Stil no town name. Use adminName2 as next best thing\n";
     $town = $admn2;
   }
   if (!$town) {
# we could be in the ocean! I saw that once, and name was North Atlantic Ocean
     print STDERR "Still no town. Try to use name: $name as last resort\n";
     $town = $name;
   }
   $gpsinfo = "$houseNumber $street $town, $state" if $locality || $town;
   } # end of GPS info exists condition
  } # end loop over ANAL file
  $gpsinfo = $gpsinfo || "No info found";
  print qq(Location: $gpsinfo
);
} # end loop over STDIN

#####################
# function to parse some xml and fill a hash of arrays
sub xml1levelparse{
# build an array of hashes
$string = shift;
# strip out newline chars
$string =~ s/\n//g;
$parentelement = shift;
@elements = @_;
$i=0;
while($string =~ /<$parentelement>/i){
 $i++;
 ($childelements) = $string =~ /<$parentelement>(.+?)<\/$parentelement>/i;
 print STDERR "childelements: $childelements" if $DEBUG;
 $string =~ s/<$parentelement>(.+?)<\/$parentelement>//i;
 print STDERR "string: $string\n" if $DEBUG;
 foreach $element (@elements){
  print STDERR "element: $element\n" if $DEBUG;
  ($value) = $childelements =~ /<$element>([^<]+)<\/$element>/i;
  print STDERR "value: $value\n" if $DEBUG;
  push @{ $xmlhash{$element} }, $value;
 }
} # end of loop over parent elements
return $i;
} # end sub xml1levelparse

Here’s a real example of calling it, one of the more difficult cases:

$ echo -n 20180127_212203.jpg|./analyzeGPS.pl

GPS: GPSInfo = {0: b'\x02\x02\x00\x00', 1: 'N', 2: (41.0, 0.0, 2.75), 3: 'W', 4: (74.0, 39.0, 12.0934), 5: b'\x00', 6: 0.0, 7: (2.0, 21.0, 58.0), 29: '2018:01:28'}
N,41.0,0.0,2.75,W,74.0,39.0,12.0934
lat,lng: 41.0007638888889, -74.6533592777778
Url: http://api.geonames.org/address?lat=41.0007638888889&lng=-74.6533592777778&username=drjohns
results:
street, houseNumber, postalcode, state, town: , , , ,
Address didn't work out. Trying extendedFindNearby instead. Url: http://api.geonames.org/extendedFindNearby?lat=41.0007638888889&lng=-74.6533592777778&username=drjohns
childelements: <address> <street>Stanhope Rd</street> <mtfcc>S1400</mtfcc> <streetNumber>433</streetNumber> <lat>41.00121</lat> <lng>-74.65528</lng> <distance>0.17</distance> <postalcode>07871</postalcode> <placename>Lake Mohawk</placename> <adminCode2>037</adminCode2> <adminName2>Sussex</adminName2> <adminCode1>NJ</adminCode1> <adminName1>New Jersey</adminName1> <countryCode>US</countryCode> </address>string: <?xml version="1.0" encoding="UTF-8" standalone="no"?>
element: street
value: Stanhope Rd
element: streetnumber
value: 433
element: lat
value: 41.00121
element: lng
value: -74.65528
element: locality
value:
element: postalcode
value: 07871
element: countrycode
value: US
element: countryname
value:
element: name
value:
element: adminName2
value: Sussex
element: adminName1
value: New Jersey
dist,lati,long: 3.88818897839883e-06, 41.00121, -74.65528
dist < distmax condition. i is: 0
street, houseNumber, postalcode, state, admn2, name: Stanhope Rd, 433, 07871, New Jersey, Sussex,
postalcode 07871 exists, let's convert to a town name
url: http://api.geonames.org/extendedFindNearby?lat=41.0007638888889&lng=-74.6533592777778&username=drjohns
results,town: <geonames>
<name>Sparta</name>
<adminName1>New Jersey</adminName1>
<adminName2>Sussex</adminName2>
<adminName3/>
</geonames>
,Sparta
Location: 433 Stanhope Rd Sparta, New Jersey (approximate)

Or, if you just want the interesting stuff,

$ echo -n 20180127_212203.jpg|./analyzeGPS.pl 2>/dev/null

Location: 433 Stanhope Rd Sparta, New Jersey (approximate)

Bonus section
Convert city to GPS coordinates with geonames

Having the city and country you can use the wikipedia search to turn that into serviceable GPS coordinates. This is sort of the opposite problem from what we did earlier. Several possible matches are returned so you need some discretion to ferret out the correct answer. And sometimes smaller towns are just not found at all and only wild guesses are returned! The curl + URL that I’ve been using for this is:

curl ‘http://api.geonames.org/wikipediaSearchJSON?q=Cornwall,Canada&maxRows=10&username=drjohns’

I think if you know the state (or province) you can put that in as well.

Convert GPS coordinates into a GMT offset

The following is partial python code which I have come across and haven’t yet myslef verified. But I am excited to learn of it because until now I only knew how to do this with the Geonames api which I will not be showing because it’s slow, potentially costs money, etc.

from datetime import datetime
from pytz import timezone, utc
from timezonefinder import TimezoneFinder

tf = TimezoneFinder()  # reuse


def get_offset(*, lat, lng):
    """
    returns a location's time zone offset from UTC in minutes.
    """

    today = datetime.now()
    tz_target = timezone(tf.timezone_at(lng=lng, lat=lat))
    # ATTENTION: tz_target could be None! handle error case
    today_target = tz_target.localize(today)
    today_utc = utc.localize(today)
    return (today_utc - today_target).total_seconds()


bergamo = {"lat": 45.69, "lng": 9.67}
minute_offset = get_offset(**bergamo)
print('seconds offset',minute_offset)
parsippany = {"lat": 40.86, "lng": -74.43}
minute_offset = get_offset(**parsippany)
print('seconds offset',minute_offset)

A word about China

Today I tried to see if I could learn the province or county a particular GPS coordinate is in when it is in China, but it did not seem to work. I’m guessing China cities cannot be looked up in the way I’ve shown for my working examples, but I cannot be 100% sure without more research which I do not plan to do.

Conclusion

An api for reverse lookup of GPS coordinates which returns the nearest address, including town name, is available. I have provided examples of how to use it. It is unreliable, however, and Geonames.org does provide alternatives which have their own drawbacks. In my image gallery, only a minority of my pictures have encoded GPS data, but it is fun to work with them to pluck out the town where they were shot.

I have incorporated this functionality into a Raspberry Pi-based photo frame I am working on.

I have created an example Perl program that analyzes a JPEG image to extract the GPS information and turn it into an address that is remarkably accurate. It is amazing and uncanny to see it at work. It deals with the screwy and inconsistent results returned by the free service, Geonames.org.

References and related

There are lots of different things you can derive given the GPS coordinates using the Geonames api. Here is a list: https://www.geonames.org/export/ws-overview.html

In this photo frame version of mine, I extract all the EXIF metadata which includes the GPS info.

One day my advanced photo frame will hopefully include an option to learn where a photo was taken by interacting with a remote control. Here is the start of that write-up.

You can pay $5 and get a zip codes to cities database in any format. I’m sure they’ve just re-packaged data from elsewhere, but it might be worth it: https://www.uszipcodeslist.com/

For a more professional api, https://smartystreets.com/ looks quite nice. Free level is 250 queries per month, so not too many. But their documentation and usability looks good to me. For this post I was looking for free services and have tried to avoid commercial services.